Terra EN-7 User manual

Contents
EN-1 Digital LCD Television Instruction Manual
Contents
Safety Warnings 2
WELCOME............................................................. 2
IMPORTANT INFORMATION ................................ 2
About your LCD TV 5
GET TO KNOW YOUR TV....................................... 5
Front control panel............................................................... 5
Rear Terminals Control ........................................................5
GET TO KNOW YOUR TV WITH DVD .................... 6
Front control panel............................................................... 6
Rear Terminals Control ........................................................6
GET TO KNOW YOUR REMOTE CONTROL ........... 7
CONNECTING YOUR TV........................................ 8
ANTENNA CONNECTION .................................................... 8
IMPROVE YOUR SIGNAL ...................................................... 8
CONNECT YOUR PC TO THE TV ......................................... 8
CONNECT A DVD PLAYER TO YOUR TV .......................... 8
CONNECT A DVD PLAYER OR VCR TO YOUR TV ..........8
Connection Option 1 ........................................................... 8
Connection Option 2 ........................................................... 8
SCART INPUT...........................................................................8
HDMI INPUT............................................................................. 9
MOUNT YOUR TV ONTO THE WALL.................................9
PREPARATION OF YOUR REMOTE CONTROL...... 9
BATTERY INSTALLATION......................................................9
BATTERY CAUTION................................................................ 9
Getting Started 9
Setting up............................................................. 9
LOCATION................................................................................. 9
CONNECTION.......................................................................... 9
SWITCHING YOUR TV ON ..................................................10
TUNING YOUR TV ............................................... 10
SWITCHING TO AN EXTERNAL SOURCE OTHER
THAT TV...................................................................................10
AUTO SEARCH.......................................................................10
DIGITAL MANUAL SEARCH...............................................10
Analog Manual Search ......................................................11
Channel Edit..........................................................................11
RENAME..................................................................................12
MOVE.......................................................................................12
Setting favourite channel.................................................12
SKIP...........................................................................................12
GUIDE (Electronic Program Guide) ...............................12
COMMON INTERFACE ........................................13
Software Update function ...............................................13
Operation...............................................................................14
USING YOUR TV.................................................. 14
How to select the TV program........................................14
HOW to adjust volume......................................................14
CH.LIST function ..................................................................15
ADJUSTING PICTURE SETTINGS .......................15
Changing the Picture Setting .........................................15
ADJUSTING SOUND SETTINGS ......................... 15
Changing the Sound Setting ..........................................15
FUNCTION SETTINGS......................................... 16
TIME SETTINGS .................................................. 17
LOCK MENU SETTING ........................................ 19
SHORTCUT MENU DISPLAY...............................20
Using the features 22
Teletext functions.............................................. 22
Teletext....................................................................................22
USB MODE..........................................................23
TO USE THE USB DEVICE ...................................................23
When connecting/removing the USB device ...........23
Operating the USB device................................................24
Playing a Picture ..................................................................24
Playing Music........................................................................24
Playing a Movie....................................................................25
Text ...........................................................................................25
Using External USB Disk For Recording........... 25
TIME SHIFT.............................................................................26
RECORDING...........................................................................26
USING YOUR DVD PLAYER
(certain models only) ........................................ 27
ADDITIONAL DVD FUNCTIONS......................... 28
Reference Sections 29
TROUBLESHOOTING.......................................... 29
Specification ......................................................29
SCREEN SECTION.................................................................29
TV/VIDEO SECTION.............................................................30
GENERAL SECTION .............................................................30

Safety Warnings
Digital LCD Television Instruction Manual EN-2
Safety Warnings
WELCOME
Thanks for buying this 32"/42" HD Ready Digital LCD TV. This guide will help you set up and begin using your TV.
First, check the contents of your box with the parts checklist below:
32"/42" HD Ready Digital LCD TV•
Remote control•
AAA battery • ×2
Instruction Manual•
Now you can get started!
IMPORTANT INFORMATION
WARNING
*To avoid electric hazards, it is strongly suggested that the back cover not be opened, as
there is no any accessory inside the casing.
*If necessary, please contact authorized after-sales services.
could result in serious injury by high voltage.
*An exclamation mark in a triangle: Major part or accessory of which technical
must be followed i t is to be replaced.
WARNING
RISK OF ELECTRIC SHOCK
DO NOT OPEN
TO REDUCE THE RISK OF ELECTRIC SHOCK DO NOT REMOVE COVER (OR BACK). NO
USER SERVICEABLE PARTS INSIDE. REFER TO QUALIFIED SERVICE PERSONNEL.
fi
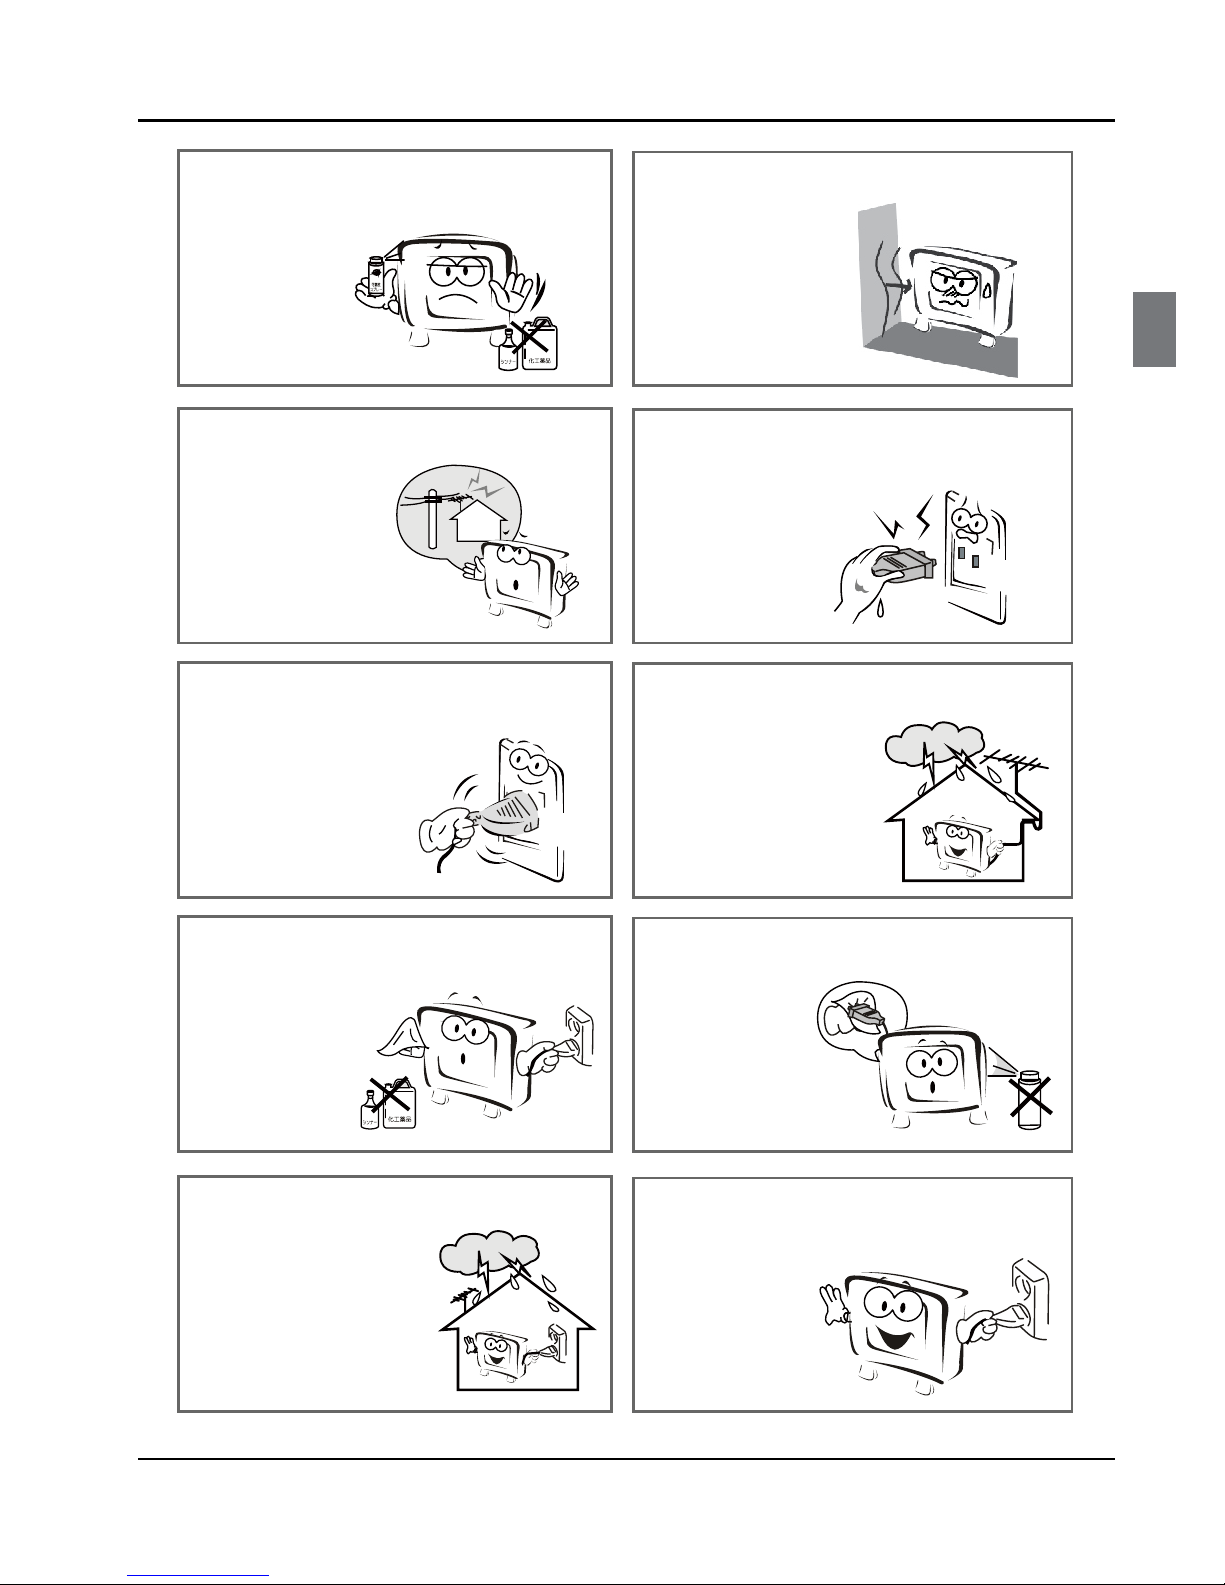
WARNING: To avoid fire or electric hazards, never place your television receiver in an area with heavy
moisture. Attention should be paid to avoid accidental scratches or impacts onto the screen.
CAUTION: ▲Please read this manual carefully before using your television and keep this manual in a
good place for future reference.
▲ To achieve the best performance of your television, read this User‘s Manual carefully and
properly store it for future reference.
▲ Information of screen displays and figures in the User’s Manual may vary due to technical
innovations.
CAUTION: ▲ Unauthorized disassembly of this product is prohibited.

Safety Warningss
EN-3 Digital LCD Television Instruction Manual
The product should be tightly fixed to avoid
drop damages and evenfire.
To avoid fire hazards, do not use this
product under direct sunlight or closely
to heat sources.
Do not locate the product close to water
or oil, which may cause fire hazards.
Unplug the power supply and antenna of
the product when there is a rainstorm,
especially
Thunderstorm.
Do not use damaged or wornelectric plugs
and keep electric cord away fromheatsources
to avoid electric shocks or fire hazards.
Do not connect excessive sockets in parallel
or share the same socket by multiple plugs
to avoid fire hazards.
The product must be placed on a solid and
stable surface to avoid collapse.
Unauthorized disassembly of the television
is prohibited to avoid electric shocks or fire
hazards. Contact
authorized after-sales
service if technical
service is needed.
Keep the product away from a transformer
or heat source to avoid fire hazards.
Disconnect the product from power supply
and contact authorized after-sales service
if abnormal sound is heard in the product.
Safety Warnings
Digital LCD Television Instruction Manual EN-4
Don‘t use or store inflammable materials
near the product to avoid explosion or fire
hazards.
Don’t place the product in a humid area to
avoid fire hazards.
The antenna of the product should be away
from electric cable to avoid
electric shocks.
Never touch the plug when your hand is wet
as this might cause electric shocks.
Always make sure that the televisionis well
plugged as poor electric
connection might cause fire.
When antenna is used, measures should be
taken to prevent water
from flowing down
along the cable into
the television.
Unplug the television, use soft fabric, never
chemicals, if you are going to make
cleaning of the product.
Make sure that no
water drops in the
product.
The plug and electric cable must be kept
clean to avoid electric
shocks or fire
hazards.
Disconnect the television from power supply
and antenna when there is a
rainstorm or thunderstorm
to avoid electric shocks
or fire hazards.
Disconnect the television from power supply
to avoid electric shocks or fire
hazards in a long
vocation.

About your LCD TV
EN-5 Digital LCD Television Instruction Manual
About your LCD TV
GET TO KNOW YOUR TV
Front control panel
Rear Terminals Control
1YP
bPrinput
2YP
bPrAUDIO input
3DVI AUDIO
input
4ANTENNA input
5HDMI3
input
6S- VIDEO input
7EARPHONE
output
8HDMI1 input
9HDMI2
input
0AV-VIDEO input
ACommon Interface
BSCART1
input
CVGA AUDIO input
DSCART2
input
EVGA input
FUSB
GOPTICAL
B
S
U
2
1C
ER
N
I
T
N
E
N
O
PM
O
C
3
I
M
D
H
VGI
AN
N
AI
TN
1234
G
5
6789 0ABC D E
F
CSH09G0685_EN.indd ••1:5CSH09G0685_EN.indd ••1:5 2009-8-14 19:40:432009-8-14 19:40:43
Standby
Program up/down button
Volume up/down button
Menu button
Source button

About your LCD TV
Digital LCD Television Instruction Manual EN-6
GET TO KNOW YOUR TV WITH DVD
Front control panel
Standby
Rear Terminals Control
1YPbPrinput
2YPbPrAUDIO input
3DVI AUDIO
input
4ANTENNA input
5HDMI3
input
6S-VIDEO input
7EARPHONE
output
8HDMI1 input
9HDMI2
input
0AV-VIDEO input
ACommon Interface
BSCART1
input
CVGA AUDIO input
DSCART2
input
EVGA input
FUSB
GOPTICAL
CSH09G0685_EN.indd 章节1:6CSH09G0685_EN.indd 章节1:6 2009-8-14 19:40:442009-8-14 19:40:44

About your LCD TV
EN-7 Digital LCD Television Instruction Manual
GET TO KNOW YOUR REMOTE CONTROL
When using the remote control, aim it towards the remote sensor on the TV.
1Stand By
2DVD Menu / REC
3
DVD open / close
4Picture Mode
5Sound Mode
6Call Screen Display
7Sleep button
8DTV Audio / NICAM / DVD Audio
9Aspect Ratio Control button
0Channel list button
ASubtitle button
BProgram Number Channel selection
C
Source Exchange
DQ.VIEW / Swap Channel
EV+/V-: Volume selection
FP+/P-: Channel selection
GMute
HMenu button
IGUIDE button (only for DTV)
JFavourite list button
KOK button
LCursor Mover button
MBack button (only for USB)
NExit Screen Display
OREPEAT (only for DVD, USB, REC &Timeshift)/CANCEL button
PZoom (only for DVD & USB)/Teletext index (only for TV) / REC index
QPlay / Pause button (only for DVD & USB) / Timeshift
RStop (only for DVD, USB, REC &Timeshift)
S
Fast Reverse (only for DVD, USB, REC &Timeshift)
T
Fast Forward (only for DVD, USB, REC &Timeshift)
UPrevious (only for DVD, USB, REC &Timeshift)
VNext (only for DVD, USB, REC & Timeshift)
WDVD Set up / Text
XDVD Title / Teletext Mix
Y
DVD Search /Teletext Subcode
ZDVD 10+ /Teletext Hold
[DVD Program / Teletext Reveal
\DVD A-B Repeat /Teletext Size
]DVD Call /Teletext Mode
`DVD Angle/Teletext Time
Note
RED button, GREEN button,❏BLUE
button and YELLOW button are fast
text button in analog signal. Function
button in DVBT (just reference the
OSD)

About your LCD TV
Digital LCD Television Instruction Manual EN-8
CONNECTING YOUR
TV
ANTENNA CONNECTION
Connect your aerial to the back of the TV into the
ANTENNA IN socket.
IMPROVE YOUR SIGNAL
To improve picture quality in a poor signal area, use a
signal amplifier (not supplied).
CONNECT YOUR PC TO THE TV
You can use your TV as a monitor for your personal
computer by connecting it with a VGA cable (not
supplied).
Read your computer user guide and check it has a
A
VGA connector.
Turn the power o on your TV and PC.
B
Connect a D type 15-pin VGA interface cable to theC
VGA video interface connector on the PC. Connect
the other end of the cable to the PC interface
connector on the TV. Tighten the screws on the
VGA connectors and connect the audio cable (not
supplied) to the audio input socket on the back of
the TV.
Turn on the power of the TV firstly and then the PC.
D
Press the button on the TV or TV remote control toE
set the video input mode to VGA.
Once the image shows, if there is noise present,
F
change the VGA mode to another resolution,
change the refresh rate to another rate or adjust
the brightness and contrast on the menu until the
picture is clear.
CONNECT A DVD PLAYER TO YOUR
TV
Connect the DVD video outputs (Y, Pb, Pr) to the
COMPONENT (Y, Pb, Pr) IN socket on your TV.
Turn on the DVD player and insert a DVD.A
Press the button to select .B
Refer to the DVD player user guide for operatingC
instructions.
DVD
CONNECT A DVD PLAYER OR VCR TO
YOUR TV
There are two ways in which you can connect a DVD
player or VCR to your TV. Make sure that both the TV and
DVD player or VCR are switched o before you connect
them.
Connection Option 1
Connect the audio and S-VIDEO cables from the VCRA
output jacks to the TV input jacks.
Insert a video tape into the VCR and press
B PLAY on
the VCR.
Turn on the power of the TV first, then the VCR.
C
Press theD SOURCE button on the TV to set the video
input mode to S-VIDEO.
Connection Option 2
Connect the AV DVD/VCR outputs to the AV INA
socket on your TV.
Press the
B SOURCE button on the TV to set the video
input mode to AV.
SCART INPUT
Connect the scart lead from the external deviceA
(DVD player, Set-top box or games console) to the
TV scart socket.

About your LCD TV
EN-9 Digital LCD Television Instruction Manual
Press theB SOURCE button to select SCART mode.
Press the
C PLAY button on the external device.
HDMI INPUT
Connect the cable from the HDMI device to the TVA
HDMI socket.
Press the
B SOURCE button to select HDMI mode.
Refer to the HDMI device user guide for how to
C
operate.
MOUNT YOUR TV ONTO THE WALL
You can mount your TV onto the wall by using a wall
bracket (not supplied). Use M4/M6 machine screws (4
pcs) to screw the TV onto the bracket (not supplied).
PREPARATION OF
YOUR REMOTE
CONTROL
BATTERY INSTALLATION
Place the remote control face down, then open theA
cover of the battery compartment.
Install two AAA batteries. (The + and - symbol of theB
battery must match with the marks on the remote).
Close the cover of the battery compartment.C
BATTERY CAUTION
Confirm there is no object between the remote control
and the remote sensor of the TV set.
Sunshine or other strong light will interfere with the
signal sent by the remote control. In this situation turn
the TV set to avoid the direct light source.
Do not put the remote control in direct heat or in a
damp place as you may damage the remote.
Please use two AAA 1.5V batteries. Do not mix battery
types. Install the batteries at the correct polarities. Do
not use rechargeable batteries. If your TV is to be stored
for a period of time, remove the batteries from the
remote control.
Getting Started
Setting up
LOCATION
You will need to place your TV near your plug socket
(so the power cable can comfortably reach) and within
reach of your aerial socket or extension lead.
CONNECTION
Insert your TV aerial lead into the Antenna input atA
the side of the TV.
Insert the batteries into the remote control. Make
B
sure they are inserted the right way around,
matching the polarity as indicated inside the battery
compartment.
About your LCD TV / Getting Started

Getting Started
Digital LCD Television Instruction Manual EN-10
SWITCHING YOUR TV ON
Press theA STANDBY button on the right side of the
TV once. A red ashing light will appear in the corner
of the screen.
Press
B STANDBY on the remote control. The TV will
turn on and the red light will turn blue. This may take
a few moments.
Select your chosen language when prompted from
C
the list that will appear on screen. Use the button
to scroll to the language you want and press to
confirm.
TUNING YOUR TV
SWITCHING TO AN EXTERNAL
SOURCE OTHER THAT TV
If you have attached a DVD player or similar external
device to the TV, you will need to tell the TV to display
the content from it. Simply press SOURCE which will
bring up the source menu in the left corner of the screen,
use the 5and button to highlight the required
source and press OK select.
For details of how to plug in other equipment see GET
TO KNOW YOUR TV on page 5.
AUTO SEARCH
PressA MENU button.
PressB 3 button to select Tuning menu, press
button to enter.
Press
C 5 button to select Country item.
Press 3 button to select you needed.
Press
D 5 button to select Auto Search item, press
OK button to enter.
Press 3 button to select the OK option, and press
OK button to start searching.
Press the MENU button, you can choose to skip the
TV /DTV Search or not.
PressE EXIT button to stop auto search during
searching.
Note
It may take a few moments to complete the Auto❏
Search.
DIGITAL MANUAL SEARCH
PressA MENU button.
(8JUIPVU%7%)8JUI%7%

Getting Started
EN-11 Digital LCD Television Instruction Manual
PressB 3 button to select Tuning menu, press
button to enter.
Press
C 5 button to select Digital Manual Search
item, press button to enter.
PressD 3 button to select the Channel.
Press OK button to start searching.
Once a channel is located, you can press
E OK button
to save it.
Press EXIT button to exit.
Analog Manual Search
Follow the below steps when you need to have a manual
search.
Press
A MENU button.
PressB 3 button to select Tuning menu, press
button to enter.
Press
C 5 button to select Analog Manual Search
item, press button to enter.
PressD 5 button to select Search item, press
button is used to select the higher frequency
channel.
Press 3button is used to select the lower frequency
channel.
And then select Storage To, press
E 3 button to
select the position number you want the channel
on. Once a channel is located, you can press red
button to save it. Press EXIT button to exit.
Sound System❖
Press 5button to select “Sound System”, then
press 3 button to select the correct sound system.
Current CH❖
Press 3 button to select the channel number to
edit.
Storage To❖
Press 3 button to select the program number you
want to storage to.
Fine tune❖
If the picture and/or sound are poor, try using the
FINE TUNE feature. Do not use this feature unless
reception is poor.
Repeat above steps
A A-C, then press 5button to
select the Fine Tune item.
Press
B 3 button repeatedly to carry out fine
tune, till the best picture and sound are obtained,
then loosen the button.
Channel Edit
Using this function, you can rename, move, set favorite
channel and skip the channel in the analogue mode.
Press
A MENU button.
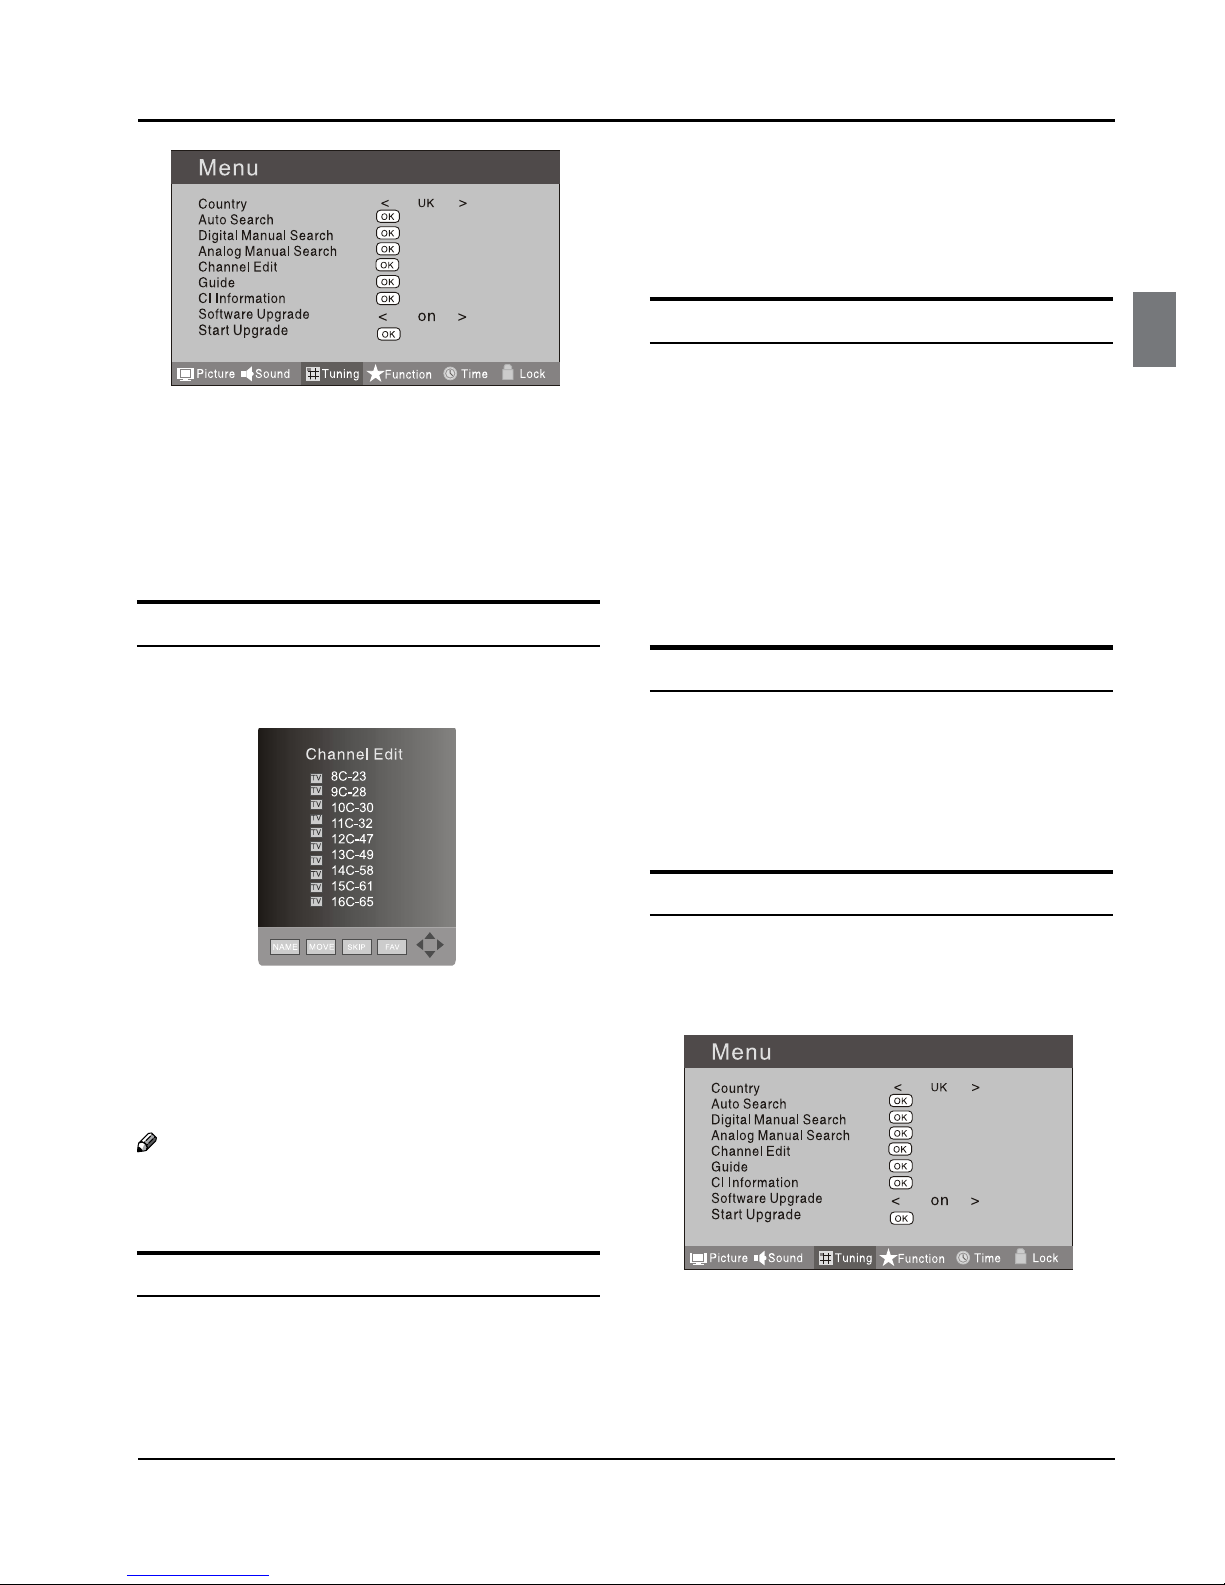
Getting Started
Digital LCD Television Instruction Manual EN-12
PressB 3 button to select TUNING menu, press
button to enter.
Press
C 5 button to select CHANNEL EDIT item.
Press button to enter the sub-menu. You can
press red, green, yellow or blue button to enter the
menu you need.
RENAME
PressA 5 button to select the channel, and press
green button to rename.
Press
B 3 button to select the number position of
channel name. Press 5 button to select number.
You can press the
C EXIT button to cancel the changes
at anytime.
Note
The RENAME function is only available in ATV❏
program.
MOVE
PressA 5 button to select the channel and press
yellow button to select the position.
PressB 5 button to select the number position you
want to remove to, press yellow button to confirm.
You can press the
C EXIT button to cancel the changes
at anytime.
Setting favourite channel
PressA 5 button to select the channel, press red
button to set your favourite channel.
You can press the red button to cancel the changes
B
at anytime.
Press
C FAV button on the remote control and
Favourite List will be displayed.
Press
D 5 button to select the channel, and press
OK button to enter.
SKIP
PressA 5 button to select the channel and press
blue button to skip the current channel.
You can press the
B blue button to cancel the changes
at anytime.
GUIDE (Electronic Program Guide)
Using this function, you can access the DTV program
information.
Press
A MENU button.
PressB 3 button to select TUNING menu.
Press button to enter.

Getting Started
EN-13 Digital LCD Television Instruction Manual
PressC 5 button to select the guide item.
Press OK button to enter the submenu, the
electronic program guide is displayed.
You can quickly call up Guide menu by GUIDE
button on the remote control.
Note
Only DTV mode.❏
COMMON INTERFACE
The common interface (CI) slot is designed to accept the
Conditional Access (CA) Module and Smart card in order
to view the pay TV programmes and additional services.
Contact your Common Interface service provider to get
more information about the modules and subscription.
Please noted that CA modules and smart cards are
neither supplied nor optional accessories from us.
Warning
Switch o your TV before any module is inserted in•
the Common Interface slot.
Insert the CAM correctly, then Smart Card to the CIA
slot that is located at the side of the TV.
CI Slot
CAM
Smart Card
Turn on the TV and it will display the below messageB
if the CA module is detected. Wait for few moments
until the card is activated.
Press the
C MENU button to display the Main Menu
and use the 5and button to highlight the
“Common Interface”line and press the“OK”button.
Detailed information on the CI card in use is
D
displayed.
Press
E OK button to access the card menu. Refer to
the module instruction manual for setting details.
When module is removed, the following message
F
will appear on the screen.
Software Update function
When you get the updating news from the TV shop’s•
web, you can update the operating software using
the Download menu. The data for various units are
transferred consecutively on a special receiving
channel.
You need to search the channel with updating code•
stream.

Getting Started
Digital LCD Television Instruction Manual EN-14
Note
You can get information from the TV shop or❏
internet.
Operation
PressA MENU button.
PressB 3 button to select TUNING menu, press
button to enter.
Press
C 5 button to select Software Upgrade item.
Press
D 3 button to set it as On. (The default is O)
The Start Upgrade item can be selected.(The default
E
is grey and cannot be selected).
13%
Press EXIT to cancel download
PressF 5 button to select the Start Upgrade option
and use OK button to enter. Then the TV will restart
and search the upgrade information.
Note
If the upgrade information is received, the TV will❏
begin to upgrade. Or else, the TV will be back the
DTV source.
Load the receiver identification. This process may
G
also take several minutes. You can press EXIT button
to cancel the download and your TV set will be back
the DTV source.
100%
15%
Press EXIT to cancel download
Updating in progress - Do not turn off the TV
After the download has finished, your TV set willH
enter burning state and the indicator light is shining.
The menu 4 of right appears.
The set will be back the DTV source when the update is
completed.
USING YOUR TV
How to select the TV program
Using Program number button Enter the channelA
number with the number keypad on the remote
control.
Using
B P+/P- button.
Press the P+/P- button to select a channel number.
HOW to adjust volume
Press V+/V- button on the remote control or the side of
the TV to adjust the volume level.

Getting Started
EN-15 Digital LCD Television Instruction Manual
CH.LIST function
Press CH.LIST button on the remote control will display
Channel List menu, and then press button to enter.
Press5 button to select the channel, and then press
OK button to enter.
ADJUSTING PICTURE
SETTINGS
Changing the Picture Setting
PressA MENU button.
PressB 3 button to select Picture menu, press
button to enter.
Press
C 5 button to select the item requires
adjusting.
Press
D 3 button to adjust the selection item.
When you are satisfied with your choice, press the
E
EXIT button to return to normal viewing or press
MENU button to return to the previous menu.
Contrast❖
This will adjust the intensity of bright parts in the
picture but keep the dark parts unchanged.
Brightness❖
This will adjust the light output of the complete
picture, which will mainly aect the darker areas of
the picture.
Colour❖
This will adjust the saturation level of the colours to
suit your personal preference.
Sharpness❖
This will adjust the sharpness of fine details in the
picture.
Tint❖
Allows you to select the colour mix (Tint) of the
picture.
Note
The Tint function is only available in NTSC mode.❏
Mode❖
This will select the picture mode. Select Standard/
Mild/User/Vivid according to the program. You can
quickly select the desired mode by P.MODE button on
the remote control.
Colour temperature❖
This will increase or decrease Warm (red) and Cool
(blue) colours to suit personal preferences.
Select Cool to give the white colour a blue tint,
Normal to give the white colour a neutral tint, Warm
to give the white colour a red tint.
Noise Reduction❖
Automatically filters out and reduces the image noise
and improves picture quality when receiving weak
video signals.
Select O/Low/Standard/High according to the
image noise.
Reset❖
To recover to the default value.
ADJUSTING SOUND
SETTINGS
Changing the Sound Setting
PressA MENU button.

Getting Started
Digital LCD Television Instruction Manual EN-16
PressB 3 button to select Sound menu, press
button to enter.
Press
C 5 button to select the item requires
adjusting.
Press
D 3 button to adjust the selection item.
When you are satisfied with your choice, press the
E
EXIT button to return to normal viewing or press
MENU button to return to the previous menu.
Balance❖
This will adjust the output of the right and left
speakers to obtain the best stereo reproduction for
your listening position.
Mode❖
This will select the sound mode.
Press 3 button to select Standard/Music/
Theater/User according to the program. You can
quickly select the desired mode by S.MODE button
on the remote control.
AVL❖(Automatic volume control)
This will reduces the dierences in volume level
among broadcasters.
SRS TS XT❖
This will control the Woofer output.
Press 5 button to select SRS TS XT.
Press 3 button to set SRS TS XT as OFF, ON.
Digital Audio Output❖
This will control the Digital Audio Output.
Press button to select Digital Audio Output.,
Press button to set Digital Audio Output. as OFF,
PCM,RAW.
Equalizer❖
This sound setting can be adjusted to suit your
personal preference.
Audio Languages❖
Press 5 button to select Primary/Secondary item,
and then press 3 button to select the languages
you needed.
Press button to select Close item, press OK button
to close it.
Note
The Audio Language function is only available in❏
DTV mode.
Reset❖
To recover to the default menu setting.
FUNCTION SETTINGS
PressA MENU button.
PressB 3 button to select Sound menu, press
button to enter.

Getting Started
EN-17 Digital LCD Television Instruction Manual
PressC 5 button to select the item requires adjusting.
PressD 3 button to adjust the selection item.
When you are satisfied with your choice, press the
E
EXIT button to return to normal viewing or press
MENU button to return to the previous menu.
Language❖
To select the menu language.
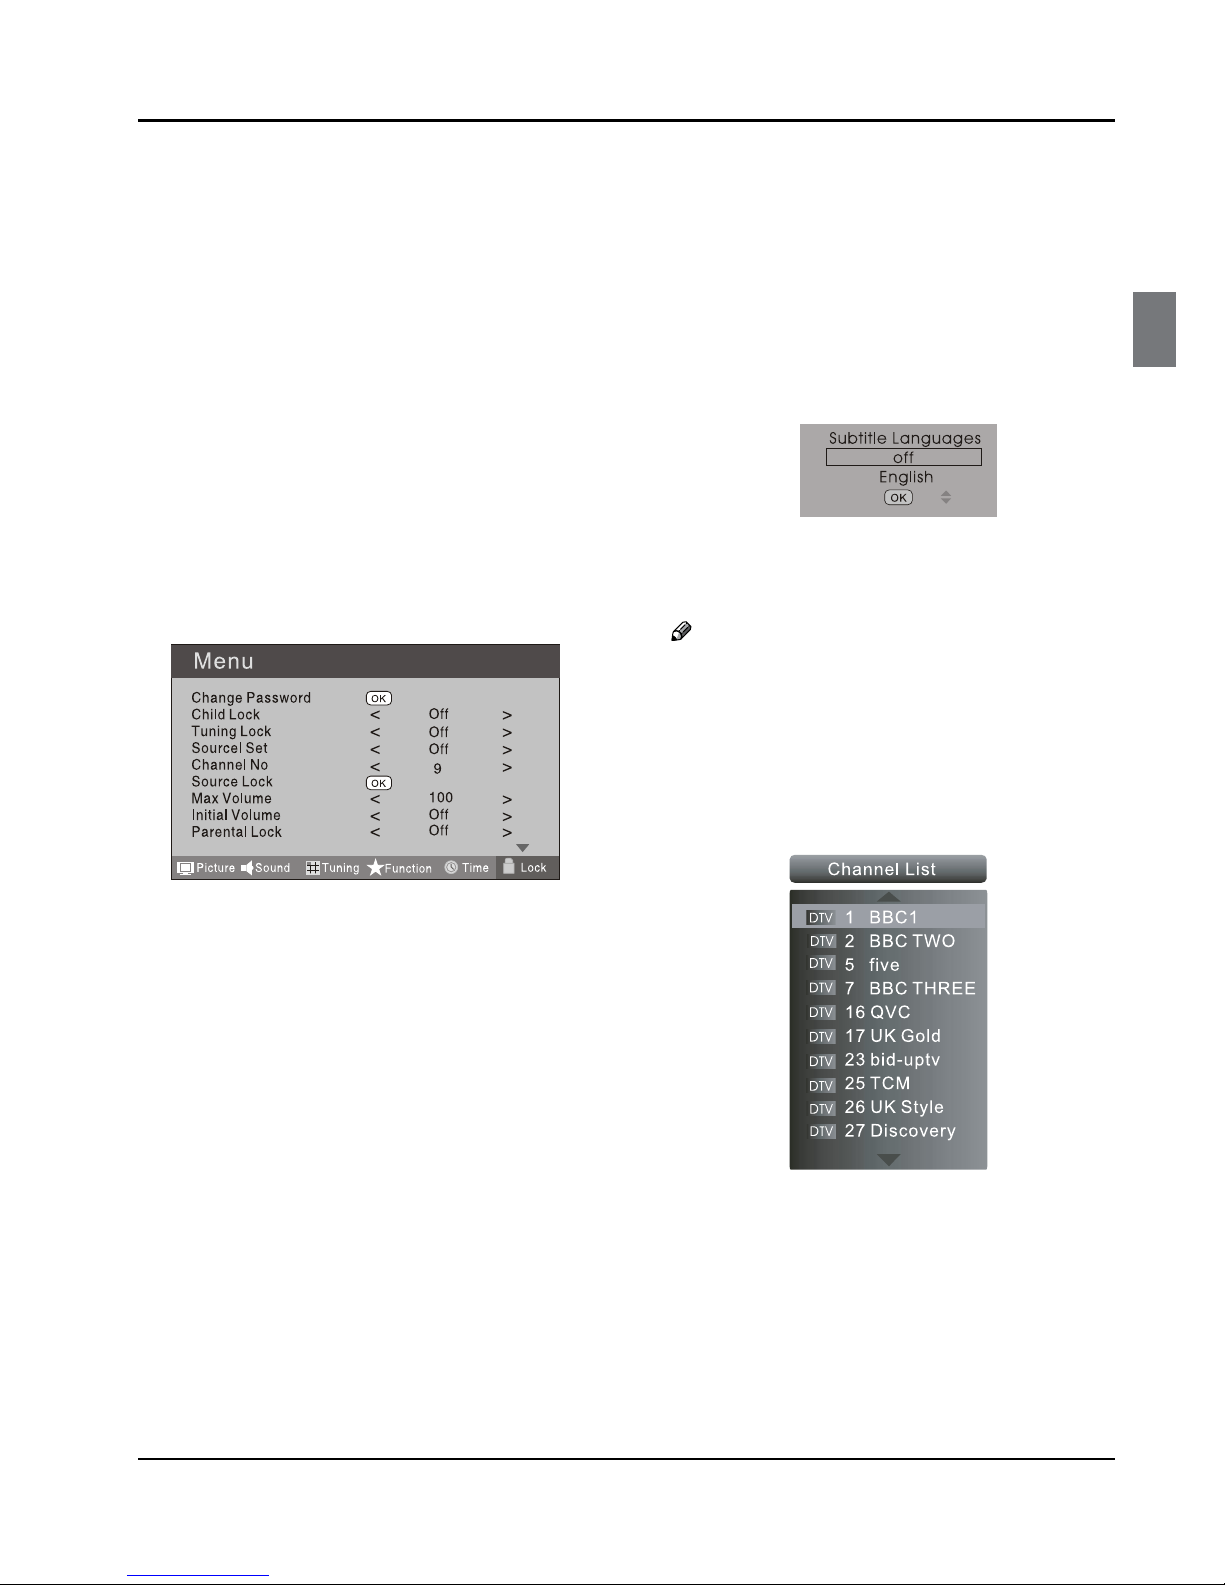
Subtitle Language❖
To select the Subtitle language.
Display Mode❖
To set the picture proportion, press3 button to
select 4:3/Zoom1/Zoom2/Wide/16:9/Auto. You can
quickly select the desired mode by SCREEN button
on the remote control.
4:3 mode•
Choose 4:3 when you want to view a picture
with an original 4:3 aspect ratio, with gray bars
appearing at both the left and right sides.
16:9 mode•
Choose 16:9 when you want to adjust the picture
horizontally, in a linear proportion to fill the entire
screen.
Zoom1•
Choose Zoom1 when you want to view the picture
without any alteration. However, the top and
bottom portions of the picture will be cropped.
Zoom2•
Choose Zoom2 when you want the picture to be
altered, both vertically extended and cropped.
The picture taking a halfway trade o between
alteration and screen coverage.
Wide•
Choose Wide when you want to adjust the picture
in a non-linear proportion, that is, more enlarged
at top sides and no alteration, at bottom side.
Blue Screen❖
This will select the character background colour.
Note
The Blue Screen function is only available for❏
ATV mode.
Recorder❖
To recorder the DTV program. Details of Recorder are
described in the page of 25, 26.
SCART Input❖
When you use the SCART2 input ,make sure the input
source is AV or S-VIDEO, and set the SCART INPUT
option.
OSD Time Out❖
To set how long you want the menus to appear
on-screen. Each press of 3 button repeatedly to
select the number of preset minutes, the Time will be
set in sequence: o, 10sec, 15sec, 30sec, 45sec, 60sec.
OSD Transparency❖
To set the transparency background of OSD, the
transparency will be set in sequence: O, 25%, 50%,
75%, 100%.
Reset❖
To recover to the default value.
TIME SETTINGS
Clock❖
PressA MENU button.
Press
B 3 button to select Time menu, press
button to enter.

Getting Started
Digital LCD Television Instruction Manual EN-18
Press
C 5 button to select Clock item, press
button to enter setting.
Press 5 button to select hour or minute, press
3 button to adjust the value.
Date❖
PressA MENU button.
Press
B 3 button to select Time menu, press
button to enter.
PressC 5 button to select Date item, press
button to enter setting.
Press5 button to select the option, and then
press 3 button to adjust value.
Note
In DTV mode, because the time information is❏
from the signal, the Clock and Date are not able
to be changed.
If you want to change the time, turn o the TV in
ATV mode, then turn on the TV.
O Time❖
PressA MENU button.
Press
B 3 button to select Time menu, press
button to enter.
PressC 5 button to select O Time item, press
button to enter setting.
Press 5 button to select Repeat option, and
then pressbutton to set it on.
Press5 button to select hour or minute, press
3 button to adjust the value.
When the o time has arrived, the TV set will
enter into standby mode.
On Time❖
PressA MENU button.
Press
B 3 button to select Time menu, press
button to enter.
PressC 5 button to select On Time item, press
button to enter setting.
Press 5 button to select activate option, and
then pressbutton to set it On.
Press 5 button to select hour or minute, press
3 button to adjust the value.
When the on time has arrived, the TV set will
switch on automatically.
Sleep❖
The sleep timer automatically shuts o the TV after a
preset time (from 5 to 240 minutes).

Getting Started
EN-19 Digital LCD Television Instruction Manual
Press the MENU button and then use button
to select the Time menu.
Press the button and then use button to
select the Sleep.
Press the button and then use button
to select the number of minutes. Select Off, 5Min,
10Min, 15Min, 30Min, 45Min, 60Min, 90Min,
120Min, 180Min, 240Min.
When you are satisfied with your choice, press
MENU button to return to the previous menu or
press the EXIT button to return to TV viewing.
And the time begins to count down from the
number of minutes selected.
Time Zone?
Press MENU button.
Press button to select Time menu, press
button to enter.
Press button to select Time Zone item.
Press button to select the correct time zone.
Press MENU button to save and exit.
LOCK MENU SETTING
Using this function can control the tuner, program,
source volume and so on. Pressing MENU on the remote
control, press button to select Lock menu, press
button to enter the sub-menu, and you will be required
to enter the password. The initial password of the
television is 0000.
CHANGE PASSWORD?
Press button to select Change Password
item. Press button to enter the submenu.
When you have inputted the four digits you will
be prompted to enter it again.
Your new password will then be automatically
saved.
CHILD LOCK?
Press button to select Child Lock.
Press button to set On or Off mode. If lock on
mode is set, Child Lock is in activated automatically.
In such case, if Child Lock button (button on the
television) is pressed, the screen will display Child
Lock, which can be erased by press of MENU button.
5 seconds later after the latest press, the screen
display will disappear automatically. The Child Lock
mode can be resumed by entering Lock Set menu, set
Child Lock On or Off.
Tuning Lock?
Press to select Tuner Lock and to set On/Off.
(To set On, some operation such as search will be not
available. When enter the Tuning menu, Tuner Lock
will be on the screen. If you want to operate Tuning
menu, you need to enter the Lock menu to set Tuner
Lock Off or operate unlock.)
Getting Started
Digital LCD Television Instruction Manual EN-20
Channel NO.❖
Channel NO. is opted for setting up preset channel.
Press 5 button to select preset Channel. Press 3
button to select channel number.
Source set❖
Channel set is opted for setting up start source.
Press 3 button to select O, DTV, TV, AV, SCART1,
SCART2, S-Video, Component1, Component2, PC,
HDMI1, HDMI2, HDMI3, USB in turn. DVD is available
for some model.
Source Lock❖
Source Lock will control the On or O of hinder
external input modes.
Press 3 button to set as on or o.
When the source lock is set as on, TV source will
display, at this time, when press SOURCE button,
the TV can switch to corresponding source and will
display the Source is locked.
Max Volume❖
Press 5 button to select Max Volume. Press 3
button for adjustment between 0-100. If a certain
Value is set, when volume is being adjusted, the
sound value can not exceed maximum volume value.
If current volume is over Max Volume, when lock set
menu is set, current volume will become set maximum
volume, if current volume is below maximum volume,
customer set volume will stay unchanged.
Initial Volume❖
The TV will remember it after your setting, that will be
the volume when turn on the TV next time.
Parental Lock❖
Press 5 button to select parental lock. Press 3
button to select OFF or 4-18 to limit the age of
children who will watch TV.
Clear Lock❖
Press 5 button to select Unlock mode. Press 3
button to unlock all set modes, setting all lock options
to o, and the maximum volume returns to 100.
SHORTCUT MENU
DISPLAY
Subtitle Function❖
PressA SUBTITLE button on the remote control will
display Subtitle languages menu, press button
to enter.
PressB 5 button to select the item and press OK
button to enter. You can press the EXIT button to
cancel the changes at anytime.
Note
Press❏SUBTITLE button on the remote, it will
display subtitle languages menu only in the DTV
mode.
CH.LIST Function❖
PressA CH.LIST button on the remote control, will
display Channel List menu.
Press
B 5 button to select the channel and press
OK button to enter. You can press the EXIT button
to cancel the changes at anytime.
GUIDE Function❖
Press GUIDE button on the remote control, will
display Program Guide menu, press 53button
to select the program.
Table of contents


