Terratek TBG6 User manual

User Manual - Please read and retain for future
reference.
6”Heavy Duty Bench Grinder
TBG6
LISTED
E154499

Page 1
part list
Eye-shield
Washer
Washer
Nut
Nut
Washer
Washer
Eye Shield Bracket
Square Neck Screw
Screw
LEFT EYE SHIELD MOUNTING ROD
Fixing piece
Washer
Nut
Screw
Left Outer Guard
Nut
Wheel flange
Grinder Wheel
Screw
Washer
Left inner guard
Left spark guard
Washer
Washer
Bolt
Washer
Bolt
Washer
Left tool rest
Screw
Washer
Washer
End bell
Bearing
Rotor
Stator
Motor house
1
2
3
4
5
6
7
8
9
10
11
12
13
14
15
16
17
18
19
20
21
22
23
24
25
26
27
28
29
30
31
32
33
34
35
36
37
38
2
4
4
4
2
2
2
2
2
4
1
2
2
2
6
1
1
4
1
6
6
1
1
2
2
2
4
4
4
1
8
8
8
2
2
1
1
1
1
1
2
1
1
1
1
1
1
1
1
1
1
1
1
1
1
2
1
2
2
1
1
1
1
1
1
1
1
1
1
1
1
4
4
4
1
1
39
40
41
42
43
44
45
46
47
48
49
50
51
52
53
54
55
56
57
58
59
60
61
62
63
64
65
66
67
68
69
70
71
72
73
74
75
76
No Part list QTY.
Right eye shield mounting rod
Right spark guard
Label
Right inner guard
Grinder Wheel
Nut
Right Outer Guard
Right tool rest
Plug & cable
Lamp
Washer
Nut
Ground terminal
Washer
Washer
Screw
Capacitor clip
Bolt
Cable Clip
Screw
Washer
Cable Block
Cable Protector
Base
Washer
Washer
Washer
Screw
Capacitor
Transformer
Washer
Screw
Base plate
Rubber foot
Washer
Screw
Switch
Logo
No Part list QTY.
Contents
Parts List Page 1
Technical Spec Page 3
Safety Instructions Page 4
Using your product Page 9
Maintenance Page 9
Warranty Page 10
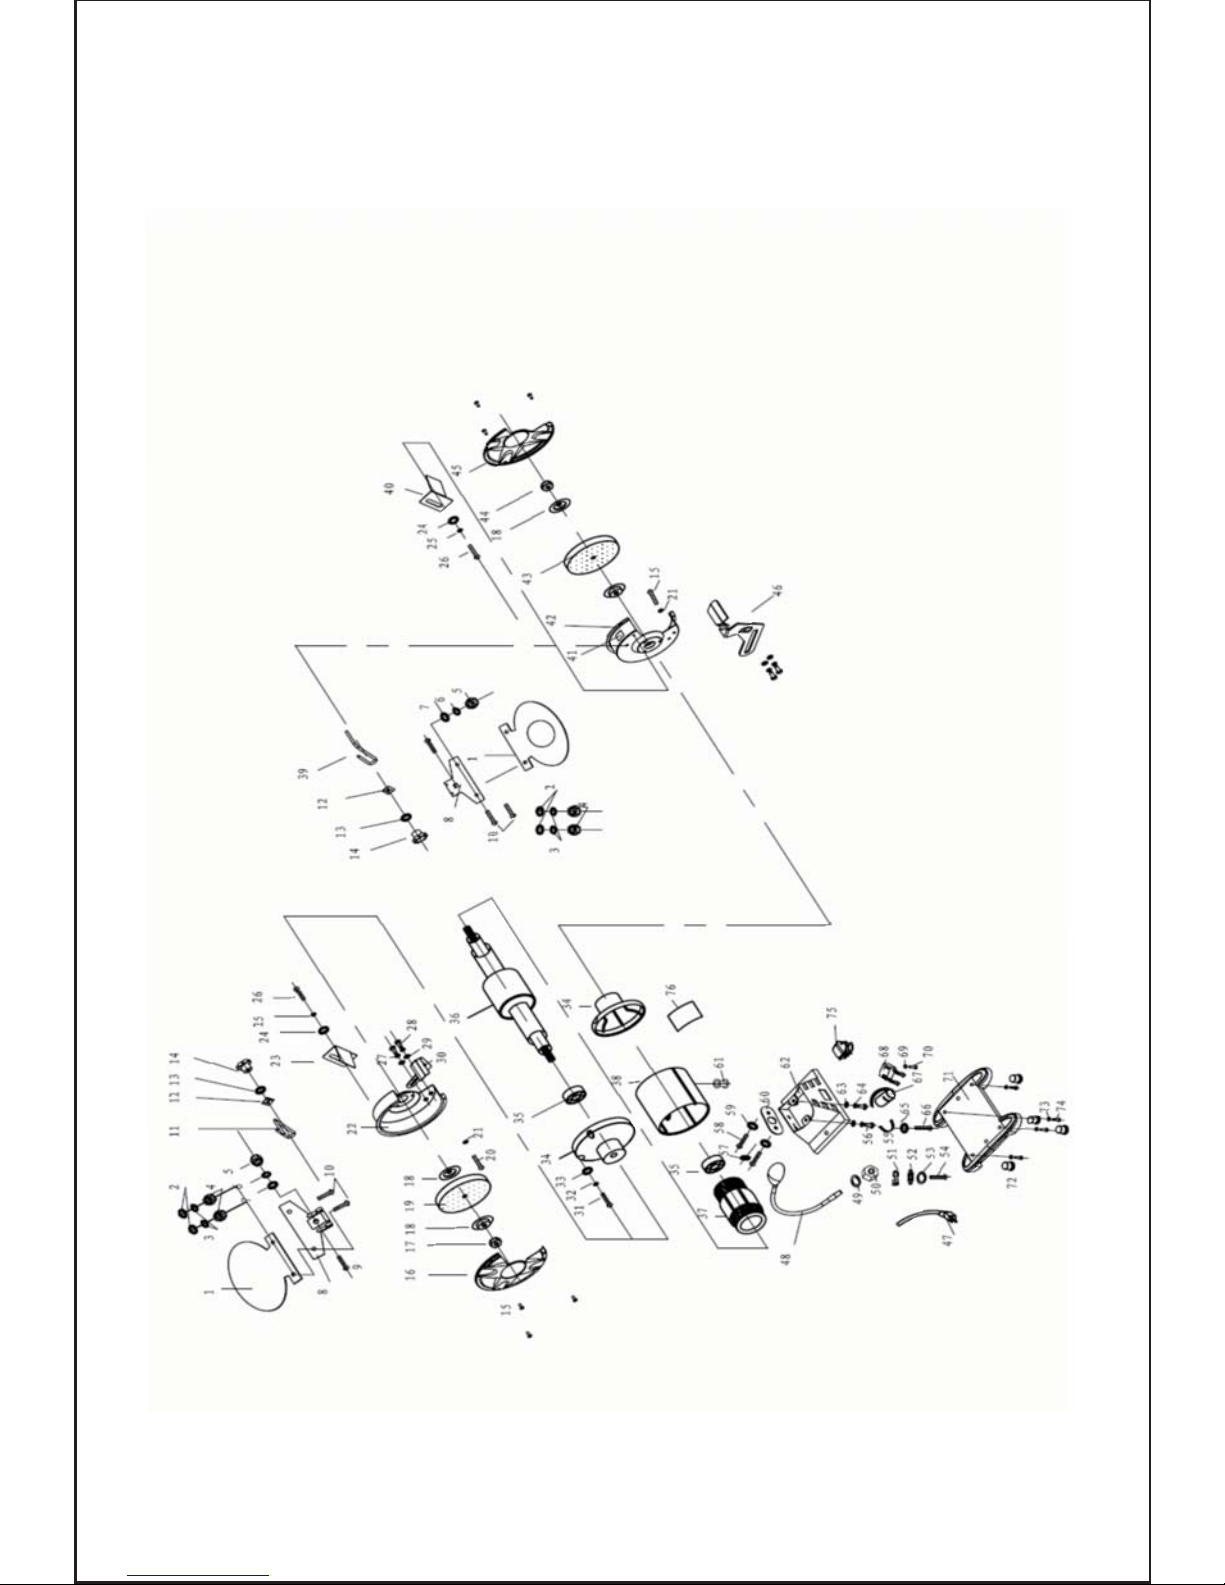
Exploded Assembly Diagram
Page 2

Technical Information
Copyright 2008 by ACL Group (Intl) Ltd All rights reserved. This manual or any artwork
contained herein must not be reproduced in any shape or form without the express
written consent of ACL Group (Intl) Ltd. Diagrams within this manual may not be
drawn proportionally. Due to continuing improvements. actual product may differ
slightly from the product described herein.
Read this entire manual before
using this product. Failure to do so can result
in serious injury. Save this manual for future
reference.
Voltage: 120V
Frequency: 60Hz
Power: 1.5A 1/2HP
Speed: 3550rpm
Wheel Size: 6”x1/2”
Work Light : LED
NW/GW: 23/26 lbs.
Page 3

Important SAFETY Information
This symbol is to warn you of potential personal
injury hazards. Please read carefully the notes along side
this warning to avoid possible injury or death.
General Safety Rules
WARNING! Read all instructions. Failure to follow all instructions listed
below may result in electric shock, fire and/or serious injury. The term
“power tool" in all of the warnings listed refers to corded or cordless po-
wer tools.
Work area safety
Read and Keep This Manual
Keep children and bystanders away while operating a power tool. Distractions can
cause you to lose control.
Please read carefully all instructions within this manual. Failure to follow all safety
warnings can result in serious personal injury. The term “Power Tool” in all of the following
warnings refers to your main operated (corded) or battery operated (cordless) power
tool
Page 4
Keep work area clean and well lit. Cluttered or dark areas invite accidents. Do not
operate power tools in explosive atmospheres, such as in the presence of flammable
liquids, gases or dust. Power tools create sparks which may ignite the dust or fumes.

Electrical safety
Before use. ensure that the power outlet you are using matches the plug on your
power tool and that the voltage of the outlet matches that of your power tool.
Only use grounded extension cards with power tools fitted with 3 pin plugs and if
using outdoors ensure any extension cord is suitable for outdoor use.
Always try to avoid body contact with grounded surfaces, such as radiators, cooking
ranges and any other fixed appliance with metal surfaces.
Do not expose your power tool to wet or damp conditions and NEVER use in rain.
Check regularly the power cord of your machine and any extension cord that you are
using for damage.
Do not carry or pull the machine with the power cord.
Ensure the cord is clear from hot surfaces, oil or sharp objects.
Personal safety
Never use your machine whilst under the influence of alcohol, drugs or medication.
Tiredness can often cause accidents, stay alert.
Never use your machine without the correct guards in place.
Always use ANSI approved eye protection and dust mask. Non slip safety shoes and
hearing protectors should be worn at all times when using your power tool.
Ensure any dust collecting device supplied with your machine is connected correctly
before use.
Ensure all loose clothing, long hair or jewelry is kept clear of the machine.
Before plugging your machine into the power outlet ensure the machine is in the OFF
position and that all blades and accessories being used are secure.
Check that wrenches or adjusting keys have been removed. Any wrench or key left
attached to a moving part can result in injury.
Power tool use and care.
Keep your machine clean and well serviced at all times.
Never adjust or service any power tool before disconnecting from the mains electricity
supply.
Page 5

SAFETY CHECK LIST
Before starting
1 Check that the power outlet matches your power tool plug.
2. Check voltage of power outlet, make sure it matches your power tool
3. Check that power cords are not damaged
4. Check that guards and clamps are secure and working.
5. Check that all wrenches, keys and accessories are clear.
6. Check that blades/cutting parts move freely
7. Check surrounding environment is clear.
8. Check the power tool is fixed securely to its work stand or bench
9. Check that no person under the age of 18 years old will use this tool.
10 Check all children are out of the work area.
11. Check you are working with the correct materials recommended for use with
this tool.
During Use
1. Do not reach across the machine.
2. Do not operate without the correct safety apparel.
3. Do not operate with loose clothing.
4. Keep all hands and limbs a safe distance from the wheels.
5. Ensure all clamps and guards are being used.
6. Do not grind materials not suitable for this machine.
7. Do not use in wet/damp conditions or locations.
8. Always use supports when working with long pieces of metal.
9. Always disconnect from the main power supply before making any adjustments
to this machine.
10. DO NOT LEAVE THIS MACHINE UNATTENDED WHILE CONNECTED TO THE
POWER SUPPLY
Always use the correct tool for the job.
Never force the tool to work harder than it is designed to do.
Never use your machine with broken parts such as switches, supports or leg stands.
ALWAYS keep your power tools away from children.
Keep cutting tools sharp to ensure less stress on the motor.
Replace damaged or dull wheels.
Only have your power tool serviced by a qualified repair agent using manufacturers
recommended parts.
This machine is supplied with all the relevant safety guards and features, it should be
checked before every operation. this manual should be read and kept in a safe place .
Whilst we warn of all the possible risks attached to using power tools
Page 6
any operator must have read and understood the manual and apply their own
caution and common sense when using this machine.
Following this guide will greatly reduce your risk of electric shock or injury.
Grounding Tools
Electrical Powered Connections
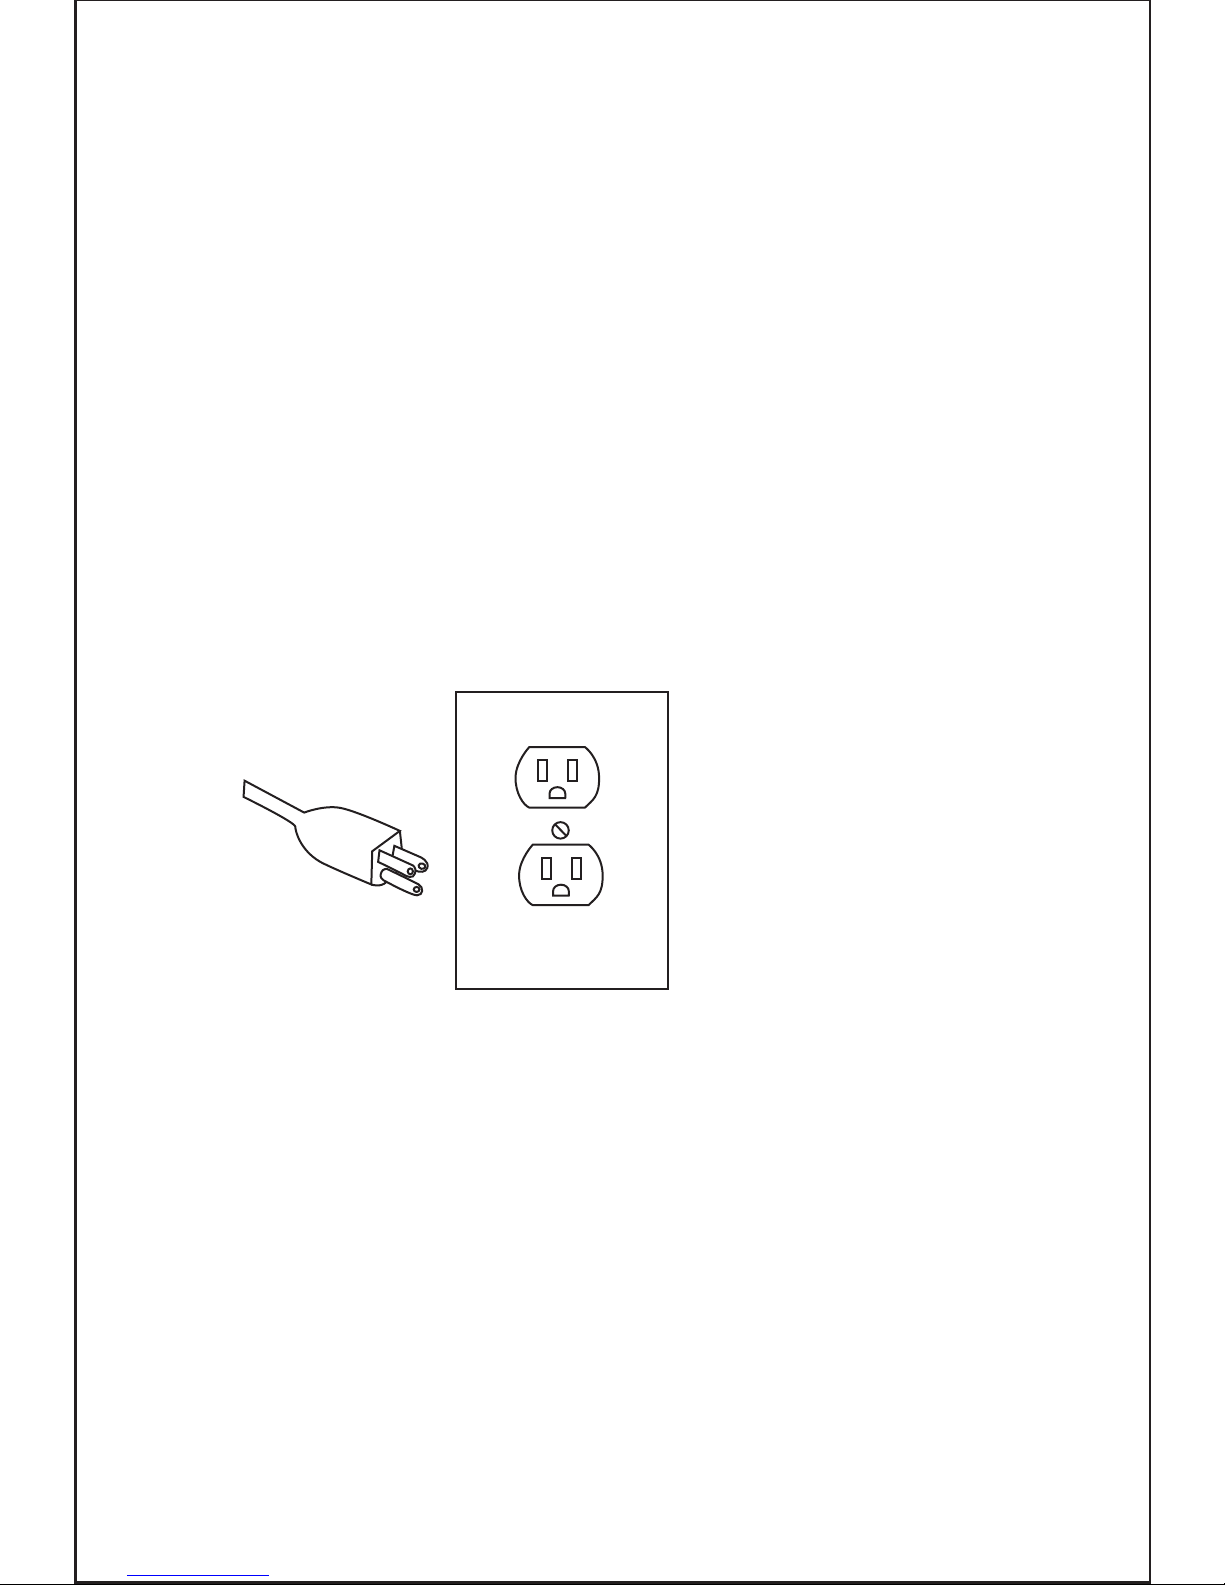
3- Prong Plug and Outlet
Any electric powered tool that is marked Ground Required must have a fitted three
wired power cord. The main importance of this is the green wire within the cord, this
green wire must at all times be connected to the grounding prong of the plug. This
prong must never be removed or discarded. The green wire Must NEVER be conne-
cted to any other prong. The Three prong plug must only be connected to the power
supply through a three prong power outlet
The illustration above shows a three prong plug and outlet.
Only use qualified repair agents to service this machine.
Only use qualified electrician to repair any damaged wiring.
NEVER remove the grounding prong from the power toll or extension cord.
Page 7
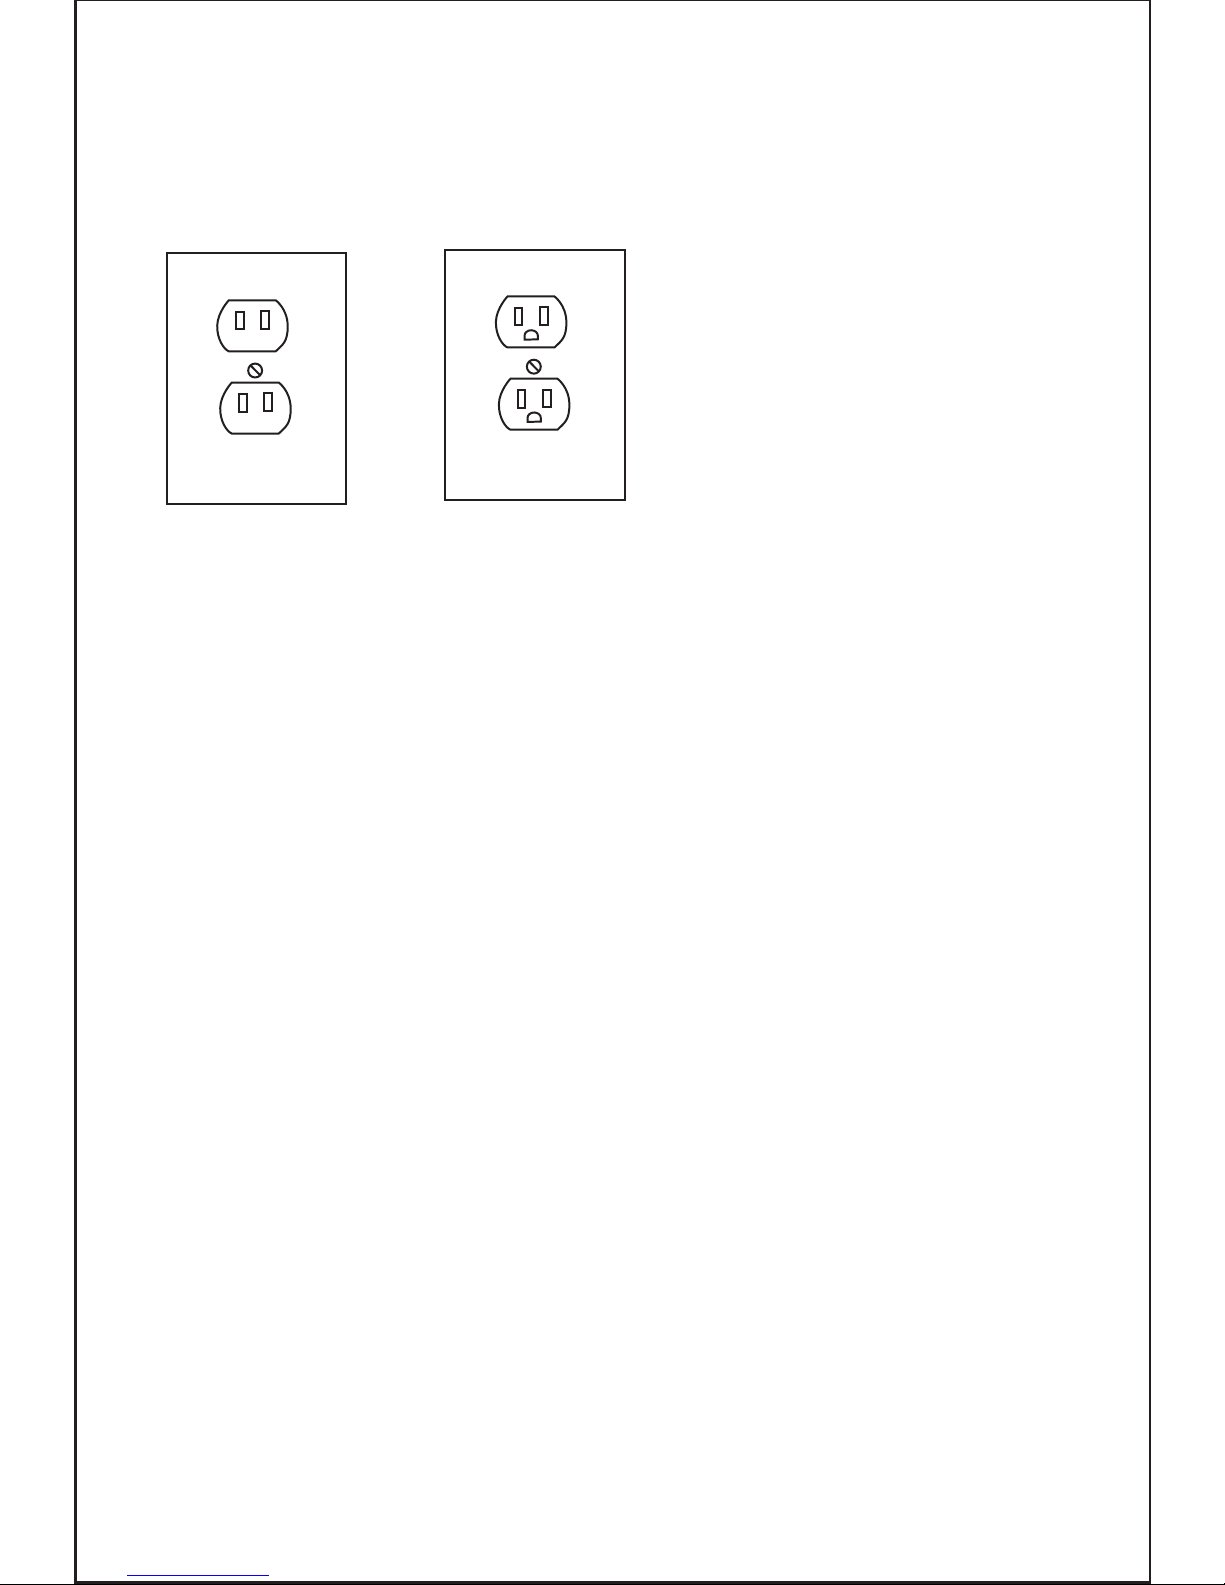
Outlets for 2-Prong Plug
Any electric powered tool that is marked “Double Insulated” only needs a two prong
connection and will be perfectly safe to operate.
These tools do not require grounding as they are fitted with an additional insulation
system internally that complies with all relevant electrical safety standards.
Unlike the three prong tools these tools CAN be connected through outlets suitable
for two prong or three prong plugs.
The illustration above shows the outlets that this type of tool can be connected to.
Any power tool marked “Grounding Required”, MUST only be connected to a three
wire extension cord. Only double insulated tools can be connected to twowire cords.
When using any extension cord the machine will suffer a power reduction due to the
drop in voltage caused by the length of the cord. This can be partially offset by sele-
cting extension cords with lower gauge wire.
Double Insulated Power Tools
Plug and Outlet, 2 prong
e.g. Cords marked 14 gauge can carry a higher current than cords marked 16 gauge,
therefore when linking extension cords make sure each cord wire gauge matches.
Note: Outdoor extension cords used in must carry the letters “W-A” (USA)) or “W”(C-
anada)
Check all extension cords for damage before use.
Avoid sharp objects.
Do not position cord where it could be subject to traffic passing over it.
Page 8

Turn on the grinder and wait until it reaches full speed before you start grinding.
Use the tool rest to keep the work piece steady. Keep a steady even pressure on the
work piece and keep moving it from side to side at even pace for smooth grinding and
to avoid uneven wheel wear. Do not push too hard because this may overheat the
motor and prematurely wear down the wheels, work slowly.
Note the original grind angle on the item you are sharpening/grindring and try to keep
the same angle. Make sure the grinding wheel always rotates down onto the object
you are grinding to avoid injury. Obtain a tray with water and place it next to the grinder
to dip your work to keep from overheating or burning as this will weaken the metal.
WARNING: For your own safety, make sure switch is OFF and unplugged from the
power source before doing any maintenance or adjustments. Replace the power cord
immediately if it is cut, worn, or damaged in any way.
Under normal use, grinding wheels may become cracked, chipped, grooved or packed
with debris from materials being cut. If a wheel cracks or chips replace it immediately.
New wheels occasionally require dressing to remedy out of round conditions.
If replacing a wheel make sure it is replaced with the same wheel and specs as the
existing wheel. Maintain the existing sequence of retaining hardware. For your own
safety make sure grinder is unplugged before attempting any repairs.
Your bench grinder can be used for polishing and buffing, you can obtain these wheels
from most hardware stores.
WARNING: The use of any other accessories is not recommended because it may
result in serious injury.
Operation
Always wear eye protection when using this or any other grinder.
Maintenance
Grinding Wheel Care
Wheel Replacement
Page 9

Thank you for purchasing a quality TERRATEK product. All TERRATEK products have
been made of high demanding quality standards and are guaranteed for domestic use
against any manufacturing faults for a period of 24 months from the date of purchase.
Normal wear and tear, including accessory wear, is not covered under this warranty.
This warranty is void if the product has been overloaded or subject to neglect, improper
use or attempted repair other than by a qualified engineer. Heavy duty, daily professional
or hire usage is not covered under this warranty. Due to continuous product develop-
ment, we reserve the right to change the product specifications without prior notice.
If the product fails due to a defect in material or workmanship during the 24 month p-
eriod, please return it to your place of purchase.
Warranty
Page 10
Coarse
wheel
36 grit
Fine
wheel
60 grit
Eye shield
Wheel
guard
Eye shield
bracket
Tool rest
adjustment
screw
Switch
Tool rest
Know your product:
Page 11
Accessories list:
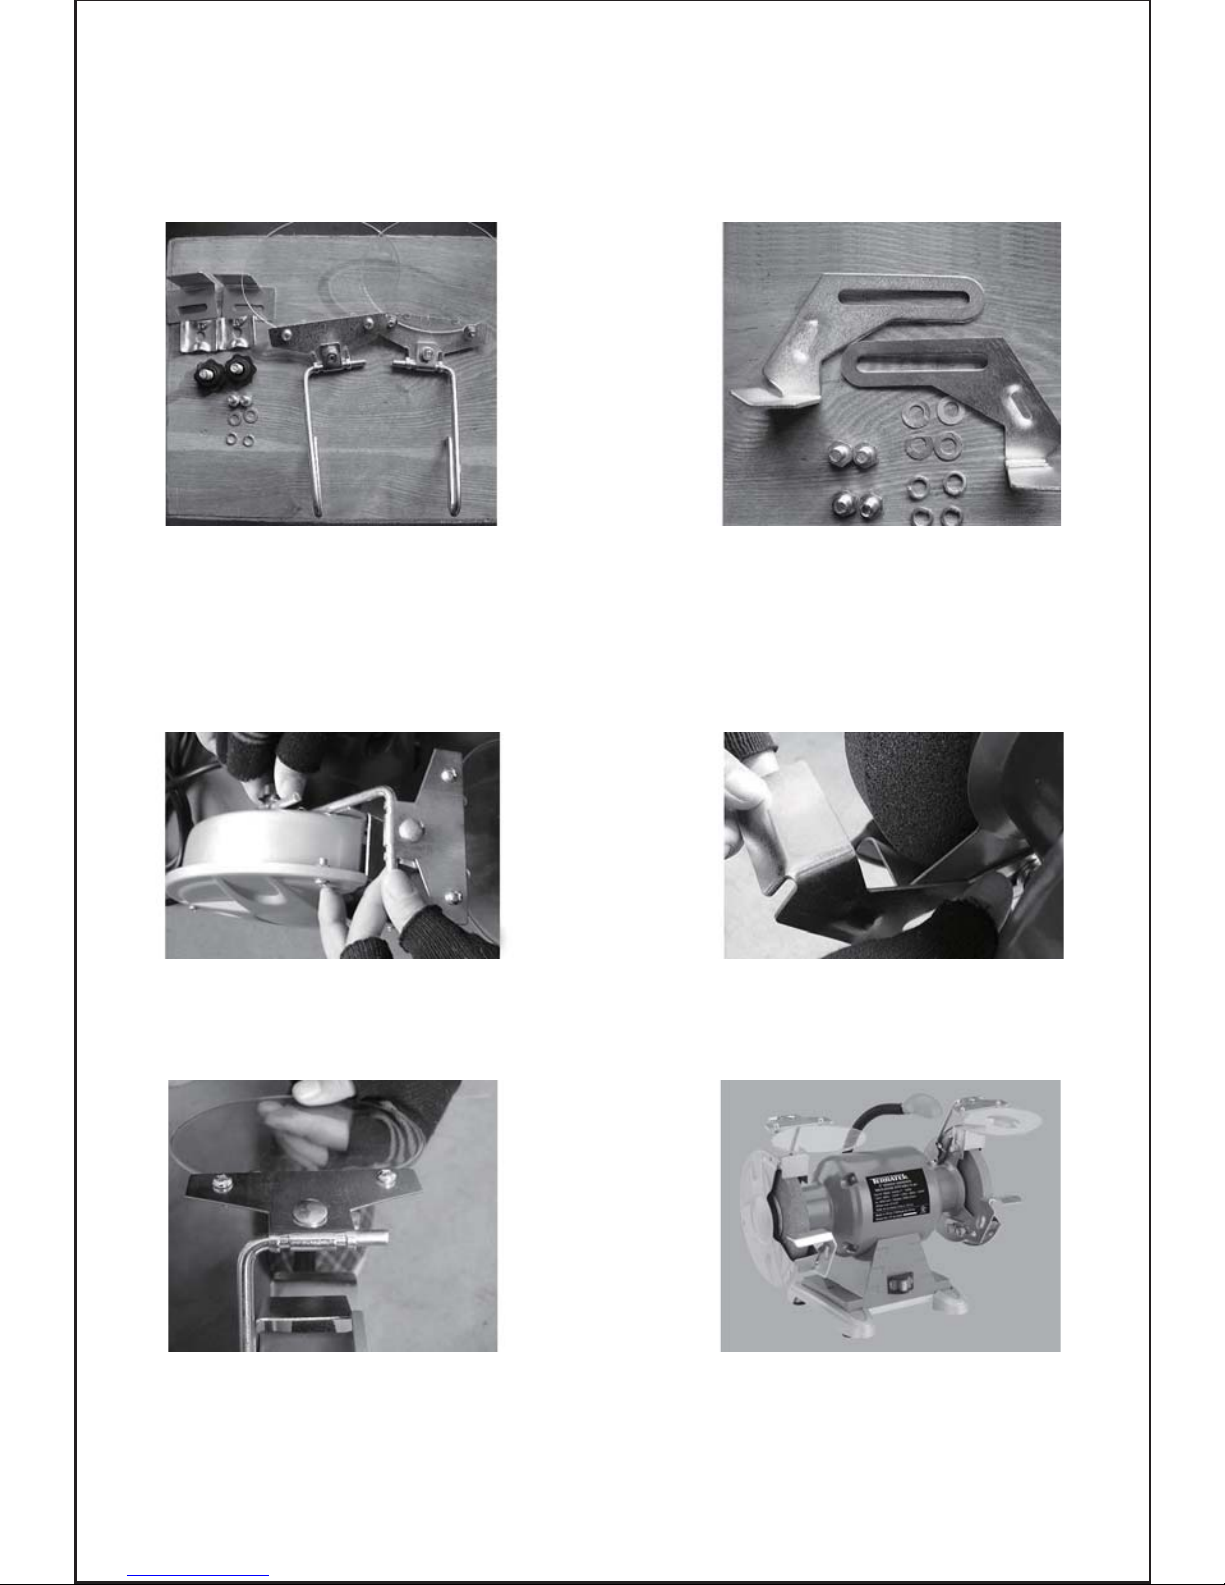
Ref 5. Remove the eye shield
protective sleeve
Ref 6. Always mount on a stable /
level surface
(mounting holes provided)
How to assemble the bench grinder:
Ref 3. Assemble the eye shield Ref 4. Set up the tool rest
Ref 2. Accessories for tool rest
1. Tool rest part
2. Screw, set-screw, flat washer,
star washer, knob
Ref 1. Accessories for eye sheild
1.Screw, set-screw, flat
washer, spring washer, nut
2.Eye shield
Page 12
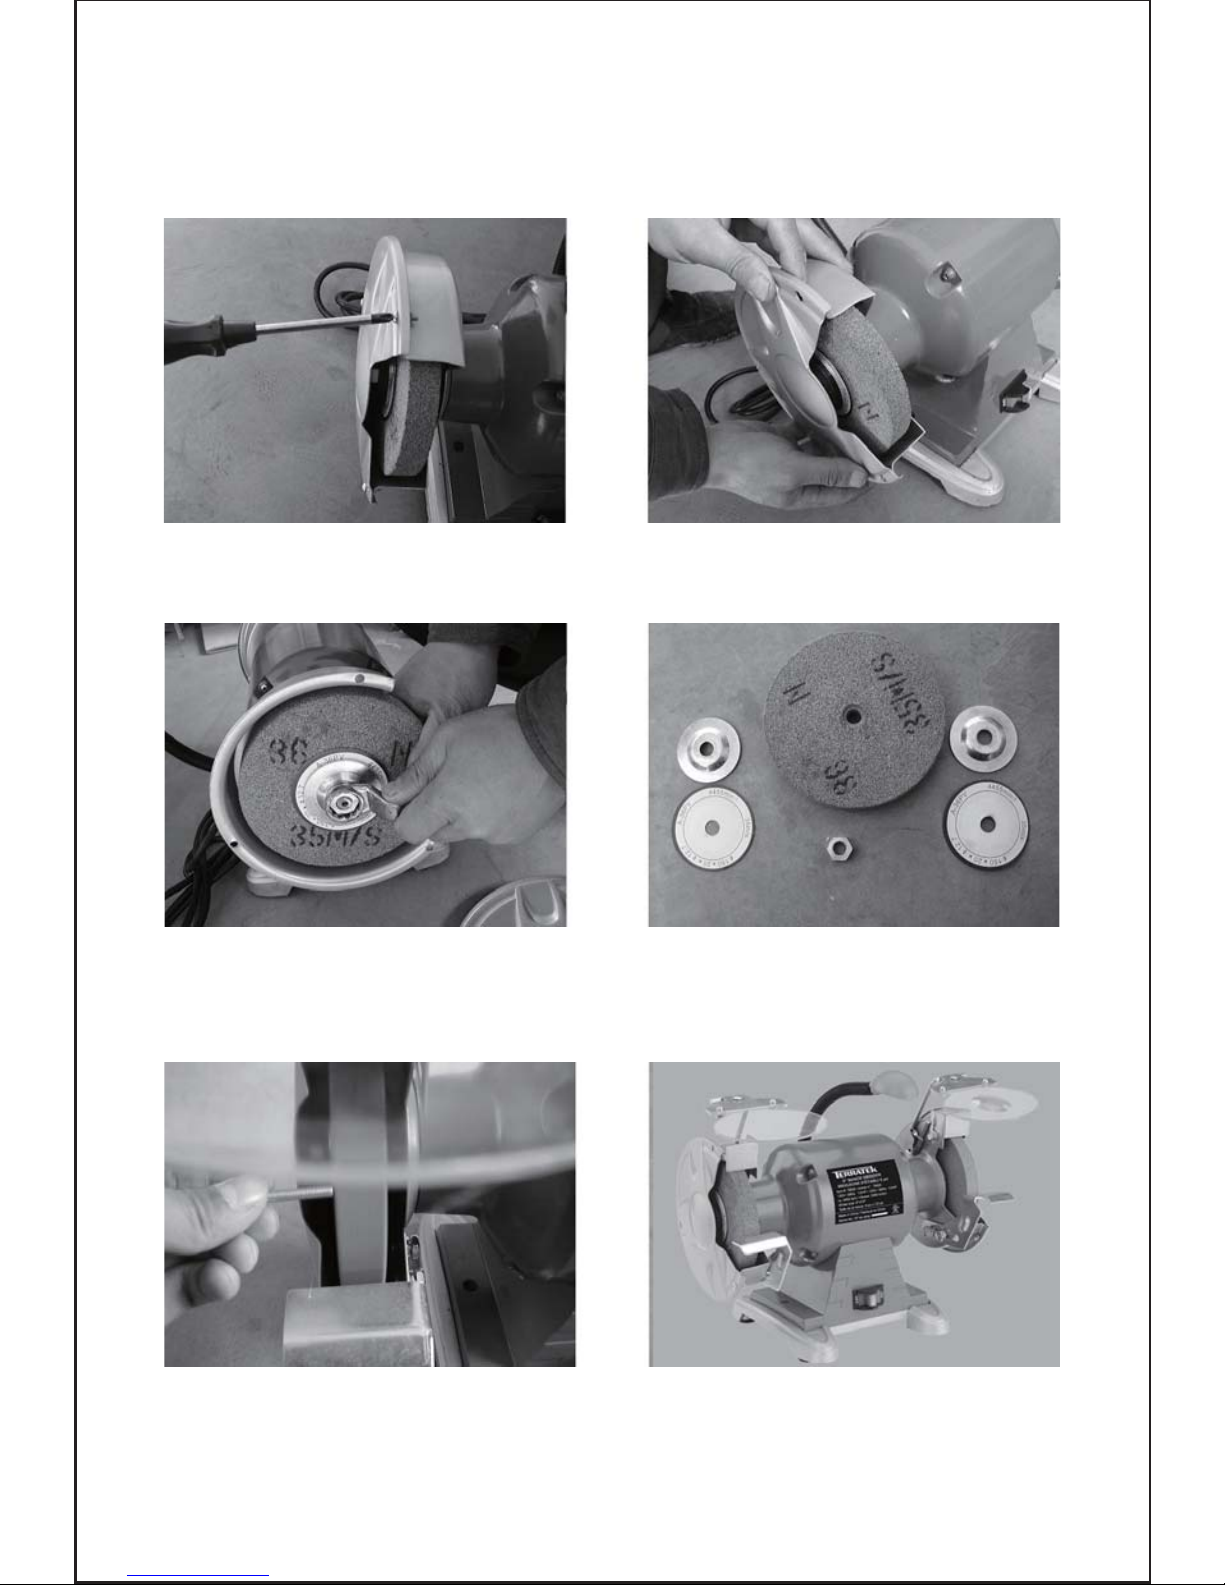
How to replace the grinding wheel
Ref 7. Take off the 3 screws on wheel guard Ref 8. Remove the wheel guard
Ref 9. Use spanner to take off the screw
nut for wheel
Ref 10. Wheel assembly parts
Ref 11.After changing a wheel make sure you
dress it to eliminate any wobble
To assemble, reverse order of disassembly

LISTED
E154499
Page 13
Manual del usuario – Por favor lea este manual y
guárdelo para referencia futura

1
2
3
4
5
6
7
8
9
10
11
12
13
14
15
16
17
18
19
20
21
22
23
24
25
26
27
28
29
30
31
32
33
34
35
36
37
38
1
1
2
1
1
1
1
1
1
1
1
1
1
1
1
1
1
2
1
2
2
1
1
1
1
1
1
1
1
1
1
1
1
4
4
4
1
1
Page 14
Lista de piezas
Protector ocular
Arandela
Arandela
Tuerca
Tuerca
Arandela
Arandela
Soporte de protector ocular
Tornillo de cuello cuadrado
Tornillo
Barra de montaje de protector ocular izquierdo
Pieza de fijación
Arandela
Tuerca
Tornillo
Guarda protectora exterior izquierda
Tuerca
Brida de muela
Muela abrasiva
Tornillo
Arandela
Guarda protectora interior izquierda
Guarda protectora contra chispas izquierda
Arandela
Arandela
Perno
Arandela
Perno
Arandela
Soporte de herramienta izquierdo
Tornillo
Arandela
Arandela
Cono extremo
Cojinete
Rotor
Estator
Alojamiento del motor
2
4
4
4
2
2
2
2
2
4
1
2
2
2
6
1
1
4
1
6
6
1
1
2
2
2
4
4
4
1
8
8
8
2
2
1
1
1
39
40
41
42
43
44
45
46
47
48
49
50
51
52
53
54
55
56
57
58
59
60
61
62
63
64
65
66
67
68
69
70
71
72
73
74
75
76
Barra de montaje de ojo derecho
Guarda protectora contra chispas derecha
Etiqueta
Guarda protectora interior derecha
Muela abrasiva
Tuerca
Guarda protectora exterior derecha
Soporte de herramienta derecho
Enchufe y cable
Lámpara
Arandela
Tuerca
Terminal de tierra
Arandela
Arandela
Tornillo
Abrazadera de capacitor
Perno
Grapa de cable
Tornillo
Arandela
Bloque de cables
Protector de cable
Base
Arandela
Arandela
Arandela
Tornillo
Capacitor
Transformador
Arandela
Tornillo
Placa de asiento
Patas de caucho
Arandela
Tornillo
Interruptor
Logo
Contenido
Lista de piezas Página 14
Especificaciones técnicas Página 16
Instrucciones de seguridad Página 17
Utilización de la producto Página 23
Mantenimiento Página 23
Garantía Página 24
Número
de la
pieza Nombre de la pieza Cantidad
Número
de la
pieza Nombre de la pieza Cantidad
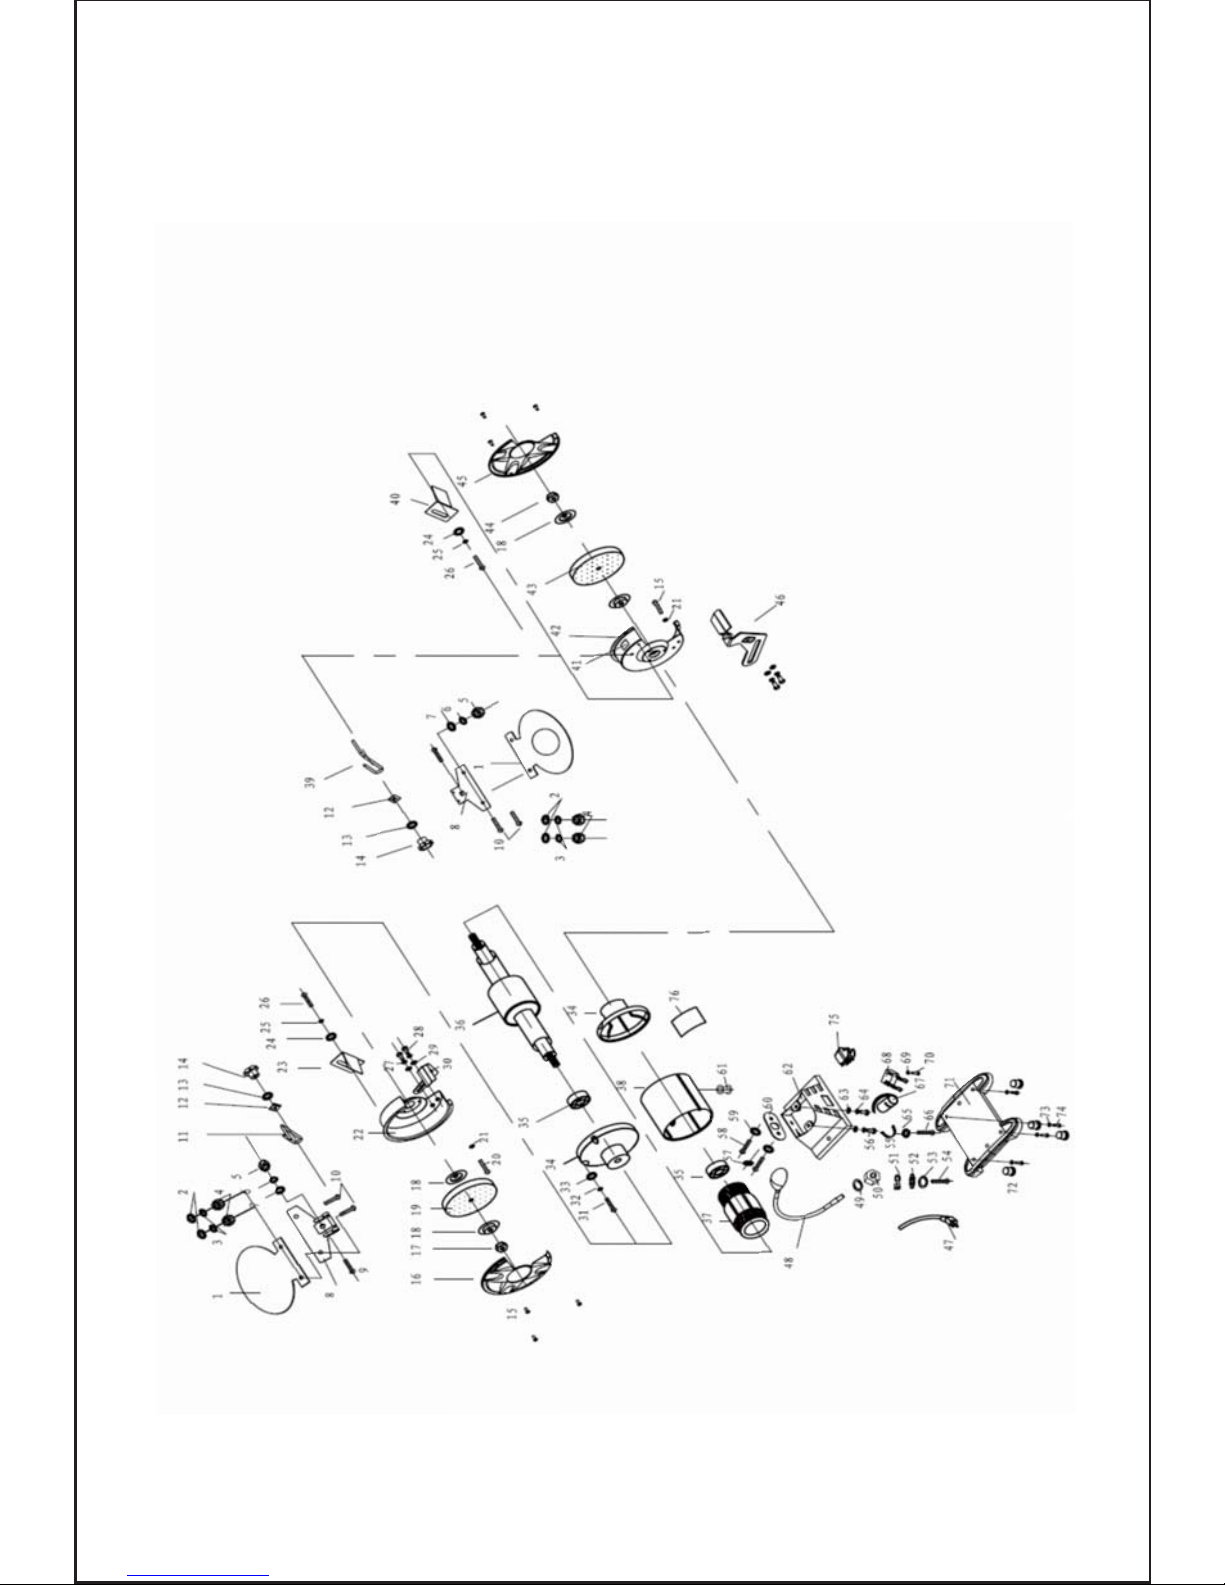
Dibujo despiezado del conjunto
Page 15

Información técnica
Copyright© 2008 perteneciente al ACL Group (Intl) Ltd. Quedan reservados todos los
derechos. Este manual o cualquier material artístico incluido en el mismo no deberá
ser reproducido en cualquier versión o forma sin el permiso escrito expreso del ACL
Group (Intl) Ltd. Los diagramas que aparecen en este manual no podrán ser dibujados
de manera proporcional. Debido a mejoras continuas, el producto especificado puede
diferir ligeramente del producto descrito en el presente.
Este manual debe leerse por ompleto
antes de utilizar este producto.
Si no se hace así pueden sufrirse lesiones graves.
Guardar este manual para referencia futura.
Page 16
Voltaje: 120V ~ 60Hz
Potencia: 1.5A 1/2HP
Velocidad: 3550 rpm
Amaño de muela: 6”X 1/2”
Luz de trabajo: LED
Peso: 23/26 lb

Información de SEGURIDAD importante
Este símbolo sirve para advertirle sobre los po-
sibles peligros de sufrir lesiones personales. Por favor
lea detenidamente las notas incluidas en este aviso para
evitar sufrir una posible lesión o muerte.
Reglas de seguridad generales
¡AVISO! Lea todas las instrucciones. Si no se observan todas las instru-
cciones enumeradas a continuación podrán sufrirse sacudidas eléctricas,
quemaduras o lesiones graves. El término “herramienta motorizada” in-
cluido en todos los avisos enumerados se refiere a herramientas motor-
izadas con cable o sin cable.
Seguridad en el área de trabajo
Leer y guardar este manual
Por favor lea detenidamente todas las instrucciones contenidas en este manual.
Si no se observan todas as advertencias de seguridad pueden sufrirse lesiones per-
sonales graves. El término “herramienta motorizada” en todas las advertencias
siguientes se refiere a su herramienta motorizada que funciona vía la red eléctrica
(con cable) o a la que funciona vía baterías (sin cable).
Page 17
Mantenga el área de trabajo limpia y bien iluminada. Áreas de trabajo desordenadas
o mal iluminadas causan accidentes.
No utilice las herramientas motorizadas en atmósferas explosivas, tales como las que
contienen líquidos, gases o polvos inflamables. Las herramientas motorizadas crean
chispas que pueden encender el polvo o los humos.
Mantenga alejados a menores y curiosos mientras utiliza la herramienta motorizada.
Las distracciones pueden hacerle perder el control.

Seguridad eléctrica
Antes de usar, asegure que la toma de energía que utiliza coincide con el enchufe incluido
en su herramienta motorizada y que el voltaje de la toma coincide con el de la herramienta
motorizada.
Use solamente cables de extensión conectados a tierra con herramientas motorizadas
provistas de enchufes de 3 clavijas y si las usa en el exterior asegure que el cable de
extensión sea adecuado para uso externo.
Trate siempre de evitar contacto corporal con las superficies conectadas a tierra, tales
como las de radiadores, hornillas de cocinar y cualquier otro aparato fijo con superficies
metálicas.
No exponga su herramienta motorizada a condiciones mojadas o húmedas y no la use
NUNCA bajo la lluvia.
Compruebe regularmente el cable eléctrico de su máquina y cualquier cable de extensión
que esté utilizando por si muestra daños.
No transporte o tire de la máquina usando su cable eléctrico.
Asegure que el cable esté alejado de superficies calientes, aceite u objetos afilados.
No use nunca la máquina mientras está bajo la influencia de alcohol, drogas o med-
icamentos.
El cansancio con frecuencia puede causar accidentes; permanezca alerta.
No use nunca la máquina sin las cubiertas protectoras correctas en su sitio.
Use siempre protección ocular y máscara antipolvo aprobadas por ANSI. Mientras se
utiliza la herramienta motorizada deberá llevarse en todo momento calzado y auricu-
lares protectores.
Asegure que cualquier dispositivo colector de polvo suministrado con la máquina esté
conectado correctamente antes de usarla.
Asegure que todas las ropas, pelo largo o joyas se mantengan alejadas de la máquina.
Antes de enchufar la máquina en la toma eléctrica asegure que la máquina esté en la
posición OFF (apagada) y que todas las cuchillas y accesorios utilizados estén colo-
cados con seguridad.
Compruebe que hayan sido retiradas todas las llaves de tuercas o de ajuste. Cualquier
llave de tuerca o de ajuste que haya sido dejada acoplada a una pieza móvil puede
causar lesiones.
Seguridad personal
Page 18

Utilización y cuidado de la herramienta motorizada
LISTA DE COMPROBACIÓN DE SEGURIDAD
Antes de comenzar
1. Compruebe que la toma eléctrica coincide con el enchufe de la herramienta motorizada.
2. Compruebe que el voltaje de la toma eléctrica coincida con el de su herramienta
motorizada.
3. Asegure que los cables eléctricos no estén dañados.
4. Compruebe que las cubiertas protectoras y las pinzas estén seguras y en buen
estado de funcionamiento.
5. Asegure que todas las llaves de tuercas y demás accesorios esté retirados.
6. Compruebe que las cuchillas y piezas de corte funcionan libremente.
7. Compruebe que el entorno de trabajo esté despejado.
8. Asegure que la herramienta motorizada esté sujeta con seguridad a su banco o
plataforma de trabajo.
9. Asegure que ninguna persona menor de 18 años maneje esta herramienta.
10. Asegure que todos los menores estén alejados del área de trabajo.
11. Asegure que trabaja con los materiales correctos recomendados para uso con esta
herramienta.
Durante la utilización
1. No extienda el cuerpo sobre la máquina.
2. No ponga la máquina en marcha sin las ropas de seguridad correctas.
3. No ponga la máquina en marcha con las ropas sueltas.
4. Mantenga manos y extremidades alejadas de las cuchillas de la sierra.
5. Asegure que todas las abrazaderas y cubiertas protectoras estén en su sitio.
6. No corte metal o mampostería con una máquina de cortar madera.
7. No use la máquina en condiciones mojadas o húmedas.
8. Use siempre soportes cuando trabaje con piezas de madera largas.
Mantenga su máquina limpia y en buen estado de servicio en todo momento.
No efectúe nunca el ajuste o servicio de cualquier herramienta motorizada antes de
desconectarla del suministro eléctrico.
Use siempre la herramienta correcta para la herramienta.
No fuerce nunca la herramienta a trabajar con fuerza superior a la diseñada.
No use nunca la máquina con piezas rotas tales como interruptores, defensas de guía
o soportes de patas.
Mantenga SIEMPRE la herramienta motorizada alejada de los menores.
Mantenga las herramientas cortantes afiladas para asegurar que el motor se esfuerza
menos.
Sustituya las cuchillas si tienen desperfectos o están desafiladas.
Haga que el servicio de la herramienta motorizada sea realizado por un agente de
reparaciones profesional que utilice piezas recomendadas por el fabricante
Page 19
Table of contents
Languages:
Other Terratek Grinder manuals


