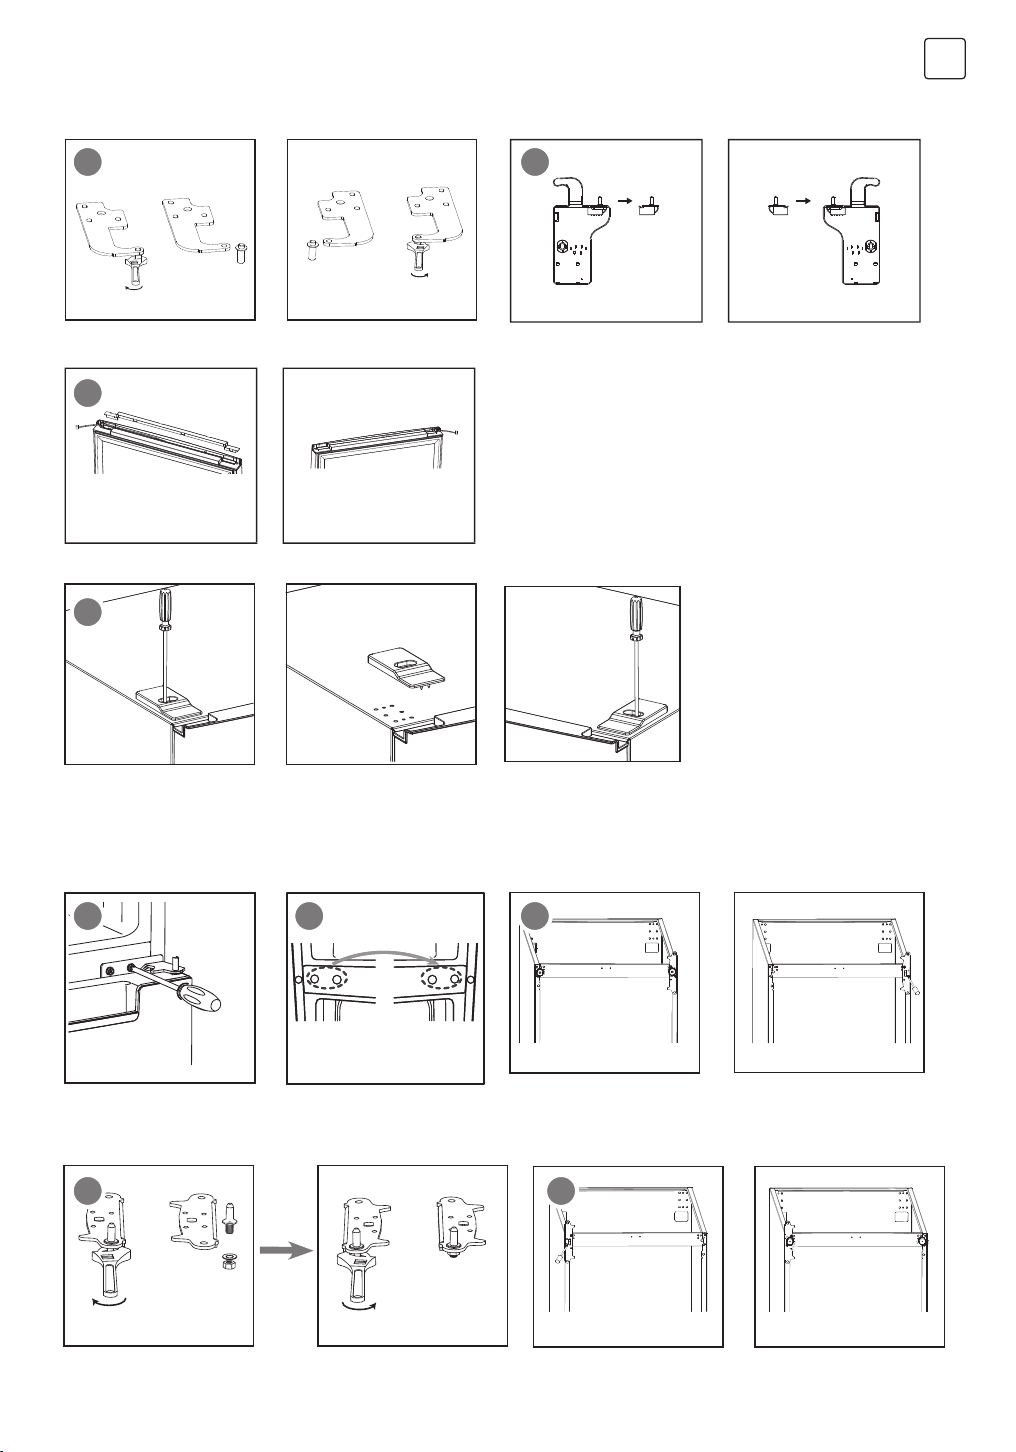
Tesla RC3400FHXE User manual

ENG BIH/
CG BG GR
Product images are for illustrative purposes only and may differ from the actual product.
COMBI FRIDGE
FREEZER
NO-FROST
RC3400FHXE
User Manual
RO SRB

2
ENG
SAFETY INFORMATION
In the interest of your safety and to ensure the correct use, before installing
and first using the appliance, read this user manual carefully, including
its hints and warnings. To avoid unnecessary mistakes and accidents, it is
important to ensure that all people using the appliance are thoroughly
familiar with its operation and safety features. Save these instructions and
make sure that they remain with the appliance if it is moved or sold, so that
everyone using it through its life will be properly informed on appliance use
and safety.
For the safety of life and property keep to the precautions of these user
instructions as the manufacturer is not responsible for damages caused by
omission.
Children and vulnerable people safety
• This appliance can be used by children aged of 8 years and above and
persons with reduced physical, sensory or mental capabilities, or lack
of experience and knowledge if they have supervision or have been
given instructions concerning the use of the appliance in a safe way and
understand the hazards involved.
• Children aged from 3 to 8 years are allowed to load and unload this
appliance.
• Children should be supervised to ensure that they do not play with the
appliance.
• Cleaning and user maintenance should not be done by children unless
they are aged from 8 years and above and supervised.
• Keep all packaging well away from children. There is risk of suffocation.
• If you are discarding the appliance pull the plug out of the socket, cut the
connection cable (as close to the appliance as you can) and remove the
door to prevent playing children from suffering electric shock or closing
themselves in.
• If this appliance features a magnetic door seal to replace an older
appliance having a spring lock (latch) on the door or lid, be sure to make
that spring lack unusable before you discard the old appliance. This will
prevent it from becoming a death trap for a child.
General safety
WARNING! Keep ventilation openings, in the appliance enclosure or in
the built-in structure, clear of obstruction.
WARNING! Do not use mechanical devices or other means to accelerate
the defrosting process, other than those recommended by the manufacturer.

3
ENG
WARNING! Do not damage the refrigerant circuit.
WARNING! Do not use other electrical appliances (such as ice cream
makers) inside of refrigerating appliances, unless they are approved for this
purpose by the manufacture.
WARNING! Do not touch the light bulb if it has been on for a long period
of time because it could be very hot.1
WARNING! When positioning the appliance, ensure the supply cord is
not trapped or damaged.
WARNING! Do not locate multiple portable socket-outlets or portable
power suppliers at the rear of the appliance.
• Do not store explosive substances such as aerosol cans with a flammable
propellant in this appliance.
• The refrigerant isobutene (R600a) is contained within the refrigerant
circuit of the appliance, a natural gas with a high level of environmental
compatibility, which is nevertheless flammable.
• During transportation and installation of the appliance, be certain that none
of the components of the refrigerant circuit become damaged.
- avoid open flames and sources of ignition
- thoroughly ventilate the room in which the appliance is situated
• It is dangerous to alter the specifications or modify this product in any way.
Any damage to the cord may cause a short circuit, fire and/or electric shock.
• This appliance is intended to be used in a household and similar
applications such as
- staff kitchen areas in shops, offices and other working environments;
- farm houses and by clients in hotels, motels and other residential type
environments;
- bed and breakfast type environments;
- catering and similar non-retail applications.
WARNING! Any electrical components (plug, power cord, compressor
and etc.) must be replaced by a certified service agent or qualified service
personnel.
WARNING! The light bulb supplied with this appliance is a “special use
light bulb” usable only with the appliance supplied. This “special use lamp” is
not usable for domestic lighting.1
• Power cord must not be lengthened.
• Make sure that the power plug is not squashed or damaged by the back
of the appliance. A squashed or damaged power plug may overheat and
cause a fire.
1If there is a light in the compartment.

4
ENG
• Make sure that you can come to the main plug of the appliance.
• Do not pull the main cable.
• If the power plug socket is loose, do not insert the power plug. There is a
risk of electric shock or fire.
• You must not operate the appliance without the lamp.
• This appliance is heavy. Care should be taken when moving it.
• Do not remove nor touch items from the freezer compartment if your hands
are damp/wet, as this could cause skin abrasions or frost/freezer burns.
• Avoid prolonged exposure of the appliance to direct sunlight.
Daily use
• Do not put hot things on the plastic parts in the appliance.
• Do not place food products directly against the rear wall.
• Frozen food must not be re-frozen once it has been thawed out. 2
• Store pre-packed frozen food in accordance with the frozen food
manufacture, s instructions. 2
• Appliance, s manufactures storage recommendations should be strictly
adhered to. Refer to relevant instructions.
• Do not place carbonated of fizzy drinks in the freezer compartment as it
creates pressure on the container, which may cause it to explode, resulting
in damage to the appliance.2
• Ice lollies can cause frost burns if consumed straight from the appliance.2
To avoid contamination of food, please respect the following
instructions
• Opening the door for long periods can cause a significant increase of the
temperature in the compartments of the appliance.
• Clean regularly surfaces that can come in contact with food and accessible
drainage systems.
• Clean water tanks if they have not been used for 48h; flush the water
system connected to a water supply if water has not been drawn for 5 days.
• Store raw meat and fish in suitable containers in the refrigerator, so that it is
not in contact with or drip onto other food.
• Two-star frozen-food compartments (if they are presented in the appliance)
are suitable for storing pre-frozen food, storing or making ice-cream and
making ice cubes.
• One-, two- and three -star compartments (if they are presented in the
appliance) are not suitable for the freezing of fresh food.
2If there is a freezer compartment.

5
ENG
• If the appliance is left empty for long periods, switch off, defrost, clean,
dry and leave the door open to prevent mount developing within the
appliance.
Care and cleaning
• Before maintenance, switch off the appliance and disconnect the main plug
from the power socket.
• Do not clean the appliance with metal objects.
• Do not use sharp objects to remove frost from the appliance. Use a plastic
scraper. 2
• Regularly examine the drain in the refrigerator for defrosted water. If
necessary, clean the drain. If the drain is blocked, water will collect at the
bottom of the appliance. 3
Installation
• IMPORTANT! For electrical connection carefully follow the instructions
given in specific paragraphs.
• Unpack the appliance and check if there are damages on it. Do not connect
the appliance if it is damaged. Report possible damages immediately to
the place you bought it. In that case retain packing.
• It is advisable to wait at least four hours before connecting the appliance to
allow the oil to flow back in the compressor.
• Adequate air circulation should be provided around the appliance, lacking
this leads to overheating. To achieve sufficient ventilation, follow the
instructions relevant to installation.
• Wherever possible the spacers of the product should be against a wall
to avoid touching or catching warm parts (compressor, con- denser) to
prevent possible burn.
• The appliance must not be located close to radiators or cookers.
• Make sure that the main plug is accessible after the installation of the
appliance.
Service
• Any electrical work required to do the servicing of the appliance should be
carried out by a qualified electrician or competent person.
• This product must be serviced by an authorized Service Center, and only
genuine spare parts must be used.
2If there is a freezer compartment.
3If there is a fresh-food storage compartment.

6
ENG
Energy saving
• Do not put hot food in the appliance;
• Do not pack food close together as this prevents air circulating;
• Make sure food does not touch the back of the compartment(s);
• If electricity goes off, do not open the door(s);
• Do not open the door(s) frequently;
• Do not keep the door(s) open for a long time;
• Do not set the thermostat on exceeding cold temperatures;
• All accessories, such as drawers, shelves balconies, should be kept there for
lower energy consumption.
Environment Protection
This appliance does not contain gasses which could damage the ozone
layer, in either its refrigerant circuit or insulation materials. The appliance shall
not be discarded together with the urban refuse and rubbish. The insulation
foam contains flammable gases: the appliance shall be disposed according
to the appliance regulations which can be obtained from your local
authorities. Avoid damaging the cooling unit, especially the heat exchanger.
The materials used on this appliance marked by the symbol are recyclable.
The symbol on the product or on its packaging indicates that this
product may not be treated as household waste. Instead it should be
taken to the appropriate collection point for the recycling of electrical
and electronic equipment. By ensuring this product is disposed of correctly,
you will help prevent potential negative consequences to the environment
and human health, which could otherwise be caused by inappropriate waste
handling of this product. For more detailed information about recycling of
this product, please contact your local council, your household waste
disposal service or the shop where you purchased the product.
Packaging materials
The materials with the symbol are recyclable.
Dispose the packaging in a suitable collection container to recycle it.
Disposal of the appliance
1. Disconnect the mains plug from the mains socket.
2. Cut off the mains cable and discard it.

7
ENG
OVERVIEW
Note: Picture is for
reference only. Real
appliance probably is
different.
Fridge Balconies
Fridge Shelves
Freezer Drawers
Crisper Cover
Crisper
Fresh convertible box
Leveling Feet
WARNING!
During using, service and disposal the appliance, please pay
attention to symbol similar as left side, which is located on rear of
appliance (rear panel or compressor) and with yellow or orange
color.
It’s risk of fire warning symbol. There are flammable materials in
refrigerant pipes and compressor.
Please be far away fire source during using, service and disposal.

8
ENG
Door Reversibility
INSTALLATION
Before reversing the door, please be prepared below tools and material: straight screwdriver, cross screwdriver, spanner and the components
included in the poly bag:
1. Unscrew top hinge cover and disconnect connectors of door
switch and harness.
2. Unscrew top hinge
Space Requirement
• Select a location without direct exposure to sunlight;
• Select a location with enough space for the refrigerator doors to
open easily;
• Select a location with level (or nearly level) flooring;
• Allow sufficient space to install the refrigerator on a flat surface;
• Allow clearance to the right, left, back and top when installing. This
will help reduce power consumption and keep your energy bills
lower.
• Keep at lest 50mm gap at two sides and back.
Positioning
Install this appliance at a location where the ambient temperature
corresponds to the climate class indicated on the rating plate of the
appliance:
For refrigerating appliances with climate class:
• extended temperate: this refrigerating appliance is intended to be
used at ambient temperatures ranging from 10 °C to 32 °C (SN);
• temperate: this refrigerating appliance is intended to be used at
ambient temperatures ranging from 16 °C to 32 °C (N);
• subtropical: this refrigerating appliance is intended to be used at
ambient temperatures ranging from 16 °C to 38 °C (ST);
• tropical: this refrigerating appliance is intended to be used at
ambient temperatures ranging from 16 °C to 43 °C (T);
Location
The appliance should be installed well away from sources of heat
such as radiators, boilers, direct sunlight etc. Ensure that air can
circulate freely around the back of the cabinet. To ensure best
performance, if the appliance is positioned below an overhanging
wall unit, the minimum distance between the top of the cabi- net and
the wall unit must be at least 50 mm. Ideally, however, the appliance
should not be positioned below overhanging wall units. Accurate
leveling is ensured by one or more adjustable feet at the base of the
cabinet.
This refrigerating appliance is not intended to be used as a built-in
appliance.
WARNING!
It must be possible to disconnect the appliance from the mains
power supply; the plug must therefore be easily accessible after
installation.
Electrical connection
Before plugging in, ensure that the voltage and frequency shown
on the rating plate correspond to your domestic power supply.
The appliance must be earthed. The power supply cable plug is
provided with a contact for this purpose. If the domestic power
supply socket is not earthed, connect the appliance to a separate
earth in compliance with current regulations, consulting a qualified
electrician.
The manufacturer declines all responsibility if the above safety
precautions are not observed. This appliance complies with the
E.E.C. Directives.
Left Door Hinge Cover x 1 Left Aid-Closer on Upper Door x 1 Left Aid-Closer on Lower Door x 1
1 2

9
ENG
3. Remove the pin with a screwdriver and filp the hinge bracket.Then
refit the pin to hinge bracket
4. Move door switch from right hinge cover to left hinge cover in
accessary bag.
5. Detach cover in top of upper
door and move harness from
right side to left side, then
replace the cover.
6. Move top left cover to right
side
7. Take off the upper door, take
out the screw from the middle
hinge by cross screwdriver, then
take off the lower door.
8.. Move the hinge hole covers
from left side to right side.
9. Unscrew bottom hinge. Then remove the adjustable feet from
both side.
10. Unscrew and remove the bottom hinge pin, turn the bracket over
and replace it.
11. Refit the bracket fitting the bottom hinge pin. Replace both
adjustable feet.
unscrew screw
3 4
5
6
7 8 9
unscrew screw
10 11

10
ENG
12. Remove aid-closers from bottom of upper and lower doors, then take
new aid-closers from accessary bag and install them to left side.
13. Detach the Fridge and the Freezer door gaskets and
then attach them after rotating.
14. Install the lower
door, adjust and fix
the middle hinge
onto the cabinet.
15. Replace upper door, please
ensure the door align with
the cabinet to make sure
door gasket seal the cabinet
tightly. Then connect door
with cabinet by tightly fixed
top hinge.
16. Connect harnesses from door and
cabinet. Then replace top hinge
cover. Before screw the cover,
connect terminals of door switch.
Install door external handle (if external handle is present)
12 13
14 15
16

11
ENG
USER INTERFACE
Using the Control Panel 1.1 Key Operation (A & B & C)
Temperature control of fridge compartment
This key is available in user defined mode and SUPER
mode, not available in ECO mode and VACATION mode.
Short touching this key to select fridge temperature.
Temperature control of freezer compartment
This key is available in user defined mode and VACATION
mode, not available in SUPER mode and ECO mode.
Short touching this key to select freezer temperature.
Running mode select / Locking / Unlocking
Keep touching this key for 3s to lock or unlock the control
panel.
In “Unlocking”status, short touching this key to select
running mode (ECO mode / VACATION mode / SUPER
mode / user definded mode).
1.2 Display (1&2)
1. Setting temperature display of fridge compartment
This area will display setting temperature of fridge
compartment.
If E0,E1,E2,E3,E5 displays in this area, please call service
2. Setting temperature display of freezer compartment
This area will display setting temperature of freezer
compartment
• Keep enough space of door open.
• Keep at least 50mm gap at two sides.
To do this adjust the two levelling feet at front of the unit.
If the unit is not level, the doors and magnetic seal alignments will not be covered properly.
Space Requirement
Leveling the unit
A600
B685
C1950
Dmin=50
Emin=50
Fmin=50
G1200
H1285
I135�
Doors
Lenghten Shorten

12
ENG
1.3 Indicators (3 & 4 & 5 & 6)
3. ECO mode indicator
This light is on when ECO mode is selected.
4. VACATION mode indicator
This light is on when VACATION mode is selected.
5. SUPER mode indicator
This light is on when SUPER mode is selected.
6. Locking / Unlocking indicator
This light is on when control panel is locked.
2.1 Operation and display
• Control panel will be 100% lit up for 3s, which operates exactly
as per the setting before the power off. After that,operations are
available.
• Before your operation, make sure the conrol panel is in unlocking
status.
• In locking status, locking indicator will flash for 3s when you short
touching any operation key, but operations are not available.
• Control panel will be locked 25s after the last operation.
• Control panel will 100% light off 2 minutes after the last operation.
• Control panel will be lit up once the door of fridge compartment
is opened.
• Control panel will be lit up once short touching operation keys.
• There will be a prompt beep for any key operation.
2.2 Temperature setting of fridge compartment
• In user defined mode or SUPER mode, short touch key
consecutively, setting temperature of firdge compartment will
display in a circle from 2�C to 8�C.
• Setting temperature will be confirmed after 5s of flashing of the
indicator.
2.3 Temperature setting of freezer compartment\
• In user defined mode, short touching consecutively,
setting temperature of freezer compartment will display in a circle
from -14�C to -22�C.
• Setting temperature will be confirmed after 5s of flashing of the
indicator.
2.4 Temperature setting recommendation
Environment Temperature Fridge Compartment Freezer Compartment
Summer
Normal
Winter
2.5 Temperature control of fresh zone
• Temperature of the fresh can be adjusted according to the type
of storage food.
• Push the knob upward from the bottom, temperature in the fresh
zone will be gradually decreased.
• When the knob is placed at the “CRISPER” position, the fresh zone
can be functioned as a crisper zone and maintain the appropriate
temperature and humidity for fruits and vegetable.
• When the knob is placed at the “ FRESH” position, it is suitable for
short-term storage of fish or other fresh food.The food will keep
fresh but not frozen which makes it the best choice for storing
fresh food.
• Tips: When you choose “ FRESH” function, it is recommended to
set the refrigerator temperature below 4°C . and preserved lead-
time no more than 3 days , in order to keep the best freshness.
2.6 ECO mode
Activate ECO mode:
• Short touching key consecutively, when (ECO mode
indicator) is lit up, ECO mode is selected.
• After 5s of flashing of ECO mode indicator,ECO mode will be
activated.
• When ECO mode is activated, fridge / freezer temperature will be
set automatically to 5°C / -18°C.
• In ECO mode, if you set fridge or freezer temperature by
manual, ECO mode indicator will flash for 3s, fridge and freezer
temperature setting operations are not workable.
Quit from ECO mode:
• Short touch key, when ECO mode indicator is light off, the
appliance quits from ECO mode.
2.7 VACATION mode
Activate VACATION mode:
• Short touching key consecutively, when (VACATION
mode indicator) is lit up, VACATION mode is selected.
• After 5s of flashing of VACATION mode indicator, VACATION
mode will be activated.
• When VACATION mode is activated, fridge temperature will
be set automatically to 17°C, setting temperature of freezer
compartment is available.
• In VACATION mode, if you set fridge temperature by manual,
VACATION mode indicator will flash for 3s, fridge temperature
setting operation is not workable.
Quit from VACATION mode:
• Short touch key, when VACATION mode indicator is light
off, the appliance quits from mode.

13
ENG
DAILY USE
First Use
Cleaning the interior
Before using the appliance for the first time, wash the interior and all internal accessories with lukewarm water and some neutral soap so as to
remove the typical smell of a brand new product, then dry thoroughly.
IMPORTANT! Do not use detergents or abrasive powders, as these will damage the finish.
2.8 SUPER mode
It is advisable to set SUPER mode 24 hours ahead, if lots of foods
need to be frozen in one time.
Activate SUPER mode:
• Short touching key consecutively, when (SUPER
mode indicator) is lit up, SUPER mode is selected.
• After 5s of flashing of SUPER mode indicator, SUPER mode will be
activated.
• When SUPER mode is activated, freezer temperature will be set
automatically to -25°C, setting temperature of fridge compartment
is available.
• In SUPER mode, if you set freezer temperature by manual, SUPER
mode indicator will flash for 3s, freezer temperature setting
operation is not workable.
Quit from SUPER mode:
• Short touch key, when SUPER mode indicator is light off,
the appliance quits from SUPER mode.
WARNING!
In SUPER mode, the appliance will keep running under heavy load,
noise level will be slightly higher than normal condition.
2.9 User defined mode
• Short touch key until ECO mode indicator / VACATION
mode indicator / SUPER mode indicator are all light off, user
defined mode is activated.
• In user defined mode, users can set fridge temperature and
freezer temperature by manual.
2.10 Door opening alarm function
If fridge door keeps open for 60s, door opening alarm will arise.
Daily use
Position different food in different compartments according to be below table
Refrigerator compartments Type of food
Door or balconies of fridge compartment • Foods with natural preservatives, such as jams, juices, drinks, condiments.
• Do not store perishable foods.
Crisper drawer (salad drawer) • Fruits, herbs and vegetables should be placed separately in the crisper bin.
• Do not store bananas, onions, potatoes, garlic in the refrigerator.
Fridge shelf – middle • Dairy products, eggs
Fridge shelf – top • Foods that do not need cooking, such as ready-to-eat foods, deli meats, leftovers.
Freezer drawer(s)/shelf
• Foods for long-term storage.
• Bottom drawer/shelf for raw meat, poultry, fish.
• Middle drawer/shelf for frozen vegetables, chips
• Top drawer/shelf for ice cream, frozen fruit, frozen baked goods.
Freezing fresh food
• The freezer compartment is suitable for freezing fresh food and
storing frozen and deep-frozen food for a long time.
• Place the fresh food to be frozen in the bottom compartment.
• The maximum amount of food that can be frozen in 24 hours is
specified on the rating plate.
• The freezing process lasts 24 hours: during this period do not add
other food to be frozen.
Storing frozen food
When first starting-up or after a period out of use. Before putting the
product in the compartment let the appliance run at least 2 hours on
the higher settings.
Important! In the event of accidental defrosting, for example the
power has been off for longer than the value shown in the technical
characteristics chart under “rising time”, the defrosted food must be
consumed quickly or cooked immediately and then re-frozen (after
cooked).
Thawing
Deep-frozen or frozen food, prior to be used, can be thawed in the
freezer compartment or at room temperature, depending on the
time available for this operation.
Small pieces may even be cooked still frozen, directly from the
freezer. In this case, cooking will take longer.

14
ENG
Accessories
Movable shelves
The walls of the refrigerator are equipped
with a series of runners so that the
shelves can be positioned as desired.
Positioning the door
balconies
To permit storage of food packages of
various sizes, the door balconies can
be placed at different heights. To make
these adjustments proceed as follows:
gradually pull the balcony in the direction
of the arrows until it comes free, then
reposition as required.
Disassemble the bottom drawer
1. Pull out the bottom drawer to stopper
position.
2. Lift up the front of drawer.
3. Pull out the bottom drawer.
Helpful hints and tips
Hints for freezing
To help you make the most of the freezing process, here are some
important hints:
• the maximum quantity of food which can be frozen in 24 hrs. is
shown on the rating plate;
• the freezing process takes 24 hours. No further food to be frozen
should be added during this period;
• only freeze top quality, fresh and thoroughly cleaned, foodstuffs;
• prepare food in small portions to enable it to be rapidly and
completely frozen and to make it possible subsequently to thaw
only the quantity required;
• wrap up the food in aluminium foil or polythene and make sure
that the packages are airtight;
• do not allow fresh, unfrozen food to touch food which is already
frozen, thus avoiding a rise in temperature of the latter;
• lean foods store better and longer than fatty ones; salt reduces the
storage life of food;
• water ices, if consumed immediately after removal from the freezer
compartment, can possibly cause the skin to be freeze burnt;
• it is advisable to show the freezing in date on each individual pack
to enable you removal from the freezer compartment, can possibly
cause the skin to be freeze burnt;
• it is advisable to show the freezing in date on each individual pack
to enable you to keep tab of the storage time.
Hints for storage of frozen food
To obtain the best performance from this appliance, you should:
make sure that the commercially frozen foodstuffs were adequately
stored by the retailer;
be sure that frozen foodstuffs are transferred from the food store to
the freezer in the shortest possible time;
not open the door frequently or leave it open longer than absolutely
necessary. Once defrosted, food deteriorates rapidly and cannot be
refrozen.
Do not exceed the storage period indicated by the food manufacture.
Hints for fresh food refrigeration
To obtain the best performance:
• Do not store warm food or evaporating liquids in the refrigerator
• Do cover or wrap the food, particularly if it has a strong flavour
Hints for refrigeration
• Make (all types): wrap in polythene bags and place on the glass
shelves above the vegetable drawer.
• For safety, store in this way only one or two days at the most.
• Cooked foods, cold dishes, etc...: these should be covered and
may be placed on any shelf.
• Fruit and vegetables: these should be thoroughly cleaned and
placed in the special drawer(s) provided.
• butter and cheese: these should be placed in special airtight
containers or wrapped in aluminum foil or polythene bags to
exclude as much air as possible.
• Milk bottle: these should have a cap and should be stored in the
balconies on the door.
• Bananas, potatoes, onions and garlic, if not packed, must not be
kept in the fridge.
Cleaning
For hygienic reasons the appliance interior, including interior
accessories, should be cleaned regularly.
CAUTION!
The appliance may not be connected to the mains during cleaning.
Danger of electrical shock! Before cleaning switch the appliance
off and remove the plug from the mains, or switch off or turn out
the circuit breaker or fuse. Never clean the appliance with a steam
cleaner. Moisture could accumulate in electrical components, danger
of electrical shock! Hot vapors can lead to the damage of plastic
parts. The appliance must be dry before it is placed back into service.
IMPORTANT! Ethereal oils and organic solvents can attack
plastic parts, e.g. lemon juice or the juice form orange peel, butyric
acid, cleanser that contain acetic acid.
• Do not allow such substances to come into contact the appliance
parts.
• Do not use any abrasive cleaners
• Remove the food from the freezer. Store them in a cool place, well
covered.
• Switch the appliance off and remove the plug from the mains, or
switch off or turn out the circuit breaker of fuse.
• Clean the appliance and the interior accessories with a cloth and
lukewarm water. After cleaning wipe with fresh water and rub dry.
• After everything is dry place appliance back into service.

15
ENG
CAUTION!
Before troubleshooting, disconnect the power supply. Only a qualified electrician of competent person must do the troubleshooting that is not
in this manual.
IMPORTANT! There are some sounds during normal use (compressor, refrigerant circulation).
If the malfunction shows again, contact the Service Center.
These data are necessary to help you quickly and correctly. Write the necessary data here, refer to the rating plate.
TROUBLESHOOTING
Problem Possible cause Solution
Appliance does not
work
Temperature regulation knob is set at coldest Set the knob at other switch on the appliance.
Power plug is not plugged in or is loose Insert power plug.
Fuse has blown or is defective Check fuse, replace if necessary.
Socket is defective Socket malfunctions are to be corrected by an electrician.
Appliance freezes or
cools too much
Temperature is set too cold or the appliance runs
at coldest.
Turn the temperature regulator to a warmer setting
temporarily.
The food is not frozen
enough.
Temperature is not properly adjusted. Please look in the initial Temperature
Setting section.
Door was open for an extended period. Open the door only as long as necessary.
A large quantity of warm food was placed in the
appliance within the last 24 hours.
Turn the temperature regulation to a colder setting
temporarily.
The appliance is near a heat source. Please look in the installation location section.
Heavy buildup of frost
on the door seal. Door seal is not air tight.
Carefully warm the leaking sections of the door seal with a
hair dryer (on a cool setting). At the same time shape, the
warmed door seal by hand so that it sits correctly.
Unusual noises
Appliance is not level. Re-adjust the feet.
The appliance is touching the wall or other
objects. Move the appliance slightly.
A component, e.g. a pipe, on the rear of the
appliance is touching another part of the
appliance or the wall.
If necessary, carefully bend the component out of the way.
Water on the floor Water drain hole is blocked. See the Cleaning section.
Side panel is hot It’s normal. Heat exchange parts are in the sides. Take gloves to touch sides if needed.
Replace the lamp
The internal light is a LED light. To replace the lamp, please contact qualified technician.

16
ENG
Product Information Sheet
COMMISSION DELEGATED REGULATION (EU) 2019/2016 with regard to energy labelling of refrigerating
appliances
Supplier's name or trade mark: Tesla
Supplier's address: Tesla Electronics, Litijska 47, 1000 Ljubljana, SI
Model identifier: RC3400FHXE
Type of refrigerating appliance:
Low-noise appliance: No Design type: freestanding
Wine storage appliance: No Other refrigerating appli-
ance: Yes
General product parameters:
Parameter Value Parameter Value
Height 1 950
Width 600
Overal dimensions
(millimetre) Depth 685
Total volume (dm³ or l) 347
EEI 100 Energy efficiency class E
Airborne acoustical noise emis-
sions (dB(A) re 1 pW) 40 Airborne acoustical noise
emission class C
Annual energy consumption
(kWh/a) 254 Climate class:
extended temperate,
temperate, subtropi-
cal
Minimum ambient tempera-
ture (ºC), for which the refrig-
erating appliance is suitable
10
Maximum ambient tem-
perature (ºC), for which
the refrigerating appliance
is suitable
38
Winter setting No
Compartment Parameters:
Compartment parameters and values
Compartment type Compartment Vol-
ume (dm³ or l)
Recom-
mended
tempera-
ture setting
for opti-
mised food
storage (ºC)
These set-
tings shall
not con-
tradict the
storage
conditions
set out in
Annex IV,
Table 3
Freezing
capacity
(kg/24h)
Defrosting type
(auto-defrost=A,
manual defrost=M)
Page 1 / 2

17
ENG
Pantry No - - - -
Wine storage No - - - -
Cellar No - - - -
Fresh food Yes 243,0 - - A
Chill No - - - -
0-star or ice-making No - - - -
1-star No - - - -
2-star No - - - -
3-star No - - - -
4-star Yes 104,0 -18 6,0 A
2-star section No - - - -
Variable temperature
compartment - - - - -
For 4-star compartments
Fast freeze facility No
Light source parameters:
Type of light source LED
Energy efficiency class -
Minimum duration of the guarantee offered by the manufacturer: 24 months
Additional information:
Weblink to the manufacturer's website, where the information in point4(a) Annex of Commission Regulation (EU)
2019/2019 is found: tesla.info
Page 2 / 2
Link to the EU EPREL database
The QR code on the energy label supplied with the appliance provides a web link to the registration of this appliance in the EU EPREL database.
Keep the energy label for reference together with the user manual and all other documents provided with this appliance.
It is possible to find information related to the performance of the product in the EU EPREL database using the link https://eprel.ec.europa.eu
and the model name and product number that you can find on the rating plate of the appliance.
For more detailed information about the energy label, visit www.theenergylabel.eu.

18
ENG

19
ENG

20
BIH/CG
BEZBJEDONOSNA UPUTSTVA
Radi sopstvene bezbijednosti obezbijedite sigurnu upotrebu, prije
instalacije i prve upotrebe uređaja, pročitajte ovo korisničko uputstvo,
uključujući i savjete i upozorenja. Da biste izbjegli nepotrebne greške i
nezgode, važno je da se postarate da sve osobe koje koriste uređaj budu
detaljno upoznate s njegovim operacijama i bezbijednosnim funkcijama.
Sačuvajte ova uputstva i pobrinite se da budu u sklopu uređaja ako bude
premješten ili prodat, kako bi svako, ko ga koristi tokom svog života bio
upoznat sa pravilnom upotrebom i bezbijednošću uređaja.
Imajte na umu ovo korisničko uputstvo radi svoje lične sigurnosti i sigurnosti
imovine, budući da proizvođač nije odgovoran za štetu učinjenu propustima.
Bezbijednost djece i nesamostalnih osoba
• Ovaj uređaj mogu koristiti djeca starosti 8 ili više godina i osobe sa
smanjenim fizičkim, čulnim ili mentalnim sposobnostima, ili manjkom
iskustva i znanja ukoliko su pod nadzorom, ili su im data uputstva u vezi sa
bezbijednom upotrebom uređaja, i svjesni su mogućeg rizika.
• Djeci uzrasta od 3 do 8 godina je dozvoljeno da stavljaju predmete u i
uzimaju predmete iz ovog uređaja.
• Deca bi trebalo da budu pod nadzorom, kako biste osigurali da se ne igraju
uređajem.
• Čišćenjem i održavanjem ne bi trebalo da se bave deca, osim ako nisu
starosti 8 ili više godina i moraju biti pod obaveznim nadzorom.
• Svu ambalažu čuvajte van domašaja dece. Postoji opasnost od gušenja.
• Ukoliko ste odlučili da više ne koristite uređaj, prekinite napajanje uređaja
strujom, presjecite kabal za napajanje (što je bliže moguće uređaju) i
uklonite vrata, kako biste spriječili mogućnost da deca, koja se igraju,
pretrpe strujni udar ili se zatvore u uređaj.
• Ukoliko ovaj uređaj ima magnetnu gumu na vratima, a želite da njime
zamijenite stariji uređaj, koji se zatvarao pomoću opruge na vratima ili
poklopcu, onemogućite funkcionisanje zatvaranja starijeg uređaja pomoću
opruge. Na ovaj način ćete spriječiti da uređaj postane smrtonosna zamka
za dijete.
Opšta bezbijednost
UPOZORENJE! Održavajte ventilacione otvore u kućištu frižidera ili
ugradnoj strukturi čistima od začepljenja.
UPOZORENJE! Nemojte koristiti mehaničke uređaje ili druge naprave
kako biste ubrzali proces odmrzavaja, osim proizvoda preporučenih od
strane proizvođača uređaja.
Table of contents
Languages:
Other Tesla Freezer manuals

Tesla
Tesla RU0900M1 User manual

Tesla
Tesla RC3800FMX User manual

Tesla
Tesla Larder RS0900H User manual

Tesla
Tesla RU2700FM User manual

Tesla
Tesla RH2900H User manual

Tesla
Tesla TS-4BTM777-BKG User manual

Tesla
Tesla RH2000M1 User manual

Tesla
Tesla RC3400FHX User manual

Tesla
Tesla RU0900M User manual

Tesla
Tesla RH2000H1 User manual