Tesla TV500 User manual

1
USER MANUAL
TESLA SMART
THERMOSTATIC
VALVE TV500
EN
EN
SK
DE
PL
CZ
HU
SL

2
1. Information about this manual
Please read this manual completely and carefully
before starting to use the device. The manual contains
important information about the intended use of the
device. Especially observe the safety notes. Keep the
manual for later consultation. If you hand the device
over to other persons for use, please hand over the
manual as well.
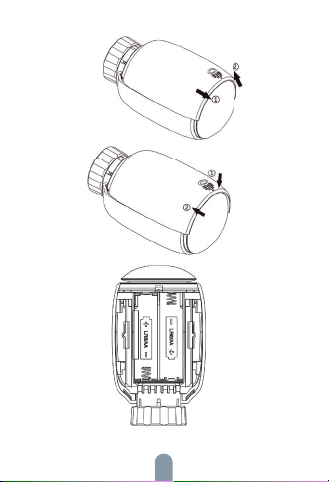
2. Product Description
Thermostatic radiator valve (TRV) is a self-regulating
valve fitted to a hot water heating system radiator, to
control the temperature of a room by changing the
flow of hot water to the radiator. With the TRV TV500
you can conveniently adjust the room temperature
between 5-30°C and save more than 15% on energy
use.
The radiator thermostat fits to all common radiator
valves and is easy to mount-without having to drain
any water or intervene in the heating system. The
additional boost function enables the radiator to be
heated up quickly for a brief period of time by opening
the valve for 5 minutes. There will be a pleasant room
temperature right away because of the radiated heat.

3
3. Device Overview
4. Start-up
4.1 Before starting
2 x AA batteries are required for TRV to work, please
get prepared.
Temperature is shown in degrees Celsius.
Smart gateway hub is required for TRV to work.
4.2 Inserting (replacing) batteries
Insert 2 AA batteries in the battery compartment,
making sure they are the right way round.
The service life of new alkaline batteries is approxi-
mately half to one year. A battery symbol [ ]
on the display indicates that the batteries need to
be replaced. After removing the dead batteries, wait
approx. 1 minute before inserting the new ones. This
device does not support operation with rechargeable
batteries.

4

5
4.3 Run adaptive
The display of ‚ InS ‚ with the rotating [ ] shows that
the motor is still travelling back.
When ‚ AdA ‚ is shown in the display, the radiator ther-
mostat can be installed on the valve. After installation,
press the pair button to run adaptive.
The display of ‚ AdA‘ with the rotating [ ] shows that
an adapting run to adapt the thermostat to the valve.
[ ] If the adapting runs is initiated before installa-
tion, press pair button and the motor travels back to
the ‚ InS ‚ position. If an error message (F1, F2, F3) is
displayed, press the Pair/Boost button and the motor
similarly travels back to the ‚ InS ‚ position.

6
5. Installation of the radiator thermostat
The radiator thermostat is easy to install and can be
done without draining heating water or intervening in
the heating system. No special tools are required, nor
does the heating have to be switched off.
The ring nut attached to the radiator thermostat can
be used universally and without accessories for all
valves with a thread size of M30 x 1.5 from the most
popular manufacturers such as:
By means of the adapters in the delivery, the device
can be installed on radiator valves of type Danfoss RA,
Danfoss RAV and Danfoss RAVL.
Danfoss
Heimeier
MNG
Junkers
Landis&Gyr (Duodyr)
Honeywell-Braukmann
Oventrop
Schlösser
Comap
Valf Sanayii
Mertik Maxitrol
Watts
Wingenroth (Wiroflex) Idmar54
R.B.M
Tiemme
Jaga
Siemens

7
5.1 Unscrew your existing radiator thermostat
Don’t worry, water will not leak during this process.
5.2 M30 x 1.5mm
Screw the TV500 smart radiator thermostat directly
onto the radiator if the connector type is M30 x 1.5
(picture shown as below). You can adjust the angle to
make the led face the viewer properly.
-Rotate the thermostat dial to the maximum value, the
max value may be 6 or 8.
-Check the [ ] is active.
-Install the device.

8
5.3 Danfoss RAVL Valve
- Check the [ ] is active.
- The valve bodies have elongated notches around
their circumference, which ensure that the adapter is
properly seated when it snaps on: snap on the adapter
completely, so that the pins inside the adapter are
lined up with the notches on the valve.
- Install the adapter, Plane A is aligned with Plane B.
- Install the round tube into the device.
- Install the device.

5.4 Danfoss RAV Valve
- Check the [ ] is active.
- The valve bodies have elongated notches around
their circumference, which ensure that the adapter is
properly seated when it snaps on: snap on the adapter
completely, so that the pins inside the adapter are
lined up with the notches on the valve.
- Install the adapter, Plane A is aligned with Plane B.
- Union nut.
- Install the device.
9

10
5.5 Danfoss RA Valve
- Rotate the thermostat dial to the maximum value,
„N“ Align Dial.
- Check the [ ] is active.
- The valve bodies have elongated notches around
their circumference, which ensure that the adapter is
properly seated when it snaps on: snap on the adapter
completely, so that the pins inside the adapter are
lined up with the notches on the valve.
- Install the adapter, Plane A is aligned with Plane B.
- Union nut.
- Install the round tube into the device.
- Install the device.

11
5.6 M28x1.5mm
- Select the length of the ejector rod according to the
following brands or valve sizes, and the size of ejector
rod is 15 / 17 / 19 / 24mm.
- Install the ejector rod with the correct size into
the hole.
- Install the adapter onto M28x1.5 valve.

12
5.7 Giacomini Valve
- Install the adapter onto the Giacomini valve in the
correct direction.
- Install the GIA ejector rod into the hole.
5.8 Caleffi Valve
- Open the valve flow to the maximum, as shown
in pic 1.
- Install the adapter onto the Caleffi valve in the
correct direction.

13
5.9 Use the Ejector rod
Due to the dimensional and assembly tolerance of the
metal valve, it may result in the following situations:
1. When the device has a fault, F2 is displayed
2. The metal valve cannot be fully closed and is kept
heating all the time
Handling method: Please use the ejector rod 1.6mm (1)
first, if the above two situations still exist, try to use the
ejector rod 2.6mm (2) instead.
6. Interface display
When you see the LED is showing information as be-
low, the radiator thermostat is ready for configuration.
If not, please uninstall and re-install the batteries and
repeat step 4.
Press the reset button to change the digital display
direction for your choice.

14
7. App Operation
Preparation for use
- Tesla Smart is available for both iOS and Android
OS. Search the name Tesla Smart in App Store or in
Google Play or scan the QR code to download the
App and register or login into your account.
- Make sure that the smartphone is connected to the
2.4 GHz network and have Bluetooth & GPS location
turned on.
Connect the device
- Make sure you have added Smart Gateway Hub to
your Tesla Smart App.
- Tesla Smart Thermostatic Valve TV500 must be
installed on the heating valve in order to pair with Tesla
Smart App and Smart Gateway Hub.
- Open Tesla Smart App and click on already paired
ZigBee Gateway and then click on Add new device or
in Tesla Smart App click + sign and Add new device.
Select Thermostatic Valve - Tesla Smart Thermostatic
Valve TV500 and follow the instructions to add Ther-
mostatic Valve step by step on your phone.
- Press Pair Button for 5 seconds on Thermostatic
Valve until the ZigBee signal icon flashes, which means
the device has entered the pairing mode.
- Wait for the device to connect.
Control the device
- Control the Tesla Smart Thermostatic Valve TV500
with App.

15
8. Product features
8.1 Auto Mode
In automatic mode, the temperature is controlled
in accordance with the set heating profile. Manual
changes are activated until the next point at which the
profile changes. Afterwards, the defined heating pro-
file will be activated again. To activate the automatic
mode, please proceed as follows:
- Press the pair button to select [ ] icon.
- Default temperature: 17°C and 21°C.
- Temperature range: 5-30°C, increment: 0.5°C.
App operation: Click the manual mode icon in the
App control panel.
8.2 Manual Mode
In manual mode, the temperature is controlled in
accordance with the current temperature set via the
button. The temperature remains activated until the
next manual change. To activate the manual mode,
please proceed as follows:
Press the pair button to select [ ] icon.
Default temperature: 20°C.
Temperature range: 5-30°C, increment: 0.5°C.
App operation: Click the manual mode icon in the
App control panel.
8.3 Holiday Mode
When you go out or go to a party, you can use the
holiday mode. The holiday mode will automatically
start at the set time starting point and run the holiday
temperature.
When the holiday mode is not activated, and you want

16
to view the holiday mode settings, please press the
pair button to view, the holiday mode icon [ ] will
flash for 5 seconds and then it will automatically return
to the automode. If you want to end the holiday mode
earlier, press the pair button to cancel.
App operation: Click the Mode icon in the App
control panel, and switch to any other mode to cancel
holiday mode.
8.4 Open Window Detection
The device automatically stops heating when it detects
a sudden temperature drop (5°C in 5 minutes as
default). This is usually caused by an opened window
or door and the open window icon will display [ ]
on the device. The device will operate according to
the preset window. Press the pair button to cancel.
App operation: Click the open window icon in APP to
cancel the window opening function.
The open window detection only operates in automa-
tic mode and manual mode.
8.5 Offset Temperature
As the temperature is measured on the radiator
thermostat, the temperature distribution can vary
throughout the room. To adjust this, a temperature
offset of ±5°C can be set. If a nominal temperature of
e.g. 20°C is set but the room presents with only 18°C,
an offset of -2°C needs to be set. In app settings, the
offset temperature is 0 degrees by default. To adjust
the offset temperature, please proceed as follows:
App operation: Click the offset icon [±] in settings.
or door and the open window icon will display [ ]

17
8.6 Eco and Comfortable Temperature
The comfort and Eco temperature icon makes
switching between comfort and Eco temperature
simple and user friendly. These have been set at the
factory at 21°C (comfort temperature) and 17°C (Eco
temperature).
App operation: Click the Comfortable [ ]/Eco
[ ] temperature icon in the App control panel to
select the corresponding temperature mode.
Even in auto mode, the temperature can be changed
at any time using the button. It will then remain
the same until the next point at which the program
changes.
8.7 Child Lock
Operation of the device can be locked to avoid
settings being changed unintentionally (e.g. through
involuntary touch). To activate/deactivate the child
lock, please proceed as follows:
App operation: Click the child lock icon in the App
settings screen. The device display “LOC”.
8.8 Anti-Freeze Mode
You can use this function when you go out in winter
or when you are not at home for a long time. When
this function is activated, the temperature in the house
is kept at 8°C, the device displays „AF“. Press the pair
button to cancel.
App operation: Click the anti-freeze icon [ ] to
turn on/off the function in the App settings screen.
Note: Once this function is activated, other functions
are not available unless the function is deactivated.

18
8.9 Heating Stop (Power Saving) Mode
Battery life can be prolonged by switching the heating
off. To achieve this, the valve is closed fully. To activa-
te the heating stop, the device displays “HS”, press the
pair button to cancel. Please proceed as follows:
App operation: Click the Heating stop icon [ ] to
turn on/off the function in the App settings screen.
Note: Once the function is activated, other functions
are not available unless the function is deactivated.
8.10 Anti-Calcification (Descaling) Protection
The equipment will automatically run for a period
every week to prevent calcification of the valve.
8.11 Boost
Sometimes people go home earlier than usual, and the
rapid heating function will make you feel the warmth
of the room faster. When activated, the valve will be
fully opened for 5 minutes. The heating of a room
takes longer than 5 minutes, but the heat given off by
the radiator can be felt immediately. The boost functi-
on is activated. The remaining time for the function will
be counted down in seconds (‘299’ to ‘000’).
After these 5 minutes have elapsed, the actuator
changes to the mode which was previously active
(auto/manual) with the previously set temperature. If
you want to end this function ahead of time, press the
pair button to cancel.
App operation: Select the mode of APP interface to
activate the boost. Click the Boost icon [ ] in the
App control panel to cancel the boost function.

19
9. Setting
Click the settings icon [ ] in the App control panel.
9.1 Date
When the device is successfully paired with the phone,
the device time is synchronized with the phone time.
9.2 Week Programming Stage
In this menu item, you can create a heating profile with
heating and cooling phases according to your perso-
nal needs. You can set up to ten stages of temperature
every day. The factory default is five stages.
Click the week programming stage icon [ ] in the
App control panel.
Select single days of the week, all weekdays, the wee-
kend, or the entire week for your heating profile.
Click time to select the end time of each period and
click temperature to select the required temperature.
Time range: 00:00-24:00, increment: 10 minutes.
Temperature range: 5-30°C, increment: 0.5°C.
9.3 Open Window
Click the open window icon [ ] in the App settings
screen.
Select the desired temperature.
Temperature range: 5-30°C, increment: 0.5°C.

20
9.4 Comfortable Temperature
Click the comfortable temperature icon [ ] in the
App settings screen.
Select the desired temperature.
Temperature range: 5-30°C, increment: 0.5°C.
9.5 ECO Temperature
Click the ECO temperature icon [ ] in the App
settings screen.
Select the desired temperature.
Temperature range: 5-30°C, increment: 0.5°C.
9.6 Offset
Click the Offset temperature icon [ ± ] in the App
settings screen.
Select the desired temperature.
Temperature range: -5-5°C, increment: 0.1 °C.
9.7 Holiday Setting
Click the holiday mode icon [ ] in the App settings
screen.
Select the end date and the start date.
Select the desired temperature.
Temperature range: 5-30°C, increment: 0.5°C.
10. Low Battery
When the battery power is less than 12%, the low
power prompt icon [ ] will be displayed. Please
replace the battery as soon as possible. When the
the device only displays [ ] the device is not
available.
Table of contents
Languages:
Other Tesla Thermostat manuals
Popular Thermostat manuals by other brands

Johnson Controls
Johnson Controls TEC2216-4 installation instructions

Vaillant
Vaillant VRT 220 manual

ZIEHL-ABEGG
ZIEHL-ABEGG SRE1G operating instructions

Efergy
Efergy air control quick start guide

Homematic IP
Homematic IP Compact Plus Mounting instruction and operating manual

Emerson
Emerson WHITE-RODGERS 1E78 installation instructions