Tesla DD600SB User manual

Product images are for illustrative purposes only and may differ from the actual product.
BiH/
CG HR SRBENG
User Manual
DECORATIVE
CHIMNEY
HOOD
DD600SB


3
ENG
Dear Customer,
Thank you very much for your preference for products.
We recommend you to read the instruction manual carefully and keep it handy before you use this chimney hood
so that it maintains its quality just like the first day you bought it and serves you most efficiently.
NOTE
This instruction manual has been prepared for a variety of models. Some of the features specified in the
manual may not exist in your device. These features are marked with *.
Our devices are designed for domestic use. They are not for professional use.
PLEASE READ THE INSTRUCTIONS BEFORE YOU INSTALL OR USE THIS DEVICE.
This product has been manufactured in an environmentally-friendly and modern plants without harming the
nature.
Conforms with the AEEE Regulations.
SAFETY INSTRUCTIONS
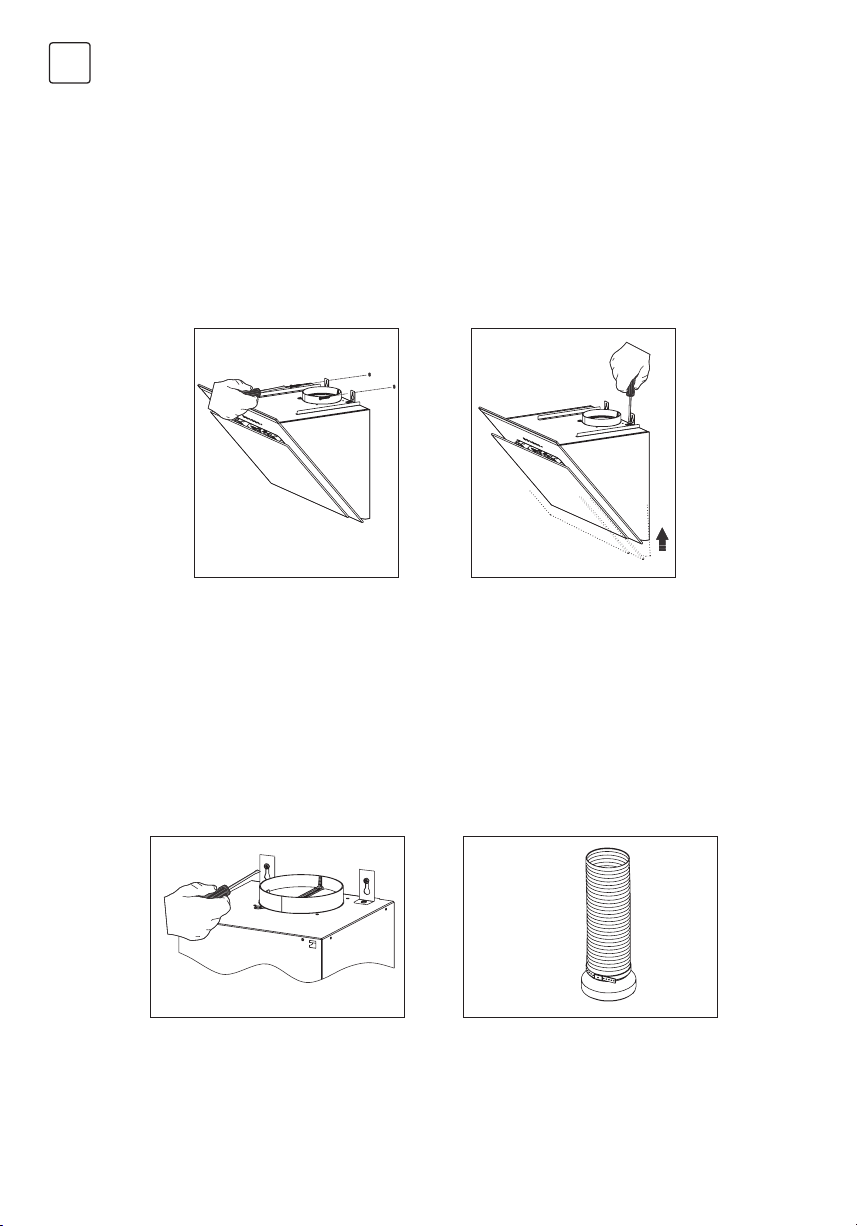
1. The installation of the product should be carried
out by authorized persons. Installation performed
by unauthorized persons may result in poor
performance, damage to the product or accidents.
The product will not be covered by the warranty.
2. When an electric cooker hood is used
simultaneously with the devices which burn gas
or other fuels, the room should be ventilated
adequately (not applicable for devices that
discharge air back into the room).
3. An electric cooker hood should not be connected
to a flue or air duct used to drain smoke from
devices which burn gas or other fuels (oven, water
heater, thermosyphon, etc.) (not applicable for
devices that discharge air back into the room).
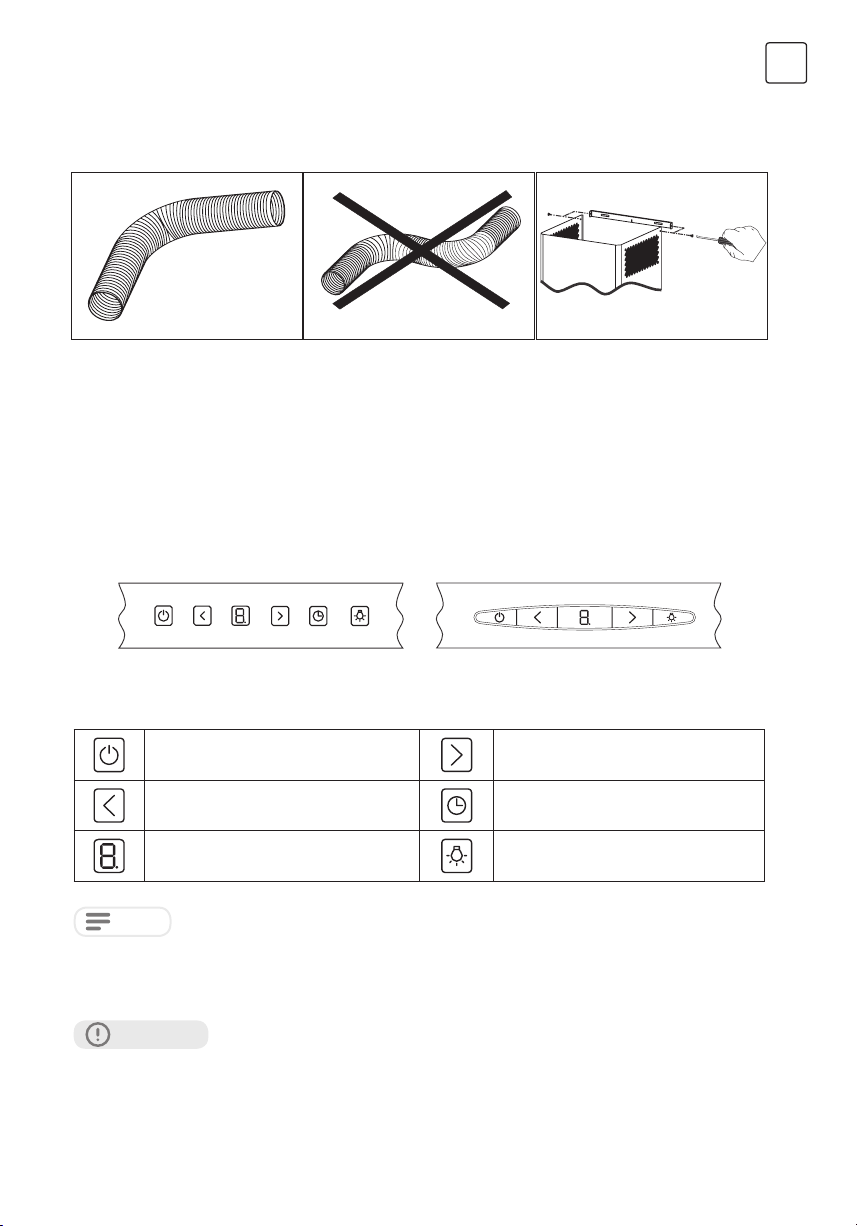
4. Comply with the instructions regarding discharge
of outlet air, stipulated by the relevant authorities
(not applicable for devices that discharge air back
into the room).
5. When the cooker hood is placed on a gas burning
device, the distance between the hob and the
hood should be at least 65 cm. If a larger distance
is specified in the installation instructions of the
gas burning hobs, this value should be taken into
account.
6. Packaging materials may be dangerous for
children. Do not allow children to play with
packaging materials. Keep packaging materials out
of reach of children.
7. This device is not designed to be used by
children, people with physical, sensory or mental
incapabilities, or with lack of experience or
technical knowledge. Do not allow the persons
and children under custody to use the product,
play with the product, to perform maintenance and
cleaning on the product.
8. Kitchen hoods are designed for domestic use.
They should not be used for other purposes.
Otherwise, it may cause various accidents and the
device will be out of warranty.
9. The electrical connection of the product must be
done to a grounded outlet.
10. Before the installation, maintenance and cleaning
of the product, de-energize the device. (By
unplugging the device or by switching off the fuse)
11. For your safety, use ”Max 6 A” fuses in the hood
installation.
12. Do not operate the hood without using cookwares.
High heat may cause some parts of your product to
deform and cause fire.
13. Do not leave boiling oil on the stove. Pots that
contain boiling oil may catch fire by itself.
14. Clean the oil trap aluminium filters regularly.
Filters pose risk of fire due to accumulated grease
deposits on them.
15. Do not operate your product without filter, and
do not remove the filters when the product is in
operation. Do not use non-fire-resistant filtering
materials instead of the filter.
16. Flammable foods must not be cooked under the
appliance.
17. Risk of fire may occur if cleaning is not carried out
periodically and according to instructions.
18. In case of any fire, de-energize devices. Cover the

4
ENG
flames with a damp cloth or towel. Never use water
to put out the flames.
19. The mains cable should not be passed near stoves,
or devices or equipment which may come into
contact with heat or which may deform the cable.
This may cause fire.
20. Do not touch your product’s lamps when they work
for a long time. Since they would be hot, they could
burn your hand.
CAUTION!
Accessible sections may be hot when used with
cooking appliances.
WARNING!
Failure to install screws or fixing installations in
accordance with these instructions may result in
electrical hazards.
INTRODUCTION AND TECHNICAL DRAWING
OF THE CHIMNEY HOOD
Min 662 Max 942
300
362
200
170
410
595
1. Inner flue plate
2. Outer flue plate
3. Control keys
4. Plate body
5. Cover glass
All dimensions are in millimeter.

5
ENG
INSTALLATION OF CHIMNEY HOOD
Location Of The Chimney Hood
Installation Of Mounting Bracket To The Chimney Hood
Installation Of Wall Mounting Bracket
Fix the 2 (two) Mounting brackets among the installation accessories to the chimney hood with one 1 screw nut as
shown in Figure 1. Make sure mounting brackets are inserted in motor box.
Drywall (8mm) anchors are nailed into the holes drilled according to installation template (A,B,C,D). They are
fixed into the wall with 2 brackets as shown in Figure 2.
Figure 1 Figure 2Installation template

6
ENG
Installation Of Inner Duct Mounting Bracket
Leveling The Chimney Hood
Mounting The Aluminum Pipe
If the chimney hood is inclined on one side, the chimney hood can be leveled with the adjustment screws as
shown in Figure 4. Once the balancing is complete, the screws shown in Figure 5 must be fixed tightly. After this,
fix the body with one screw through the hole on the body.
Place the aluminum pipe on the plastic duct. Place the other end of the pipe into the air outlet in the kitchen.
(Figure 6)
MOUNTING THE CHIMNEY HOOD ON THE WALL
2 fixing holes are drilled on the wall with Ø 6 mm electric drill at a suitable height and place to fix the inner duct
hanger plate onto the wall. 6mm drywall anchors are nailed into those holes and inner duct mounting brackrets are
pinned down.At the last step of chimney hood installation, the inner duct is screwed on the inner duct mounting
brackets.
Lift the chimney hood body and fix the hanger plates onto the wall anchors as shown in Figure 3.
Figure 3 Figure 4
Figure 5 Figure 6

7
ENG
FUNCTIONS OF THE CHIMNEY HOOD
Control Panel
Symbols Functions
Twists and bends on the aluminum pipe may cause minimizing the air suction so avoid unnecessary bends and
twists as much as possible. (Figure 7-8) Place the inner duct and outer duct carefully on the product. Fix the inner
duct to inner duct connection plate with 2 screws. (Figure 9)
Digital Control: Touch the symbols on the keys. (On/Off function and timer are on the same key; if pressed for 1
sec on-off function will operate.If pressed for 3 sec. 15 minutes timer will operate.
Touch Control: Touch the symbols on the glass surface. If Press a symbol longer (more 3 sec) may operate various
functions.
Figure 7 Figure 8 Figure 9
Switches on and off the motor. (Except for
the lighting)
Increases the speed when the motor is
running.
Decreases the speed when the motor is
running.
If pressed this symbol, the motor turns
itself off 15 minutes later.
Display Only switches on and off the lighting
system.
NOTE
When the product operates for a certain time, the aluminum filters get dirty and the digital display shows “C” Clean
sign. This means the filters should be cleaned. Press the speed reduction key for 5 secs in order to delete “C” sign
from the display.
When the timer key is pressed for 3 secs digital display starts to change.Air-circulation system of the chimney hood
becomes active. The chimney hood runs for 10 minutes in the lowest speed. Then the system automatically shuts
down.
CAUTION!

8
ENG
Four Button Touch Control*
Screenless Touch Control*
ON/OFF Button Plus Button Timer Minus Button Lamp
• ON&OFF: Starts the motor.
• Speed +: Increase the speed of the motor. Max: 3 speed.
• Speed -: Decrease the speed of the motor. Max: 1 speed.
• Lamp: Turns the lamp on. When the lamp is on, the dot segment is viewed on the screen.
• Timer: If the lamp button is pressed for 3 seconds, the device starts flashing in respective speed. After 15
minutes the device is turned off.
• Air Cleaning: When the air cleaning button is pressed on the Remote Control, the function is initiated. The
motor is operated for 10 minutes in 1 speed, then switches to standby for 50 minutes. While this function is
active, the screen segments start rotating. Then the system shuts down automatically. The rotation is only for 24
hours.
• Filter Warning: At the end of 100 hours of operation, the ‘C’ warning is viewed on the screen. This warning can
be deleted by pressing the speed - button for 5 seconds, the ‘E’ is viewed on the screen, the warning is deleted
and the timer is reset. This warning is viewed for 2 seconds when on/off button is pressed. During rotation
changes this warning is not displayed.
• Automatic Shutdown: For safety purposes, the circuit board of the motor is programmed to provide maximum
of 5 hours lighting and maximum 10 hours of operation. When the air cleaning function is in effect, the motor
shutdown feature is turned off.
• ON&OFF Button: Starts the engine.
• Timer: To activate, press and hold the ON / OFF for 3 seconds. Operating duration is 15 minutes at the adjusted
cycle. The appliance shuts down at the end of this duration. During the operation, the activated engine LED
flashes.
• Air Cleaning: To activate the function, press the air cleaning button on the remote control. On cycle 1, the
engine operates for 10 minutes and then stays on stand by mode for 50 minutes. This cycle continues for 24
hours.
When this function is active, the engine ON / OFF button LED flashes. Then the system automatically shuts
down. The cycle runs only for 24 hours.
• Light ON / OFF Button: Turns the light on and off. When the light is on, the first LED is activated.
1. Receiver
2. ON / OFF Button
3. Light
4. LED
5. Speed Adjustment Button

9
ENG
Chimney hood is used in ducted and non-ducted kitchens.
In Ducted Use
In ducted use, extractor fan should be connected to an air outlet to send the air out. In order to use your chimney
hood efficiently, make sure length of the pipe system between the chimney hood and the air outlet should be
short. Your product has been manufactured suitable for ducted and non-ducted use.
Round Charcoal Filter
In kitchens with no duct, a round charcoal filter should be reintroduced the clean air into the kitchen. You can
obtain the round filter from your service or dealer.
Use Of Charcoal Filter
• Our products allow the installation of charcoal filter.
• Regardless of use of charcoal filters or not, grease filters should be installed on the product. Do not use your
product without grease filter.
• Use of charcoal filteris as follows.
• Cut off the device power before replacing charcoal filter.
• Charcoal filter is used in the kitchens with no duct therefore should be replaced in every 3-5 months depending
on the frequency of use.
• Charcoal filter should never be washed.
Installation Of Charcoal Filter
• Charcoal filters are used in the kitchens with no duct.
• Charcoal filters are installed onto both sides of the fan as shown in Figure 10 by turning 10 degrees clock-wise.
• When uninstalling, reverse the same procedure.
Use Of Aluminum Cartridge Filter
Aluminum cartridge filter holds dust and grease in the air. Chimney hoodshould never be used without aluminum
cartridge filter. (Figure 11)
OPERATING THE CHIMNEY HOOD
• Cycle Adjustment Button: It increases the cycle speed while the engine is in operating state. If pressed when
the cycle is on the top speed, the engine goes back to cycle 1.
Cycle LEDS:
• 2nd LED: Activated when the engine operates at cycle 1.
• 3rd LED: Activated when the engine operates at cycle 2.
• 4th LED: Activated when the engine operates at cycle 3.
Figure 10 Figure 11
Installing Position

10
ENG
REPLACING THE BULB
Always switch off the electrical supply
before carrying out any operation
LED bulb does not operate is possible to
remove as shown in Figure 12.
A new bulb to be supplied from service
points is replaced with the same
reoperation.
Cables are designed with sockets. The
plug in should be made according to
previous connection.
Remove the holder on the LED bulb as
shown in Figure 12.2. Put the new LED
bulb on the holder housing of the LED
bulb you removed as shown in Figure
12.1.
Figure 12
Red
Black
NOTE
WARNING!
MAINTENANCE OF THE CHIMNEY HOOD
• Device should be unplugged or switch should be turned off before cleaning and maintenance procedures.
• Metal filter should be cleaned once a month with hot soapy water or in the dishwasher, if possible. (60 °C)
• Remove the aluminum cartridge filter by pressing on the spring catches on the side. Do not refit before drying
after wash.
• Outer surface of the extractor hood should be wiped with a damp cloth soaked with soapy water.
• Make sure electronic parts do not contact with water or similar materials.
• For inox products, using inox cleaning and maintenance products available in the market will provide longer
usage life for your device.
• Aluminum filters can be washed in dishwasher. After several washes, aluminum filters may change colour. This is
normal and filters do not need to be replaced.
• When installing the chimney hood to the air duct, use 150/120 mm diameter pipes and use bends as minimum
as possible.
• Be ware of cleaning periods of metal filters and replacing times of charcoal filters.
• When dense suction power is not required, use the product in medium setting.
• For right ventilation, the windows in the kitchen leading to the outside should be kept closed.
When used with devices which use fuel (heaters working with gas, diesel fuel, coal or firewood, water heaters,
etc) and the air in the environment; should be used cautiously. The chimney hood sending the air out in the
environment may affect the burning adversely.
This warning is not applicable to non-ducted use.
Efficient Use Of Chimney Hood

11
ENG
IF CHIMNEY HOOD DOES NOT WORK
You can supply spare parts of your device from your dealer or authorized services. The package includes a list of
authorized services with the product. When you contact your service or dealer to ask for any spare parts, notify
them of product model name shown in the product label. When you
remove the aluminum cartridge filter, you will see the product label.
Before contacting your service, check your chimney hood against the table below. If problem persists, contact your
dealer or authorized service point.
Before contacting the service, make sure the product is plugged and the fuse in the electrical installation is
working. Do not do anything that may harm the product.
Service And Spare Parts
Check electricity connection
(mains voltage should be 220-
240 V, Chimney hood should be
connected to grounding socket.)
Check motor switch (Motor switch
should be on.)
Check bulb switch (Bulb switch
should be on.)
Check aluminum filter (Aluminum
cartridge filter should be washed
once a month in normal use.)
Check bulbs (Bulbs should be in
working condition.)
Check air outlet shaft (Air outlet
shaft should be unblocked.)
Check charcoal filter (Charcoal filters
should be replaced quarterly in
normal use.
Chimney Hood does
not work
Light bulb is not
working
Chimney hood air
suction is poor
Do not send air out
(in non-ducted cases)

12
ENG
ENVIRONMENTALLY-FRIENDLY DISPOSAL
PACKAGE INFORMATION
Dispose of packaging in an environmentally-friendly manner.
This appliance is labelled in accordance with European Directive 2012/19/EU concerning
used electrical and electronic appliances (waste electrical and electronic equipment - WEEE).
The guideline determines the frame work for the return and recycling of used appliances as
applicable throughout to the EU.
Packaging materials of the product are manufactured from recyclable materials in accordance with our National
Environment Regulations. Do not dispose of the packaging materials together with the domestic or other wastes.
Take them to the packaging material collection points designated by the local authorities.

13
BiH/CG
Poštovani korisniče,
Zahvaljujemo Vam ste što ste odabrali naš proizvod.
Preporučujemo Vam da pažljivo pročitate ovo uputstvo za upotrebu i da Vam uvijek bude pri ruci tokom upotrebe
ove nape kako bi ste mogli da održite njegov kvalitet na onom nivou, na kom je bio i prvog dana kada ste ga kupili
i da bi mogao da vas služi na najefikasniji način.
NAPOMENA
Ovo uputstvo za upotrebu je sačinjeno za različite modele. Neke od funkcija navedenih u uputstvu možda
ne postoje na vašem uređaju. Te funkcije su označene sa *.
Naši uređaji su i dizajnirani isključivo za kućnu upotrebu.
Nisu za profesionalnu upotrebu.
MOLIMO VAS PROČITAJTE UPUTSTVA PRIJE NEGO ŠTO INSTALIRATE ILI KORISTITE OVAJ UREĐAJ.
Ovaj proizvod je proizveden u ekološki prihvatljivim i modernim postrojenjima bez narušavanja prirode.
Odgovara propisima AEEE.
BEZBJEDNOSNA UPUTSTVA
1. Instalaciju proizvoda treba da obavljaju ovlaštena
lica. Instalacija koju obavljaju neovlaštena lica
može dovesti do lošeg rada, oštećenja proizvoda
ili nesreća. U tom slučaju, proizvod neće biti
pokriven garancijom.
2. Kada se električna kuhinjska napa koristi
istovremeno sa uređajima koji sagorijevaju plin
ili druga goriva, prostoriju treba adekvatno
provjetravati (nije primjenljivo za uređaje koji
ispuštaju vazduh nazad u prostoriju).
3. Električna kuhinjska napa ne treba priključiti na
odvod ili kanal za odvod dima iz uređaja koji
sagorijevaju plin ili druga goriva (peć, bojler,
termosifon, itd.) (Nije primjenjivo za uređaje koji
ispuštaju vazduh natrag u prostoriju).
4. Pridržavajte se uputstava za ispuštanje izduvnog
vazduha, propisanih od strane nadležnih organa
(nije primjenljivo za uređaje koji ispuštaju vazduh
nazad u prostoriju).
5. Kada je kuhinjska napa postavljena na uređaj
za sagorijevanje gasa, razmak između ploče za
kuhanje i nape treba da bude najmanje 65 cm.
Ako je u uputstvima za ugradnju ploča za kuhanje
na gas naznačeno veće rastojanje, onda se treba
pridržavati te vrijednosti.
6. Materijali za pakovanje mogu biti opasni za djecu.
Ne dozvolite djeci da se igraju materijalima za
pakovanje. Materijale za pakovanje čuvati van
domašaja djece.
7. Ovaj uređaj nije dizajniran da ga koriste djeca,
osobe sa fizičkim, senzornim ili mentalnim
nesposobnostima, ili sa nedostatkom iskustva ili
tehničkog znanja. Nemojte dozvoliti osobama i
djeci pod starateljstvom da koriste proizvod, da
se igraju sa proizvodom, da održavaju ili čiste
proizvod.
8. Kuhinjske nape su dizajnirani za kućnu upotrebu.
Ne treba ih koristiti u druge svrhe. U suprotnom,
mogu prouzrokovati razne nezgode i uređaj će
ostati bez garancije.
9. Električno povezivanje proizvoda mora se izvršiti
na uzemljenoj utičnici.
10. Prije instalacije, održavanja i čišćenja proizvoda,
isključite napajanje uređaja. (Isključivanjem
uređaja ili isključivanjem osigurača)
11. Radi Vaše bezbijednosti, koristite "Max 6 A"
osigurače tokom instalacije nape.
12. Nemojte koristiti napu bez upotrebe posuđa.
Visoka temperatura može uzrokovati deformaciju
nekih dijelova proizvoda i izazvati požar.
13. Nemojte na šporetu ostavljati ulje koje ključa.
Posude koje sadrže ulje koje ključa mogu se same
zapaliti.
14. Redovno čistite aluminijske filtere za masnoću.
Filteri predstavljaju opasnost od požara zbog
nakupljenih masnih naslaga.
15. Nemojte koristiti proizvod bez filtera, i ne
uklanjajte filtere dok proizvod radi. Umjesto filtera
ne koristite materijale za filtriranje koji nisu otporni
na vatru.
16. Zapaljiva hrana ne smije se kuhati ispod aparata.
17. Opasnost od požara može nastati ako se čišćenje
ne vrši periodično i prema uputstvima.
18. U slučaju bilo kakvog požara, isključite napajanje

14
BiH/CG
uređaja. Pokrijte plamen vlažnom krpom ili
peškirom. Nikada ne koristite vodu da biste ugasili
plamen.
19. Kabal za napajanje ne smije da prolazi pored peći,
ili uređaja ili opreme koji mogu doći u kontakt
sa toplotom ili koji mogu da deformišu kabal. To
može izazvati požar.
20. Ne dodirujte lampe Vašeg proizvoda kada rade
duži vremenski period. Vjerovatno su vrele, i
možete opeći ruku.
OPREZ!
Pristupačni dijelovi mogu biti vrući kada se koriste sa
aparatima za kuhanje.
UPOZORENJE!
Ako ne montirate vijke ili instalaciju u skladu sa ovim
uputstvima, može doći do električnih opasnosti.
UVOD I TEHNIČKI CRTEŽI NAPE
Min 662 Max 942
300
362
200
170
410
595
1. Unutrašnji ventilacioni odvod
2. Spoljašnji ventilacioni odvod
3. Kontrolni tasteri
4. Kućište
5. Stakleni poklopac
Sve dimenzije su u milimetrima.

15
BiH/CG
MONTAŽA NAPE
Lokacija nape
Instalacija nosača za montažu nape
Instalacija zidnog nosača za montažu
Pričvrstite 2 (dva) nosača za montažu iz pribora za montažu za napu šarafom kao što je prikazano na slici 1.
Provjerite da li su nosači za montažu u kutiji.
Pričvrstite tiplove (8mm) u rupe koje su izbušene prema instalacionom šablonu (A, B, C, D). Oni se fiksiraju u zid sa
2 nosača, kao što je prikazano na slici 2.
Slika 1 Slika 2instalacioni šablon

16
BiH/CG
Instalacija nosača za montažu unutrašnjeg kanala
Nivelisanje nape
Montaža aluminijumske cijevi
Ako je napa nagnut na jednu stranu, može se iznivelisati vijcima za podešavanje, kao što je prikazano na slici 4.
Pošto završite sa nivelisanjem, čvrsto fiksirajte vijke kao što je prikazano na slici 5. Nakon toga, fiksirajte kućište
nape jednim vijkom kroz otvor na kućištu.
Postavite aluminijumsku cijev na plastični kanal. Stavite drugi kraj cijevi u odvod za vazduh u kuhinji. (Slika 6)
MONTAŽA NAPE NA ZID
Električnom bušilicom Ø6mm, na odgovarajućoj visini i odgovarajućem mjestu, izbušiti 2 rupe u zidu za
pričvršćivanje montažnih ugaonika unutrašnjeg kanala. Tiplovi od 6mm se postave u te rupe, a potom se pričvrste
nosači za montažu unutrašnjeg kanala. Tokom posljednjeg koraka instalacije nape, unutrašnji kanal se pričvrsti na
nosače za montažu unutrašnjeg kanala.
Podignite kućište nape i učvrstite montažne ugaonike na zidne tiplove kao što je prikazano na slici.
Slika 3 Slika 4
Slika 5 Slika 6

17
BiH/CG
FUNKCIJE NAPE
Kontrolna tabla
Funkcije simbola
Uvrtanje i pregibi aluminijumske cijevi mogu da dovedu do smanjenja usisne snage vazduha, zato pokušajte
da izbjegnete nepotrebne pregibe i uvrtanja što je više moguće. (Slika 7-8) Pažljivo postavite unutrašnji kanal i
spoljašnji kanal na proizvod. Pričvrstite unutrašnji kanal na unutrašnju priključnu ploču kanala sa 2 vijka. (Slika 9)
Digitalna kontrola: Dodirnite simbole na tasterima. (Funkcija uključivanja / isključivanja i tajmer su na istom
tasteru; ako se pritisne na 1 sekund, određena funkcija će se uključiti. Ako se pritisne na 3 sekunde, tajmer će raditi
15 minuta.
Kontrola dodirom: Dodirnite simbole na staklenoj površini. Ako pritisnete simbol na duže (više od 3 sekunde) više
funkcija biće u opticaju.
Slika 7 Slika 8 Slika 9
Uključuje i isključuje motor.
(Osim za osvetljenje)
Povećava brzinu prilikom rada
motora.
Smanjuje brzinu prilikom rada motora. Ako se pritisne ovaj simbol, motor će se
sam isključiti u roku od 15 minuta.
Displej Uključuje i isključuje sistem za osvjetljenje.
Kada proizvod radi određeno vrijeme, aluminijumski filteri se zaprljaju i digitalni displej prikazuje znak „C“ (Clean).
To znači da filtere treba očistiti. Pritisnite taster za smanjenje brzine na 5 sekundi kako biste izbrisali znak "C" sa
displeja.
Kada se taster tajmera pritisne na 3 sekunde, digitalni displej počinje da se mijenja. Sistem cirkulacije vazduha
nape postaje aktivan. Napa radi 10 minuta u najnižoj brzini. Potom se sistem automatski isključuje.
NAPOMENA
OPREZ!

18
BiH/CG
Kontrola dodirom četiri tastera *
ON/OFF taster Plus taster Tajmer Minus taster Lampica
• ON&OFF: Pokreće motor.
• Speed +: Povećava brzinu motora. Maks: 3 brzine.
• Speed -: Smanjuje brzinu motora. Maks: 1 brzina.
• Lamp: Uključuje lampicu. Kada je lampica uključena, tačka se prikazuje na ekranu.
• Timer: Ako se taster lampice pritisne na 3 sekunde, uređaj počinje da treperi na odgovarajućoj brzini. Nakon 15
minuta uređaj je isključen.
• Air Cleaning: Kada pritisnete taster za prečišćavanje vazduha na daljinskom upravljaču, funkcija se pokreće.
Motor radi 10 minuta u 1. brzini, a zatim se prebacuje u stanje mirovanja na 50 minuta. Dok je ova funkcija
aktivna, segmenti ekrana počinju da se rotiraju. Zatim se sistem automatski isključuje. Rotacija traje samo 24 sata.
• Filter Warning: Na kraju 100 sati rada, na ekranu se prikazuje upozorenje „C“. Ovo upozorenje se može izbrisati
pritiskanjem tastera za brzinu u trajanju od 5 sekundi, na ekranu se prikazuje "E", upozorenje se briše i tajmer
se resetuje. Ovo upozorenje se prikazuje na 2 sekunde kada se pritisne dugme za uključivanje / isključivanje.
Tokom promjene rotacije ovo upozorenje se ne prikazuje.
• Automatic Shutdown: Iz bezbjednosnih razloga, ploča motora je programirana da obezbijedi maksimalno
5 sati osvjetljenja i maksimalno 10 sati rada. Kada je funkcija čišćenja vazduha u funkciji, funkcija isključivanja
motora je isključena.
Kontrola dodirom bez ekrana *
• ON&OFF Button: Pokreće motor.
• Timer: Za aktiviranje, pritisnite i držite ON / OFF na 3 sekunde.Trajanje rada je 15 minuta na podešenom
ciklusu. Uređaj se isključuje na kraju trajanja ciklusa. Tokom rada, aktivirana LED lampica treperi.
• Air Cleaning: Da biste aktivirali funkciju, pritisnite dugme za čišćenje vazduha na daljinskom upravljaču. Na
ciklusu 1, motor radi 10 minuta, a zatim ostaje u stanju mirovanja 50 minuta. Ovaj ciklus traje 24 sata.
• Kada je ova funkcija aktivna, LED dugme za uključivanje / isključivanje motora treperi. Zatim se sistem automatski
isključuje. Ciklus traje samo 24 sata.
• Light ON / OFF Button: Uključuje i isključuje svjetlo. Kada je svjetlo uključeno, prva LED lampica je aktivirana.
• Cycle Adjustment Button: Povećava brzinu ciklusa dok je motor u radnom stanju. Ako se pritisne kada je ciklus
na najvećoj brzini, motor se vraća u ciklus 1.
Ciklus LED lampica:
• 2. LED: Aktivira se kada motor radi u 1. ciklusu.
• 3. LED: Aktivira se kada motor radi u 2. ciklusu.
• 4. LED: Aktivira se kada motor radi u 3. ciklusu.
1. Resiver
2. ON / OFF taster
3. Svjetlo
4. LED
5. Taster za podešavanje brzine

19
BiH/CG
Slika 10 Slika 11
Poz. instaliranja
Napom se koristi u kuhinjama sa i bez odvodnih kanala.
Režim sa odvodnim kanalom
U slučaju odvodnih kanala, ventilator za odvod vazduha treba da bude povezan sa izlazom vazduha da bi se
vazduh izvukao. Da biste efikasno koristili napu, cijev između aspiratora i izlaza vazduha treba da bude kratka.
Proizvod je pogodan za upotrebu sa i bez odvodnih kanala.
Okrugli ugljeni filter
U kuhinjama koje nemaju cijev za odvod vazduha, treba ponovo ugraditi okrugli ugljeni filter. Okrugli filter možete
dobiti od svog servisa ili prodavca.
Upotreba ugljenog filtera
• Naši proizvodi omogućavaju ugradnju ugljenog filtera.
• Bez obzira da li se ugljeni filter koristi ili ne, na proizvodu treba da budu instalirani filteri za masnoću. Nemojte
koristiti proizvod bez filtera za masnoću.
• Upotreba ugljenih filtera je kao što slijedi.
• Isključite napajanje uređaja prije zamjene ugljenog filtera.
• Ugljeni filter se koristi u kuhinjama bez odvodnog kanala, stoga ih treba mijenjati svakih 3-5 meseci, u zavisnosti
od učestalosti korištenja.
• Ugljeni filter se nikada ne smije prati.
Instalacija ugljenog filtera
• Ugljeni filteri se koriste u kuhinjama bez odvodnog kanala.
• Ugljeni filteri se instaliraju na obje strane ventilatora kao što je prikazano na slici 10 okretanjem za 10 stepeni u
pravcu kazaljke na satu.
• Prilikom deinstaliranja, koristite isti postupak u suprotnom smjeru.
Upotreba aluminijumskih kasetnih filtera
Aluminijumski kasetni filter zadržava prašinu i masnoću iz vazduha. Napa se nikada ne smije koristiti bez
aluminijumskih kasetnih filtera. (Slika 11)
RUKOVANJE NAPOM

20
BiH/CG
ZAMJENA SIJALICE
Uvijek isključite napajanje prije nego što
počnete sa radom. Ukoliko LED sijalica ne
radi, može se ukloniti kao što je prikazano
na slici 12
Nova sijalica koja se isporučuje uz
uređaj zamjenjuje se istom operacijom u
suprotnom smjeru.
Kablovi su dizajnirani sa utičnicama.
Utikač mora biti izveden u skladu sa
prethodnim priključkom.
Uklonite LED sijalicu sa držača kao što
je prikazano na slici 12.2. Stavite novu
LED sijalicu na kućište držača LED sijalice
koje ste uklonili kao što je prikazano na
slici 12.1.
Slika 12
Crvena
Crna
NAPOMENA
ODRŽAVANJE NAPE
• Treba isključiti uređaj ili prekidač prije procesa čišćenja i održavanja.
• Metalni filter treba jednom mjesečno čistiti vrućom vodom i sapunom ili u mašini za posuđe, ako je moguće. (60 °C)
• Uklonite aluminijumski kasetni filter pritiskom na opruge na bočnoj strani. Poslije pranja filter nemojte ponovo
montirati prije nego ga osušite.
• Spoljnu površinu nape treba obrisati vlažnom krpom natopljenom sapunicom.
• Pobrinite se da elektronski dijelovi ne dodiruju vodu ili slične materijale.
• Za inox proizvode: korišctenje inox proizvoda za čišćenje i održavanje koji su dostupni na tržištu obezbjediće
duži vijek trajanja vašeg uređaja.
• Aluminijumski filteri se mogu prati u mašini za pranje posuđa. Nakon nekoliko ispiranja aluminijumski filteri
mogu promjeniti boju. Ovo je normalno i filteri se zbog toga ne moraju zamijeniti.
• Prilikom ugradnje nape na kanal za dovod vazduha, koristite cijevi prečnika 150/120 mm i koristite krivine što je
manje moguće.
• Pazite na periode čišćenja metalnih filtera i vrijeme zamjene ugljenog filtera.
• Kada jaka usisna snaga nije potrebna, koristite proizvod u srednjoj postavci.
• Za ispravnu ventilaciju, prozori u kuhinji koji vode ka spolja treba da budu zatvoreni.
Kada se koristi sa uređajima koji koriste gorivo (grijači koji rade na gas, dizel gorivo, ugalj ili ogrijevno drvo,
bojleri, itd.) i vazduh u životnoj sredini; treba ga koristiti oprezno. Poklopac nape koji šalje vazduh iz okoline može
negativno uticati na sagorijevanje.
Ovo upozorenje nije primjenljivo kod uređaja bez odvodnih kanala.
Efikasna upotreba nape
UPOZORENJE!
Table of contents
Other Tesla Ventilation Hood manuals
Popular Ventilation Hood manuals by other brands

Lang
Lang CSG24 Installation & maintenance instructions

Thermador
Thermador UCVM30FS use and care manual

KOBE
KOBE CH0030SQB (30") installation instructions

Miele
Miele DA 5381 W Operating and Product dimensions

Jenn-Air
Jenn-Air JXI8036WS Installation Instructions and Use & Care Guide

Holzstar
Holzstar SAA 902 instruction manual