Tesla MS360 User manual

PP 1
www.tesla-electronics.eu
USER MANUAL CZ | SK | PL | EN
TESLA MS360
SMART WEATHER STATION
WITH 3-DAY WEATHER FORECAST

2 3
www.tesla-electronics.eu www.tesla-electronics.eu
Please read this manual carefully before use.
Technical specications and operating procedures in this manual
are subject to change without notice. In case of any questions regarding
the period of use, please contact the manufacturer.
Dear customer, Thank you for purchasing a product
from the proven TESLA brand.
Please read this manual carefully before rst use.
It will be a good guide when getting to know your new device.
We hope that the TESLA weather station will be a pleasant companion for you.
The data and advice used in this guide may be subject to future changes
and improvements and is valid as of the release
of its current version, in March 2023.
Thank you for your understanding.
OBSAH
1. PACKAGE CONTENTS 5
2. BASE UNIT SPECIFICATIONS 6
3. SENSOR SPECIFICATIONS 6
4. QUICK GUIDE 7
5. INSTALLATION AND PLACEMENT 10
6. SENSOR LOCATION 10
7. SENSOR BATTERY CHARGING 10
8. HOW TO PAIR THE SENSOR BASE UNIT 11
9. CONNECTING THE APPLICATION 14
10. SMART LIFE APPLICATION 15

4 5
www.tesla-electronics.eu www.tesla-electronics.eu
WARNING
FUNCTION DESCRIPTION
• Keep the sensor in a safe place where children cannot swallow it.
• When using this product, the ambient temperature should not exceed 140°C or be lower than -20°C;
humidity should not exceed 99% or be below 0%.
• This product is not reproof, please do not throw it into the re, do not come close to the re source.
• This product is not waterproof, please do not soak it in water to avoid damage to the device.
• It is a smart weather forecast station that downloads online weather data for the local area where
the product is located and displays weather information, time, date and temperature and humidity.
• The base unit allows access to multiple sensors (up to 3 sensors). You can place the sensors
indoors or outdoors and the collected data will be transmitted and displayed on the base unit.
• You can congure and control the product through the app and you can check the data
about the weather on both the indoor base unit and the app, the historical indoor/outdoor
temperature records can only be checked in the Smart Live app.
BASIC UNIT
CHARGING CABLE
SENSOR
LACE
POWER ADAPTER
INSTRUCTIONS FOR USE
1. PACKAGE CONTENTS
Pleasereadthismanualcarefullybeforeusingtheproductandkeepitwithproperstorage
UserManual
(V1.0)
Indoorweatherstatio
nWirelesssensor
SmartWeatherClock
-with3-dayWeatherForecast
(SWS-S002)

6 7
www.tesla-electronics.eu www.tesla-electronics.eu
2. BASE UNIT SPECIFICATIONS
3. SENSOR SPECIFICATIONS
4. QUICK GUIDE
4.1. FRONT VIEW
Weather forecast:
sunny, cloudy,
rain, snow
WEATHER ICON
UV INDEX
RISING TIME
AND THE SUNSET
ONLINE TEMPERATURE
DATA AND HUMIDITY
IN THE PLACE
TEMPERATURE DATA
AND HUMIDITY
FROM BASIC UNITS
DIGITAL CLOCK
WiFi
The lowest temperature
Month/date Weather forecast
Alarm clock
The highest temperature
Day of the week Day of the week
WEATHER FORECAST
FOR THE NEXT
THREE DAYS
Model MS360 Material ABS + PC
Power source Lithium battery 3.7V 400mA
Mass 335 g Temperature unit °C/°F
Standby battery life Up to 6 months
Size 160x23x160 mm Exit USB-A 5V-1A
Power connector Micro USB
Operating temperature -20°C~60°C Humidity Unit RH %
Communication frequency 433,92 MHz
Color Black Power supply Micro USB-A 5V-2A
Standby power consumption 11uA
Connection Wi (2,4G) + Bluetooth
Communication distance Up to 80 m in an outdoor open environment
Accuracy Temperature: ±0.5°C Humidity: ±2 %

8 9
www.tesla-electronics.eu www.tesla-electronics.eu
4. QUICK GUIDE
4.2. REAR VIEW
VIEW FROM ABOVE
USB OUTBUTTON
SYNCHRONIZATION/
RESTARTING SENSOR
HANGING HOLE
DISPLAY BRIGHTNESS CONTROL
SWITCHING OFF THE ALARM
BUTTON WIFI
SETTINGS
POWER INPUT
POWER INPUT STAND
4. QUICK GUIDE
4.3. SENSOR
Pairing button
SIDE VIEW
INSIDE VIEW
FRONT VIEW
Led indicator
Lanyard slot
REAR VIEW
Micro USB
charging input

10 11
www.tesla-electronics.eu www.tesla-electronics.eu
5. INSTALLATION AND PLACEMENT
6. SENSOR LOCATION
7. SENSOR BATTERY CHARGING
5.1. BASE UNIT INSTALLATION METHODS
PLACEMENT ON THE TABLE REAR VIEW WALL MOUNTING SIDE VIEW
Power input
Hole for hanging
on the wall
Power
input
Note: the red indicator means „Charging“, when fully charged, the red indicator will disappear.
Note: red indicator means „Charging“, after full charge the red indicator will disappear.
8. HOW TO PAIR THE SENSOR BASE UNIT
The base unit should be placed inside; Sensors can be placed indoors/outdoors up to the maximum
communication distance.
Plug in the power and then connect the 2.4G WiFi (see page 14).
THE WIFI ICON IS
FLASHING
THE DEFAULT
TIME DISPLAY
THE DEFAULT
TIME DISPLAY
Network connected; Weather data
available online; The base unit‘s local
temperature and humidity are updated
normally.
Default view
PUSH THE CABLE THROUGH THE HOLE
UNLOCK THE BATTERY COVER BY ROTATING
AGAINST CLOCKWISE
INSERT MICRO USB
POWER CABLE
SECURE THE BATTERY
COVER TURNING IN THE
DIRECTION CLOCK HANDS

12 13
www.tesla-electronics.eu www.tesla-electronics.eu
8. HOW TO PAIR THE SENSOR BASE UNIT
Long press the „SYNC/PAIR“ button to enter the synchronous mode, rst activate it by pressing
the button on the base unit, the light point on the front is ashing. Then press and hold the button
on the sensor to sync with the base unit. The base unit beeps once after successful synchronization
and automatic exit of SYNC mode.
CONNECTION SUCCESSFUL
LONG PRESS
LONG PRESS
SYNC/PAIR BUTTON
SYNCHRONIZATION
IT WAS SUCCESSFUL
Note: Data from the Remote Sensor will not appear on the display, it is only available through
the application.
The WiFi icon will remain lit
8. HOW TO PAIR THE SENSOR BASE UNIT
To add another sensor, if it has been purchased, press the „SYNC/PAIR“ button again briey to activate
the synchronization mode. First, activate it by pressing the button on the base unit, the light point
on the front ashes. Then press and hold the button on the sensor to sync the other sensor, one
beep will conrm that the sync was successful. Repeat the above steps to sync the third sensor.
After connecting, press the button on the paired sensor, the base unit will beep three
times; If not, it means that SYNC has failed or exceeded the maximum distance.
Reset: Long press the “SYNC/PAIR” button on the base unit to clear all channels and sensor data
and the unit will beep three times.

14 15
www.tesla-electronics.eu www.tesla-electronics.eu
2) Wi-Fi connection
mode Connect to power, the WiFi connection icon will ash. This indicates that the device is now
in Wi-Fi connection mode. If the symbol remains lit, long press the „WiFi“ button until it starts ashing.
This will take you to Wi-Fi connection mode ( ).
9. CONNECTING THE APPLICATION
1) Download the app
Download „Smart Life“ from App Store/Google Play or scan the QR code to register and login.
Notice: Wi-Fi (2.4GHz only) Please allow the app to access your mobile phone‘s bluetooth before connecting,
the app will help you nd your device automatically.
Allow the app to access your mobile phone‘s location so that the app and device can get your city‘s weather data
from the service provider.
THE WIFI ICON IS FLASHING
LONG PRESS
WIFI BUTTON
10. SMART LIFE APPLICATION
1) App pop-up window Start the “Smart Life”
app and a small window will appear with
“Devices to be added:1” and the device icon
will appear. Then click „Add“.
2) Enter the add device interface, check the
displayed device name and click „ “.
10.1. AUTOMATIC APPLICATION DETECTION
Chybí CZ
screen
Chybí CZ
screen

16 17
www.tesla-electronics.eu www.tesla-electronics.eu
10. SMART LIFE APPLICATION
3) Application will show a
small window saying „Enter
WiFi password“. Please select
the 2.4G WiFi network (must
be the same 2.4G WiFi network
the mobile phone is connected
to), then enter the WiFi pass-
word and click „Next“.
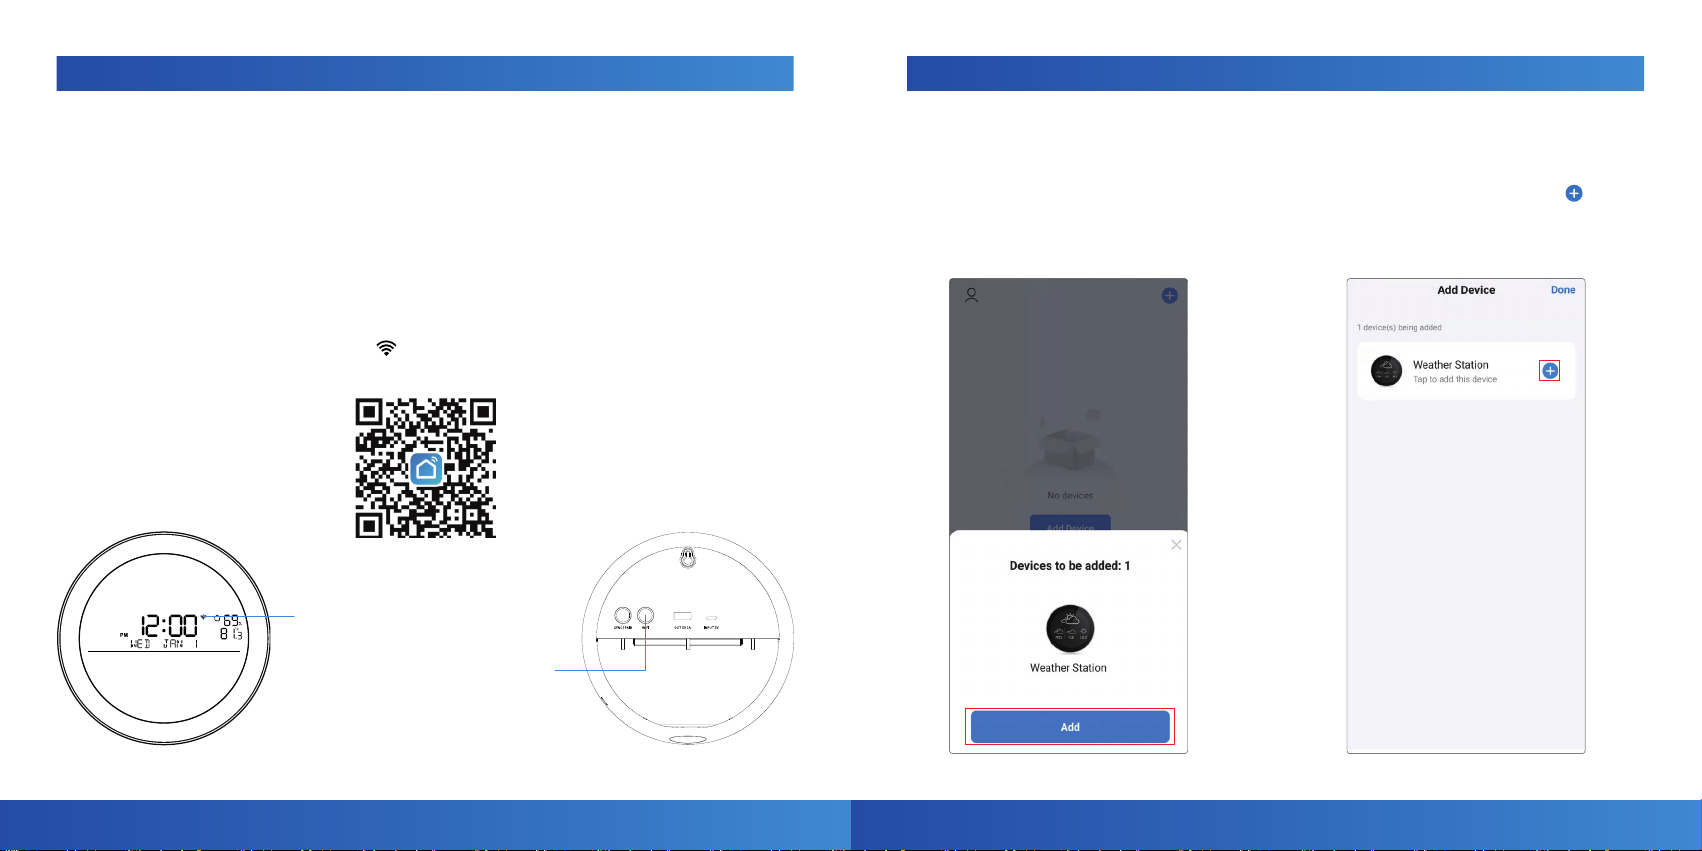
4) A menu with the device
to be added will appear. When
the addition is complete,
the notication „1 device has
been added successfully“ will
be displayed.
5) After the device is
successfully added, the „ “
symbol will appear. Click to
edit the name of the
added device. Click the
„Done“ button to complete
the setup.
10. SMART LIFE APPLICATION
6) Manually adding devices.
Launch the „Smart Live“ app,
click „Add device“ or on the
upper right corner „ “.
7) Enter the add menu while
driving, where the available
devices will be displayed.
Click „Add“.
8) To add the selected device,
click „ “.
Chybí CZ
screen
Chybí CZ
screen
Chybí CZ
screen

18 19
www.tesla-electronics.eu www.tesla-electronics.eu
10. SMART LIFE APPLICATION
9) The app will display a small
window saying „Enter WiFi
password“. Please select the
2.4G WiFi network (must be the
same 2.4G WiFi network that
the mobile phone is connected
to) and then enter the WiFi
password and click „Next“.
10) A menu with the process
of adding a new device will
appear. After successful
addition, the „Done“ button
will appear.
11) On the interface where the
added device is displayed, you
can click t he button „ “ edit
the device name and click „Done“
to complete the network setup.
10. SMART LIFE APPLICATION
10.2. SMART LIFE APP HOME PAGE.
WEATHER DATA
(weather condition, current
temperature and humidity)
GEOGRAPHICAL LOCATION
WEATHER FORECAST ON
NEXT THREE DAYS
(weather condition;
highest/ lowest temperature;
day of the week)
BASE UNIT DATA
(temperature; humidity;
temperature setting)
TIME AND DATE
SUNSET TIME
HISTORICAL DATA
SET ALARM CLOCK
UV INDEX
SENSOR DATA
(temperature; humidity;
alarm settings)
DISCHARGE WARNING
BATTERY
(when sensor battery
is below 10%)
Chybí CZ
screen

20 21
www.tesla-electronics.eu www.tesla-electronics.eu
10. SMART LIFE APPLICATION
10.3. ALARM CLOCK
1) Setting the alarm clock is only possible using the application.
You can set a specic time and repeat options.
10. SMART LIFE APPLICATION
2) Turning off the alarm clock in the application. 3) Turning off the alarm clock using the buttons.
Switching off the alarm clock is possible either with
the button on the top or with one of the buttons
on the back , .

22 23
www.tesla-electronics.eu www.tesla-electronics.eu
FAQ
1) CAN‘T CONNECT THE DEVICE?
Place the router, device and mobile phone in the same area (as close as possible). Make sure your
signal is strong or at least usable (only 2.4GHz Wi-Fi is supported). To connect to another smartphone
or Wi-Fi network, long press again to enter Wi-Fi - Wi-Fi connection mode.
2) WHAT IF THE WEATHER DATA IS NOT AVAILABLE OR ACCURATE?
First, please reconnect the base unit to 2.4 WiFi, the weather data will be automatically acquired
and updated when the network is available; weather data will be updated every 15 minutes, please
make sure to allow Smart Life (App) to access your location for accurate data.
3) SENSOR DATA IS NOT DISPLAYED ON THE BASE UNIT/IS THE SENSOR DISCONNECTED?
Keep the device at least 9m/3ft away from electronics such as TVs, computers, microwave ovens,
etc. Pay attention to the working distance. Long press the button on the sensor, check if the red dot
is displayed. Press the button and then press the button on the sensor to synchronize the data with
,,SYNC/PAIR” on the base unit.
4) FAILED TO SYNCHRONIZE THE BASE UNIT WITH THE SENSOR?
Long press the SYNC/PAIR button on the base unit to clear the previously connected channels
and enter the sync mode. You will hear three beeps to indicate that you are in sync mode. Then press
and hold the button on the remote sensor, it will beep once to conrm that the sync was successful.
Up to 3 sensors can be paired with the base unit.
WARRANTY CONDITIONS
1. WARRANTY PERIOD
The manufacturer provides a warranty for this product for a period of 24 months from the date of purchase
by the consumer. The warranty period is extended by the time during which the product was under warranty
repair. The warranty only applies to defects caused by manufacturing errors or material defects!
2. WARRANTY CERTIFICATE
Free warranty service is provided only upon presentation of proof of purchase of the product (receipt and
a correctly completed warranty certicate - it must contain the production number, date of sale and stamp
of the store (assembly company). Copies and incorrectly completed warranty forms will not be considered!
3. REPAIRS DURING THE GUARANTEE AND POSTGUARANTEE PERIOD
The warranty service must be claimed at the organization where the product was purchased or at the assembly
company that performed the installation.
4. SCOPE OF VALIDITY OF THE WARRANTY
The warranty is void if the defect is caused by mechanical damage, improper use, carelessness, an unavoidable
event (natural disaster), if the product was connected to a different supply voltage than that specied in the
technical specication, and also in case of modications or repairs performed outside the distributor‘s service.
The warranty also cannot be applied if the consumer requires modication or adaptation to extend the functions
of the product (or a system made up of several components) compared to the standard design.
TESLA Electronics LTD, as the manufacturer of this device, declares that the MS360 device is in compliance
with Directive 2014/53/EU. The full text of the EU declaration of conformity is available on the website
https://www.tesla-electronics.eu/
Serial number
Date of notication
Writing warranty messages:
Execution date No. mont. sheet / comment Signature
Date of sale Seller‘s stamp and signature
Table of contents
Popular Weather Station manuals by other brands

TFA
TFA GAIA instruction manual

UNITEC Climate
UNITEC Climate W010 owner's manual

WEATHER DIRECT
WEATHER DIRECT Weather Direct Lite WD-2512UR-B owner's manual

La Crosse Technology
La Crosse Technology WS-2310 Quick setup manual

Oregon Scientific
Oregon Scientific WMR300 user manual

Auriol
Auriol z29592 Operation and safety notes