Thales KeySecure k570 User manual

SafeNet KeySecure k570 Appliance
INSTALLATION GUIDE

Contents
Overview 3
Verifying the Integrity of Your Shipment 4
Received Items 5
Basic order items 5
PED related order items 8
Optional Items 11
Rack-Mounting 13
Using the Supplied Mounting Brackets 13
Using the Optional Sliding Rail System 16
Connecting to the Appliance 20
Connecting the appliance to your network 20
Connecting the appliance to a console device 21
Connecting to the GUI 22
Installing the Locking Bezel 25
Deploying the Appliance 26
Initializing the SafeNet Luna PCIe HSM Card 26
Resetting the Crypto Officer Password 29
Activating the Appliance 31
Configuring the HSM as Root of Trust 33
Licensing 34
Lock Codes 34
Connector/Client Licensing 35
Support Contacts 36
Customer Support Portal 36
Telephone Support 36
Email Support 36
Troubleshooting Issues in Conjunction with Customer Support 36
KeySecure k570 Appliance : Installation Guide
16 June 2020,Copyright© 2020 Thales Group.All rights reserved. 2

Overview
The SafeNet KeySecure k570 Appliance incorporates the new SafeNet NextGen KeySecure Architecture. This
document describes how to install the k570 Appliance, from verifying your shipment to product activation and
licensing.
To ensure a successful installation of the appliance, perform the following procedures in the order indicated
here:
1. Before unpacking your new hardware, refer to "Verifying the Integrity of Your Shipment"on the next page
for safe unpacking instructions.
2. Ensure that you have all of the required components, as listed in "Received Items"on page5
3. If you plan to mount the hardware in an equipment rack, follow the instructions in "Rack-Mounting"on
page13.
4. Connect the appliance to your network and log in as described in "Connecting to the Appliance"on page20
5. For maximum physical access security, install the Locking Bezel as described in "Installing the Locking
Bezel"on page25.
6. Deploy your appliance as described in "Deploying the Appliance"on page26.
7. The NextGen KeySecure requires a valid license to create and manage keys. Review the licensing
requirements in section "Licensing"on page34
8. Support Contacts are provided if needed.
KeySecure k570 Appliance : Installation Guide
16 June 2020,Copyright© 2020 Thales Group.All rights reserved. 3

Verifying the Integrity of Your Shipment
CAUTION! Gemalto employs a number of security measures to allow you to verify that
your new hardware was not intercepted in transit or otherwise tampered with before you
received it. To verify the authenticity and handling history of your received items, review
the following checklist before you unpack your new hardware, and then follow the
checklist as you unpack each received item.
Step Yes No
1. Do the items received (individual items, part numbers) match those listed in the enclosed packing list?
If yes, go to the next step. If no, contact Thales support.
2. Before you received the product, did you receive an advanced shipping notification providing details
regarding the shipment (part numbers and serial numbers for the product and tamper-evident bags)? If
yes, go to the next step. If no, contact Thales support.
3. Are all of the tamper-evident bag serial numbers and tamper-evident label serial numbers listed in the
advanced shipping notification present, and do they match the actual tamper-evident bag/label serial
numbers received? If yes, go to the next step. If no, contact Thales support.
4. Did you receive any tamper-evident bag/label serial numbers that are not listed on the advance shipping
notification? If yes, contact Thales support. If no, go to the next step.
5. Are there any signs of physical tampering? If tamper-evident labels are affixed to the received product,
have any of these labels been damaged? Have the tamper evident bags been damaged in any way?
The tamper seals on the sides indicate tampering if they show the ALERT markings as illustrated
below. If yes, contact Thales support. If no, go to the next step.
6. Once you have verified all of the received items, you can proceed with the installation.
KeySecure k570 Appliance : Installation Guide
16 June 2020,Copyright© 2020 Thales Group.All rights reserved. 4

Received Items
This section provides a list of the components you should have received with your KeySecure k570 Appliance
order. The specific items you received depend on whether you ordered a password-authenticated or a PED-
authenticated KeySecure k570 Appliance.
Basic order items
The basic items that you should have received as part of your order for a KeySecure k570 Appliance are listed
the following table:
Qty Item
1 KeySecure k570 Appliance
Your order should include one password-authenticated or PED-authenticated KeySecure k570 Appliance .
Both models appear physically identical.
NOTE You can verify whether your appliance is password-authenticated or PED-
authenticated using the part number on the product label.
2 Power Supply Cord
One for each power supply, with connectors appropriate to your region of operation.
KeySecure k570 Appliance : Installation Guide
16 June 2020,Copyright© 2020 Thales Group.All rights reserved. 5
Qty Item
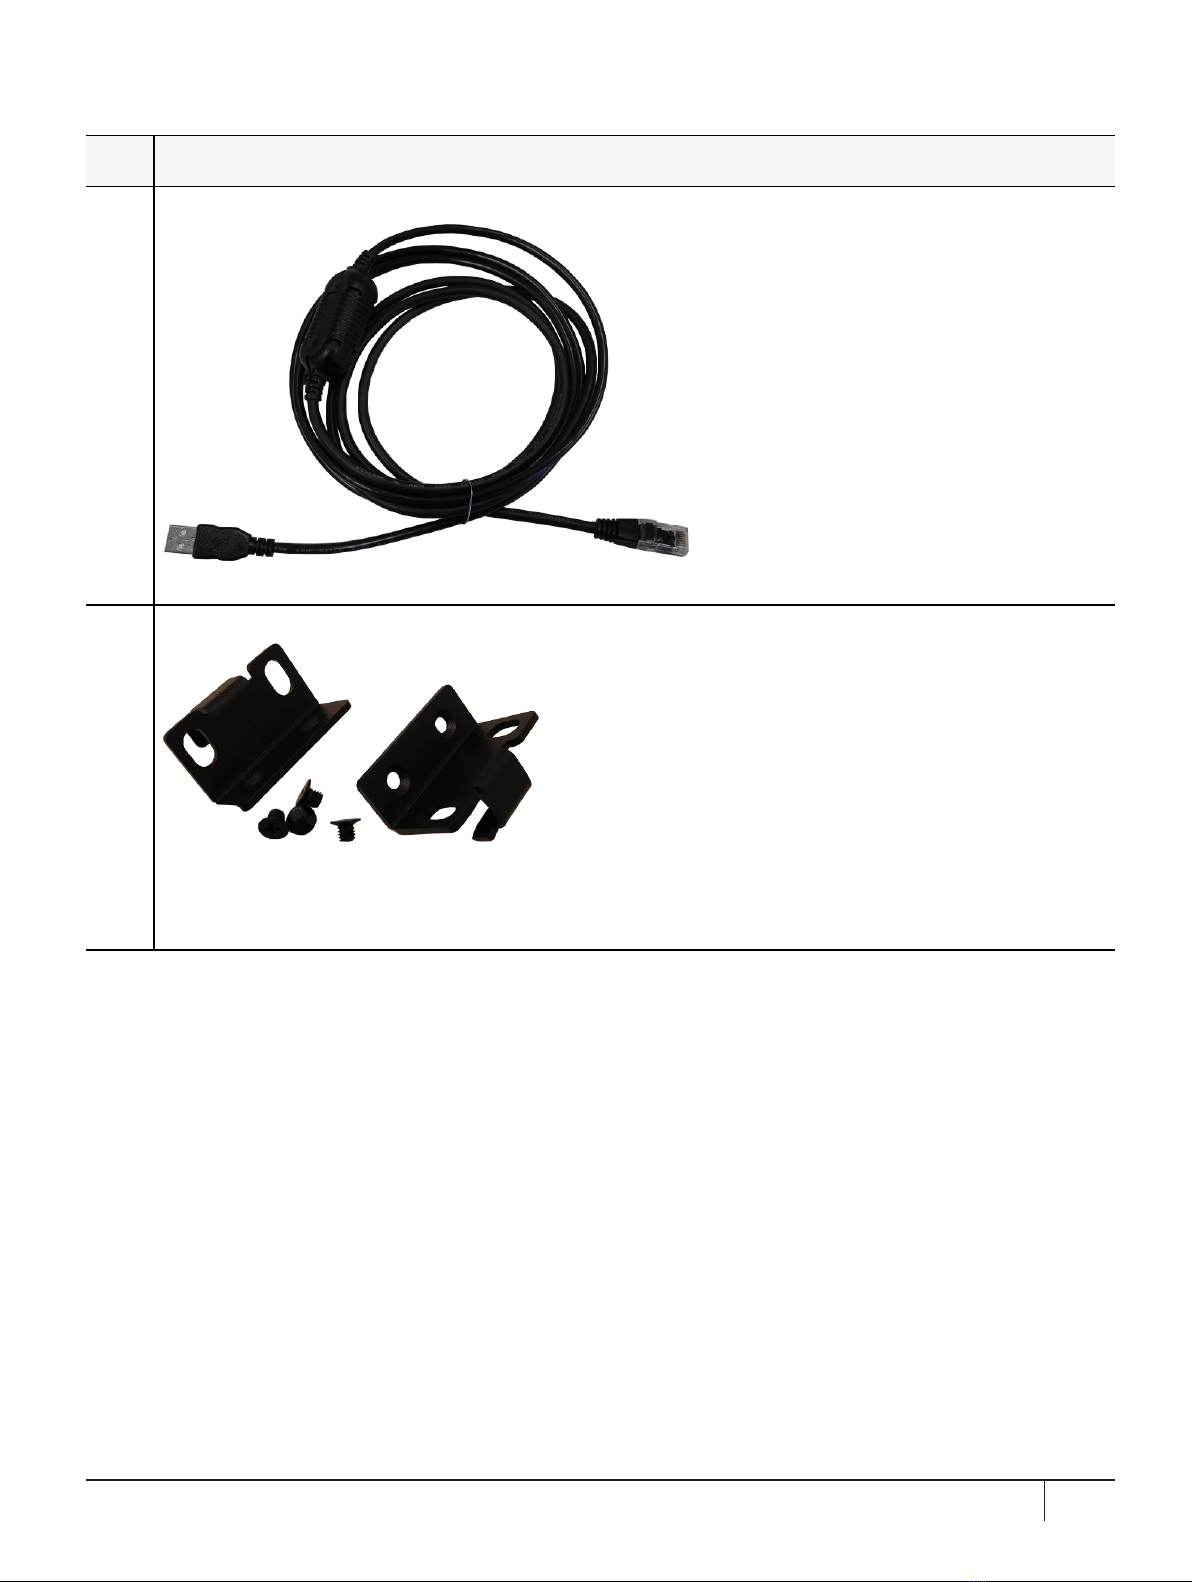
1Adapter Cable: RJ45 to USB with a standard eight-pin, eight connector (8P8C) modular connector
Used to connect a console terminal to the appliance during initial configuration.
1Front Ear Bracket Set
Set includes:
>(2) front ear brackets
>(4) bracket screws
KeySecure k570 Appliance : Installation Guide
16 June 2020,Copyright© 2020 Thales Group.All rights reserved. 6
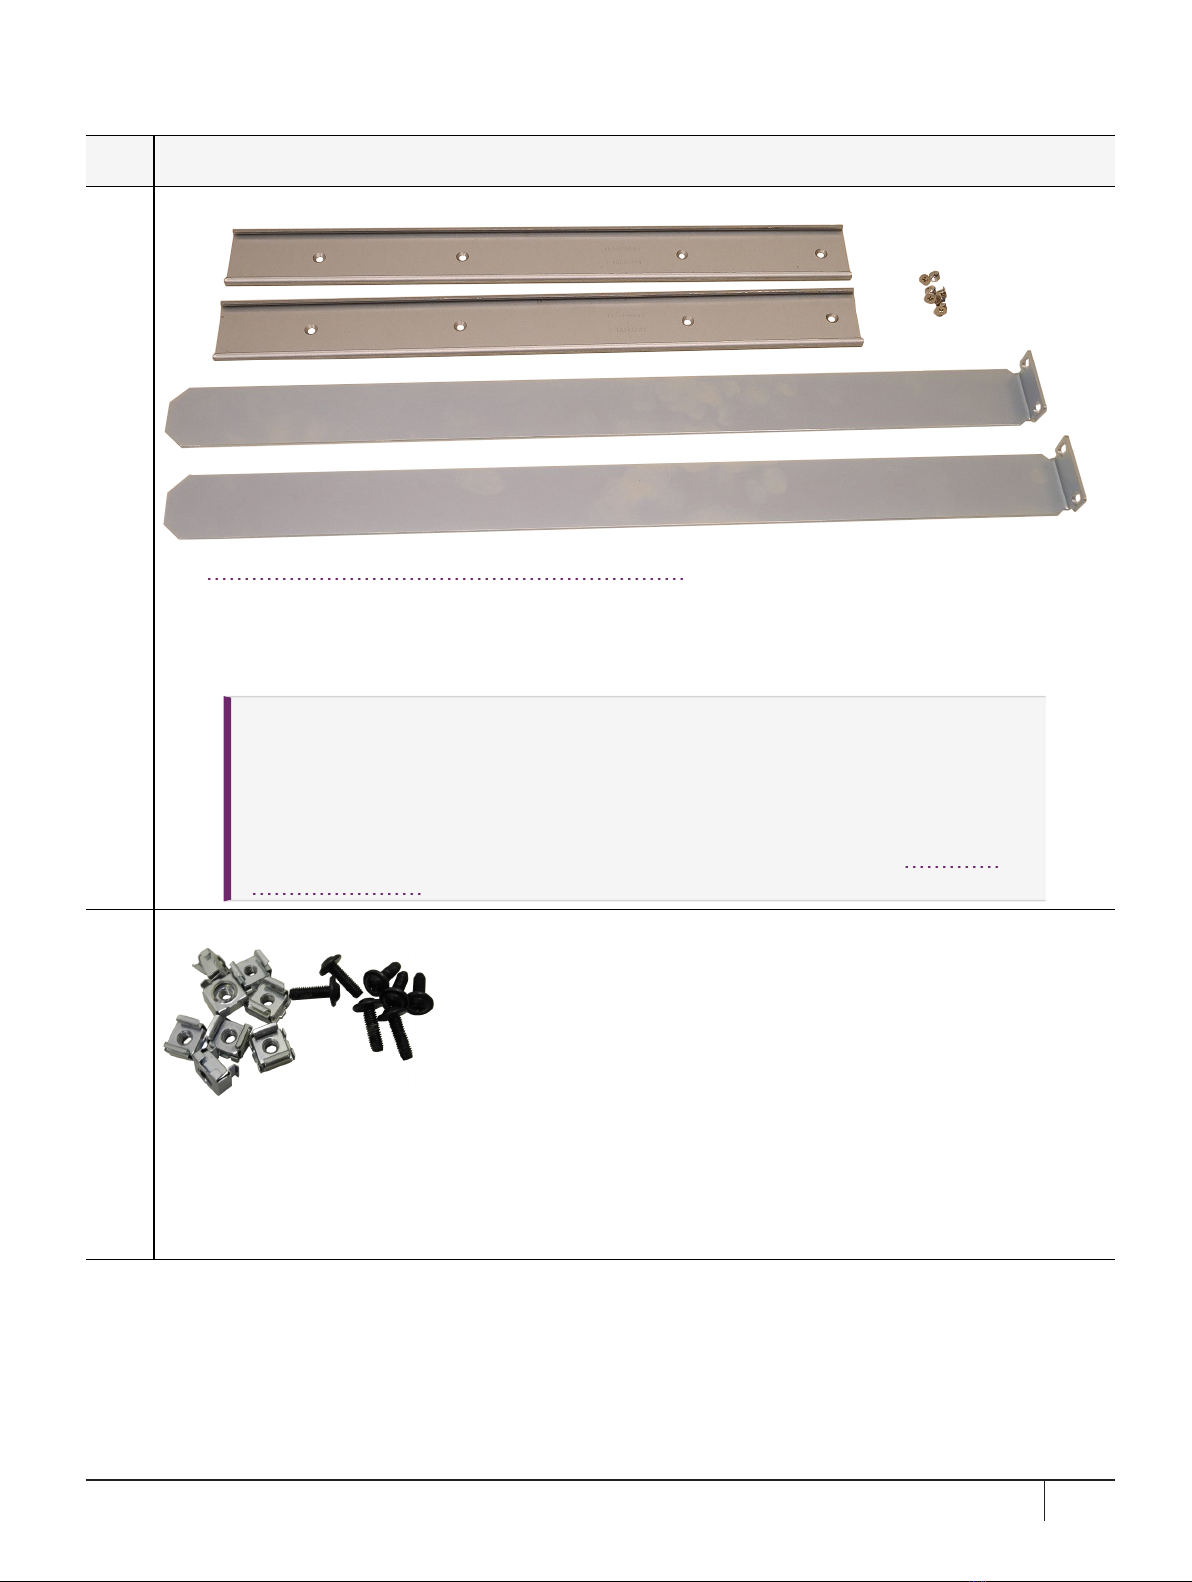
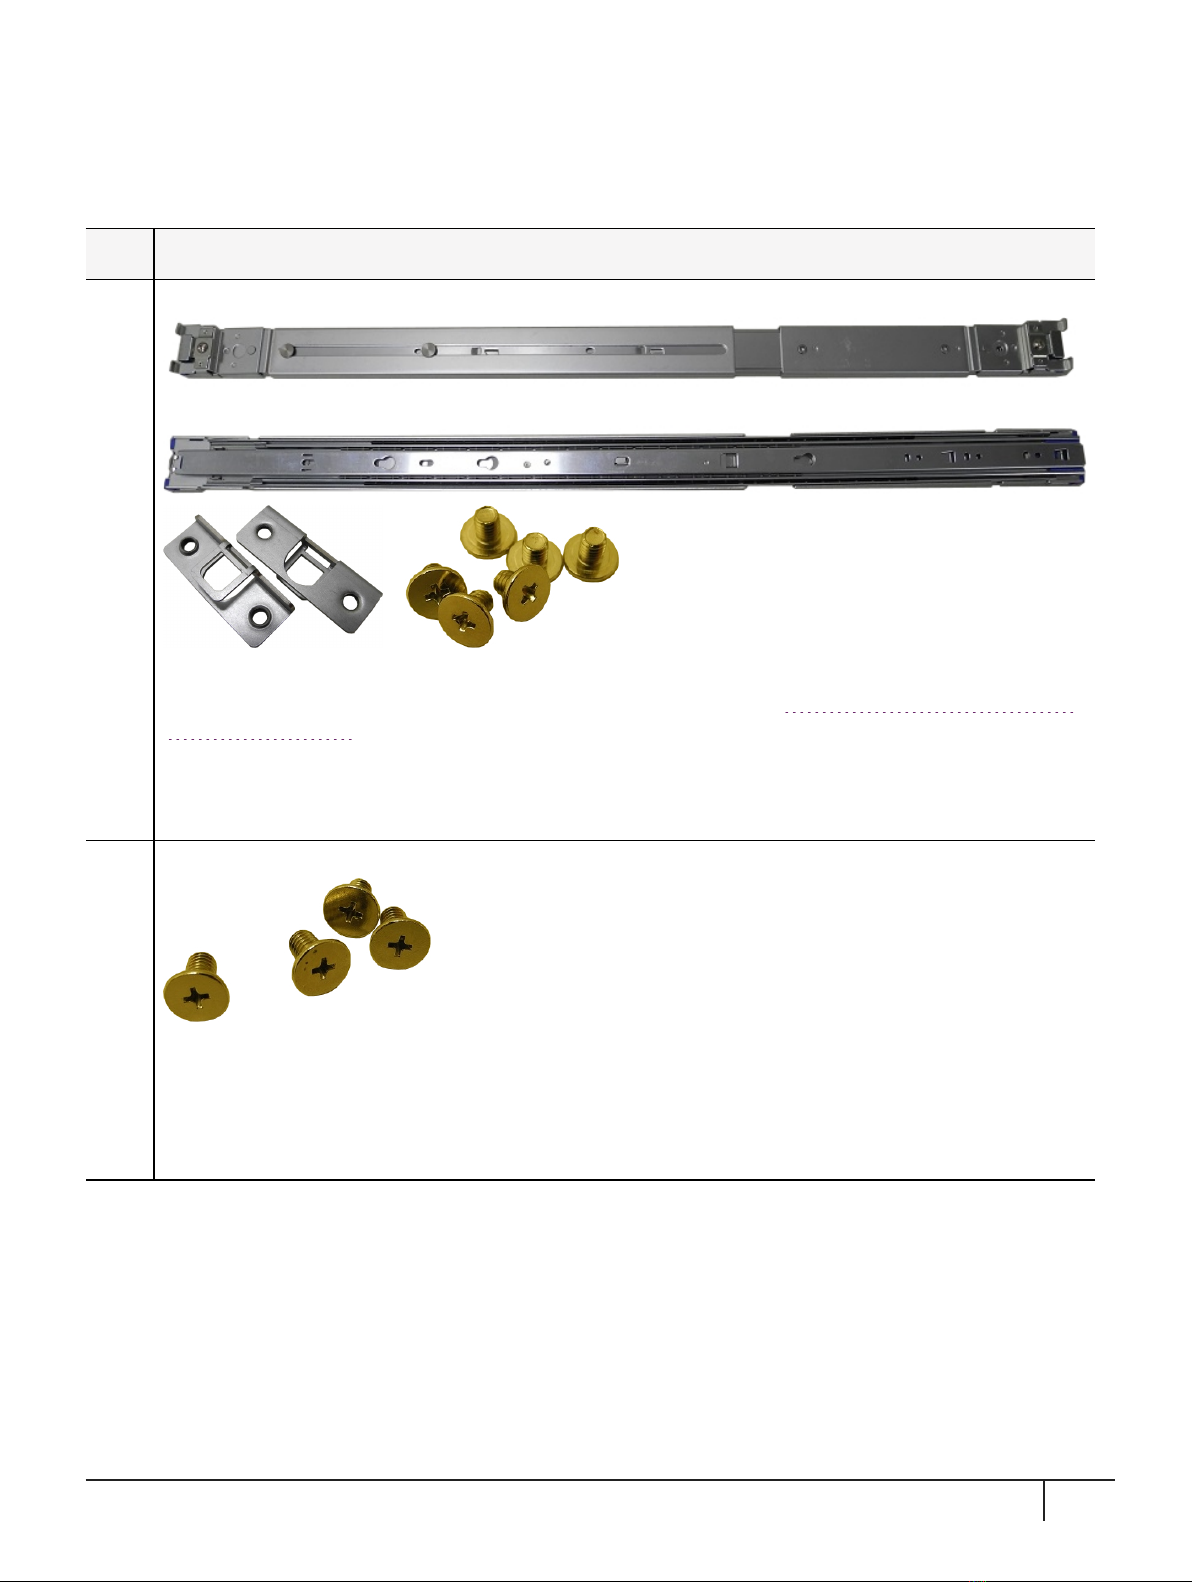
Qty Item
1Friction Rail Mounting Bracket Set
See "Using the Supplied Mounting Brackets"on page13 for installation instructions. Set includes:
>(2) side rails
>(8) side rail screws
>(2) sliding rear brackets (fit into the rails for rear support adjustable positioning)
CAUTION! The included mounting hardware is meant for static positioning of the
appliance. The long tab that slides into the bracket, applied to each side of the appliance, is
adjustable for fitting the appliance into racks of varying depth - it must not be used to extend
the appliance out of the rack.
Optional gliding rails with rolling bearings are available for situations where rolling excursion
of the appliance, while attached to the rack, is required for maintenance. See "Optional
Items"on page11.
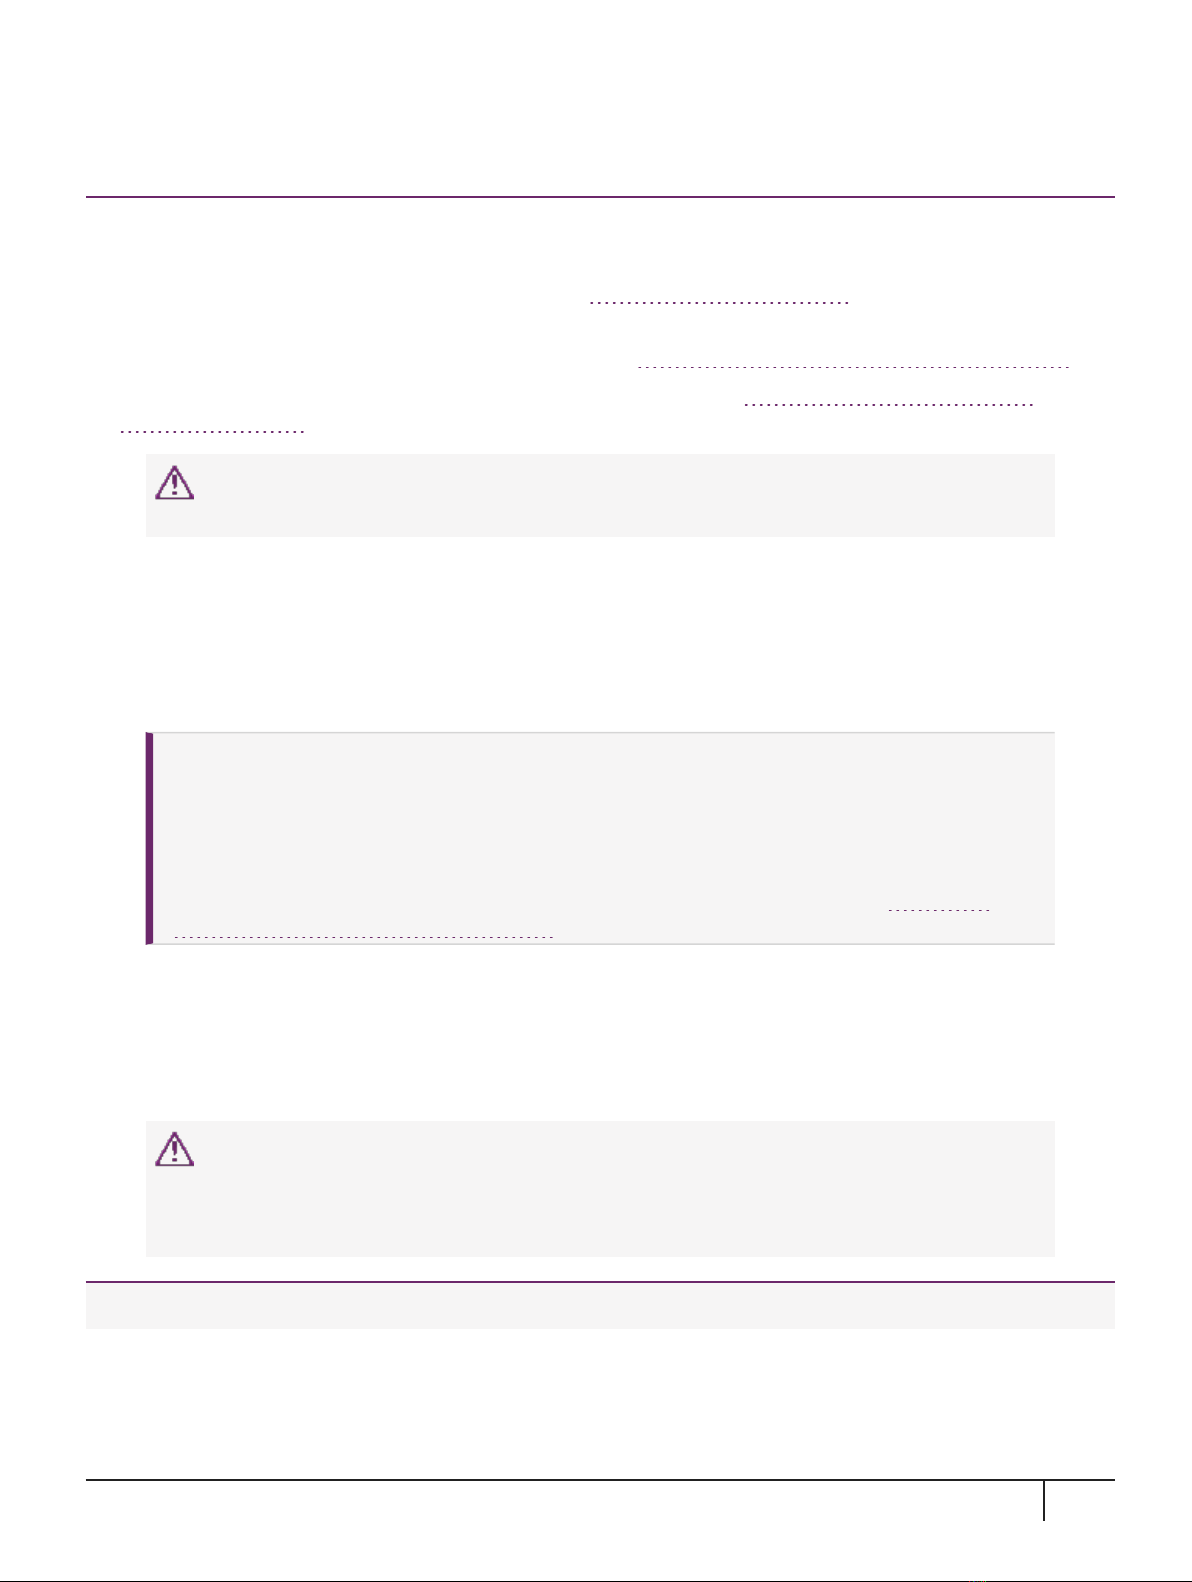
1Friction Rail Rack Mounting Screws/Cage Nuts
Set includes:
>(8) M5 cage nuts
>(8) M5x14 rack screws
If you did not receive this set, you can request one from Thales Group (part number: 216-000035-001) or obtain
your own suitable screws/nuts.
KeySecure k570 Appliance : Installation Guide
16 June 2020,Copyright© 2020 Thales Group.All rights reserved. 7
Qty Item
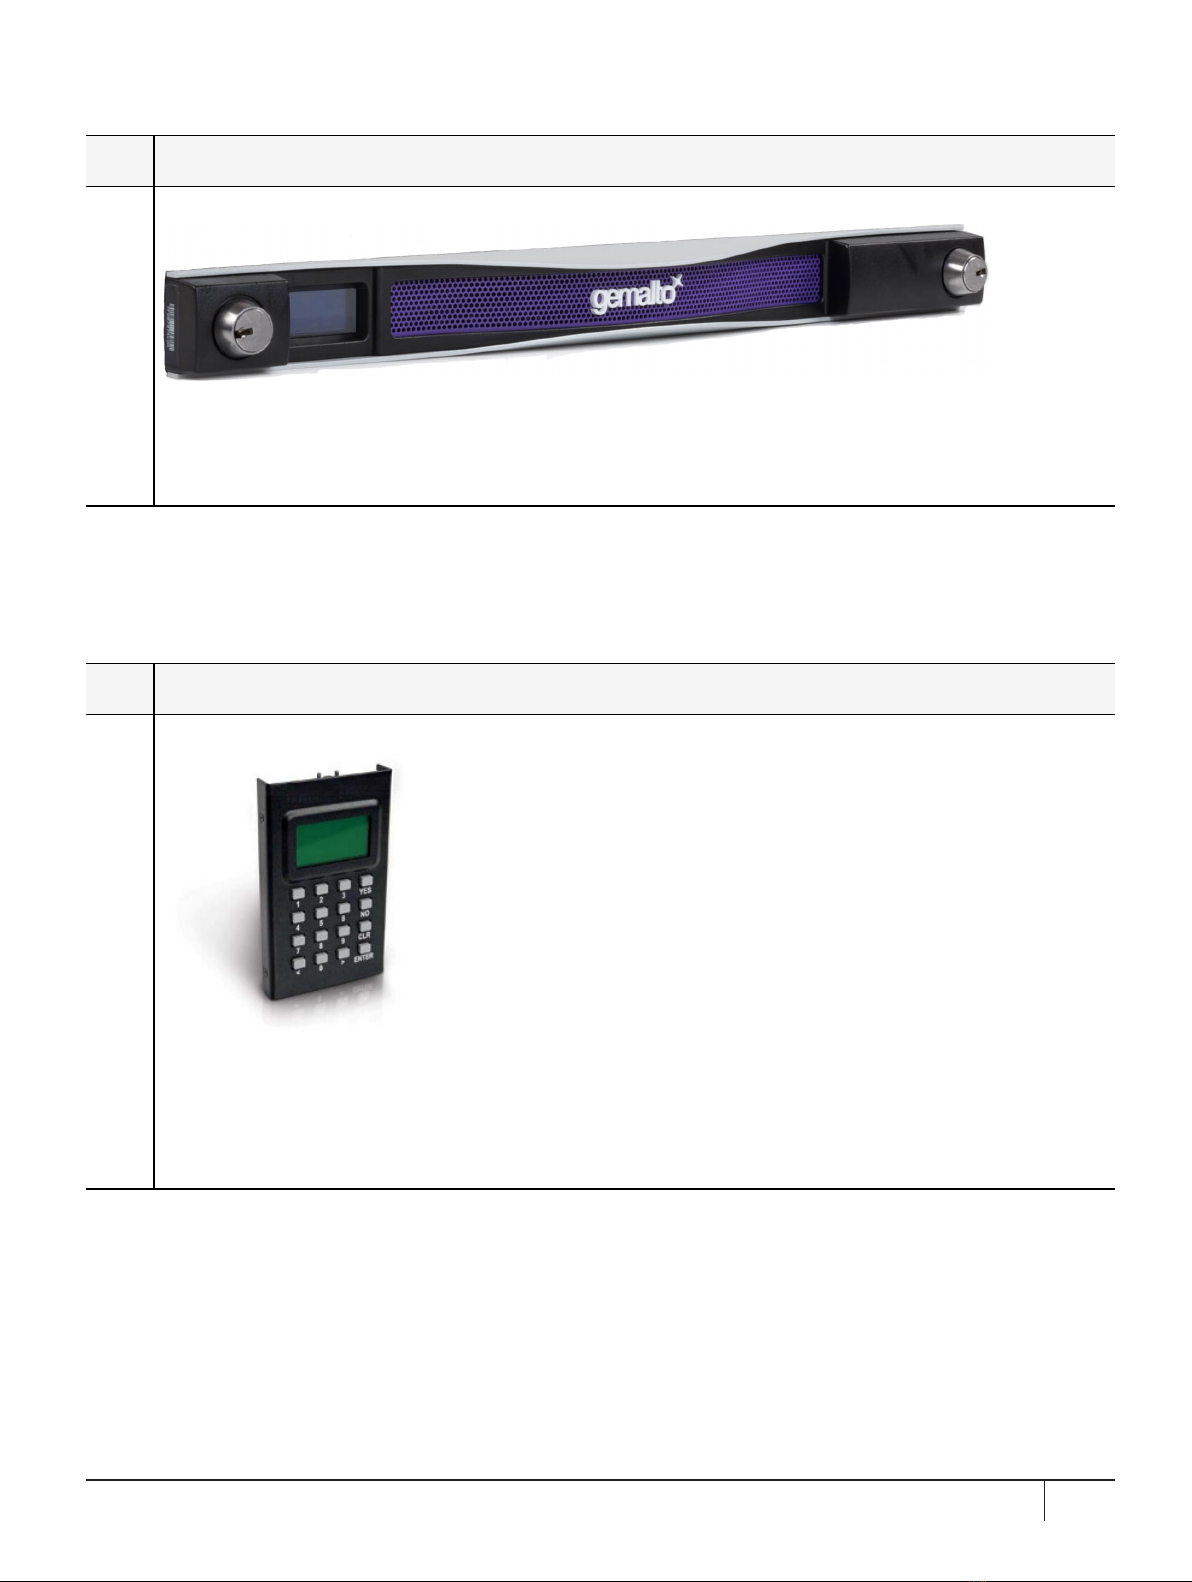
1Secure Locking Bezel
For maximum physical security, this faceplate bezel can restrict access to the KeySecure k570 Appliance
front-facing inputs. Includes set of three (3) keys for each lock (locks are keyed differently).
Some security standards require the use of this bezel. Leaving the appliance uncovered for ease of access
might compromise physical security.
PED related order items
If you ordered a PED-authenticated KeySecure k570 Appliance, you should have received some combination
of the following items in addition to the basic order items (above).
Qty Item
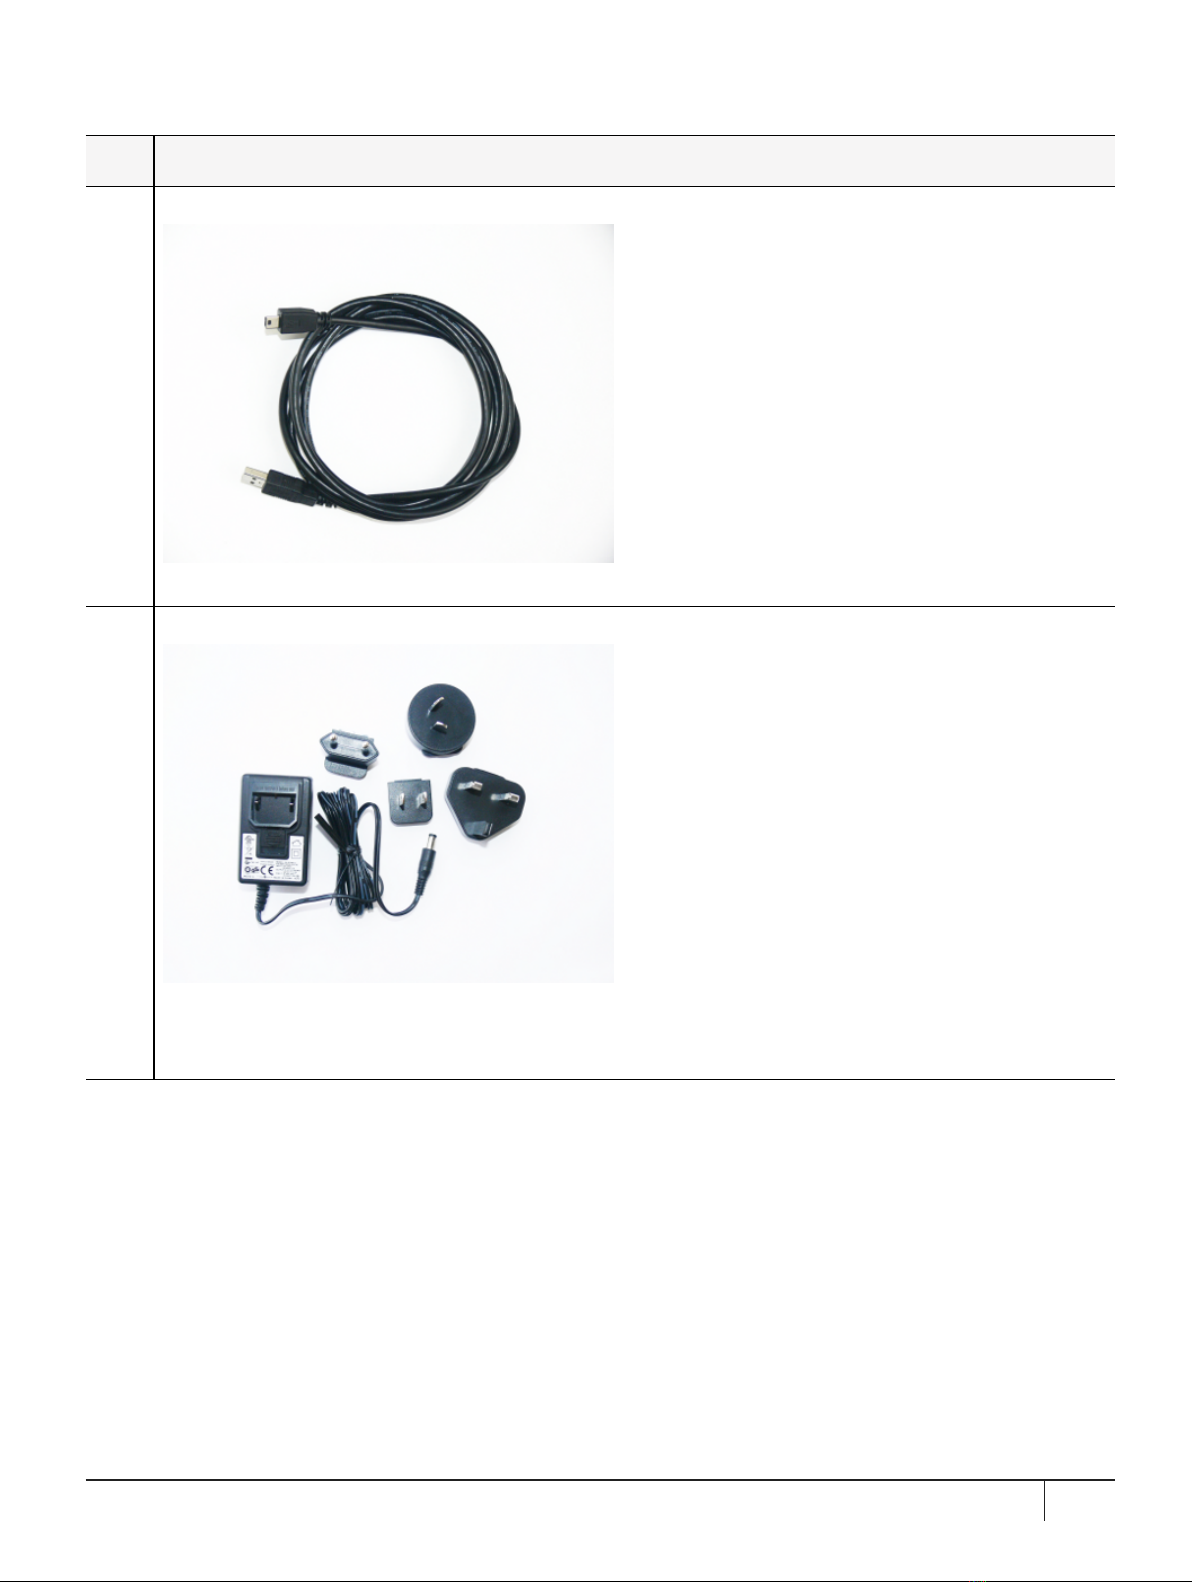
1PED device
Your order should include at least one PED device.
If you intend to back up your KeySecure k570 Appliance Appliance to a SafeNet Luna Backup HSM, then you
require a Luna PED to connect to that Backup HSM.
If you intend to combine remote operation and backup, you might prefer to have a second PED. It is possible to
use a single Luna PED for both connections, and to simply change between local and remote mode as needed.
KeySecure k570 Appliance : Installation Guide
16 June 2020,Copyright© 2020 Thales Group.All rights reserved. 8
Qty Item
1PED cable
This is a Type A to Mini B USB cable used to connect the PED device to your KeySecure k570 Appliance.
1Luna PED Power Supply Kit
If you ordered a Luna PED, your order should also include a Luna PED power supply kit with the appropriate
power connection for your region. The power supply is auto-sensing and includes replaceable mains plug
modules for international use.
KeySecure k570 Appliance : Installation Guide
16 June 2020,Copyright© 2020 Thales Group.All rights reserved. 9

Qty Item
1Set of PED Keys and Labels
Your order should include a set of iKey PED keys and peel-and-stick labels.
KeySecure k570 Appliance : Installation Guide
16 June 2020,Copyright© 2020 Thales Group.All rights reserved. 10
Optional Items
You may have also ordered one or more of these optional items:
Qty Item
1Sliding Rail Mounting Bracket Set
The KeySecure k570 Appliance will fit into any standard 19-inch server rack. The optional sliding rail mounts
allow for easy removal and access to the rear face of the appliance. See "Using the Optional Sliding Rail
System"on page16 for installation instructions. The set includes:
>(2) sliding rail mounts with removable side rails
>(2) transformer brackets
>(6) rail screws
1Sliding Rail Rack Mounting Screws
Set includes:
>(8) M5x8 flat-headed screws
If you did not receive this set, you can request one from Thales Group (part number: 216-000034-001) or
obtain your own suitable screws. If you do not use the screws included in this kit, ensure that the screw
heads are flat enough so as not to interfere with the locking bezel.
KeySecure k570 Appliance : Installation Guide
16 June 2020,Copyright© 2020 Thales Group.All rights reserved. 11

Qty Item
1SafeNet Luna Backup HSM
You can back up your selected KeySecure k570 Appliance partition contents (root keys, certificates, other
items) to a SafeNet Luna Backup HSM. The SafeNet Luna Backup HSM is suitable for off-site storage and
for backing up multiple HSM partitions. It can back up contents of password-authenticated or of PED-
authenticated HSMs. It must be initialized as one type or the other before the backup operation starts.
The SafeNet Luna Backup HSM can be connected directly to an HSM, or it can be connected to a separate
computer to back up remotely-located HSMs in conjunction with a Remote PED.
The authentication method for a Backup HSM must match the authentication method (password or PED) for
any HSM with which it is used.
2SFP 10 Gbps Optical Ethernet transceiver modules
If you ordered the k570 model with 2X10Gbps ports and 2X1Gbps ports, you should have received two SFP
10 Gbps Optical Ethernet transceiver modules, packed separately.
Installation:
On the appliance rear panel, the two 2X10Gbps ports are protected by plastic dust covers during shipment.
As part of appliance installation, you must remove these dust covers and insert a transceiver module in each
port.
KeySecure k570 Appliance : Installation Guide
16 June 2020,Copyright© 2020 Thales Group.All rights reserved. 12
Rack-Mounting
If you intend to mount the KeySecure k570 Appliance in a standard equipment rack, front ear brackets, side
rails, rear slider brackets, and the necessary screws are packed separately in the carton. You may also have
ordered the optional sliding rail mounting system. See "Received Items"on page5 for details. Instructions for
installing both systems are provided below:
>If you intend to use the supplied mounting brackets, see "Using the Supplied Mounting Brackets"below.
>If your order included the optional sliding rail mounting system, see "Using the Optional Sliding Rail
System"on page16. The sliding rails are recommended for ease of installation and maintenance.
CAUTION! Do not attempt to mount the appliance using only the front brackets –
damage can occur.
Using the Supplied Mounting Brackets
Install and adjust the rails and brackets to suit your equipment rack. The standard mounting bracket set is
designed for use in racks with a maximum depth of 27 inches (686 mm). For racks larger than 27 inches, a
mounting tray or shelf is recommended.
CAUTION! The included mounting hardware is meant for static positioning of the appliance.
The long tab that slides into the bracket, applied to each side of the appliance, is adjustable
for fitting the appliance into racks of varying depth - it must not be used to extend the
appliance out of the rack.
Optional gliding rails with rolling bearings are available for situations where rolling excursion
of the appliance, while attached to the rack, is required for maintenance. See "Using the
Optional Sliding Rail System"on page16.
Ensure you have all the necessary components before proceeding. In addition to the supplied components,
you will need:
>#2 Philips screwdriver
>hydraulic equipment lift
CAUTION! If you are installing the appliance in a rack without a mounting tray or shelf,
ensure that the appliance is supported at all times or damage may occur. Use of a
hydraulic equipment lift is strongly recommended. If you do not have access to a lift, you
will need at least one assistant to mount the appliance.
To mount the appliance
1. Install the two front ear mounting brackets on the appliance using the included screws and a #2 Phillips
screwdriver.
KeySecure k570 Appliance : Installation Guide
16 June 2020,Copyright© 2020 Thales Group.All rights reserved. 13
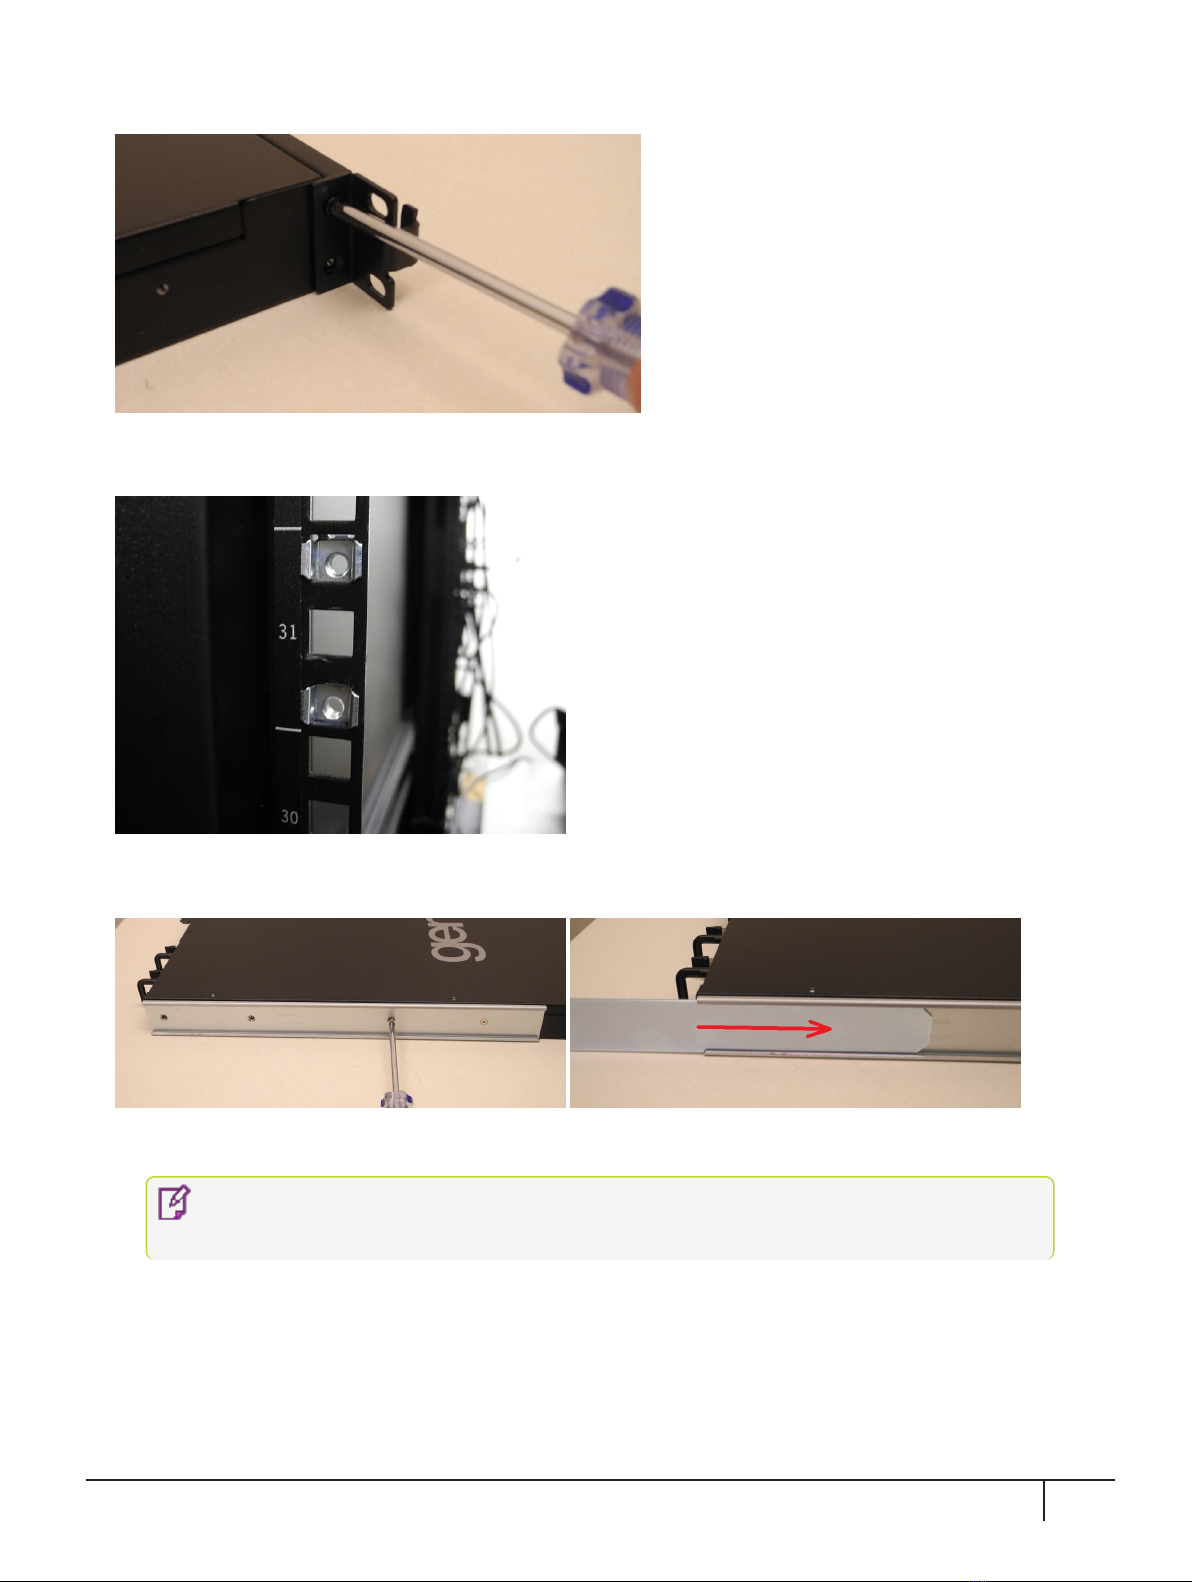
2. Fit eight cage nuts into the rack space where you want to install the appliance. Ensure that they are spaced
correctly.
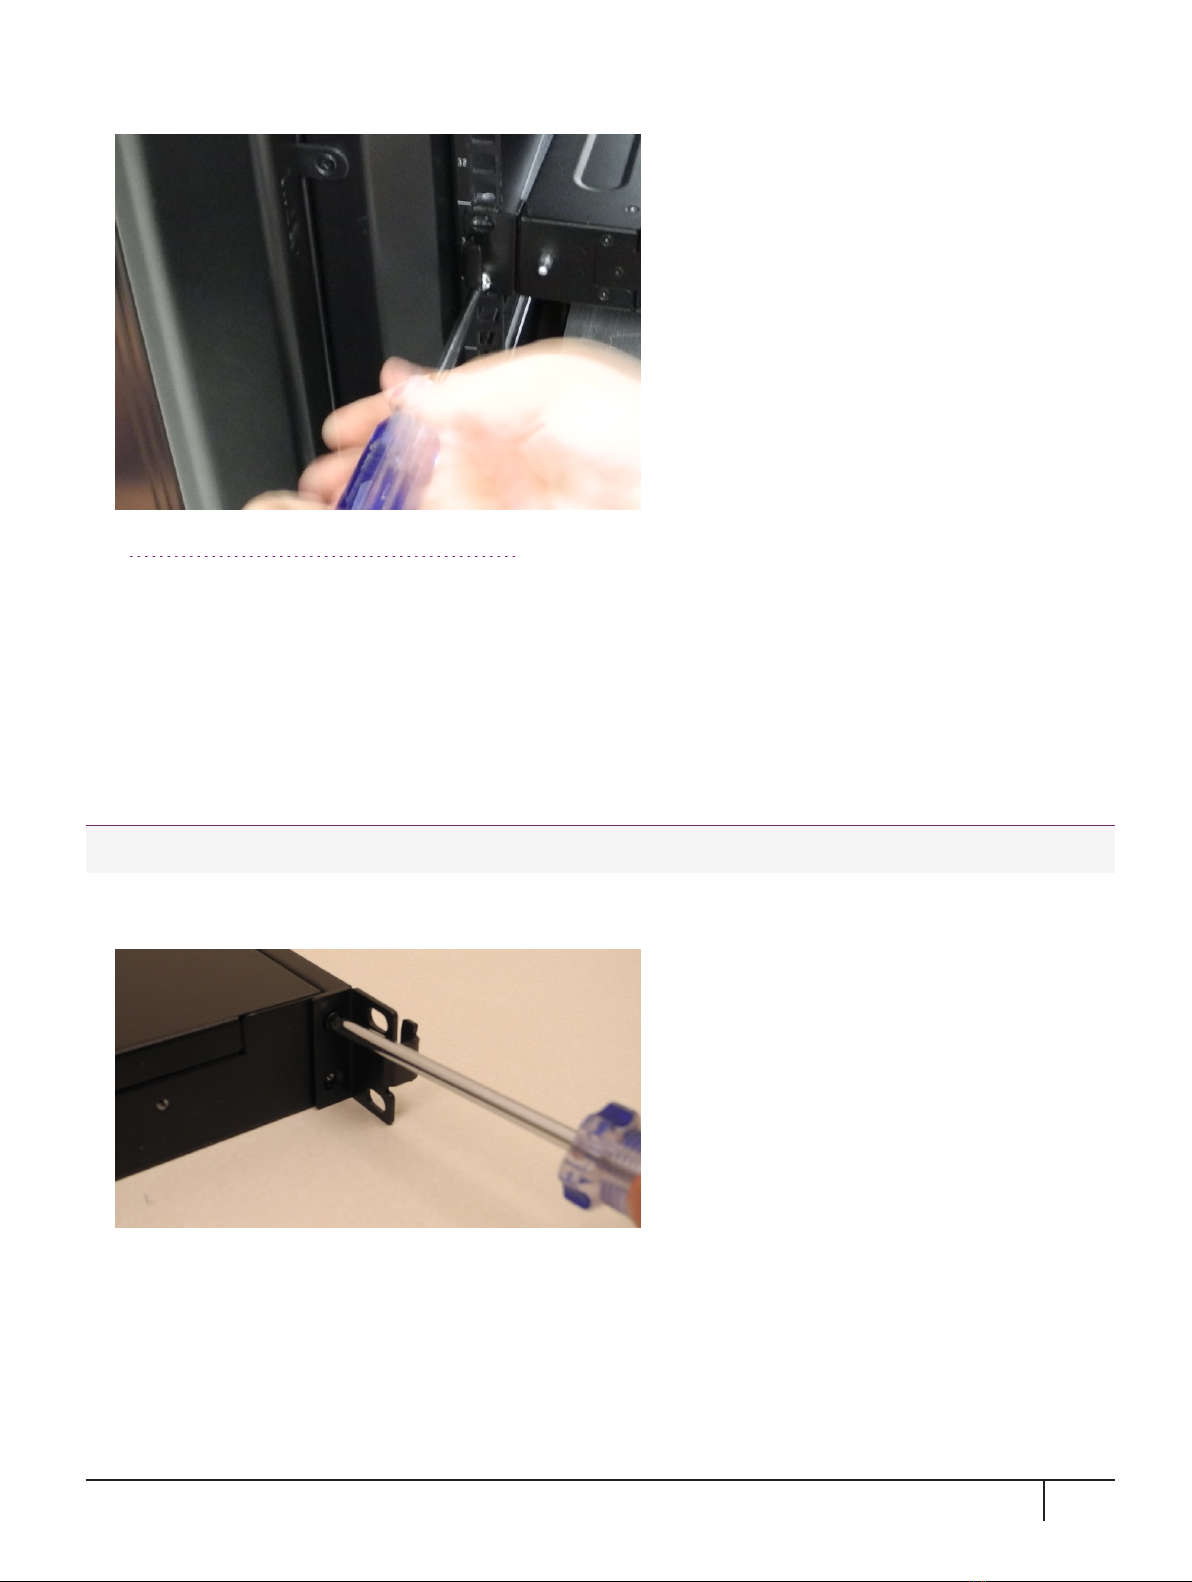
3. Install the two side rails on either side of the appliance, using the included screws and a Phillips screwdriver.
Note how the sliding rear brackets fit into the side rails.
4. Install the two sliding rear brackets in your equipment rack using four rack mounting screws.
NOTE While any standard equipment rack screws should fit the brackets, certain large-
headed screws may interfere with the operation of the secure locking bezel.
KeySecure k570 Appliance : Installation Guide
16 June 2020,Copyright© 2020 Thales Group.All rights reserved. 14
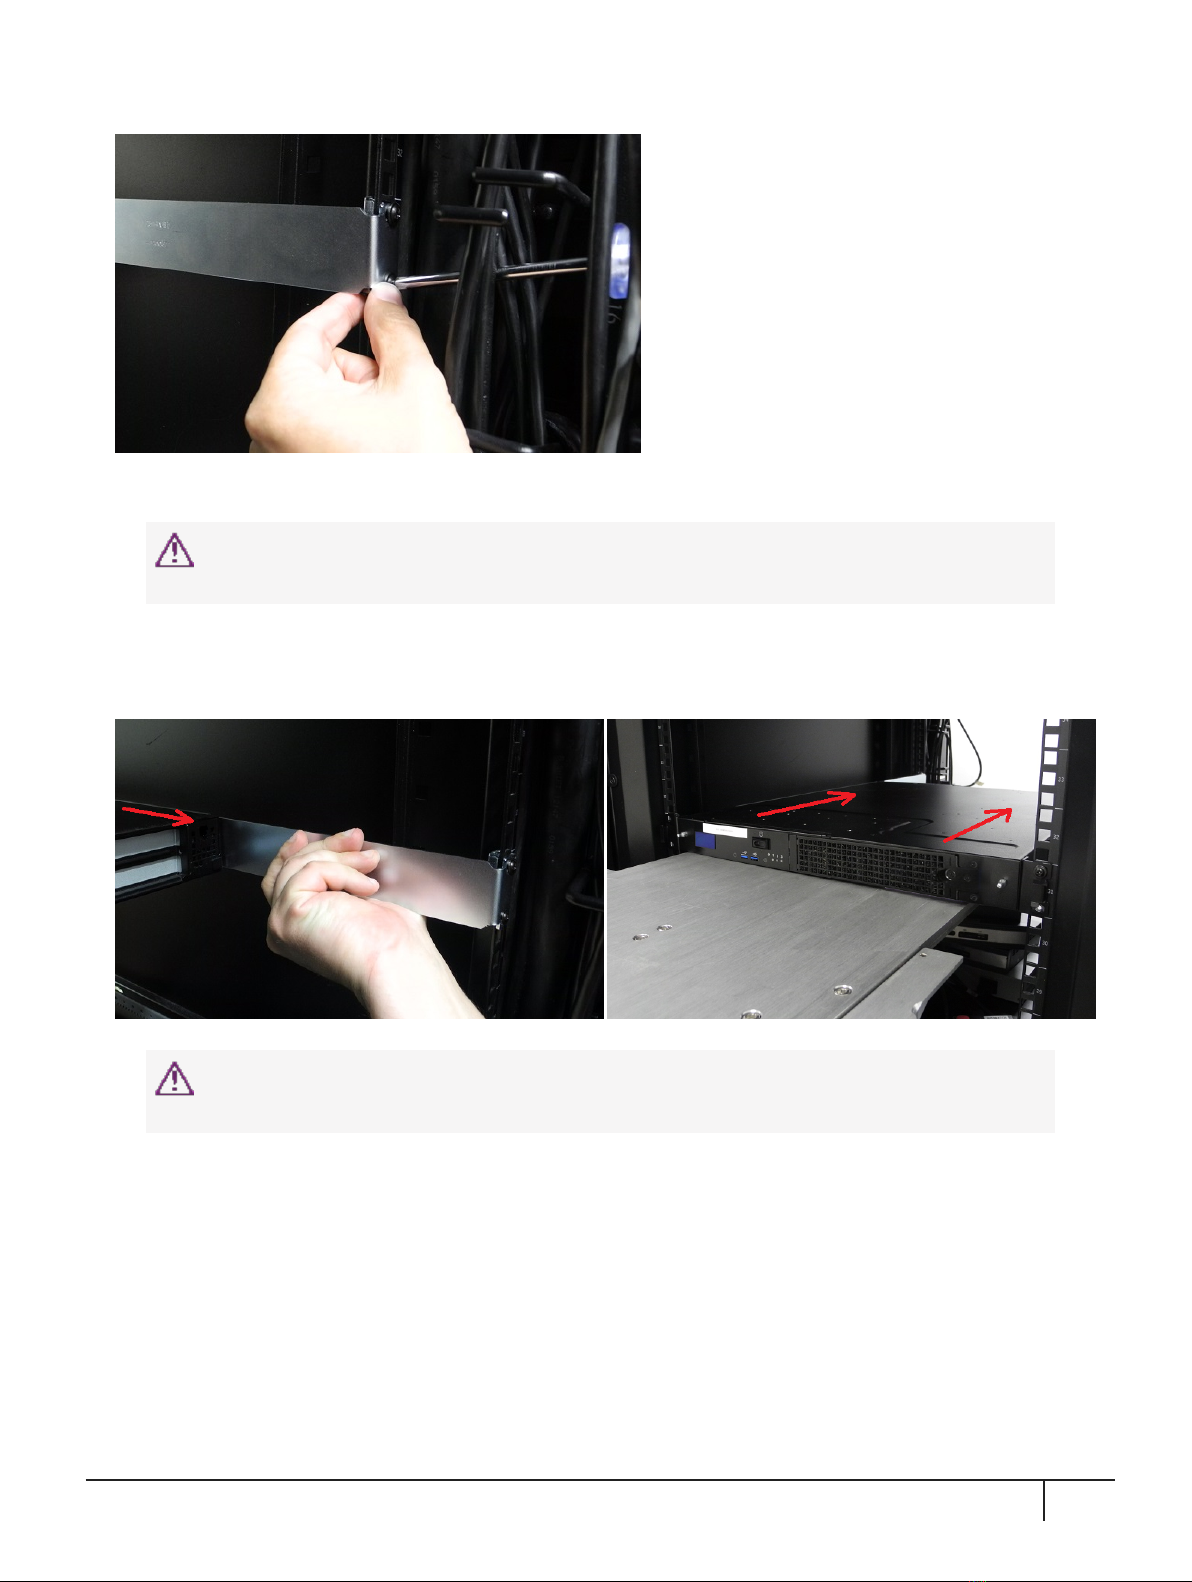
5. Using a hydraulic lift, raise the appliance to the level of the brackets and extend the lift into the rack.
CAUTION! Perform the next step from the rear of the server rack. Do not push the
appliance off the lift without supporting its rear end.
6. From the rear of the server rack, pull the appliance back towards you until the sliding rear brackets fit into
the side rails. Pull the appliance back onto the rear brackets until the front ear brackets meet the equipment
rack.
CAUTION! Support the weight of the appliance with the hydraulic lift until all four
brackets are secured.
7. Secure the front ear brackets using rack mounting screws.
KeySecure k570 Appliance : Installation Guide
16 June 2020,Copyright© 2020 Thales Group.All rights reserved. 15
See "Connecting to the Appliance"on page20 to continue the installation process.
Using the Optional Sliding Rail System
The optional sliding rail system allows for the appliance to be extended out in front of the equipment rack,
possibly easing access to other racked appliances. This is rarely necessary.
The sliding rail mounts fit into any standard 19" equipment rack.
Ensure you have all the necessary components before proceeding. In addition to the supplied components,
you will need a #2 Philips screwdriver.
To mount the appliance
1. Install the two front ear mounting brackets on the appliance using the included screws and a #2 Phillips
screwdriver.
2. Fit the front end of each mount into either side of the rack and pull the spring-loaded latch at the rear to snap
it in place.
KeySecure k570 Appliance : Installation Guide
16 June 2020,Copyright© 2020 Thales Group.All rights reserved. 16
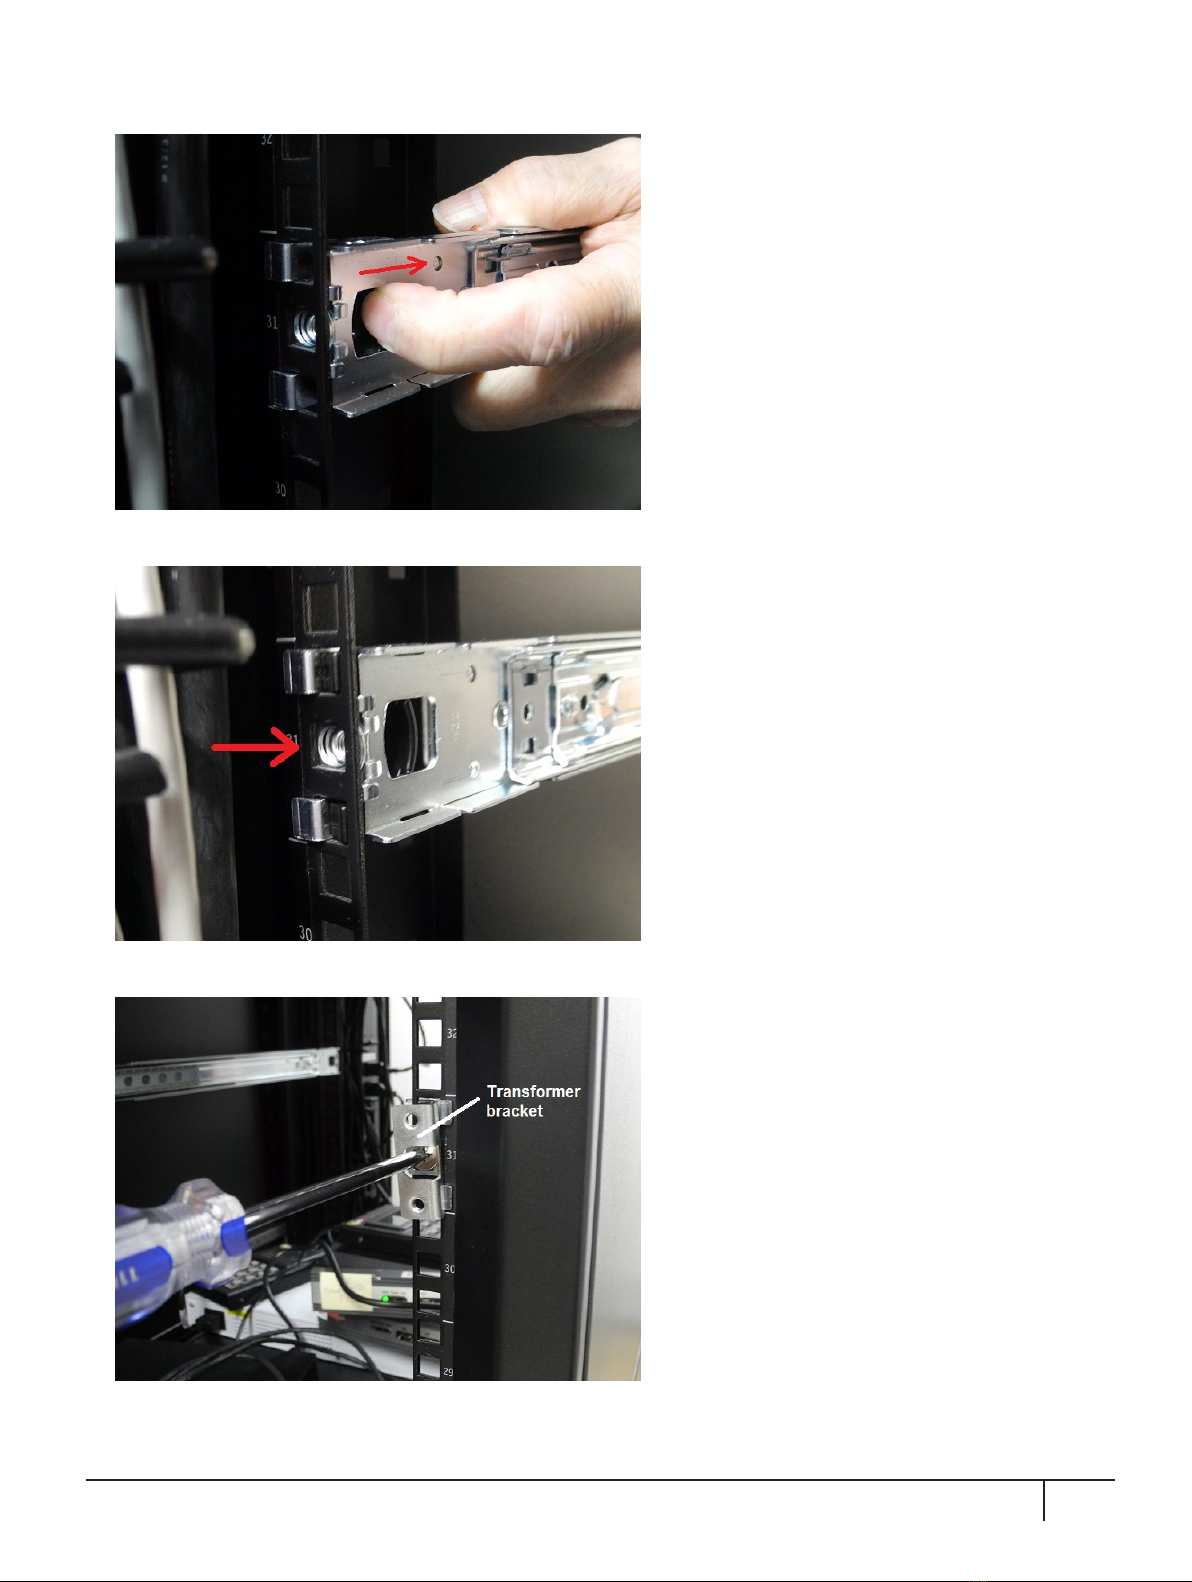
3. Secure the rear end of each mount to the rack with two wide flat-headed screws.
4. Fasten the transformer bracket to each sliding mount with two wide flat-headed screws.
KeySecure k570 Appliance : Installation Guide
16 June 2020,Copyright© 2020 Thales Group.All rights reserved. 17

5. Loosely thread two small flat-headed screws into each side of the appliance. Fit each sliding rail over the
screw heads and slide it forward into place before tightening the screws. Fasten each sliding rail with a third
screw where it lines up with the hole on the appliance.
6. Fit the sliding rails onto the rack mounts until they lock into place.
7. The appliance now moves smoothly and securely on the rails. Push the appliance all the way back and
secure it to the transformer bracket with four rack screws.
NOTE Screws with heads that are too large can prevent the locking bezel from fitting to
the faceplate. Use the screws included with the appliance, or other screws with suitable
heads.
KeySecure k570 Appliance : Installation Guide
16 June 2020,Copyright© 2020 Thales Group.All rights reserved. 18

Connecting to the Appliance
This section provides the following procedures for:
>"Connecting the appliance to your network"below
>"Connecting the appliance to a console device "on the next page
>"Connecting to the GUI"on page22
Connecting the appliance to your network
Follow these instructions to connect and begin configuring the appliance.
To connect your appliance to your network:
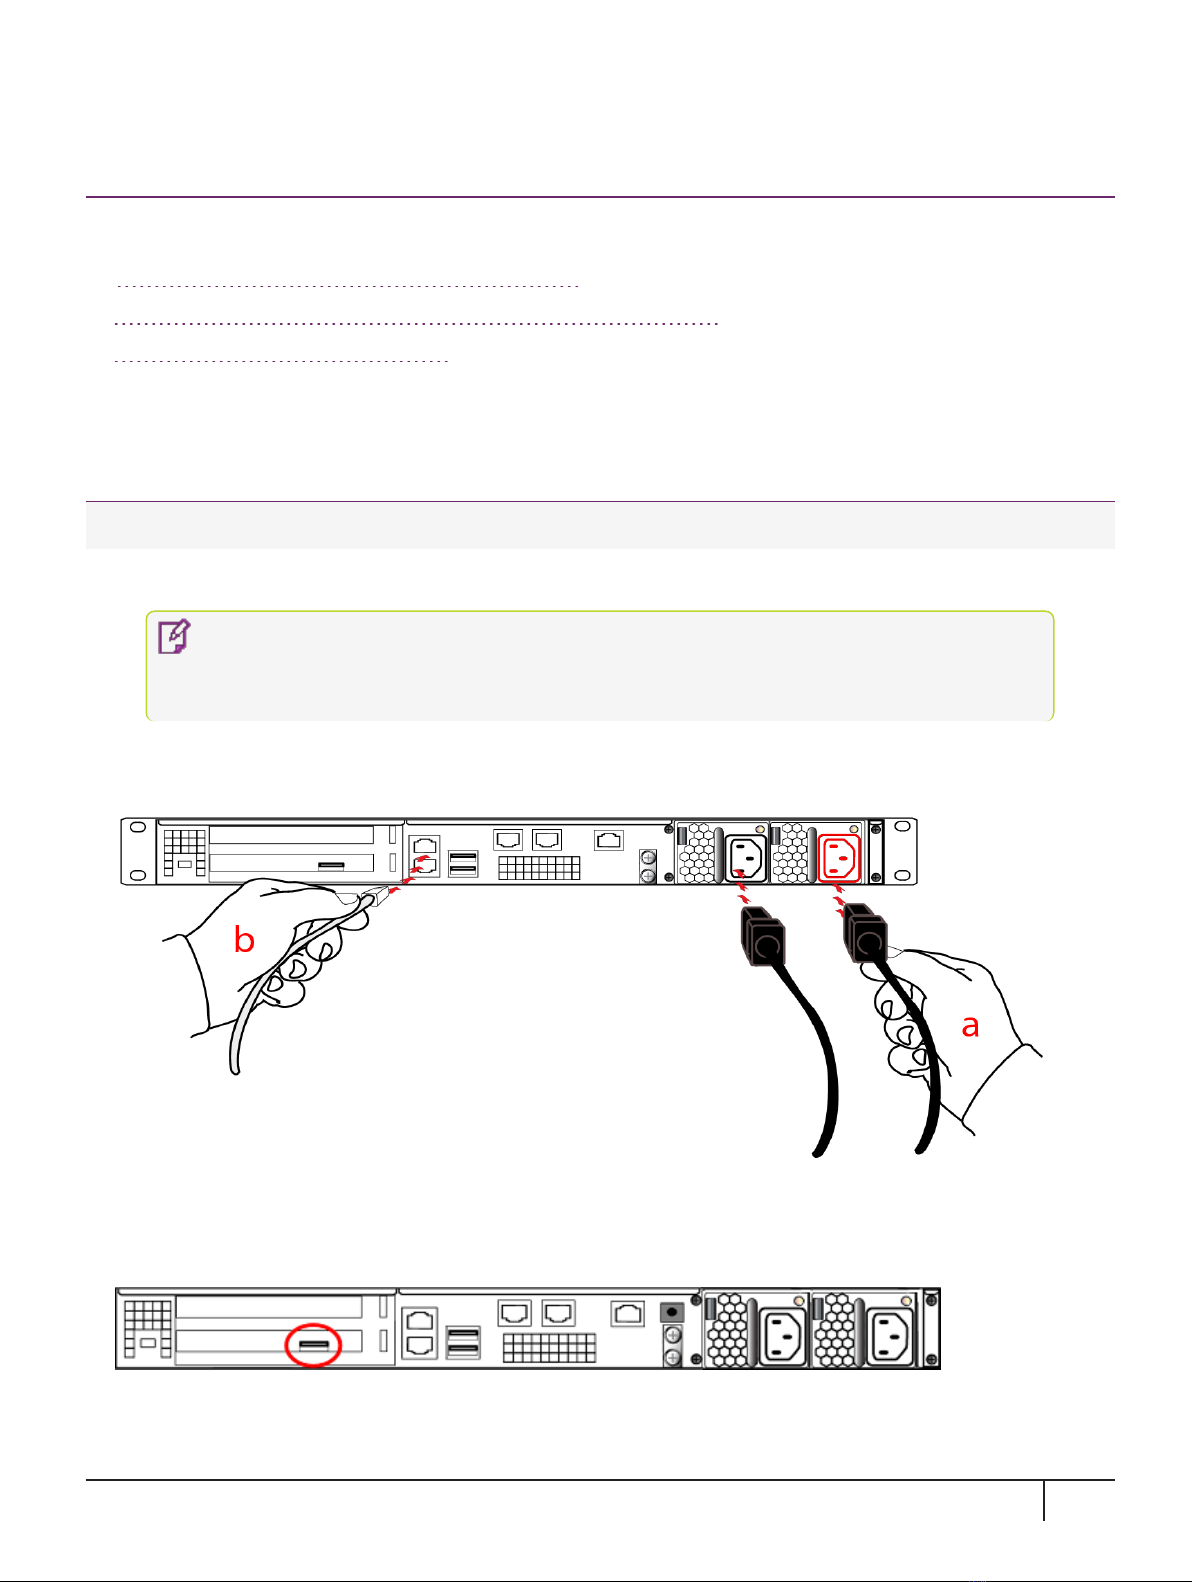
1. Insert the power (a) and network cables (b) at the rear panel.
NOTE The physical location of the network ports (Eth0, Eth1, Eth2 and Eth3) are
dependent on the appliance model. Correct locations for your model are printed on the
rear panel.
For proper redundancy and best reliability, the power cables should connect to two completely independent
power sources.
2. If you have a password-authenticated appliance, skip to the next step.
If you have a PED-authenticated appliance, connect the PED directly to the appliance's USB port (on the
rear panel's left side), using the included USB-to-MiniUSB PED cable.
3. Press and release the Start/Stop switch on the front panel to power up the appliance.
KeySecure k570 Appliance : Installation Guide
16 June 2020,Copyright© 2020 Thales Group.All rights reserved. 20
Table of contents
Popular Firewall manuals by other brands


PaloAlto Networks
PaloAlto Networks PA-400 Series quick start guide

Fortinet
Fortinet FortiGate-200A Administration guide

Barracuda Networks
Barracuda Networks NG FIREWALL 5.0.3 Release notes

Cisco
Cisco Meraki MX64 installation guide

ZyXEL Communications
ZyXEL Communications ZyWALL 110 Series Handbook

Meraki
Meraki MX67C Installation guides


