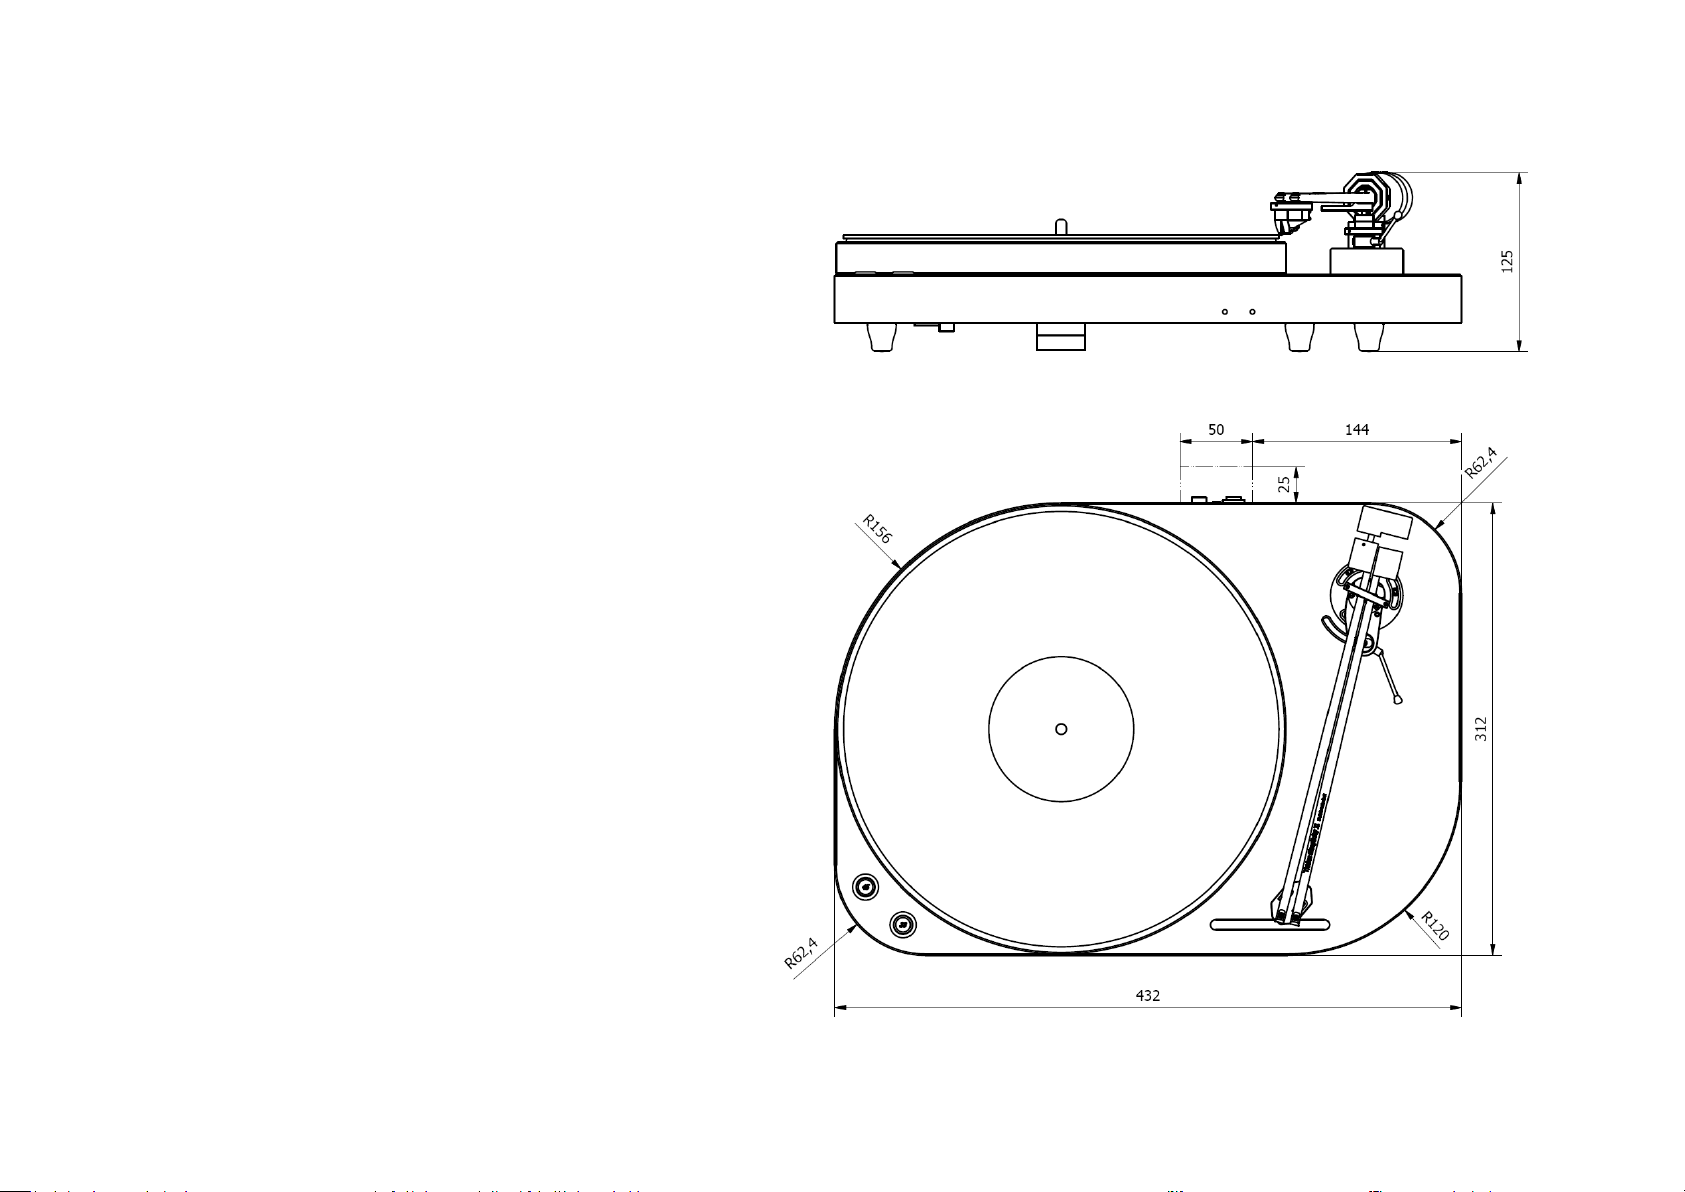
Thales TTT-Compact II User manual

Page 1/10
TTT-Compact II
Dear Client,
Congratulations to your new turntable TTT-Compact II. This unit allows analogue playback on
the highest level because of compact design and careful engineering in every detail. Please fol-
low this manual carefully step by step, for getting advantage of all possibilities offered by your
new turntable.
Please take your time to assemble, install and adjust the TTT-COMPACT II carefully. Your dealer
will be ready to assist you. The TTT-C is a mechanical precision instrument. Please beware of
using high forces or hits to this unit.
You will find actual information about our products on www.tonarm.ch.

Page 2/10

Page 3/10
1) Unpacking TTT-Compact II
The packaging of this unit consists of three layers. Please open the main packaging and take
out the following items carefully:
1. Clamp
2. External charger
3. Accessories: belt for replacement, hex-key-wrenches, key to adjust speed
Please place these items well-ordered to the side, so they are ready to be used during installa-
tion of the turntable.
After taking out the upper layer completely, the second layer of the packaging will be visible. It
contains the platter. Please take out the platter carefully and place it on a suitable base.
After taking out the second layer of the packaging, the last layer will be visible. This layer con-
tains the main chassis of the TTT-Compact II. Please take out the cassis and place it horizontally
on a suitable base.
1
3
Chassis
Platter
2
Page 4/10
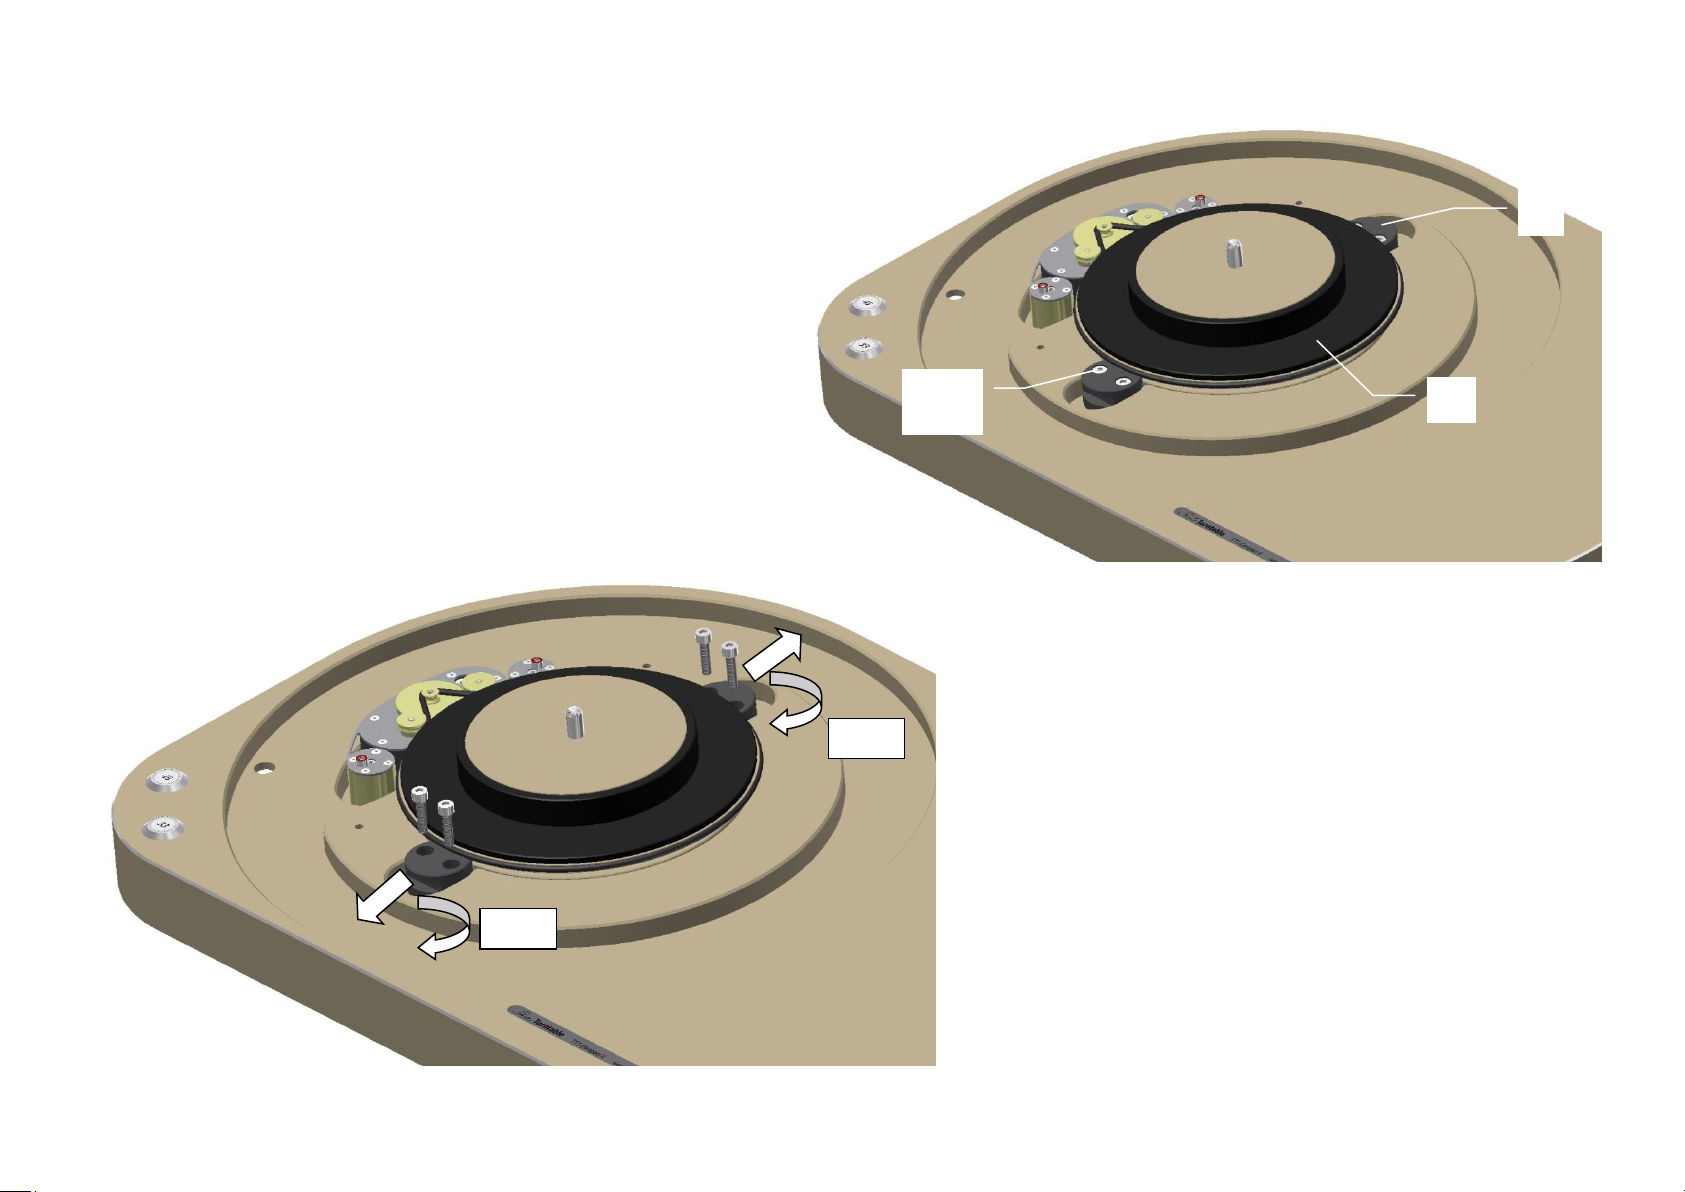
2) Transport-lock main bearing
The main bearing of the TTT-Compact II is locked during transport to prevent damages to the
bearing caused by vibration. This locking mechanism lifts the sub-platter slightly and keeps it in
position. To release the transport lock, please follow the following steps:
1. Release 4x hexagon-screw (1)
2. Remove 4x hexagon-screw (1) completely
3. Move both locking-cylinders (3) out of the sub-platter (2)
4. Turn both locking cylinders 180° around their axle
5. Reinsert 4x hexagon-screw and tighten them
6. Sub-platter incl. belt and flywheel shall be free turning now
3
180°
180°
1
3mm
2
Page 5/10
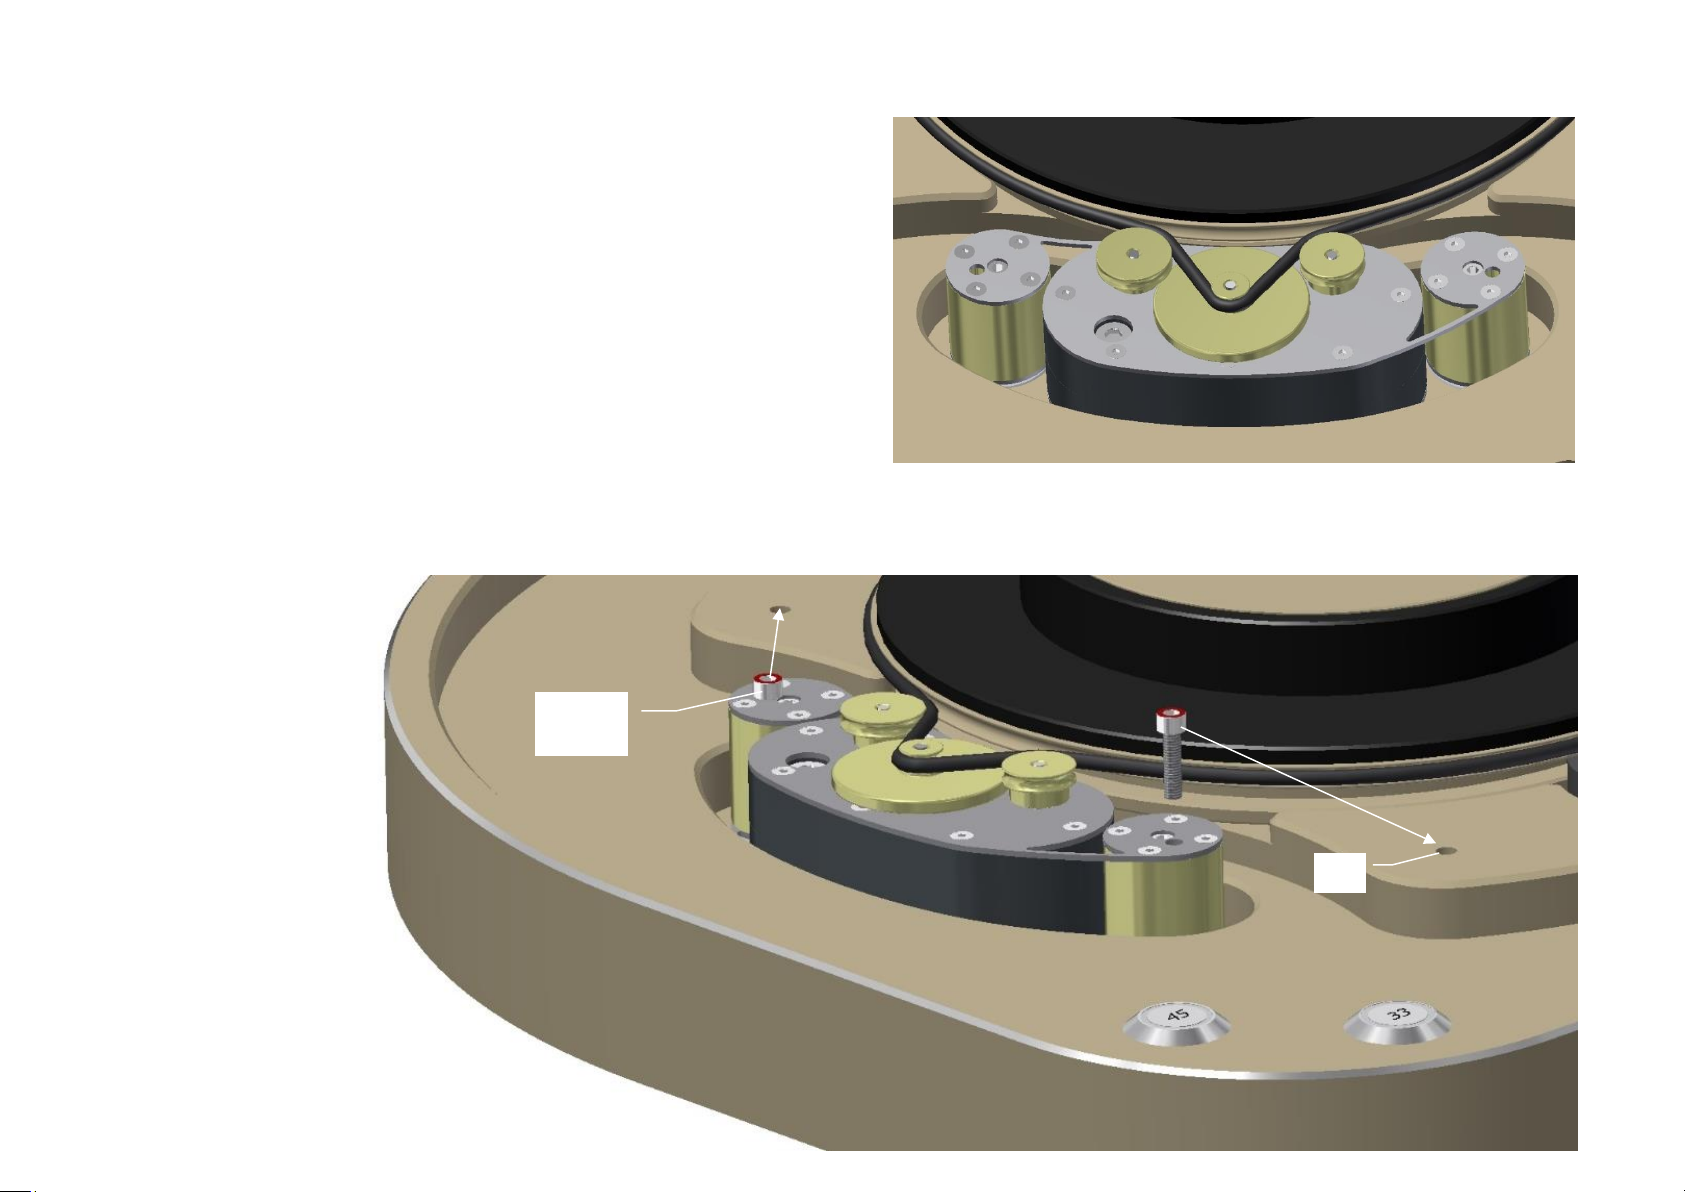
3) Transport-lock drive unit
The drive-unit of the TTT-Compact II is featured with a locking mechanism in order to prevent
it from vibration and movement. To release the transport-lock, please follow the following
steps:
1. Release 2x locking-screw (1) carefully and take them out
Caution: do not touch the two sealed adjustment-screws (X). This would modify
the carefully adjusted position of the drive unit.
2. Insert both locking-screws (1) into the intended hole of the chassis (2). This will
make sure they are available for future use.
1
2.5mm
2
X
X

Page 6/10
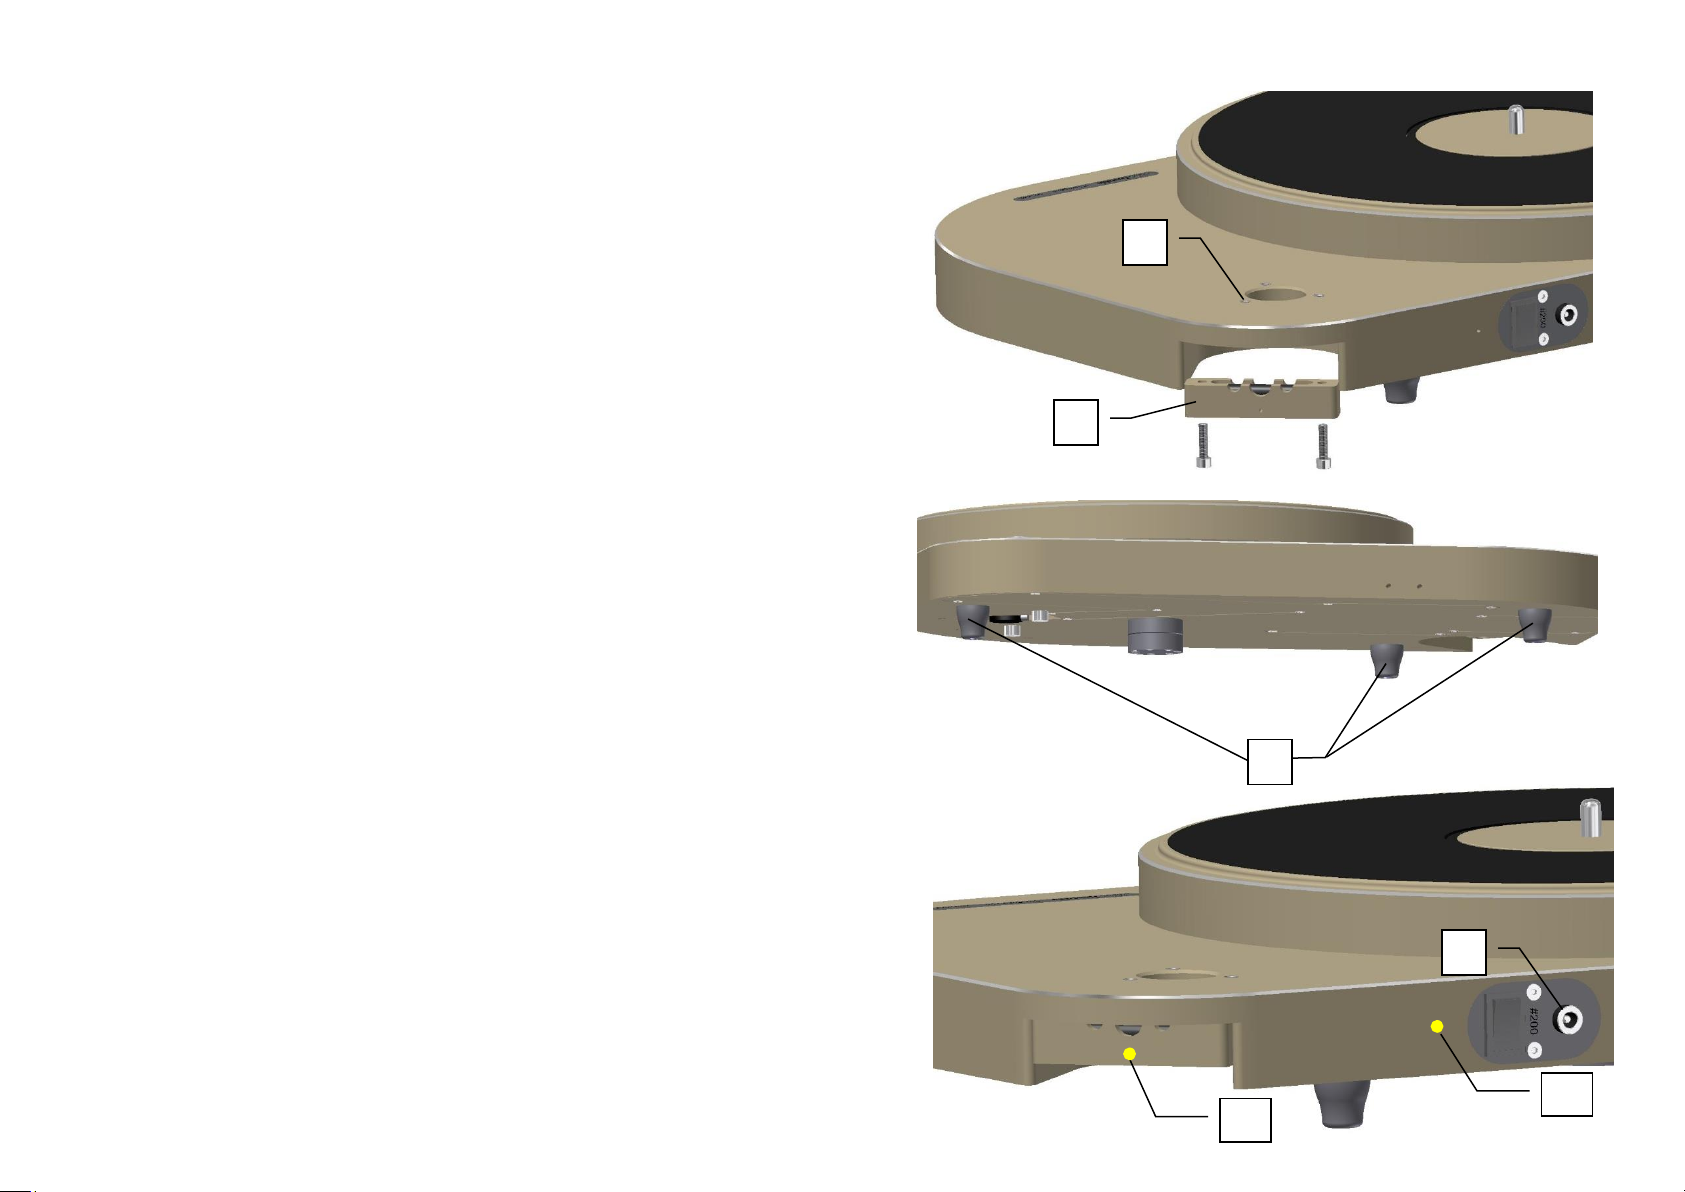
4) Installing platter
The main-platter (1) is bearing freely on the sub-platter (2). During assembling, please make
sure to guide the main-platter exactly vertically on the sub-platter. The main-platter has an
inlay of a specified high density mat (3). Please take care on this mat for not destroying it during
installation.
1. Guide the main platter (1) carefully from above on the sub-platter (2).
2. Make sure the main-platter is bearing completely on the sub-platter.
3. If needed, dress the inlay-mat (3) around the centre (4) carefully, so the record will lay
on an absolutely even surface.
1
2
3
4
Page 7/10
5) Put into operation
Tonearm
For assembling the tonearm, please follow the manual of the tonearm itself carefully. The base-
ring of the tonearm shall be connected with the three mounting-bolts (1) of the chassis rigidly.
A cable-holder (2) allows you to guide either single or double executed phono-cables out of the
turntable nicely.
As an option, a connection-box (RCA or XLR) is available.
Set the level
Place the unit on an even and horizontal base. The level of the TTT-Compact II can be set by
turning the spikes in and out of the main chassis. Please use a level gauge to level the unit
exactly horizontal. Please make sure at least one of the spikes is tightened fully.
The spikes are guided not only by a fine pitch thread but by a cylindrical fitting as well.
Therefore, no locking of the spike is needed. The maximum range of adjustment is 6mm.
Interconnects
Connect the ground wire (deliverd with your TTT-Compact II) with either the jack of the cable-
holder (4), or the jack of the chassis (5) and with the fitting connection of your phono-stage. If
the tonearm is connected by a DIN-cable, no separate ground-wire is needed.
Connect the external charger with the power plant and with the fitting jack (5) of the TTT-Com-
pact II. Plug the external charger into the electrical socket. The external charger can handle all
usual input voltage.
5
4
1
2
3
6
Page 8/10
5) Internal power supply TTT-Compact II
The TTT-Compact II is fitted with a high-power-battery-pack. The turntable is driven by the
internal power supply only. The external charger is to be used for charging the battery only.
Please refer to the table on the right hand side.
Important notes:
-A fully charged battery-pack will keep the turntable running in playback mode
for at least 12 hours.
-We are using most modern Li-Ion batteries. These accumulators do have no
memory-effect. This means, you are free to charge them no matter what the ac-
tual charge state is. The battery can be recharged for at least 1’000 cycles.
-The battery-pack can provide power up to 100 Watts. This energy is set free by
incorrect handling of the accumulator as well. Therefore, the battery needs to be
exchanged by your distributor / dealer only.
-The external charger can produce emissions (electrical field, noise). Therefore,
we recommend to unplug it completely from the power-plant while playing mu-
sic. Alternatively, you can use a switchable socket to switch the charger on while
charging only.
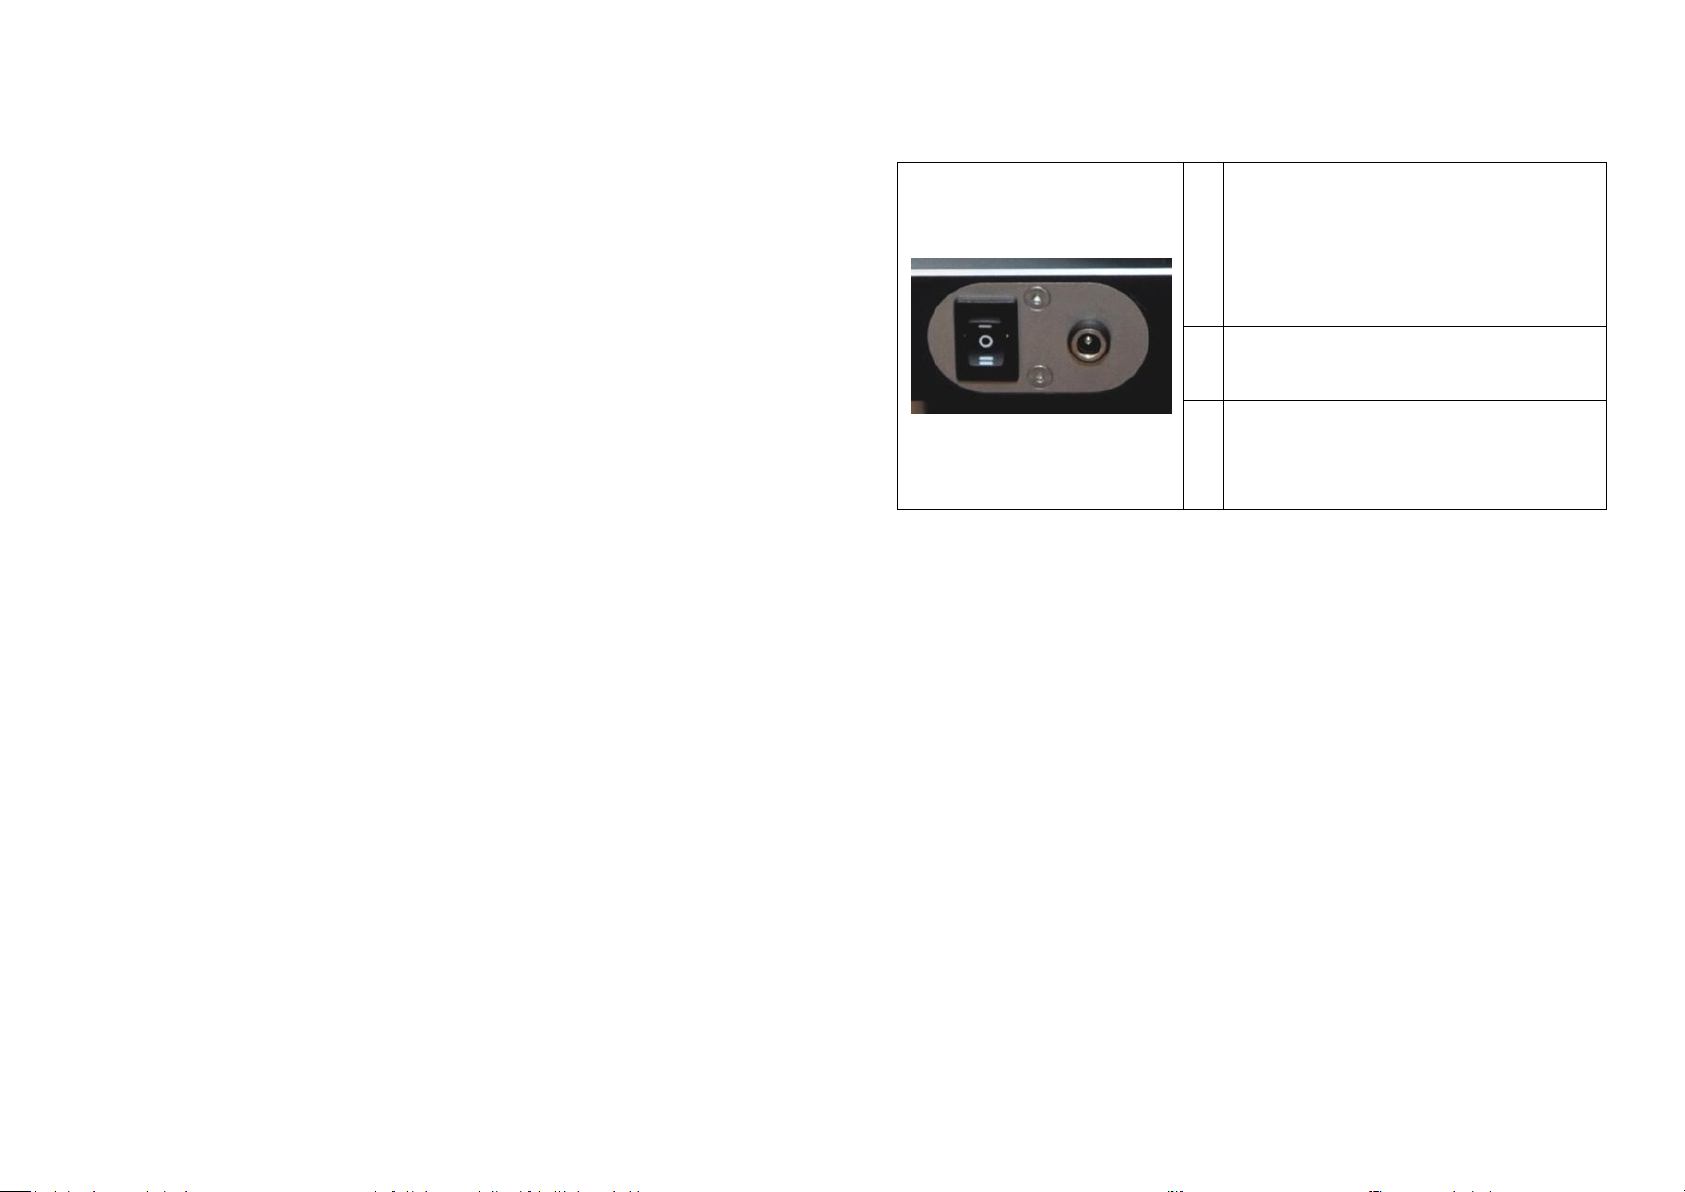
I
Standby: The unit is ready to be started by
the push-buttons at the front (33/45). The
external power supply is disconnected elec-
trically from the circuit. Standby-current is
limited some µA only, so the battery keeps
its charge state for many months.
0
Off: The unit is disconnected completely
from the internal and external power-sup-
ply.
II
Charging: If the external charger is con-
nected, the battery will be charged. The
charge state is shown on the external
charger.
Page 9/10
6) Setting and adjusting speed
The two push-buttons at the front, labelled with “33” and “45” are to be used to start and stop
the platter on the speed indicated. The push-buttons do have an integrated light, showing the
actual status of the turntable:
-Blinking single light: acceleration phase of the platter
-Steady: Platter turns on the speed indicated
-Blinking both lights: Low battery status is indicated by the blinking of both lamps. The
battery will still have enough charge to drive the TTT for at least one more hour.
The speed of the turntable was set in our factory using most precise equipment. This setting is
stable for a long time period. If re-adjusting is needed, use the specific adjusting-key (1) deliv-
ered with the TTT-Compact II.
The adjusting-key is set thru the hole at the front of the TTT-Compact II and connected to the
internal potentiometer. Turning the key clockwise will decrease; turning it anticlockwise will
increase the speed of the platter.
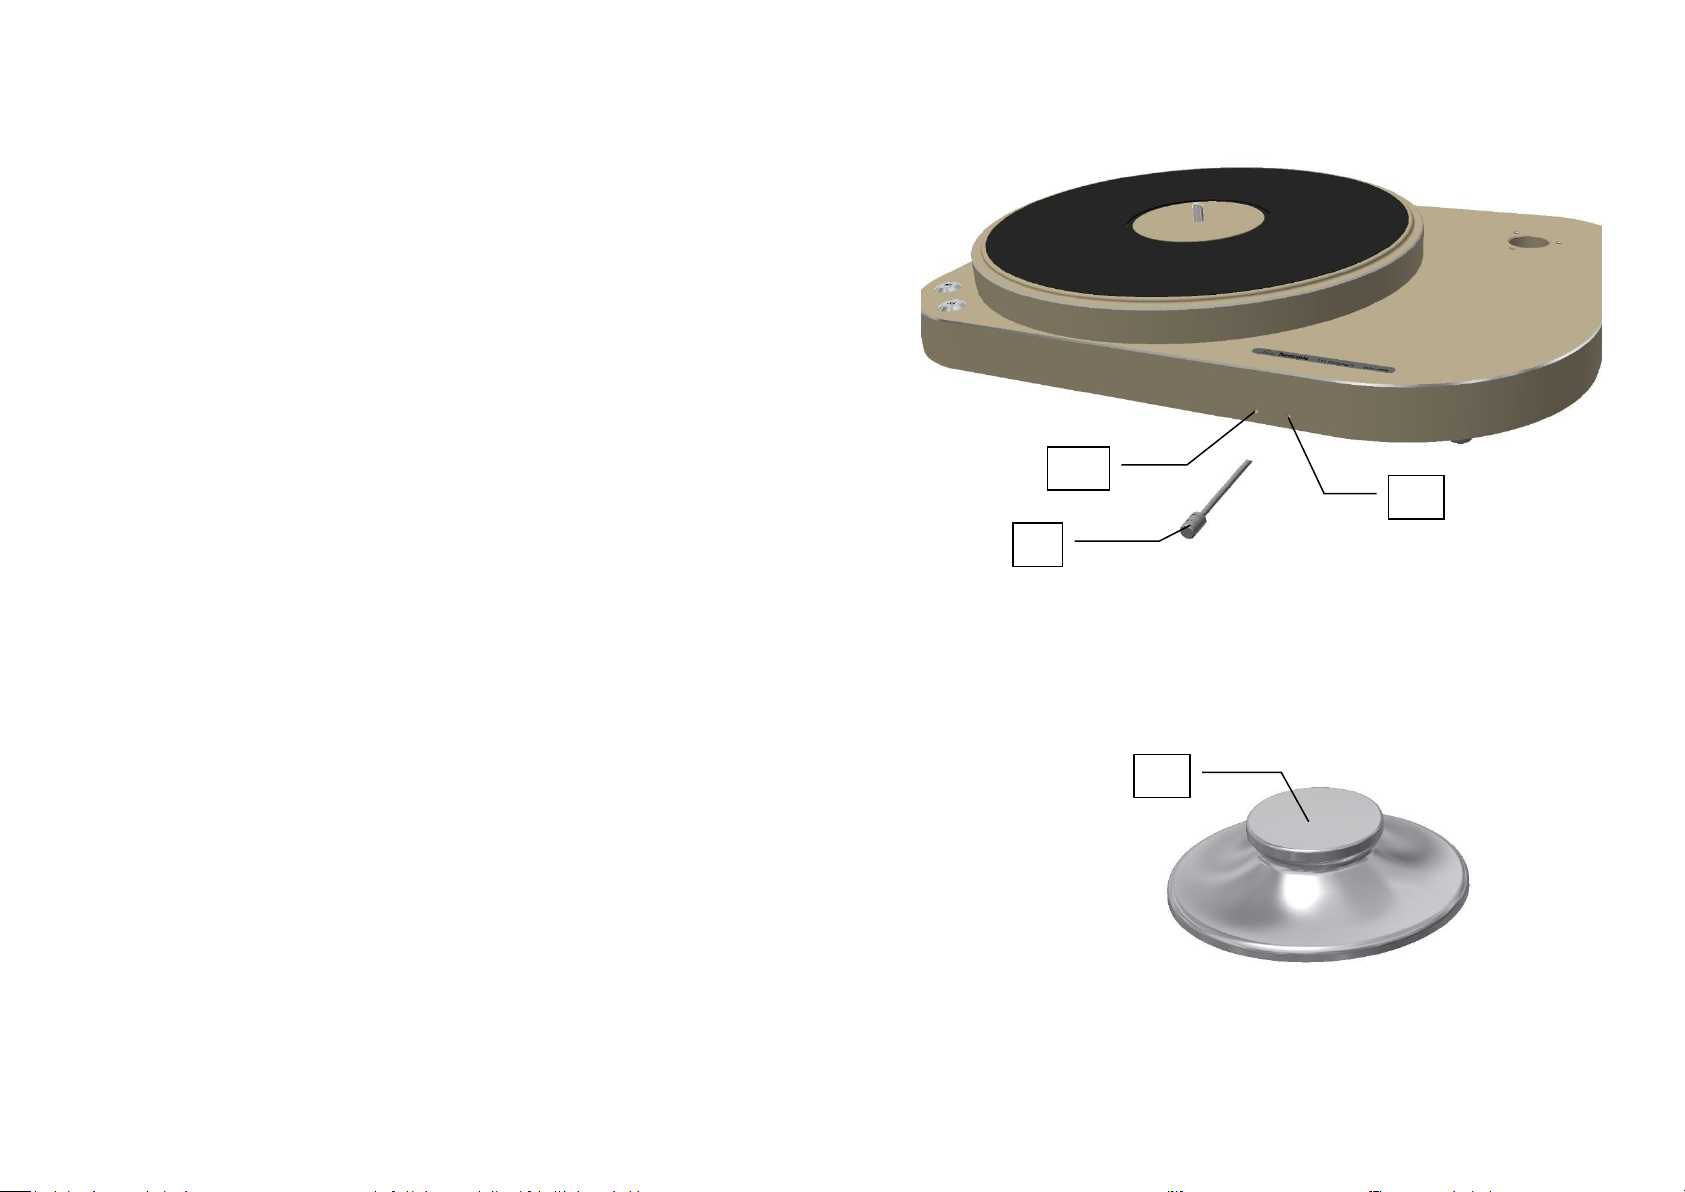
7) Clamp
The TTT-Compact II is delivered with a record-clamp designed for this turntable specifically. This
clamp is working harmonically with the high density inlay of the main platter. It reduces vibra-
tion and deformation of the record itself and ensures steady contact between platter and rec-
ord. Please plug the clamp carefully on the spindle of the turntable. The clamp is not screwed
or tightened, but operates with its mass only.
8) Cleaning
For cleaning the TTT-Compact II, please use a soft and clean towel. The high density inlays of
the platter and the clamp shall be cleaned with a wet microfiber towel. For this process, please
use water only, neither cleaning nor dissolver-liquids.
33
45
2
1
Page 10/10
9) Specifications
Turntable specs.
- Decoupled drive unit with BLDC motor
- Belt-guidance with three flywheels
- High-precision bearing, hardened
- High density mat as platter inlay
- Decoupling ball element feet
- Integrated batteries and drive electronics
- Clamp with high density inlay
- Available in two colours: bronze or black with silver edges
Technical specs.
- Platter speed: 33⅓rpm, 45rpm
- Wow and flutter at 33⅓rpm, IEC 386: ±0,04%
- Rumble: -60dB (unweighted)
- Weight: 16kg
- Input voltage for charger: 100-240V, 50-60Hz
- Battery service life: 12h
Options
- Connection-box (RCA oder XLR)
- LEVI-Base (air-decoupling-base)
Table of contents
Other Thales Turntable manuals


