Thales Simplicity II User manual

Seite 1 / 8
User Manual THALES SIMPLICITY II
Dear user
Thank you for using the THALES SIMPLICITY II. This tonearm is designed differently than all
other tonearms. If you follow this manual accurately the most precise analogue playback is
ensured.
Take your time to assemble, install and adjust the SIMPLICITY II. Please remember to work
carefully and to follow the instruction manual step by step. Beware of using high forces or hits
to this micromechanical unit.
You will find actual information about our products on www.tonarm.ch.

Seite 2 / 8
1) Content
Please open the packaging and take out the tool-box placed on top, containing:
1) Positioning device to install the tonearm on your turntable.
2) Screwdriver for the locking mechanism of the azimuth adjustment device.
3) Hex key wrenches (0,9 / 1,3 / 2,0 / 2,5) for installation and adjustment.
4) All screws needed for the installation incl. some spares.
Please prepare all the tools for the installation. Under the top layer of the packaging unit, you
will find the following content:
5) Tonearm: Main tonearm unit incl. tonearm-lift and internal wiring. While handling
this unit, please take special care on the thin and very flexible internal wiring.
6) Headshell: The SIMPLICITY II is delivered with a separate headshell for quick installa-
tion and changing of the cartridge. As an option, additional pieces can be delivered
for the pre-installation of further cartridges.
7) Base-ring: this item is to be installed on the turntable and includes a clamping mech-
anism. Please take care the clamping-piece is kept inside the base-ring.
8) Sight-unit: This unique and ingenious tool enables you to install the cartridge in an
absolute precise position.
9) Counter-weights: The SIMPLICITY II is delivered with three different counter-weights
to balance a wide range of cartridges.
5) Tonearm
6) Headshell
8) Sight-unit
1) Positioning device
3) Hex key 0,9 / 1,3 / 2,0 / 2,5
2) Screwdriver 2,0
7) Base-ring
9) Counter-weights

Seite 3 / 8
2) Installing the tonearm
If the SIMPLICITY II has been delivered together with our turntable, the base-ring has been
installed on the turntable already and you can skip step 1 to 4.
Make sure the turntable and the tonearm-base are manufactured according to our specifica-
tions. Please ask your dealer for any further information. Remember that a proper installation
of the tonearm is absolutely necessary for the perfect tracking of the SIMPLICITY II.
1) Install the base-ring incl. the clamping-piece on the tonearm-base by using the three
fitting base-screws. Please tighten the screws gently so that the base-ring stays in
position but still can be moved manually.
2) Carefully set the tonearm-shaft inside the base-ring and use the locking-screw to fix
the tonearm ca. 20mm above the base-ring surface.
3) Set the positioning-device on the spindle of the turntable’s platter. Move the base-
ring until the shaft fully fits into the profile of the positioning device.
4) Turn the positioning device away from the tonearm. Make sure not to move the
base-plate anymore. Fully tighten the three base- screws now.
5) Please release the locking-screw and set the tonearm down until the VTA-screw is fit-
ted into the intended hole in the base-ring.
Tonearm-base
Base-ring
Base-screws
1
2
Tonearm-shaft
Locking-screw (Hex 2,5)
Positioning-device
3
VTA-Screw
Spindle
Clamping-piece
Seite 4 / 8
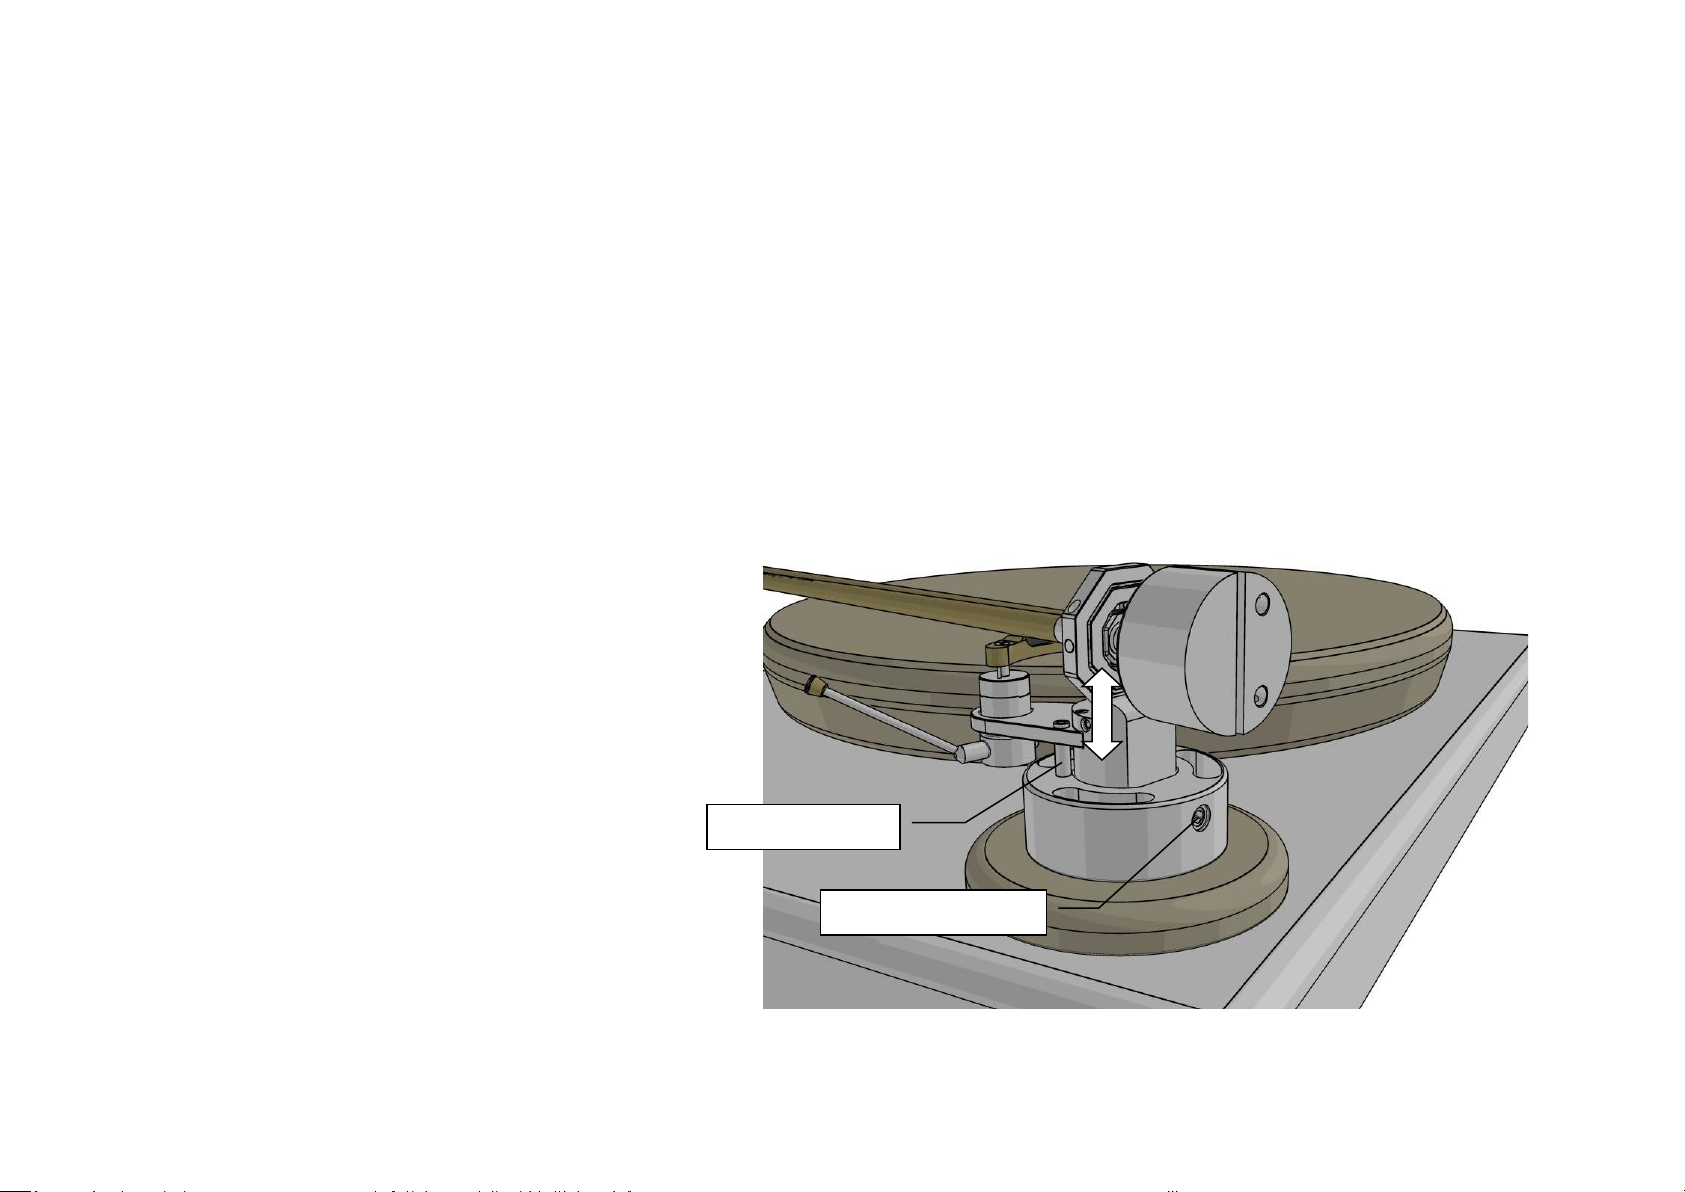
3) Adjusting the VTA
The tonearm should always be parallel to the record-surface. The VTA (Vertical Tracking An-
gle) has an influence on the sound. It can be adjusted easily and precisely, even while playing.
1) Please release the locking-screw and make sure the tonearm-unit moves up and
down freely.
2) Use the VTA-Screw to adjust the vertical position of the tonearm. If the length of the
pre-installed screw does not fit, change it for another length. It’s three VTA-screws
delivered with the tonearm in total.
3) Tighten the locking-screw again. Do not forget to do this, as it has an audible influ-
ence on the sound (dynamics).
Locking-screw (Hex 2,5)
VTA-screw (Hex 2,0)

Seite 5 / 8
4) Adjusting the azimuth
The azimuth (Horizontal Tracking Angle) can be adjusted with a setscrew. The azimuth has
been set carefully at our workshop. If the cartridge is manufactured correctly, there is no
adjustment needed. We do not recommend adjusting the azimuth, except if you do have a
problem in channel separation.
1) Loose the two locking-screws with the screwdriver delivered with the tonearm.
Make sure not to take away the screws but just untighten them.
2) Adjust the azimuth by turning the setscrew slowly.
3) Tighten the two locking-screws again. Do not forget to do this, as it has an audible in-
fluence on the sound (dynamics).
Setscrew (Hex 1,5)
2x Locking-screw (2,0mm)

Seite 6 / 8
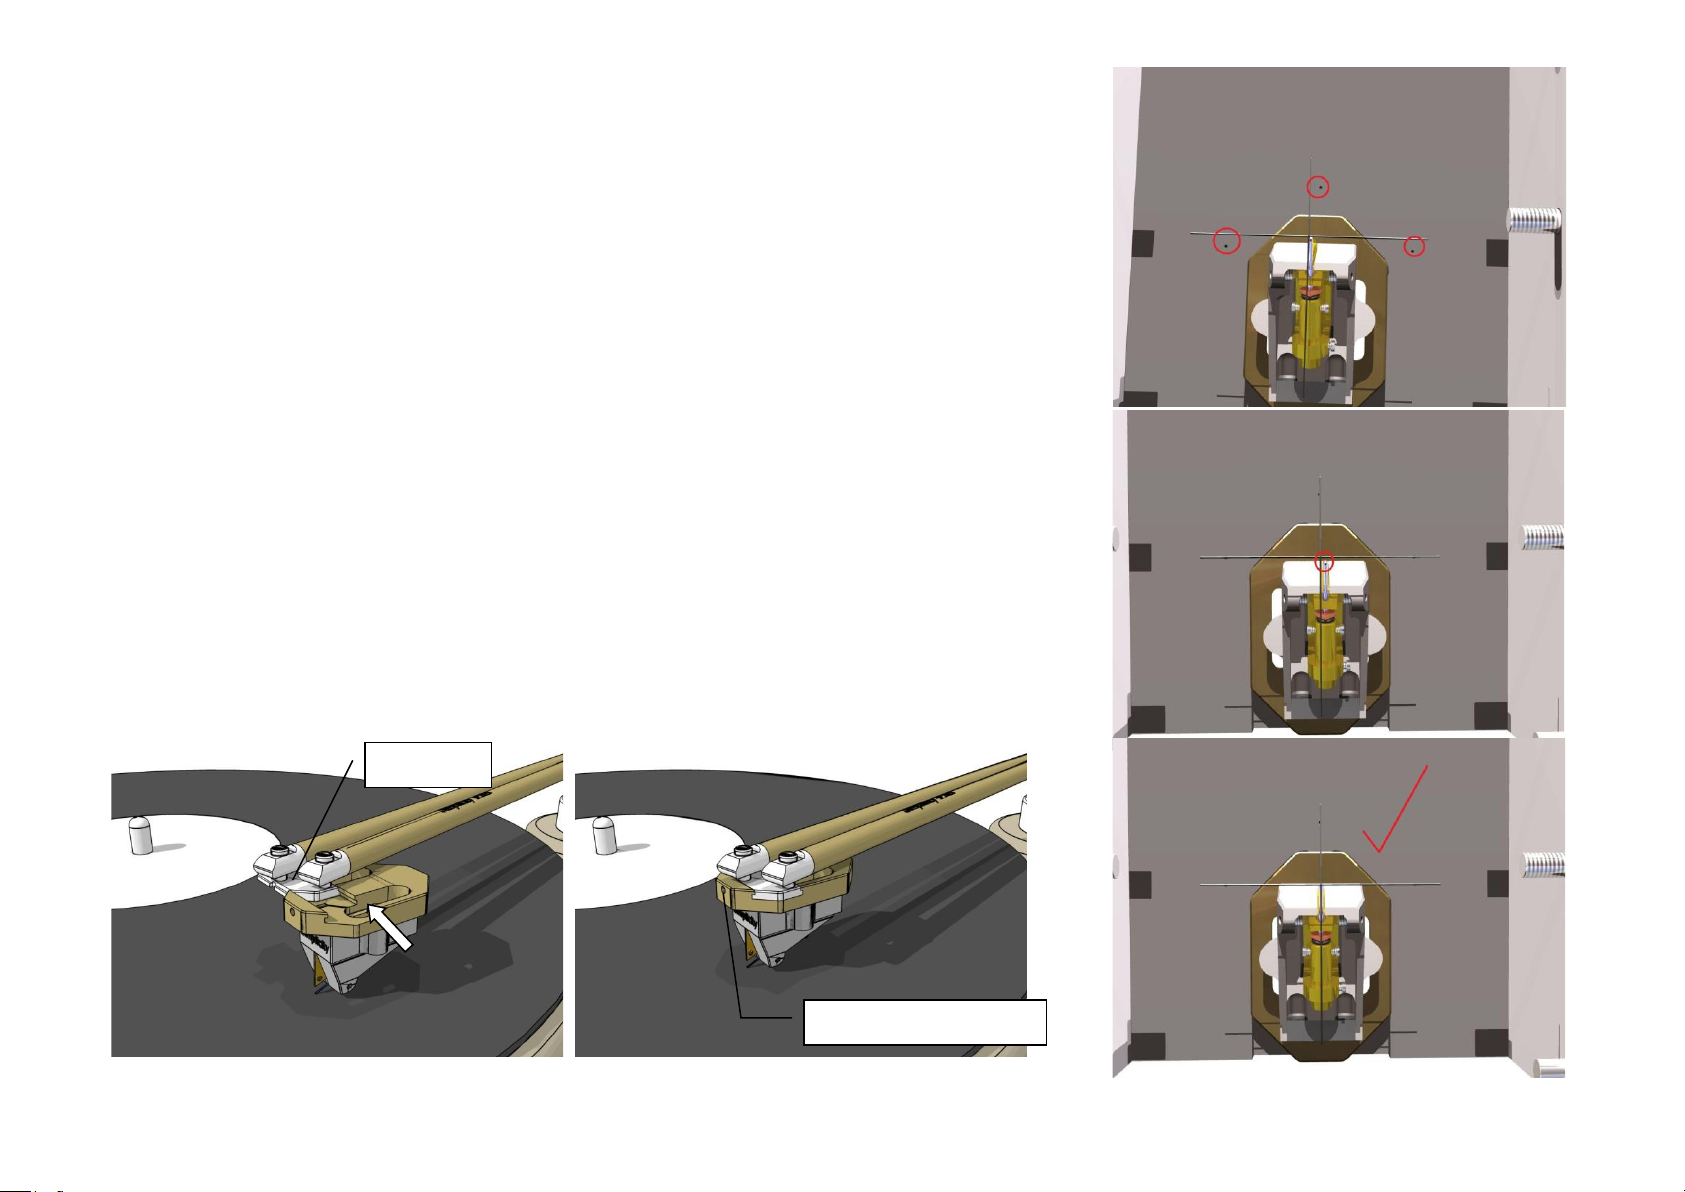
5) Installing the cartridge
The SIMPLICITY II offers a unique way to install the cartridge very accurately and get all the
advantages of the ultra-precise tracking. The headshell can be taken apart for easy installa-
tion. To install the cartridge correctly, follow these directions step by step.
1) Make sure the internal screw of the headshell does not project out of the front sur-
face of the headshell. Use the Hex 0.9 to adjust it.
2) Prepare the cartridge and the cartridge screws for installation. Make sure you use
the cartridge screws delivered with the SIMPLICITY II, as another type might block
the installation on the tonearm. Tighten the screws gently so that the cartridge
stays in position but still can be moved manually.
3) Carefully move the headshell and cartridge into the sight-unit. Make sure not to
break the diamond tip.
4) Keep the cartridge assembly in the sight unit. Make sure it does not move.
Hex 0.9
Headshell
1
2
Sight-unit
3
4
Seite 7 / 8
6) Adjusting the cartridge
1) Make sure you look to the sight-unit in an absolute upright position. There are three
points engraved around the cartridge to control the exact perpendicular view. Make
sure these three points fit to the target-line as shown in the picture.
2) Carefully move the cartridge until the diamond definitely fits the target-circle. Make
sure the cantilever is exactly under the target-line.
3) Move the cartridge assembly out of the sight unit carefully and tighten the two car-
tridge-screws equally.
4) Please verify the correct setting of the cartridge again and correct it if needed.
5) Attach the headshell to the tonearm by carefully sliding it to the head-piece. Tighten
the locking screw at the front of the headshell.
6) Connect the four small clips of the internal wiring to the internal wiring. Take special
care on the very thin wiring.
Head-piece
Locking-screw (Hex 0.9)
Seite 8 / 8
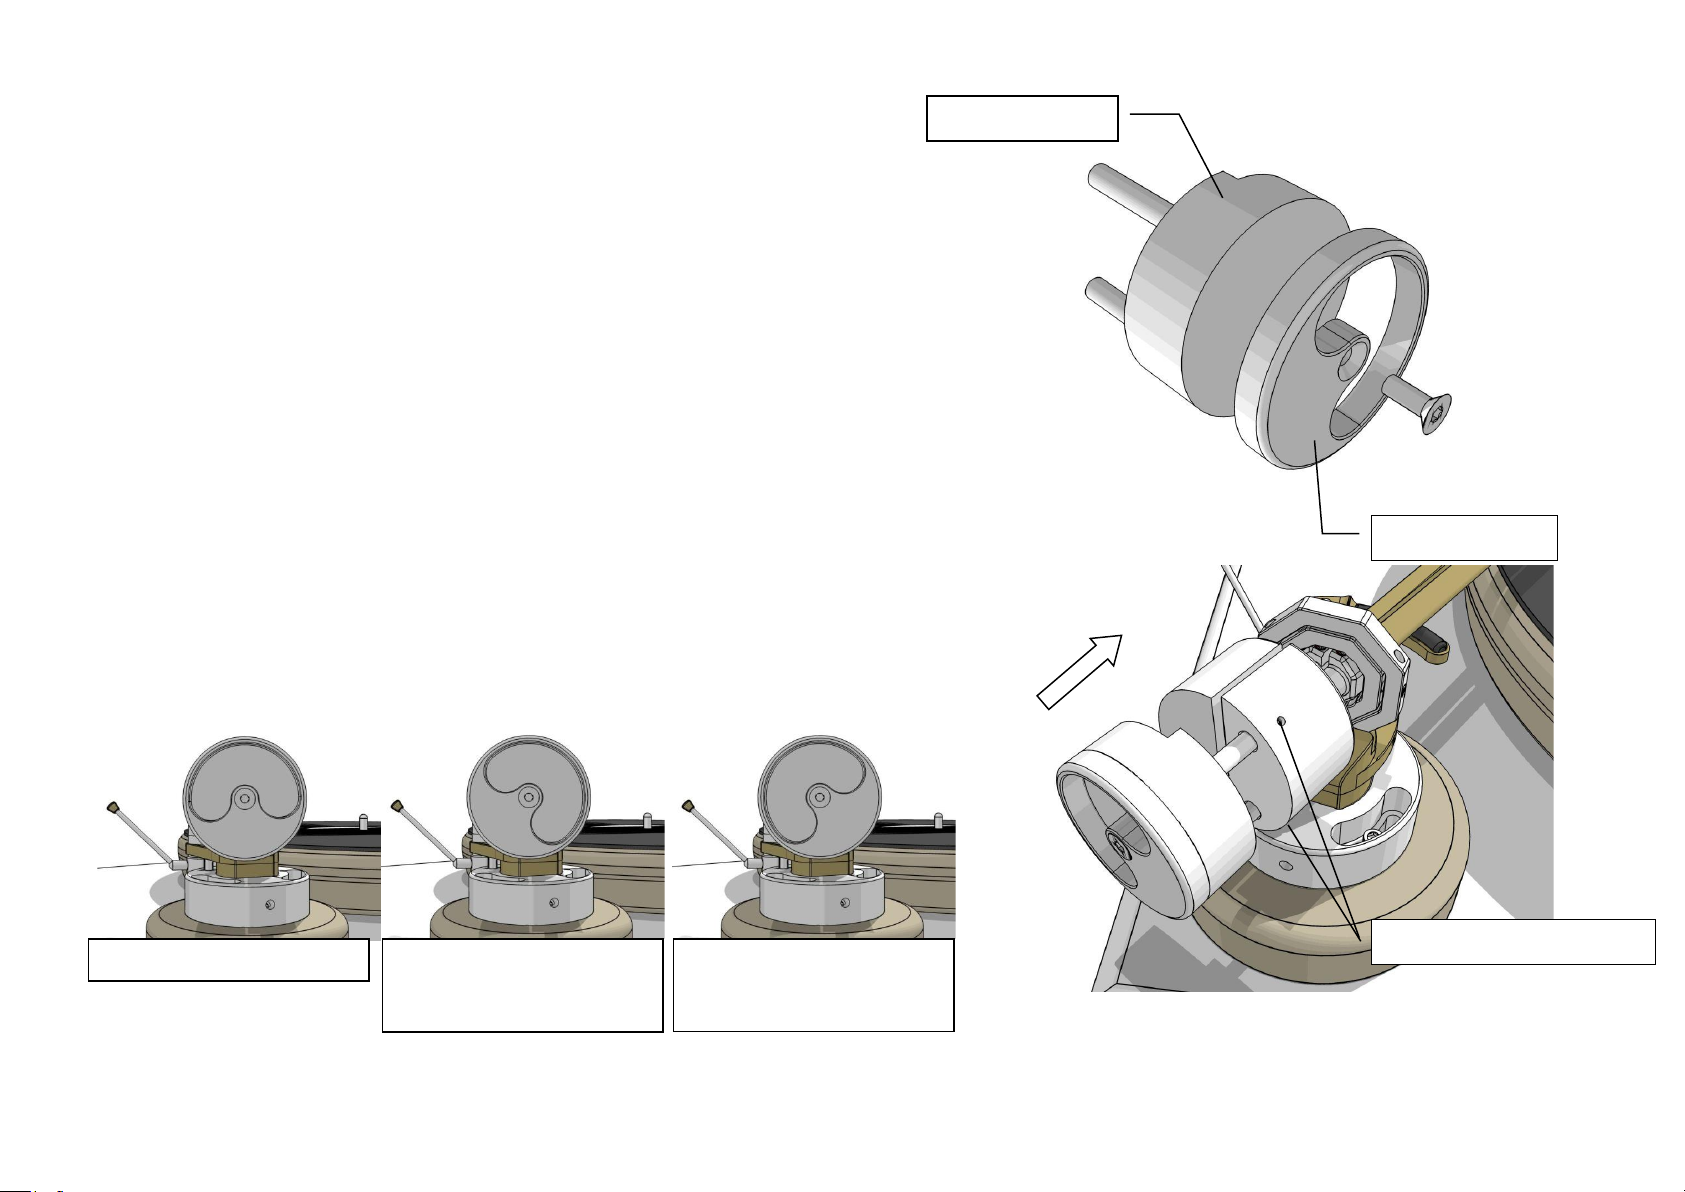
7) Setting the tracking force
Three different counter-weights are delivered with the SIMPLICITY II. They fit for light, medi-
um, and heavy cartridges. The counter-weight is moved towards the cartridge for increasing
the tracking force and away from the cartridge for reducing it. Please use a proper tonearm-
gauge to measure the tracking force. One or two additional eccentric pieces are to be at-
tached to the counter-weight to ensure the constancy of the tracking force across the record
surface.
1) Please choose the size of the counter-weight fitting your cartridge. Mount the slim-
mest eccentric piece using the fitting screw.
2) Carefully attach the counter-weight-assembly to the main tonearm unit. Move to-
wards the cartridge to lower the tracking force. If you cannot reach the tracking
force wanted choose another counter-weight. Use the two locking screws to lock the
position of the assembly.
3) Use the eccentric piece to ensure the constancy of the tracking-force. Turn it accord-
ing to the illustrations below. If the constant tracking force cannot be reached,
choose the thicker eccentric piece or both of them.
Counter-weight
Eccentric piece
2x Locking-screw (Hex 0.9)
Neutral position
Move clockwise if the track-
ing-force decreases towards
the center.
Move anti-clockwise if the
tracking-force increases to-
wards the center.
Table of contents
Other Thales Turntable manuals


