The Galley Ideal Workstation IWS 7S User manual

Ideal Workstations™, Workstations with DryDock™,
BarStations™ and WashStations™ Installation Guide

1
Single Bowl Workstations
IWS 4S
Side view applies to all
Single Bowl Workstations
IWS 5S
IWS 6S
IWS 7S
Note: For installation where the drain is on the left side, simply reverse placements of Tap and Tap Accessories
18” Finished cutout
1/2” Reveal front
and back
10”
16”
IWS 2C*
SUGGESTED GALLEY TAP AND TAP ACCESSORIES PLACEMENT GUIDE
(Recommendations are based on installing 3 or more Tap accessories)
Galley Tap 1 3/8" min hole diameter (1 1/2" min hole diameter for fast water jet cut)
Galley Deck Switch 1 3/8" min hole diameter or Galley Automatic Strainer Basket knob 1" min and 1 3/8" max hole diameter
Galley Hot and Cold Water Dispenser 1 3/8" min hole diameter (1 1/2" min hole diameter for fast water jet cut)
Galley Soap Dispenser 1" min hole diameter
Center hole diameters 2" behind cutout
Note: Galley Hot and Cold Water dispenser requires a minimum 8" clearance center to center if installed to the right of the Galley Tap
1
2
2
3
*IWS 2C SUGGESTED GALLEY TAP AND TAP ACCESSORIES PLACEMENT GUIDE
Galley Deck Switch 1 3/8" min hole diameter or Galley Soap Dispenser 1" min hole diameter
Galley Hot and Cold Water Dispenser 1 3/8" min hole diameter (1 1/2" min hole diameter for fast water jet cut)
1 2
2
IWS 3S
1
23 4
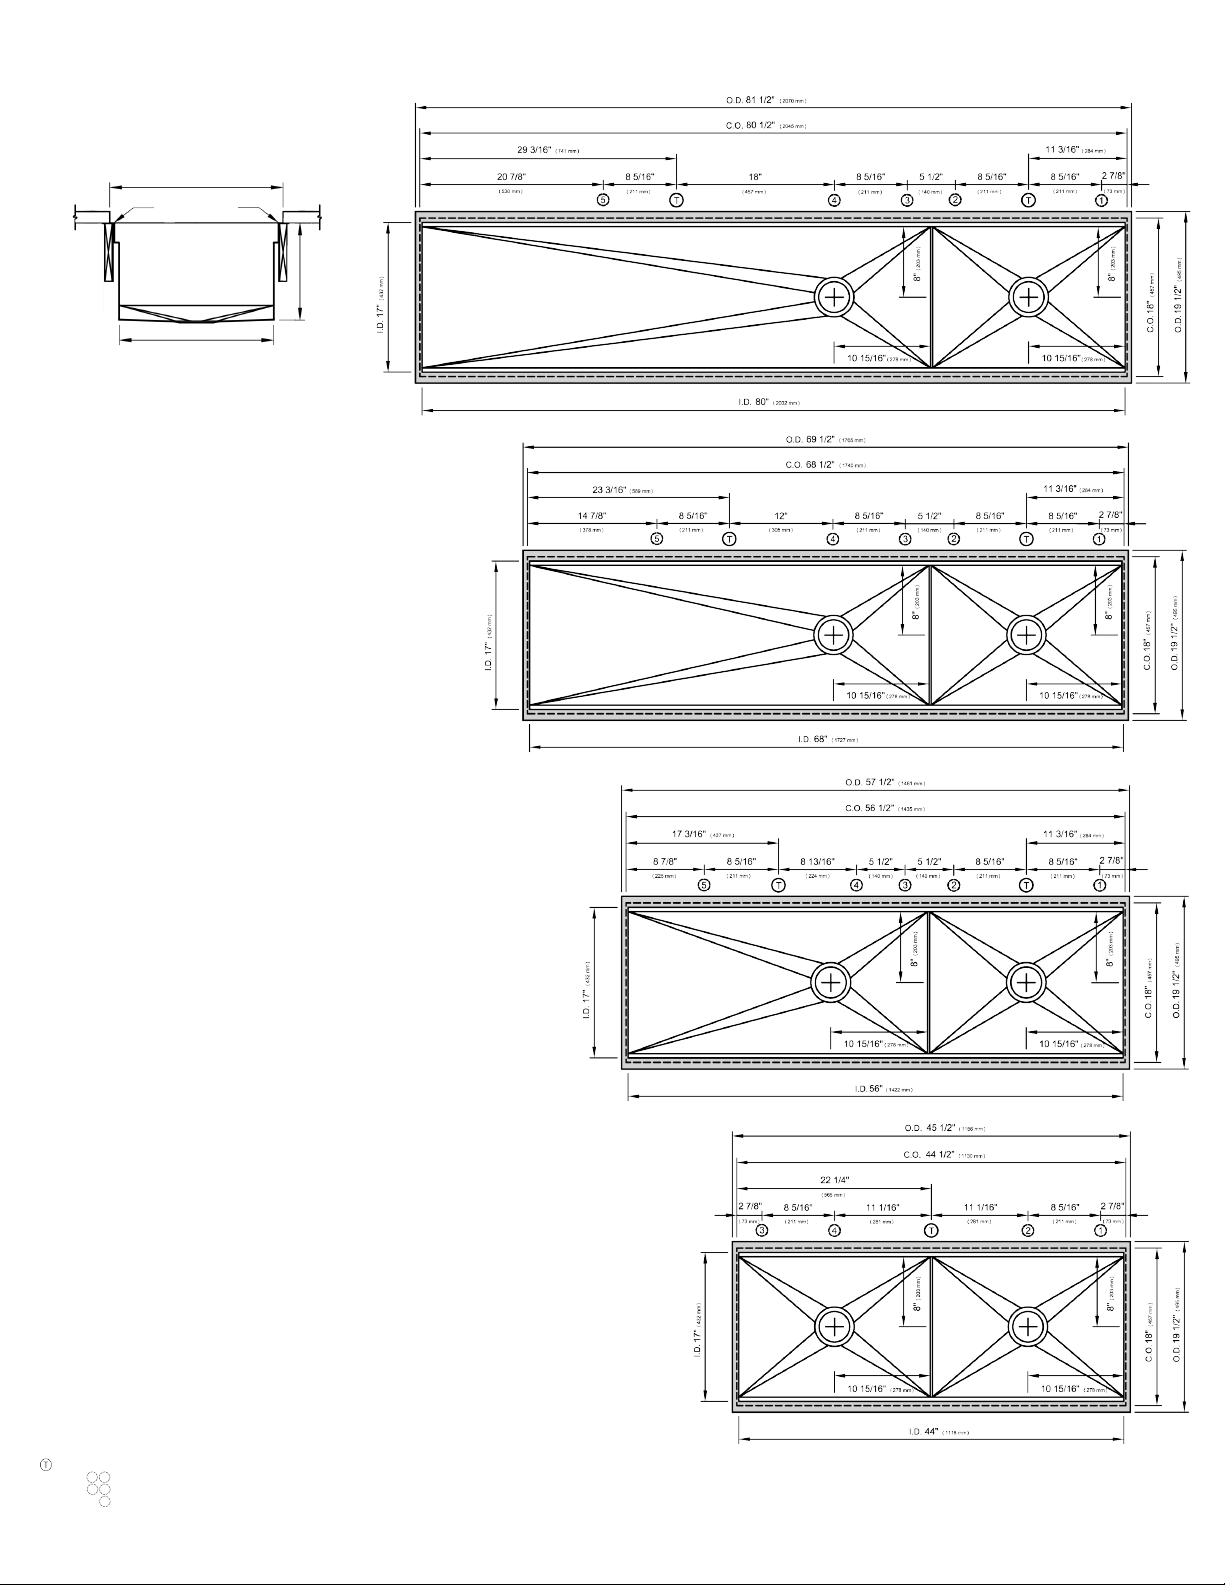
Double Bowl Workstations
2
IWS 7D
IWS 6D
IWS 5D
IWS 4D
SUGGESTED GALLEY TAP AND TAP ACCESSORIES PLACEMENT GUIDE
(Recommendations are based on installing 3 or more Tap accessories)
Galley Tap 1 3/8" min hole diameter (1 1/2" min hole diameter for fast water jet cut)
Galley Soap Dispenser 1" min hole diameter
Galley Deck Switch 1 3/8" min hole diameter or Galley Automatic Strainer Basket knob 1" min and 1 3/8" max hole diameter
Galley Hot and Cold Water Dispenser 1 3/8" min hole diameter (1 1/2" min hole diameter for fast water jet cut)
Center hole diameters 2" behind cutout
Note: Galley Hot and Cold Water dispenser requires a minimum 8" clearance center to center if installed to the right of the Galley Tap
Side view applies to all
Double Bowl Workstations
18” Finished cutout
1/2” Reveal front
and back
10”
16”
4
31
52
Note: For installation where the drain is on the left side, simply reverse placements of Tap and Tap Accessories
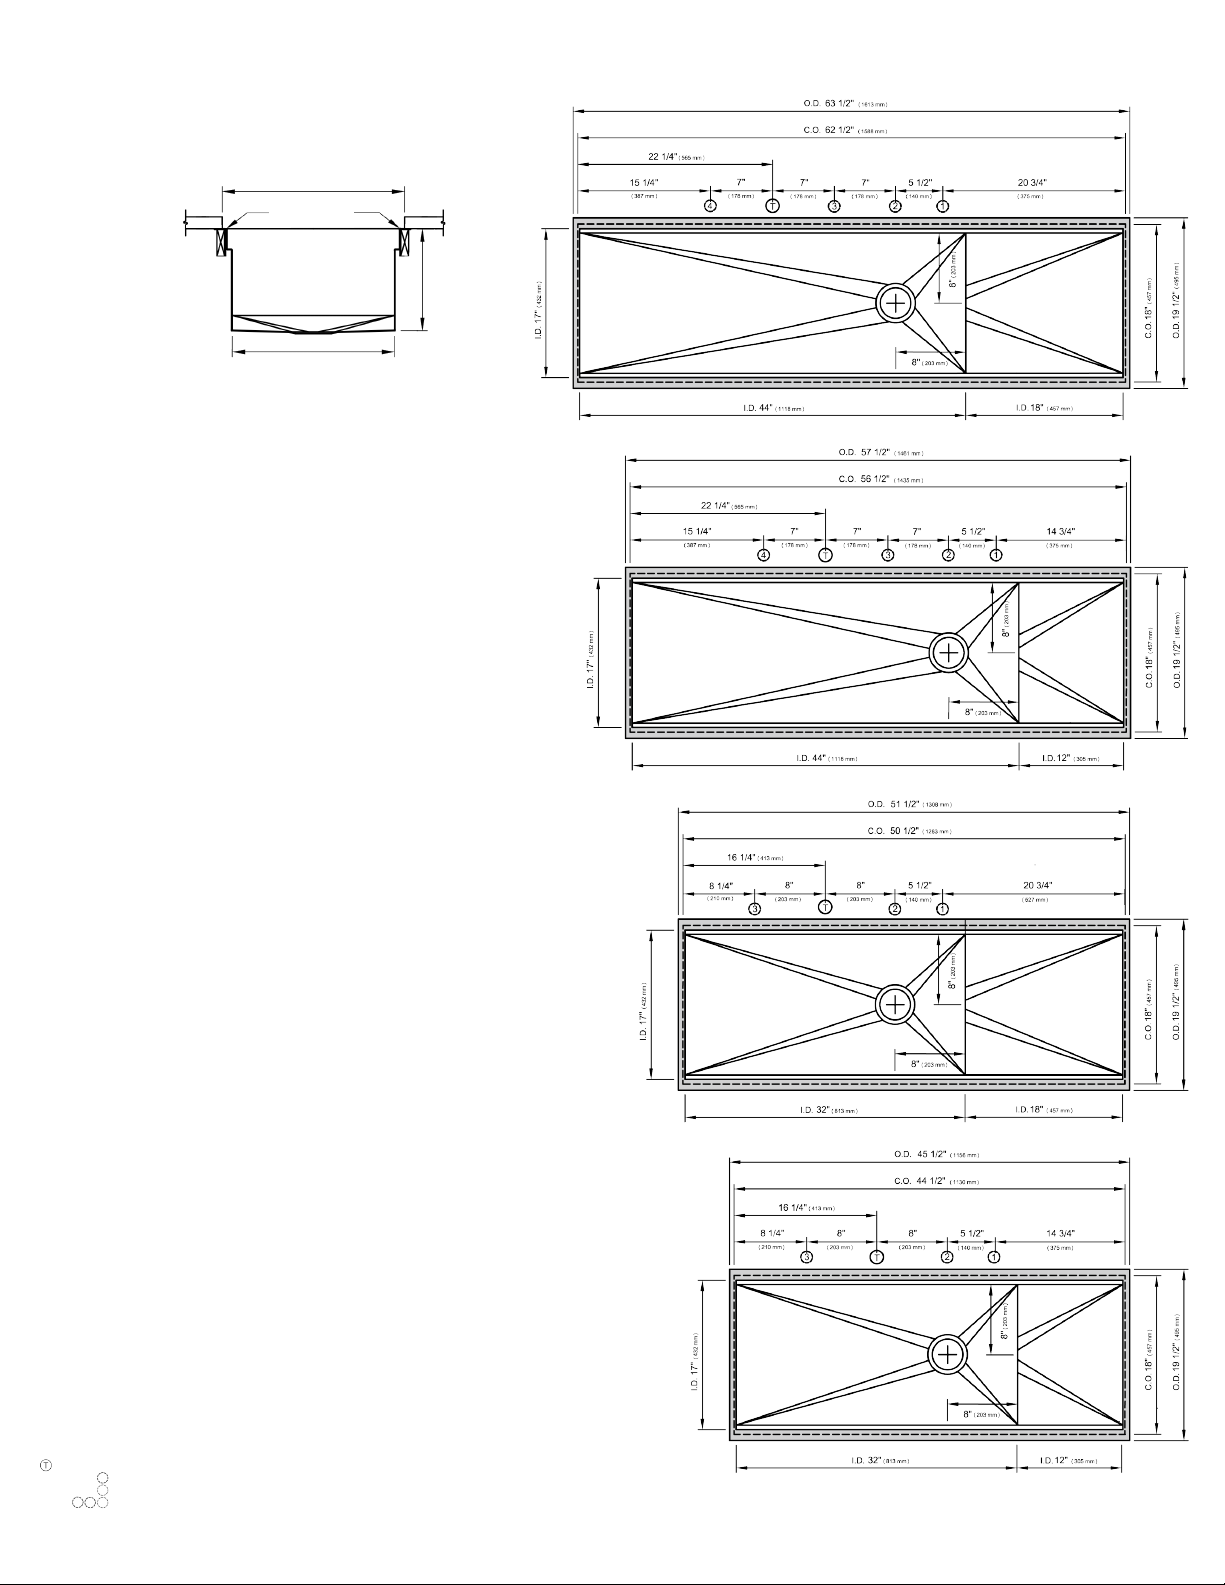
In Stock Workstations with DryDock™
3
Side view applies to all
DryDock™ Workstations shown
IWS 4S + DD12
IWS 4S + DD18
IWS 3S + DD18
IWS 3S + DD12
18” Finished cutout
1/2” Reveal front
and back
10”
16”
SUGGESTED GALLEY TAP AND TAP ACCESSORIES PLACEMENT GUIDE
(Recommendations are based on installing 3 or more Tap accessories)
Galley Tap 1 3/8" min hole diameter (1 1/2" min hole diameter for fast water jet cut)
Galley Deck Switch 1 3/8" min hole diameter or Galley Automatic Strainer Basket knob 1" min and 1 3/8" max hole diameter
Galley Hot and Cold Water Dispenser 1 3/8" min hole diameter (1 1/2" min hole diameter for fast water jet cut)
Galley Soap Dispenser 1" min hole diameter
Center hole diameters 2" behind cutout
Note: Galley Hot and Cold Water dispenser requires a minimum 8" clearance center to center if installed to the right of the Galley Tap
1
2
2
3
1
23 4
Note: For installation where the drain is on the left side, simply reverse placements of Tap and Tap Accessories

4
BarStations™ & WashStations™
Side view applies to all
Single Bowl Workstations
IWA 30
IBS 18C
18” Finished cutout
1/2” Reveal front
and back
10”
16”
IWA 4S
IWA 2C*
IBS 24C*
IWA 3S
*IBS 24C, IWA 2C SUGGESTED GALLEY TAP AND TAP ACCESSORIES PLACEMENT GUIDE
Galley Deck Switch 1 3/8" min hole diameter or Galley Soap Dispenser 1" min hole diameter
Galley Hot and Cold Water Dispenser 1 3/8" min hole diameter (1 1/2" min hole diameter for fast water jet cut)
1 2
2
SUGGESTED GALLEY TAP AND TAP ACCESSORIES PLACEMENT GUIDE
(Recommendations are based on installing 3 or more Tap accessories)
Galley Tap 1 3/8" min hole diameter (1 1/2" min hole diameter for fast water jet cut)
Galley Deck Switch 1 3/8" min hole diameter or Galley Automatic Strainer Basket knob 1" min and 1 3/8" max hole diameter
Galley Hot and Cold Water Dispenser 1 3/8" min hole diameter (1 1/2" min hole diameter for fast water jet cut)
Galley Soap Dispenser 1" min hole diameter
Center hole diameters 2" behind cutout
Note: Galley Hot and Cold Water dispenser requires a minimum 8" clearance center to center if installed to the right of the Galley Tap
1
2
2
3
1
23 4
Note: For installation where the drain is on the left side, simply reverse placements of Tap and Tap Accessories
Other manuals for Ideal Workstation IWS 7S
1
This manual suits for next models
19
Table of contents
Popular Indoor Furnishing manuals by other brands

Regency
Regency LWMS3015 Assembly instructions

Furniture of America
Furniture of America CM7751C Assembly instructions

Safavieh Furniture
Safavieh Furniture Estella CNS5731 manual

PLACES OF STYLE
PLACES OF STYLE Ovalfuss Assembly instruction

Trasman
Trasman 1138 Bo1 Assembly manual

Costway
Costway JV10856 manual


