The GigRig G3 User manual

THE ADVANCED SWITCHING SYSTEM
USER MANUAL

2
THE ADVANCED SWITCHING SYSTEM
THE GIGRIG G3 USER MANUAL
CONTENTS
1. INTRODUCTION------------------------------------------------------------------------------4
2. QUICK START GUIDE------------------------------------------------------------------------5
2.1. BACK PANEL CONNECTIONS------------------------------------------------------------------------5
2.2. TOP PANEL ---------------------------------------------------------------------------------------------5
2.3. CONNECTIONS ----------------------------------------------------------------------------------------5
2.4. PROGRAMMING---------------------------------------------------------------------------------------6
2.5. STOMPBOX MODE ------------------------------------------------------------------------------------6
2.6. NAVIGATING THE DEEP EDIT MENU ---------------------------------------------------------------7
3. CONNECTIONS ------------------------------------------------------------------------------8
3.1. INPUT ---------------------------------------------------------------------------------------------------8
3.2. TUNER/ AUX OUT--------------------------------------------------------------------------------------8
3.3. EFFECTS LOOPS ---------------------------------------------------------------------------------------8
3.4. OUTPUTS -----------------------------------------------------------------------------------------------8
3.5. REMOTE SWITCHES ----------------------------------------------------------------------------------8
3.6. BANK REMOTE SWITCH -----------------------------------------------------------------------------8
3.7. MIDI IN & OUT -----------------------------------------------------------------------------------------8
3.8. POWER--------------------------------------------------------------------------------------------------8
3.9. EXPRESSION PEDALS --------------------------------------------------------------------------------8
3.10 CONNECTION EXAMPLES: --------------------------------------------------------------------------9
4. BASIC PROGRAMMING ------------------------------------------------------------------ 11
4.1 PRESET PROGRAMMING --------------------------------------------------------------------------- 11
4.2 STOMP BOX MODE ---------------------------------------------------------------------------------- 11
4.3 CHANGING BANKS ---------------------------------------------------------------------------------- 13
5. DEEP EDIT ---------------------------------------------------------------------------------- 14
5.1 DEEP EDIT FUNCTIONS ----------------------------------------------------------------------------- 14
5.2 NAVIGATING DEEP EDIT---------------------------------------------------------------------------- 14
5.2.1 NAME--------------------------------------------------------------------------------------- 15
5.2.2 MIDI----------------------------------------------------------------------------------------- 15
EXPRESSION PEDAL MIDI--------------------------------------------------------- 16
MIDI CLOCK ------------------------------------------------------------------------- 16
5.2.3 EXPRESSION ------------------------------------------------------------------------------ 17
5.2.4 LOOP ORDER------------------------------------------------------------------------------- 17
5.2.5 STOMPBOX -------------------------------------------------------------------------------- 18

3
THE ADVANCED SWITCHING SYSTEM
THE GIGRIG G3 USER MANUAL
5.2.6 TRAILS-------------------------------------------------------------------------------------- 18
5.2.7 PARALLEL ---------------------------------------------------------------------------------- 19
5.2.8 TAP TEMPO-------------------------------------------------------------------------------- 22
5.2.9 HIDDEN PRESET -------------------------------------------------------------------------- 22
6. GLOBAL SETUP ---------------------------------------------------------------------------- 23
GLOBAL SETUP------------------------------------------------------------------------------------------- 23
SONG / BANK--------------------------------------------------------------------------------------------- 23
NUMBER OF BANKS------------------------------------------------------------------------------------- 23
BANK EXT SWITCH -------------------------------------------------------------------------------------- 23
BANK PRESET -------------------------------------------------------------------------------------------- 23
BLUETOOTH----------------------------------------------------------------------------------------------- 23
UPDATE---------------------------------------------------------------------------------------------------- 23
HIDDEN PRESET------------------------------------------------------------------------------------------ 23
STEREO PAIRS-------------------------------------------------------------------------------------------- 23
GLOBAL PHASE ------------------------------------------------------------------------------------------ 23
BACKLIGHT ----------------------------------------------------------------------------------------------- 23
STATUS BAR---------------------------------------------------------------------------------------------- 23
BANK RESET---------------------------------------------------------------------------------------------- 24
FACTORY RESET------------------------------------------------------------------------------------------ 24
VERSION--------------------------------------------------------------------------------------------------- 24
7. THE G3 iOS APP AND BLUETOOTH ----------------------------------------------------- 25
7.1 SOFTWARE UPDATE--------------------------------------------------------------------------------- 25
7.2 SONG LIST -------------------------------------------------------------------------------------------- 26
7.3 BACKUP ----------------------------------------------------------------------------------------------- 26
7.4 RESTORE ---------------------------------------------------------------------------------------------- 26
8. TECH SPECS-------------------------------------------------------------------------------- 27
9. WARRANTY -------------------------------------------------------------------------------- 28
4
THE ADVANCED SWITCHING SYSTEM
THE GIGRIG G3 USER MANUAL
1. INTRODUCTION
After years of work by myself and my extraordinary team of engineers, we are delighted to introduce our new
generation of pedalboard switching systems –TheGigRig G3 and G3 Atom.
We started from scratch and designed G3 from the ground up, obsessively testing and retesting every aspect of
its design to ensure we delivered the most robust, fully featured, tonally transparent switching system in the
world.
G3 is an expression of our passion: we compromised on nothing.
After years of design and testing G3 with every scenario imaginable, I can honestly say I’m so excited for you to
dive in and explore its possibilities. Using a mix of the fully movable loops, phase reversible parallel blend,
programable stereo output voltage-controlled amplifiers and stereo trails, I’ve been achieving some of the most
inspirational sounds I’ve ever had. I cannot wait to see what you do with it.
I am so proud to head a team who are passionate about ensuring you have the best experience possible using
Daniel Steinhardt

5
THE ADVANCED SWITCHING SYSTEM
THE GIGRIG G3 USER MANUAL
2. QUICK START GUIDE
We want you to jump right in, so here is what you need to know to get started.
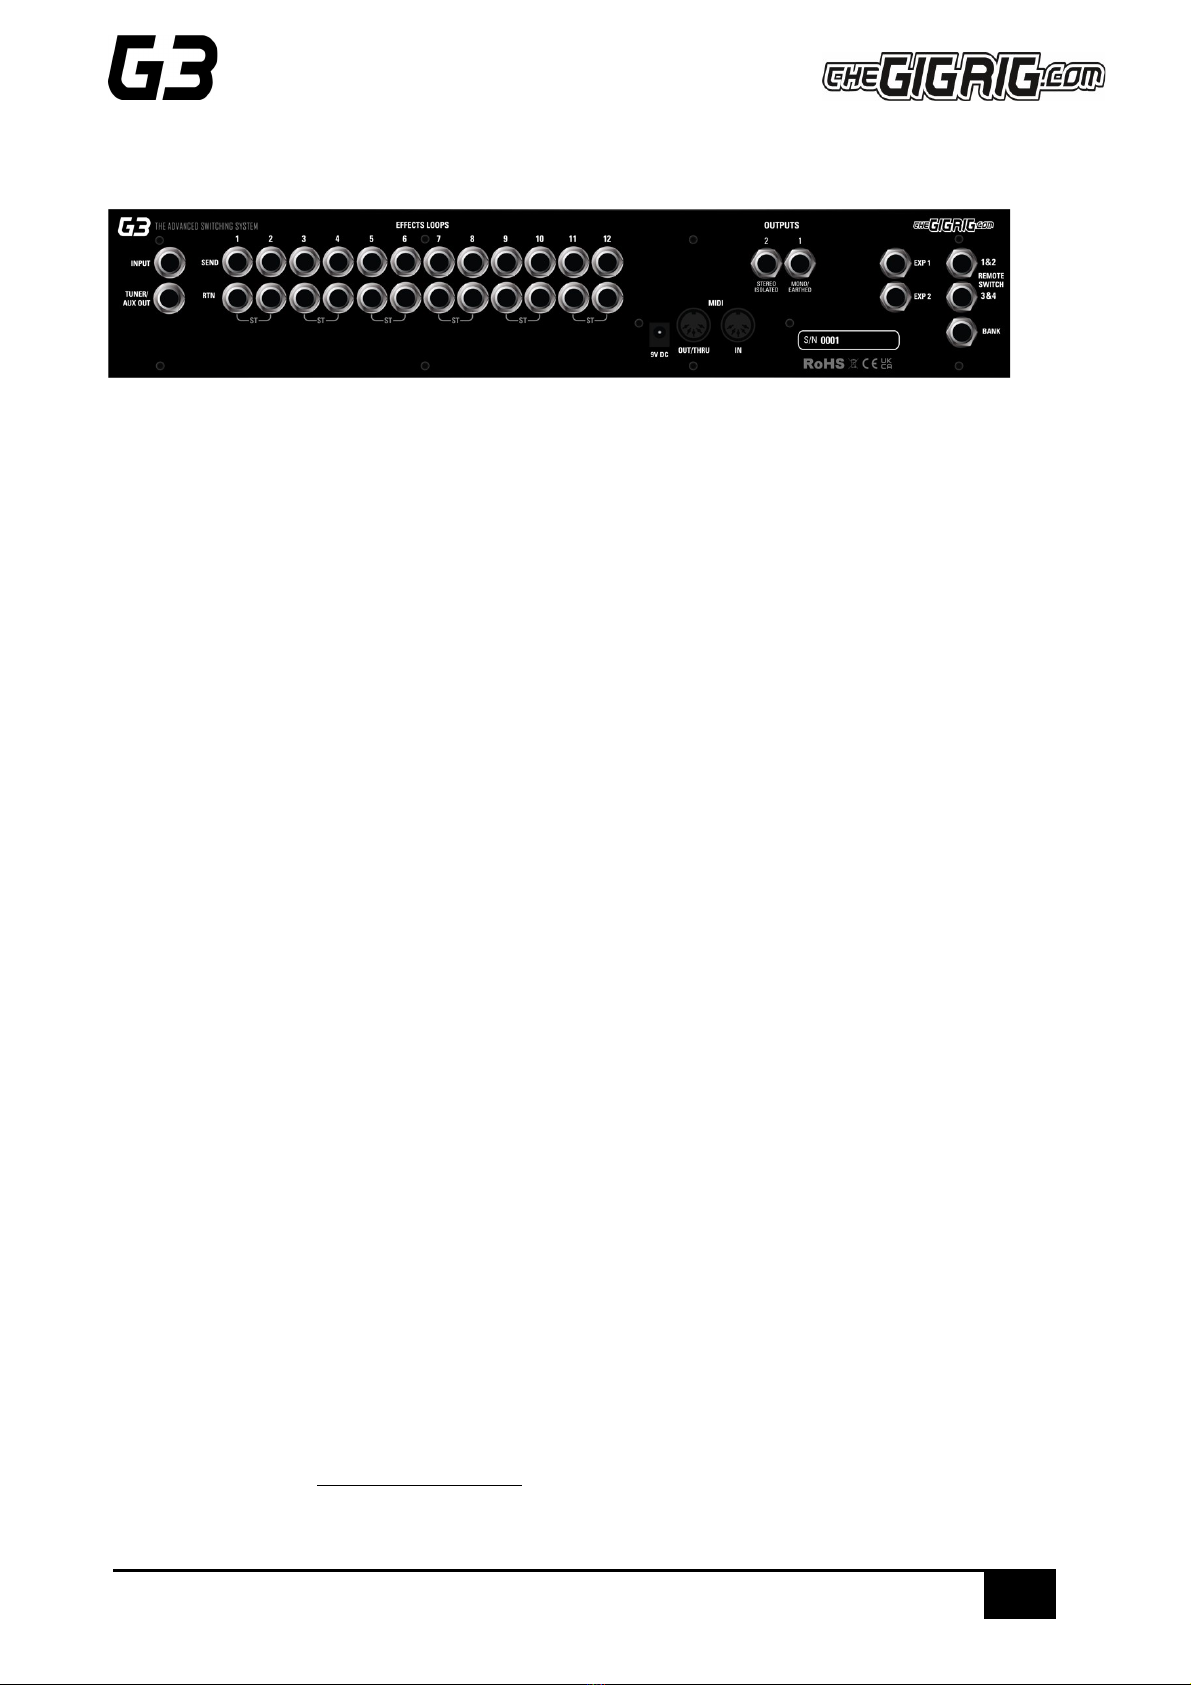
2.1. BACK PANEL CONNECTIONS
2.2. TOP PANEL
2.3. CONNECTIONS
To connect your effects to the back panel of G3:
1. Connect G3 FX Loop SEND to FX Pedal Input.
2. Connect FX Pedal OUTPUT to G3 Loop Return.
3. Connect your amp(s) PLEASE NOTE if you are only using one amplifier/DAW you MUST use OUT1 as
this is your earth/ground. Connect to your second amplifier or channel/DAW using OUT2 as this is
isolated and phase reversible.
4. Connect your tuner to the TUNER/AUX output.
5. Connect any MIDI enabled pedals using the MIDI INPUT/OUTPUT.
6. Connect your Remote Switch controllable devices (i.e. Amp channel, Remote Loopy 2, Tap Tempo) using
G3’s REMOTE SWITCH sockets.
7. Connect your power to G3. We strongly recommend using TheGigRig Generator which is supplied with
your G3.

6
THE ADVANCED SWITCHING SYSTEM
THE GIGRIG G3 USER MANUAL
2.4. PROGRAMMING
1. Choose a preset that you wish to programme by pressing a PRESET FOOTSWITCH. It will light up and
the corresponding number will also appear on the LCD screen.
2. Select the EFFECTS LOOPS and CONTROL FUNCTIONS you want to use with that preset.
3. Repeat for the other presets you wish to programme.
4. There is no store button, G3 remembers every time you press a button and automatically saves after
each step.
2.5. STOMPBOX MODE
This enables you to add any LOOP, or combination of LOOPS and CONTROL FUNCTIONS, on top of any standard
PRESET. This gives you the ability to create and build sounds on the fly without being tied to traditional presets.
1. Choose the PRESET you want to turn into a STOMPBOX Mode preset, eg; using PRESET 10.
2. Select the LOOP(s) you want to turn on. In this example below, I want to add a delay that is in
LOOP 9.
3. Now make sure everything else is turned off including OUTPUTS and PHASE OUT2.
4. Now press the STOMPBOX MODE button. A yellow LED will turn on next to the main preset
LED.
Preset 10 is now in STOMPBOX Mode and will add the delay in LOOP 9, ON TOP of any other
preset.
You can add as many STOMPBOX MODE presets as you like. All Stompbox Mode presets will clear when you
press any normal preset. This can, however, be changed in the DEEP EDIT MENU by selecting either STICKY
STOMP or FLASH.

7
THE ADVANCED SWITCHING SYSTEM
THE GIGRIG G3 USER MANUAL
2.6. NAVIGATING THE DEEP EDIT MENU
Press the button on the left-hand side of the LCD screen to access
the DEEP EDIT MENU.
To navigate through the Deep Edit Menu, use
footswitches 1,2,3 & 4 which correspond to Up, Down, Back,
Scroll/Enter respectively.
Editing menu options include:
MIDI, PARALLEL & WET/DRY SIGNAL PATHS, DELAY/REVERB TRAILS, PRESET NAMES, BLUETOOTH
SOFTWARE UPDATES, STOMPBOX MODES, PRESET BANK COPY & PASTE, SCREEN BRIGHTNESS, etc.
The Editing menu in G3 has been designed to be as intuitive as possible, but for additional guidance please
refer to the full manual.
8
THE ADVANCED SWITCHING SYSTEM
THE GIGRIG G3 USER MANUAL
3. CONNECTIONS
All of G3’s connections are made via the back panel.
3.1. INPUT - Connect your guitar here. Seems obvious, but this is the input.
3.2. TUNER/ AUX OUT - This is where we would send a signal to our tuner so we can tune silently on stage.
3.3. EFFECTS LOOPS - There are 12 mono effects loops in G3 that can be configured in various different ways.
For example, you can pair them for stereo effects, connect them to your amplifier’s effects loop (four cable
method), connect your volume pedal, re-order the effects loops or create a wet/dry set up. Loops can also be
configured in parallel or sent to different outputs.
3.4. OUTPUTS - These two outputs are where we connect to our amplifiers or audio interface.
IMPORTANT! OUTPUT 1 is your EARTH/GROUND and MUST be connected. OUTPUT 2 is isolated with an audio
transformer to prevent earth loops when using two amps, so this is where you connect your second amp. BUT if
you are only using one amp, you MUST connect to Output 1.
3.5. REMOTE SWITCHES - The G3 features four remote switches configured into two TRS remote switch
sockets, which are programmable via the push buttons on G3’s centre panel. These can be used to change
channels in your amplifier, Tap Tempo control, to control a Remote Loopy –in fact, they can be used for
anything that uses isolated latching or momentary switches.
3.6. BANK REMOTE SWITCH - Simply connect a momentary switch into the BANK input and you will be able
to control your G3 banks remotely.
To BANK UP, tap the momentary switch.
To BANK DOWN, hold the switch down and you will see the bank numbers start to descend.
PLEASE NOTE –a latching switch will NOT work here.
3.7. MIDI IN & OUT - This is where you connect your MIDI IN and MIDI OUT cables from G3 to control your
MIDI effects. The connection is a standard five pin din cable.
3.8. POWER (9V DC) - G3 uses a standard centre 9V DC input connection. G3 operates around 650 mA, so it is
important that your power supply can provide sufficient current. The GigRig Generator Power Supply is included
with your G3.
3.9. EXPRESSION PEDALS (EXP1 & EXP2) - G3 has two expression pedal ports that use a TRS connector.
These can be used to send MIDI CC information, as well as being able to control G3’s PRE GAIN and POST GAIN
levels. We recommend using The GigRig Wetterbox EXP Pedal, however, other EXP pedals may be compatible.

9
THE ADVANCED SWITCHING SYSTEM
THE GIGRIG G3 USER MANUAL
3.10 CONNECTION EXAMPLES:
a. CONNECTING MONO EFFECTS
Connect G3 FX Loop SEND to FX Pedal Input. Connect FX Pedal OUTPUT to G3 Loop Return
b. CONNECTING STEREO EFFECTS
If you want to use stereo effects with G3, you can pair two mono loops together into a single stereo loop. G3’s
loops are paired as follows:
Loop 1/2, Loop 3/4 etc.
Of course, you can use a combination of mono and stereo loops.
To pair loops together:
a. Enter the DEEP EDIT menu then select GLOBAL.
b. Select STEREO PAIRS
c. Select the loops you want to pair. The red LED indicates two loops are paired in stereo.
d. Select the stereo loop by pressing either of the paired loops.

10
THE ADVANCED SWITCHING SYSTEM
THE GIGRIG G3 USER MANUAL
c. CONNECTING AMPLIFIERS’EFFECTS LOOP
There are three important steps to connecting to your amplifier’s effects loop.
The best way I find to explain this is to think of your amps’ preamp as another pedal. Your preamp is connected
to your amps power section and this is where the amps FX LOOP sits, between the preamp and power amp.
a. First select a G3 loop to connect with your amps FX loop. In the diagram above, loops 1-4 are placed
before the pre amp, loop 5 contains the pre amp and loops 6-12 are placed inside the FX loop (note -
any loop can be selected).
b. Connect the SEND from the chosen G3 effects loop to the input of the amplifier. The connections
needed to achieve this are:
c. G3 Loop 5 SEND to AMP INPUT.
d. AMP FX Loop SEND to G3 Loop 5 RETURN.
e. G3 Atom Output 1 to AMP FX Loop RETURN.
f. As the amp’s pre-amp is contained within Loop 5, this needs to be engaged on all presets.
11
THE ADVANCED SWITCHING SYSTEM
THE GIGRIG G3 USER MANUAL
4. BASIC PROGRAMMING
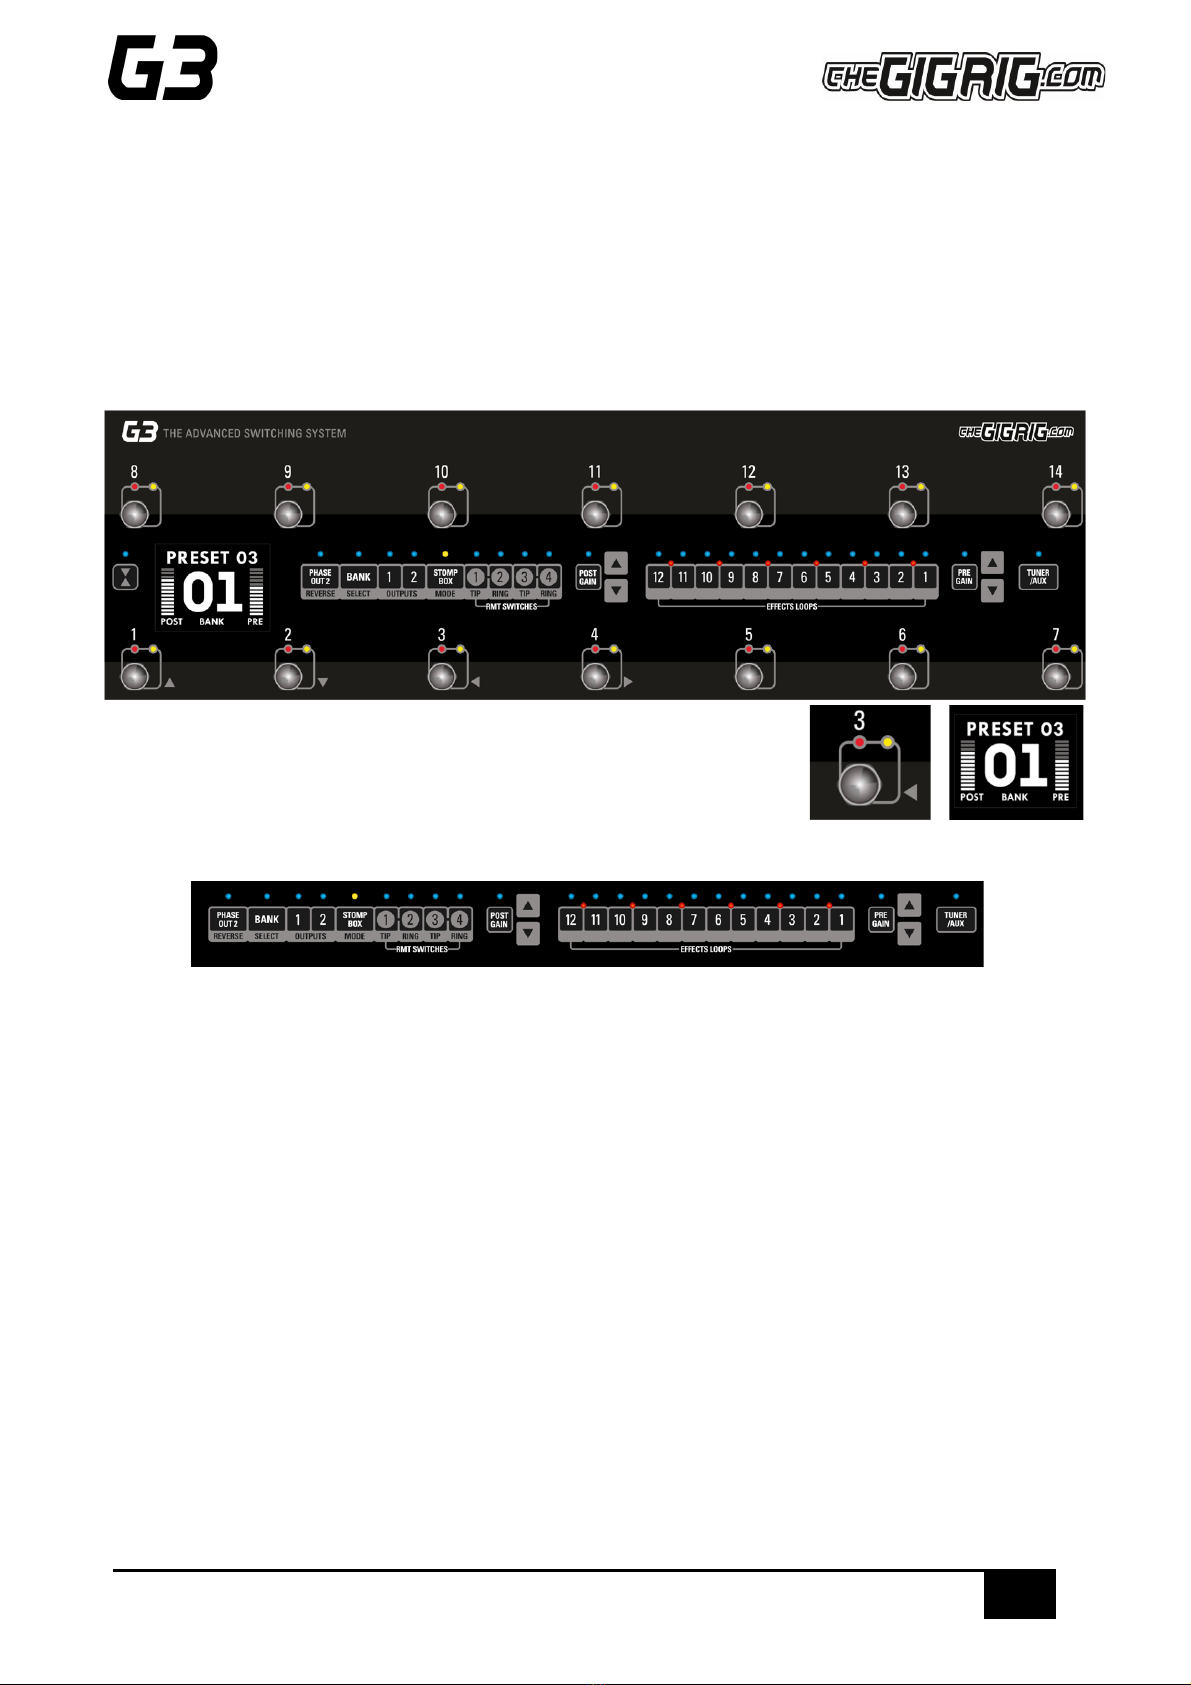
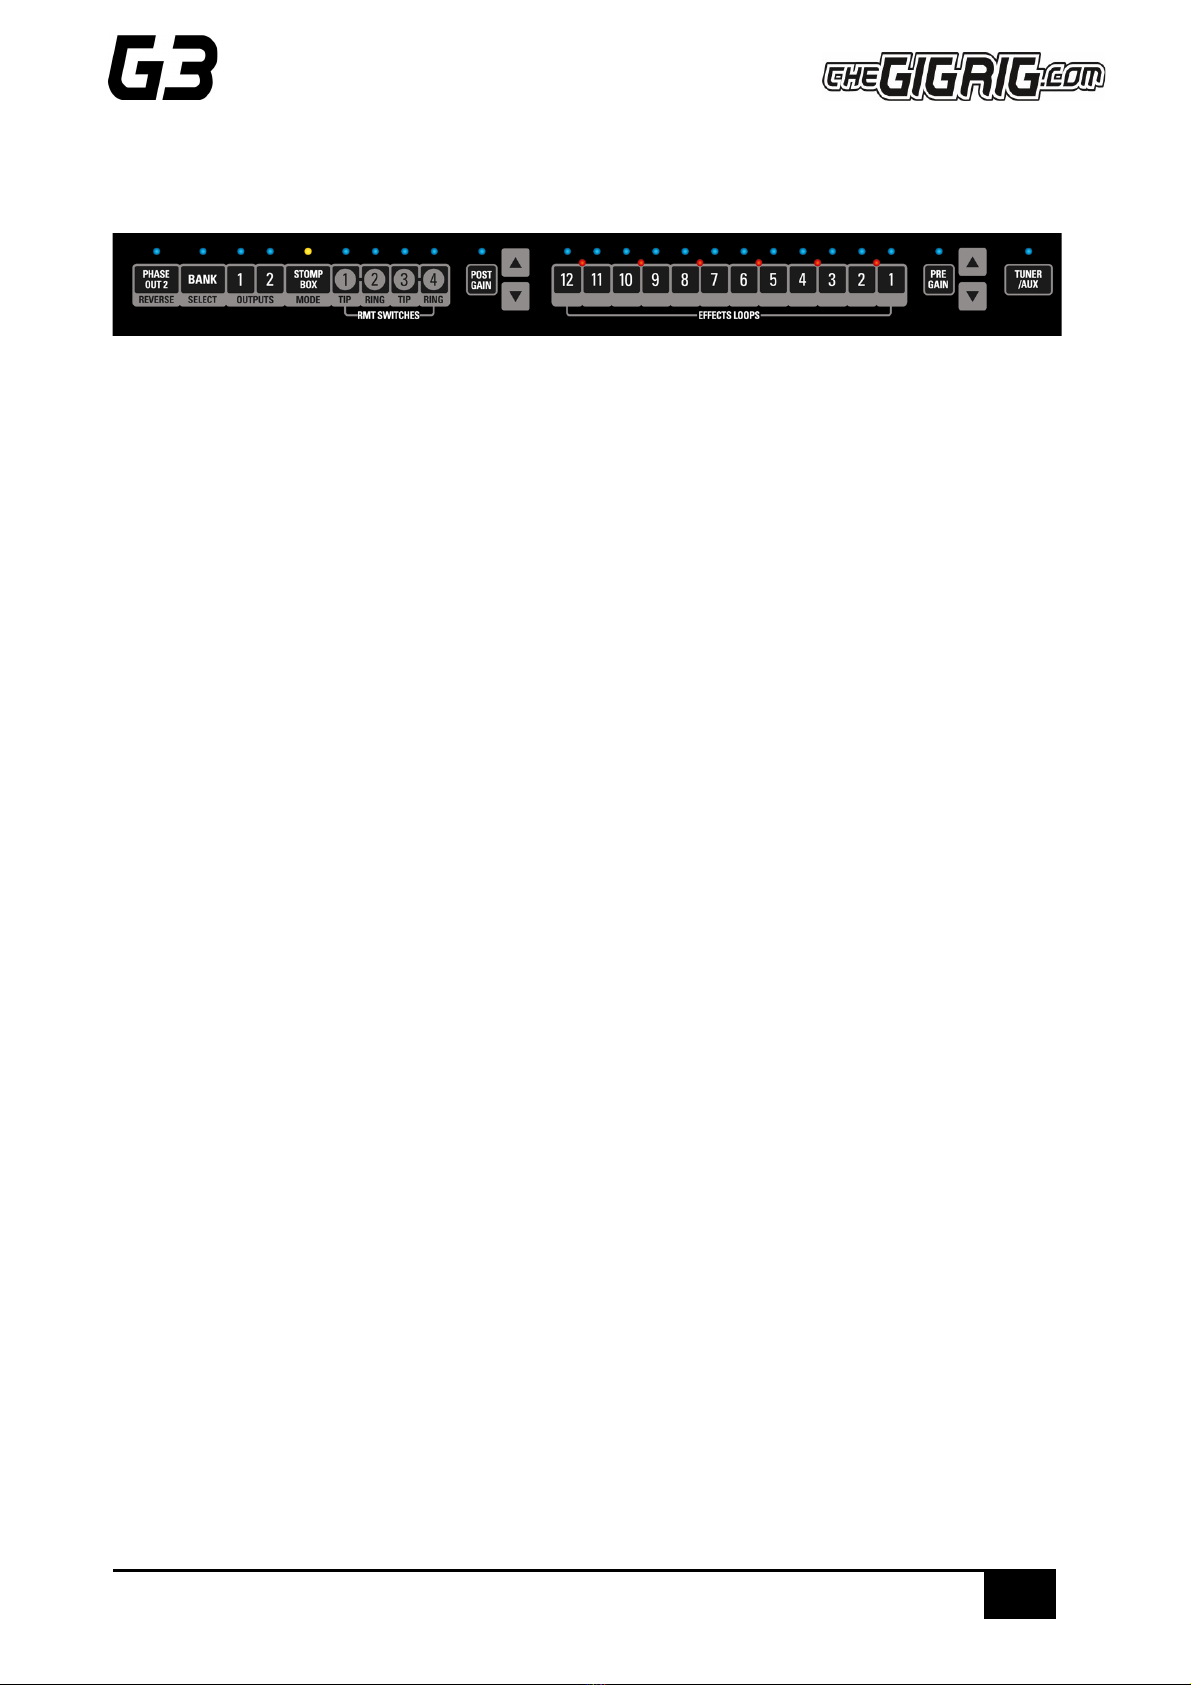
Most of G3’s programming is done via the top panel.
Everything is laid out in a simple, logical order to keep the experience as intuitive as possible.
4.1 PRESET PROGRAMMING
Presets are at the heart of G3’s functionality. Whether you are controlling MIDI or adding Stompbox Mode, it all
happens within a preset.
a. Select the preset that you want to programme using the footswitches on
G3.
b. Add loops and functions to that preset using the corresponding buttons
along the centre of G3 (i.e. Output 1/2, FX loops 1-12). Your preset is now stored.
c. Repeat for each footswitch, as necessary.
d. You can now switch between your programmed presets.
There are 14 standard presets plus 14 hidden presets in each of G3’s 99 banks.
4.2 STOMP BOX MODE
STOMPBOX MODE allows you to add any function or loop(s) on top of a G3 preset.
(In DEEP EDIT mode you can choose between 3 different types of STOMPBOX MODE –STANDARD, STICKY and
FLASH.
To programme a STOMPBOX MODE enabled preset:
a. Select the preset that you want to programme using the footswitches on G3.
b. Add the loops/functions you wish to add to this preset. These loops/functions will be disengaged when the
footswitch is pressed a second time. NOTE - this means if both Outputs are included in that Stompbox
12
THE ADVANCED SWITCHING SYSTEM
THE GIGRIG G3 USER MANUAL
Mode preset, pressing this footswitch a second time will result in no sound, so it’s important to ONLY
include the loops and functions you want to add/subtract on top of a standard preset.
c. Then press the Stompbox Mode button. A yellow LED above the preset indicates it is now in Stompbox
Mode.
d. Now try adding your Stompbox Mode preset to a standard preset.
As a Stompbox Mode preset is engaged ON TOP of a normal preset, the enabled preset cannot be edited whilst
in Stompbox Mode.
To edit a Stompbox enabled preset:
a. Press the Stompbox enabled footswitch then press Stompbox Mode (yellow LED next to the footswitch will
turn off).
b. Then press the footswitch a second time so it is the only one selected, then you can programme the preset
as normal.
You can create as many Stompbox Mode presets as you like.
There are 3 Stompbox modes in G3; Standard, Sticky and Flash.
Standard is the default setting, to select either of the other two modes you will need to enter the DEEP EDIT
MENU, scroll down to STOMPBOX, and select the Stompbox Mode you want BEFORE you create your Stompbox
Mode preset. A normal preset will clear any standard Stompbox Mode presets.
Sticky Stomp –Once you turn on a Sticky Stomp preset, it will NOT be cleared by pressing a normal preset the
same way a standard STOMPBOX Mode preset does. It will stay active until you turn it off by pressing the
footswitch. For example, if you have an effect that you like to have on most of the time such as reverb, but like
the option to be able to turn it off, set the reverb pedal up on a Sticky Stomp footswitch and it will stay on until
you decide to turn it off.
Flash Stomp - This sets up your Stompbox Mode in momentary mode so that the Stompbox preset will only be
on while you have got your foot pressed down on the foot switch. Imagine you’ve got a delay set on the edge of
self-oscillation and you just want to be able to kick it on every now and then, Flash function is perfect for that.
13
THE ADVANCED SWITCHING SYSTEM
THE GIGRIG G3 USER MANUAL
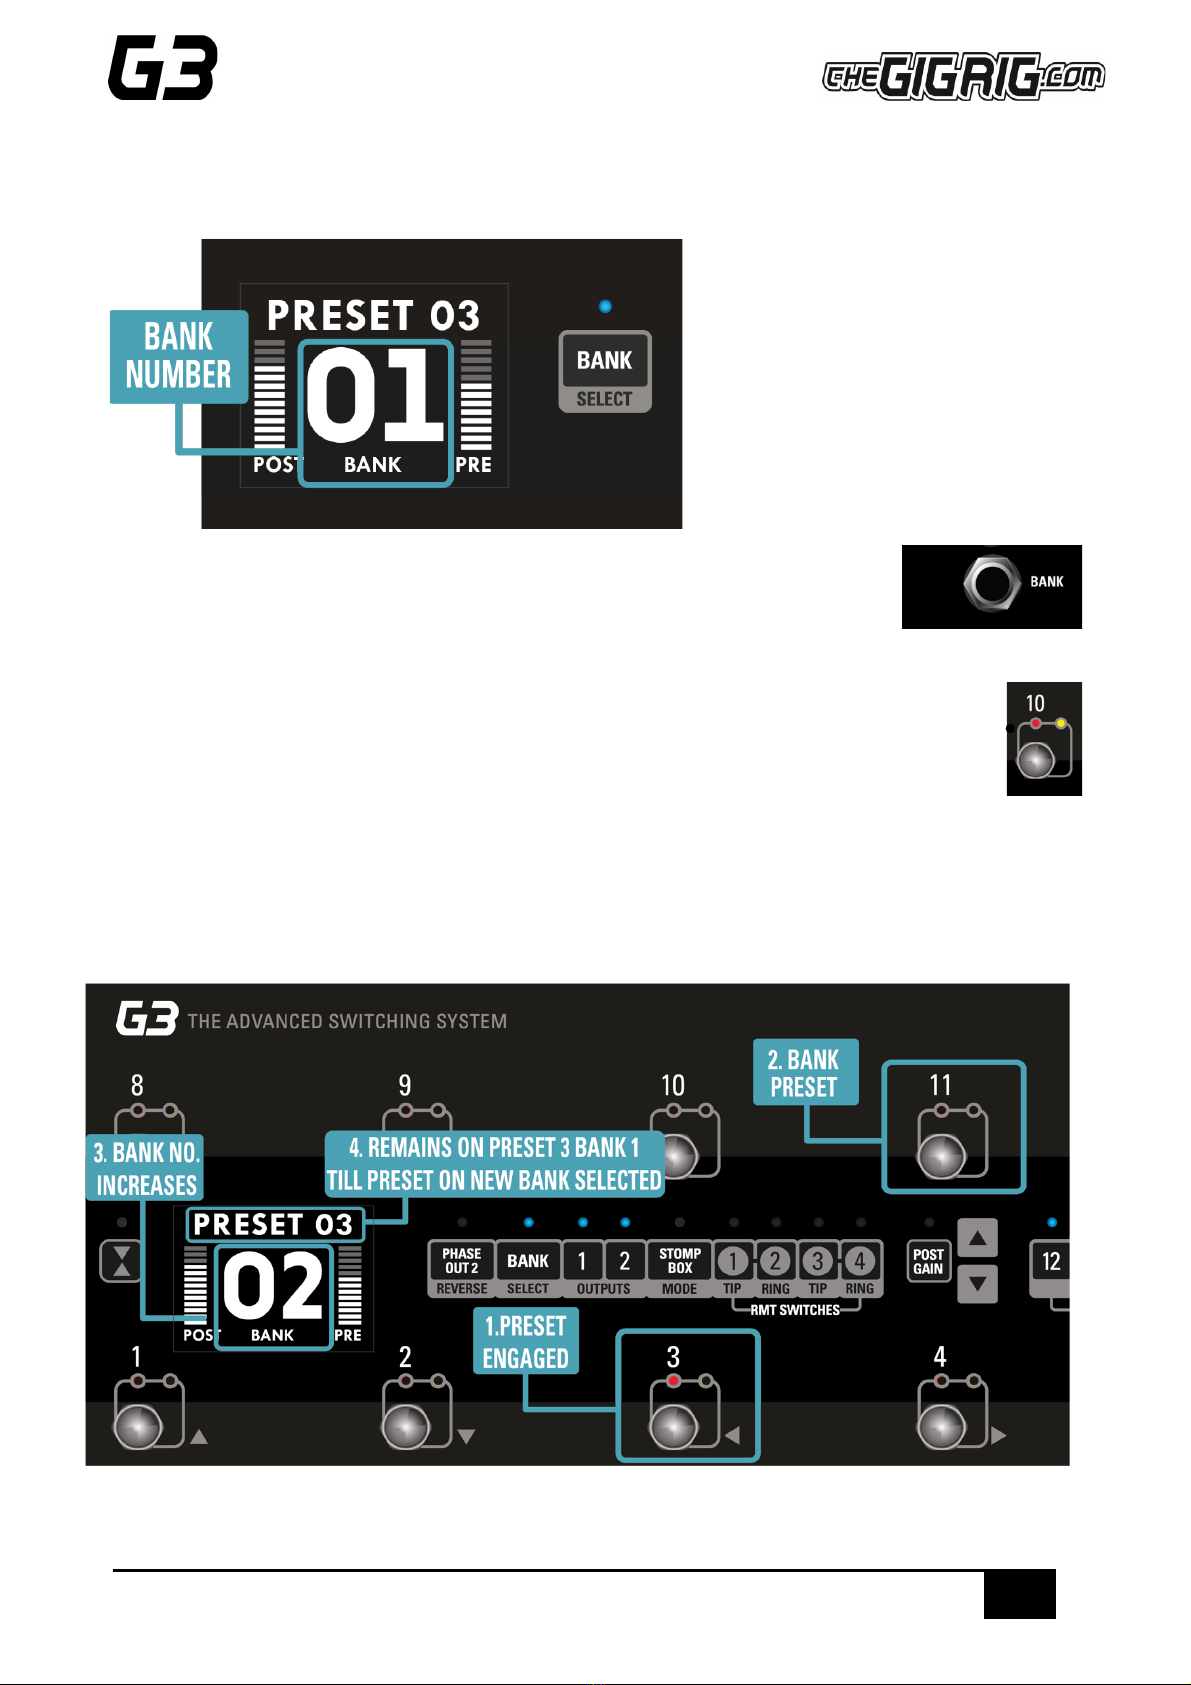
4.3 CHANGING BANKS
You can access G3’s 99 Banks in one of three ways:
1. The ‘Bank Select’ push button on the top
panel. Pressing it once will scroll up the
Banks and pressing and holding will scroll
down the Banks. (Please note that
whichever preset you are on you will stay
on until you have selected a new preset in
your newly chosen bank).
2. Back Panel Bank Remote - connect the GigRig Bank Manager or any momentary
switch to the back-panel bank socket to access G3 banks (this needs to be activated
in the Deep Edit Menu under Global Settings). Again, press the Bank switch once to
go up, press and hold to go down.
3. Footswitch Assign - assign your bank control to a G3 footswitch. In the Deep Edit Menu, in Global
Settings, you have the option to assign the Bank Select switch to a G3 footswitch. Once done,
simply tap the footswitch to go up a Bank or press and hold to go down a Bank.
Remember, the 99 banks are accessed through a single footswitch.
Press and release –The Bank numbers go up
Press and hold –The Bank numbers go down

14
THE ADVANCED SWITCHING SYSTEM
THE GIGRIG G3 USER MANUAL
5. DEEP EDIT
5.1 DEEP EDIT FUNCTIONS
To the left-hand side of the LCD screen you will
see the DEEP EDIT push button.
This push button gives you access to G3’s Deep
Edit Menu.
Except for the Global Settings, the Deep Edit
functions are associated with each preset. We
must first choose the preset we want to edit.
5.2 NAVIGATING DEEP EDIT
Next to footswitches 1,2,3 and 4 you will see these symbols -
You will use these footswitches to navigate around the Deep Edit Menu.
On pressing the button, the LCD screen will display the following:
Use the button (footswitch 2) to access more of the Deep Edit Menu,
including the following sub-menus:
1. NAME - This is where we edit the name of the preset.
2. MIDI - This is where we edit G3’s MIDI functionality.
3. EXPRESSION - Assign your Expression Pedal parameters here.
4. LOOP ORDER - Change the order of your effect’s loops.
5. STOMPBOX –Determine if Stompbox Mode on this preset is Standard, Sticky, or Flash.
6. TRAILS - Set up your effects Trails/Spill-over.
7. PARALLEL - Use this to create Parallel or Wet/Dry signal chains.
8. TAP TEMPO - Use G3’s Tap Tempo with remote switches and MIDI CC’s.
9. HIDDEN PRESET - Each preset in G3 has a separate, fully programmable hidden preset. This is accessed by
pressing this footswitch a second time.
10. GLOBAL SETUP- setup Global Options including Stereo Pairs, Bluetooth, MIDI IN, etc.
15
THE ADVANCED SWITCHING SYSTEM
THE GIGRIG G3 USER MANUAL
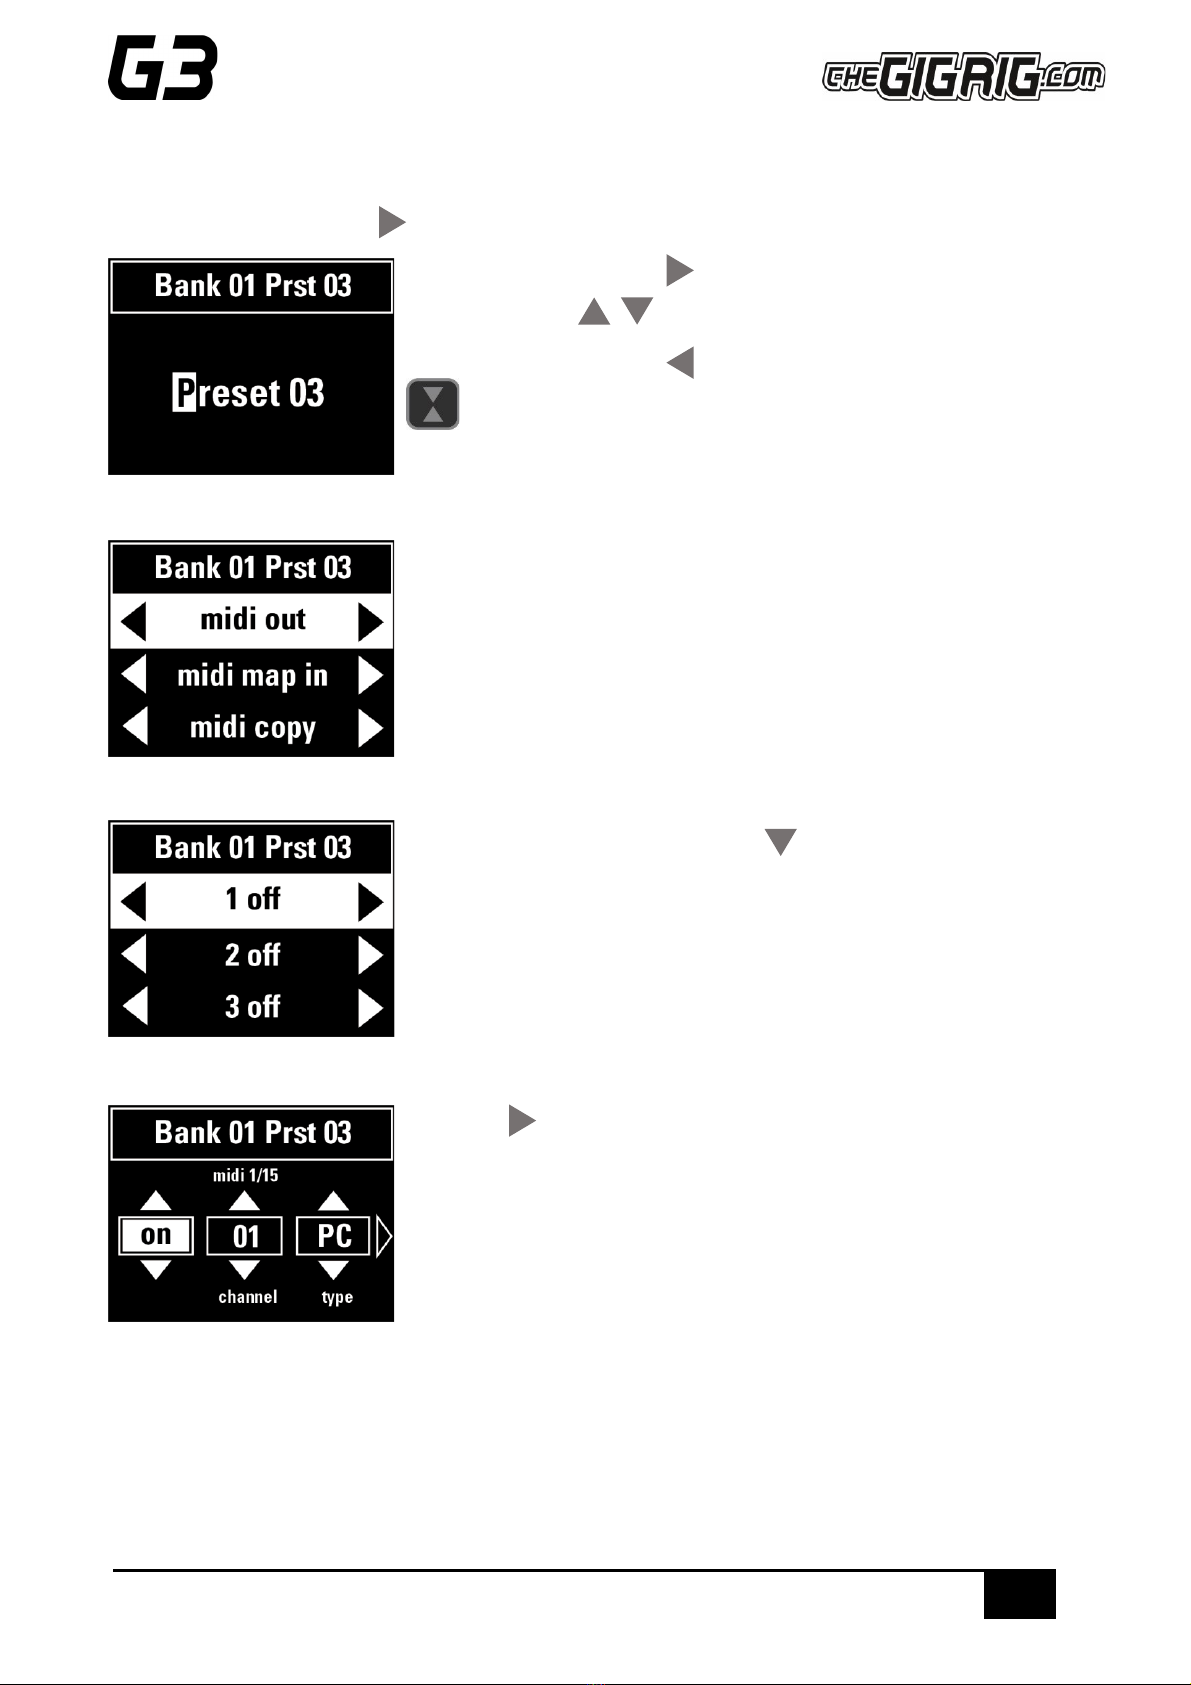
5.2.1 NAME - NAMING PRESETS
To edit the preset name, press and you will see the flashing cursor on the selected letter.
Move the cursor across using button and scroll up and down through the
character set using
Once you are done, either use to get back to the main menu or press
to exit.
5.2.2 MIDI
G3’s MIDI capability allows you to send up to 15 individual MIDI messages on
each preset. These can be PC (Programme Change), CC (Control Change) or
EXP (Expression Pedal) MIDI messages.
G3 also has a MIDI Clock and a separate MIDI Tap Tempo feature.
MIDI Menu screen –to edit, scroll down to each of the 15 available MIDI
messages.
Scroll right to edit the selected MIDI command.
Scroll right again to select between PC (Programme Change), CC (Control
Change) or EXP (Expression pedal).
Scroll right again to select the Value (if CC is selected, scroll right again to
select the CC number).
Choose the MIDI command that you want to send - in this example we will choose PC - then scroll to the right
to choose the MESSAGE number or channel VALUE number etc.
16
THE ADVANCED SWITCHING SYSTEM
THE GIGRIG G3 USER MANUAL
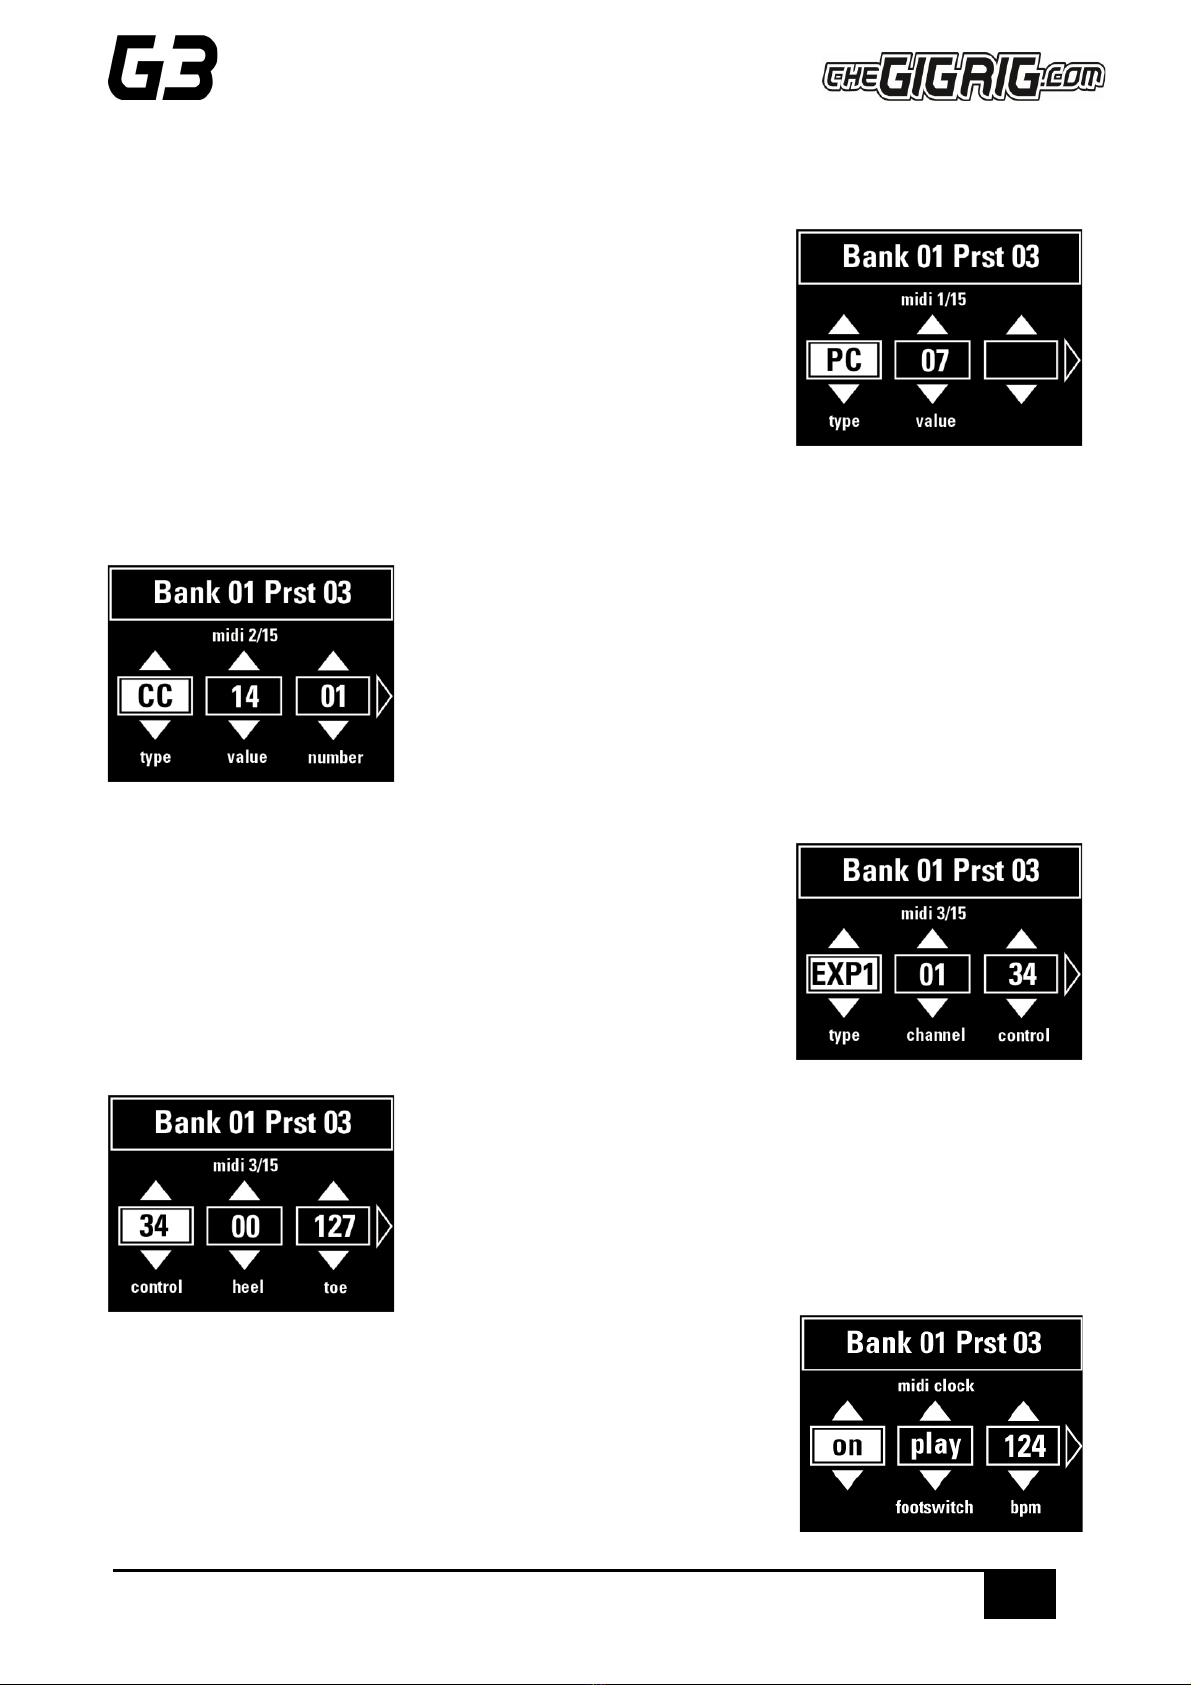
For example, if you want to programme channel 7 and would like Preset Number 1 on G3 to send MIDI
programme 7 on MIDI channel 3, you will need to:
a. Select a MIDI command (1-15).
b. Edit MIDI Channel (in this instance, to MIDI channel 3).
c. Set Type to PC.
d. Set Value to 7.
e. Press DEEP EDIT. Push button 3 to exit.
You can repeat this process up to 15 separate times per individual preset.
To Set Up Control Change (CC) Messages:
a. Select a MIDI command (in this example, MIDI command 2 is selected)
b. Scroll right to set Type to ‘CC’
c. Scroll right again to set VALUE and NUMBER.
EXPRESSION PEDAL MIDI
This is the same procedure as above:
Select Expression Pedal from the MIDI Type list.
Choose the CHANNEL number and the CONTROL number.
Scroll right and choose the HEEL down position number and the TOE down
position number.
There are two expression pedal inputs in G3 so you have the choice of which
expression pedal you want to use to send your EXP commands.
MIDI CLOCK
G3’s MIDI CLOCK enables you to send a MIDI clock message that can sync all
your clock input enabled, time-based effects. You can send the MIDI clock out
on all MIDI channels.
17
THE ADVANCED SWITCHING SYSTEM
THE GIGRIG G3 USER MANUAL
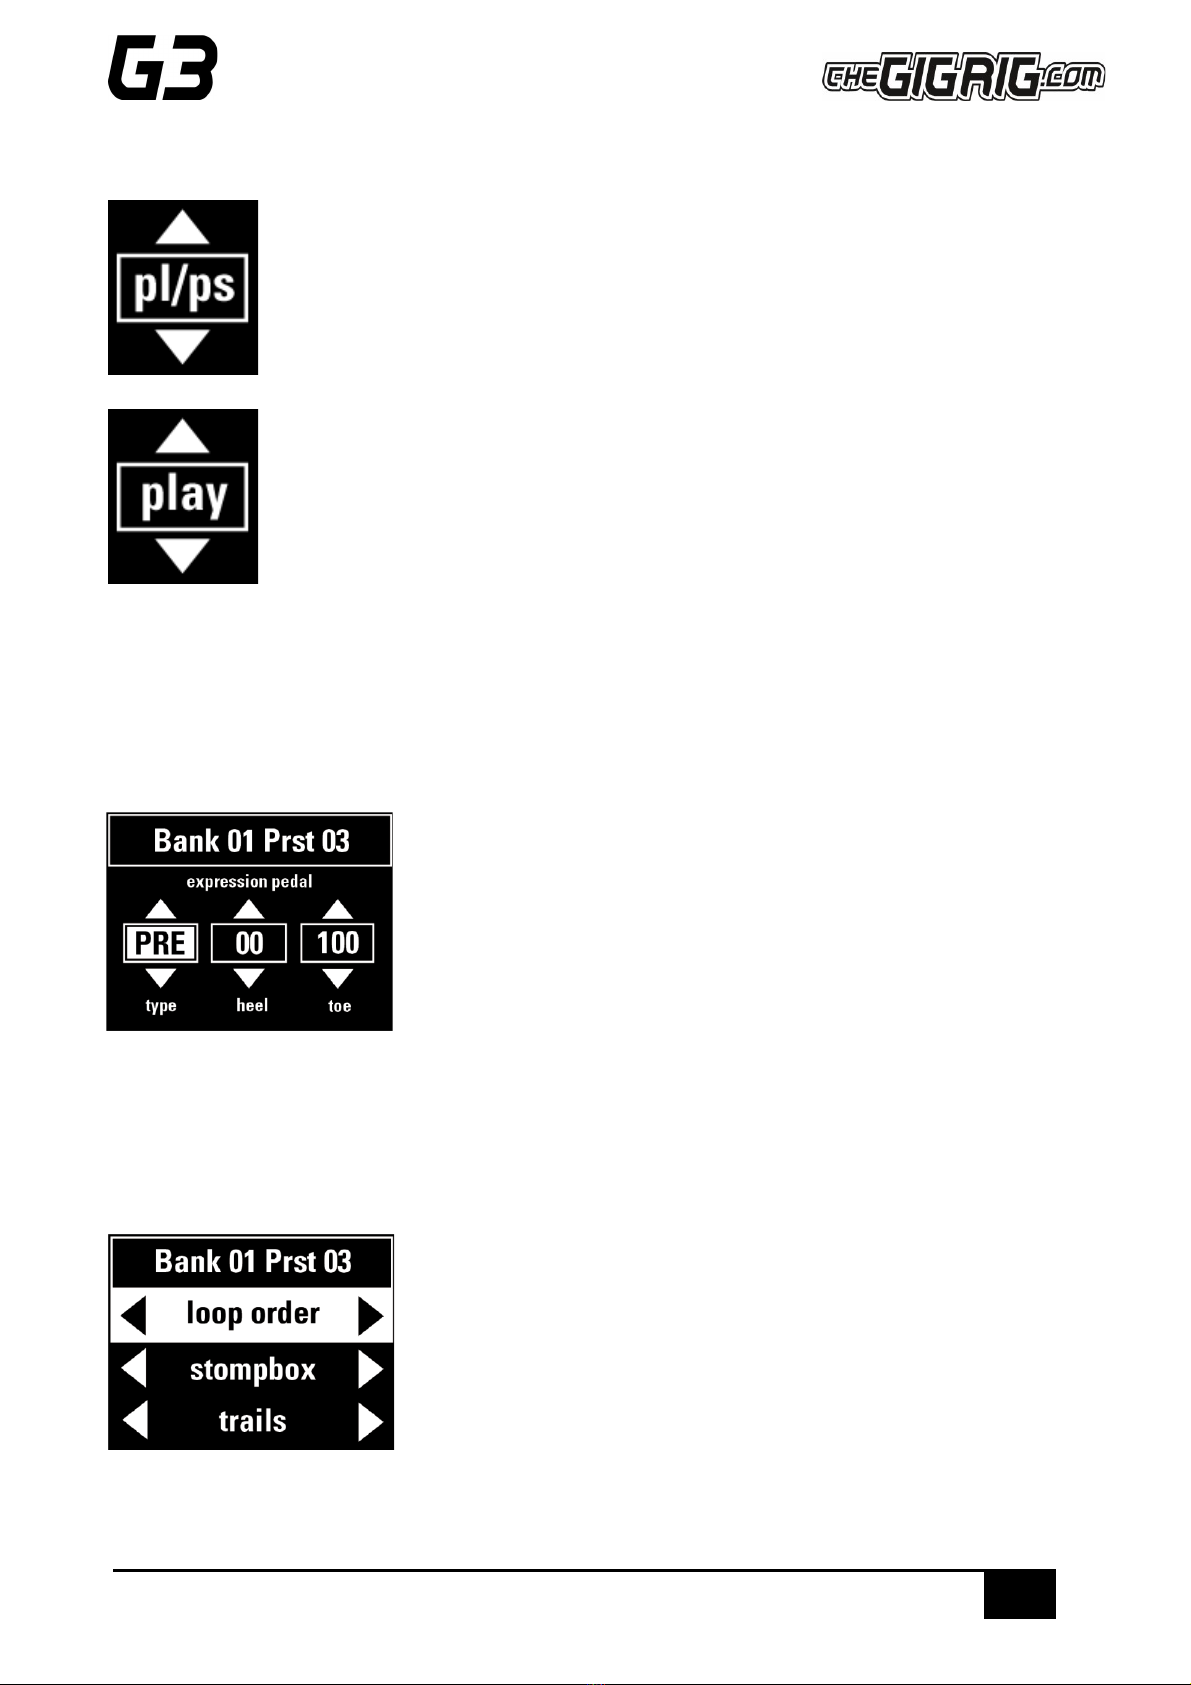
You will have two states to the MIDI clock:
- PL/PS (Play and Pause)
In this mode:
When the MIDI clock enabled footswitch is engaged, the MIDI clock will begin to run. When
the footswitch is pressed for a second time, it will pause the MIDI clock. Pressing this
footswitch multiple times will toggle between the two states.
- PLAY
In this mode:
When a MIDI clock enabled footswitch is engaged in this mode, the MIDI clock will start
running at the specified tempo and will continue to run until you leave this state.
5.2.3 EXPRESSION - EXPRESSION PEDAL PRE/POST GAIN
You also have the option to set up the Expression Pedals to control the PRE and POST GAIN in G3 - for example,
as a volume control, using the PRE GAIN to control the levels going into your effects or using the POST GAIN as
a master volume control.
a. Select EXPRESSION from the Main Menu.
b. Scroll to select either PRE GAIN or POST GAIN.
c. Select your Heel and Toe values.
Your expression pedal will now control Pre and/or Post Gain levels.
Remember you must have your Pre or Post Gain selected on this preset to be able to control the levels with your
Expression Pedal.
5.2.4 LOOP ORDER
With G3, you can reorder your effects loops in any way you like:
a. Go to LOOP ORDER on the Deep Edit menu.
b. Scroll right and you will see Loops 1-12 which correspond to your effects
loops.
c. Use the EFFECTS LOOPS push buttons along the centre of G3 to order the
loops, as desired.

18
THE ADVANCED SWITCHING SYSTEM
THE GIGRIG G3 USER MANUAL
The numbers will change positions to reflect the order chosen.
5.2.5 STOMPBOX –See Section 4.2
5.2.6 TRAILS
To activate TRAILS on a preset:
a. Select the preset you want your Reverb and Delay Trails to spill-over onto.
b. Go to TRAILS in the menu.
c. Scroll right and turn on TRAILS for the preset.
d. Select the loop(s) that contain Delay and/or Reverb, to enable the spill-over
function for these pedals.
Remember, you set up Trails on the preset you are going to, not the preset
that you have come from.
19
THE ADVANCED SWITCHING SYSTEM
THE GIGRIG G3 USER MANUAL
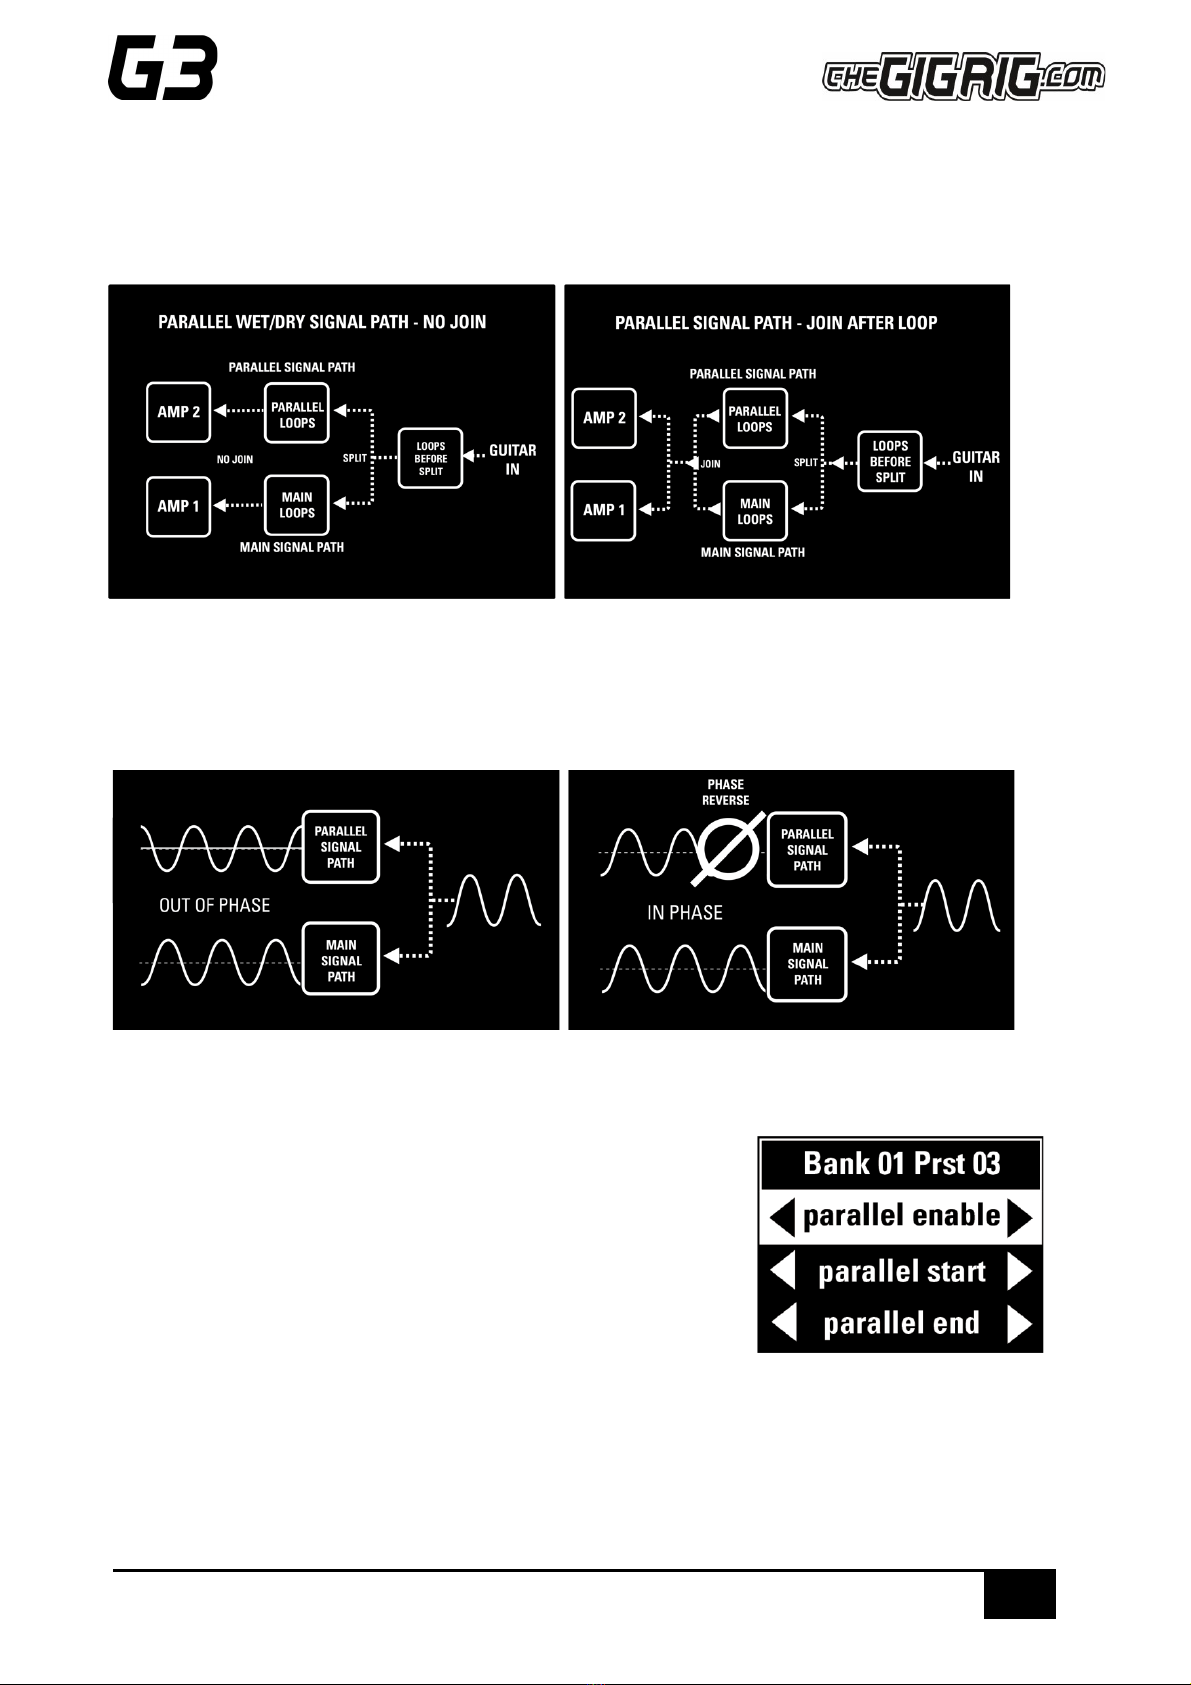
5.2.7 PARALLEL
G3’s PARALLEL FUNCTION enables you to split your signal path in two, meaning you can set up effects in
Parallel, Wet Dry, and even send different effects to different amplifiers.
G3 allows you to flip the phase of the parallel signal chain. This is important for resolving phase cancellation
between the two signal paths. If the effect is out of phase you will hear a cancellation/reduction of
frequency/volume. An example of this would be setting up a parallel signal path with no effects selected and
then flipping the phase in G3. You would hear a complete cancellation of your guitar signal.
SETTING UP PARALLEL
a. In the Deep Edit Menu, scroll down to PARALLEL.
b. Scroll right to turn on PARALLEL ENABLE.
c. Use PARALLEL START to select where the signal path splits (i.e.
before Loop 1).
d. Use PARALLEL END to select where parallel signal rejoins.
e. If no join is selected the parallel signal path will be sent to OUTPUT 2.
f. Next, you need to select the loops you want to add to your Parallel Signal Path using the PARALLEL
LOOPS option.
g. Use PHASE SETTINGS to resolve any phase cancellation.
20
THE ADVANCED SWITCHING SYSTEM
THE GIGRIG G3 USER MANUAL
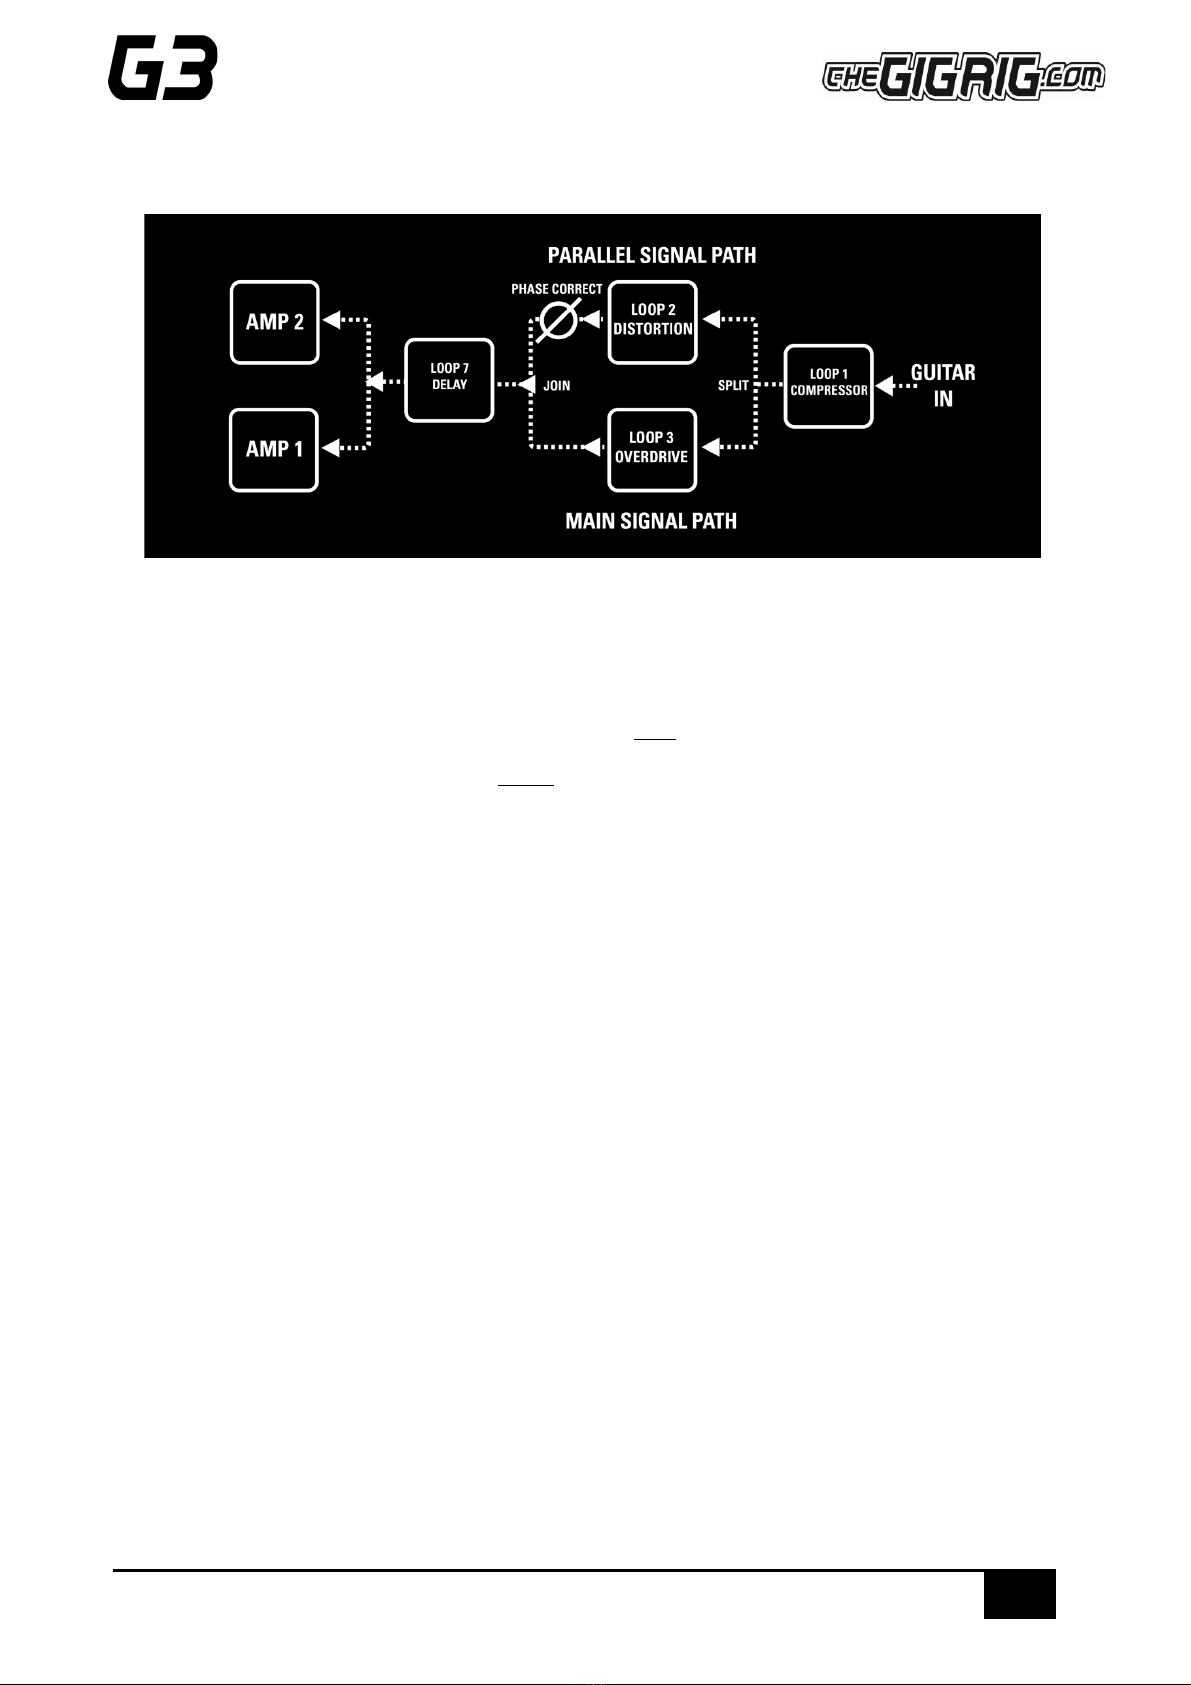
EXAMPLE 1 - PUTTING AN OVERDRIVE AND DISTORTION IN PARALLEL
Here is how you would set up this signal path:
a. Enter Deep Edit Menu and scroll down to Parallel.
b. Select Parallel Enable, then Parallel Start and set to after Loop 1.
c. Now select Parallel End, then select before Loop 7.
d. Select Parallel Loops then engage Loop 2.
e. Now use the Phase setting to correct any phase cancellation issue between loop 2 and loop 3.
Other manuals for G3
2
Table of contents
Other The GigRig Music Pedal manuals


