The GigRig Wetter Box User manual

The GigRig Ltd
Unit 85 Basepoint Business Centre
Swindon
SN5 7EX
1
TheGigRigTM Wetter Box Manual
1.
SELECT INPUT STEREO/MONO
9.
PHASE LOOP B RETURN
2.
MIX/BLEND CONTROL
10.
MIX/BLEND SELECT
3.
OPTOKICK FOOTSWITCH
11.
REMOTE SWITCH INPUT
4.
GAIN CONTROL LOOP B RETURN
12.
EXPRESSION PEDAL INPUT
5.
GAIN CONTROL LOOP A RETURN
13.
EFFECTS LOOP B SEND
6.
EFFECTS LOOP A RETURN
14.
EFFECTS LOOP B RETURN
7.
EFFECTS LOOP A SEND
15.
OUTPUT LEFT (MONO)
8.
MAIN INPUT
16.
OUTPUT RIGHT (STEREO)

2
GLOSSARY
•INPUT MONO/STEREO: If your INPUT to the Wetter Box is Mono, set
the switch to MONO. If your signal path is stereo (using a TRS cable),
set to STEREO.
•MAIN INPUT: Connect your guitar here (if using STEREO, use a TRS
Cable).
•GAIN CONTROL LOOP B RETURN: Use this to control the Gain of LOOP
B.
•GAIN CONTROL LOOP A RETURN: Use this to control the Gain of LOOP
A.
•EFFECTS LOOP A SEND: Connect a patch cable (TRS, if STEREO) from
here to the Input of the effects pedal in LOOP A.
•EFFECTS LOOP A RETURN: Connect a patch cable (TRS, if STEREO) from
here to the Output of the effects pedal in LOOP A.
•EFFECTS LOOP B SEND: Connect a patch cable, (TRS, if STEREO) from
here to the Input of the effects pedal in LOOP B.
•EFFECTS LOOP B RETURN: Connect a patch cable (TRS, if STEREO) from
here to the Output of the effects pedal in LOOP B.
•OUTPUT LEFT (MONO): Connect to Amp for Mono Output.
•OUTPUT RIGHT (STEREO): Connect second Amp for STEREO output.
•OPTOKICK FOOTSWITCH: Press this to engage/disengage the Wetter
Box.
•MIX/BLEND SELECT: Push to select between MIX or BLEND modes of
operation.
•MIX/BLEND CONTROL: Use this dial to either MIX or BLEND LOOP A
and LOOP B together.
•PHASE LOOP B RETURN: Use this to flip the Phase on LOOP B when
required.
•REMOTE SWITCH INPUT: Plug in a Mono (TS) cable here to control the
wetter box remotely from any latching Footswitch.
•EXPRESSION PEDAL INPUT: Connect an Expression Pedal here for
alternative MIX/ BLEND Control operation.
•DC INPUT: Plug in your DC power here. You’ll need a supply capable of
185mA using a standard 2.1mm centre neg connector. PLEASE NOTE -
if you are using TheGigRig Modular Power Supply you may power the
Wetter Box direct from a Distributor as the power is isolated internally.

3
How the Wetter Box Works
In a standard series signal path the signals are fed one into the other.
In a parallel path the signal is split and fed separately into each effect, then
mixed together before the output.
This is how the Wetter Box works:
1. The signal enters the Wetter Box via the main INPUT
2. The signal is then split into 2 separate signals
3. These two signals are sent to effects loops Aand B
4. If nothing is plugged into the effects loop, the signal simply bypasses the
loop
5. The signal from the Loop Return (or if the loop is empty, the signal
directly from the split) is fed into the Gain stage
6. These signals are then mixed and sent to the Output

4
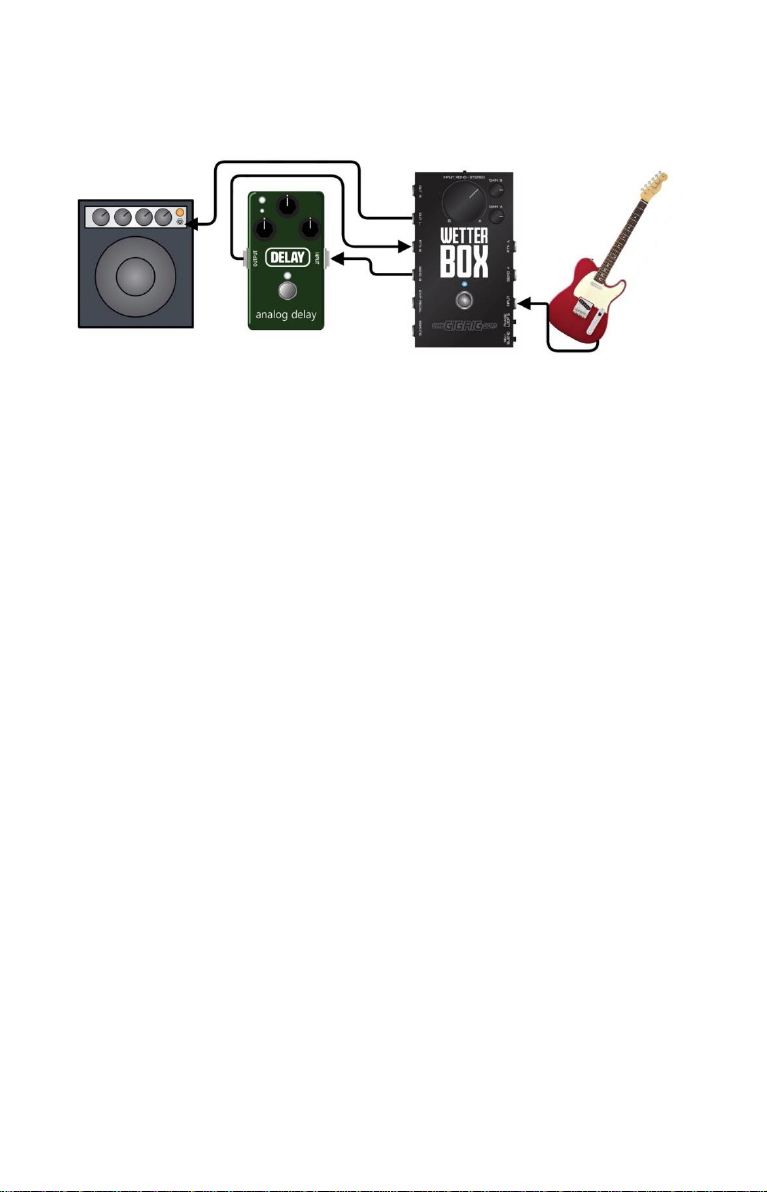
Blending a Pedal in Parallel with your Direct Signal
1. With your pedals and the Wetter Box correctly powered, connect your
guitar to the INPUT and connect OUT L to your amp. Please note, in
standard MONO operation you will only get signal out of OUTPUT L
2. Connect a pedal (in this case an analog delay) to LOOP B of the Wetter
Box
3. When the MIX CONTROL on the Wetter Box is switched to Ayou’ll hear
only your direct signal. With the MIX CONTROL switched to Byou’ll hear
the sound from your effects pedal
4. You can balance the sound of the delay with the GAIN CONTROLS
GAIN CONTROLS:
Both Wetter Box loops have independent GAIN CONTROLS to help balance
the level between the effects in the loops. These circuits are positioned
after the loop return. Think of these as a master volume that let you boost
or cut the level. Remember that these circuits are still active, even if you
don’t have a pedal in the loop.
MIX CONTROL:
Use the MIX CONTROL to blend between LOOP A and LOOP B. If a loop is
empty (as is LOOP A in this example), that loop becomes your direct signal.
With the MIX CONTROL set to LOOP B, set your delay to the maximum
desired level. As you turn the control towards the LOOP A, your delay will
get quieter and your direct sound will take over.

5
Blending 2 Pedals Together
You can choose any two pedals to
blend.
1. With your pedals and the
Wetter Box correctly powered,
connect your guitar to the INPUT
and connect OUT L to your amp
(please note - in standard MONO
operation you will only get a
signal out of OUT L)
2. From the SEND of LOOP A,
connect a patch lead to the input
of your pedal, then connect the
output of the pedal to the LOOP A
RETURN
3. Connect your second pedal to
LOOP B in the same way
Setting the Gain Controls:
1. Start with the pedals turned off (so they are in their bypass state)
2. Turn the Wetter Box ON by pressing the FOOTSWITCH (Blue LED)
3. Turn the Wetter Box MIX CONTROL to “A”, so LOOP A is 100%, and LOOP
Bis 0%
4. Toggle the Wetter Box on and off, increasing or decreasing the level of
GAIN A until it matches the bypassed level
5. Turn the MIX CONTROL all the way to “B”and repeat the process
Now turn the pedals on and use the MIX CONTROL to seamlessly blend
between them.

6
Phase Loop B
On the side of the Wetter Box you’ll see a push button PHASE LOOP B.
When you mix two signals together ‘in phase’ they combine and when you
mix them ‘out of phase’ they cancel each other out. No matter where you
are in the sweep between LOOP A and LOOP B, both signals - as long as
they’re in phase - will always equal 100%. However, if one of the pedals is
out of phase, you’ll notice the signal gets quieter as they combine. If this
happens, press the PHASE LOOP B button to reverse the phase on LOOP B.
The difference between MIX and BLEND
These are the two modes of Wetter
Box operation.
In BLEND mode (MIX/BLEND Select
in OUT position) you blend between
LOOP A and LOOP B.
MIX mode adds LOOP B on top of
LOOP A.
For example, if you put a reverb
pedal in LOOP A, then a delay pedal
in LOOP B, you can MIX the delay
on top of the reverb without reducing the reverb. This works well with
pedals that have a KILL DRY or 100% Wet feature.
Using an Expression Pedal
Plugging an expression pedal into the EXP PEDAL Input disconnects the
master MIX knob, enabling you to blend your effects in real time.
You can use any commercially available expression pedal with a pot value of
between 10K and 100K (most are 50k and work well).
It’s also worth noting that no audio is present in the expression pedal, it
simply uses a controlled voltage that informs the circuit of the blend ratio.
Using a Remote Switch
The REMOTE Switch allows you to turn the Wetter Box on and off remotely.
Any latching switch can now control the ON/OFF state of the Wetter Box.
This feature is useful if you’re using the Wetter Box in conjunction with your
amps FX Loop as it eliminates the need for two long audio cable runs.
Simply leave the Wetter Box at the amp and switch it on/off remotely.

7
Connecting the Wetter Box to your Amps FX Loop
1. Connect the SEND from the amps FX loop to the IN of the Wetter Box
2. Connect the OUTPUT of the Wetter Box to the FX RETURN of your amp
For maximum functionality from your amps FX loop, try a delay pedal set to
100% wet effect (Kill Dry) and mix that on top of your pre-amp tone.
Using the Wetter Box in Stereo
The Wetter Box can be used with stereo pedals. The entire signal path of
the Wetter Box is stereo including the gain controls. The stereo capabilities
are accessed using TRS to Dual Mono connectors which enable you to blend
your stereo signals in parallel.
MONO Send/Stereo Return
You can switch the Wetter Box to operate in either Mono or Stereo. If in
Mono, insert a standard patch cable and switch to Mono. When in Stereo
simply insert a TRS to Mono Connector and switch to Stereo.

8
The example below shows two pedals with Mono inputs and Stereo
outputs. To set up this signal chain:
•Make sure the switch is set to Mono
•LOOP A Send to LOOP A pedal Input
•Pedal A stereo Outputs to dual Mono Jacks (of Y-cable)
•TRS Jack (of Y-cable) to Loop A Return
•LOOP B Send to LOOP B Pedal Input
•Pedal B Stereo Outputs to dual Mono Jacks (of Y-cable)
•TRS Jack (of Y-cable) to Loop B Return
Stereo Input to Wetter Box
You can also feed the Wetter Box with a true stereo signal using a TRS to
Dual Mono connector. In this scenario we are feeding the INPUT of the
Wetter Box with a stereo signal from a stereo chorus.
The entire signal path is true stereo but you need to change the input switch
on the Wetter Box from MONO to STEREO.

9
True Bypass or Trails Mode
There are two bypass states in the Wetter Box: True Bypass and Trails
Mode.
TRUE BYPASS: This is the default mode for the Wetter Box (all circuitry
bypassed) and is indicated by the BLUE led.
TRAILS MODE, which enables your delay/reverb to ‘spill over’ into bypass
mode, is exclusive to LOOP B.
By leaving LOOP A empty and putting a delay pedal in LOOP B, you can mix
the repeats on top of your original signal. Then when you hit bypass the
repeats will trail over onto your bypass tone. Trails mode is indicated by the
RED led.
Switching between True Bypass and Trails Mode
1. Unplug the power to the Wetter Box
2. Hold down the foot switch
3. Whilst holding down the foot switch, plug the power back into the
Wetter Box
4. The LED will flash, keep holding for 3 seconds, then release. You have
now switched your Wetter Box to bypass state
To revert, simply repeat
Using Delay/Echo Trails - MONO
Here’s an example of using the Wetter Box to get delay trails in a MONO
setup.
•Turn Trails mode on (red LED) & push IN the MIX mode button
•Leave LOOP A empty - this will be your direct signal
•Remember that in TRAILS mode the GAIN CONTROL for LOOP A is active,
even when the pedal is bypassed
•Set delay to 100% WET or KILL DRY so there’s no direct signal from the
delay, only repeats
•The MIX control will now blend between your direct signal (LOOP A) AND
your direct signal plus the delay (LOOP A + LOOP B)
•Now, when you turn the Wetter Box OFF using the footswitch, you’ll hear
the repeats from the delay pedal trail over the direct sound

10
PLEASE NOTE - If your delay doesn’t have a Kill Dry or 100% wet feature
(many older analog delay pedals don’t), simply select BLEND instead of MIX.
With the MIX control turned to LOOP B, set your delay pedal with the
maximum level of delay required.
Using Delay/Echo Trails - Stereo
To make this work you’ll require a MONO to DUAL MONO TRS connector.
•Mono signal to delay pedal input
•Stereo outputs of the delay pedal feed both sides of the stereo
LOOP B return, using a dual MONO/Stereo TRS connector
•LOOP A - MONO send/Dual MONO return (both sides of the stereo
return are fed by the mono send from LOOP A using a MONO/Dual
MONO TRS cable as above).
•Now when you blend in your delay pedal, the stereo signal from
the delay will blend in parallel with the input signal (in both left and
right channels)
A Tip on Powering your Wetter Box
Under the Phase and WET/MIX pushbuttons is the 9V, 2.1mm centre neg DC
input. The Wetter Box will need a supply capable of delivering 185mA to
operate properly. If your current power supply doesn’t have this capability,
we suggest either purchasing the optional Wetter Box power supply from
the website or checking out TheGigRig Modular power solutions. If you’re
already using TheGigRig Modular Power Supply, you may power the Wetter
Box directly from a Distributor as the Wetter Box power is internally isolated
so there’s no need for a high current adapter.

11
Using the Wetter Box with G2 or Quartermaster
Think of the Wetter Box as another effects pedal and any sounds you create
with it are selected by including it in a loop of the G2 or Quartermaster.
In the example above, we’re blending a short analog delay with a long
digital delay:
•The Wetter Box is placed in the last loop of G2
•When that loop is activated it will be fed by any pedals before it
•Using an expression pedal in conjunction with this set up means
that when the Wetter Box loop is selected, you can blend between
your long and short delay in real time
Don't forget, the Wetter Box is stereo so you can integrate it into the G2’s
stereo loops and blend stereo reverbs and delays in parallel.
Another way to integrate the Wetter Box with G2 is utilize the Wetter Box’s
REMOTE SWITCH. This enables you to activate the Wetter Box by
connecting it to one of the G2’s Remote Switches, controlling it within a G2
preset.

12
Warranty:
The GigRig warrants the product to be free from defects in material and
workmanship for a period of 2 years from the original date of purchase. If the
product fails within the warranty period, The GigRig will repair or, at our discretion,
replace the product and cover the cost of return shipping to the original purchaser.
This warranty covers defects in manufacturing discovered while using this product as
recommended by TheGigRig. This warranty does not cover loss or theft, nor does the
coverage extend to damage caused by misuse, abuse, unauthorized modification,
improper storage, lightning or natural disasters. Damage caused by any of the above
circumstances may result in a non-warranty repair fee.
Legal:
In the case of malfunction, the purchaser’s sole recourse shall be repair or
replacement, as described in the preceding paragraphs. The GigRig will not be held
liable to any party for damages that result from the failure of this product. Damages
excluded include, but are not limited to, the following: lost profits, lost savings,
damage to other equipment and incidental or consequential damages arising from
the use, or inability to use, this product. In no event will The GigRig be liable for
more than the amount of the purchase price, nor to exceed the current retail price
of the product. The GigRig disclaims any other warranties, express or implied. By
using the product, the user accepts all terms herein.
Technical Specification
Supply Voltage - 9V DC (2.1mm centre negative connector)
Max current - 185mA
Input Drive Levels (Line level compatible)
True Bypass: Input impedance = Source impedance
Max input level = Source maximum
Buffered/Trails Bypass: Input impedance = 1MΩ
Max input level = +/- 8.5V
Outputs Left (mono) and Right (stereo)
True Bypass mode: Bandwidth = Source bandwidth
Output impedance = Source impedance
Max output Level = Source Level
Gain=0dB(V)
Bypass –Trails mode: Bandwidth = 10Hz –85KHz
Output impedance = 27Ω
Noise = 3nV/√Hz
Max output Level = +/- 8.5V
Gain=+6dB(V)
© The GigRig Ltd, 2016. Business Reg: 05731704 / VAT: 884568858.
All rights reserved. Design rights claimed. Moral rights asserted.
Other manuals for Wetter Box
1
Table of contents
Other The GigRig Music Pedal manuals