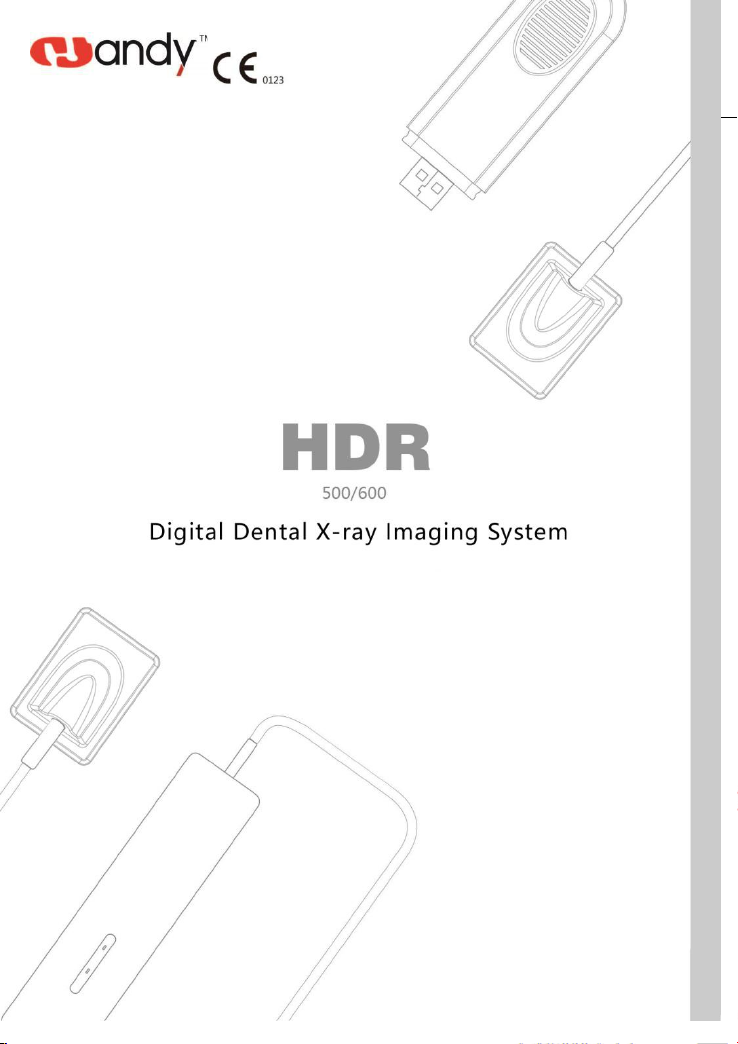
The Handy HDR 500 User manual
1
Q/HD 14.73-08-SM V1.1


Preface
Dear users:
Thank you for using Handy Medical’s Digital Dental X-Ray Imaging System
HDR-500/600 and the trust to Handy Medical’s products. We will provide our best
to ensure the satisfaction when you using the Digital Dental X-Ray Imaging
System HDR-500/600 .
The Digital Dental X-Ray Imaging System HDR-500/600 is operated through the
software HandyDentist. HandyDentist is designed to take full advantage of
HDR-500/600 . To get the best imaging and processing quality, the combine
between HDR-500/600 and HandyDentist is necessary.
To ensure your safety and effective use of the Digital Dental X-Ray Imaging
System HDR-500/600 , please read the manual carefully before use.
Handy Medical remind: Any copy of the contents in this manual is not allowed without the
permission of Handy.
Remark: For undated references, the latest edition of the referenced document (including any
amendments) applies.

Content
1. Notice........................................................................................................................................1
1.1 Indication of Use........................................................................................................ 1
1.2 Brief Introduction of this Manual............................................................................... 1
1.3 Manufacturer.............................................................................................................. 1
1.4.Packing....................................................................................................................... 1
1.5 Symbols......................................................................................................................1
2. Safety issue............................................................................................................................... 2
2.1 Check Sensor and controller before using them......................................................... 2
2.2 Protect Sensor from Potential ESD Damage...............................................................2
2.3 Do Not Touch Exposed Connectors on Non-Medical Equipment and the Patient at
the Same Time..................................................................................................................2
2.4 Ensure Proper System and PC Workstation Installation and Operation...................... 2
2.5 Safety Classifications................................................................................................. 2
2.6 Conditions required in operation, transportation, and storage.................................... 2
3. Waste Electrical and Electronic Equipment...............................................................................3
3.1 Background................................................................................................................ 3
3.2 WEEE Marking.......................................................................................................... 3
3.3 Reporting....................................................................................................................3
3.4 WEEE from Users other than Private Households......................................................3
3.5 Information for Reuse Centers, Treatment and Recycling Facilities...........................3
3.6 Warning and Safety Instructions................................................................................. 3
3.7 Hygiene and claaned Instruction.................................................................................4
4. Handy Sensor General Introduction.......................................................................................... 4
4.1 Product Composition.................................................................................................. 4
4.2 HDR Sensor ............................................................................................................4
4.3 Technical Specifications............................................................................................. 5

4.4 Sharing the Sensor Between Rooms ......................................................................... 5
4.5 Using the different Positioning Systems Attentions....................................................5
4.6 Attentions................................................................................................................... 6
5. Imaging Software General Introduction.................................................................................... 6
5.1 Computer System Requirements................................................................................ 6
5.2 Imaging Software....................................................................................................... 6
6. Working Sketch......................................................................................................................... 7
7. Driver Installation..................................................................................................................... 8
8. Software Installation................................................................................................................. 9
9. Registry & Activation..............................................................................................................10
10 Calibration File Installation....................................................................................................12
11 Software Operation.................................................................................................................13
12 Image Acquisition.................................................................................................................. 21
12.1 HDR sensor Preparation......................................................................................... 21
12.2 Image Acquisition Preparation................................................................................21
12.3 X-Ray Emission......................................................................................................21
13.Cleaning and maintenance......................................................................................................23
14. Maintenance.......................................................................................................................... 23
14.1. Visual Inspection................................................................................................... 23
14.2. Periodic Maintenance............................................................................................ 24
14.3. Cable Care............................................................................................................. 24
14.4. Damaged or Non-Functioning Sensor....................................................................24
15. Warranty................................................................................................................................24
16.Adjust exposure x-ray dose. ................................................................................................. 25
17.Troubleshooting..................................................................................................................... 25
Annex A. EMC table.
1
1. Notice
1.1 Indication Use
The Digital Dental X-ray Imaging System is intended to be used and operated by professionals
like dentists, radiographers or other specific staffs in hospitals or dental clinics to make use of
the converted signals as shown by x-ray images in the computer for reading, storing or
transferring for daily dental practice uses.
1.2 Brief Introduction of this Manual
This manual consist of the safety issue, HDR-500/600 brief introduction, software introduction,
how to use sensor and the warranty policy.
1.3 Manufacturer
Manual Name: Digital Dental X-Ray Imaging System Manual
Revision Number: 1.1
Print Date: July, 2020
The Brand names and logos reproduced in this manual are copyright.
Handy is a trademark of Handy used under license.
The system shall be in accordance with IEC60601-1. The person connect the product to the host
computer shall insure its compliance.
0123
Manufacturer
Shanghai Handy Medical Equipment Co., Ltd
Floor 2, Building No.11, Lane 177, Fulian Er Road, Baoshan District, Shanghai
201906, P. R. China
European Representative:
Shanghai International Holding Corp.GmBH
1.4.Packing
1. Digital Dental X-Ray Imaging System 1pc
2. USB Flash Disk 1pc
3. Manual 1pc
4. Holder 1pc
5. Warranty and Quality Control Card 1pc
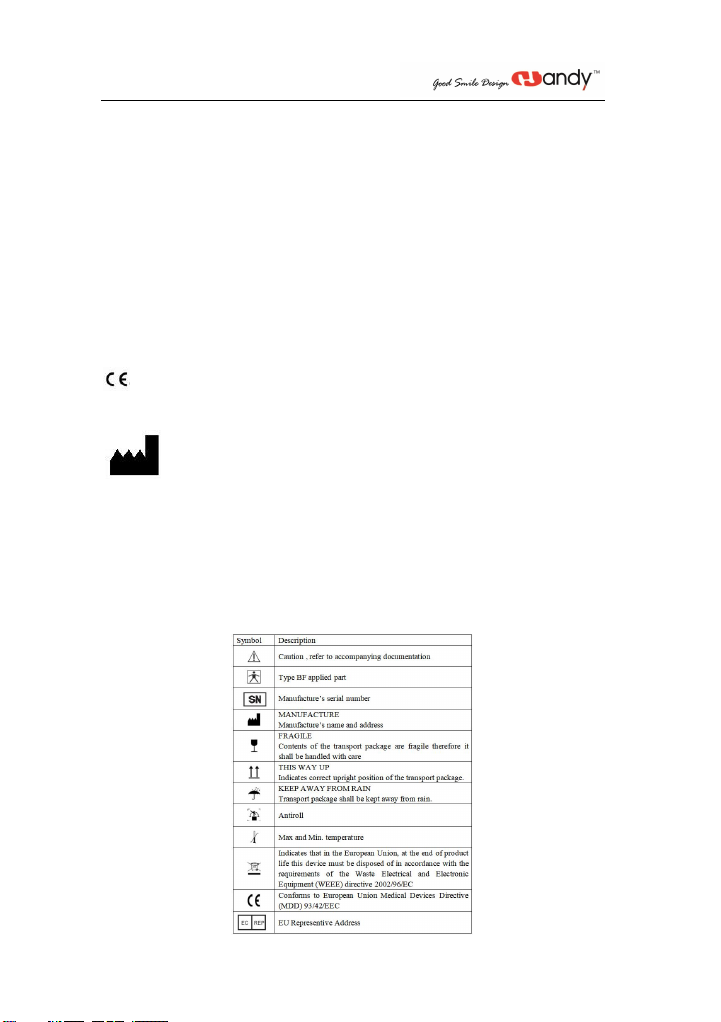
1.5 Symbols
Marking and Labeling Symbols

2
Label Location
The following Figure indicates the label locations of The HDR-500/600 Systems.
Figure 1 HDR-500/600 Label Locations
2. Safety issue
2.1 Check Sensor and controller before using them
Before each usage, check the outer surface of the Sensor and controller for any signs of physical
damage or defect. Sensor and controller surfaces should have a smooth finish, with no evidence
of chipping or damage. If detected, contact your local distributor of this product for further
instructions.
2.2 Protect Sensor from Potential ESD Damage
Like other electronic devices, Sensor is susceptible to electrostatic discharge (ESD), particularly
when the device is used in or around carpeted areas or low humidity environments. During cable
replacement, when Sensor contacts are exposed, it is especially important to protect the device
from potential ESD damage. Touching a metal surface prior to replacing the cable will reduce
the risk of damaging Sensor components by accidental static discharge. The use of anti-static
floor mats or floor treatments (for example Staticide 6005/6002) will also help eliminate static
build-up in your office.
2.3 Do Not Touch Exposed Connectors on Non-Medical Equipment and the Patient at the
Same Time
When the Sensor and controller are in use, avoid touching exposed connectors on non-medical
electrical equipment and the patient at the same time. The human body is capable of conducting
electrical current and may cause a shock hazard to patients if appropriate safety practices are not
observed.
2.4 Ensure Proper System and PC Workstation Installation and Operation
The Sensor and controller have been determined to be in accordance with international safety
standards and are deemed suitable for use within the patient area, which extends from the patient
for a distance of 5 ft (1.5m). To comply with these standards, do not operate non-medical
equipment (such as a PC workstation) inside the patient area. Outside the patient area, the
presence of approved non-medical grade equipment and Listed / Approved / IEC 60950-1
certified Information Technology Equipment (ITE) computer equipment is acceptable. The host
computer (PC workstation) should be CE-approved and conform to the Low Voltage [73/23/EC]
and EMC Directive [89/336/ERC]. The system shall be in accordance with IEC60601-1-1. The
person connect the product to the host computer shall insure its compliance. Also, to help ensure
optimal performance, ensure that all software programs residing on the workstation are
virus-free and have been adequately tested so they will not impact imaging applications after
installation. Any questions please contact your local distributor
2.5 Safety Classifications
Safety Type: BF
Power: DC5V Maximum 200MA.Rate of Work: Max 1W
Degree of protection against water resistance: IPX7 (Only applicable for the sensor head part.)
Non AP equipment, non APG equipment
Mode of operation: Continuous operation
2.6 Conditions required in operation, transportation, and storage
2.6.1 Operating conditions
Environment Temperature : +10℃~+40℃
Environment relative humidity : ≤93%;
Air pressure : 860hPa~1060hPa;
2.6.2 Transport and Storage conditions
Environment Temperature: -25℃~+60℃;
Environment relative humidity : 10%~93%;

3
Air pressure : 860hPa~1060hPa;
3. Waste Electrical and Electronic Equipment
3.1 Background
The European Union’s Waste Electrical and Electronic Equipment (WEEE) Directive
(6002/96/EC) has been implemented in member states as of August 13, 6005. This directive,
which seeks to reduce the waste of electrical and electronic equipment through re-use, recycling,
and recovery, imposes several requirements on producers. Handy Medical and its Dealers are
committed to complying with the Directive.
3.2 WEEE Marking
All Handy products subject to the WEEE Directive and shipped after August 13, 6005 will be
compliant with the WEEE marking requirements. These products will be identified with the
“crossed-out wheeled bin” WEEE symbol shown below, as defined in European Standard EN
50419, and in accordance with WEEE Directive 6002/96/EC.
This “crossed-out wheeled bin” symbol on the product or on its packaging indicates that this
product must not be disposed of with other unsorted municipal waste. Instead, it is user’s
responsibility to dispose of EE waste equipment by handing it over to a designated collection
point for the reuse or recycling of waste electrical and electronic equipment. The separate
collection and reuse or recycling of Electrical & Electronic waste equipment will help to
conserve natural resources and ensure that it is recycled in a manner that protects the
environment and human health. For more information about where you can drop off your waste
equipment for recycling, please contact your local officials.
3.3 Reporting
According to the WEEE Directive, Handy Medical or its Dealers will ensure that information
needed to calculate the financial obligations with respect to EEE products will be provided as
required.
3.4 WEEE from Users other than Private Households
According to the WEEE Directive, Handy Medical or its Dealers will fulfill its obligations for
the management of WEEE from users other than private households.
Furthermore, as required by the WEEE Directive, in order to enable the date upon which the
equipment was put on the market to be determined unequivocally, a mark on the equipment will
be placed to specify that the equipment was put on the market after August 13, 6005.
3.5 Information for Reuse Centers, Treatment and Recycling Facilities
After August 13, 6005, and as required by the WEEE Directive, Handy Medical or its Dealers
will provide reuse, treatment, and recycling information for each type of new EEE put on the
market within one year of the date in which the equipment is put on the market.
Information will include the different EEE components and materials as well as the location of
substances in these items. The information will be provided as a printed document or in
electronic media (on USB flash disk or by web download, for example)
3.6 Warning and Safety Instructions
For Device:
Read and comprehend this Safety Instruction before using the HDR500/600 Systems.
The operation and maintenance of this device must be taken charge by you.This device
only can be operated by the legally qualified persons.If necessary, have a authorized
qualified technician carry out inspection and maintenance operations.
This device must be installed in a X-ray room that complies with current installation
standards. From this location, Any visual or audio communication with the patient must
be maintained by you and the Acquisition interface module during exposure.
X-ray equipment is hazardous to patients and the operator if you do not comply with the
exposure safety factors and operating instructions.
This device must not be allowed to be operated if there is the threat of an earthquake.

4
After an earthquake, ensure that the device is operating satisfactorily before using it
again. Failure to observe patients to hazards.
DO NOT place any objects within the field of operation of the device.
Connect this equipment ONLY to a mains power supply with protective ground to avoid
any risk of electric shock.
Disposing of the device or its components must be executed by a qualified service
technician.
Never be allowed to modify the device.
This device is never allowed to be applied in conjunction with oxygen-rich
environments. Nor intended for apply with flammable anesthetics or flammable
agents.Using accessories other than those specified in this document with the exception
of those sold by Handy Health may result in a lower level of security for the entire
system.
For Computer:
DO NOT place the computer and the peripheral equipment connected toit in the
immediate vicinity of the patient in the unit. Leave at least 1.5m distance between the
patient and the unit. The computer and the peripheral equipment must conform to the
IEC60950 standard.
Read your computer installation guide for details of the data processing system and
screen. Ensure the proper ventilation with leaving a sufficient amount of clear space
around the CPU.
In order to acquire maximum image quality and visual comfort, direct light reflections
from internal or external lighting should be avoided when position the screen.
3.7 Hygiene and cleaned Instruction
DO NOT place the sensor in an autoclave environment as which could cause serious
damage to the sensor.
Never immerse the RVG sensor in any solution.
The sensor head should be disinfected after each patient.
Do not apply chemical autoclave for the toothbrush holders and avoid direct contact
with the metallic part of the autoclave.
To prevent from cross-contamination , apply a new hygienic barrier for each new patient
4. Handy Sensor General Introduction
4.1 Product Composition
Dental digital x-ray imaging system is consisted of sensor, image controller, image capture
system and connection cable/USB port, connected with PC or notebook via USB cable. The
power of controller and sensor is supplied by USB port, require no battery or power charge
system. The whole equipment need to work together with imaging software.
NOTICE: The computer and other peripheral devices like monitor, printer, etc. are
equipped by the user own self. For the suggested computer configuration, please refer to
5.1 Computer System Requirements.
4.2 HDR sensor
HDR-500/600
The sensor active surface is flat including the size 1 and size 2.
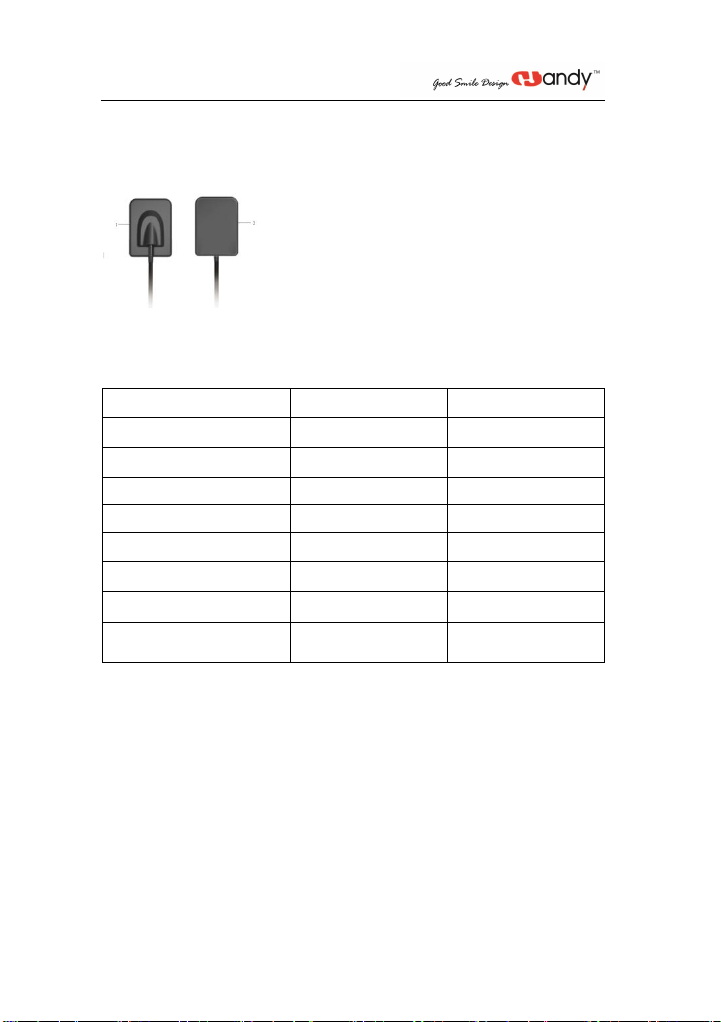
5
Size1, universal sensor---Use for regular procedures, both for children and adult .
Size2 sensor---Use for bitewings procedures.
The sensor non-reactive to X-Rays surface, contains the cable attachment.
Figure 2 HDR Sensor
1 Sensor non-reactive to X-Rays surface
2 Sensor active surface
4.3 Technical Specifications
4.4 Sharing the Sensor Between Rooms under proper installation and operation
The sensor could be used under net version through HandyServer software and accessed by
several dentists in different rooms as a working station . In this case, the HandyServer needs to
be installed in one computer which is as the database and other computers in different rooms
could access the data by remote.
Attentions: The HDR sensor and control box conform to the international safety standards and
are regarded to be applicable to be used in patient available area, namely, within 1.5m distance.
Within the patient available area, the (computer) devices used should be qualified as a medical
device and is compliant with GB9706.1(IEC 60601-1), YY0505(IEC 60601-1-1) standards;
outside the patient available area, the (computer) devices used other than a medical device
should be compliant with GB4943(IEC 60950); the whole working station configurations should
be compliant with GB9706.15(IEC 60601-1-2) standards and be verified by qualified station
staffs. In order to ensure the device’s normal performances, all programs used in the working
station should be without virus and under verification .
4.5 Using the different Positioning Systems
There are two ways to position the sensor in the patient mouth to get an classic radiology. You
may spend some time to adapt due to the rigidity of the sensor.
Model
HDR-500
HDR-600
Sensor
APS CMOS
APS CMOS
External dimension (mm)
39×28.5
44.5×33.0
Sensor Active Area(mm)
30×22.5
36×27
Sensor Thickness
6mm
6mm
Grey Value
0~4,096
0~4,096
Power
5V±0.5V
5V±0.5V
Image Transfer
USB2.0
USB2.0
Cable Length
≥ 3m
≥ 3m

6
One method is angular bisector technique, the other method is paralleling technique. It is just the
way to position sensor, which can be chosen by practitioner’s experience.
X-Ray Generator Compatibility
Normally, the sensor is compatible with all generators which meets the present standard of
intraoral radiology. You can use a high frequency or conventional generator. To achieve gaining
better images, the generator must operate with a voltage of 65 to 70kV.
4.6 Attentions
1 As a precision devices, avoid flop,pulling and long-time disinfectant soak
2.Put disposable plastic jackets before used, avoid cross infection and allergy
3.No bite, for fear that the sensor or the jacket been broken
4.Caution for epileptic or psychopath
5.Learn the user manual carefully before use
6.User should be the professional dental or technician
5. Imaging Software General Introduction
5.1 Computer System Requirements
Items
Minimum configuration
PC processor
Intel 1.5GHz chip or above
Memory
Above 4G
Hard disk
Above 40G
(1GB for software installation,40GB for software operation)
Video card
256MB RAM
Display
Resolution 1024 × 768 (15") or above
32-bit color mode
Interface
At least 2 available USB2.0 ports/USB3.0 ports
(If used desktop computer, 2 available USB ports must be have at the
back of compute)
Operating System
Windows XP/Win7/Win10(32bit&64bit)
Backup medium
USB flash disk / Mobile disk
(using mobile disk to avoid loss of patient data,some case like PC disk
is corrupt/full,PC is attacked by virus,etc.)
NOTICE:
The computer and other peripheral devices like monitor, printer, etc. are equipped
by the user own self.
The requirement form above is the suggested minimum configuration for the
computer and the product performance might be affected if those above are not
reached.
5.2 Imaging Software
The Handy HDR-500/600 dental imaging system operates with the following software:
HandyDentist V3
HandyServer for sharing information between workstations.
HandyDentist Software is a user-friendly working interface that was designed and developed
specifically for radiological diagnosis. It is the common imaging platform for all our digital
systems for dentistry.
5.3 Network Security
Relevant electronic data in the software can be exchanged with multiple computers via LAN.

7
Connect the computer to the local area network (router/switch) with an ethernet cable.
If necessary, consult a network administrator to establish a local area network.
The computer can automatically obtain an IP address (DHCP) or set it manually (static IP).
Notice :
Set up a computer to act as a database server on the network;
Make sure that the software installed on the computer is used to view the images.
When any other computer is in use, the computer installed the server must be kept on.
Network requirements
Network connection setting
TCP/IP protocol
Gigabit Ethernet cable
Security software
anti-virus software
firewall
Attention :
If the user of the network are disconnected from the network during the image
transmission process, the images could not be saved to the server. In this case, repair the
network, and after the network connection is normal, perform image transmission again.
6. Working Sketch
The sensor and control box is connected already, please check the light on control box, before
taking x-ray image. The power indicator on the control box displays yellow light and working
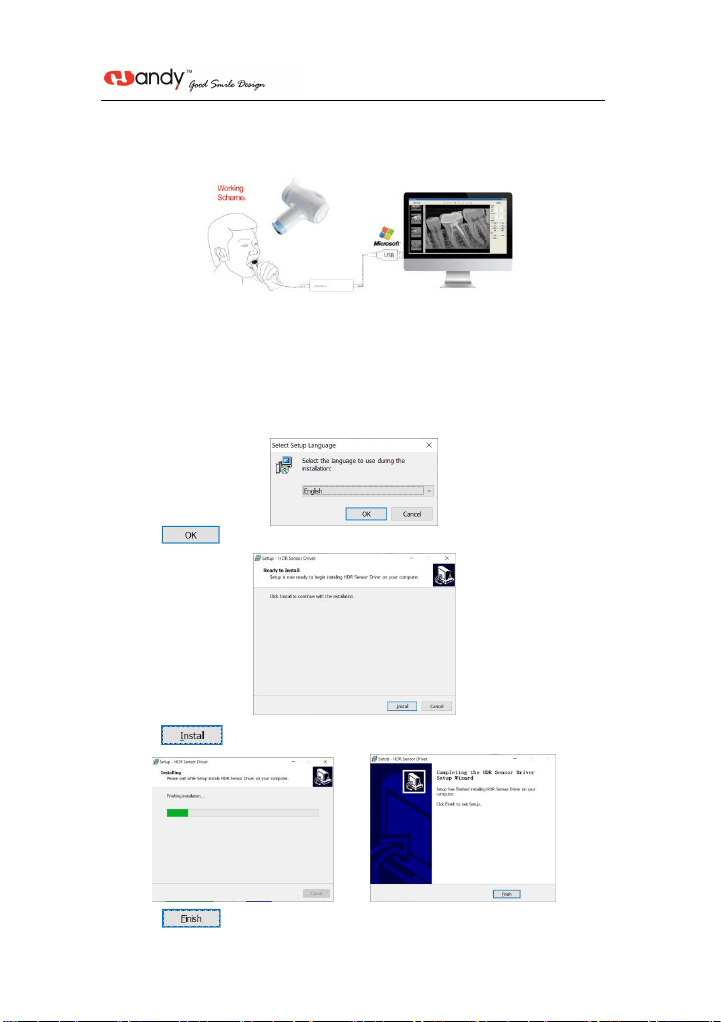
8
indicator flash green light.
Working Sketch map
HDR-500/600
7. Driver Installation
We provide a USB flash disk together with the sensor in package. Please plug the USB flash
disk into your computer to start installation.
7.1.Open the USB flash disk and find the Driver icon HDR Sensor Driver 2.x.x.x(xxxxxxxxxx)
(The Driver name might change with update version, please refer to the actual using name)
7.2. Double click Driver icon, chose the language you’d like
7.3. Click
7.4. Click
7.5. Click to complete installation, then connect sensor to computer via USB wire,
9
the sensor will be detected, and green blinking in shooting window shows it is ready to work.
You can check its right drive name in Device Manager.
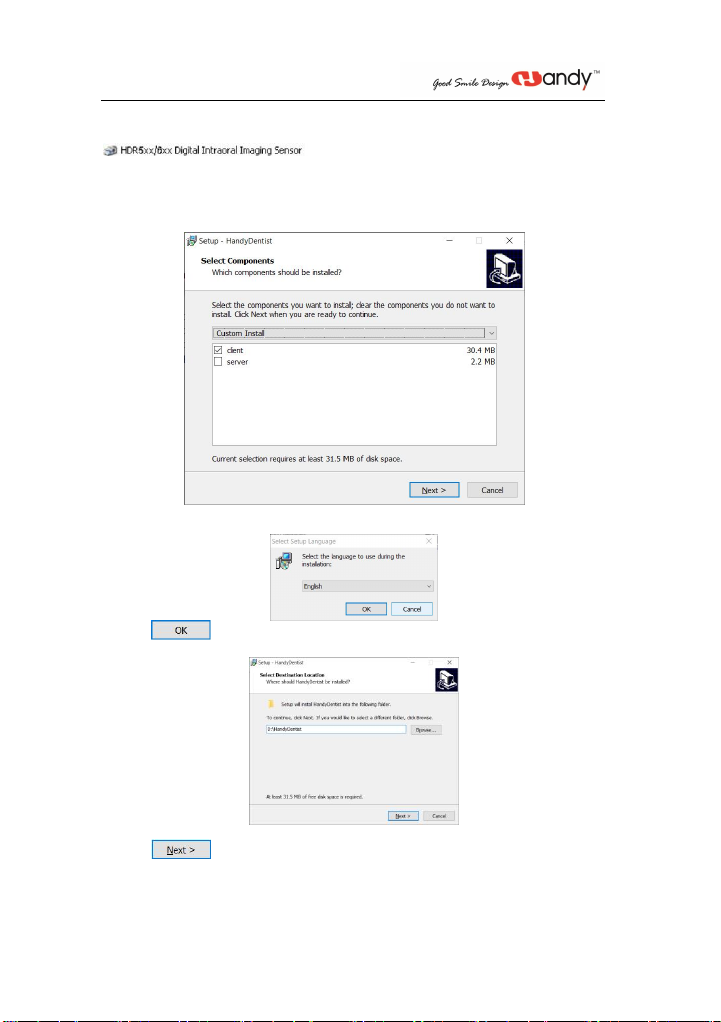
8. Software Installation
8.1 HandyDentist
1 Find HandyDentist software icon HandyDentist_3.xx.xx(xxxxxxxxxx) (The Driver name
might change with update version, please refer to the actual using name)
2. Double click to launch install-shield wizard
Chose the ‘client’, then chose the language you’d like
3. Click ,select its installation path you want
4. Click , chose the below two options as needed

10
5.Click →to continuing,after that,click to complete
HandyDentist software installation
8.2 HandyServer
When users need sharing the sensor between rooms, please follow up below installation and
operation
Software Installation(The server version is optional. The server version needs to be purchased
separately. please contact with your local deal to purchase.)
1. Find HandyDentist software icon HandyDentist_3.xx.xx(xxxxxxxxxx) (The Driver name
might change with update version, please refer to the actual using name)
2. Double click to launch install-shield wizard
Chose the ‘server’, then chose the language you’d like

11
3. Click →→→to continuing, after that, click
to complete Handyserver software installation
4. Settings
Click ,select ‘Tools’ - ‘Options’ – ‘Database’
(Remark:Refer to 11 Software Operation)
Input the IP address in ‘Server IP’ according to that of HandyServer software(For example:
192.168.56.1)
Or input the Hostname in ‘Server Hostname’ according to that of HandyServer software(For
example:DESKTOP-V9UV9V4)
9. Registry & Activation
9.1 HandyDentist Software Registration
After 30 days since the date of software installed, the trial version will be stopped, and ask for
an activation code, as well the registration window will be showed automatically for your side to
proceed with register.
If the registration window disappear, please follow the below steps:
1)Run the software, click button in menu bar, and select ;
2)Fill in the blank of the user information: Company/Email/Address/Phone,in which the
Company and Email information is required;
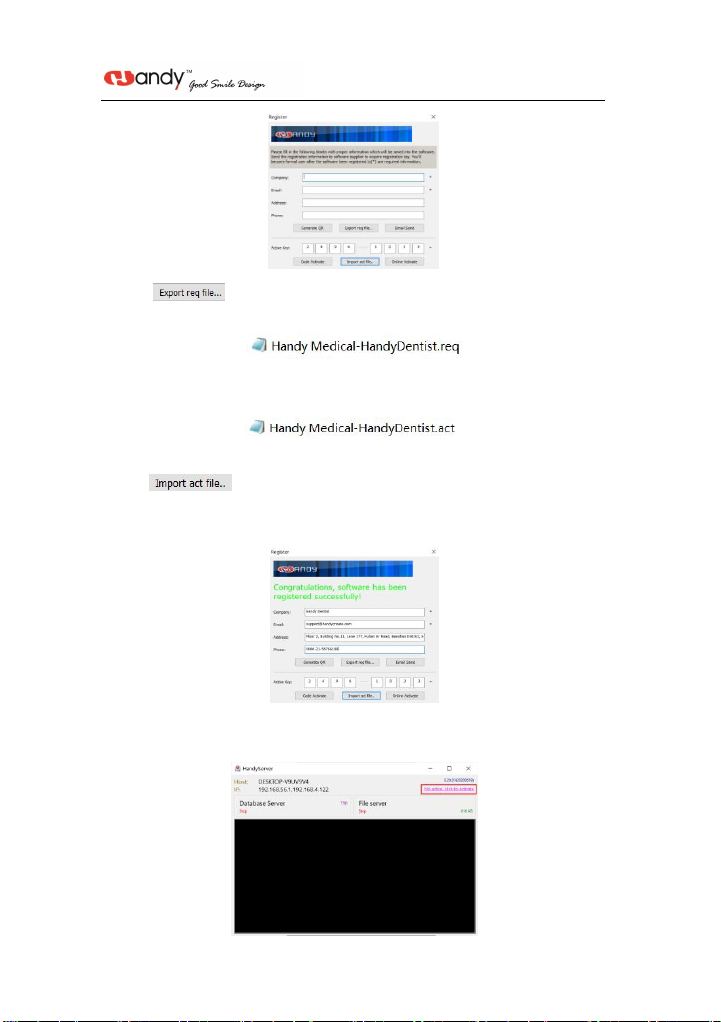
12
3)Click button after the user information is be finished, save it on your
computer desktop, a file suffixed with ‘.req’ will be generated, then send this request file to your
4)We will reply you an activation file suffixed with ‘.act’ ,to activate your software by import
this file into registration window directly (No need to open this file);
5)Click button to import the activation file you received;
6)Successful registration information will appear to remind you your software has been
activated;
9.2 HandyServer Registration
After 30 days since the date of software installed, the trial version will be stopped, and ask for
an activation code, it will show as below:

13
Please follow the below steps:
1)Run the software ,click button;
2)Fill in the blank of the user information: Company/Email/Address/Phone,in which the
Company and Email information is required;
3)Click button after the user information is be finished, save it on your
computer desktop, a file suffixed with ‘HandyServer.req’ will be generated, then send this
request file to your local distributor or directly to our after-sales
support:[email protected];.
4)We will reply you an activation file suffixed with ‘.act’, to activate your software by import
this file into registration window directly (No need to open this file);
5)Click button to import the activation file you received;
6)Successful registration information will appear to remind you your software has been
activated;
10 Calibration File Installation
10.1 On-line Automatic Installation
If the calibration file hasn’t been installed yet, a prompt box will pop up showing the calibration
file is being installed automatically at the first time of bring up the shooting window in
HandyDentist Software. This procedure is trying to connect to network to search its calibration
file and install the file automatically.

14
10.2 Manual Installation
If the on-line automatic installation fails, the prompt box will disappear.
Meanwhile, an alarm message display in title bar to remind the absence of calibration file, that
means need to be installed manually.
Click ‘Calibrations’ button to bring up the interface for manual installation.
Choose ‘Install from file’ option, manually search for its calibration file saved on USB flash disk
packed together with the sensor.
Click ‘Calibrations’ button to bring up the interface for manual installation.
Choose ‘Install from file’ option, manually search for its calibration file saved on USB flash disk
packed together with the sensor.
The alarm message will be removed after calibration file installed successfully

15
11 Software Operation
User interface
Double click the icon to run the software
Default name: Admin
Password: empty(on need put-in any character, click ‘Login’ directly)
Then you can click the ‘Menu bar’ - ‘Tools’ - ‘Options’ - ‘General’ to modify
Example Screen:
1.System menu of the program windows
2.Menu bar
This manual suits for next models
1
Table of contents


