The Source AK-100SD User manual

INSTRUCTION MANUAL
Original instructions for
Multi Slicer Machine
AK-100SD
Keep these instructions with the appliance.
You should read this user manual carefully before using the appliance.

Dear Customer,
Thank you for purchasing this appliance. Please take a few minutes before starting
operation of the appliance and read the following operating instructions.
1. Intended use
1.1This machine is designed for commercial used only and must not be used for
household.
1.2The appliance must only be used for the purpose for which it was intended and
designed. Otherwise, it might lead to damage of the machine, property or personal
injury.
1.3The machine is intended for commercial and indoor use by trained and skilled
personnel familiar with these instructions.
The machine body is mainly made in stainless steel, aluminum, PC, and ABS for easy
cleaning and maintenance. It has safety features compliant with the applicable safety
Directives.
2 Safety regulations
2.1 Safety regulations
2.1.1 This appliance is intended for commercial use only and must not be used for
household use.
2.1.2 The appliance must only be used for the purpose for which it was intended and
designed. The manufacturer is not liable for any damage caused by incorrect
operation and improper use.
2.1.3 Keep the appliance and electrical plug away from water and any other liquids. In the
event that the appliance should fall into water, immediately remove plug from the
socket and do not use until the appliance hasbeen checked by a certified technician.
Failure to follow these instructions could cause a risk to lives.
2.1.4 Never attempt to open the casing of the appliance yourself.
2.1.5 Do not insert any objects in the casing of the appliance.
2.1.6 Do not touch the plug with wet or damp hands.
2.1.7 Danger of electric shock! Do not attempt to repair the appliance yourself. In case
of malfunctions, repairs are to be conducted by qualified personnel only.
2.1.8 Never use a damaged appliance! Disconnect the appliance from the electrical outlet
and contact the retailer if it is damaged.
2.1.9 Do not immerse the electrical parts of the appliance in water or other liquids. Never
hold the appliance under running water.
2.1.10 Regularly check the power plug and cord for any damage. If the power plug or power
cord is damaged, it must be replaced by a service agent or similarly qualified
persons in order to avoid danger or injury.

2.1.11 Make sure the cord does not come in contact with sharp or hot objects and keep it
away from open fire. To pull the plug out of the socket, always pull on the plug and
not on the cord.
2.1.12 Ensure that the cord (or extension cord) is positioned so that it will not cause a trip
hazard.
2.1.13 Always keep an eye on the appliance when in use.
2.1.14 Warning! As long as the plug is in the socket the appliance is connected to the
power source.
2.1.15 Turn off the appliance before pulling the plug out of the socket.
2.1.16 Never carry the appliance by the cord.
2.1.17 Do not use any extra devices that are not supplied along with the appliance.
2.1.18 Only connect the appliance to an electrical outlet with the voltage and frequency
mentioned on the appliance label.
2.1.19 Connect the power plug to an easily accessible electrical outlet so that in case of
emergency the appliance can be unplugged immediately. To completely switch off
the appliance pull the power plug out of the electrical outlet.
2.1.20 Always turn the appliance off before disconnecting the plug.
2.1.21 Never use accessories other than those recommended by the manufacturer. Failure
to do so could pose a safety risk to the user and could damage the appliance. Only
use original parts and accessories.
2.1.22 This appliance is not intended for use by persons (including children) with reduced
physical, sensory or mental capabilities, or lack of experience and knowledge.
2.1.23 This appliance must not be used by children under any circumstances.
2.1.24 Keep the appliance and its cord out of reach of children.
2.1.25 Always disconnect the appliance from the mains if it is left unattended or is not in use,
and before assembly, disassembly or cleaning.
2.1.26 Never leave the appliance unattended during use.
2.2 Special Safety Regulations
2.2.1 The appliance is intended for commercial and indoor use by trained and skilled
personnel familiar with these instructions.
2.2.2 This machine is designed for vegetable (green onion, chili, celery, coriander etc.)
slicing in restaurants, canteens and similar catering establishments.
2.2.3 Any other use might lead to damage to the appliance or personal injury.
2.2.4 Do not place the appliance on a heating object (gasoline, electric, charcoal cooker,
etc.) Keep the appliance away from any hot surfaces and open flames. Always
operate the appliance on a level, stable, clean, heat-resistant and dry surface.
2.2.5 Danger of injury! Care is needed when operating or cleaning. Wear protective
gloves (not supplied) if necessary.

2.2.6 Caution!Securely route the power cord if necessary, in order to prevent
unintentional tripping over and falling.
2.2.7 Do not use the appliance before it is properly assembled.
2.2.8 This appliance is not intended to be operated by means of an external timer or
separate emote-control system.
2.2.9 Never bypass any safety interlocks on the appliance.
2.2.10 WARNING: ALWAYS switch off the appliance and unplug from electrical power
supply before cleaning, maintenance or storage.
2.2.11 WARNING: ALWAYS keep hands, long hair and clothing away from the moving
parts.
2.2.12 WARNING: Take great care when handling the cutting blade. Wear protective gloves
(not supplied) if necessary.
2.2.13 Allow at least 15cm spacing around the appliance for ventilation purpose during use.
2.2.14 Do not wash the appliance with water or waterjet. Washing with water can cause
leakage and increase the risk of electric shock. No parts are dishwasher safe.
2.2.15 Do not move the appliance while it is under operation. Unplug the appliance when
moving and hold it at the bottom.
2.2.16 Special care should be taken when moving or transporting the appliance. Move the
machine slowly, carefully.
2.2.17 This appliance is equipped with a cord having a grounding wire with a grounding
plug, the plug must be plugged into an outlet that is properly installed and grounded.
3 Product description
3.1Parts of description
1. Pressing assembly 2. Locked cover 3. Feeder 4. Speed control knob 5. Plastic
container 6. Latch 7. Conveyor belt 8. Switch 9. Fastener 10. S blade
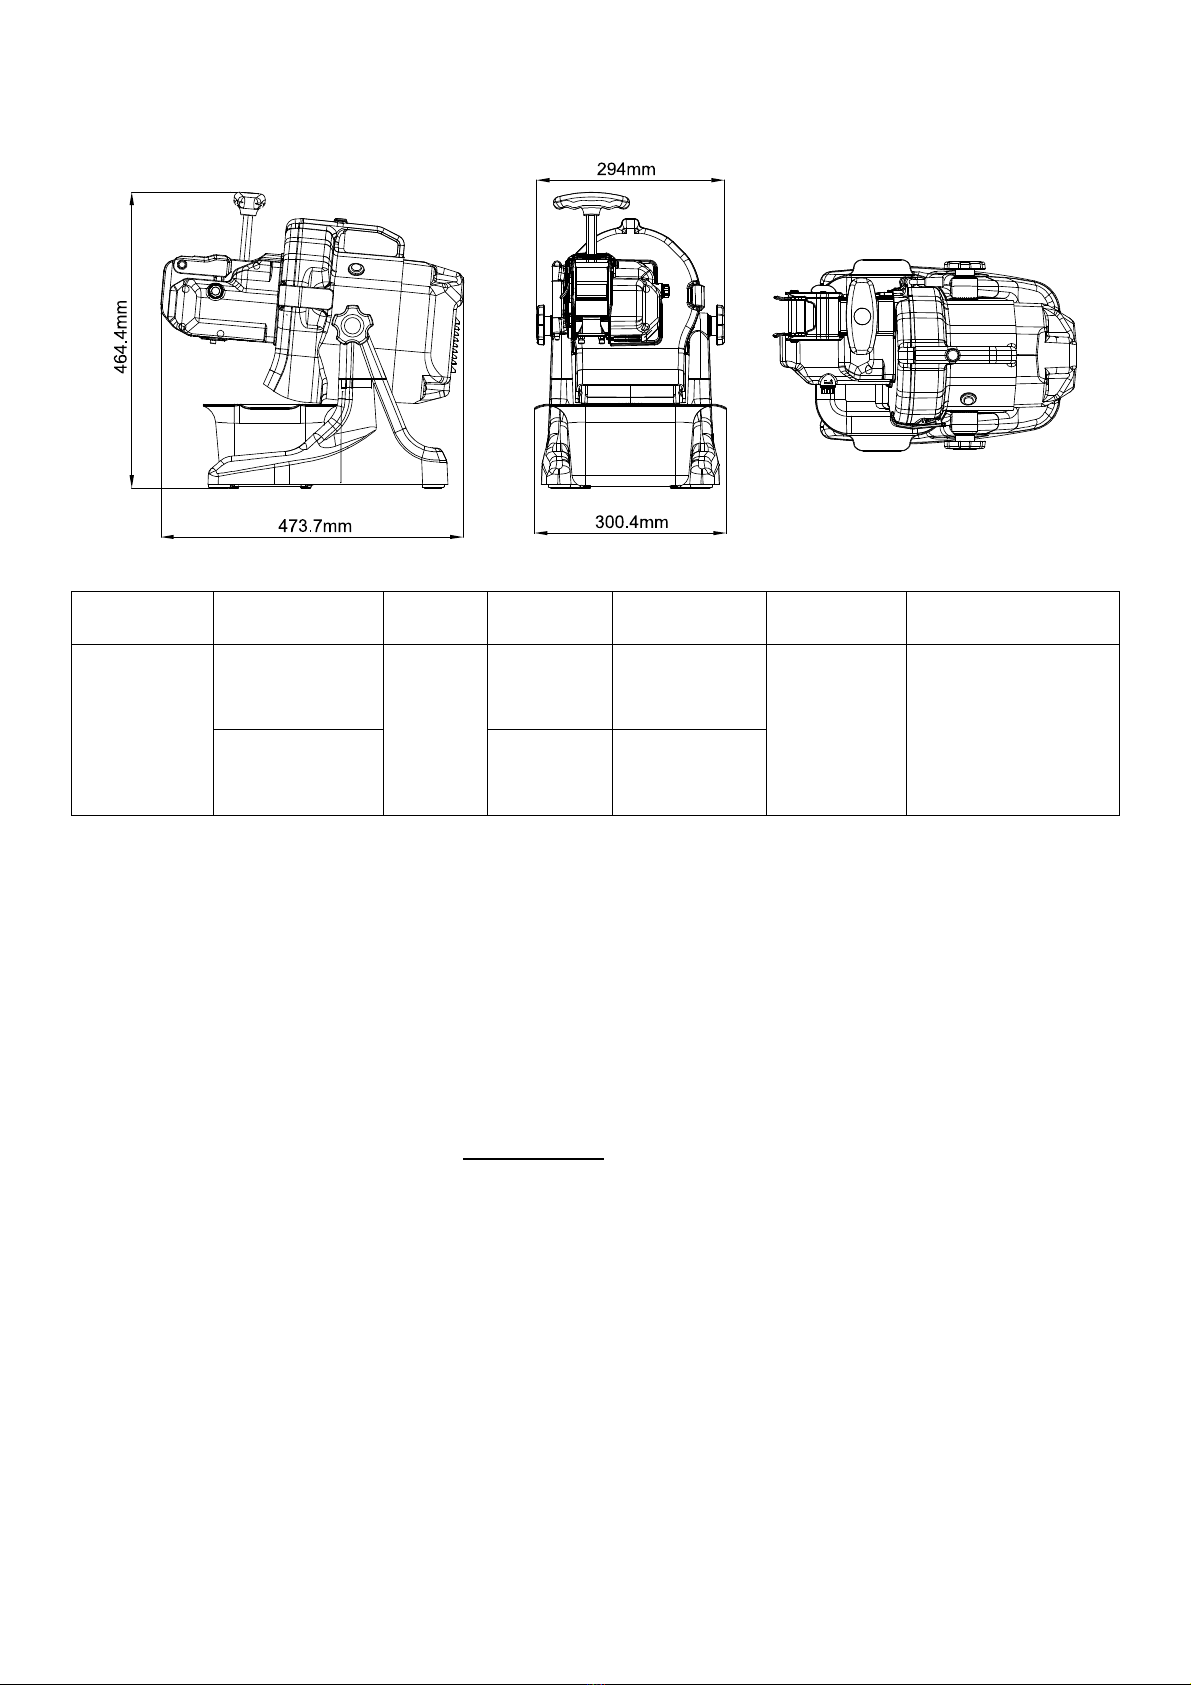
3.2 MAIN TECHNICAL PARAMETERS
MODEL VOLTAGE POWER SPEED THICKNESS N.W./G.W. PACKING SIZE
AK-100SD
220V-240V~
50/60Hz,
300W
1500 rpm 1-5mm
(±0.2mm) 15.6/17.2
KGS 56.5x37.5x52 cm
115V~60Hz 1725 rpm 1-4mm
(±0.2mm)
Remark: Technical specification is subjected to change without prior notification.
4 Introduction
4.1 Preparation for first use
4.1.1 Check to make sure the appliance is undamaged. In case of any damage, contact
your supplier immediately and do NOT use the appliance.
4.1.2 Remove all the packing material and protection film (if applicable). Keep the
packaging for future storage.
4.1.3 Clean the appliance, see: 4.6 Cleaning.
4.1.4 Place the appliance on a level and steady surface, unless mentioned otherwise.
4.1.5 Make sure there is enough clearance around the appliance for ventilation purposes.
4.1.6 Position the appliance in such a way that the plug is accessible at all times.
4.1.7 Make sure the power outlet ratings correspond to the specifications printed on the
rating plate.
4.1.8 Make sure that the machine is connected to a grounding system.
4.1.9 Even if safety systems are installed on the machine, prevent approaching moving
parts with hands and do not touch the machine with wet or damp hands.
4.1.10 It is strongly recommended that the operator contact the after sales center if there is
any problem or malfunction occurred. Please do not dismantle the machine or in
place of unauthorized parts.

4.2 The manufacturer will be not responsible for following cases:
4.2.1 If the machine is tampered with or safety functions are installed by non-authorized
staff.
4.2.2 If the components are replaced by unauthorized parts.
4.2.3 If the instruction in this manual is not carefully followed.
4.2.4 If the machine surfaces are treated with unsuitable substance or solvent.
4.3 Safety devices
4.3.1 Micro-switch: The micro-switch is equipped with a magnet mechanism. The
appliance stops automatically when the upper lid or the outlet lid is opened during
operation.
4.4 INSTALLATION
4.4.1 Packing and unpacking
4.4.1.1 Remove all packaging materials. Keep the packaging for future storage.
4.4.1.2 Ensure the packages you received includes following items: multi slicer machine,
plastic container, instruction manual.
4.4.1.3 After unpacking all accessories, lay them on a flat and stable surface.
4.4.1.4 Make sure the delivery contents are complete and free of any damage. If you find
that parts are missing or show damage, do not use the appliance but contact
your dealer.
4.4.1.5 Clean the feeder, front cover assembly, conveyor, pressing assembly, S blade,
middle shell, and other parts which contact with vegetable.
BE CAREFUL: the cross knife is sharp. (Use gloves if necessary, not included)
4.4.1.6 Position the appliance in such a way that the plug is always accessible.
4.4.2 Installation area
The selected machine work setting must be sufficiently lit and have an electric power outlet.
The workplace must be sufficiently large, perfectly level and dry. The machine should be
installed in non-explosive environments. In any case, installation should be carried out by
taking into account any applicable industrial safety regulations in force.
4.4.3 Assembling instructions
Attention: Always unplug the appliance from the electrical power outlet before starting
assembling or disassembling.
4.4.3.1 Place the machine on a steady and flat table.
4.4.3.2 Make sure the switch is on “OFF” position.
4.4.3.3 Install the front cover assembly with middle shell, lock the fastener.
4.4.3.4 Install the pressing assembly, and lock the locked cover.

4.4.3.5 Install the S blade -- Hold the S Blade with hexagonal wrench, turn the handle
clockwise to lock the S blade.
4.4.4 Electric connection
DANGER-CAUTION: Electric connection to the power outlet should be operated by skilled
personnel. Check for the perfect efficiency of the plant grounding system. Make sure that
the line voltage (V) and frequency (Hz) correspond to the machine ratings (refer to the
machine identification plate and wiring diagram). The machine comes equipped with an
electric cable with plug. Plug the machine into a main wall switch with differential.

4.5 OPERATING
4.5.1 Preparation
4.5.1.1 Make sure the appliance is unplugged from the electrical power supply, the
switch is on “OFF” position. Check the front cover, pressing assembly and S
blade are properly installed into appliance.
4.5.1.2 Before you start with the operation, you should make sure that the shaft is
rotating in an anticlockwise direction. Otherwise, the appliance will not cut the
materials.
4.5.1.3 Clean and prepare vegetable appropriately for slicing.
4.5.1.4 Place the appliance on a on a horizontal, stable, dry and heat resistant surface
with 4 suction cup rubber feet firmly placed on the surface.
4.5.1.5 Place the plastic containerunderneath the appliance delivery chute to catch the
vegetable as it falls.
4.5.2 Operating
4.5.2.1 Connect the power plug to a socket outlet.
4.5.2.2 Press down the switch to start. The button will light up, appliance works.
4.5.2.3 Feed the vegetables into the feeder to start transiting by conveyor and slicing.
4.5.2.4 When materials are finished, press down switch again to stop, the lights out,
unplug the appliance and clean it.
Note: Don’t put the materials’ diameter bigger than 4.2cm.
4.5.3 Adjust the speed and slicing thickness
4.5.3.1 Turn the speed control knob clockwise,
the conveyor will speed up. The
conveyor faster, the sliced vegetable
longer.
4.5.3.2 Turn the speed control knob
anticlockwise, the conveyor will speed
down to “0” pause. The conveyor
slower, the sliced vegetable thinner.
4.5.3.3 Variable speed belt conveyor makes
the cutting length rangesfrom
1-5mm(220V-240V) Or 1-4mm(110V).

4.5.4 Trouble removal
Trouble Possible cause Remedy
The power switch
is not working
Power plug is not inserted
correctly.
Connect the power plug to a socket
outlet.
Front cover assembly is
not locked, the magnetic
switch is not connected.
Lock the front cover correctly, and make
the magnetic switch connected.
Belt conveyor is
not working. speed control knob is at the
“0” position Turn speed control knob clockwise to
adjust speed
Belt conveyor off
tracking or belt
loose
The screw under the belt is
loosen, or belt is worn. Adjust the two screws, make the belt is
on the right track, or replace new belt.
4.6 Cleaning
4.6.1 It is important to keep the appliance clean and in good working condition to ensure
optimum quality of the products and long life of the appliance.
4.6.2 Never immerse the appliance in water or other liquids.
4.6.3 To clean the motor housing, unplug the appliance and clean with a damp cloth or
sponge with some mild soap solution. Dry with a dry cloth.
4.6.4 Never use abrasive sponges or detergents, steel wool or metal utensils to clean the
interior or exterior parts of the appliance.
WARNING: Take care during cleaning when handling the rollers due to its sharp edges.
Wear protective gloves (not supplied) if necessary.
4.7 Storage
4.7.1 Before reassembling, make sure that all parts are dry. Before storing, remove all
residues from the appliance (incl. the basins), disconnect it from the supply and
clean the appliance and its accessories thoroughly. Use white Vaseline oil (or any
similar product) to protect all parts of the device.
4.7.2 To protect the appliance from dust, cover it with a cloth that allows air circulation
inside the appliance.

5 Circuit diagram

6 Exploded view and spare parts lists
No. English Name No. English Name No. English Name
1Locked cover 14 Rear connecting screw 27 Capacitor bracket
2 Pressing assembly 15 Flexible coupling 28 Power cord
3 Front cover assembly 16 Motor fixing plate 29 Rubber feet
4 Oil seal 17 Motor 30 Cable tie
5 Pin 18 Fastener 31 Bottom base
6 Output axis 19 Case back cover 32 Clutch bracket
7 Ball bearing 20 Magnetron buckle 33 Plastic container
8 Star handwheel 21 Magnetic switch 34 S blade
9Latch 22 Cooling fan 35 Handle
10 Shell cover 23 Transformer 36 Hexagonal wrench
11 Contact pin 24 Rectifier board 37 Brush
12 Middle shell 25 6μcapacitor
13 Switch 26 Relay
Table of contents


