4 5
Roots and Harvest • West Chester, OH 45011 •877-509-3457 • RootsandHarvest.com Roots and Harvest • West Chester, OH 45011 •877-509-3457 • RootsandHarvest.com
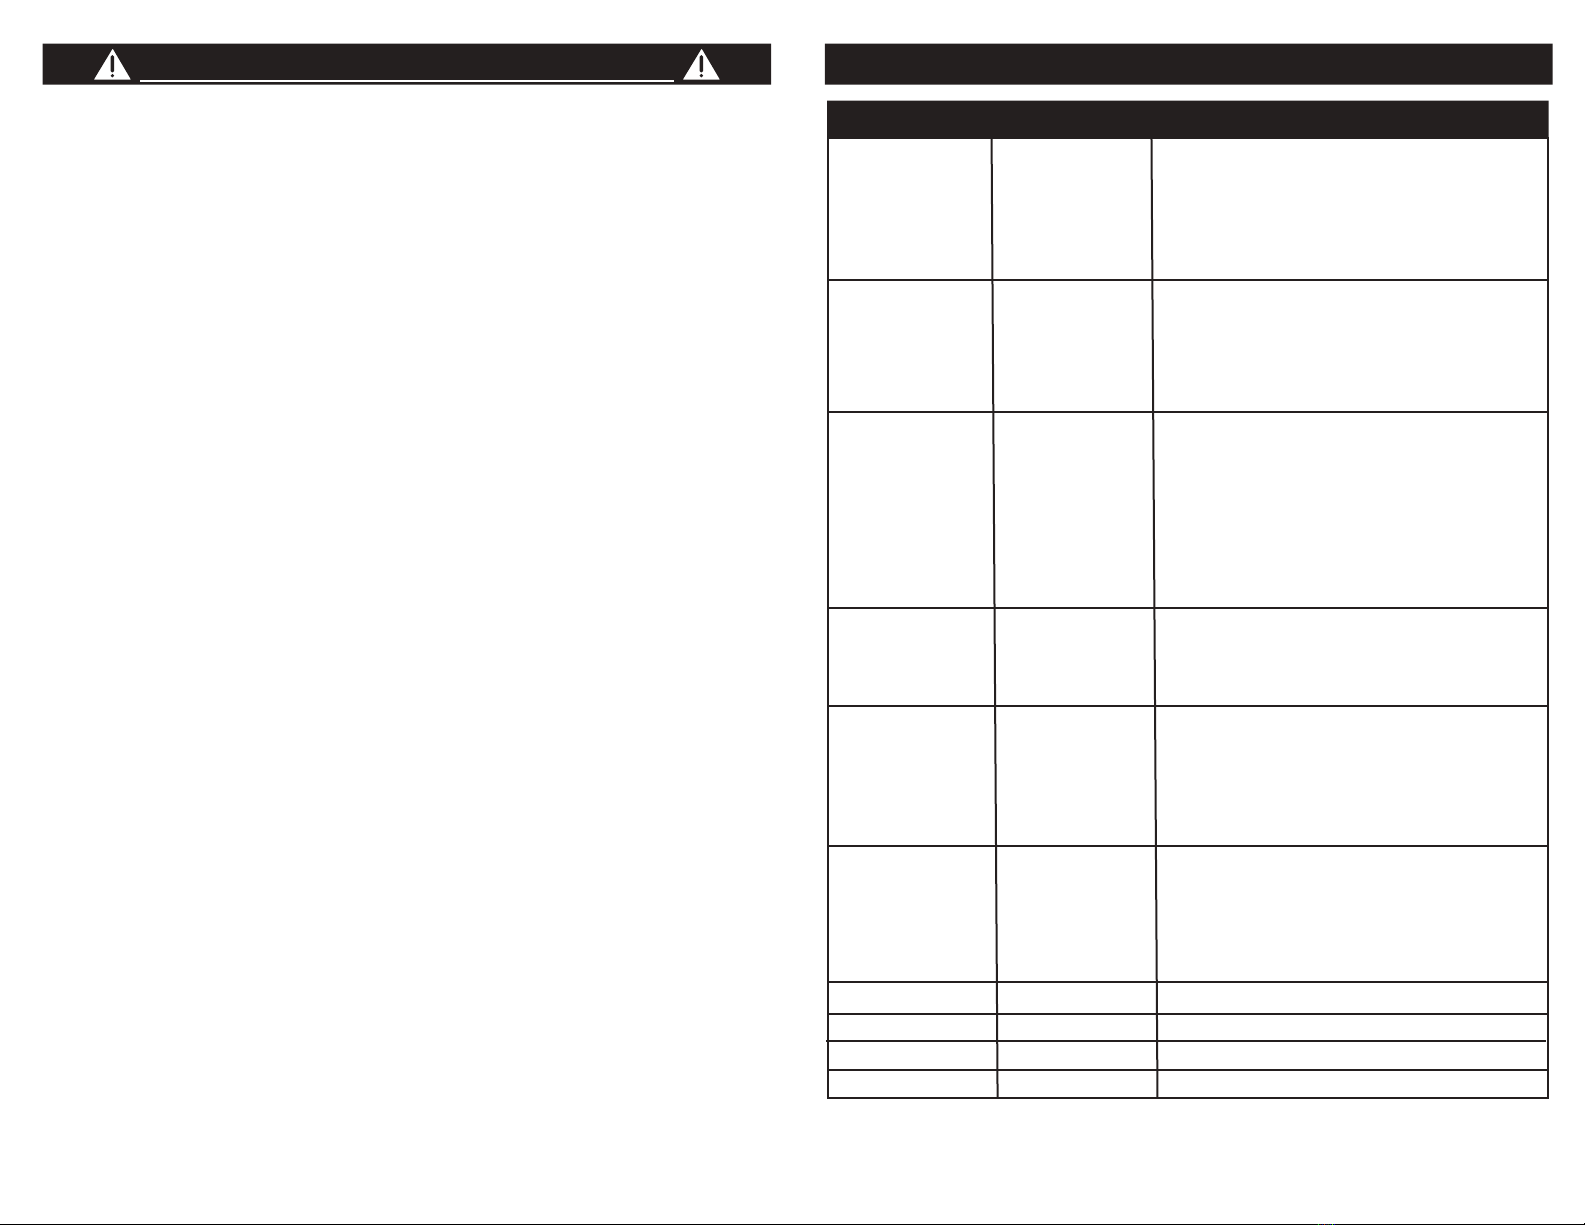
TROUBLESHOOTING
BLACK GARLIC
FOOD MAKING
Prior to each ferment you will need to have your recipe and culture or spores required to ferment your product. Follow
your recipe for preparing the item and then use the multi- purpose fermenter to ferment or heat the product.
Prior to any function, sterilize the inner tank and any utensils that will be used for making your fermentation. You can
do this by using the disinfection feature or sterilize in boiling in water for about 1 minute and then wipe bowl or
cups dry.
Automatic timing function and power failure function: The fermenter has long working hours and automatic time
function. Long term power failure memory function, if the power is cut o, then the fermenter will suspend work, after power
is restored the fermenter will automatically continue to work, no need to worry about accidental power outage. Please do not
power o frequently during the fermentation or open the lid frequently or for long periods of time, and don’t press the cancel
button when fermentation is working.
To begin: Plug the fermenter into the power supply, the display will show 888, the fermenter is on the standby. If the display
doesn’t show 888, it may be that the fermenter is in memory mode, press and hold the ENTER/CANCEL button for 2-3 seconds to
cancel the memory and the display will show 888. Press the FUNCTION button (within 15 seconds) to select the desired mode.
Pressing FUNCTION button will scroll though all available modes: SOLO GARLIC, GARLIC, YOGURT/NATTO,ENZYME/SWEET
WINE, DRYING/HEAT PRESERVATION, SIMMER/DISINFECTION. When you come to the desired function, if you want to
change the time and temperature, pressing the TIME and TEMP button to adjust time and temp for your function choice. To
adjust time and temperature these buttons must be pressed within 15 seconds of selecting the function to be used. The
fermenter has default time and temperature for each function, you can use it directly if you don’t want to change time and
temperature. After the function is selected, you can press ENTER/CANCEL to start immediately or let the machine start
automatically after 15 seconds, do not hold in the ENTER/CANCEL button (holding in the button will cancel all functions and put
the unit into standby). When the fermenter is working the indicator light will ash and the display will cycle to display
remaining fermentation time in days (indicated by “d”), then hours, then actual working temperature (in Celsius). Press and
hold the ENTER/CANCEL button for 2-3 seconds in the working mode to cancel all functions and reset the machine. This will
put the fermenter in stand by and will auto shut down after 5 minutes. When the fermentation is complete, the display will
show 000 and temperature and alternate between them, and makes 3 sounds every 10 minutes. After 2 hours, the fermentation
will shut down automatically.
Disinfection function: Disinfection can be used for high temperature sterilization for household goods (excluding plastics)
Cooking/disinfecting function: Enter the cooking disinfecting function by pressing the function button the indicator light
illuminates when function is selected and digital display will default to 6 hours. Press the time button to adjust length to time
for this setting. You can also press the temperature button continuously to adjust the temperature. The tools required for the
fermentation operation can be sterilized in the liner/bowl of the machine for 1 hour. Plastic tools are not recommended for
disinfection, high temperature may melt the plastic.
HOW TO USE WARNING!
Note: Fermentation of garlic has a strong smell. You may want to consider placement of your fermenter to keep
odor at a minimum in the house.
This machine has a cage like frame for holding garlic. The structure allows for good air circulation and uniform temperature. It
can be removed for cleaning. The cage will hold 3-4 lbs. of garlic. For best results ll the cage and shake it to settle the garlic.
Note: It is suggested you keep notes of pounds of garlic used time and temperature so to remember next time
what worked and what could be done better.
1. Choose fresh garlic or solo garlic, no peeling, no need to clean. As Figure 1, you can cut o the end of the garlic.
2. Fill the cage with 3-4 lbs. of garlic and close the door of the cage. Shake to settle and even out the garlic. It is better to ll
the cage, the ferment will do better with more garlic.
3. With the inner liner bowl already installed put the cage into the fermenter and close and lock the lid
4. Set the machine to garlic function (adjust time and temp as desired). After the fermentation complete, the machine will
automatically turn o and will beep to indicate fermentation is complete.
The rst time you make black garlic set it to 7 days. Open the fermenter 5-6 days in and take one out and taste it. If you think it
tastes good, fermentation is complete. It is possible to end the fermentation in advance. If it is not fermented enough, let
ferment for the remaining time. If you want to eat some dry, you can dry for another 1-2 days. The longer the time, the higher
the temperature the dryer the black garlic will be. Excessive fermentation will be too dry and bitter. But if your fermentation is
too short or at too low temperature, the garlic may not be black and will be wet and sour. Generally, it is best to ferment for
the full default time at the default temperature, but both time and temperature can be adjusted according to your preference.
If you nd after you fermented the garlic is still wet and the center is not black you can ferment again for 1-2 more days or you
can dry using the drying function. 6-48 hours can be chosen. When drying the lid does not need to be fastened, it is best to
leave a gap so the humidity can escape and the drying eect will be better.
When making black garlic the fermentation will be better if you ll the cage completely with garlic too few garlic will not
ferment well. 3-4.5 lbs. (1.5-2 kg) of garlic is best.
After black garlic process is complete it can be eaten but avor is at its best after it has been stored for 5-10 days. Shelf life of
black garlic stored in a container is about 1 months if refrigerated and sealed shelf life is extended to about 3 months.
No Power. No lights. Power is not connected
Power on, buttons do not
work Process is working or is in power
o memory
Display code, alarm Working complete, prompt
Power on, no display or no
heating Machine is broken
Display not working Machine is broken
Check that both ends of the power
cord are securely plugged into the
unit and the power outlet.
Press the Cancel button for several
seconds to cancel the program and
reset the machine.
Press the cancel button to cancel
the program
Maintenance
Press and hold the cancel button,
no change then machine is broken.
PROBLEM REASON SOLUTION
CAUTION
Be extra careful when opening the lid of the fermenter contents will be hot and hot air will
escape and may cause burns.
Fermentation of garlic has a strong smell. You may want to consider placement
of your fermenter to keep odor to a minimum in the house.