manuals.online logo
Brands
  1. Home
  2. •
  3. Brands
  4. •
  5. Harbor Freight Tools
  6. •
  7. Kitchen Appliance
  8. •
  9. Harbor Freight Tools 93001 User manual

Harbor Freight Tools 93001 User manual

Other Harbor Freight Tools Kitchen Appliance manuals

Harbor Freight Tools 92049 User manual

Harbor Freight Tools

Harbor Freight Tools 92049 User manual

Harbor Freight Tools 44934 User manual

Harbor Freight Tools

Harbor Freight Tools 44934 User manual

Harbor Freight Tools 91611 User manual

Harbor Freight Tools

Harbor Freight Tools 91611 User manual

Harbor Freight Tools 41420 Quick reference guide

Harbor Freight Tools

Harbor Freight Tools 41420 Quick reference guide

Harbor Freight Tools 93669 User manual

Harbor Freight Tools

Harbor Freight Tools 93669 User manual

Harbor Freight Tools 66928 Parts list manual

Harbor Freight Tools

Harbor Freight Tools 66928 Parts list manual

Harbor Freight Tools 66906 Parts list manual

Harbor Freight Tools

Harbor Freight Tools 66906 Parts list manual

Harbor Freight Tools 42787 Installation manual

Harbor Freight Tools

Harbor Freight Tools 42787 Installation manual

Harbor Freight Tools 63146 Assembly instructions

Harbor Freight Tools

Harbor Freight Tools 63146 Assembly instructions

Harbor Freight Tools 98412 User manual

Harbor Freight Tools

Harbor Freight Tools 98412 User manual

Harbor Freight Tools 99871 User manual

Harbor Freight Tools

Harbor Freight Tools 99871 User manual

Popular Kitchen Appliance manuals by other brands

Tayama TYG-35AF instruction manual

Tayama

Tayama TYG-35AF instruction manual

AEG 43172V-MN user manual

AEG

AEG 43172V-MN user manual

REBER Professional 40 Use and maintenance

REBER

REBER Professional 40 Use and maintenance

North American BB12482G / TR-F-04-B-NCT-1 Assembly and operating instructions

North American

North American BB12482G / TR-F-04-B-NCT-1 Assembly and operating instructions

Presto fountain popper instruction manual

Presto

Presto fountain popper instruction manual

Westmark 1035 2260 operating instructions

Westmark

Westmark 1035 2260 operating instructions

Zanussi ZCG64396XA user manual

Zanussi

Zanussi ZCG64396XA user manual

HOFFEN SM-9302M instruction manual

HOFFEN

HOFFEN SM-9302M instruction manual

Philips HD3133 user manual

Philips

Philips HD3133 user manual

Ronco Beef Jerky User guide and recipes

Ronco

Ronco Beef Jerky User guide and recipes

Hendi 470411 user manual

Hendi

Hendi 470411 user manual

Livoo MEN386 user manual

Livoo

Livoo MEN386 user manual

croydon WR-10313-700 instruction manual

croydon

croydon WR-10313-700 instruction manual

Chefman RJ43-SQ Series user guide

Chefman

Chefman RJ43-SQ Series user guide

Vacmaster VP680 user guide

Vacmaster

Vacmaster VP680 user guide

Jetmaster 900HG operating instructions

Jetmaster

Jetmaster 900HG operating instructions

Küppersbusch EEH 610.0 Instructions for use and installation instructions

Küppersbusch

Küppersbusch EEH 610.0 Instructions for use and installation instructions

HURAKAN HKN-F10 manual

HURAKAN

HURAKAN HKN-F10 manual

manuals.online logo
manuals.online logoBrands
  • About & Mission
  • Contact us
  • Privacy Policy
  • Terms and Conditions

Copyright 2025 Manuals.Online. All Rights Reserved.

INSTRUCTIONS AND PRECAUTIONS
Visit our website at: http://www.harborfreight.com
SAVE THESE INSTRUCTIONS. READ ALL
PRECAUTIONS AND INSTRUCTIONS.
Copyright©2005, 2009 by Harbor Freight Tools®. All rights reserved. No portion of this document or any artwork
contained herein may be reproduced in any shape or form without the express written consent of Harbor Freight
Tools. Diagrams within this document may not be drawn proportionally. Due to continuing improvements, actual
product may differ slightly from the product described herein. Tools required for assembly and service may not be
included.
For technical questions or replacement parts, please call 1-800-444-3353.
SPECIFICATIONS
Cutting Sizes 1/2” Square x 25 holes
Mounting Suction Cup Base
UNPACKING
When unpacking, check to make sure that
the item is intact and undamaged. If any parts are
missing or broken, please call Harbor Freight Tools
at the number shown on the cover of this document
as soon as possible.
FRENCH FRY SLICER
93001
Revised Manual 09k
93001 For technical questions, please call 1-800-444-3353. Page 2
IMPORTANT SAFETY
INFORMATION
1. This is a cutting device. Do not place hand
near Cutting Blades (2).
Do not hold vegetable or any object in place2.
during cutting operation.
Avoid cuts. Use care when handling; the3.
blades are sharp.
Avoid health hazards. Before assembling,4.
thoroughly hand wash all parts of the
French Fry Slicer with soap and warm water
before using with food. Remove the Cutting
Blades and Push Block (3) and wash in a
dishwasher if available. Do not place the
base unit in the dishwasher.
After assembly, test the French Fry Slicer5.
by running several potatoes through the
machine to insure that all parts are working
properly.
After each use, clean all components6.
thoroughly.
Do not submerge the base unit in water.7.
Dry parts and reassemble when ready to8.
use.
Use Slicer on a at, level, and solid surface 9.
that is capable of securing the suction cup of
the base.
This product is not a toy. Do not allow10.
children to play with or near this item.
Use for intended purpose(s) only.11.
Inspect before use; do not use if parts are12.
loose or damaged.
Maintain product labels and nameplates.13.
These carry important safety information.
If unreadable or missing, contact Harbor
Freight Tools for a replacement.
Foodborne Illness Safety
Before every use, thoroughly clean the1.
appliance (see “Cleaning” section for
instructions) and wash your hands.
Follow Food and Drug Administration (FDA)2.
food safety recommendations for cooking
and food handling (www.fda.gov). Also, refer
to the following safety information, taken from
FDA’s website:
Keep hot food hot (above 140° F) anda.
cold food cold (below 40° F). Do not let
perishable food sit out longer than 2 hours
(1 hour in temperatures above 90° F).
Read the ENTIRE IMPORTANT
SAFETY INFORMATION section
at the beginning of this document
including all text under subheadings
therein before set up or use of this
product.
OPERATION
WARNING! Avoid health hazards. Before
assembling and the initial use, thoroughly wash
all parts of the French Fry Cutter with soap and
warm water.
1. Place the Base Unit (1) on a clean, at surface
and turn the Suction Lever (5) all the way to
the left. This will keep the unit immobile.
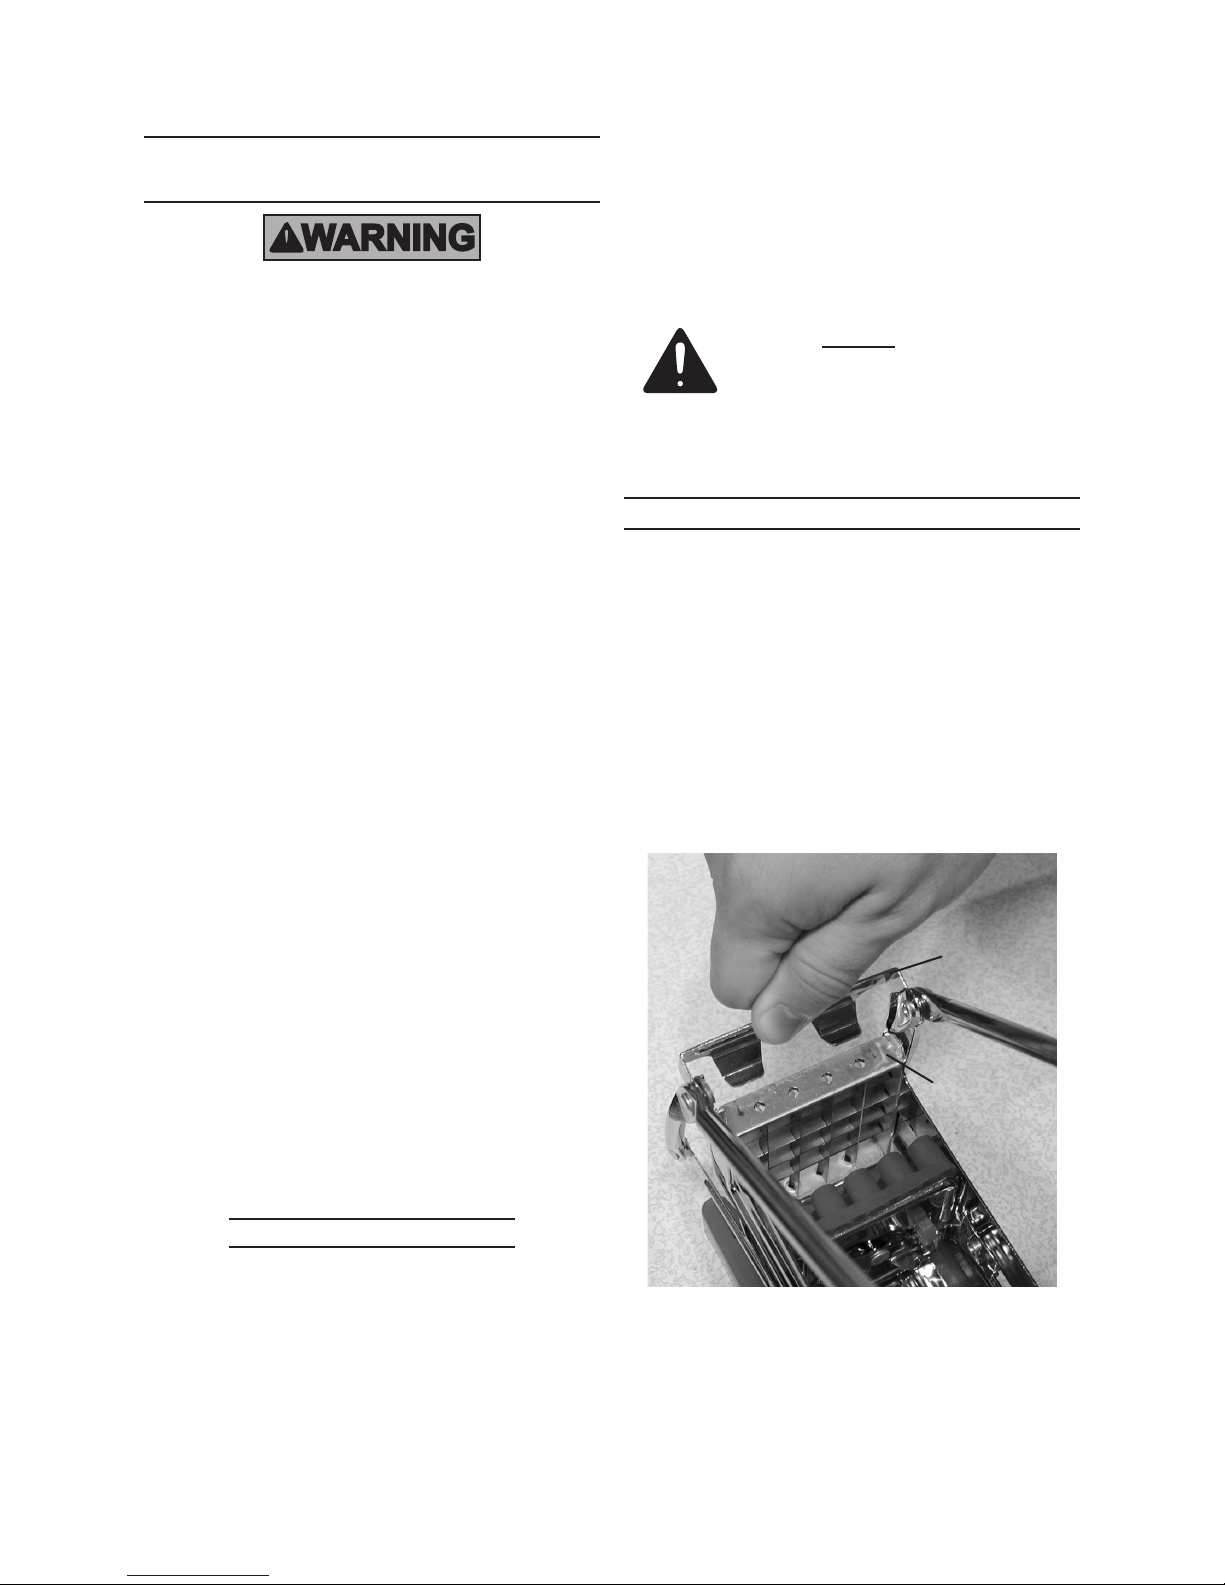
2. Insert the 1/2” Cutting Blade Frame (2) by rst
lifting the Handle (4) all the way up and pulling
back on the blade lock. See Figure 1, below.
1/2” Cutting
Blade Frame
(2)
Blade Lock
Figure 1
93001 For technical questions, please call 1-800-444-3353. Page 3
3. Slide the Cutting Blade Frame (2) all the way
down with the sharp edges facing inward.
See Figure 2, below.
4. Push the blade lock down over the Cutting
Blade Frame (2), locking the Frame in place.
5. Place the plastic Push Block (3), with the open
side of Tabs facing down, onto the back end
of the unit so that the tabs on the back of the
Push Block t through the holes on the end
frame. See Figure 3, below.
6. Turn the Lock Lever on the back of the end
frame, locking the Push Block (3) in place.
See Figure 4, above right.
7. Lift the Handle all the way up and place
a potato, or other soft vegetable, into the
working area of the unit. See Figure 5, below.
WARNING! Keep ngers and hands away from
the cutting area of the unit.
8. Press down on Handle slowly and rmly with
both hands to cut the potato. Remove slices
while Handle is still in the down position.
CLEANING
Remove Cutting Frame (2) and Push Block1.
(3).
Wash Cutting Frame and Push Block in2.
dishwasher or by hand using hot water and
detergent.
Wipe off the rest of the Base (1) using a3.
clean damp cloth with light detergent. Wipe it
dry after cleaning.
Figure 2
1/2” Cutting
Blade
Frame (2)
Figure 3
Push Block
(3)
Figure 4
Push Block
(3)
93001 For technical questions, please call 1-800-444-3353. Page 4
Record Serial Number Here:
Note: If product has no serial number, record month and year of purchase instead.
Note: Some parts are listed and shown for illustration purposes only, and are not available individually as
replacement parts.
PLEASE READ THE FOLLOWING CAREFULLY
THE MANUFACTURERAND/OR DISTRIBUTOR HAS PROVIDEDTHE PARTS LISTANDASSEMBLY DIAGRAM IN THIS DOCUMENT
AS A REFERENCE TOOL ONLY. NEITHER THE MANUFACTURER OR DISTRIBUTOR MAKES ANY REPRESENTATION OR
WARRANTY OF ANY KIND TO THE BUYER THAT HE OR SHE IS QUALIFIED TO MAKE ANY REPAIRS TO THE PRODUCT,
OR THAT HE OR SHE IS QUALIFIED TO REPLACE ANY PARTS OF THE PRODUCT. IN FACT, THE MANUFACTURER AND/
OR DISTRIBUTOR EXPRESSLY STATES THAT ALL REPAIRS AND PARTS REPLACEMENTS SHOULD BE UNDERTAKEN BY
CERTIFIED AND LICENSED TECHNICIANS, AND NOT BY THE BUYER. THE BUYER ASSUMES ALL RISK AND LIABILITY
ARISING OUT OF HIS OR HER REPAIRS TO THE ORIGINAL PRODUCT OR REPLACEMENT PARTS THERETO, OR ARISING
OUT OF HIS OR HER INSTALLATION OF REPLACEMENT PARTS THERETO.
PARTS LIST & ASSEMBLY DIAGRAM
Part Description Qty.
1 Base 1
2 1/2” Cutting Blade Frame 1
3 Push Block 1
4 Handle 1
5 Suction Lever 1
4
1
23
5