Theiling Polar 250 User manual

Polar Chiller
1
Aquarium Cooler
Polar 250, Polar 500 und Polar 1500
Operation Manual
Congratulations for your new Polar Chiller. It is a quality product and has been specially
designed for aquarium and pond use. It has been developed and tested by specialists.
The flow through chiller Polar are supplied with sea water resistant heat exchanges made
of Titanium.
The heat exchangers are absolutely corrosion proof and contamination free. The chillers
can be used for freshwater and marine aquariums and with a broad number of chemicals.
The chiller have a one stage cooling system with R 134a as cooling oil (FCKW free) They
work with capillary injection.

Polar Chiller
2
1. Delivery
The Theiling cooling units of the Polar series are supplied with:
- a temperature computer with digital display
- Connections for water in and outlet.
- On/Off switch with fuse.
- Exchangeable air filter
- Strong housing made of metal and plastic
The units are ready to use
2. Installation
2.1 The cooling unit must be installed in a well aerated place. The
complete heat that the unit extracts from the water is blown into the air as
well as the excess heat of the unit itself. A heat build-up at the chiller will
result in a decrease of the cooling capacity and in the long term destroy the
unit. Good ventilation is absolutely necessary. The hot air must flow open from
the back side of the unit. The unit may only be placed inside of an aquarium
cabinet, if sufficient aeration grids guarantee the exchange of the air.

Polar Chiller
3
2.2 Advise of the setup:
-1. Do not place the unit outdoors
-2. Do not place the nit in direct sunlight.
-3. Place the unit on a horizontal area
-4. Keep sufficient distance from a wall.
-5. Do not cover the cooler, when it is working. Do not shake it.
-6. The cooler has no integrated circulation pump. We recommend to use the River 2700
pump for the water supply.
-Do not tilt the cooler. Wait minimum 1 hour after the setup of the cooler before you
start it.
Setup of the chiller
-1. besides a filter sump. The pump circulates the water between sump and chiller
-2. besides the aquarium, but below the water level.
-3. Integrated into the filter cycle, but pressure less at the outlet.
The ambient temperature may not exceed 35°C.
3. START
1. Connect the chiller to the water cycle.
2. Switch on the water flow. Make sure, that water flows through the chiller –
always. The temperature sensor is located inside of the heat exchanger. This
prevents freezing and damage of the heat exchanger, in case the water flow is
interrupted.
3. Control all pipes and connections to be water tight. If there is a leakage, tighten
the unions. Control the water flow and make sure the pipes are not clogged.
4. The chiller must stand upright minimum for one hour before starting. Connect it to
the mains (230V/50 Hz~). Switch the unit on. The actual water temperature is
displayed. The temperature sensor is near the water inlet. The temperature displayed
is the real temperature in the aquarium
Attention: Operate the Chiller pressure less
Set up maximum 150 cm below the water level in the aquarium.

Polar Chiller
4
4. Temperature Display
The Theiling Polar Cooling units are supplied with a digital temperature
controller.
Programming: During operation, the display shows the actual aquarium water
temperature.
-Display of the set value
Press the „Set“ button. The programmed set value and the actual aquarium water
temperature are displayed alternating. The temperature indicator (1) is switched off,
if the actual temperature is displayed. It flashes when the set value is displayed.
-Set point adjusting
Press the „Set „ button for longer than 3 seconds to enter the program mode. Now
the set value is displayed. By pressing the and –buttons the set value can be
adjusted in the range from 3°C to 32°C. If you have adjusted the set value, you can
save it by pressing the “SET “button. Now the aquarium temperature is displayed and
the chiller is working.
-Switch on Protection.
To prevent a frequent on and off switching of the chiller, it will start again only after a
break of minimum 3 minutes. If switched on for the first time, it will start after 1
minute.
.
- Temperature control
If the cooler was switched off for minimum 3 minutes and the water temperature
rises for 1°C above the adjusted set value, the unit is switched on automatically and
the water is cooled. As soon as the water temperature reaches the set value, the
cooler is switched off.
The „working“ LED (7) is switched on when the cooler is working and is switched off,
when the set temperature is reached and the cooler is switched off. If this LED
flashes, the cooler is in the 3 minute wait phase (switch on protection).
-Automatic switch Off
The cooler is switched off automatically, when there are problems with the
temperature sensor. The display will then show: “ P1“ or „P2“
- Display,
1. Temperature indicator
2. Temperature display
3.Comma
4. Button to decrease the set value
5. Button to increase the set value
6. SET Button
7 Working LED

Polar Chiller
5
5. Technical data of the cooling units
Model
Polar 250
Polar 500
Polar 1500
Power supply
230V/50 Hz
Current uptake
1,2A
1,8A
2,4A
Motor capacity (HP)
1/6
1/4
1/2
Power uptake (watts)
160W
190W
375 W
Cooling power
(watts)
300W
400W
800W
Cooling oil
R 134A
Flow rate
600-2200l/h
1000-2500l/h
1200-3000l/h
weight
18 kg
19,3 kg
19,8 kg
Dimensions
435 x 295 x 470 mm
460 x 320 x 595 mm
Connection
Hose connection, 20 mm inner diameter
6. Maintenance
The cooling unit needs the same maintenance like conventional cooling units (Freezers).
All Maintenance and repair works have to be done by authorised workers or send the unit
back to the factory.
Clean the air cooled condenser regularly. Disconnect the unit from the mains. Open
the Housing carefully with a Philips screw driver. Clean the lamellae of the condenser
carefully with a vacuum cleaner. Without regular cleaning, the fan and the compressor
may be damaged
We recommend flushing the heat exchanger one per year with tap water to remove
sludge residues.
Polar Chiller
6
Cleaning advice:
1. Do not use detergents to clean the unit
2. Clean the dust filter with a vacuum cleaner
3. All electric part may only be cleaned with a clean soft and dry cloth.
4. Never submerse the unit in water.
5. If the cooler is not used for a longer period, disconnect it from the mains and from the
water connections. Tilt the unit so the water can flow out of the heat exchanger. Dry and
clean the unit with a soft cloth for storage.
7. For further questions contact your dealer or a cooling technician.
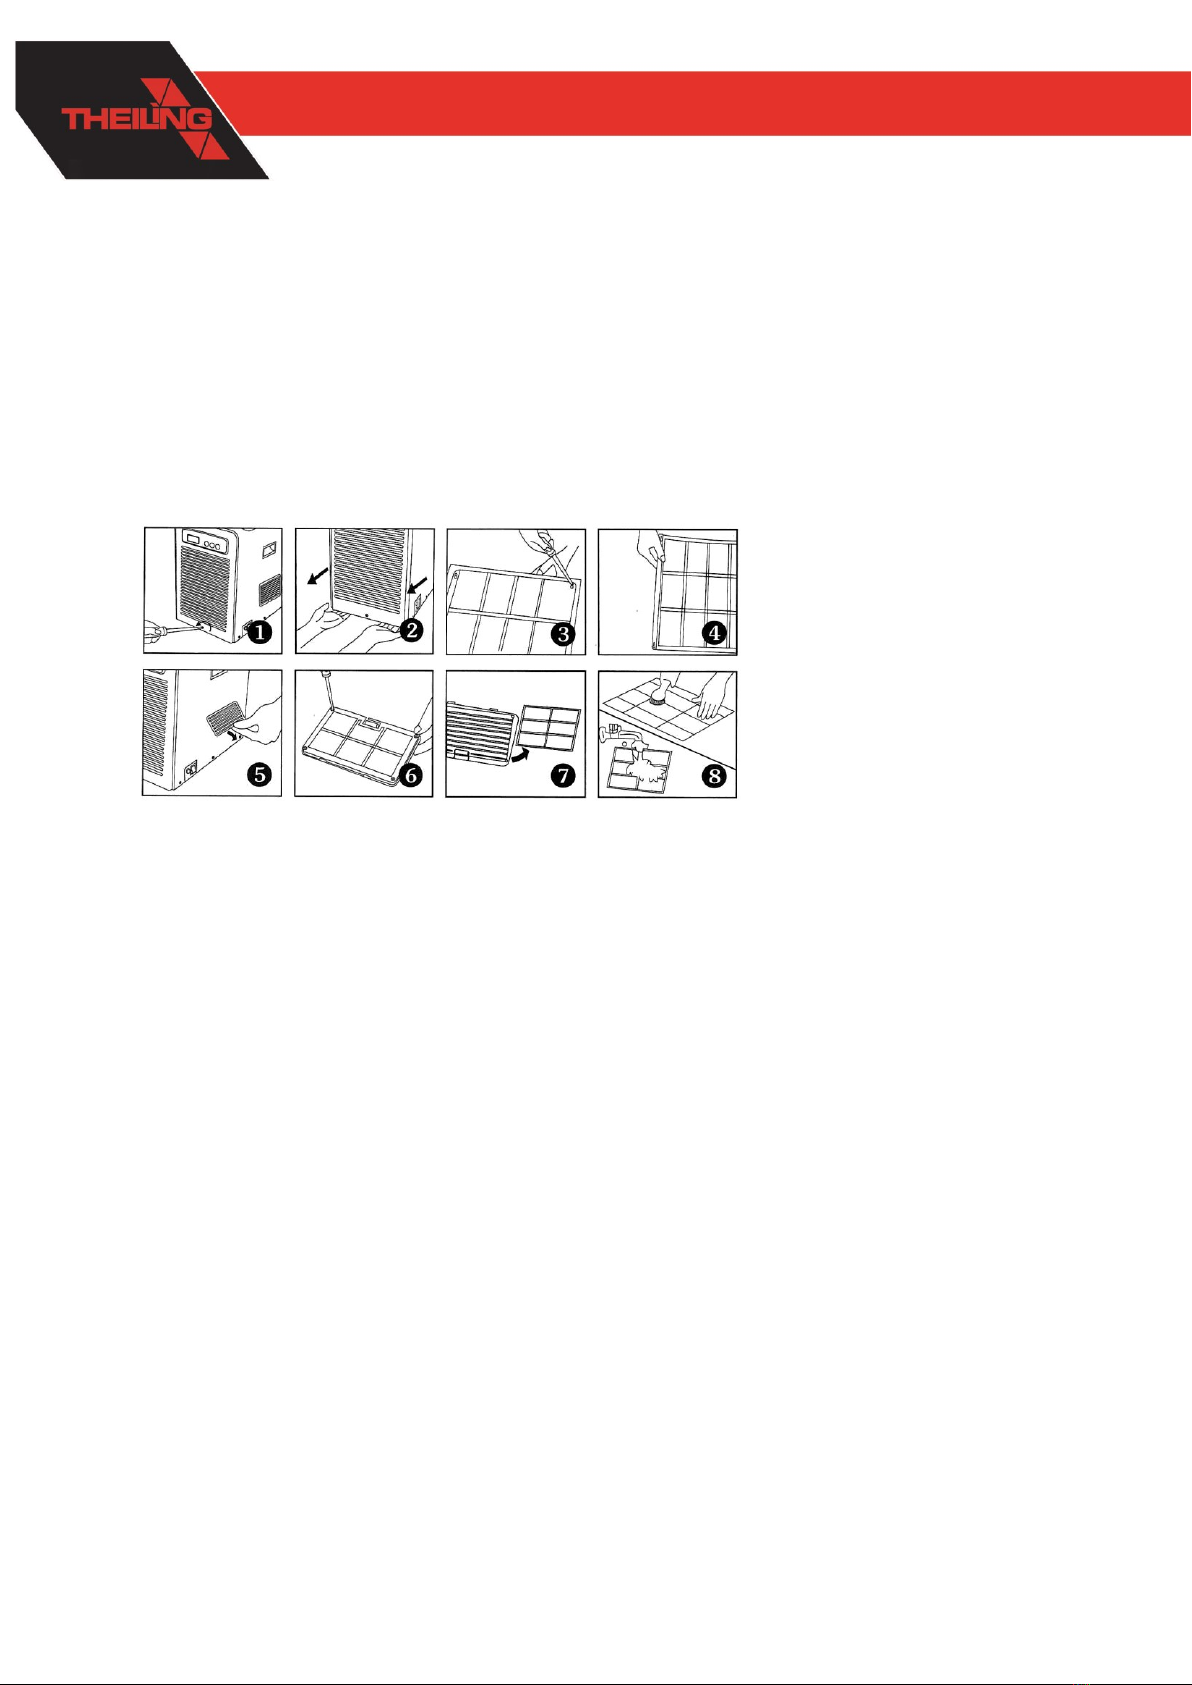
Cleaning the Air Filter
1. Unscrew the screw at the bottom of the air filter (1)
2. Pull the air filter carefully by hand (2)
3. Remove the screws and take out the filter. (3,4)
4. Push the filter at the side upwards, tilt it and remove it. (5)
5. Take the filter out of the grid (6)
6. Remove the dust with a brush or a vacuum cleaner and flush the filter with water. Dry
it carefully before remounting it. (7)
7. Remount the filter.

Polar Chiller
7
7. Failures:
Failure
Cause
Action
No electricity. The unit will
not switch on, no display is
lighted.
The unit is switched off.
Switch it on
The plug is not correct
pushed into the main.
Control the plug
The fuse is burnt
Replace the fuse
The unit switches
permanent on and off.
Voltage or the Frequency
are wrong
Make sure, that the power
supply fits to the label at
the unit.
The switch on protection is
activated
A. Check if the water is
circulating. If the fan is
operating normal, wait 3
minutes and the unit will
switch on automatically.
Small or no cooling capacity
The compressor works
normal, however the fan is
broken and the unit cannot
blow away the heat into the
environment
Replace the Fan with
another with the same
technical data.
The adjusted set point is
higher, that the water
temperature.
Check the set value and
readjust it if necessary.
Air in-and outlet are
blocked with dust
Clean the air filter as
described
Not enough cooling oil
Bring the unit to a cooling
technician
.
The nit is too small for the
aquarium size or the
desired temperature
difference is too big.
Change the unit to a bigger
one or reduce the water
volume.
The cooler is noisy or
jerking
The base is not even
Move the cooler to an even
area.

Polar Chiller
8
8. part list
1. control box (temperature controller
2. Electronic board
3. Back plate of the control box
4. Water in- and outlet fittings
5. Nut
6. Housing
7. Handle
8. Condenser
9. Fan
10.Compressor
11. Ground plate
12. Switch
13. 230V in
14. Fuse
15. Water temperature sensor
16. Heat exchanger
17. Filter
18. Front plate

Polar Chiller
9
9. Circuit diagram
10. Warranty.
Should any defect in material or workmanship be found within 12 months of the date of purchase
Theiling GmbH undertakes to repair or, at our option, replace the defective part free of
charge –always provided the product has been installed correctly, is used for the purpose that was
intended by us, is used in accordance with the operating instructions and is returned to us carriage
paid. The warranty term is not applicable on the all consumable products. Proof of Purchase is
required by presentation of an original invoice or receipt indicating the dealer’s name, the model
number and date of purchase, or a Guarantee Card if appropriate. This warranty may not apply if
any model or production number has been altered, deleted or removed, unauthorized persons or
organisations have executed repairs, modifications or alterations, or damage is caused by accident,
misuse or neglect. We regret we are unable to accept any liability for any consequential loss.
Please note that the product is not defective under the terms of this warranty where the product,
or any of its component parts, was not originally designed and / or manufactured for the market in
which it is used. These statements do not affect your statutory rights as a customer. If your
Theiling GmbH product does not appear to be working correctly or appears to be defective, please
contact your dealer in the first instance. Before calling your dealer, please ensure you have read
and understood the operating instructions. If you have any questions your dealer cannot answer
please contact us. Our policy is one of continual technical improvement and we reserve the right to
modify and adjust the specification of our products without prior notification.
Theiling GmbH -
- technical changes reserved –04/2014
TC-01- Temperature Controller
FT Fuse
PTC Motor Starter
FAN Fanr
MC Compressor
OL Motor protection
T Water temperature sensor
This manual suits for next models
2
Popular Freezer manuals by other brands

Frigidaire
Frigidaire FFN15M5H W manual

emerio
emerio CFR-126353 instruction manual

SPX
SPX Cooling Tower Marley NC Class Specifications

Gorenje
Gorenje COMBI FS-600 Instructions for use

KTR
KTR OAC Series Operating & assembly instructions

Indesit
Indesit IN F 140 UK Instructions for installation and use


