TheLoudest.com Competition PRO TL-1102 User manual
OWNER’S MANUAL
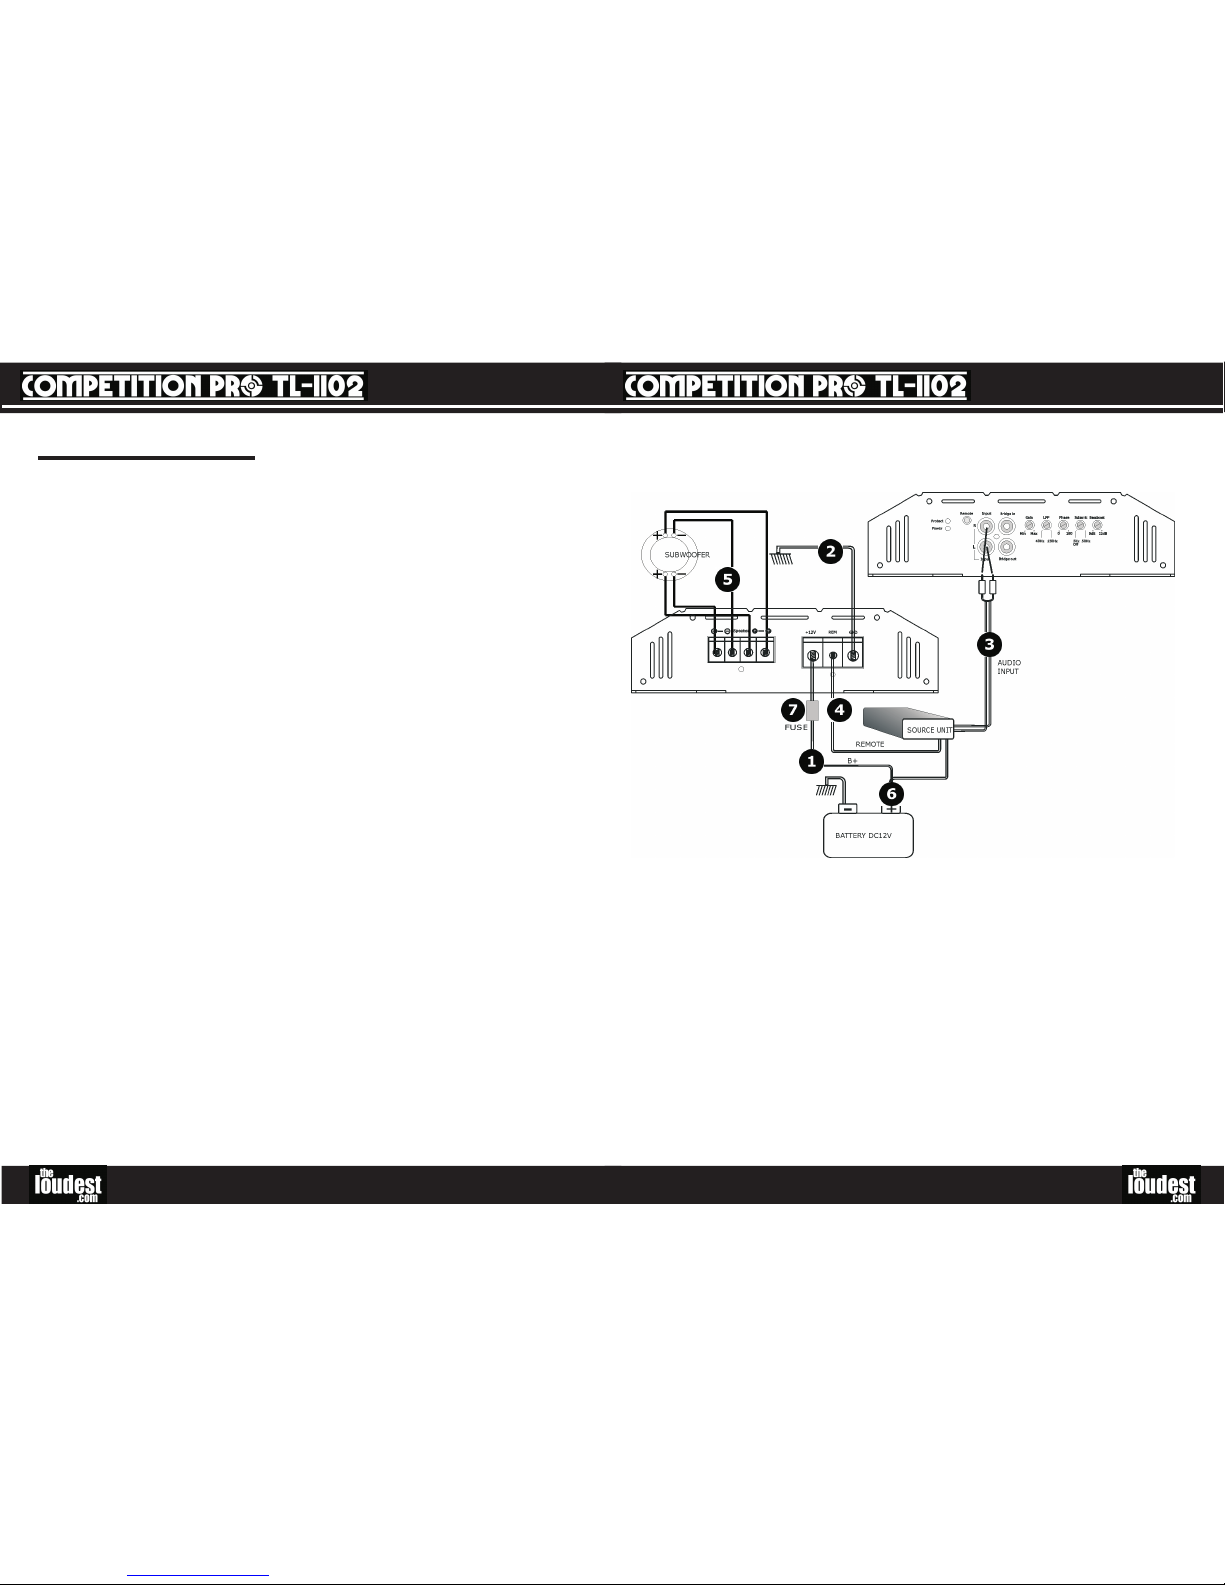
Please see the diagram below for how this professional car amplifier wiring kit could be used
in a typical installation of a subwoofer to an amplifier. The numbers on the diagram
correspond to the numbered contents of the kit, as seen on the pervious page to this.
How to make these connections is described below, in chronological order.
Competition Pro amplifiers especially, are capable of delivering extremely high power levels.
Therefore tight, reliable and clean power connections at both ends are very important and
ensure maximum performance.
Connect the earth (-) (or ground) cable (thick black wire) to a solid, bare metal point on
the vehicle’s chassis. A common place for this is the boot catch; however any existing bolt
or screw that makes contact with the car’s body near the amplifier would be sufficient. If
there is no existing point, you can make one by drilling into the car’s body. This should be
done carefully as a last resort, ensuring that none of the car’s electronics or any other
components such as fuel leads are going to be damaged. A clean connection is needed, so
scraping away the paint around the mounting point is required.
For safety reasons, the ground cable is quite short (1 m). Bolt the ring of the cable to the
mounting point, and then connect the other end of the ground cable to the ground terminal
on the amplifier. A barrel connector is already installed on the amplifier end of the ground
cable for connection to the amplifier. Un-tighten the ground terminal of the amplifier, slide
the connector in, and then tighten. If the amplifier uses different connections to this, you
will need to remove the barrel connector and take this stripped the end of the cable, and
insert it into the ground terminal of the amplifier (or crimp a different connector to it).
OWNER’S MANUAL
Installation
If you do not have sufficient experience or tools to carry out the installation, it is
strongly advised that you seek the assistance of someone who does, or have the
amplifier professionally installed.
The contents and specifications of this professional car amplifier wiring kit are as follows:
1. Power cable 2. Ground cable
Colour: Red Colour: Black or Brown
Size: 4 AWG/GAUGE Size: 4 AWG/GAUGE
External diameter: 10 mm External diameter: 10 mm
Length: 6 meters Length: 1 meter
4/8 AWG Barrel connector. 4/8 AWG Barrel connector.
(Amplifier end) (Amplifier end)
Terminal diameter: 8.3mm Terminal diameter: 8.3mm
(Battery end) (Battery end)
AFC Fuse holder installed
3. RCA (phono) cable 4. Remote turn on wire
Colour: Blue and silver Colour: Blue
Length: 5 meters Length: 5 meters
Moulded RCA plugs installed Crimp terminal installed (source unit end)
Double shielded, twisted
Oxygen free copper
5. Speaker cable (subwoofer) 5. Speaker cable (general)
Colour: Transparent Blue Colour: Transparent Blue
Length: 4 meters Length: 6 meters
External diameter: 2 x 6.6mm External diameter: 2 x 2.5mm (2 x 13 AWG)
Heavy Duty (2 x 9 AWG) Oxygen free copper
Oxygen free copper
6. Battery terminal 7. Fuses
Finish: Nickel plated AFC, 120 Amp x 2 (one spare)
2 AWG x 1
4 AWG x 1
8 AWG x 2
Before starting the installation it is advisable to disconnect the negative terminal of the
vehicle battery. This ensures the battery will not short if the wires are accidentally
crossed during installation, and is generally good practice when making electrical changes.
Please be warned that after disconnecting the battery, your control/source unit (head unit)
may require a code to be entered, some car alarms may also sound. Therefore it is best to
disable the alarm before installation and enable it again after installation is complete.

OWNER’S MANUAL
Connect the speaker cable from your speaker(s) to the amplifier. Negative should go to
negative and positive to positive. Cut the speaker cable(s) to size, making sure that the
same length is used for each speaker of the same type. Please refer to the instruction
manual for the speaker(s)/subwoofer(s) for specific installation instructions.
Never connect or disconnect speakers when the amplifier is on; you risk permanently
damaging the speakers. Sometimes speaker cable is supplied with speakers; alternatively,
crimp speaker connectors can be connected to the supplied speaker cable for connection to
the terminals on the speakers. Check whether the speakers use spade connection
terminals. They could be push-fit or screw-fit; if they are, connectors wouldn’t be needed
for these types of terminals.
There are two types of speaker cable included in this wiring kit. The 4 meter long heavy
duty subwoofer cable can be used to connect heavy duty subwoofers, and the 6 meter long
general speaker cable can be used to connect any type of speakers, including small to
medium sized subwoofers. Both cable types are of a high quality.
Once you have checked that all the connections are good and solid, insert one of the fuses
into the fuse holder on the power cable, and re-connect the negative terminal of the battery.
If anything goes wrong, disconnect it immediately and investigate. If the amplifier’s
protection LED is lit, please refer to the “Troubleshooting” section of the amplifier’s owner’s
manual.
Ensure that the fuse (or fuses’) rating on the amplifier are rated at less than that of the fuse
on the power cable. If this is not the case, a higher rated fuse must be used. This TL-1102
amplifier wiring kit is rated at 4000 watts maximum power, and can use fuses rated up to
around 130A, though two 120A fuses are supplied as standard.
For support and information, please visit www.theloudest.com
OWNER’S MANUAL
Either Connect the power (+) cable (thick red wire) directly to the positive terminal of
your vehicle battery by unscrewing the nut on positive terminal and slipping on the power
lead connector, before replacing and tightening the nut.
Or Connect the power (+) cable (thick red wire) to the battery terminal supplied.
Remove the current battery terminal, cut and strip the cable currently connected to it, and
connect it to the supplied battery terminal too. Then place the supplied battery terminal
onto the battery.
This is a much neater way of connecting multiple fused power cables to the positive terminal
of the vehicle battery. When needing to replace the battery or remove the positive
connections, the terminal is simply removed.
The power cable then needs to be run to where the amplifier will be mounted. Look around
the engine bay for a place to run the cable through to the inside of the vehicle. Suitable
points are usually bonnet pull grommets or air intake holes. The positive wire needs to be
protected from damage; failure to protect it from damage could lead to a vehicle fire.
When you have been able to feed the cable to the inside of the car, try to hide the cable as
well as possible on its way to the amplifier (under carpet, or inside panels).
A barrel connector is already installed on the amplifier end of the power cable for connection
to the amplifier. Un-tighten the power terminal of the amplifier, slide the connector in, and
then tighten. If the amplifier uses different connections to this, you will need to remove the
barrel connector, and take this stripped the end of the cable and insert it into the terminal of
the amplifier (or crimp a different connector to it).
Connect the remote cable (thin blue wire) from the source unit’s (head unit’s) remote
output. This is called a variety of things including “remote”, “aerial”, “electric antenna”,
“REM” and “remote turn on”. To do this you will need to have access to the back of the
source unit; it will need pulled out. Please refer to the source unit’s manual to find the right
cable. Strip the end of this cable and crimp it to the crimp-connector installed on the source
unit end of the remote cable.
Leave the source unit pulled out for the moment, and run the remote cable to where the
amplifier is, down the same side of the vehicle as the power cable. As with the power cable,
try to hide it under panels and carpet. Un-tighten the remote terminal on the amplifier
enough to slide stripped amplifier end of the cable in, then re-tighten.
Connect the audio signal lead (RCA phono lead) to the “line level” or “pre-out” of the
source unit. The pre-out of the source unit should be in the form of two RCA phono sockets.
Simply plug the lead into the sockets, ensuring red goes to red, and white (or black) goes to
white (or black).
Then run the lead all the way to the amplifier. To minimise noise, please ensure that the
audio signal lead is run well away from the power leads. It is normally best to run it down
the opposite side of the car. If the cables are too close, a high pitched whine can
get into the system; this is engine noise.
If your source unit has no pre-outs, it is probable that it is not of sufficient quality to work
well with an amplifier; if it is giving poor quality audio then the amplifier will simply amplify
this poor quality audio. However, if a line output converter is purchased, it would convert
speaker outputs to a line level and enable you to operate the amplifier. As mentioned, the
output may not be of a great quality.
Other TheLoudest.com Amplifier manuals


