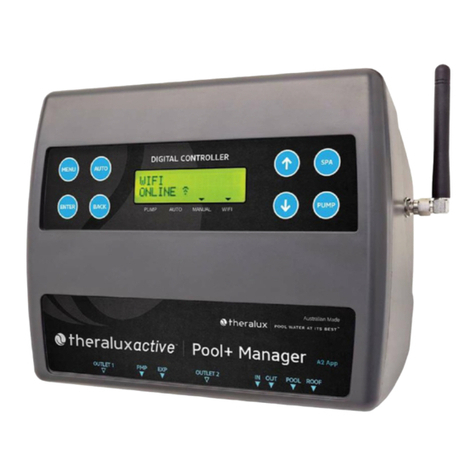
Theralux POOL+ MANAGER A2 APP User manual

Pool^M Manager App A2 User Manual v1.0 1
1
POOL+ MANAGER A2 APP
Instruction Manual
DESCRIPTION
The Pool+ Manager A2 Controller manages
your pool, spa and heating requirements from your smart phone
via the home WIFI. It will control single and many multi speed pumps, sanitiser, heater,
solar heating, lights,
water features, pool/spa valve actuators and all spa equipment requirements.
The Pool+ Manager A2
Control system is modular and can accommodate most pool control requirements big
or small.

Pool^M Manager App A2 User Manual v1.0 2
2
INSTALLATION INSTRUCTIONS
THIS APPLIANCE IS NOT INTENDED FOR USE BY
YOUNG CHILDREN OR INFIRM PERSONS WITHOUT
SUPERVISION. PLEASE ENSURE THAT YOUNG
CHILDREN ARE SUPERVISED TO ENSURE THAT THEY
DO NOT PLAY WITH THE APPLIANCE.
CONTROLLER MOUNTING
Find a suitable location to mount the control box.
Ideally, as with all pool equipment, it should be
installed out of direct weather and no closer than
3 metres from the water’s edge, at a minimum
600mm above ground. The power cable is 1.8m
long and should be plugged directly into a general
power outlet, not into an extension lead.
Mount the pump and sanitiser according to the
manufacturer’s instructions.
SANITISER CONNECTION
The sanitiser (Ioniser, Chlorinator, etc) can be
connected to any of the 240V sockets on either the
Master Controller or on one of the Expansion
Units. The sanitiser must be set to operate 24hrs
per day as the Pool+ Manager A2 controller will
control the number of hours per day the system
will operate. Refer to the sanitiser instructions for
24hr timer setup and dosing requirements.
Note: Both the Sanitiser and the Filtration pump
will need to be allocated sockets in 6.1 of the
Installer Menu.
POWER OUTPUT CONNECTIONS
The 240VAC Output Sockets are for equipment to
be controlled via the Pool+ Manager A2 controller.
Each socket can be assigned via the menu and/or
app.
The maximum combined load for both sockets on
the master controller, is 9.98 AMPS at 2395W.
HEATER CONTROL
Set the heaters temperature limit to maximum
(40°C). The heaters internal control will be
interrupted, to turn off heating. The heater
interlock cable connects to the green socket
marked INT which switches on (closes) the voltage
free NO/C relay contacts when the heater is to be
turned on. The heater end of the interlock cable
connects in series with the heater’s pressure/flow
or fireman’s switch. Contact the heater
manufacturer for the best location to connect to.
The heater interlock is for extra low-voltage (MAX
30V at 2Amps) switching only.
Note: If the heater’s flow or pressure switch circuit
is 240Vac, an external relay (KIT10) which can be
purchased separately, is to be connected by a
licensed electrician.
If the heat pump/gas heater is equipped with a
“Demand Heat” function, the heater interlock
cable will be connected into the socket labelled as
“Pump Call”. The controller will over-ride the filter
pump when flow is called for by the heat pump
which monitors the temperature within its own
defined run times. Connect the heater cable from
the controller output to the heater’s connection
point. Check with heater manufacturer for correct
interlocking procedure.
Note: If the heater’s flow or pressure switch circuit
is 240Vac, an external relay (KIT11) which can be
purchased separately, is to be connected by a
licensed electrician.
VALVES
The Pool+ Manager A2 has 4 valve actuator sockets
for the controlling of solar heating, water features,
pool/spa water flow, and In Floor cleaning.
Note: If wiring your own supplied valve then wire
as per the label on the base of the controller (Red,
Black then White) red and white are for direction
control and black is the common. Ensure the
switch on the valve actuator is in the ON position.
Refer the valve instructions for mounting
requirements, cam adjustments etc.
Maximum power for the VALVE output is 24VA.
SENSORS
Fix the mounting bracket to a solid structure via
screws and wall plugs kit provided, and slide the
controller on, locking into place. Adjust the
screws on the back of unit to ensure a snug fit.
To remove unit, lift and gently pull away from
mounting bracket.

POOL+ MANAGER App A2 - User Manual v1.0 3
POOL SENSOR
The pool sensor must be fitted into the heating
circuit, upstream of the heater and preferably in a
position out of direct sunlight. It is recommended
that a 14.5mm hole be drilled in the side of the PVC
pipe (not the top of the pipe where water will
collect), this can be carried out using a Theralux
PD01 grinding drill or a small pilot hole can be
drilled with a 14.0mm drill-bit used spinning in a
counter clockwise direction to minimize the
chance of shattering pipe. Insert the grommet into
the pipe and gently push in the sensor barb. Ideally
~30cm of the cable from the sensor should be tied
to the shaded side of the pipe to prevent extreme
ambient conditions leeching into the sensor via the
copper in the cable. The blue sensor plug is to be
fitted to either Sensor 1 or 2 port located beneath
the controller (see diagram on p 4).
ROOF SENSOR
If a roof sensor is installed, it must be fitted into a
small piece of collector material away from the
main collector but on the same aspect, preferably
no more than 50cm from the roof gutter (for ease
of sensor replacement). If required, the roof sensor
can be on a different roof as the solar collector as
long as the alignment to the sun is similar to the
solar collector. For encapsulated collector panels
use the manufacturer’s instructions for roof sensor
placement. The red sensor plug is to be fitted to
either Sensor 1 or 2 port located beneath the
controller (see diagram on p 4).
SENSOR NOTES: All excess cable must be removed;
coils of cable are not permitted under any
circumstances and must not be tied to 240V
wiring. If the cable is to be extended with non-
genuine cable a size of 14/020 should be used. Any
cable joins should be soldered. Heat shrink is to be
used over soldered joints to eliminate moisture
ingress.
EXPANSION UNITS
The Pool+ Manager A2 has the capacity to have an additional 2 expansion units connected to it. Each
Expansion Unit has an additional 3, 240VAC Output sockets that are controlled via the Pool+ Manager A2
controller. Up to an additional 6 power sockets can be utilised and controlled by the Pool+ Manager A2 master
controller.
The Expansion Units are rated at either 10Amps or 15Amps. All 3 sockets of the Expansion Unit are rated the
same. 3 sockets at 10Amps or 3 sockets at 15Amps.
EXPANSION UNIT MOUNTING
Find a suitable location to mount the control box.
Ideally, as with all pool equipment, it should be
installed out of direct weather and no closer than
3 metres from the water’s edge, at a minimum
600mm above ground. The power cable is 1.8m
long and should be plugged directly into a general
power outlet, not into an extension lead.
Mount as per main controller.
POWER OUTPUT CONNECTIONS
The 240VAC Output Sockets are for equipment to
be controlled via the Pool+ Manager A2. Each
socket can be assigned via the menu and/or app.
The maximum combined load for all three sockets
of the module is either, 9.98 Amps / 2340 Watts,
or, 14.98 Amps / 3540 Watts. Please refer to the
unit’s rating label.
The 15Amp rated expansion unit must be plugged
into a 15Amp rated GPO.

Pool^M Manager App A2 User Manual v1.0 4
INSTALLATION DIAGRAMS
The Pool+ Manager A2 Master Controller and an Expansion Unit.
MASTER CONTROLLER
EXPANSION UNIT/S
10 & 15AMP
Expansion Unit 1
Socket 3
Expansion Unit 2
Socket 6
Expansion Unit 1
Socket4
Expansion Unit 2
Socket 7
Expansion Unit 1
Socket5
Expansion Unit 2
Socket 8
If Expansion Unit 1, the connection cable to the
master controller will plug in here.
If Expansion Unit 2, the connection cable runs
from here to Expansion unit 1
If Expansion Unit 1, the connection cable from
Expansion Unit 2 will plug in here. It will be
unused if there is no Expansion Unit 2.
If Expansion unit 2 connection port is unused.
Pin 1 is on the right-hand
side of the plug

POOL+ MANAGER App A2 - User Manual v1.0 5
OPERATING INSTRUCTIONS
LCD SCREEN
In Automatic (Pool) mode the LCD screen displays; the time of day, what time the current filtration cycle will
finish/start at, if more than one filtration cycle is set, then the start time of the next filtration cycle is
displayed, current pool and roof temperatures or any faults are displayed, current status of the pump
(run/inactive), Heat Demand time (if active), and whether the WIFI is active or disabled.
In Spa mode the LCD screen will display; the time of day, SPA MODE on, pool temperature or sensor fault,
Temperature – both current temperature and set temperature of the spa, pump status, and WIFI status.
LCD INDICATORS
There are arrow icons on the LCD screen that point to text on the label.
CONTROLLER BUTTONS
AUTO
Pressing the AUTO button will run the controller in automatic pool mode. If the AUTO
button is pressed while in the settings menu, the changed settings will be used but not
saved. If there is a power failure the controller will retrieve the previously saved settings.
On power–up the controller will start automatic pool operation.
BACK Pressing the BACK button will allow you to go back to previous menu options.
ENTER Pressing the ENTER button will turn on the LCD backlight or
Pressing the ENTER button will accept the currently displayed setting option.
MENU
After pressing the MENU button, a range of options can be selected from and changed.
The selectable options in the MENU are as follows:
1) FILTER TIMES
2) TEMPERATURE SETTINGS
3) MANUAL ON
4) TIMERS
5) LIGHTS
6) INSTALLER MENU
UP & DOWN The UP & DOWN buttons allow you to scroll through different functions and or settings
in the menus, as well as increasing or decreasing temperature settings.
SPA
The SPA button allows you to toggle between Pool and Spa modes.
Pressing the SPA button begins the process of heating the spa to the spa temperature
limit. The pool/spa valve will move to the spa and prime the pump if required. Heating
will occur to the displayed set temperature. To return to automatic pool operations
press the AUTO button or press the SPA button to return to automatic pool operations

POOL+ MANAGER App A2 - User Manual v1.0 6
PUMP
If at any time the PUMP button is pressed the pump is switched on and the following
will be displayed:
3 MINS BACKWASH
ENDS IN xx:xx:xx
This function is used for a system back wash, pool vacuuming, manually running the
system for a set amount of time, running the filtration system after adding chemicals,
etc. It can also be used to stop the pump from running (if maintenance is required) for
a set amount of time.
Use the Up/Down buttons to increase or decrease the amount of time that the pump
will run, or not run. The countdown timer lets you know how much time is left until the
manual function ends.
The timer amounts after the
3 minute backwash are:
PUMP ON: 30 MINS,
PUMP ON: 1HR,
PUMP ON: 2HR,
PUMP ON: 3HR,
PUMP ON: 5HR,
PUMP ON: 9HR,
PUMP ON: 10HR,
PUMP ON: 15HR,
PUMP ON: 20HR, and
PUMP ON: 24HR.
The timer amounts to stop the pump
are displayed as follows:
HOURS OFF: 01HR,
HOURS OFF: 02HR,
HOURS OFF: 03HR,
HOURS OFF: 05HR,
HOURS OFF: 09HR,
HOURS OFF: 10HR,
HOURS OFF: 15HR,
HOURS OFF: 20HR, and
HOURS OFF: 24HR.
At any time during the count down, if you press the ENTER button, the timer will reset
to the selected time, and start again.
During the count down, if you press the PUMP button again, the controller will return
to automatic operation.
NOTE
It is advisable to go into Installer Setup first and enter all equipment that will be utilised/allocated in the
Menu functions.

POOL+ MANAGER App A2 - User Manual v1.0 7
MENU
The menu system can be navigated using the ↑ or ↓ buttons. All selectable and changeable values will be
displayed on the LCD screen. Press the ENTER button to accept the currently displayed item.
All menu items are shown below:
1) FILTER TIMES
2) TEMPERATURE SETTINGS
3) MANUAL ON
4) TIMERS
5) LIGHTS
6) INSTALLER MENU

POOL+ MANAGER App A2 - User Manual v1.0 8
1.
FILTER TIMES
You have the option to choose up to 4 different Filtration Times.
When you select the FILTER TIMES menu option, the screen will display:
FILTER ON
TIME 1 OFF
When you select ON and press ENTER the screen will display:
FILTER XX:XX
TIME 1 ON XX:XX
Adjust the start time and end time for the required filter cycle. The circulation pump
will run between these times for filtration purposes.
Once you have set the first filter time, you will then be asked to select a pump speed
for the first filter cycle.
Note: This will only be displayed if you have installed a Multi Speed Pump through the
Installer Setup (6.2). You won’t be asked for a pump speed if Single Speed pump was
selected in the Installer Setup (6.2).
This will be displayed as:
FILTER TIME 1
SPEED 1, (2,3, or 4 can be selected, depending on pump).
Once you have selected a speed for the first Filter Cycle, the option for a second filter
cycle will be displayed:
FILTER ON
TIME 2 OFF
Set and adjust as with Filter Time 1 or if not required then set the timer to OFF.
Repeat the above steps for Filter Time 3 and 4.
Note: You can run different pump speeds in the separate filter times.
Filter cycle 1 may run at speed 4, filter cycle at speed 2, filter cycle 3 at speed
1, and filter cycle 4 at speed 4.
For example:
Filter Time 1: 8.00 – 9.00 at speed 4.
Filter Time 2: 9.00 – 15.00 at speed 2.
Filter Time 3: 15.00 – 16.00 at speed 4.

POOL+ MANAGER App A2 - User Manual v1.0 9
2.
TEMPERATURE
SETTINGS
When you enter Temperature Settings, the first setting that will be displayed is:
POOL
TEMPERATURE 27o.
**Range is OFF, 20oc to 40oc in 1oc increments. Default is 27oc.**
This temperature is the minimum pool temperature that you would like the Heater to
heat the pool to if a heater is utilised.
The temperature limit can be increased or decreased with the ↑ or ↓ buttons to a
temperature of your choice.
Once you have selected a Pool Temperature, press Enter and the temperature will be
set. The controller will then display:
SPA
TEMPERATURE 37oc.
**Range is OFF, 20oc to 40oc in 1oc increments. Default is 37oc.**
This is the temperature that you would like the SPA to be at when in use.
The temperature limit can be increased or decreased with the ↑ or ↓ buttons to a
temperature of your choice.
Once you have selected a Pool Temperature, press Enter and the temperature will be
set. The controller will then display:
SOLAR
TEMPERATURE 30oc.
**Range is OFF, 20oc to 40oc in 1oc increments. Default is 30oc.**
This is the temperature you would like the solar to heat the pool to, if it is utilised.
The temperature limit can be increased or decreased with the ↑ or ↓ buttons to a
temperature of your choice. Once you have selected a Pool Temperature, press Enter
and the temperature will be set.
The controller will then return you to the Main Menu.
3.
MANUAL ON
In this menu setting you will be able to manually turn on any socket or valve that has
been allocated an appliance.
Socket 1 through to 8, and valve 1 through to 4, if allocated.
Press Enter to open the setting and the controller will display:
S1: XXXXXXXXX
AUTO
Use the ↑ or ↓ buttons to move between the allocated sockets and valves.
If a socket or valve hasn’t been allocated an appliance, then it won’t be shown.
Press the Enter button to toggle between; AUTO, OFF, & ON.
Press the Auto Button to return all appliances to normal automatic operation.
Please remember that you will also need to turn the appliance back to Auto,
otherwise it will continue to run.
Note 1: If a socket has been set to ALWAYS ON, then you won’t be able to turn it on manually.
Note 2: If a valve has been allocated to Pool/Spa, you will not be able to turn it on using this
menu option.

POOL+ MANAGER App A2 - User Manual v1.0 10
4.
TIMERS
When you enter the TIMER menu, you can set a number of the allocated appliances on
a timer. The appliance has to be allocated a socket or valve to be allowed a Timer
setting. Each appliance has the choice of either; Off, 1 time, or 2 timer allocations.
**Note: Time periods for different appliances can overlap each other.**
The first available appliance to be set on a timer will be displayed as:
Socket #X
XXXXXXXXXXXX.
Press the ENTER button to be able to adjust the time setting or use the ↑ or ↓ buttons
to display the Appliance to be set.
You will see displayed:
XXXXXXXXXXX
TIME 1 ON.
Toggle the ↑ or ↓ buttons to either turn the appliance ON or OFF the timer.
If you select OFF the next allocated appliance will be shown.
If you select ON then the controller will display:
XXXXXXXXXXXXX
TIME 1 FRM XX.XX
Use the↑ or ↓ buttons and the Enter button to allocate a start time. Once the time has
been entered, the next display will be:
XXXXXXXXXXXXX
TIME 1 TO XX.XX
Use the↑ or ↓ buttons and the Enter button to allocate an end time. Once the time has
been entered, the next display will be:
XXXXXXXXXXXXX
TIME 2 ON/OFF
Adjust TIME 2 setting as with TIME 1.
Once the TIMER setting has been completed you can move onto the next allowable
appliance. Adjust and set as above.
Notes:
Socket type “Sanitiser” is not allowed on appliance timer, as it follows filter timer.
Socket type “Filter Timer” is not allowed on appliance timer, as it follows filter timer.
Socket type “Solar” is not allowed on appliance timer, it follows solar configuration.
Socket type “Always On” is not allowed on appliance timer.
Socket type “Blower” is not allowed on appliance timer, used only in Spa mode.
Socket type “Jet Pump” is not allowed on appliance timer, used only in Spa mode.
Valve type “Pool/Spa” is not allowed on appliance timer, used on in Pool/Spa mode.
Valve type “Solar” is not allowed on appliance timer, as it follows solar configuration.
VF contact types are not allowed on appliance timers.
Please ensure that when you set the timers for different appliances, that the maximum
combined load DOES NOT exceed either the controllers power rating, or the power
rating of the expansion unit when the different appliances are turned on at the same
time.

POOL+ MANAGER App A2 - User Manual v1.0 11
5.
LIGHTS
In this menu setting, you can only change the colour of your allocated Pool and Spa
light/s. Garden lights are not given the option of colour changing.
The socket number and the brand/type of light must have been allocated in the
Installer Setup under Appliances (6.3) before you can change the colours through this
menu option.
When you enter the Lights menu the controller will display the allocated socket
number, allocated light type, and the brand/style of light. For example.
S6: POOL LIGHT
SINGLE COLOUR
The ↑ or ↓ buttons can be used to move between the allocated lights to the light you
wish to change. Once the Light is displayed on the screen, press Enter and the
controller will display:
S6: (Brand name)
(current colour)
Use the ↑ or ↓ buttons to toggle through the range of colours (if any) associated with
that brand of pool light. Press Enter to accept the colour you wish to choose.
If you so wish you can then move onto another allocated socket and change the colour
settings of that socket.
Adjust the colour as described above.
Note:
A maximum of 3 sockets can be allocated to lights, whether Pool, or Spa.
Each socket/group of lights will be the same colour as chosen for that allocated socket.

POOL+ MANAGER App A2 - User Manual v1.0 12
6. INSTALLER MENU
The Installer Setup is where you will go to enter all the equipment that is installed on the Pool/Spa system
and can have its settings changed in the Menu functions or via the App.
6.
INSTALLER
MENU
Under the Installer Menu there is a range of options to choose from. These are:
1. Appliances
2. Pump
3. Lights
4. Heating
5. Spa
6. Heat Demand
7. Pump Call
8. Water Feature
9. Temperature Sensor
10. Expansion Unit
11. Set Time
12. WIFI
13. Factory
14. About
Use the
↑
or
↓
buttons to toggle through the list of menu options. When the option you
want is displayed on the screen, press the Enter button.
6.1
APPLIANCES
Appliances can be allocated on up 8 power sockets, 4 valves and 1 VF contact.
Socket 1-2, Valves 1-4, and the VF Contact are all located on the master controller.
Sockets 3, 4, & 5 are located on Expansion Unit 1.
These sockets are only available for selection if the expansion unit is there and has been enabled.
Sockets 6, 7, & 8 are located on Expansion Unit 2.
These sockets are only available for selection if the expansion unit is there and has been enabled.
The list of appliances available to choose from are listed below:
Sockets
Sanitiser
Filter Pump
Cleaning Pump
Blower
Pool Light
Spa Light
Garden Light
Water Feature
Solar Pump
Other
Always On
Jet Pump
None
Valves
Pool/Spa
Filter Pump
In Floor cleaning
Water Feature
None
None
VF Contact
Gas Heater
Heat Pump

POOL+ MANAGER App A2 - User Manual v1.0 13
6.1
APPLIANCES
CONTINUED
When you enter the Appliance Menu, the first thing that will be displayed is:
SOCKET #1
(currently allocated appliance)
The ↑ or ↓ buttons are used to toggle between the Sockets of the Master Controller
then Expansion Unit 1, then Expansion Unit 2, then the Valves and VF Contact of the
Master Controller. Once the Appliance you want to change is displayed on the screen,
press Enter.
This will move the cursor next to the allocated appliance. Use the ↑ or ↓ buttons to
toggle through the range of Appliances that can be selected for that output. Once the
Appliance you want to select is displayed, press Enter. The Appliance will have been
selected and the controller will then display the next socket/valve/VF contact:
SOCKET #2
(currently allocated appliance)
Note: When you move onto the next appliance the cursor will still be next to the
allocated appliance.
If you wish to change this appliance simply use the ↑ or ↓ buttons to toggle through the
range of allowable appliances. Press Enter to select.
Keep pressing Enter to scroll through the allocated appliances (if there is another
socket, valve, or VF contact you wish to change) until the appliance you wish to change
is displayed. Use the ↑ or ↓ buttons to toggle through the range of allowable
appliances. Press Enter to select.
Alternatively, if you don’t want to change any more appliances, press the MENU
button to exit.
When changing the Valve appliances, the controller will display:
VALVE #1
(currently allocated appliance)
The Valve appliance is changed the same way as the Socket appliances.
When changing the VF Contact, the controller will display:
VF CONTACT
(currently allocated appliance)
The VF Contact is changed the same way as the Socket & Valve appliances.

POOL+ MANAGER App A2 - User Manual v1.0 14
6.2
PUMP
In this menu option, you will be able to select which type and brand of filtration pump
your system is running and what its default speed will be.
When you Enter this sub menu option, the controller will display the option to choose
either a Single Speed Pump or Multi Speed Pump:
PUMP TYPE
MULTI-SPEED
Use the ↑ or ↓ buttons to switch between the 2 options, press Enter to accept the
option you require.
If you Enter SINGLE SPEED, the controller will accept the option and return you to the
Installer Setup Menu.
If you Enter MULTI SPEED, then the controller will display:
PUMP BRAND
THERALUX.
Use the ↑ or ↓ buttons to scroll through the range of allowable pump brands. Press
Enter on the brand you wish to select when you see it displayed.
The options for brands of Multi Speed Pumps are:
Theralux
Reltech
Theralux 485
Reltech 485
Pentair VS/F
Insnrg
DAB
Once you have pressed Enter to select the pump, the controller will ask you to set 4
pump speeds.
In the case of the Theralux 485, Reltech 485 & Insnrg brands you will be asked
to set the speeds in RPM.
In the case of the Pentair VS/F, Theralux, and Reltech pumps, you will be asked
to set the default speed only as the pump has pre-set speeds.
In the case the DAB brand, you will be asked to set the 4 speeds as a
percentage.
Note: The Theralux and Reltech pumps only have 3 speeds to choose from and need to
be set via the manufacturer’s instructions.
Once the speeds have been set for the Theralux 485, Relthech 485, Insnrg, and DAB
pumps, the controller will then ask what Default speed you would like the pump to be
set at.
This is displayed as:
PUMP DEFAULT
SPEED X
Use the ↑ or ↓ buttons to scroll through the range of pump speeds (1, 2, 3, & 4) that
you have just set.
Once you have adjusted the default speed, press Enter to accept.
The controller will accept the default speed and return to the Installer Setup Menu.

POOL+ MANAGER App A2 - User Manual v1.0 15
6.3
LIGHTS
In this menu option, you will be able to select which type and brand of Pool & Spa
lights that you have installed.
A maximum of 3 sockets can be allocated to lights, whether Pool, or Spa. Each
of the 3 sockets will run a Light Transformer. Each socket/group of lights will be
the same colour as chosen.
Before any pool or spa lights can be setup in this menu option, 1, 2, or 3 sockets
need to have been allocated in appliances to either the pool or spa light.
When you enter this menu option, the first socket that has been allocated will be
displayed along with the allocated appliance. The controller will display:
S2: SPA
SINGLE COLOUR
Use the ↑ or ↓ buttons to scroll through the allocated sockets, press Enter to change
the displayed socket.
After you press Enter, the cursor will be located on the second line. Use the ↑ or ↓
buttons to scroll through the allowable brands of lights.
The allowable brands and types are as follows:
AquaQuip
AquaQuip INS
Spa Electrics
Astral Pool
Single Colour (non-branded)
Press Enter to select the light brand installed.
The controller will now display: (For Example)
AQUAQUIP
PURE RED
Use the ↑ or ↓ buttons to scroll through the colours that are associated with the brand
of light.
Once the colour you want is displayed on the screen, press Enter to accept the colour.
If there is only one socket that is allocated to a light, the controller will return
you to the Installer Setup Menu.
If there is more than one socket allocated to a light, the controller will keep you
in this menu option. You can use the ↑ or ↓ buttons to scroll through the other
allocated sockets. Press Enter when another allocated socket is displayed in
order to change that sockets settings. Change the settings as above.
Once you have finished, either press the Back Button to return you to the
Installer Setup Menu or press the Menu Button to return the controller to
normal operations.

POOL+ MANAGER App A2 - User Manual v1.0 16
6.4
HEATING
In this Menu option, you will be setting up the type/s of heating that is installed.
The options are:
Solar
Heat Pump
Gas Heater
When you enter this menu option the first thing that is displayed is:
SOLAR
1. NONE
With Solar Heating, you have the options of:
1. None
2. Separate (Independent plumbing)
3. Valve
4. Boosted (Integrated plumbing)
If you have an independent solar heating system, use ↑ or ↓ buttons to scroll
down to 2. Separate and press Enter. The controller will display:
SOLAR
START TIME XX.XX
Use the ↑ or ↓ buttons to adjust the time you would like the solar to start. Press Enter
to accept the hours, then adjust the minutes and press Enter.
If you have a system where a valve is turned to send water into the solar
panels, select 3. Valve.
If you have a Boosted (integrated) system, then scroll down to 4. Boosted and
select.
With options 3. Valve & 4. Boosted, (once you have pressed Enter to select) the
controller will display:
SOLAR
SPEED X
The controller is asking what speed you would like the pump to run at when solar
heating is asked for.
Note: If you are running a single speed pump, this question will not appear.
Use the ↑ or ↓ buttons to select which pre-set speed you would like, and press Enter.
Once you have selected the pump speed, the controller will then display:
SOLAR
START TIME XX.XX
Adjust as above.
Once you have adjusted and accepted the Solar Heating start time, the controller will
move you onto the next option.
If you have no Solar Heating installed, press Enter to accept 1. None and the
controller will move you onto the next option and display:

POOL+ MANAGER App A2 - User Manual v1.0 17
6.4
HEATING
CONTINUED
HEAT PUMP ON
OFF
Use the ↑ or ↓ buttons to highlight either ON or OFF.
Enter On to enable the controller to run the Heat Pump or OFF to disable the heater.
Press the Enter button to accept.
Once you have accepted an option the controller will display:
GAS HEATER ON
OFF
If you select ON, the controller will then display:
GAS HEATER
COOL DOWN XXMIN
This is the controller asking how many minutes you would like the filtration pump to
run for once the Heater has stopped heating. Use the ↑ or ↓ buttons to increase or
decrease the amount of time.
The range of time for the Cool Down is 00Mins to 59Mins.
Note: This function is here to help prolong the life of a Gas Heater. 5Mins is an
acceptable minimum but the time can be extended if so desired.
Once you have selected the timeframe you would like for the Gas Heater COOL DOWN,
the controller will move you onto the next option.
If you select OFF, the controller will move you onto the next option and display:
HEATING PUMP
SPEED X
Use the ↑ or ↓ buttons to select which pre-set speed you would like, and press Enter.
Once you have selected the pump speed the controller will exit you to the Installer
Setup Menu.

POOL+ MANAGER App A2 - User Manual v1.0 18
6.5
SPA
In this menu option, you are able to turn ON or OFF Spa operation, and Spa options.
Use the ↑ or ↓ buttons to highlight either ON or OFF. Press Enter to accept.
Note: These Spa options can only be turned ON or OFF if they have been allocated a
socket in the Appliances Menu.
If you select OFF the controller will turn off all spa options (including the ability to use
the SPA button on the front of the controller) and return you to the Installer Setup
Menu.
If you select ON then the controller will display (only if allocated):
BLOWER ON
OFF
If you select ON, the controller will display:
BLOWER
SWITCH ON AT XXo
Use the ↑ or ↓ buttons to select what temperature you would like the Blower to turn
on at and press Enter to accept.
Note: The Temperature range is within a 10o offset from the set Spa temperature or
Always On.
If you select OFF, the controller will move you to the next option and display: (only if
Allocated)
JET PUMP ON
OFF
If you select ON, the controller will display:
JET PUMP
SWITCH ON AT XXo
Use the ↑ or ↓ buttons to select what temperature you would like the Jet Pump to turn
on at and press Enter to accept.
Note: The Temperature range is within a 10o offset from the set Spa temperature or
Always On.
Note 1: If you have both a Blower and a Jet Pump allocated under Appliances, the
controller will let you select ON for Blower but will wait until after you select ON or OFF
for Jet Pump before asking you what temperature you want temperature you want the
Blower to turn on at.
Note 2: If you select ON for both the Blower and the Jet Pump, the message that is
displayed is:
BLOWER + JET PUMP
SWITCH ON AT XXo
Once you have adjusted the above, the controller will display:
SPA ON
CHLORINATOR OFF

POOL+ MANAGER App A2 - User Manual v1.0 19

POOL+ MANAGER App A2 - User Manual v1.0 20
6.5
SPA
CONTINUED
If you select ON, the controller will display:
SPA CHLORINATOR
DUTY CYCLE 10%
Use the ↑ or ↓ buttons to adjust the percentage of chlorination you would like, while
the Spa is running. The percentage is adjustable in lots of 10% from 0% to 100%. Adjust
and press Enter to accept. The controller will then move you onto the next option.
If you select OFF to Spa Chlorinator, the controller will move you onto the next option.
Once you have selected the temperatures for the Blower and/or Jet Pump, and if you
have adjusted the Chlorinator Duty Cycle, the controller will move you onto the next
option which is selecting the Spa Pump speed (if a Multi Speed pump is installed) and
will display:
SPA PUMP
SPEED X
Use the ↑ or ↓ buttons to select which pre-set speed you would like, and press Enter.
If you don’t have Spa lights allocated, the controller will display the message:
NO SPA LIGHT CONFIGURED
and will exit you to the Installer Setup menu after a period of time, or you can press
the menu button to exit.
If you have Spa Lights allocated, the controller will display:
S4: SPA LIGHT
When you press Enter you will be able to change the colour of the Spa light. This will
be the colour that the Spa light will turn onto when the controller is switched into SPA
MODE. It may be a different colour to what is set under the Timer menu.
Use the ↑ or ↓ buttons to scroll through the colours, press Enter to select.
Once you have pressed Enter to select, the controller will return you to the Installer
Setup menu.
6.6
HEAT
DEMAND
In this menu option you will be able to set the timeframe in which you would like your
heater to run.
When you enter the menu option, the controller will display:
HEAT ON
DEMAND OFF
If you select OFF, the controller will accept the selection and exit you to the Installer
Setup menu.
If you select ON, the controller will then display:
HEAT 06.00
DEMAND 22.00 (default times)
Use the↑ or ↓ buttons and the Enter button to allocate a start and finish time. Once the
time has been entered, the controller will exit you to the Installer Setup menu.
Table of contents
Other Theralux Controllers manuals
Popular Controllers manuals by other brands
Siemens
Siemens RMH760 manual
Johnson Controls
Johnson Controls FX-PCV1617 installation instructions
Grifo
Grifo Tele Web user manual
Altronix
Altronix Maximal3F installation guide
Anaheim Automation
Anaheim Automation PROGRAMMABLE SIMPLE INDEXER/DRIVER MBC10SI1 user guide

3M
3M Versaflo V-500E User instructions
