thermo mate BE211S Parts list manual

PORTABLE GAS WATER HEATER
Europe:
www.thermomateworld.com
+1(844) 334-4203
United States:
www.thermomate.com
Live Smart, Better Life!
BE211S & BE318S
Instruction / Installation Manual

Live Smart, Better Life!
01
+1(844) 334-4203
You're All Set!
Thanks for purchasing your new thermomate outdoor portable instant
water heater. This convenient, safe and one of kind product will open
the doors to enjoy outdoor life!
We highly suggest you to take the time to read through all of the safety
and installation procedures in this manual, before attempting to install
your new outdoor portable water heater.
Any questions regarding the operation, maintenance service or warranty
of this water heater should be directed to thermomate, please contact us
Read this manual
Inside you will find many helpful hints on how to use and maintain your water
heater properly. A little preventive care on your part can save you time and
money over the life of your water heater.
You’ll find many answers to common problems in the Troubleshooting Guide.
If you review the chart of Troubleshooting Tips first you may not need to call
for service.
Read the safety information
To Ensure your safety and the safety of others, we have included important
safety warnings throughout this manual.
All safety messages will follow the safety alert symbol and the words:
“CAUTION”, “DANGER” “WARNING”or “NOTICE”.
These words mean:
CAUTION - A potentially hazardous situation that may result in minor
or moderate injury.
DANGER - An imminently hazardous situation that will result in death
or serious injury.
WARNING - A potentially hazardous situation that could result in
death or serious injury and/or damage to property.
NOTICE - Attention is called to observe a specified procedure or
maintain a specific condition.

Live Smart, Better Life!
02
+1(844) 334-4203
Safety Warnings
Please be sure to read through this portable tankless water heater manual in
its entirety before attempting to set up, install or operate your thermomate
water heater. Please note: Failure to abide by this warning can result in
serious bodily injury or death. Any questions regarding the operation,
maintenance service or warranty of this water heater should be directed to
DANGER!
Natural gas and liquefied petroleum models
Both liquid propane and natural gas have an odorant added to aid in detecting
a gas leak. Some people may not physically be able to smell or recognize this
odorant. If you are unsure or unfamiliar with the smell of liquid propane or
natural gas, ask the gas supplier. Other conditions, such as “odorant fade”,
which causes the odorant to diminish in intensity, can also hide or camouflage
a gas leak. Always check with commercial leak detector or soapy water.
You're All Set .................................................................................................
Safety Warnings .......................................................................................
Product Diagrams ..........................................................................................
In The Box ......................................................................................................
Get Started ...............................................................................................
Installation Steps ......................................................................................
Use And Adjustment..................................................................................
Troubleshooting ........................................................................................
Warranty .........................................................................................................
Product Comparison .......................................................................................
Contents
01
02-07
07
08
08-11
11-12
12-15
15-17
17
18

Live Smart, Better Life!
03
+1(844) 334-4203
Purpose and benefit
● The portable outdoor gas water heater is capable of delivering 8 liter
(BE211S)/12 liter (BE318S) of hot water almost anywhere.
● The gas water heater has standard 1/2” BSP pipe fittings.
● The gas water heater is not a toy. People around the world use similar gas
water heaters to heat the water around their homes, safely and reliably.
● Gas is supplied from a standard 5-15kg LPG cylinder (not included).
● Shower kit and certified gas regulator are included.
● Ignition is automatic and powered by 2pcs of “D” cell batteries (not
included). Burners start to work when water flow is incoming and off when
the water is shut-off. No pilot light.
● Ideal operating use with water pressure between 0.25-8 bar.
Function and features
● Ignition by “D” cell battery, no electric power needs.
● Water controlled automatic ignition: applicable water pressure between
0.25-8 bar opens the ignition circuit for easy and convenient operation.
● Pulse igniter, perfect rate of ignition.
● Automatic cut off protection: the auto cut-off protection will shut the gas
supply off immediately in the event of flameout to reduce the risk of gas
leakage.
● Removable drain plug to avoid water pipe and regulator damage caused by
freezing water. Please do not adjust the screw inside on the drain plug,
remove the plug as whole unit.
● The water temperature can be adjusted freely.
● Starts with a small amount of water and low water pressure.
● The auto cut-off protection will shut off the gas supply immediately if the
flame goes out for accident.
● Should over-heating occur for accident, the gas supply will be immediately
and automatically cut-off.
● When water pressure is over 8 bar, the appliance will automatically relieve
the excessive pressure to avoid damage to its internal components.
● LED temperature display for easy to know the outlet hot water temperature.

Live Smart, Better Life!
04
+1(844) 334-4203
Cautions and warnings
Caution
This appliance can produce carbon monoxide which has no odor. Using it in
an enclosed space will cause death. Do not use in caravans, tents, marine
craft, cars, mobile homes or similar locations.
Caution
This appliance is not intended for the supply of drinking water. This appliance
is intended for the supply of heated water, for the purpose of showering,
washing and cleaning only.
Caution
Always cover the appliance when not in use, and this appliance could not be
exposed to strong wind or rain.
Warning
Use two shifting spanners when connecting the gas regulator hose to the
appliance or damage to the gas valve may occur.
Warning
Check and confirm safe water temperature before using this appliance water
from this appliance may be very hot.
Warning
This appliance is not suitable to operate under frost surrounding or ambient
temperature at 0°C or below. It’s recommended to operate the appliances
above 0°C to 25°C.
DANGER
Install and properly vent the appliance. Failure to properly install the appliance
in this instruction manual can result in unsafe operation of the appliance. To
avoid the risk of fire, explosion, or asphyxiation from carbon monoxide, never
operate this appliance unless it is installed properly and has an adequate air
supply for proper operation. Be sure to inspect the flue terminal for proper
installation at initial start-up, and at least annually thereafter.
Safety and care advice
This appliance shall only be used in an open-air situation with natural
ventilation, without stagnant areas, where gas leakage and products of
combustion can rapidly be dispersed by wind and natural convection.

Live Smart, Better Life!
05
+1(844) 334-4203
● For outdoor use only.
● The appliance may be installed in a partially protected place.
● Important:
— This appliance shall not be connected to a flue,
— This appliance shall only be used for short delivery periods.
● Read instructions before using the appliance. Failure to follow instructions
could result in death, serious bodily injury, and/or property loss.
● Any modification of the appliance, misuse, or failure to follow the instructions
may be dangerous and will invalidate your warranty. This does not affect
your statutory rights.
● Retain these instructions for future reference.
● Do not leave unattended when the appliance is operating.
● Do not use this appliance if it has damaged or worn seals.
● Do not use this appliance if it is leaking, damaged or does not operate
properly.
● Do not operate from a non-upright position. This appliance must be fixed in
an upright position against a non-combustible flat vertical surface.
● Do not use within 1 meter of any flammable structure or surface. Do not use
under any combustible surface.
● Do not store flammable materials near the appliance.
● Check the gas type before you connect it to the water heater, improper gas
will cause serious danger.
● For use with LPG cylinder gas only. A suitable regulator must be used for
propane.
● Turn off the gas supply at the gas cylinder after use.
● Leak test your water heater annually. Check the hose connections are tight
and leak test them each time you reconnect the gas cylinder .
● Accessible parts may be very hot. Keep young children away.
● The exhaust gas and top of the appliance is hot! Do not place hands or any
other object near the top of the appliance.
● This appliance is not to be used in wind speeds above 10kPh. The appliance
will extinguish at used in wind speed above 10kPh. This feature is governed
by the safety feature fitted to the appliance.
● If there is a leak on your appliance (or smell of gas), immediately turn off the
gas cylinder valve, remove the appliance to a well-ventilated location away
from any ignition sources. Check for leaks by using soapy water. Do not try
to detect leaks using a flame.
● Gas cylinder shall be changed in a well-ventilated location, preferably
outside away from people and any sources of ignition, such as naked flame,
pilot flames, electric heaters or similar equipment.

Live Smart, Better Life!
06
+1(844) 334-4203
● This appliance should be sited in an open area using, a natural surround
features to protect it from direct winds.
● This appliance will be hot during and after use. Never move it during
operation. At least wait for about 10 minutes after extinguished the flame
before moving it.
● Should overheating occur or the gas supply fails to shut-off, turn off the gas
supply at the gas cylinder .
● Always cover the appliance when not in use.
● This appliance is to be stored in a dry and well ventilated location free from
direct sunlight heat and ignition sources.
● The installation, adjustment, check and maintenance jobs must only be
carried out by qualified installer.
● All the parts sealed by the manufactured or his agent shall not be
manipulated by the user.
● The appliance must be installed in accordance with any national situation in
force in the country of use.
Things to do in an abnormal or emergent situation
* Shut-off both of the water control knob and gas control knob
* Do not use shower head
To prevent accidents like fires, smoke, etc., the gas source, water source must
all be cut off immediately in case any abnormity (like a fuming or smelling air
inlet/flue gas outlet pipe, etc.) is discovered, and an authorized servicer must
also be contacted.
● Do not use this appliance for any purposes except for producing hot water.
Fire prevention around the appliance
Keep this appliance away from all combustible materials.
Minimum clearances: Rear-1000mm, Side-1000mm, Top-1000mm.
In order to prevent fire or explosive, no inflammable, explosive and corrosive
substances could be placed around the appliance (Such as newspaper, wood,
kerosene).
No dismantling the appliance
To avoid accidents, never dismantle the appliance without authorization.
Using auxiliary products
When using the appliance in low water pressure area, do not use shower head
avoid scalding.

Live Smart, Better Life!
07
+1(844) 334-4203
Avoid damage from freezing water
Be sure to drain off the residual water after each use in winter time, in order to
avoid damage to the appliance when water is frozen.
Not using for a long period
In order to prevent freezing water or gas leakage, please discharge residual
water inside the appliance, cut gas and electricity supply when appliance is not
used for a long period.
Product Diagrams
1. Back Shell
10. Battery Box
2. Heat Exchanger
3. Induction Needle
5. Gas/Water Valve Assembly
6. Water Valve
7. Micro Switch
8. Drain Plug
9. Water Inlet Pipe
18. Cover
17. Thermostat
16. Burner 4. Ignition Pin
15. Gas Valve
14. Ignition Device
13. Solenoid Valve
11. Gas Inlet Pipe
12. Water Outlet Pipe
1. Back Shell
2. Heat Exchanger
3. Induction Needle
4. Ignition Pin
5. Gas/Water Valve Assembly
6. Water Valve
7. Micro Switch
8. Drain Plug
9. Water Inlet Pipe
10. Battery Box
11. Gas Inlet Pipe
12. Water Outlet Pipe
13. Solenoid Valve
14. Ignition Device
15. Gas Valve
16. Burner
17. Thermostat
18. Cover

Live Smart, Better Life!
08
+1(844) 334-4203
Get Started
The installation, the adjustments and maintenance listed in this part must only
be carried out by qualified persons. The manufacturer cannot be held
responsible for any damage to persons or things deriving from an incorrect
installation of the appliance.
Remark: The supplied gas regulator is only compatible with any 27mm clip-on
propane gas cylinder.
In The Box
Item Description Identification Quantity
A
B
C
D
F
Thermomate outdoor portable
gas water heater 1 Piece
1 Roll
1 Set
1 Set
1 Set
Teflon tape
Hardware pack
CE certified gas regulator with
150cm hose
ON/OFF switch shower head
with 150cm stainless steel
hose

Live Smart, Better Life!
09
+1(844) 334-4203
Selecting a location
The appliance shall be installed in well-ventilated area, such as gardens in
open air.
Find a suitable sturdy, non-combustible vertical surface to fix the appliance on.
The surface should be at least 1000mm clear from the sides and 1000mm
from the top of all combustible surfaces, fabrics, flammable materials, and
people.
The walls sensitive to heat, for example wood, shall be protected by suitable
insulation. We advise you equip our appliance on the fire-proof wall, in case of
non-fire-proof wall, please underlay a fire-proof board, 100mm bigger than the
water heater from every side and 10mm away from the wall.
Suggest appropriate protections to the appliance when you install gas water
heaters, so as to reduce the effective on combustion due to surrounding wind
or rain. Refer to below figure.
Precautions
Combustible surfaces, fabrics, flammable materials must be kept far away
from the sides and top of the appliance while it is operating.
The appliance is designed to be fixed upright against a non-combustible
vertical surface. Do not operate from a non-upright position. Doing so can be
dangerous and will damage the appliance.
Do not obstruct any ventilation openings in the water heater body. Position the
gas cylinder on level ground next to the barbecue and safely away from any
source of heat. Should you need to install or change the gas cylinder, confirm
that the water heater is switched off, and that there are no sources of ignition
(cigarettes, open flame, sparks, etc.) near before proceeding.

Live Smart, Better Life!
10
+1(844) 334-4203
Gas and regulator
This water heater shall only be used with a LPG gas cylinder, recommend a
5-15kg gas cylinder. Use a suitable regulator certified to EN16129 and a
suitable hose must comply with EN16436-1.
We provide a gas regulator and 150cm hose for quick installation, which
is compatible with 27mm clip-on propane gas cylinders.
● The hose should hang freely with no bends, twisting, tension, folds, or kinks
that could obstruct free flow of gas. Always inspect the hose for cuts, cracks,
or excessive wear before use.
● Apart from the connection point, no part of the hose should touch any hot
parts. If the hose shows any sign of damage it must be replaced with a hose
suitable for use with LP gas which meets the national standards for the
country of use.
● A suitable hose must comply with EN16436-1,and
the length should not exceed 1.5 meters.
For optimal performance, we suggest to use a
5-15kg gas cylinder. The maximum dimension
of the gas cylinder is diameter 31.5cm and
height 58cm.
● Never mount the gas cylinder under the gas
water heater as this could result in serious injury
to the user, other people and/or property. Always
place the gas cylinder at the side of the appliance.
The gas cylinder should be sited as far away from
the appliance as possible without straining the hose. This appliance is only
suitable for use with low-pressure propane gas and fitted with the
appropriate low-pressure regulator via a flexible hose. The hose should be
secured to the regulator and the appliance with hose clips/nut. This
appliance is set to operate a 37 mbar regulator with propane gas. Use a
suitable regulator certified to EN16129. Please consult your LPG dealer for
information regarding a suitable regulator for the gas cylinder.
Preparation
● Open carton box and remove appliance from the box and remove all transit
material such as the plastic bag and foam. Hang the appliance on a suitable
vertical surface by the fix holes on the bottom panel of the appliance with
fixing kit.
● Install 2pcs of “D” cell batteries (NOT INCLUDED) in the battery box on the
bottom of the appliance. Check the batteries are facing the correct direction.
● Use shifting spanner to connect the supplied gas regulator to the bottom of
appliance which marked “GAS INLET”. Do not over tighten. Over tighten may
Key
1=maximum diameter
2=maximum height

Live Smart, Better Life!
11
+1(844) 334-4203
cause a gas leak! Ensure that you use supplied washers and “Teflon” tape
on all connectors and check for any gas smell before ignition as instruction.
● Attach the shower head to the fitting marked “WATER OUTLET”. DO NOT
OVER TIGHTEN! Make sure to insert the supplied rubber gasket at the
connections. Connect the opposite end of the hose to the brass fitting on the
bottom of the appliance marked “WATER OUTLET”. Make sure to insert the
supplied rubber gasket at this connection. Tighten by hand only.
● Only use a CE certified gas regulator & hose for this appliance. Install
according to regulator instruction manual.
● Place at a comfortable height without putting stress on the gas hose.
● Before opening LP cylinder valve, check the coupling nut for tightness. When
appliance is not in use, turn off LP cylinder valve on supplied cylinder.
● Never use LP cylinder if visibly rusted, damaged or out of date.
● Clean and inspect the hose before each use. If there is evidence of abrasion,
cuts or leaks, the hose must be replaced prior to the appliance being put into
operation.
Installation Steps
●Install the appliance vertically by fixing kit and ensure it securely.
● This appliance shall only be used with a LPG gas cylinder, recommend a
5-15kg gas cylinder.
● Confirm gas cylinder valve is closed then connect the regulator to the gas
cylinder according to your regulator and cylinder dealer’s instructions.

Live Smart, Better Life!
12
+1(844) 334-4203
● Connect shower kit to the appliance fitting marked “WATER OUTLET”.
● Install two “D” cell batteries (not included) in the compartment on the bottom
of the appliance. Check the batteries are facing the correct direction.
Leak testing (always perform a leak test in a well-ventilated
area)
Confirm all control knobs are in the off position. Turn the gas on/open the gas
control valve on the gas cylinder or regulator. Check for leaks by brushing a
solution of 1/2 water and 1/2 liquid detergent/soap over all the gas system
joints, including gas cylinder valve connections, hose connections, and
regulator connections.
NEVER USE AN OPEN FLAME to test for leaks at any time. If bubbles form
over any of the joints there is a leak. Turn off the gas supply at the gas
cylinder. Retighten all joints. Repeat leak testing. If bubbles forming again do
not use the water heater and contact thermomate aftersale service for
assistance. Always wipe the mixed solution (1/2 water and 1/2 liquid detergent
/soap) from all joints and connections after leak testing.
Live Smart, Better Life!
13
+1(844) 334-4203
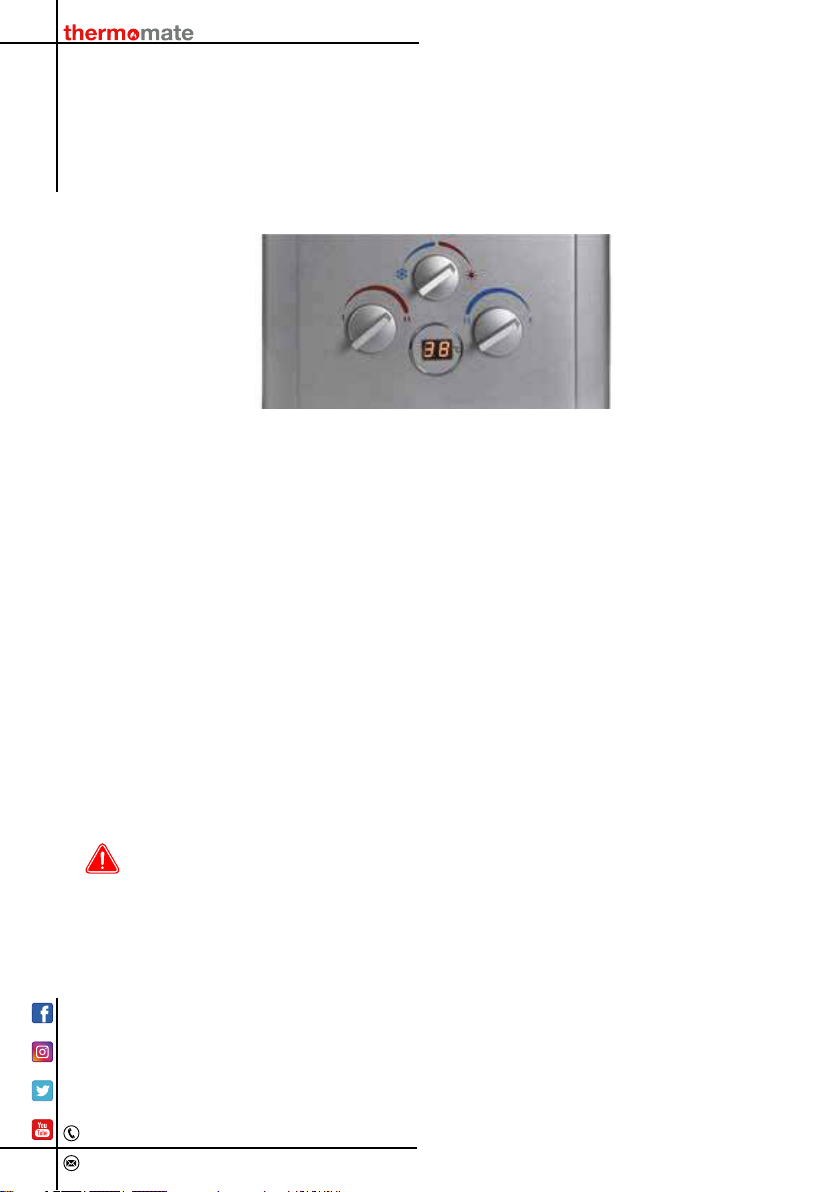
Use And Adjustment
Starting and adjustment
● Turn the gas valve on your gas cylinder all the way open.
● Adjust the temperature of the water flowing from the shower head by turning
the “gas” and “water” knobs.
● Turn the gas knob towards to Right (symbol in Red) direction will increase
gas flow.
● Turn the gas knob towards to Left (symbol in Red) direction will decrease
gas flow.
● Turn the water knob towards to Left (symbol in Blue) direction will increase
water flow.
● Turn the water knob towards to Right (symbol in Blue) direction will decrease
water flow.
● For higher temperature, increase the gas flow and decrease the water flow.
● Turn on the incoming water supply. Ensure that you have adequate water
pressure between 0.25-8 bar.
● Once water is flowing through the system, the appliance will ignite. During
ignition there will be a series of audible clicks and then the burner will ignite.
If the burner does not ignite after 5 seconds, refer the section on
troubleshooting.
CAUTION
Take care to test the temperature of the water flow from the shower head, as it
may be hot enough to cause scalded.
Attention! Avoid getting scalded
During the use or right after finish, do not touch the outer panel to avoid scald.

Live Smart, Better Life!
14
+1(844) 334-4203
Keep tidy and clean around the appliance
Regular cleaning should be done in order to keep the surroundings of the
appliance tidy.
If the area is not tidy, cockroach instructions or accumulated cobwebs may
occur, which could cause the appliance to malfunction or a fire accident to
occur.
Shut off
* To temporarily stop the operation of this appliance, merely shut off water
knob control or water inlet valve to cease water flow and the flame fire will
extinguish automatically.
After you have finished using the water heater, please shut off the water
knob control and gas knob control.
CAUTION
The appliance should not be used continuously for an extended period so as
to ensure its lifetime.
Storage
● After using, turn the gas cylinder valve in a clockwise direction to the “off”
(close) position. The burner will continue to operate until all gas has been
bled from the hose and regulator assembly.
● Wait for the flame to go out, after that, turn the appliance control valve(s) off.
● Disconnect the shower hose from the “water output”, allow all water to drain
out from hosing before rolling up and storing away.
● Disconnect the regulator and hose assembly from the appliance and gas
cylinder and store away.
● Disconnecting from gas cylinder
*Check the appliance is fully extinguished, the gas cylinder control valve is
in the fully “off” position and all surfaces are cool enough.
*Loosen the connection to the gas cylinder in a clockwise direction.
Daily inspection and maintenance
The appliance, gas pipes and hoses should be checked and maintained by a
qualified installer every 6-12 months. If you find joints that are not tightly
secured or if there are cracks or corrosion anywhere, you should stop using
the appliance and perform the necessary maintenance immediately.

CAUTION: The appliance will still be hot shortly after use. Avoid draining off
the residual water until the water cools down, to avoid being scalded.
Users should regularly use the soapy water to wipe on connecting part of each
pipe to test whether the gas leakage has.
● Clean the accumulated dirt and dust on the casing of the appliance by cloth
regularly. Do not use chemical or volatile solvent.
● Use a neutral detergent to clean all surfaces and areas then wipe it dry.
Taking care not to allow water to enter the top vent.
● Before each use, check the stainless steel filter on the “Water input” pipe is
in place and clean if have any particles.
● Do not submerge the appliance in a sink or container.
● Do not use abrasive cleaners or bleach.
NOTE
Do not drop dirt and dusts into the fire holes of burner and electric parts, do
not loosen or damage other parts as well. To re-fix the parts after cleaning,
refer to the installation requirements.
Live Smart, Better Life!
15
+1(844) 334-4203
Before operate the drain plug, must be
● Ensure that the appliance is disconnected from the gas supply.
● Ensure that the appliance is disconnected from the water supply. (Turn off
cold water inlet switch.)
● Turn the shower switch to “ON”.
● Open the drain plug to drain off the residual water.
Draining the appliance to avoid being frozen or broken
Draining the appliance below 0°C
● During the stage of no using, the temperature is same between the inside
and outside of the appliance, the water will expand when temperature reach
0°C, even break the water pipe.
● Operate the drain plug at the base of the appliance to drain off the residual
water from the appliance and then screw it tightly. This can prevent the cold
from damaging the appliance. Failure to do so will avoid your warranty.

Live Smart, Better Life!
16
+1(844) 334-4203
Following Phenomena Are Not Real Troubles
Water pressure too high
Protective function Reaction How to do
Increase the valve pressure limit
according to local water supply
pressure
Check that the water pressure is at
least 0.25 bar to activate the burners
Water pressure too low Use the appliance later when
pressure becomes higher
The power of battery will become
less after use for some time, thus
the appliance cannot be ignited.
Low battery Change battery and make sure new
battery installed in the correct
position.
The appliance automatically shuts off
when water temperature is over
(85ºC±3ºC)
Over heat protection Re-start the appliance later when
water becomes cooler
If water pressure is over 8 bar, the
water-out valve will release water
and adjust to lower pressure
Troubleshooting guide
This guide should be followed in case of failure of the appliance to operate
correctly.
For more information, please refer to Service Manual or contact service
provider.
A B C D E F GH I J
Overall fuel gas valve is
unopened
Malfunction
Causes
Open overall valve of gas supply
Water supply valve is unopened
Improper regulation method of
water temperature
Improper
operation
Open valve of water supply
Inadequate fresh air supply Improve ventilation and ensure air
supply
●
Air exiting inside fuel gas pipe Repeat opening and closing water
knob for several times
●●
Improper position of water switch Turn water knob to hot water point
●
Electrical leakage protective
switch is not restored Restoration of electric leakage
protective switch
●
Enlarge gas volume, reduce water
volume
Reduce gas volume, enlarge water
supply
●
●
●
●
Fuel gas
pressure Too low Check if gas rubber pipe twists
or not
Too high Regulate pressure relief valve,
reduce overall gas supply
● ● ●
●●●●

Live Smart, Better Life!
17
+1(844) 334-4203
Surroundings
Water
pressure
Inadequate
supply of
fuel gas
Stop other users' using fuel gas
Simultaneous
consumption
of fuel gas by
several users
Displace joints of rubber pipe
Too small through
diameter of joints
Shorten rubber pipe
Too long pipe
Gas valve is half
opened Open gas valve completely
Too high
Reduce water supply
Too low Utilize when water pressure
recovers to normal
Blockage of shower Clean shower device
Blockage of water route system Clean filtration net on water
admitting orifice
Displace batteriesInadequate battery voltage
Clean flue pipeBlockage of vent pipe
●
●
●
●
●
● ● ● ● ●
●●
●●
●●●
● ●●
Safety
protection Ask for authorized person to
repair it
Other causes Ask for authorized person to
repair it
Heat protective switch works
Electrical leakage protective
device works
Reduce water volumeToo low water temperature
Exorbitant air pressure
protective device Utilize when air pressure recovers
to normal
●
●
●●
●
●●
A. Ignition failure
D. Too low temperature
G. Removed flame and renegade fire
J. Flameout at point of large water volume
B. Blasting combustion
E. Too high temperature
H. Returned fire
C. Flameout during operation
F. Sparks from fire peep hole
I. Other malfunctions
Warranty Information
The appliance comes with 1 year limited warranty, provided it has been
operated and maintained as per the manufacturer’s specifications outlined in
the instruction manual.
In the event of defects arising from faulty workmanship and/or materials for a
period of 1 year from the date of purchase, manufacturer will replace or repair
the appliance free of charge. You are also entitled to have the unit replaced or
repaired if it fails to be of acceptable quality and the failure does not amount to
a major failure.

Live Smart, Better Life!
18
+1(844) 334-4203
Product Comparison
Our BE series portable instantaneous models
BE318S
BE211S BE318S
Injector size (mm)
Nominal heat input (Qn, kW)
Min. heat input (Qmin, kW)
Nominal heat output (Pn, kW)
Nominal efficiency (%)
Nominal hot water producing
capacity (L/min, Δt=25K)
Battery power voltage (V d.c)
Range of water pressure (pw) (bar)
Product dimensions (mm)
Warranty
0.72
16
5.5
14.3
88
8
3
0.25 - 8
520 x 320 x 168
1 Year
0.7
24
8
20.7
85
12
3
0.25 - 8
610 x 350 x 188
1 Year
BE211S
PORTABLE SERIES

Europe:
www.thermomateworld.com
+1(844) 334-4203
United States:
www.thermomate.com
This manual suits for next models
1
Table of contents
Languages:
Other thermo mate Water Heater manuals


Popular Water Heater manuals by other brands


A.O. Smith
A.O. Smith RPV series Installation Instructions and Use & Care Guide

Airthereal
Airthereal EVT-9K user manual

Buderus
Buderus Logalux P120.5S Installation and maintenance instructions

Diamond
Diamond 500104-01 owner's manual

Everflo
Everflo EPU-OS5 installation instructions

A.O. Smith
A.O. Smith ELJH-30 user guide

Dux
Dux Proflo 25S124P owner's manual

TESY
TESY bilight series Instructions for use and maintenance

Rheem
Rheem MPi 554 Series Owner's guide and installation instructions

Drazice
Drazice Okce 100 OPERATING AND INSTALLATION Manual

Hotline
Hotline HL30SK Set-up, operating & maintenance instruction manual

GE
GE GE40T06MAG Energy guide