ThermoFLUX Minitherm Operating instructions

2

3
ThermoFLUX
Minitherm -
Content:
Content: .......................................................................................... 3
1Notes on the manual .................................................................... 5
1.1 Introduction .......................................................................................................5
1.1.1 Easy and safe operation....................................................................................5
1.1.2 Reading the manual .........................................................................................5
1.1.3 Technical changes............................................................................................5
1.1.4 Copyright .......................................................................................................5
2Safety notes ................................................................................ 6
2.1 Proper use .........................................................................................................6
2.1.1 Basic principles ...............................................................................................6
2.1.2 Using the stove ...............................................................................................6
2.1.3 Permissible fuel for the Minitherm - stoves...........................................................6
2.1.4 Recommended wood pellets ..............................................................................6
2.2 Warnings and safety symbols used.........................................................................7
2.3 Other risks of the side effects................................................................................8
2.4 Duty to inform....................................................................................................8
2.5 Safety devices....................................................................................................8
3Installation and commissioning of the stove .................................... 9
3.1 Conditions .........................................................................................................9
3.2 Chimney and flue gas pipes ..................................................................................9
3.3 Minimum distances of the stove from wall and objects............................................. 10
4Functional description ................................................................. 11
4.1 General overview .............................................................................................. 11
4.2 Technical data:................................................................................................. 12
5Function of stove ....................................................................... 13
5.1 Overview of the controls and display and their basic functions .................................. 13
5.2 Principle of stove operation................................................................................. 15
5.3 Schematic representation of the menu control ....................................................... 16
5.3.1 Clock adjustments ......................................................................................... 18
5.3.2 Adjustments of the programmed on and off mode ............................................... 19
5.3.3 Stove has possibility for programmed on and off mode during a day and this option is
regulated on three ways: .......................................................................................... 19
5.3.4 LANGUAGE OPTIONS...................................................................................... 21

4
ThermoFLUX
Minitherm -
5.3.5 STAND BY mode ........................................................................................... 21
5.3.5.1 STAND BY mode with installed sensor for air temperature ................................. 21
5.3.5.2 STAND BY mode with room thermostat connected............................................ 22
5.3.6 Option Buzzer ............................................................................................... 22
5.3.7 Filling of spiral dispenser................................................................................. 23
5.3.8 STATE OF THE STOVE..................................................................................... 23
5.3.9 Technical settings .......................................................................................... 23
5.3.10 FUEL TYPE................................................................................................. 23
6Ignition and shutting down of stove.............................................. 25
6.1 Ignition ........................................................................................................... 25
6.2 Shutting down of stove ...................................................................................... 26
6.3Stove power adjustments ................................................................................... 26
6.4 Adjustment of air temperature ............................................................................ 27
6.5 Modulation....................................................................................................... 27
6.6 Cleaning of FIRE-POT......................................................................................... 28
7Cleaning and maintenance .......................................................... 29
7.1 Daily cleaning................................................................................................... 29
7.2 Weekly cleaning................................................................................................ 29
7.3 Cleaning the tube heat exchanger........................................................................ 30
7.4 Cleaning the flue gas chamber ............................................................................ 31
8Connection options..................................................................... 33
8.1 Scheme for electric connection ............................................................................ 33
9Alarms...................................................................................... 34
10 Instruction about safety removal and proper disposal of stove ...... 36
10.1 Disposal .......................................................................................................... 36
11 Guarantee .............................................................................. 37
11.1 Guarantee period .............................................................................................. 37
11.2 Guarantee terms............................................................................................... 37
11.3 Exemption from the guarantee ............................................................................ 37
12 Technical personal................................................................... 38
13 EU Label ................................................................................ 39

5
ThermoFLUX
Minitherm -
1Notes on the manual
1.1 Introduction
1.1.1 Easy and safe operation
This manual contains important information for proper and safe operation of the
Minitherm - stoves. Following these instructions you will avoid danger and repair
costs, and also increase the operational life of the stove.
1.1.2 Reading the manual
This manual must be read and applied by everyone who operates or works on the
Minitherm - stove.
1.1.3 Technical changes
ThermoFLUX continuously develops and improves its stoves. The information in this
version is correct at the time of going to press. All details in this manual on
standards and regulations should be checked before use and should be compared
with the installed stove. We reserve the right to make changes which may then
deviate from the technical details and illustrations in this manual.
1.1.4 Copyright
Written agreement is required from Thermo FLUX d.o.o. for any reprints,
storage in a data–processing system or transmission by electronic, mechanical
or any other means, for copies and publications, in whole or in part.

6
ThermoFLUX
Minitherm -
2 Safety notes
2.1 Proper use
2.1.1 Basic principles
Minitherm stove was built in accordance with safety regulations. However, its use can
result in the injury or death of the user and/or third part and in impairments to the
stove itself or to other material goods.
2.1.2 Using the stove
Use the stove only when it is in perfect condition. Use it properly, as described in this
manual. Stay aware of the safety and of the dangers involved. Have any faults which
can impair safety immediately fixed.
The stove was designed to burn wood pellet and wood. The manufacturer will accept
no responsibility for any damage resulting from improper use. Proper use includes
maintaining the installation, operation and maintenance specified by the
manufacturer. The user may only enter or change the operating values specified in
this manual. Any other entries will affect the stove's control program and operation,
which can lead to a malfunction.
2.1.3 Permissible fuel for the Minitherm - stoves
Only wood pellets and wood are permissible as fuel for the stove. Wood pellets are
pressed into a cylindrical shape. They consist of untreated sawdust from the wood
processing industry as well as unprocessed forestry waste. They have a standardized
diameter and length and very low air content.
2.1.4 Recommended wood pellets
Thermo FLUX d.o.o. recommends wood pellets with a diameter of 6 mm and a
length of 10 - 30 mm.
Other requirements on the fuel result from either standard O-Norm M 7135,
DIN plus 51731,
UNI CEN/TS 14961
Pay particular attention to the wood pellet quality.

7
ThermoFLUX
Minitherm -
2.2 Warnings and safety symbols used
DANGER OF ELECTRIC SHOCK.
Work on areas marked with this symbol may only be done
by a qualified electrician.
WARNING!
Warning about a dangerous location. Work on areas marked
with this symbol can lead to serious injuries or to extensive
material damage.
CAUTION!
Hand injuries. Work on locations marked with this symbol
can lead to hand injuries.
CAUTION!
Hot surface. Work on locations marked with this symbol can
lead to burns. .
CAUTION!
Danger of fire. Work on locations marked with this symbol can
lead to a fire.
CAUTION!
Frost danger. Work on locations marked with this symbol can
lead to frost damage.
Notes on disposal.

8
ThermoFLUX
Minitherm -
2.3 Other risks of the side effects
Despite the precautions taken there are also certain risks of side effects:
DANGER OF CARBON MONOXIDE.
If the stove is running during cleaning time may occur
transmission of CO through the open door. Do not open the
door longer than necessary.
2.4 Duty to inform
Reading the manual
Everyone who works on the stove must have read the Use and maintenance manual
before starting work and, in particular, have read the second chapter „Safety notes“.
This holds especially true for persons who only occasionally work on the stove e.g.
when cleaning or maintaining the stove. This manual must be kept ready to hand at
the stove's installation location.
Pay particular attention to the applicable local standards and guidelines.
2.5 Safety devices
Stove is equiped with safety devices that in case of unexpected situations
stop the power supply and thereby stop the operation stove.
Stove electronic regulation: operates directly and stops the operation of the stove
until it cools down.
* In case of the suction fan failure, failure of the motor for auger (doser), black out
(if the blackout was longer than 10 seconds), an unsuccessful firing.
Fuse F 4 A 250V : Fast fuse , protects the stove from large voltage changes of
electricity and short circuits inside the stove.
Safety thermo switch (STB) : intervenes by breaking the circuit in the stove
(automatically stops motor of the auger and exhaust gasses fan) if the stove
temperature reaches the limit of 95 °C.

9
ThermoFLUX
Minitherm -
3Installation and commissioning of
the stove
Commissioning system in the operation is performed by personnel
authorized by ThermoFLUX Ltd or autorized seller.
Commissioning includes referral to operation with the basic operations and
maintenance of the stove. Authorized service for the first start, must control the
functioning of the stove at least during one full operating cycle.
Danger from material and body due to improper
commissioning. If the commisioning is performed by
unautorished personel, it may cause damage to the stove
and heating system.
3.1 Conditions
The following conditions must be fulfilled before the system is put into
operation.
Turn OFF electrical power.
Check mechanical connections
Check that all components are properly connected
Check that all mechanical components are connected.
Check whether combustion chamber properly seated
Check hidraulical connections
Check whether the circulation pump and the mixing valve is properly
connected.
Check whether the safety equipment properly connected.
3.2 Chimney and flue gas pipes
The chimney should be calculated and constructed in accordance with the EN
13384-1 standard.
The venting of flue gas must be done in accordance with all applicable laws
including those related to dimensions of the chimney and materials used for its
production. Flue gas channel should be made of adequate materials, such as steel
tubes, with various sealing.
10
ThermoFLUX
Minitherm -
In any case, materials that could potentially catch fire, e.g. wooden planks,
beams, cloth, should be adequately protected with non-combustible material. For
the sake of parity of dimensions, chimneys that are round in shape of the inner
part should have an advantage over the rectangular-shaped chimneys.
Too small inner zone can cause irregular flow from the stove to the top which
could lead to poor stove performance and excessive exhaust gas production that
discharges the exhaust gas to the environment. Gas flue pipe should be
permanently installed and it would be good to make safety door which would
enable the cleaning of inner parts, especially the horizontal parts.
Smoke pipe should be installed fixed. It would be good to leave safety gates that
could do the Minitherm -r cleaning, especially in their horizontal parts.
You should avoid as much as possible horizontal mounting parts. Horizontal parts
must have a slope of at least 3% upwards.
Length of the horizontal part should be minimal and in any case not more than 3
meters.
ALL PARTS OF THE FLUE GASN PIPE NEED TO BE SECURED AND REPLACEABLE
IN ORDER FOR INTERNAL CLEANING.
AVOID MULTIPLE HORIZONTAL DEVIATION AND ANGLES.
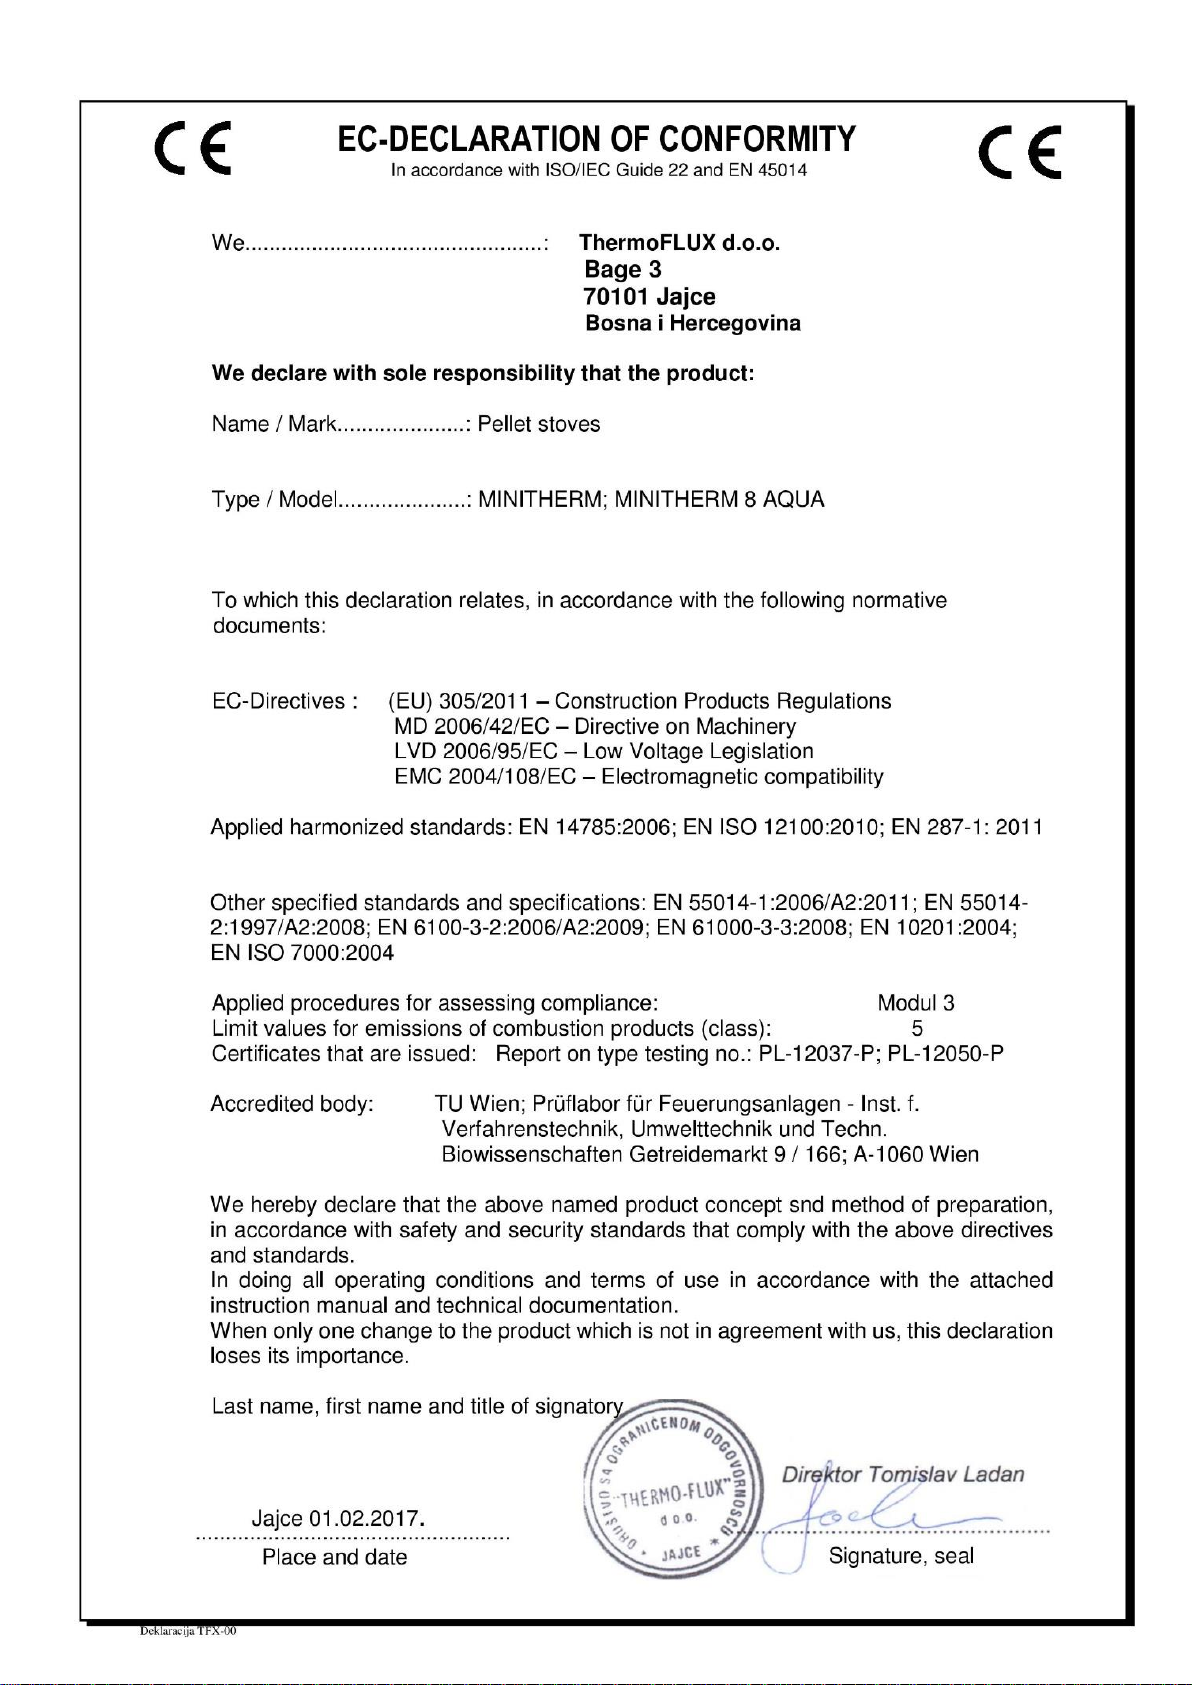
3.3 Minimum distances of the stove from wall
and objects
A –minimum distance front - 100 cm
B –minimum distance from side - 20 cm
C –minimum distance back side- 20 cm
D –minimum distance from side - 20 cm
ThermoFLUX leaves itself the right to later perform changes without notice.

11
ThermoFLUX
Minitherm -
4Functional description
4.1 General overview
Accompanying material
Tools for the pipeline and firebox cleaning
Door key
Power supply cable
Instructions booklet
Guarantee
12
ThermoFLUX
Minitherm -
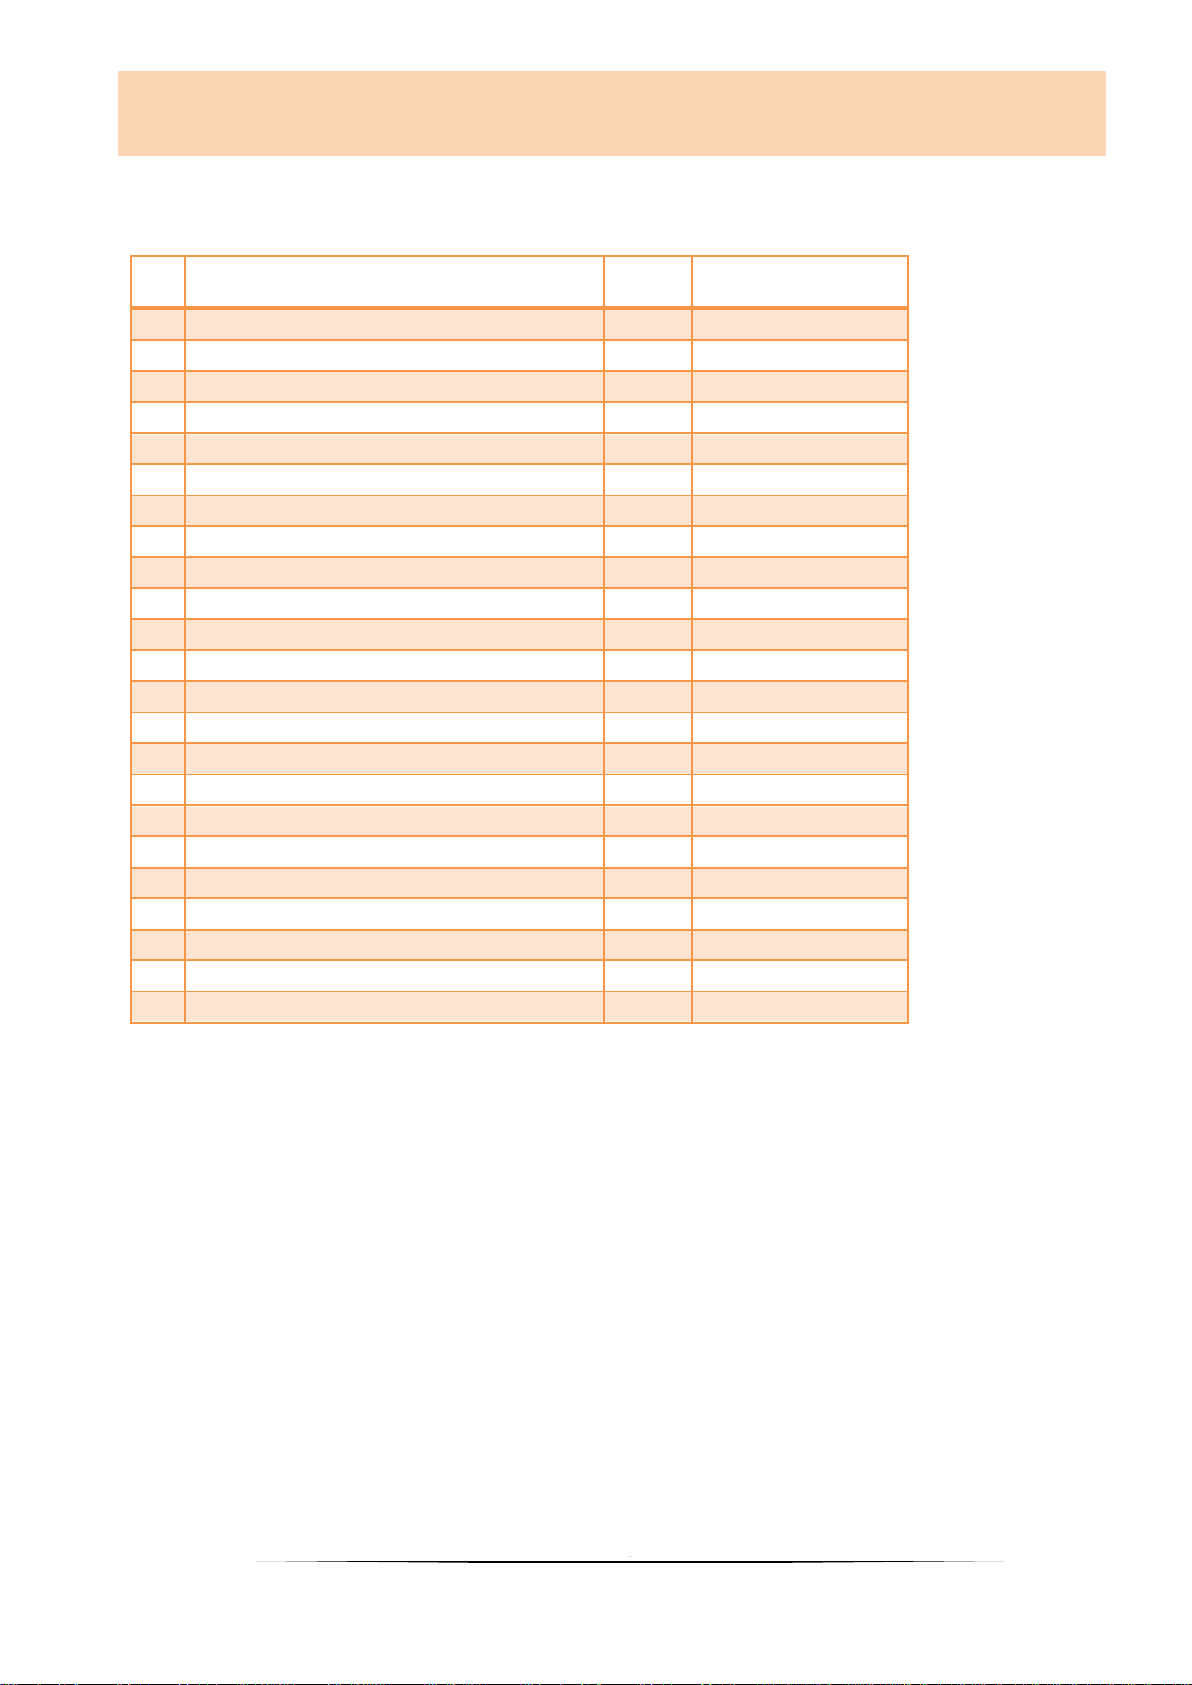
4.2 Technical data:
RB
J.M
Minitherm -
1.
Power range
kW
3 - 8,5
2.
Heat transfer to the air
kW
6,5
3.
Heat in room
kW
2
4.
Air content
L
23
5.
Recom. draught ratio
mbar
0,05/0,1
6.
Air conection return / out
inch
3/4''
7.
Flue gas max.temperature
oC
cca160
8.
Max working temperature
oC
85
9.
Max working pressure
bar
2,5
10.
Height to center of flue pipe
mm
198,5
11.
Depth
mm
575
12.
Width
mm
480
13.
Height
mm
945
14.
Color
red / black
15.
Flue pipe diameter
mm
80
16.
Out / Return height
mm
321 / 321
17.
Pellet storage cappacity
kg
18
18.
Electrica consumption nominal/max
W
80 / 330
19.
Min/max air temperature
oC
55 / 85
20.
Glass dimensions
mm
330x220x4
21.
Min/max pellet consumption
kg/h
0,6 –1,7
22.
Fuel
-
Pellet
23.
Flue pipe direction
back
820mm

13
ThermoFLUX
Minitherm -
5Function of stove
5.1 Overview of the controls and display and
their basic functions
Button
Description
1-
Increasing temperature and program functions
(adjusting days, time...)
2-
Decreasing temperature and program functions
(adjusting days, time...)
3-
Changing –accepting program
4-
ON / OFF, program exit
5 -
Decreasing power, navigate through the menu
6 -
Increasing power navigate through the menu
1
2
1
3
4
5
6
7
8
9
10

14
ThermoFLUX
Minitherm -
Display
8
Info
9
Clock
10
Air temperature indicator
Regulation on the stoves ''Minitherm'' is most important electronic
component. It is consisted of key controling modul set under the cover of the
stove and controling unit with display set on the front side of the stove. With
controling unit it is possible to control functions of the stove and also to check
information about present state of the stove.
Due to the possibilty to work in 5 (five) different powers, regulation can
satisfy needs to increase or decrease heating by automatic adjustment of
power.
If there is a need to increase power, this is registered by regulation and
regulation gives a signal to increase power by adding more pellet as well as
proportional increase of air flow in the burning basket.
When desired temperature is reached (need for heating energy is satisfied)
regulation is decreasing power ( modulates ), or when room thermostat gives
signal that set temperature is reached, stove then goes into SHUT DOWN mode
(if mode STAND-BY is ON )
7
When mark is visible
Clock
programmed ignit. active
Heater
heater active
Pelet dosage
auger active
Smoke fan
fan active
Primary air fan
fan active
Circulating pump
pump active
Alarm
alarm active
7

15
ThermoFLUX
Minitherm -
5.2 Principle of stove operation
Principle of the stove operation is very simple.
When button for start is pressed stove goes into IGNITION MODE. START is
displayed, and after that PELLET IGNITION. Usually this phase lasts for 5-15 minutes
depending on type of the stove and pellet quality. At that point dosing system is
activated, igniter and suction fan. Dispenser is making initial dosing of pellet into
burning basket. At the same point igniter starts to ignite pellet and suction fan is on
and is making necessary underpressure needed for combustion. When temperature
sensor for flue gasses detects that temperature in the chimney has reached
necessary value, regulation then changes working mode of the stove into FLAME
STABILIZATION.
This phase (FLAME STABILIZATION) lasts for 2-3 min. (depending on the type of the
stove and in this phase igniter goes off. After flame stabilization, stove goes into the
normal working mode and changes power from power 1 to set power. On display is
written WORK. On the right side set power is displayed and in the last
Start PELLET IGN. Flame
stabilization WORK

16
ThermoFLUX
Minitherm -
5.3 Schematic representation of the menu
control
By pressing button SET we enter general menu.

17
ThermoFLUX
Minitherm -

18
ThermoFLUX
Minitherm -
5.3.1 Clock adjustments
Clock adjustments can be done on following way:

19
ThermoFLUX
Minitherm -
5.3.2 Adjustments of the programmed on and off
mode
5.3.3 Stove has possibility for programme d on and off mode
during a day and th is o ption is regulated on three ways:
1. DAY PROGRAM, in this mode we can set 2 (two) different times
for ignition and shutting down of the stove.This applies to all
days in the week.(Scheme 2)
2. WEEK PROGRAM, in this mode we can set 4 (four) different
times for ignition and shutting down. In this mode, we can
choose day in the week (MON-SUN) in which we want stove to
work for each program (Scheme 3)
3. SUN-SAT PROGRAM, in this mode we can set 2 (two) different
times forignition and shutting down, but onl for SATURDAY and
SUNDAY. (Scheme 4)
Sheme1.

20
ThermoFLUX
Minitherm -
Shema 2. Shema 3. Shema 4.
Table of contents
Other ThermoFLUX Pellet Stove manuals


Popular Pellet Stove manuals by other brands

Enviro
Enviro Maxx brochure

Enviro
Enviro EF2 Service manual

Harman
Harman P43 Installation & operating manual

Palazzetti
Palazzetti MULTIFIRE BIO 9 Installation, use and maintenance guide

THERMOROSSI
THERMOROSSI BellaVista R silent Installation, use and maintenance guide

Enviro
Enviro Alliance EF3 Technical manual


Puros
Puros JOB Operating and maintenance manual

Hudson River Stove Works
Hudson River Stove Works Saratoga owner's manual

Palazzetti
Palazzetti ECOFIRE AIR SLIM 7 DESCRIPTION / CLEANING / TECHNICAL DATA

EURO AJPI
EURO AJPI Bernina Use and maintenance manual

klover
klover DEA PLUS manual

Whitfield
Whitfield Profile 20 FS Installation and operation manual