Theta Digital Enterprise User manual

THETA DIGITAL
CORPORATION
Enterprise
Owner’s Manual
Vers 1.01

ii
PREFACE CONGRATULATIONS
You have just acquired one of the most advanced and versatile components for the amplification of audio ever
to have been developed.
IMPORTANT
Save all packaging in a dry place away from fire hazards. Your Enterprise is a precision electronic instrument
and should be properly packaged any time shipment is made. In the unlikely event that you have to return
your Enterprise to the factory or dealer for service or updating, the original packaging will best protect the unit
from shipping damage.
In order to achieve the fullest flexibility and enjoyment from your Enterprise, we at Theta recommend that you
read this manual in full before connecting the unit to your audio system.
Note: It is imperative that the Enterprise be operated in a well-ventilated environment and that the immediate
external temperature be maintained as specified. External cooling fans may be required in some cases. Do
not stack any equipment directly above, below or to the immediate sides of the Enterprise to protect it from
overheating, as well as to protect the continued functionality of equipment near and around it.
Warning: The Enterprise is a balanced bridge amplifier, thus the negative speaker terminal is NOT a ground,
and cannot be connected to a system ground or a loudspeaker system with a common ground. Consult your
speaker manufacturer to ensure that any speaker in your system that will be connected to the Enterprise does
NOT have internal circuitry with a common ground.
WARNING: When connecting the speaker wire to the Reich output connector, using the hex tool provided –
DO NOT OVER TIGHTEN. There is a lot of surface area in the Reich connector to create a complete
connection with a minimum of torque applied. OVER TIGHTENING WILL ULTIMATELY BREAK THE REICH
CONNECTOR, WHICH WILL NOT BE COVERED UNDER WARRANTY. In addition, if the hex stud is
removed from the Reich connector, make certain that it is not cross threaded before fully reinserting it as this
will destroy the threads. CROSS THREADING THE HEX STUD WILL NOT BE COVERED UNDER
WARRANTY.
WARNING
United States law prohibits disposition of these commodities to Libya, Laos, North Korea, Cambodia or Cuba
unless otherwise authorized by the United States.
2003 Theta Digital Corporation. All rights reserved.
Written and Illustrated by Glenn Buckley.
This manual is also available for download as a PDF file at Theta Digital’s website.
http://www.thetadigital.com. Check out the library.
No part of this publication may be reproduced or transmitted in any form or by any means, electronic or
mechanical, for any purpose, without the express written permission of Theta Digital Corporation.

iii
The lightning flash with arrowhead symbol, within an equilateral
triangle, is intended to alert the user to the presence of uninsulated
“dangerous voltage” within the product’s enclosure that may be of
significant magnitude to constitute a risk of electric shock to persons.
The exclamation point within an equilateral triangle is intended to alert
the user to the presence of important operating and maintenance
(servicing) instructions in the literature accompanying the product.
WARNING TO REDUCE THE RISK OF FIRE OR ELECTRIC SHOCK,
DO NOT EXPOSE THIS PRODUCT TO RAIN OR MOISTURE
CAUTION: TO PREVENT ELECTRIC SHOCK, DO NOT USE THE AC (POLARIZED) PLUG WITH AN
EXTENSION CORD, RECEPTACLE OR OTHER OUTLET UNLESS THE BLADES CAN BE FULLY
INSERTED TO PREVENT BLADE EXPOSURE.
Extension cords are not recommended for use with this product.

iv
Enterprise Identification Record
This information is for your records and for future identification of the Enterprise. Please take a moment to fill
out all pertinent data now, and as upgrades and/or options are installed. Whenever upgrades, inquiries
and/or changes are requested, the serial number will be required.
SERIALNUMBER
DATE PURCHASED
DEALER’SNAME
DEALER’S ADDRESS/PHONE
INSTALLEDCARDS/OPTIONS
(Dateofinstallation)

v
SAFETY PRECAUTIONS
Please carefully read each item of the operating instructions and safety precautions before installing and
using this product. Use extra care to follow the warnings written on the product itself and/or in the operating
instructions. Keep the operating instructions and safety precautions for future reference.
CAUTION: TO REDUCE THE RISK OF ELECTRICAL SHOCK, DO NOT REMOVE ANY OF THE COVER
PANELS.
NO USER-SERVICEABLE PARTS INSIDE. REFER ALL SERVICING TO QUALIFIED SERVICE
PERSONNEL ONLY.
TO PREVENT FIRE OR SHOCK HAZARD, DO NOT ALLOW LIQUIDS TO SPILL OR OBJECTS TO FALL
INTO ANY OPENINGS OF THE PRODUCT.
THIS UNIT IS SUPPLIED WITH A 3 PIN GROUNDED AC PLUG. ALWAYS INSERT THE AC PLUG INTO
A GROUNDED OUTLET. DO NOT REMOVE THE GROUND PIN OR DISABLE THE GROUND FOR ANY
PURPOSE.
BEFORE MAKING ANY CONNECTIONS TO THE ENTERPRISE, FIRST TURN OFF THE POWER AND
THEN DISCONNECT THE AC POWER CORD.
WHEN INSTALLING THE ENTERPRISE IN YOUR SYSTEM, MAKE CERTAIN TO ALLOW A MINIMUM
OF 6 INCHES OF VENTILATION ON TOP AND ON EACH SIDE OF THE UNIT. IMPROPER
VENTILATION OF THE UNIT MAY CAUSE OVERHEATING, WHICH MAY DAMAGE THE UNIT AND
CAUSE A FIRE. PLACE THE UNIT ON A SOLID SURFACE ONLY. I.E. NOT ON CARPET, ETC.
DO NOT PLACE THE ENTERPRISE NEAR HEAT SOURCES SUCH AS DIRECT SUNLIGHT, STOVES,
HEAT REGISTERS, RADIATORS OR OTHER HEAT PRODUCING EQUIPMENT.
TO PREVENT DAMAGE TO THE ANALOG OUTPUT CIRCUITRY, BE CERTAIN NOT TO SHORT THE
OUTPUT SIGNAL TO GROUND. ENSURE THAT YOUR AUDIO OUTPUT CABLES DO NOT HAVE ANY
INTERNAL SHORTS BEFORE CONNECTING THEM TO THE ENTERPRISE.
IF REPLACEMENT OF THE AC LINE FUSE AND/OR ANY INTERNAL/EXTERNAL FUSE BECOMES
NECESSARY, REPLACE ONLY WITH SAME VALUE AND TYPE OF FUSE. NEVER BYPASS THE
FUSE.
IF THE AC CORD BECOMES DAMAGED, DO NOT USE IT. IMMEDIATELY REPLACE IT WITH A NEW
ONE OF THE SAME OR BETTER RATING.
IT IS IMPERATIVE THAT THE ENTERPRISE BE OPERATED IN A WELL VENTILATED ENVIRONMENT
AND THE IMMEDIATE EXTERNAL TEMPERATURE BE MAINTAINED AS SPECIFIED. EXTERNAL
COOLING FANS MAY BE REQUIRED IN SOME CASES. DO NOT STACK ANY EQUIPMENT DIRECTLY
ABOVE, BELOW OR TO THE IMMEDIATE SIDES OF THE ENTERPRISE AS TO PROTECT IT FROM
OVERHEATING, AS WELL AS THE CONTINUED FUNCTIONALITY OF ANY EQUIPMENT NEAR AND
AROUND IT.
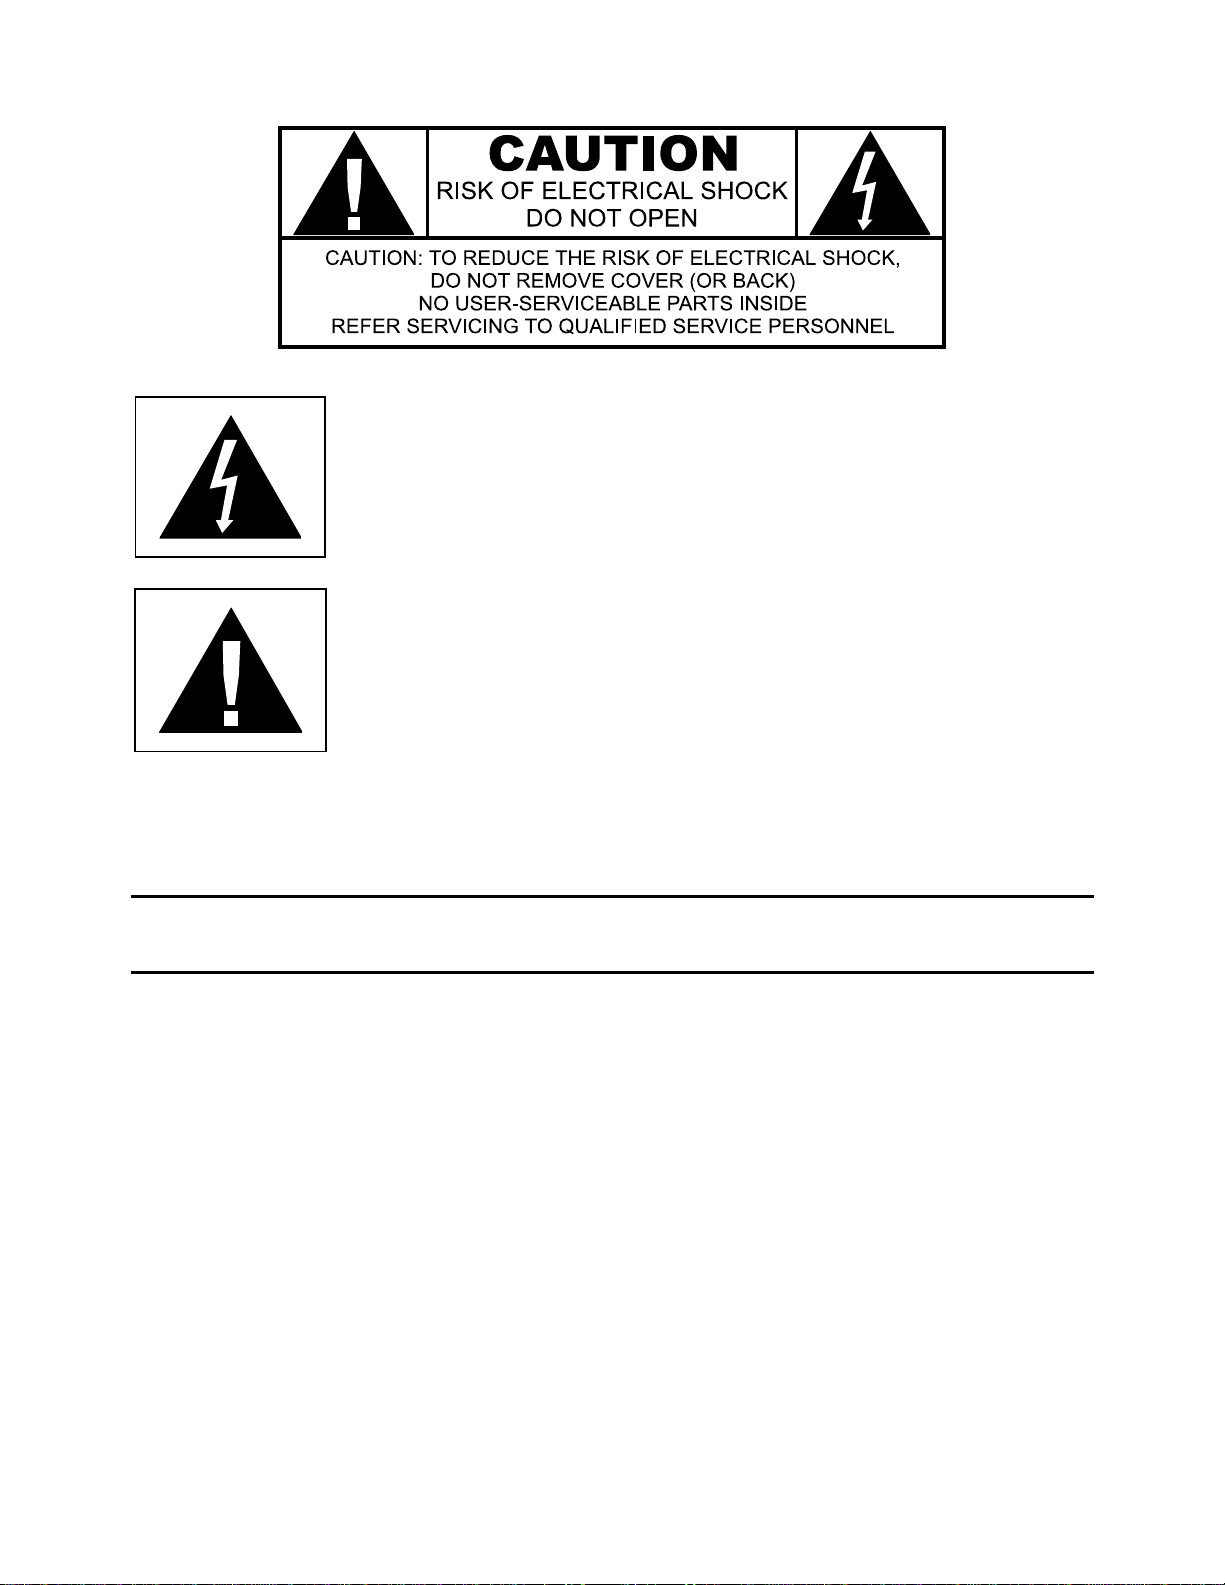
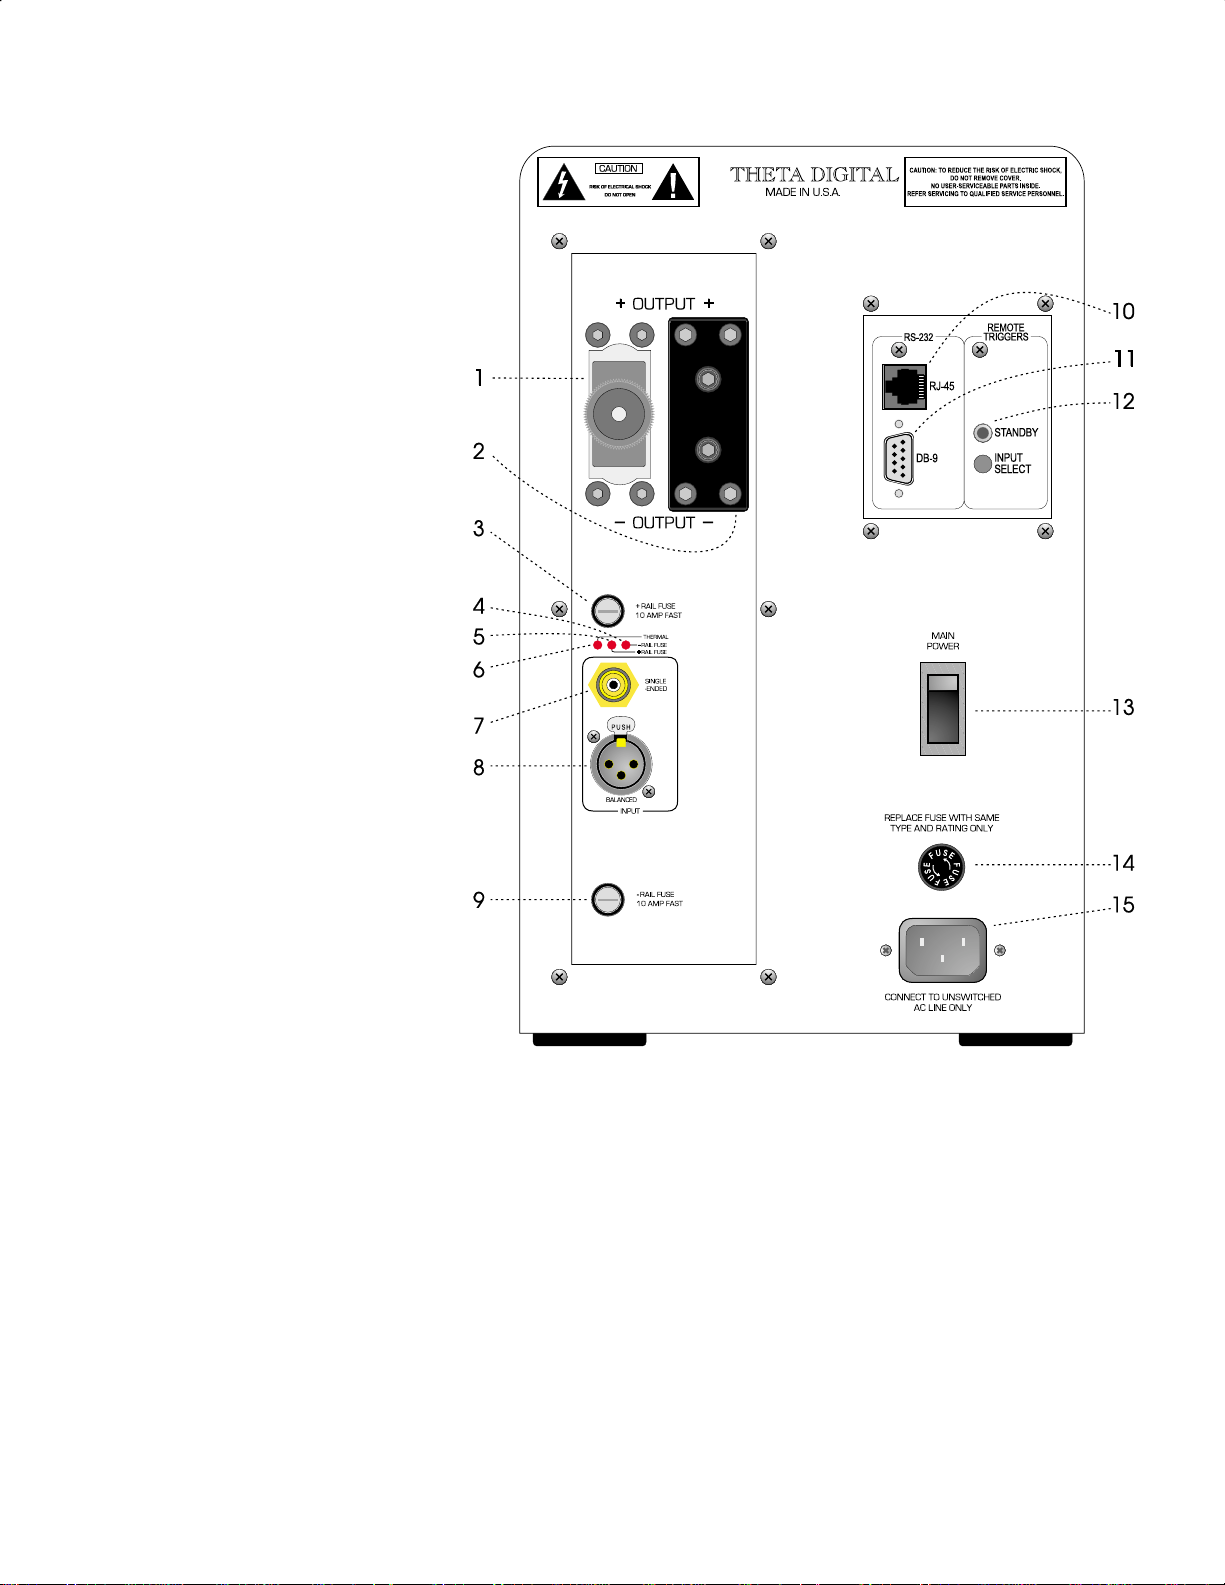
THE ENTERPRISE IS A BALANCED BRIDGE AMPLIFIER, THUS THE NEGATIVE SPEAKER TERMINAL
IS NOT A GROUND, AND CANNOT BE CONNECTED TO A SYSTEM GROUND OR LOUDSPEAKER
SYSTEM WITH A COMMON GROUND. CONSULT YOUR SPEAKER MANUFACTURER TO ENSURE
THAT ANY SPEAKER IN YOUR SYSTEM THAT WILL BE CONNECTED TO THE ENTERPRISE DOES
NOT HAVE INTERNAL CIRCUITRY WITH A COMMON GROUND.
AFTER MARKET and THIRD PARTY MODIFICATIONS
Please note that any after market and/or third party modifications will void the warranty. In the case of
changing the feet on a unit, in order to prevent any damage (which will also not be covered under warranty),
please verify that the screws being used to secure non-Theta feet do not screw any deeper into the chassis
than the original ones. The original screw is 1/4-20 by 1/2 and goes into the chassis 1/8 inch.

vi
Table of Contents
PREFACE ...........................................................................................................................................................ii
WARNING..................................................................................................................................................... iii
Enterprise Identification Record.....................................................................................................................iv
SAFETY PRECAUTIONS.............................................................................................................................. v
INTRODUCTION................................................................................................................................................1
Getting to know your Enterprise.....................................................................................................................1
Burn-In/Break-In Time....................................................................................................................................1
Reference Manual Conventions.....................................................................................................................1
IMPORTANT NOTICE.................................................................................................................................... 2
Enterprise Block Diagram............................................................................................................................... 3
Front Panel Layout.........................................................................................................................................4
Rear Panel Layout..........................................................................................................................................6
OPERATION......................................................................................................................................................7
Connecting the Enterprise..............................................................................................................................7
Setup and Operation ......................................................................................................................................7
Remote Triggers.............................................................................................................................................7
RS232.............................................................................................................................................................7
Appendix A Troubleshooting Guide ......................................................................................................... 8
Appendix B Wiring Diagram.....................................................................................................................9
Appendix C RS232 Protocol...................................................................................................................10
RS232 Jumper Settings......................................................................................................13
Appendix D Specifications...................................................................................................................... 14

1
INTRODUCTION
Getting to know your Enterprise
This Enterprise has been put through a rigorous and unique testing procedure that ensures that it will last for
many years with minimal service requirements. This procedure includes the following:
•All assembled circuit boards are given a thorough visual inspection and are then tested in a bench-
reference Enterprise.
•The tested, assembled circuit boards are then installed in a new Enterprise and the whole unit is
tested for every function and parameter.
•The unit is put on a burn-in torture rack to test for any possible component failures.
•The Enterprise then undergoes a critical listening and functional test.
•The unit has all remaining chassis components installed and then undergoes a complete visual
inspection, which assures that all Enterprises meet visual specifications.
The front panel of the Enterprise is manufactured in two versions – a left and a right, as shown in figure 3. A
left version has the tower on the right side of the faceplate and is intended to be placed on the left side of the
room. Visa versa for the right.
Burn-In/Break-In Time
This unit has a break in period of about 1 week during which continuous improvement in sound quality will be
observed. It is recommended that music be played continuously through the unit during this time to expedite
the break in period.
Reference Manual Conventions
For clarity purposes, references to buttons and LED’s will be shown in bold capital letters.

2
IMPORTANT NOTICE
I. It is imperative that the Enterprise be connected to a ground via its three wire AC power cord. It is
important that the AC power outlet, which the Enterprise is plugged into, is actually grounded.
Failure to do so will severely compromise the performance, reliability and safety of use of the
Enterprise.
II. Ventilation is an important issue when placing the Enterprise in a system. Make certain that the
Enterprise is placed in a well-ventilated area or rack unit. Heat must be dissipated and cool air must
be allowed to enter the Enterprise.
III. Please take note that some powerline conditioners defeat the AC power ground on their outlets. If
the intention is to plug the Enterprise into a line conditioner, check with your dealer to make certain
that the particular conditioner that is intended for use DOES NOT DEFEAT THE AC GROUND on its
AC outlets. Only the highest powered line conditioners should be considered for use with the
Enterprise. Otherwise, the amplifier’s power output may be compromised.
IV. DO NOT remove any cover panels from the Enterprise, as there are no user serviceable
components inside. Refer servicing and updating to qualified service personnel only.
V. Endcaps (NOT shorting plugs) on the unused RCA input will improve the sound quality and may
reduce the susceptibility to RF induced anomalies.
VI. It is imperative that the Enterprise be operated in a well ventilated environment and the immediate
external temperature be maintained as specified in Appendix D of this manual. External cooling fans
may be required in some cases. Do not stack any equipment directly above, below or to the sides of
the Enterprise as to protect it from overheating, as well as the continued functionality of any
equipment near and around it.
VII. Each channel is a balanced bridge amplifier, thus the negative speaker terminal is NOT a ground,
and cannot be connected to a ground or a loudspeaker system with a common ground. Consult your
speaker manufacturer to ensure that any speaker in your system that will be connected to the
Enterprise does NOT have internal circuitry with a common ground.
VIII. WARNING: When connecting the speaker wire to the Reich (Derlin) output connector, using the hex
tool provided – DO NOT OVER TIGHTEN. There is a lot of surface area in the Reich connector to
create a complete connection with a slightly firm torque applied. OVER TIGHTENING WILL
ULTIMATELY BREAK THE REICH CONNECTOR, WHICH WILL NOT BE COVERED UNDER
WARRANTY. In addition, if the hex stud is removed from the Reich connector, make certain that it
is not cross threaded before fully reinserting it as this will destroy the threads. CROSS THREADING
THE HEX STUD WILL NOT BE COVERED UNDER WARRANTY.

3
Enterprise Block Diagram
Figure 1 - Block Diagram

4
Front Panel Layout
Figure 2 - Front Panel Layout of a RIGHT Enterprise
1. THERMAL LED. Illuminates when the Enterprise’s amplifier module temperature rises above the maximum
operating temperature and puts the Enterprise into standby.
2. STANDBY LED. Illuminates red when the power amplifier is in STANDBY, green when the amplifier is active.
3. STANDBY button. After the rear panel MAIN POWER switch is turned on press the front panel Theta logo button to
exit the standby mode. The Enterprise will come out of standby.

5
Figure 3 - Front Panel of a LEFT and RIGHT Enterprise

6
Rear Panel Layout
1. BINDING POST (Cardas type).
Connect plus and minus speaker wires
for one speaker to appropriately marked
terminals of this post. This is the single
default output connector. It can be
upgraded to a Reich type.
2. Optional second
BINDING POST. This
is used when bi-wiring a speaker. This
can be either an additional Cardas type
or a Reich type. (Reich type shown).
3. +(plus) Rail Fuse. Replace only with
same type and rating.
4. FUSE RAIL – LED. When this LED is
illuminated, the fuse on the negative rail
of the channel is blown.
5. FUSE RAIL + LED. When this LED is
illuminated, the fuse on the positive rail
of the channel is blown.
6. THERMAL LED. Illuminates when the
amplifier rises above the maximum
operating temperature. The Enterprise
should be powered off and cooled if this
LED is lit.
7. SINGLE-ENDED input jack.
8. BALANCED input jack.
9. -(minus) Rail Fuse. Replace only with
same type and rating.
10. RJ45 RS232 connector. Used for
connecting an external controller to the
Enterprise to control and monitor its
functions.
11. DB9 RS232 connector. See RJ45
RS232 connector.
Figure 4 – Rear Panel Layout showing most options installed
12. STANDBY REMOTE TRIGGER jack. When the rear panel STANDBY TRIGGER jack receives a 5-12 VDC pulse the
Enterprise will change its mode from either standby to operate, or operate to standby, depending on its current state.
13. MAIN POWER
switch. Master power switch. Disconnects AC to all circuits. It is recommended that this be left ON at all
times during regular use with the exception of whenever cables are connected/disconnected or when the unit is not
going to be used for an extended period of time.
14. Main Power
FUSE. If necessary, replace with same type and rating only.
15. Amplifier
AC POWER INPUT.

7
OPERATION
Before turning on the Enterprise, ensure that all precautions and warnings have been carefully reviewed and adhered
to. Damage to the Enterprise caused by improper operation, wiring and/or ventilation will not be covered under
warranty and Theta will not be liable for any consequential damage or loss.
Connecting the Enterprise
With the Enterprises’ rear panel main power switch turned off, connect the signal outputs of the preamp/processor to
either the single-ended or balanced input of the Enterprise. Connect the output to the input of the speaker that is
intended to be driven. Please refer to figure 5.
If the Enterprise has a second binding post output connector, this is to be connected to the second speaker input
terminal.
Please Note: The Enterprise is a balanced bridge amplifier, thus the negative speaker terminal is NOT a ground, and
cannot be connected to a ground or a loudspeaker system with a common ground. Consult your speaker
manufacturer to ensure that any speaker in your system that will be connected to the Enterprise does NOT have
internal circuitry with a common ground.
Connect a 12V pulse trigger source to the STANDBY trigger input of the Enterprise, if it is desired to be taken in and
out of standby via another device.
If the Enterprise’s functionality is to be controlled from a remote controller via RS232, connect the RS232 cable
between the Enterprise and the controller, using either the DB9 or RJ45 RS232 connector on the Enterprise.
Setup and Operation
Turn the output volume of the preamp/processor, or other source device, down all of the way.
Turn on the MAIN POWER switch, located on the rear panel.
When first turning on the rear panel power switch, the red STANDBY LED on the front panel will illuminate, indicating
that the Enterprise is in standby mode. When in standby, the signal is muted and the output bias of the Enterprise is
reduced to approximately 10 percent.
Press the round standby button on the front panel to take the Enterprise out of standby. The STANDBY LED will turn
from red to green.
Slowly bring the output volume of the preamp/processor up to an audible level.
Remote Triggers
When the rear panel STANDBY trigger jack receives a 5-12 VDC pulse, the Enterprise will change its state from either
standby to operate, or operate to standby, depending on what the current state is.
RS232
RS232 is another option in the Enterprise. It can be installed at any time either at the factory or by an authorized
Theta dealer. All functions of the Enterprise can be controlled and monitored via RS232, using either the RJ45 or DB9
connector. As long as the rear panel MAIN POWER switch is turned on, the RS232 circuitry is always active, thus
allowing the Enterprise to be taken out of STANDBY via RS232.

8
Appendix A Troubleshooting Guide
If the Enterprise should function abnormally during operation, please review the items in the following
checklist. Please be sure to thoroughly check all other connected components such as speakers and
preamplifiers, as well as cables.
Symptom Possible Cause(s) Remedy
No power or front panel
lights and no sound. The power cable is not inserted 100% into
AC input connector. Ensure that the AC cord is inserted all the
way into the Enterprise and that the wall
outlet is active.
The rear panel fuses is open. Replace with same type and rating ONLY.
Circuit breaker is open (AC outlet). Check the AC outlet circuit breaker and reset,
if necessary, or contact your dealer.
No audio output. Overheating If the front and/or rear panel THERMAL LED
is illuminated, shut down the Enterprise until
it cools. An external fan may be necessary.
Plus or minus fuse is open. Check the rear panel fuse indicator LEDS. If
one is on, a fuse is open.
Hot/Warm Normal operation

9
Appendix B Wiring Diagram
This section provides an example illustration of an input and output wiring scheme. Before making any connections,
please turn off ALL audio and video devices. Unplug those that do not have a main power switch. It is recommended
that all cables, including speaker cables be kept as short as possible for best sound quality.
Figure 5 - Examples of Typical Input and Output Connections
------------ = optional connection.
WARNING: The Enterprise is a balanced bridge amplifier, thus the negative speaker terminal is NOT a ground and cannot
be connected to a ground or a loudspeaker system with a common ground. Consult your speaker manufacturer to ensure
that any speaker in your system that will be connected to the Enterprise does NOT have internal circuitry with a common
ground. Damage, not covered under warranty, will occur if the negative terminal is connected to ground or to a terminal of
another amplifier.
WARNING:
When connecting the speaker wire to the Reich (Delrin) output connector, using the hex tool provided – DO NOT
OVER TIGHTEN. There is a lot of surface area in the Reich connector to create a complete connection with a
minimum of torque applied. OVER TIGHTENING WILL ULTIMATELY BREAK THE REICH CONNECTOR, WHICH
WILL NOT BE COVERED UNDER WARRANTY. In addition, if the hex stud is removed from the Reich connector,
make certain that it is not cross threaded before fully reinserting it as this will destroy the threads. CROSS
THREADING THE HEX STUD WILL NOT BE COVERED UNDER WARRANTY.

10
Appendix C RS232 Protocol
RS232 settings are internally definable via jumper blocks, to accommodate interfacing with a wide range of control
products.
Baud rate 96ØØ or 192ØØ
Echo status AUTO or REQUEST
Select C Ø or 1
Select D Ø or 1
Select E Ø or 1
Baud rate: Maximum number of bits per second. The duration of a single bit is equal to 1 / baud rate.
Echo status: Specifies whether the STATUS of each parameter shown in the protocol will automatically (AUTO) be
echoed back to the controller when there is any change, or whether the user must manually request
(REQ) the status information be sent to the controller.
Select C,D & E: The three SELECT jumpers are used to set the unit ID. There are possible 8 configurations, listed in
the chart on page 13.
All commands will follow the format:
<Header><Command Identifier><Argument 1><Argument 2><Argument 3>
where:
<Header> = <FEh><DØh> **
<Command identifier> = <byte>
<Argument x> = <byte>
Each command will be able to access the system configuration directly, eliminating the need to press any button on
the Enterprise’s front panel.
Example:
1) To put the [Front Left] Enterprise into standby: Send FE, DØh **, Ø1, ØØ, ØØ, ØØ (all values in Hex).
Where FE and DØh ** are the header, Ø1 = standby command, ØØ = put into standby, ØØ = filler and ØØ =
filler (4 characters required).
HEADER COMMAND ARG 1 ARG 2 ARG 3
HEX FE DØ Ø1 ØØ ØØ ØØ
DEXIMAL 254 2Ø8 Ø1 ØØ ØØ ØØ
** In this example the header ID is set to the Front Left Enterprise. Replace this data to match the ID of the Enterprise
to be controlled, if different.

11
Command Description Argument 1 Argument 1 Description Argument 2 Argument 2 Desc Argument 3 Argument 3 Desc
1 Standby Ø Put in standby
1 Take out of standby
2 Status Ø Return amplifier status.
4 Toggle Standby Ø Toggles Amp in/out of standby.
The RS232 can be set using a hardware jumper to automatically send changes to the RS232 port.
There can be multiple Enterprise’s in a system. Each can have a different device address, selectable on the RS232 board and defined in Status byte #2, below.
Status Byte # Byte Desc Bit Value Description Comment
1 Status Ø Standby Ø = In, 1 = Out
1 Temperature Ø = OK, 1 = Over temperature
2 Fuse + Ø = Good, 1 = Blown
3 Fuse - 1 = Good, 1 = Blown
2 Device Address Lower 3 bits Ø=Front Left, 1=Front right, 2=Amp #3, 3=Amp #4, 4=Amp #5, 5=Amp #6, 6=Amp #7, 7=Amp # 8

12
RS232 Hardware Connections
Figure 6 – Enterprise RS232 Jack Pinout

13
RS232 Jumper Settings
Note: Changing the RS232 jumper settings must be done by an authorized Theta Dealer or Installer ONLY.
Removing the cover of the amplifier in all other cases will void the warranty and can cause an electric shock. Please
see warnings on page ii.
There are 2 possible Baud rates: 9600 and 19200. The factory
default is 19200. To change the baud rate to 9600, move the
BAUD jumper to the center and top pins (if the RS232 board is
orientated as in figure 6). This is also known as position 0.
The STATUS can be returned to the controller either automatically
every time a parameter has changed, or only on user request. The
factory default is AUTO. To set the Echo STATUS to return Status
information only upon request, move the STATUS jumper to the top
pins position 0), or nearer to REQ on the RS232 board.
The three SELECT jumpers are used to derive the product ID
number, or the “header” ID. The Enterprise can have any one of up
to eight different product IDs. In this way, when communicating with
a Enterprise via RS232 in a system that has multiple Enterprises,
each one can be controlled separately. When a LEFT Enterprise is
shipped from the factory, it is set to be the Front LEFT. Accordingly
a RIGHT Enterprise is set to be Front RIGHT.
Address(h) Address(d) Jumper EDC Assignment
FE, D0 254, 208 ØØØ Front Left
FE, D1 254, 209 ØØ1 Front Right
FE, D2 254, 210 Ø1Ø Amp # 3
FE, D3 254, 211 Ø11 Amp # 4
FE, D4 254, 212 1ØØ Amp # 5
FE, D5 254, 213 1Ø1 Amp # 6
FE, D6 254, 214 11Ø Amp # 7
FE, D7 254, 215 111 Amp # 8
Example of changing the Enterprise header ID to be Amp #3:
Set the jumper on SELECT E to Ø, the jumper on SELECT D to 1,
and the jumper on SELECT C to Ø. The diagram to the right shows
the ID set to ØØ1.
Figure 7 – Enterprise RS232 Jumper Settings

14
Appendix D Specifications
Inputs: Analog audio:
1 Single-ended RCA jack.
1 Balanced (XLR) jack.
Input Impedance: 50 KΩSingle-Ended or Balanced, for each phase.
Input sensitivity: (Single-Ended) 2.8V RMS input for 300W into 8 ohms.
(Balanced) 1.4V RMS input for 300W into 8 ohms.
Gain: (Single-Ended) 25dB (18x).
(Balanced) 31dB (36x).
Polarity: (Single-Ended) Non-Inverting.
(Balanced) Pin-2 = Positive, Pin-3 = Negative for Non-Inverting Output.
Outputs: Analog Audio: 1 balanced output (Cardas Type standard); optional second balanced output for bi-wiring. (Can
be Cardas type or Reich type)
I/O RS232: 1 DB9 and 1 RJ45 connector.
Modes/Processes: Standby: Amplifier is muted and output bias is reduced to 10%.
Thermal: Channel has overheated; amp automatically switches to Standby.
Power Output: (8 ohms) 300 W (rated) 350 W (typical)
(4 ohms) 500 W (rated) 525 W (typical)
Frequency Response: (-3dB points @ full power) 0.5 Hz - 400 KHz.
THD+Noise: <1.75%
Signal to Noise Ratio: (unweighted) >105dB
Power Requirements: 117 VAC, 10A Slo Blo main fuse, 230 VAC, 6A Slo Blo main fuse, 50-60 Hz.
Power Consumption: 30W @ Standby; 53W @ idle; 525W @ full power into 8 ohms; 925W @ 4 ohms.
Standby Trigger Input: 5-12 VDC Pulse between 1 and 500mS.
Dimensions: 9
1/16" W x 13 7/8" H x 23 5/8" D (230 x 346 x 600 mm)
Weight: 51 Lbs. Stand alone (19 Kg), 60 Lbs. Boxed with accessories (22.4 Kg)
Maximum Operating Temperature: Internal: 176°F (80°C)
Room: 131°F (55°C)
Table of contents
Other Theta Digital Amplifier manuals

Theta Digital
Theta Digital Prometheus User manual

Theta Digital
Theta Digital Dreadnaught III User manual

Theta Digital
Theta Digital Intrepid User manual

Theta Digital
Theta Digital Dreadnaught User manual

Theta Digital
Theta Digital Compli Blu User manual

Theta Digital
Theta Digital Casablanca III HD User manual

Theta Digital
Theta Digital Dreadnaught User manual

Theta Digital
Theta Digital Dreadnaught II User manual