ThinkGizmos TG21 ROBOVAC XD User manual

TG21 ROBOVAC XD
CONGRATULATIONS ON OWNING THIS ROBOVAC XD.
PLEASE READ THIS MANUAL BEFORE USE & SAVE FOR FUTURE
REFERENCE AS IT INCLUDES IMPORTANT SAFETY ADVICE.
User Manual
English p 1
Deutsch p 25
Francais p 49
Italiano p 73
Español p 97

ENGLISH MANUAL - CONTENTS
1.
2.
3.
4.
1.1 Vacuum Features .................................................................................................3
2.1 Safety Instructions .............................................................................................. 4
2.2 Safety Instructions Continued ........................................................................... 5
2.3 Safety Instructions Continued ........................................................................... 6
FEATURES OF THE ROBOVAC XD
SAFETY INSTRUCTIONS
2
5.
6.
4.1 Setting Current Time ........................................................................................ 13
4.2 How to Charge .................................................................................................. 14
4.3 How to Start and Pause Cleaning ................................................................... 15
4.4 Setting Schedule Cleaning Mode .................................................................... 15
4.5 How to use the Virtual Wall ............................................................................. 16
4.6 How to use the Mop Attachement ................................................................. 16
HOW TO USE
7.
6.1 Troubleshooting ............................................................................................... 21
6.2 Analysis of Common Problems/Solutions .................................................... 21
6.3 Specications ................................................................................................... 22
ADDITIONAL INFORMATION
7.1 Warranty Information ...................................................................................... 23
WARRANTY
ROBOVAC XD INFORMATION
3.1 Cleaning Modes .................................................................................................. 7
3.2 Packing List .......................................................................................................... 8
3.3 Main Body Anatomy ........................................................................................... 9
3.4 Remote Controller ............................................................................................ 10
3.5 Remote Controller Battery Installation .......................................................... 10
3.6 Pairing Robot with Remote Controller............................................................ 10
3.7 Virtual Wall ......................................................................................................... 11
3.8 Installation of Charging Base ........................................................................... 11
3.9 Display Screen.................................................................................................... 12
MAINTENANCE
5.1 Cleaning the Dust Bin ........................................................................................17
5.2 Cleaning the Main Brush and Dusting Brush .................................................18
5.3 Cleaning the Senors and Charging Contacts ..................................................18
5.4 Cleaning the Side Brushes ................................................................................19
5.5 Cleaning the Mop ..............................................................................................19
5.6 Cleaning the Universal Wheel ..........................................................................19
5.7 Cleaning the Right and Left Wheels ................................................................20

1. FEATURE OF THE ROBOVAC XD
3
1.1 Vacuum Features
Using this technology to adjust the cleaning speed depening on dierent working
environments, will use less power and produce less noise.
Frequency Conversion Technology
You don’t have to point at the vacuum to operate and can use it more conveniently. The
remote controller also has the direction control function using the rocker handle.
Bluetooth Wireless Remote Controller
The robot has combined the advantages of traditional vacuum cleaners and intelligent
cleaners perfectly. It can pick up ne dust on the carpet.
Powerful Suction
With humanized design, you can clean the dust bin more easily which can avoid secondary
pollution.
Easy-Clean Dust Bin
Enhanced high power UV lamp can help to kill bacteria more ecently.
High-Ecient Stertilization
The vacuum can recognise day or night automatically and will enter into dierent cleaning
modes according to the time. At night, the vacuum will enter into mute cleaning mode
which makes the vacuum quieter. (Day is from 8.00 to 18.00 by default).
Day and Night Recognition

2. SAFETY INSTRUCTIONS
4
Basic Safety Instructions
To reduce the risk of injury or damage, you should keep the safety instructions in mind
when using the vacuum.
This is a safety warning symbol. It alerts that there is potential danger, which may
cause property damage, severe personal injury or even death.
After reading, please keep this manual safe.
WARNING: This indicates a dangerous situation, which if not avoided may cause
severe personal injury or even death.
CAUTION: This indicates a dangerous situation, which if not avoided may cause
slight or moderate injury.
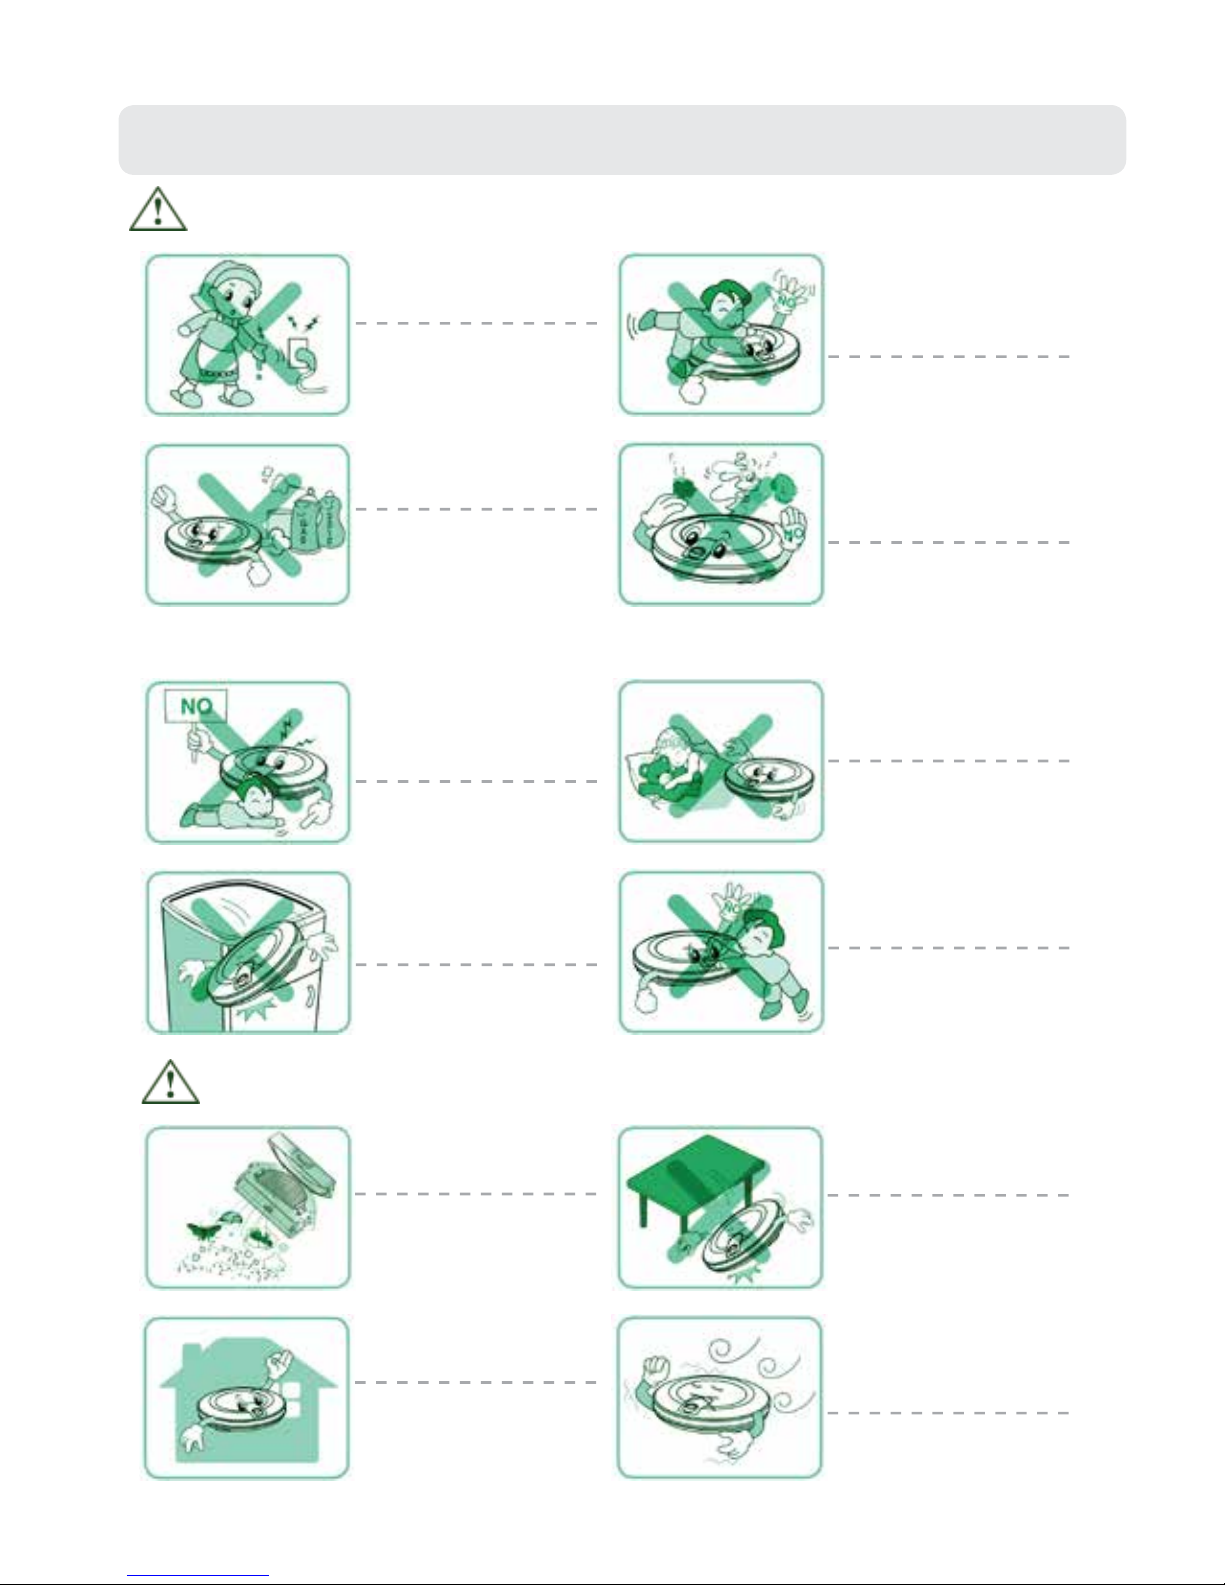
WARNING
For safety concerns, do not
let children disassemble the
robot without supervision.
Or may cause product
failure.
Do not use the robot with
batteries or charging base of
other products.
Or may cause product
failure.
Ensure that the power
cord will not be crushed or
punctured.
Or may cause an alectric
shock, re or product failure.
If the power cord is broken,
do not plug it into the outlet.
Do not use the robot when
candles or fragile objects are
on the oor.
Or may cause re or product
failure.
Do not place the robot or
charging base near a heating
device.
Or may cause product
deformation, re or failure.
Must use the special
electrical outlet.
If multiple appliances are
connected to one outlet
simultaneously, may
produce too much heat or
re.
Do not bend the powe plug.
Do not use the power plug
when it is damaged or loose.
Or may cause re or product
failure.
When unplugging the power
adaptor, please hold the
plug, not the cord. Do not
touch the plug with your
ngers.
Or may cause electric shock.
2.1 Safety Instructions
5
2.2 Safety Instructions Continued
WARNING
Do not touch the power plug
with wet hands.
Or may cause product
electric shock.
Do not let small children or
pet sit or stand on the robot.
Do not operate the robot
when objects are on the
robot.
Or may cause injury or
product damage.
Do not spray or place
in ammables, surfactant or
drinks around the robot.
Or may cause re or product
failure.
In ammables: e.g. gasoline,
thinner etc.
Surfactant: e.g. detergent,
bathroom articles etc.
Turn o the power switch
immediately if the robot
generates any abnormal
knocking, odor or smoking.
Or may cause re or product
failure.
Do not put any part of
the body (e.g. hand, foot)
under the central brushes
or wheels while the robot is
working.
Or may cause injury or
product failure.
Do not operate robot in
the room where the child is
sleeping.
Or may cause injury or
product damage.
Do not operate the robot on
narrow raised furniture,
e.g. wardrobe, refrigerator,
table etc.
Or may cause injury or
product failure or damage.
Do not let small children
stay with the robot without
supervision.
Or may cause injury or
product damage.
Empty dust bin regularly and
keep it clean.
The dust collected in the
dust bin may contain
harmful bacteria / may cause
allergies.
Do not drop the robot or
subject it to strong collision.
Or may cause product
failure.
The robot is for indoor use
only.
Using it outdoors may cause
product failure or irreparable
damage.
Do not expose the robot to
cold temperatures (less than
-10oC) for a long period of
time.
Or may cause product
failure.
CAUTION

6
2.3 Safety Instructions Continued
WARNING
Do not let the robot pick up
liquids, blades, thumbtacks,
kindling etc.
Or may cayse product
failure.
Do not let the bottom frame
and charging terminals
of charging base contact
metallic objects.
Or may cause product
failure.
Do not pour liquids (e.g.
water, detergent, etc) into
the robot.
If the liquids enter into the
robot, please turn o the
power switch and contact
sales agent or customer care
center.
Do not use the robot when
dust bin is full.
Or may cause product
failure.
Tip:
Please check the following items before use:
●Remove fragile or unnecessary objects from the room that will be cleaned. (e.g.
Remove expensive potteries and valuables from the oor).
●Do not use the robot in a room where children will be alone, or may cause injury.
●Please check the battery is fully charged before use.
●Please empty the dustbin if full and remove any excess string/hair from the main
brushes.
NOTE: Do not use the robot in workshops, shops, garages or outdoor environments. It is
designed for home use only.

7
3. ROBOVAC XD INFORMATION
3.1 Cleaning Modes
The robot will clean automatically in di erent kinds of cleaning paths
till it returns to the charging base to recharge.
(1) Auto Cleaning Mode
(2) Spot Cleaning Mode
(3) Edge Cleaning Mode
(4) Mute Cleaning Mode
(5) Scheduled Cleaning Mode
(6) Zigzag Cleaning Mode
The robot will spiral approximately 2.4 meters in diameter, intensively
cleaning a localized area.
(The robot can be controlled by the remote controller to move to the
localized area and then clean it.)
When detecting a wall or furniture, the robot will clean the full
perimeter of the wall and navigate around furniture with its side
brushes.
(This mode can help to clean the dust at the comer of a sofa, bed,
wall, etc. This cleaning process will last for 25 minutes till the
robot returns to the charging base to recharge automatically.)
The robot will complete cleaning under ultra low noise and will not
a ect people’s work or rest.
You can schedule the cleaning time according to your requirements.
The robot will clean automatically at the speci ed time.
The robot will clean in zigzag cleaning path, just like arti cial
mopping.
The cleaning area will be enlarged and best cleaning e ects will be
provided.

8
3.2 Packing List
Main Body (1pcs)
Remote Controller (1pcs)
(Battery not included)
Power Adaptor (1pcs)
User Manual (1pcs)
Charging Base (1pcs)
Virtual Wall (1pcs)
(Battery not included)
Side Brush (2pcs)
Mop (2pcs)

9
3.3 Main Body Anatomy
Decorative Panel
Front Cover
IR Receiver
Display Screen
Bin Release Button
Rubber Bumper
Transparent Window
Power Switch
DC Jack
Universal Wheel
Charging Contact Piece
UV Lamp
Battery Cover
Side Brush
Left/Right Wheel
Main Brush
Dusting Brush
Mop
Mop Plate
Fan
Dust Bin
Cli Sensor
Top View
Bottom View

3.4 Remote Controller
Charge
Forward
Right
Back
Mute
Edge
Zigzag
UV
Speed
Spot
Auto
Left
Power
Power Indicator
Power Power Button
Power Indicator Press any button, if this indicator lights, it
means the remote controller works.
Charge Press this button, the robot will look for the
charging base to recharge.
Auto Press this button, the robot will enter into
auto cleaning mode.
Spot Press this button, the robot will enter into spot
cleaning mode.
Mute Press this button to exchange between normal
cleaning mode and mute cleaning mode
Edge Press this button, the robot will enter into
edge cleaning mode.
Speed Press this button to adjust the cleaning speed.
UV Press this button to turn on/o UV sterilization
function.
ZigZag Press this button, the robot will enter into
zigzag cleaning mode.
3.5 Remote Controller Battery Installation
1. Lift the clasp on the back of remote controller and open the battery cover.
2. Load 2 x AAA alkaline batteries (Pay attention to the correct polarity).
3. Close the battery cover.
NOTE: If not used for a long time, please remove the batteries.
3.6 Pairing Robot with Remote Controller
Ensure that the power switch is o.
Press and hold CHARGE button on remote
controller, then turn on the power switch.
After hearing two beeps, it indicates that
robot and remote controller are paired.
TIP: One remote controller is only able to control one robot. Please make sure the robot
works correctly rst, then try to pair the robot with the remote.
10
11
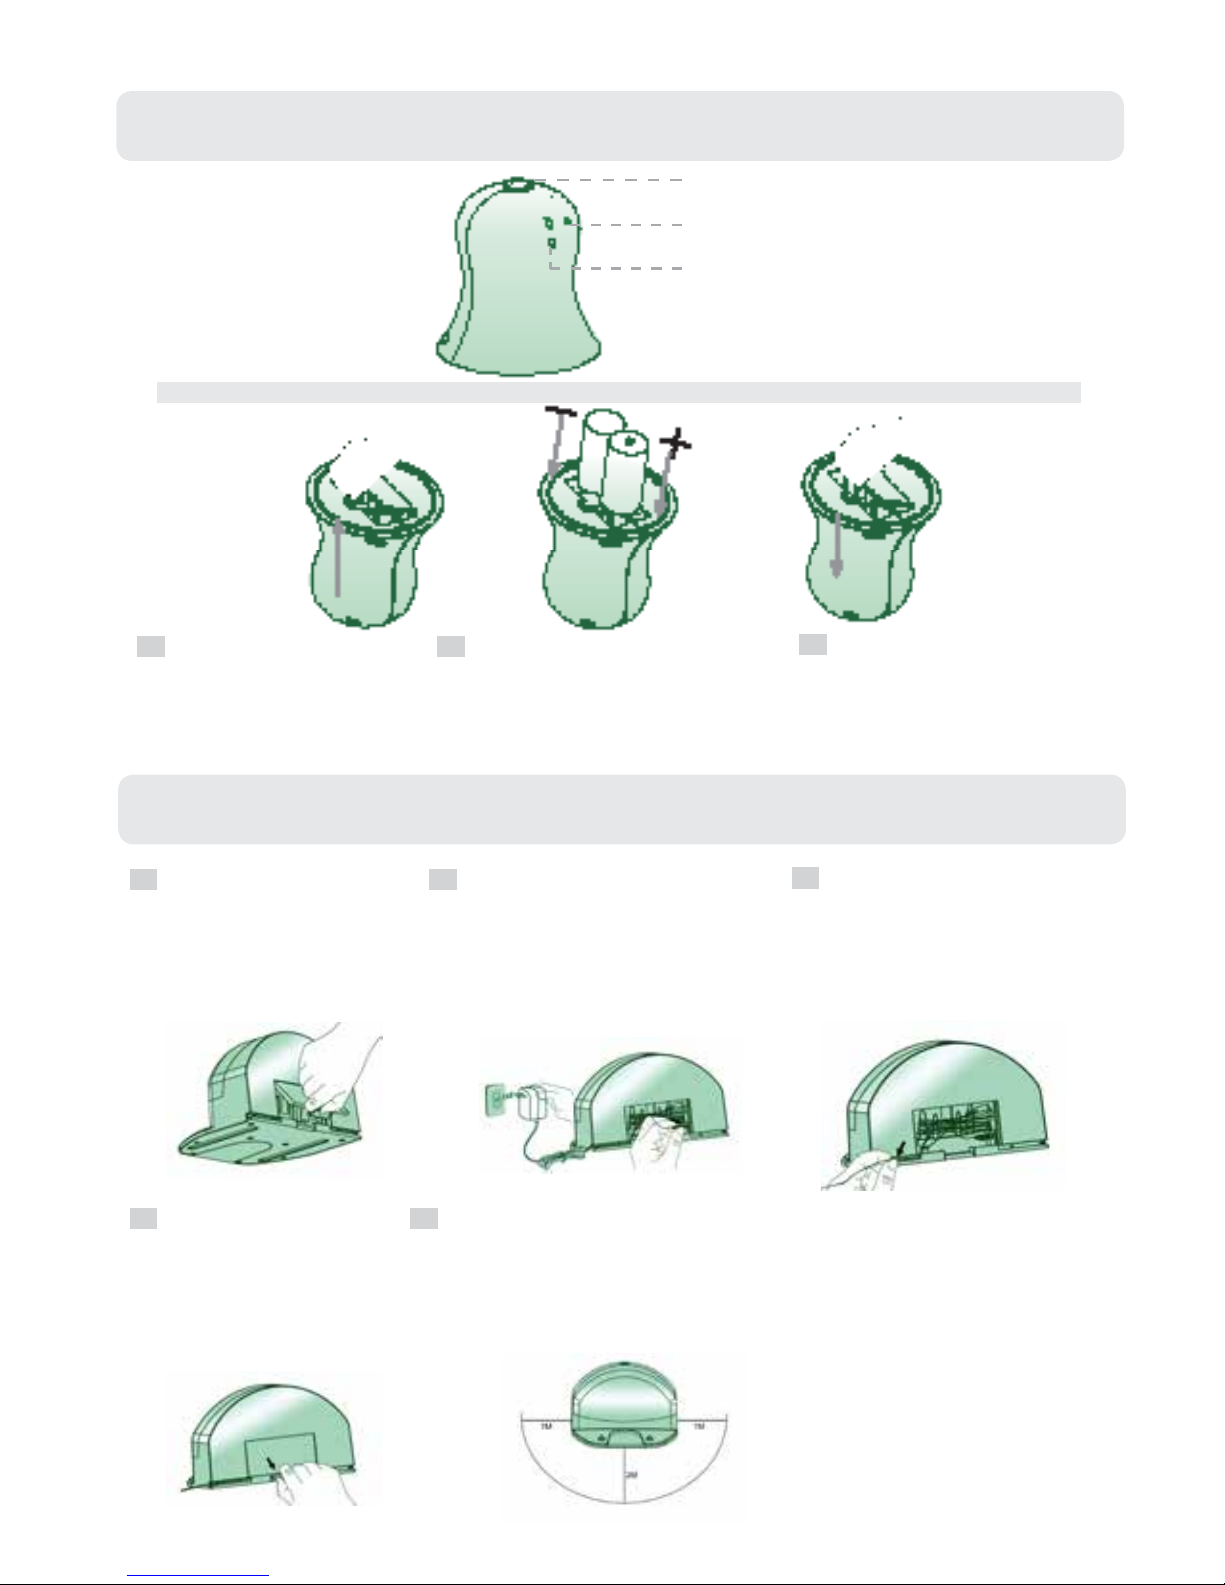
3.7 Virtual Wall
3.8 Installation of Charging Base
Lift the clasp on the back
of the charging base and
open the cover.
Connect the power adaptor
with the power socket and
charging base.
Tidy up the spare power
cord and put it into the
back hopper. Then put
extension cord along the
slot.
Close the cover. Put the charger base on a hard level surface and againts a
wall or other immovable object to prevent it from sliding
during charging.
Clear objects within one meter from both sides and within
two meters from the front of charging base.
1 2 3
4 5
Installing Virtual Wall Batteries
Power Switch
Signal Window
Signal Light
Lift the cover of the
virtual wall.
Install 2x C Type batteries
into the virtual wall as shown
above.
After inserting the clasp
of the cover into the slot,
push the other end to
close it.
1 2 3
NOTE: If not used for a long time, please remove the batteries.

12
3.9 Display Screen
Auto Cleaning Light
Spot Cleaning Light
Day Light
(Monday , Tuesday etc)
UV Light
Power Light
Time/Error Code Light
1. CLEAN
Press this buttom, the robot will enter into auto cleaning mode.
2. SCHEDULE
Press this button, you can set ‘Day’, ‘Hour’, ‘Minute’ in order.
3. CHARGE
A. Press this button, the robot will enter auto-recharging mode.
B. When setting the cleaning day, just press this button to conrm the
day.
C. When setting ‘Hour’ and ‘Minute’, press this button to choose the
correct gures.
Indicator Instructions
Touch Buttons
CLEAN
SCHEDULE
CHARGE
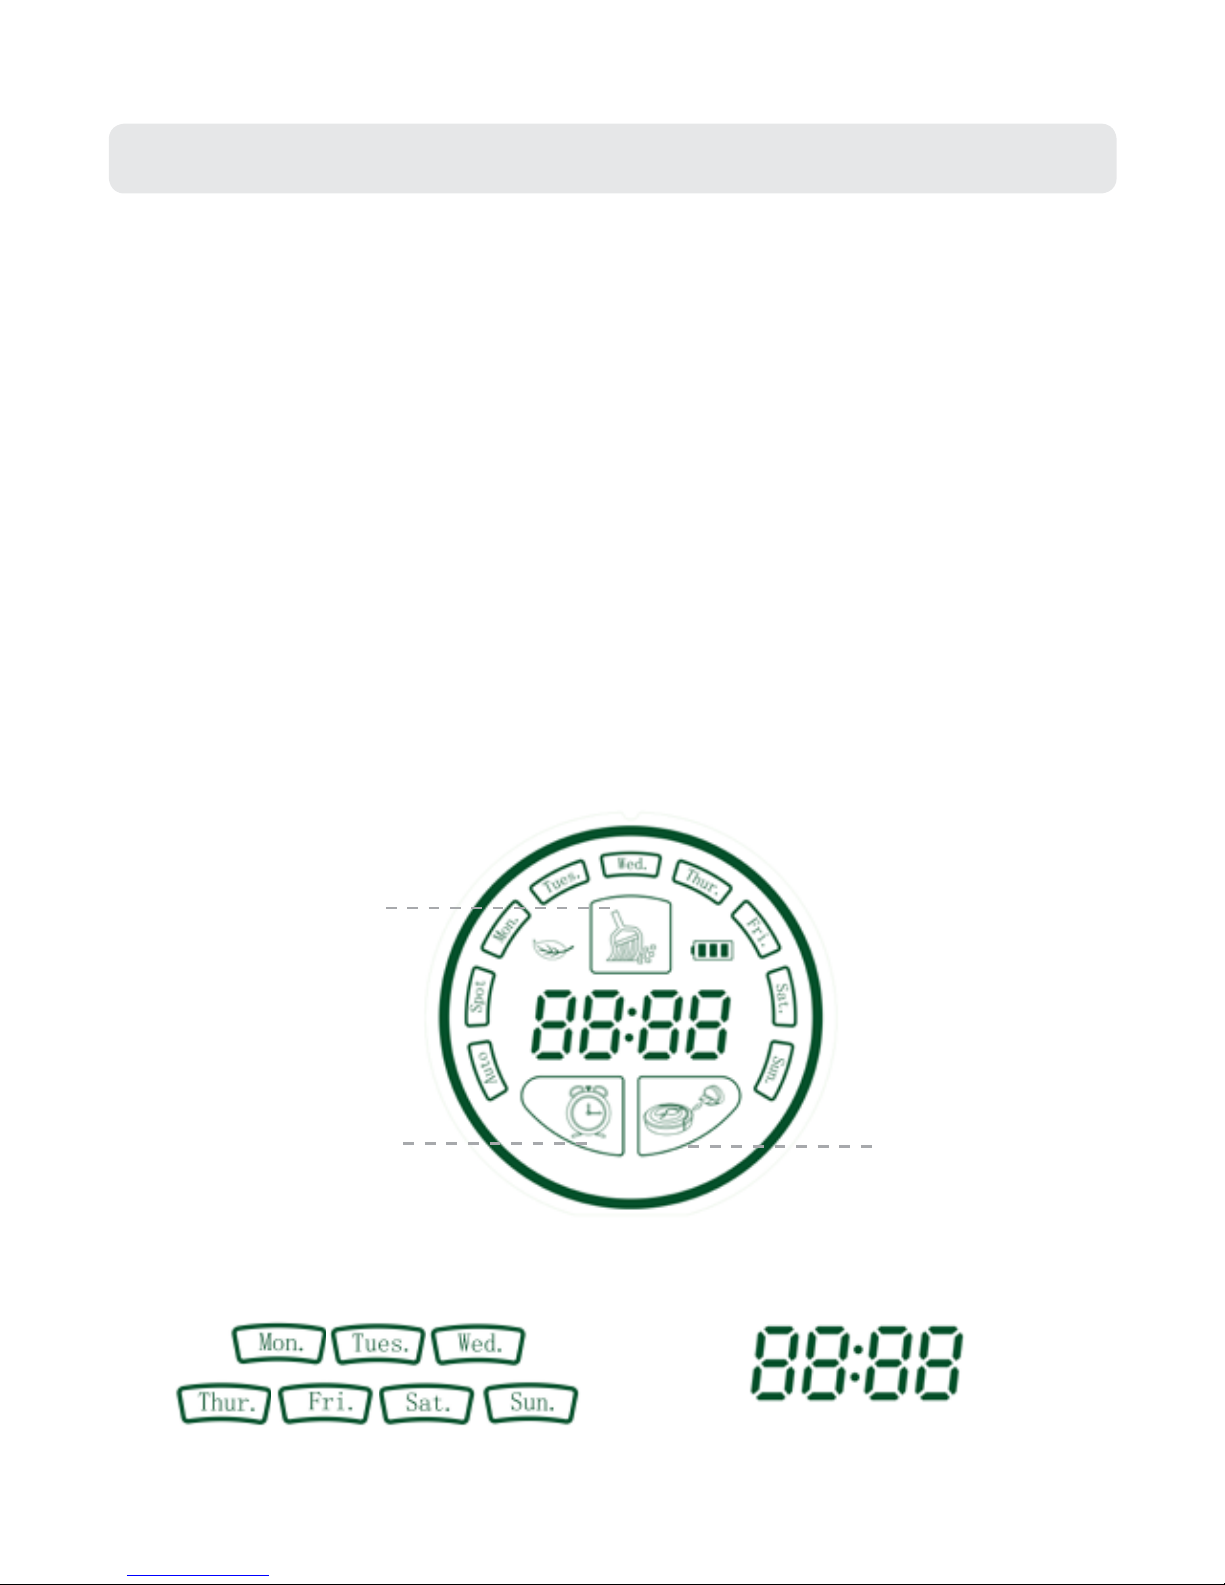
13
Day Light
(Monday , Tuesday etc)
4.1 Setting Current Time
4. HOW TO USE
1. Setting the ‘Day’:
A. Switch the machine on with the switch
on the side, you should see the main
screen turn on with all the lights lit and it
will beep once. As soon as you hear this
beep press the CHARGE Button on the
machine (bottom right button). At this
point if timed correctly the ‘Mon’ icon will
be ashing.
B. Press the SCHEDULE button (bottom
left button) to move through the days
until the correct day is lit, once the correct
day is reached press the CHARGE Button
twice to select the day. If this is set
correctly the day you have selected should
be lit.
2. Setting the ‘Hour’ and ‘Minute’.
A. Once the day is set press the SCHEDULE
button again to move through to the time,
the digit you are currently on should ash.
Press the CHARGE button to change the
number to the correct number.
B. Press the SCHEDULE button to move
onto the next digit. Again press the
CHARGE button to change the number,
repeat this until the time is correct.
3. Once the correct day and time have been selected press the CLEAN Button (top button)
to conrm and save the settings
Note: You must press the CLEAN button to save the time settings.
Day Light Time Display
Hour Light Minute Light
SCHEDULE CHARGE
CLEAN

14
4.2 How to Charge
1. Auto-Recharging
When the cleaning work is done or the battery power is running low,
the robot will return to the charging base to recharge automatically.
Note: If aected by obstacles, low power or a complicated environment, the robot may
not be able to return to the charging base for automatic recharging. If this occurs please
charge the robot manually.
2. Manual Charging
If the robot is being used for the rst time or you want to charge the robot during its
cleaning, please charge the robot manually.
Position the robot pointing
at the charging base
manually. After one beep,
the indicator light on the
charging base will ash red
and blue alternately. This
indicates that the robot
is in the correct charging
position.
Press the CHARGE button
on the display screen or on
the remote, the robot will
return to the charging base
to recharge automatically.
Charge the robot directly by
plugging the power adaptor
directly into the robot.
Ways of Manual Charging:
A B C

15
4.3 How to Start and Pause Cleaning
1. Start Cleaning
Turn on the power switch.
1.1 Touch CLEAN button, the robot
will enter into auto cleaning mode.
The AUTO light is always on until
the robot returns to the charging
base to recharge.
1.2
2. Pause Cleaning
Touch any button as shown below,
the robot will enter into stand-by
state and pause cleaning.
2.1 Turn o the power switch.
2.2
4.4 Setting Schedule Cleaning Mode
1. Schedule the ‘Day’:
A. Turn on the power switch and the robot
will enter into a stand-by state.
B. Press SCHEDULE button to select the
‘Day’ you want, then press the CHARGE
button twice to conrm. (When the Day
light is constantly lit, it means the setting
is successful). You can schedule the robot
to clean per day, up to seven times per
week.
2. Schedule the ‘Hour’ and ‘Minute’.
A. Once the day is set press the SCHEDULE
button again to move through to the time,
the digit you are currently on should ash.
Press the CHARGE button to change the
number to the correct number.
B. Press the SCHEDULE button to move
onto the next digit. Again press the
Charge button to change the number,
repeat this until the time is correct.
3. Press the CLEAN Button to save the schedule setting.
NOTE: You must set the current time before setting a schedule.
Hour Light Minute Light
SCHEDULE CHARGE
CLEAN
16
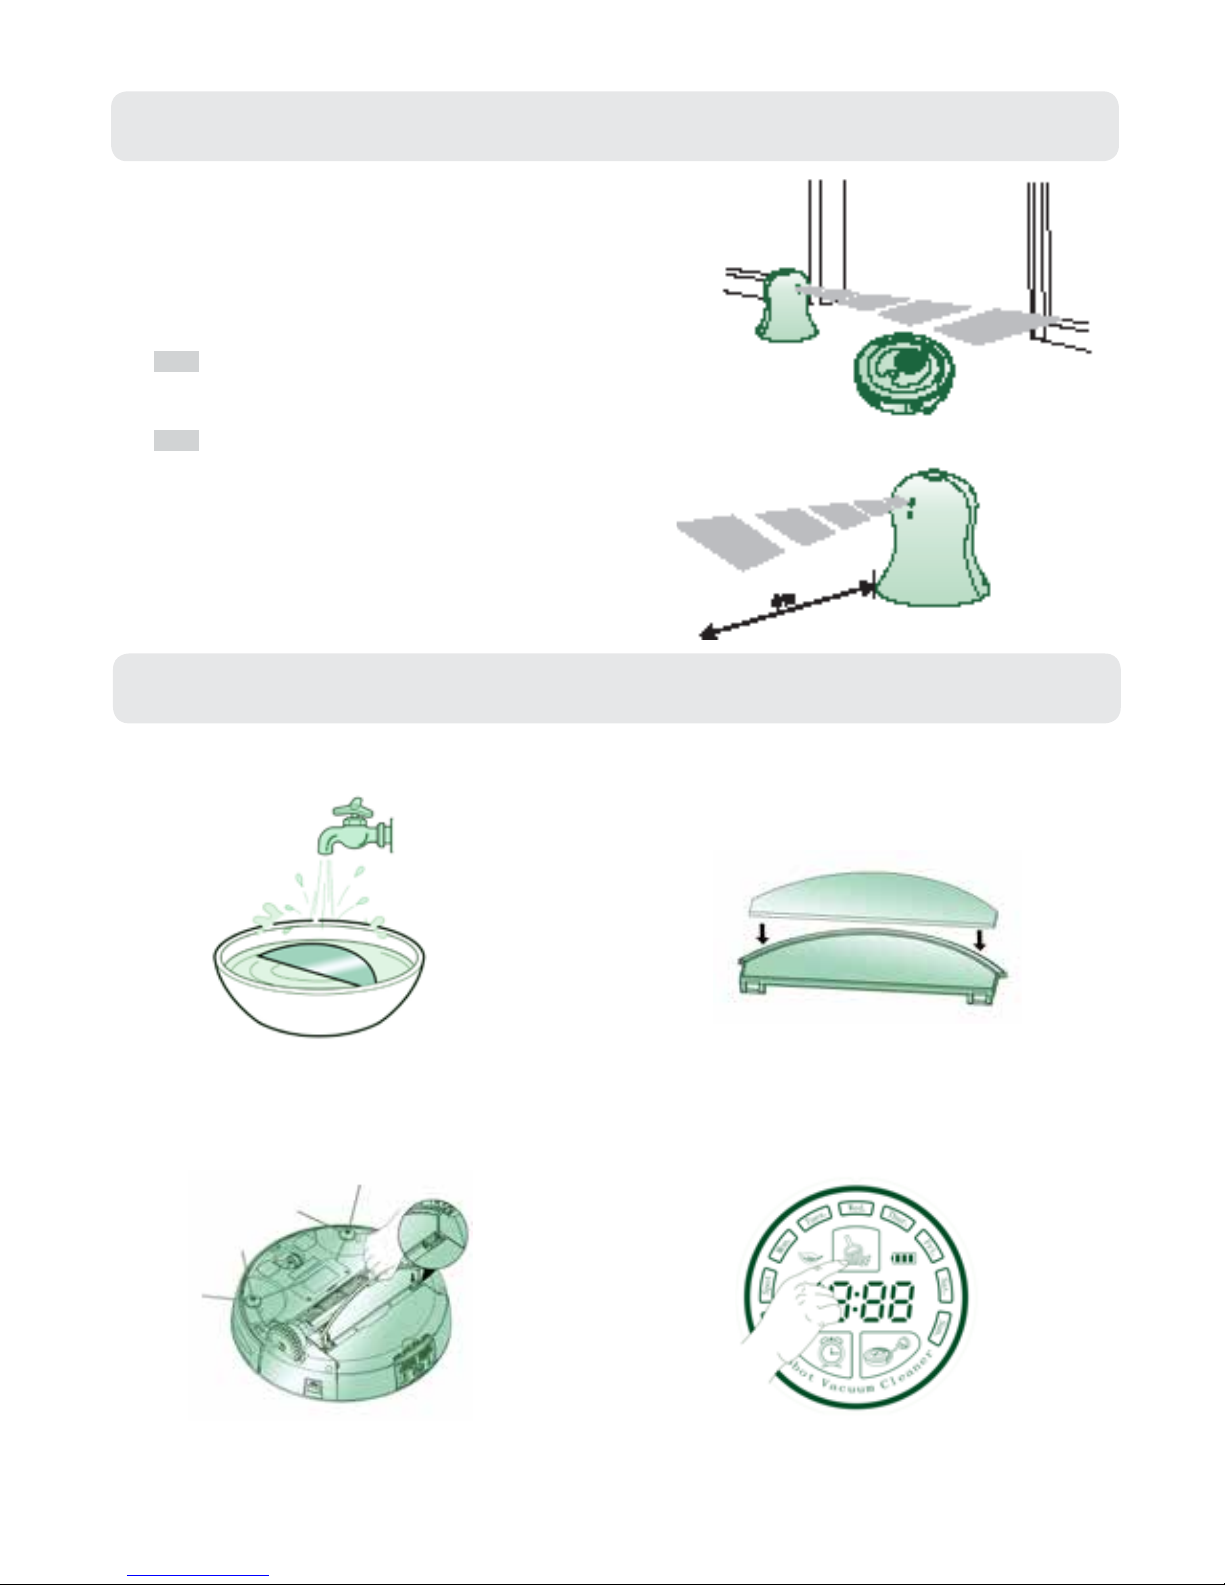
4.5 How to use the Virtual Wall
The Virtual wall is used to prevent the robot from entering
o-limit areas. It can create a 4-meter length strip to separate
two areas, such as in front of doors, doorways or where there
are applicances or other fragile objects.
After the batteries have been installed, turn on the
power switch.
1
Place the virtual wall where you would like it to work.
2
NOTE:
1. When using the virtual wall, aim the signal
window towards the area you want to set.
2. Turn the power o when not using the virtual wall.
4.6 How to use the Mop Attachement
1. Get the mop wet. 2. Stick the mop on the mop plate.
3. Attach the mop plate to the robot. 4. Press the CLEAN Button.
TIP: The mop is only suitable for use on hard oors. Please remove the mop and mop
plate when using the robot on carpet.

17
5.1 Cleaning the Dust Bin
If the dust bin is full, the suction power will be weakened. Please empty the dust bin
before and after every use. Please follow the steps below:
5. MAINTENANCE
Before performing the robot maintenanee, please ensure the power switch is o.
Press the bin release
button to pop out the
dust bin.
Hold dust bin with both
hands, use thumb to press
each side button and stretch
other ngers, the dust bin
will be open completely.
Use a cleaning brush to
clean the dust bin and
HEPA Filter.
1 2 3
Close the bottom board
of the dust bin.
Install the dust bin into the
robot.
4 5
When washing the dust
bin and HEPA Filter,
please dismantle the fan
module.
After washing, dry them
in a well-ventilated place
avoiding direct sunlight.
NOTE:

18
5.2 Cleaning the Main Brush and Dusting Brush
Excessive build up of hair in the brushes can damage the robot. Please clean the brushes
at least once per week.
Turn the robot over and
put it on a smooth soft
and level surface.
Remove the brush guard by
lifting both xing clasps.
Lift up the right side of
the brushes and take
them out in order.
1 2 3
Clean any hair and dirt
wrapped around the
brushes with a cleaner
or scissors. Don’t wash
the brushes to avoid any
damage.
Install the main brush and
dusting brush into the
robot.
Make the anges of the
brush bracket align with the
xed grooves of the main
body. Then press the xed
clasps inward. It will click
when installed correctly.
4 5 6
NOTE:
1. Make sure that the anges of the brush guard are aligned with the xed grooves of the
main body.
2. Make sure that the side brushes are not stuck under the brush guard.
5.3 Cleaning the Sensors and Charging Contacts
Turn the robot over, put it on a smooth soft and level surface. Use a soft and dry cloth or
cleaning brush to clean the sensors and charging contact pieces. Please follow the steps
as below:
1 2 3
19
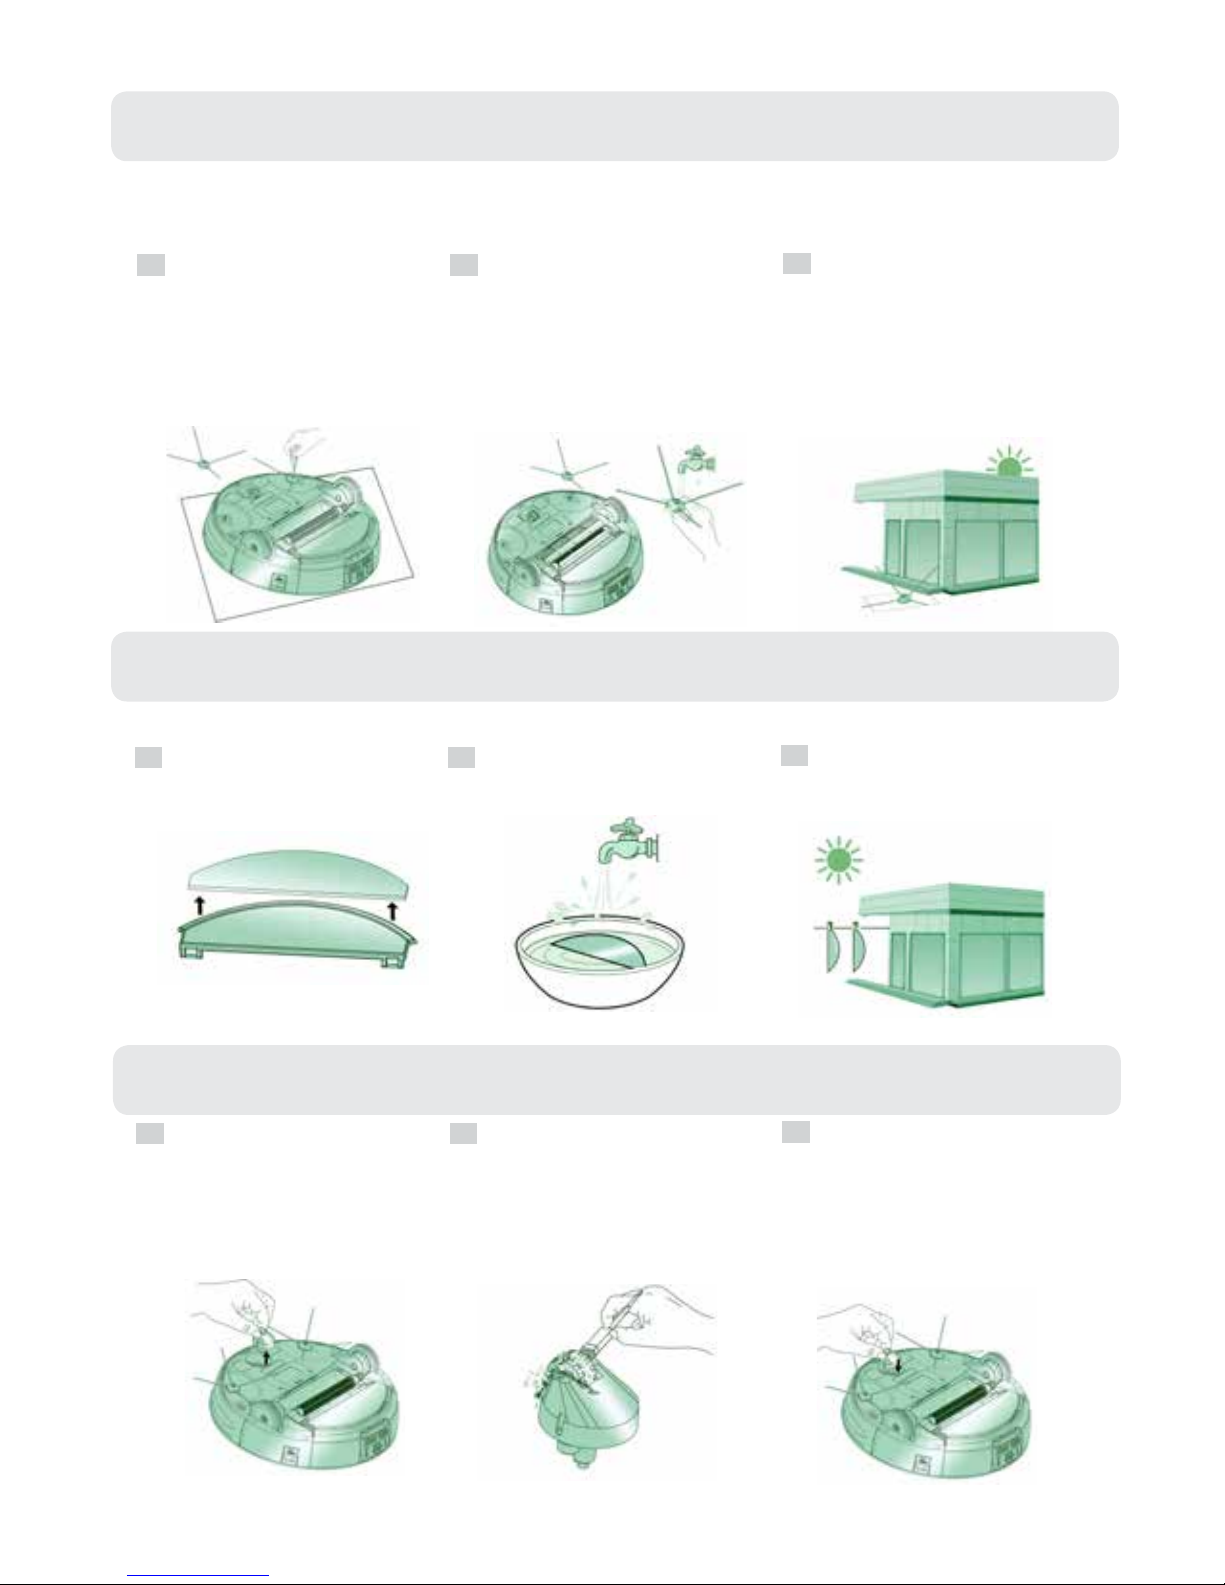
5.4 Cleaning the Side Brushes
Excessive build up of hair in the brushes can damage the robot. Please clean the brushes
at least once per week.
Turn the robot over
and put it on a smooth
soft and level surface,
remove the screws of
the side brushes with a
screwdriver.
Pull out the side brushes
and wash them
After drying the side
brushes in a well-
ventilated place avoiding
direct sunlight, install
them back to the robot
with a screwdriver.
1 2 3
5.5 Cleaning the Mop
To avoid odors, the mop should be washed after every use. Please follow the steps below:
Separate the mop from
the mop plate.
Wash the mop carefully. Dry the mop in a sunny
well-ventilated place.
1 2 3
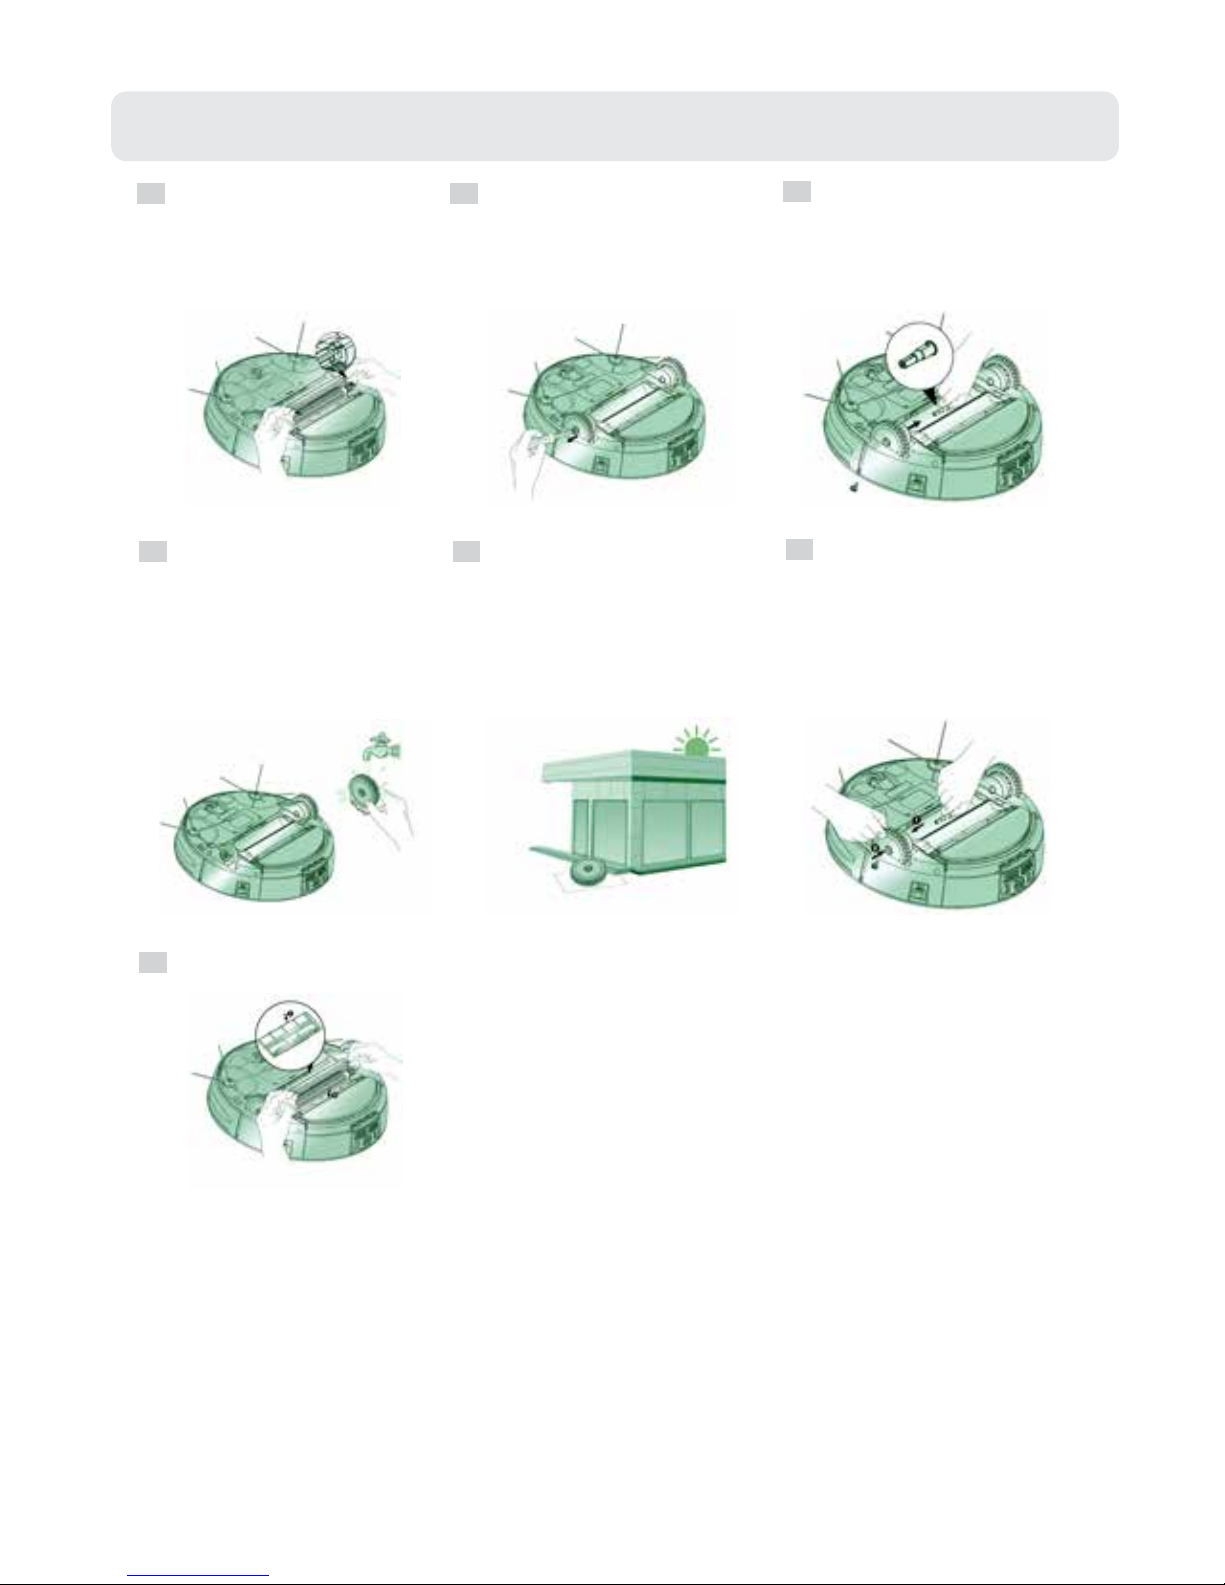
5.6 Cleaning the Universal Wheel
Turn the robot over and
put it on a smooth soft
and level surface, then
pull out the universal
wheel.
Clean the hair and debris
from the universal wheel.
Install the universal
wheel into the robot.
1 2 3
20
5.7 Cleaning the Right and Left Wheels
Turn the robot over and
put it on a smooth soft
and level surface, remove
the brush guard
Remove the xed screws
from the right and left
wheels with a screwdriver.
Pull out the connection
shaft in the middle of the
right and left wheels.
1 2 3
Take out the right and
left wheels and wash
them.
Dry the right and left wheels
in a well-ventilated place
avoiding direct sunlight.
Align the hole of the
wheels with the hole of
the wheel frame, install
the connection shaft.
Then screw back in the
xing screws.
4 5 6
Install the brush guard.
7
Table of contents


