Thinkware BAB-50 User manual

Customer Quality Management
© 2018 THINKWARE. All rights reserved. 1
Apr 3
, 2018
CS Department
Customer Quality Management Department
iVolt Dash Cam External Battery
Installation Guide
Models: BAB-50 & BAB-100 (overseas models)

Customer Quality Management
© 2018 THINKWARE. All rights reserved. 2
Table of Contents
1. Parts …..……………………………………………………..…….…..
2. Product Specifications ……..…………………..…………...…..
3. Wiring Diagram for Installation –BAB-50 ……………....
4. Wiring Diagram for Installation –BAB-100 ……………..
5. Installation ………………….……………………………………….
6. LED Status Indicator ...……………………………….…….……..
7. Precautions ………….……………………………………….……..
.
3
4
5
7
9
24
25
Customer Quality Management
© 2018 THINKWARE. All rights reserved. 3
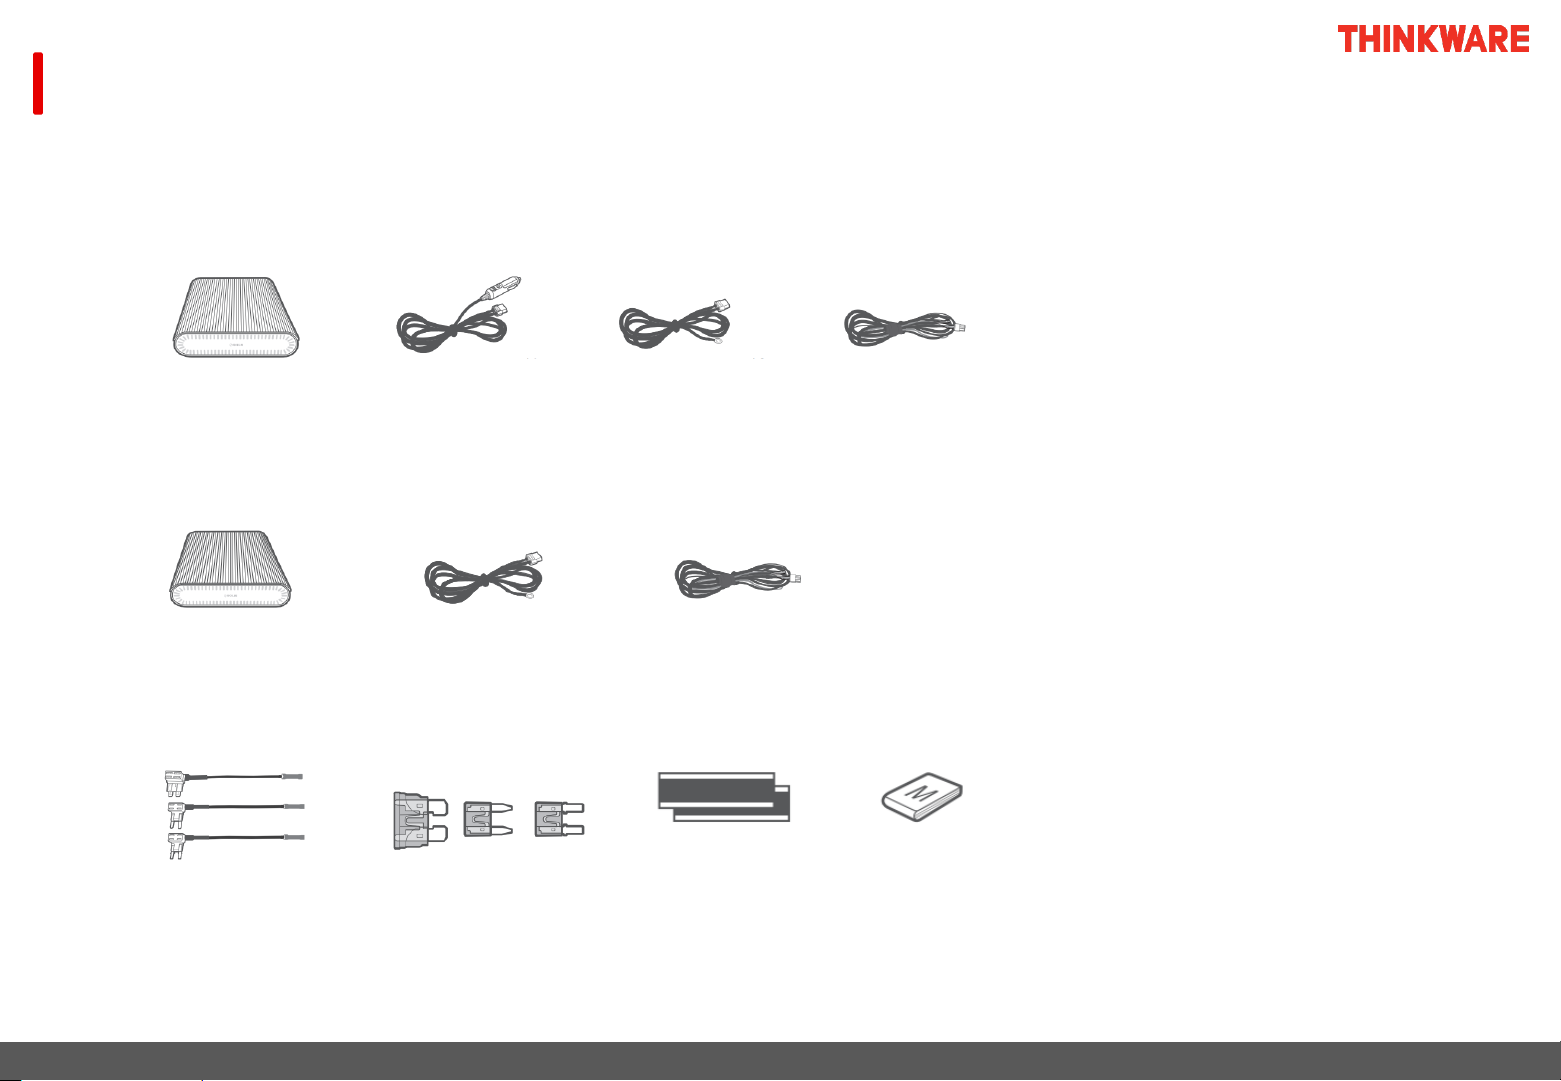
1. Parts
*1. The cigar jack charging cable is included only if you have purchased a cigar jack option product.
*2. The fuse box charging cable is included only if you have purchased a hardwire cable option product.
•BAB-50 (iVolt Mini)
•Common
•BAB-100 (iVolt)
Main Unit Output Cable
Main Unit Cigar Jack
Charging Cable *1
Output CableFuse box
Charging Cable
(Hardwiring) *2
Fuse Holder *2 3 Fuse Types *2 Velcro Tape Simple Manual
Charging Cable

Customer Quality Management
© 2018 THINKWARE. All rights reserved. 4
2. Product Specifications
Category Specifications
Model BAB-50
(iVolt Mini)
BAB-100
(iVolt)
Input Power 12.0 - 15.5V / 9A Max. 12.0 - 15.5V / 12.5 A Max.
Output Voltage / Current 11.5 - 14.4V / 2A Max. 11.5 - 14.4V / 2A Max.
Charge Voltage / Current •LOW (Normal charging mode): 14.4V / 5A
•HIGH (Fast charging mode): 14.4V / 7A 14.4V / 9.4A (Fast charging)
Charge Time •LOW (Normal charging mode): Around 1 hour (5A)
•HIGH (Fast charging mode): Around 45 minutes (7A) Around 1 hour (9.4A)
Run Time Around 16 hours
(Based on 3.5 W power consumption)
Around 32 hours
(Based on 4 W power consumption)
Battery Type LiFePo4 (Lithium iron phosphate) LiFePo4 (Lithium iron phosphate)
Battery Capacity 12.8V / 4,500 mAh / 57.6 Wh 12.8V / 9,900 mAh / 126.7 Wh
Input Power Type ACC power B+ power
Change to Charge Mode When there is input power When there is ACC power
Remarks
2 different charging cables are available
(Cigar jack type or Hardwiring type) -

Customer Quality Management
© 2018 THINKWARE. All rights reserved. 5
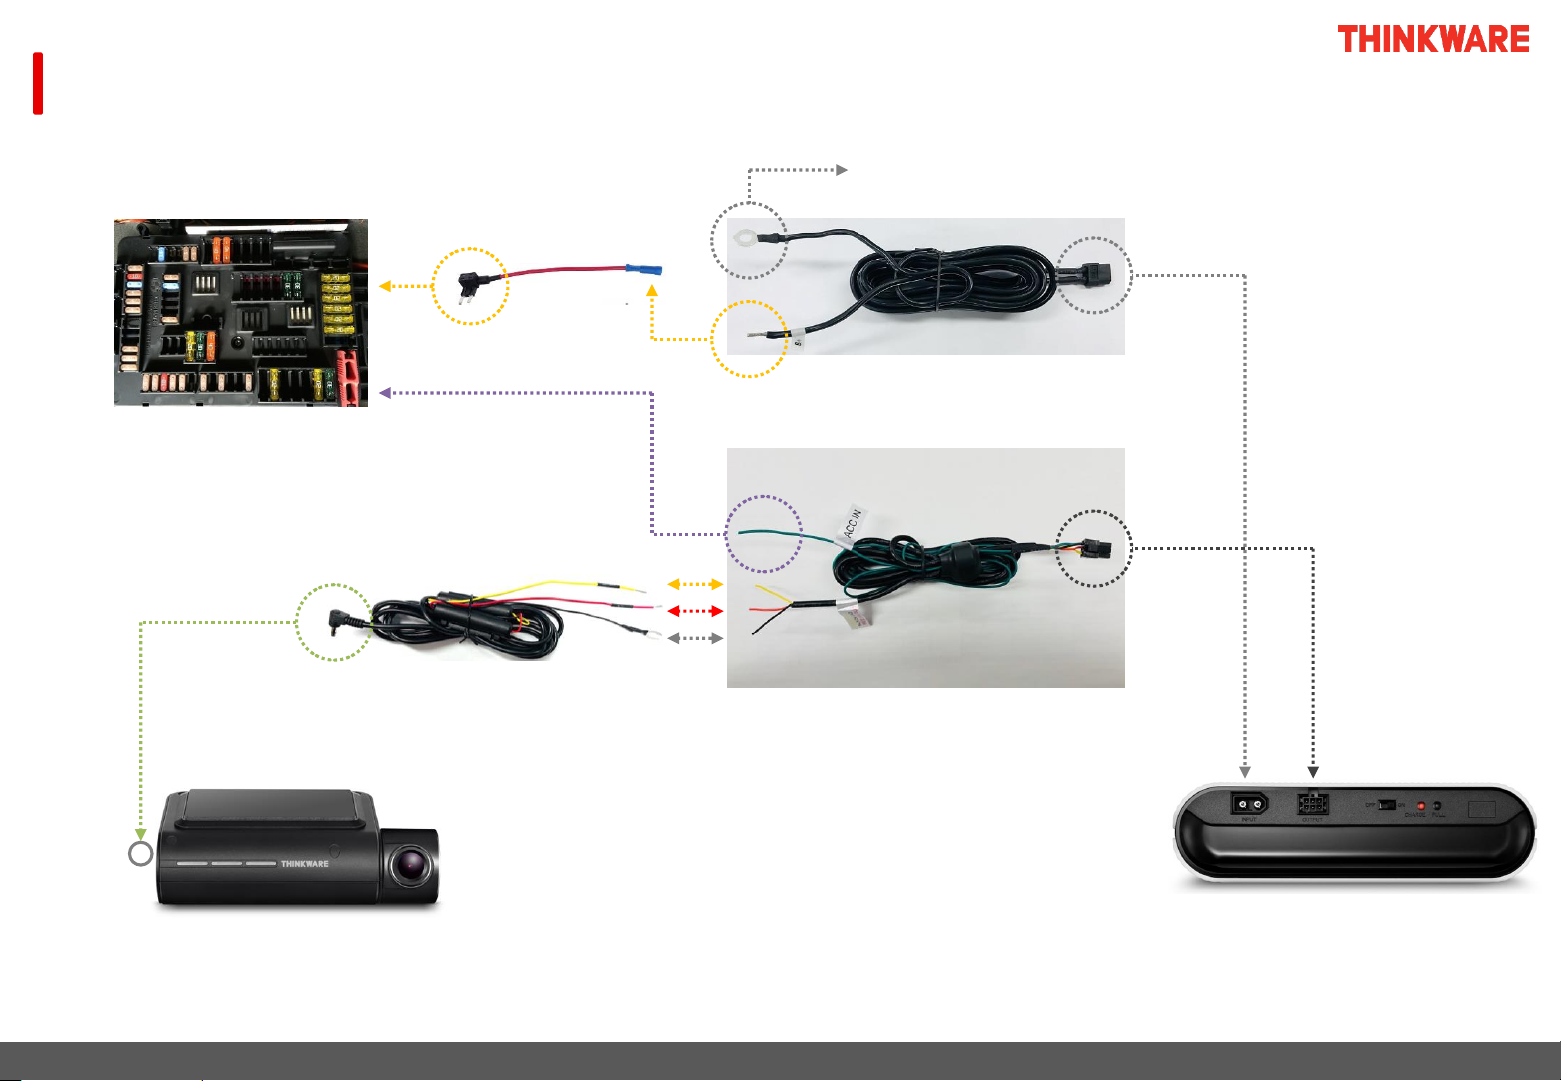
3. Wiring Diagram for Installation –BAB-50 (Connecting to the Fuse Box)
BAB-50 Main Unit
Dash Cam
Constant Power Cable
* The BAB-50 model uses an ACC power fuse of 20A or higher when the fuse box charging cable is connected.
Interior Fuse Box
Fuse Holder
B+
ACC
GND
ACC Power
Input
Ground to Chassis (GND)
Hardwiring Cable
Output Cable
Switch HIGH
(7A) Setting
DC-IN

Customer Quality Management
© 2018 THINKWARE. All rights reserved. 6
4. Wiring Diagram for Installation –BAB-50 (Connecting to the Cigar Jack)
BAB-50 Main Unit
Dash Cam
Constant Power Cable
* Do not connect the 12V cigar jack power port which uses battery power (B+) to the port.
** You cannot connect the BAB-100 model directly to the 12V cigar jack power port of the vehicle.
12V Cigar Jack Power Port
(ACC Power)
B+
ACC
GND
ACC Power
Input
Cigar Jack Charging Cable
Output Cable
Switch LOW
(5A) Setting
DC-IN
Customer Quality Management
© 2018 THINKWARE. All rights reserved. 7
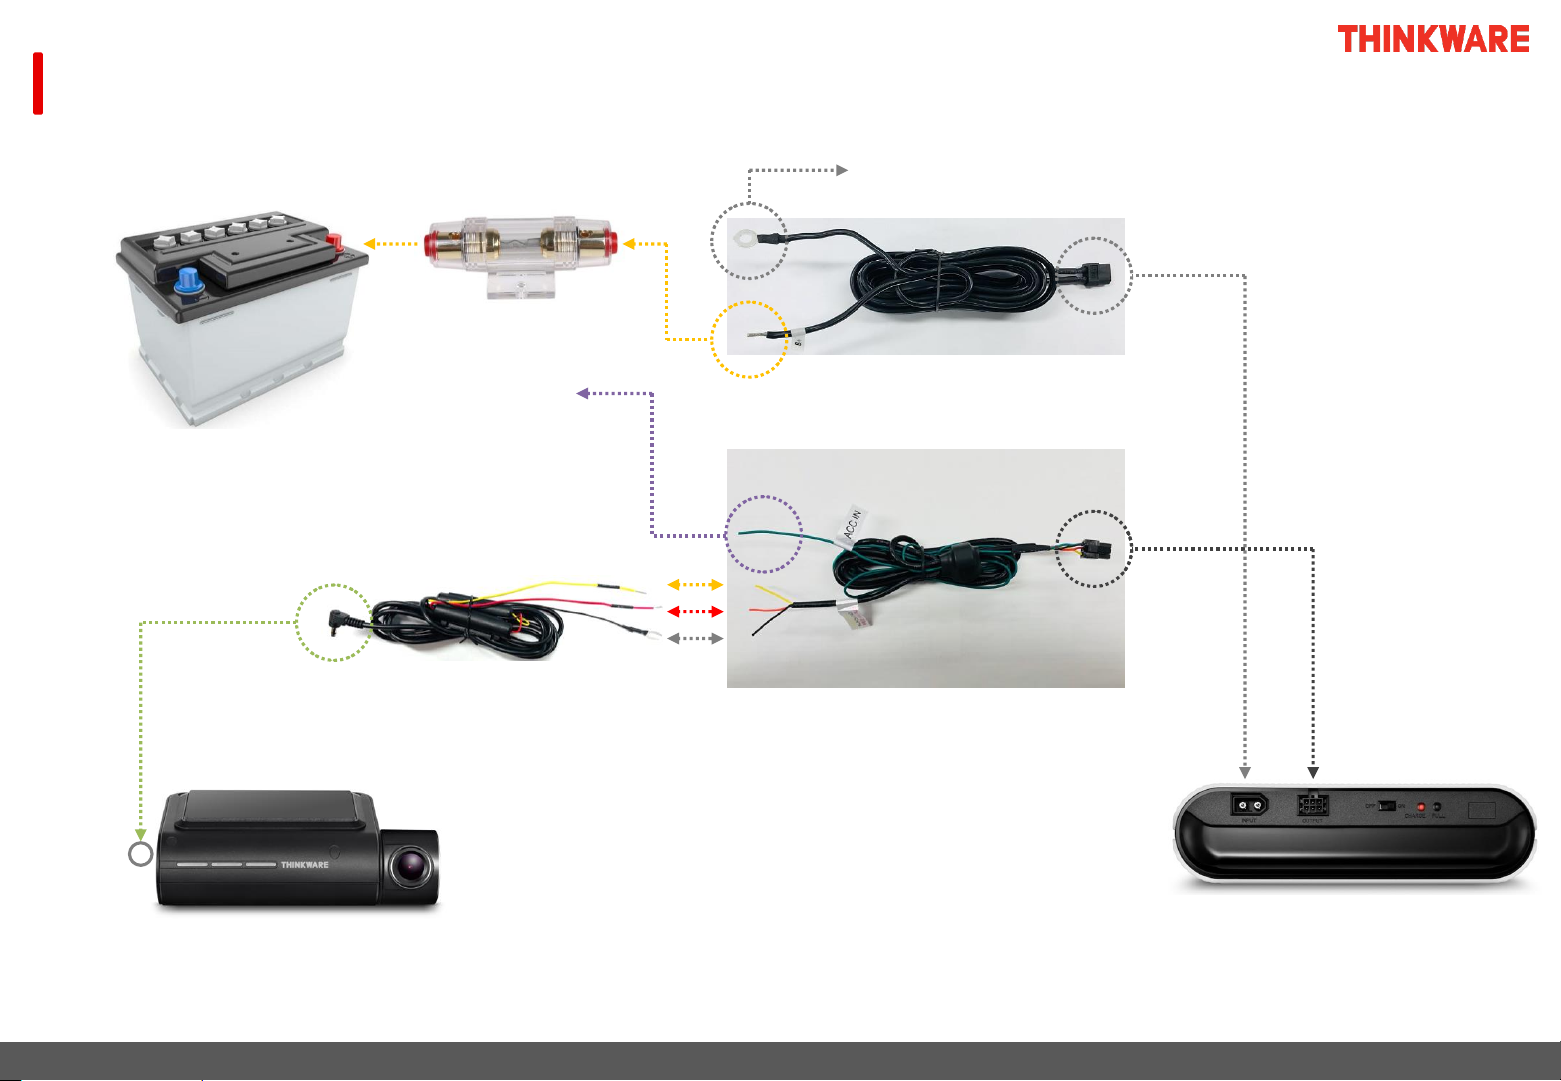
5. Wiring Diagram for Installation –BAB-100 (Connecting to the Fuse Box)
BAB-100 Main Unit
Fuse Holder
B+ Power Input
ACC Power Signal Input
Ground to Chassis (GND)
Charging Cable (Power Input)
Output Cable
ACC IN
Dash Cam
Constant Power Cable
DC-IN
B+
ACC
GND
Interior Fuse Box
* BAB-100 model uses B+ power fuse of 20A or higher when the charging cable is connected.
Customer Quality Management
© 2018 THINKWARE. All rights reserved. 8
6. Installation Wiring Diagram –BAB-100 (Connecting to the Car Battery)
* A separate purchase AGU or ANL fuse block (20A or higher) is required when connecting directly to the car battery.
** You cannot connect the BAB-50 model directly to the car battery.
ACC Power Signal
Input
(Interior Fuse Box)
Ground to Chassis (GND)
Charging Cable (Power Input)
Output Cable
Fuse Block
(AGU or ANL)
B+ Power Input
ACC IN
Car Battery
Output Cable
Dash Cam
Constant Power Cable
DC-IN
B+
ACC
GND
BAB-100 Main Unit

Customer Quality Management
© 2018 THINKWARE. All rights reserved. 9
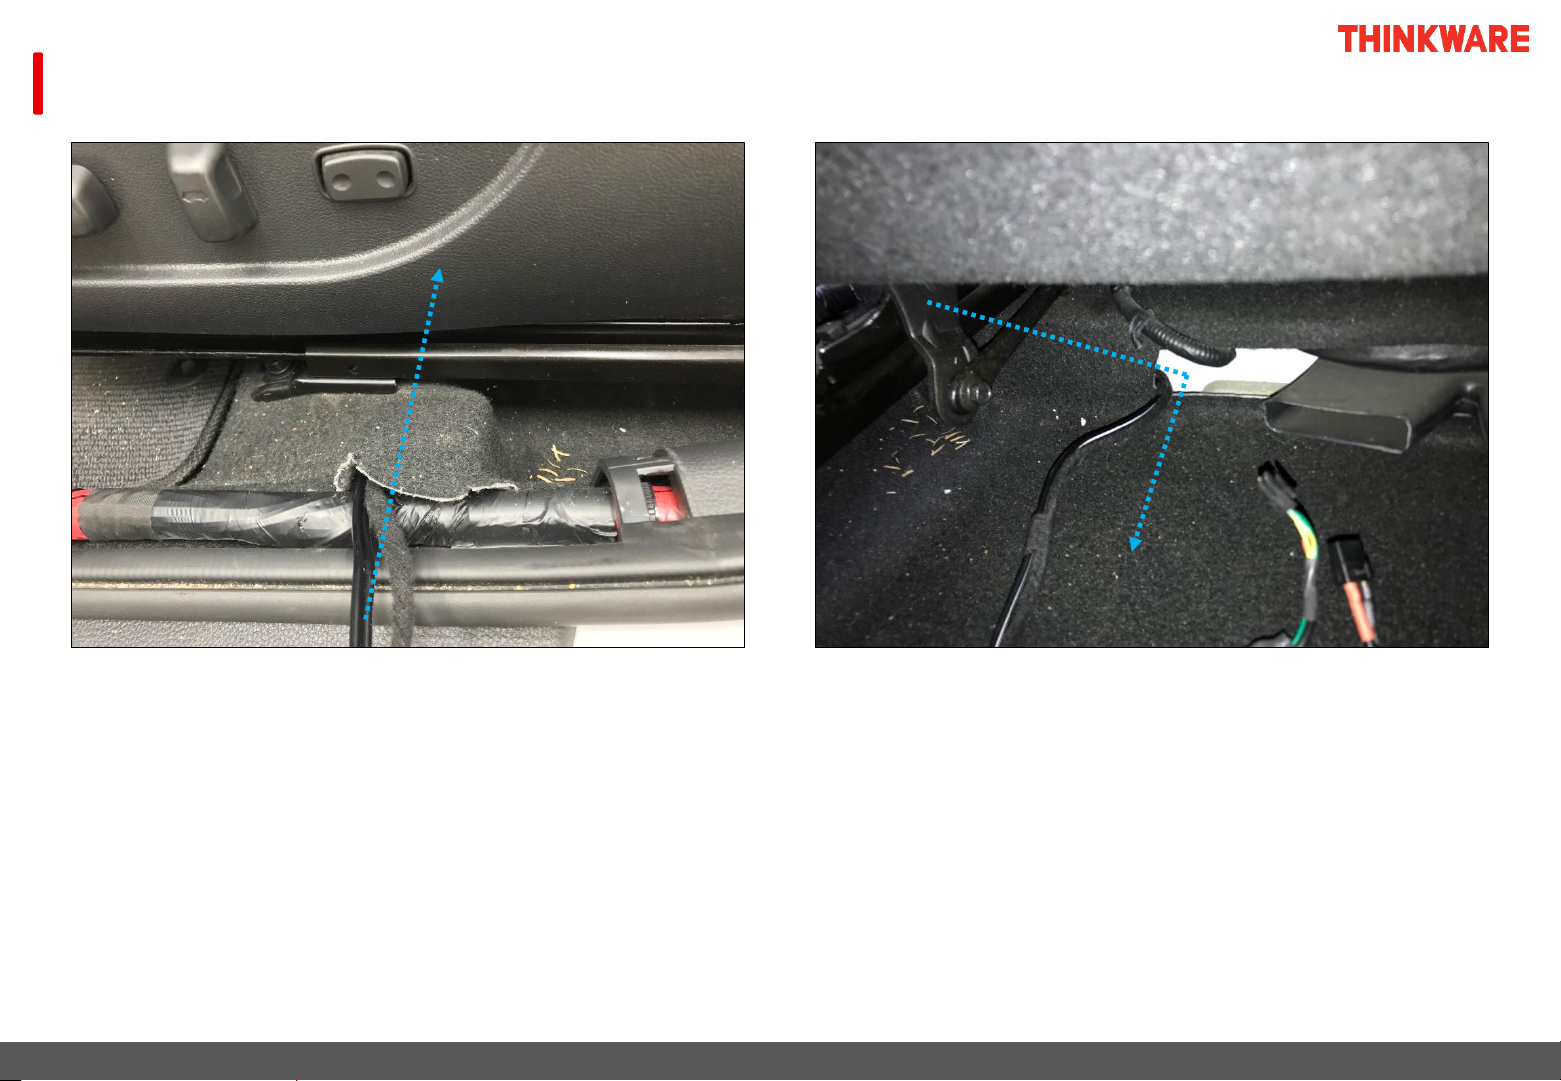
7. Installation
•Location of the external battery
①Below the driver's seat
It must not interfere with adjusting the seat
②Inside the trunk
If it interferes with seat adjustment
when located below the driver’s seat
If a car battery or fuse box is located inside the trunk
Customer Quality Management
© 2018 THINKWARE. All rights reserved. 10
7. Installation
•Installation of the charging cable & output cable
①Remove the door step cover on the driver's seat
② Organize the external battery’s two connectors below the carpet,
just like the genuine wiring
③Follow the genuine wiring of the vehicle and
take the wire out of the other end of the carpet
③Adjust the cable by considering the distance
to the main unit and allowing for slack
This manual suits for next models
1
Table of contents
Popular Camera Accessories manuals by other brands

Viltrox
Viltrox EF-NEX Mount instructions

Calumet
Calumet 7100 Series CK7114 operating instructions

Ropox
Ropox 4Single Series User manual and installation instructions

Cambo
Cambo Wide DS Digital Series Main operating instructions

Samsung
Samsung SHG-120 Specification sheet

Ryobi
Ryobi BPL-1820 Owner's operating manual


