Accsoon TOPRIG S60 User manual

01 02
User Manual | 使用说明书
VIDEO SLIDER
V1.0

CONTENTS
General Information
基本信息
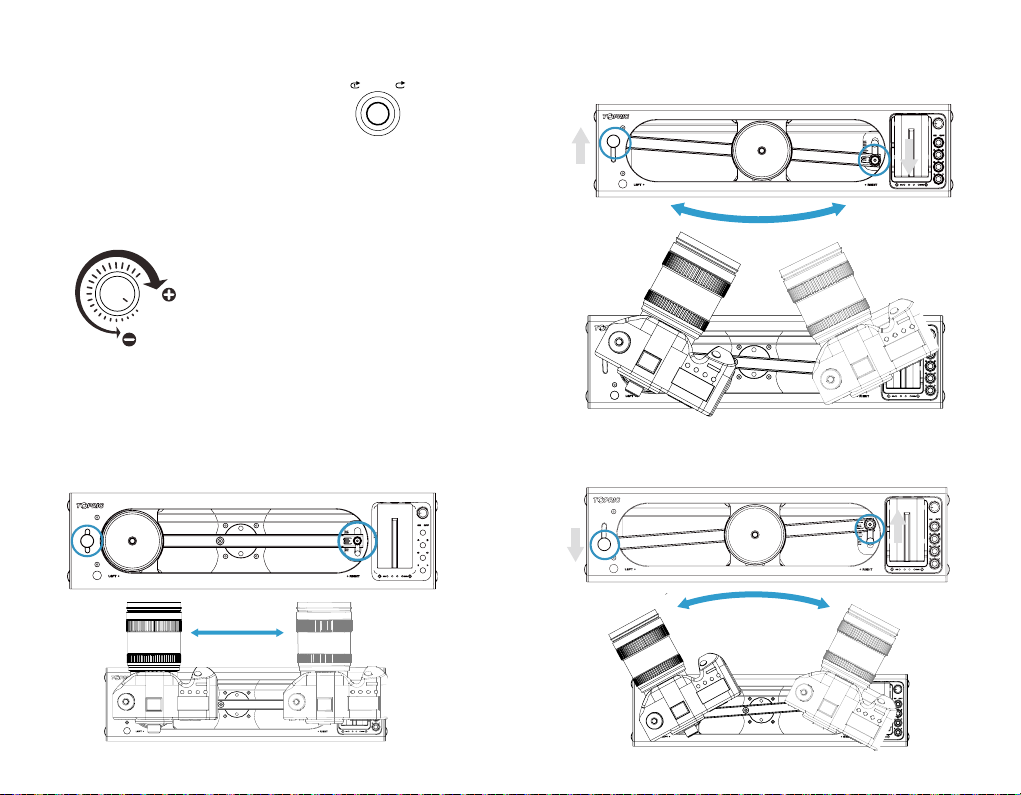
Calibration··············08
行程校准·················24
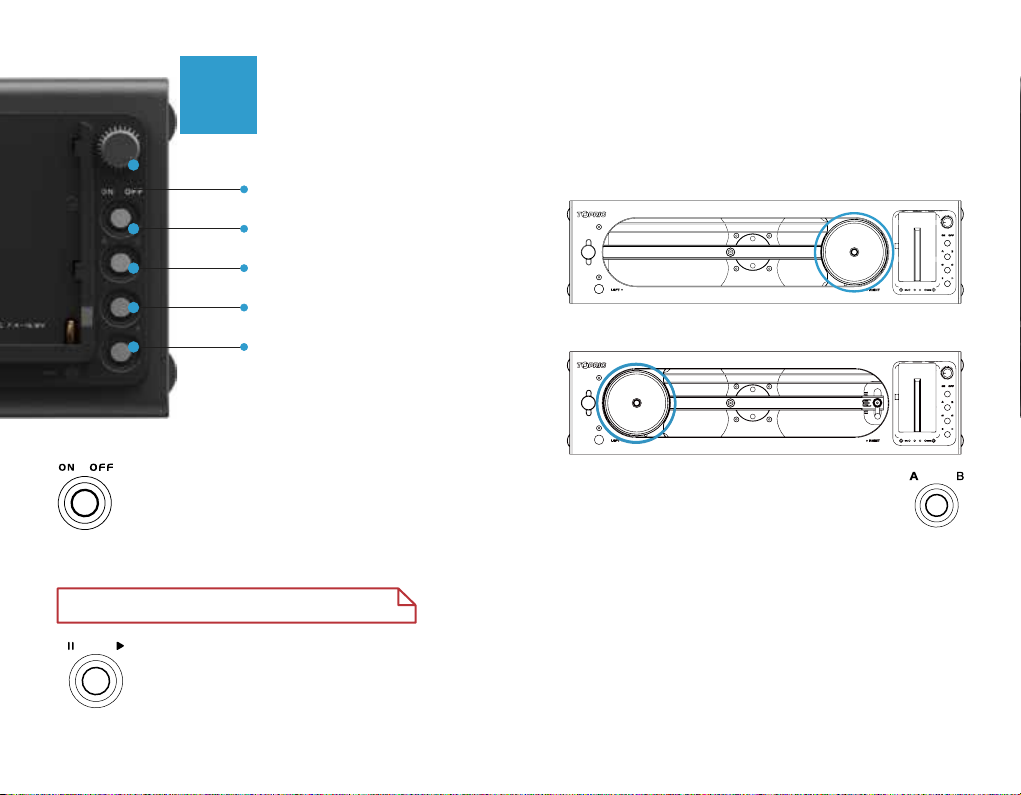
A B P o i n t S e t t i n g·······0 9
A B 点设 置···············25
Sp e ed C on t ro l·········10
速度调节················26
Loop Mode··············10
循环模式·················26
Stationary Object Tracking&Panoramic Mode Setting
········
10
追焦扫景设置············26
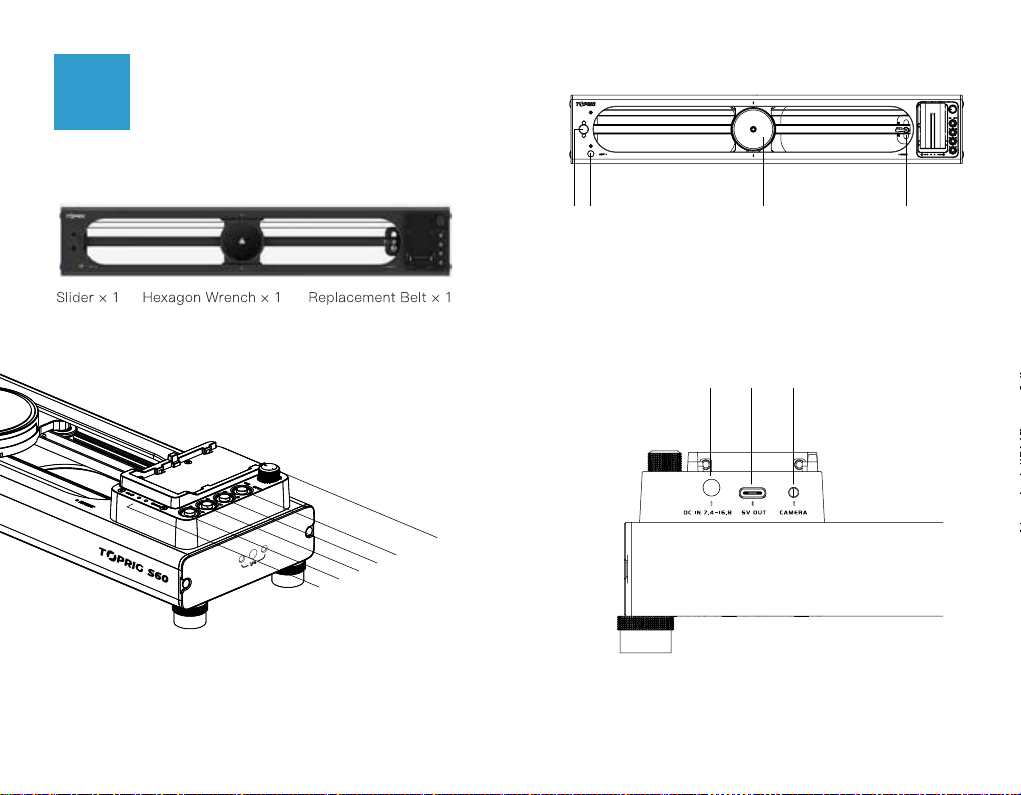
O v e r v i e w················· 02
主体介 绍··················18
Ke y Feature s··········0 4
特点····················20
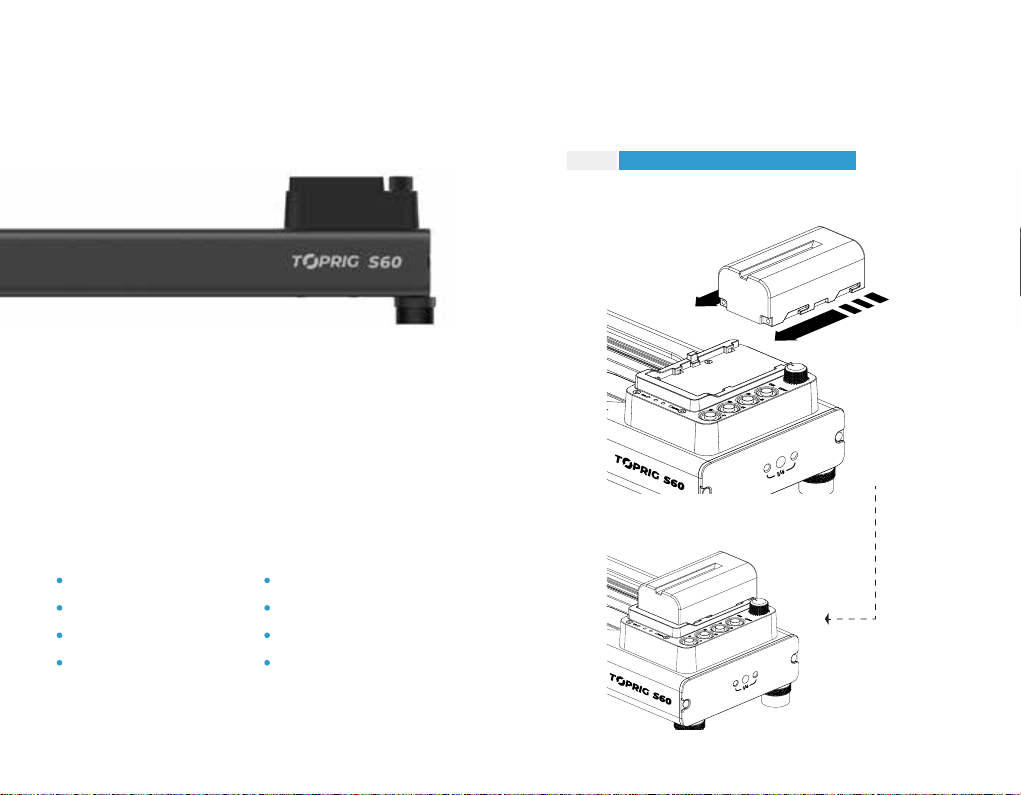
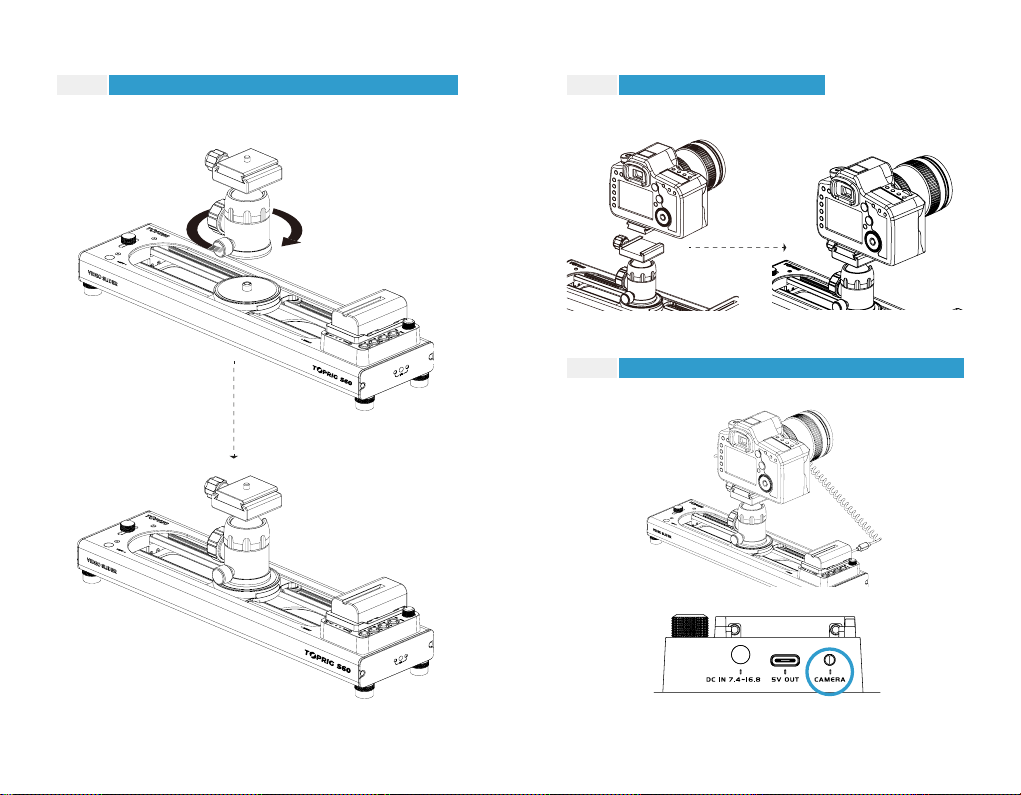
How to In stall···········05
安装说明··················21
In th e B o x··············02
装配清单·················18
P o we r O n/O ··········0 8
开关 机···················24
Functions
基础功能
APP
APP
Specs
Warranty
保修说明
产品规格表
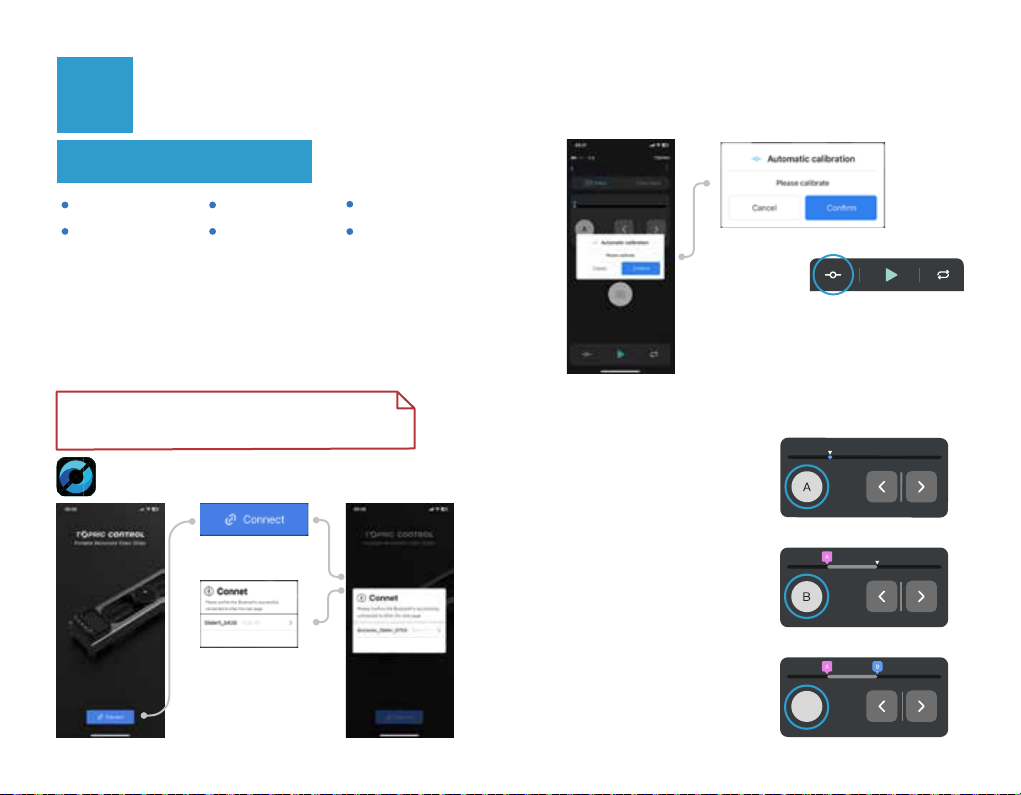
A p p C on n ec t···········12
A p p 和 滑 轨 连 接···········2 8
A B Po i nt S e t t i n g·······13
A B 点 设 置················2 9
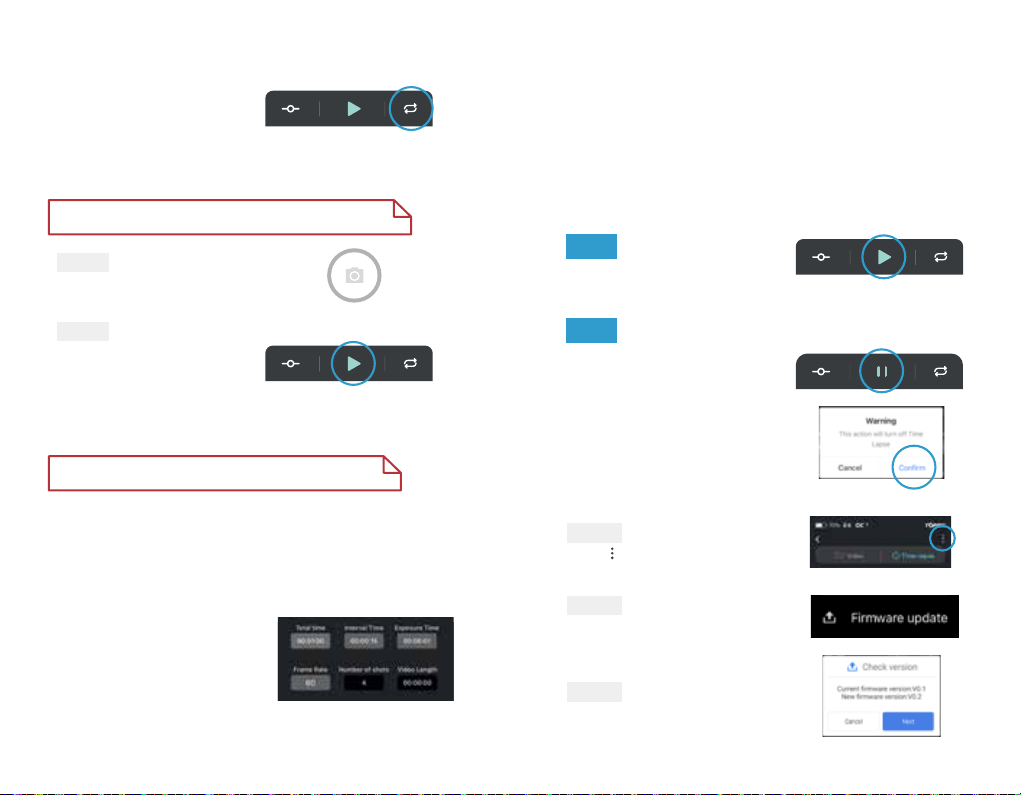
Vid e o S ho otin g········14
视频拍摄················3 0
Fi r mw a re U p da t e······15
固 件 升 级·················3 1
Time-Laps e·············14
延 时 摄 影···················3 0
Lo op M od e···············14
循 环 模 式···················3 0
Ca lib r a tio n···············13
行 程 校 准···················2 9
·············16
··········17
·············33
············32
03 1

1.2 Overview
1.1In the Box
01 General Information
②
①
⑦ ⑦⑧
⑩
⑨
⑪ ⑫
① Speed Control
② Power On/O
③ AB Setting
⑦ Panoramic Setting Knob
⑧ Spirit Level
⑨ Slider Platform
⑩ DC
⑪ 5V Output
⑫ Shutter Release Port
③
④
⑤
⑥
④ Loop Mode
⑤ Start/Stop
⑥ Power Indicator
23

1.4 How to Install
Battery compatibility: NP-F550/NP-F750/NPF 970
1.3 Key Features
Brushless Motor
Stable
Adjustable Speed
Dual-axis Camera
Motions
APP Control
AB Point Setting
Time-Lapse
Silent
Step 1 Install battery (not included)
45

Shutter Release Port
Step 2 Step 3
Step 4
Installthetripod ball head(notincluded)ontotheslider Installthecamera
Connecttheshutterextensioncable (notincluded)
67

02 Functions
2.1 Power On/O
2.2 Calibration
Power On: Press the power button
Power O: Press and hold the power
button for 2 seconds
Please calibrate the slider before use.
How to calibrate:
Press the Start/Stop button after powering
on and the slider will automatically
complete the calibration.
Speed Control
Loop Mode
Start/Stop
AB Point Setting
Power On/O
2.3 AB Point Setting
1. Default AB Point
2. Customize AB Point
3.Cancel AB point setting
The default AB point of the slider upon powering on
is shown below:
① Move the slider to the 1st position
② Press the AB point setting button to set point A (indicator light A on)
③ Move the slider to the 2nd position
④ Press the AB point setting button to set point B (indicator light B on)
⑤ Setting complete
After the AB point setting is completed, press the AB point
setting button again to cancel the AB point. The indicator
lights A and B will both be turned o.
A
B
89

2.4 Loop Mode
2.5 Speed Control
2.6 Stationary Object Tracking &
Panoramic Mode Setting
Slider S60 supports Single-loop mode and
Innite-loop mode, with single-loop mode
being the default mode.
Setting: Press the loop mode button to switch
between the two modes.
Control the speed of the slider by
rotating the speed control knob.
Speed control range: 0.1-5.0cm/s
2.6.1 Pan Shooting Mode:Adjusttheknobtothe
center as shown below.
2.6.3 Panoramic Shooting Mode: Adjusttheknobt
othelowerleftandupperrightas shown below.
2.6.2 FocusShooting Mode:Adjusttheknobtoth
eupperleftandlowerrightas shown below.
10 11

03 App
Calibration
AB Point Setting
Video Shooting
Time-Lapse
TopRig App Features
3.2 App Connect
3.1 App Download
TopRig App connects to Slider S60 via Bluetooth. To
use the TopRig App, please enable Bluetooth on your
mobile device.
Step 1
Step 2
Step 3
Step 1
Step 2
Open the TopRig App
Tap「Connect Device」
Select the device
'Slider_****'
Step 4
Tap 「Conrm」
3.3 Calibration
Tap 「Calibration」
Tap 「Conrm」
The slider will automatically complete the
calibration.
3.4 AB Point Setting
Tap the arrow button to move
the slider to the 1st position
Tap 「A」
Set Point B
Set Point A
Tap the arrow button to move
the slider to the 2nd position
Tap 「B」
Cancel AB Point
Tap 「Delete」 Delete
Loop Mode
Firmware Update
Please download the App- TopRig from Google Play Store or iOS
Apple Store.
12 13

3.5 Loop Mode
Switch the loop modes by tapping
the loop button.
3.8 Firmware Update
3.7.1 Parameter Setting
Total Time: Denes how long the
shoot lasts. (User setting required)
Interval Time: Denes how long it
lasts between each photo shot. Interval
time must be longer than exposure
time. (User setting required)
3.7.2 Start/Stop Time-lapse
Start
Stop
After the parameter setting, tap 「Start」.
Tap 「Stop」
Tap 「Conrm」
Step 1
Tap 「 」
Step 2
Select 「Firmware Update」
Step 3
Tap 「Next」
Users can customize the AB point setting based on
dierent shooting needs.
Note: A camera shutter cable is needed for time-lapse.
3.7 Time-Lapse
3.6 Video Shooting
Note: A camera control cable is needed for this function.
Once all parameters are set, tap 「Shoot」
Step 1
Tap 「Start」 to start video
shooting
Step 2
Exposure Time: Denes how long the slider remain stationary. Must
be longer than the camera's exposure time. (User setting required)
Frame Rate: Denes the frame rate of the nal video. (User setting required)
Number of Shots: The total number of photo shots for reference.
Video Length: The nal length of the video for reference.
14 15

04 Specs
Rated Voltage
Max.Horizontal Load
Max.Vertical Load
Max.Operating Speed
Max.Travel Distance
0.5W
610 x 106 x 71.3mm
1.5Kg
Stationary Object Tracking
Panoramic Angle 55°
Power Consumption
Dimensions
Weight
Power Supply
7.4 -16.8V
4.0kg
2.5kg
5cm/s
425mm
DC 9-16.8V
NP-F Battery
1. lf there is a quality problem that occurs within 15 days
after receiving the product, TopRig will provide complimentary
maintenance or replacement.
2. Under proper use and maintenance, from the date of receipt,
TopRig will provide a one-year warranty on the wireless video
transmission system and a three-month warranty on the accessories
and cables. Free maintenance service is available during the
warranty period.
3. Please keep the proof of purchase and the user manual in a safe
place.
1. Out of warranty (lf the proof of purchase is not available, the
warrenty will be calculated from the date the product is delivered
from the factory)
2. Damage caused by use or maintenance is not following the
requirements of the product manual.
3. Unauthorized repair, modifcation or disassembly.
4. Damage caused by force majeure such as fre, ood, lightning
strike, etc.
Add:Room 302, BLDG D, Zhiyuanyungu, 73 Guanlan Blvd, Longhua
District, Shenzhen 518110
Tel:0086-28-84334099
Warranty
01
02
03
Warranty Period
Warranty Exclusions
Warranty Process
16 17

1.2 主体介绍
1.1 装配清单
01基本信息
⑩ ⑪ ⑫
① 速度调节
② 电源
③ AB 点设置
⑦ 扫景旋钮
⑧ 水平仪
⑨ 滑台
⑩ DC
⑪ 5V 输出
⑫ 快门线接口
④ 循环模式
⑤ 启停
⑥ 电量指示
②
①
③
④
⑤
⑥
⑦ ⑦⑧ ⑨
18 19

1.4 安装
电池型号:NP-F550/NP-F750/NPF 970
1.3 产品特点
无刷电机视频滑轨
长焦不抖
无极调速
机械双轴
APP 控制
手动AB打点
延时拍摄
超级静音
Step 1 安装电池 ( 自备 )
20 21

3.5mm 相机快门控制线插孔
Step 2 Step 3
Step 4
云台 ( 自备 ) 与滑轨进行安装 相机 / 摄像机安装
相机快门控制线
(本产品不标配控制线,需要用户另行购买)
22 23

02 基础功能
2.1 开机关机
2.2 行程校准
开机 : 单 击 电 源 键
关机 : 长按电源键2秒
注意 : 开机后必须对滑轨行程校准才能使用。
建议水平放置进行校准,请勿携负载进行垂直放置校准
校准 方法:
开机后单击“启停”键,滑轨将自动完成行程校准。
速度调节旋钮
循环模式键
启停键
AB 点设置键
电源键
2.3 AB 点设置
1. 默认 AB 点
2.自定义AB点
3. 取消 AB 点
滑轨开机后默认的行程为 :
①将滑台推到第一个位置
②单击“AB 点设置”键设置 A 点(指示灯“A”亮)
③将滑台推 到第二个 位 置
④单击“AB 点设置”键设置 B 点(指示灯“B”亮)
设置完成
AB 点设置完成后,再次单击“AB 点设置”键将取消 AB 点,
指示灯“A”和“B”均熄灭。
24 25

2.4 循环模式
2.5 速度调节
2.6 追焦扫景设置
滑轨支持“单次循环”和“无限循环”两种
模式,默认为“单次循环”模式。
设置 : 单击“循环模式”键在两种模式之间进行切换。
通过旋转“速度调节”旋钮对滑轨
速度进行调节。
滑轨运动速度范围:0.1-5.0cm/s
2.6.1 平移拍摄:将扫景旋钮调节为 居中
2.6.3 扫景拍摄:将扫景旋钮调节为左下右上
2.6.2 聚焦拍摄:将扫景旋钮调节为 左上右下
26 27

03 App
行程校准
AB 点设置
视频拍摄
延时摄影
App 包含如下功能 :
3.2 App 和滑轨连接
3.1 APP 下载安装
注意 :App 使用蓝牙和滑轨进行连接,使用前请打开手机蓝牙。
Step 1
Step 2
Step 3
Step 1
Step 2
打开 TopRig APP
点击“连接设备”
点击设备名称“Slider_****”
Step 4
点击“确定”
3.3 行程校准
3.4 AB 点设置
点击“校准按钮”
点 击 “ 确 定 ” ,滑 轨 将 完 成 自 动 校 准
设置 A 点
点击箭头图标将滑台移动到第一
个位置→ 点击“A”图标。
设置 B 点
点击箭头图标将滑台移动第二个
位置→点击“B”图标。
取消 AB 点
点击“Delete”图标。
Delete
循环模式
固件升级
请从应用宝商城或苹果官方应用商城搜索 TopRig 并下载
28 29

3.5 循环模式
3.6 视频拍摄
点击 APP 界面右下角循环
图标进行切换。
当 所 有 参 数 设 置 完 毕 ,点 击 “ 拍 摄 ” 图 标
点击“启动”按钮即可进行视频拍摄。
用户可以根据实际拍摄确定是否进行 AB 点设置。
注意 : 如需使用 App 控制相机,请使用相机快门控制线。
注意 : 必须使用相机快门控制线才能实现延时拍摄。
Step 1
Step 1
Step 1
Step 2
Step 2
3.7 延时摄影
3.8 固件升级
3.7.1 参数设置
拍摄时间:指总的拍摄时间,
需要用户设置。
拍 照 间 隔:指相机拍照的间
隔时间,需要用户设置,此时
间必须大于曝光时间。
曝 光 时 间:指滑轨的停留的
时间,需要用户设置,需要大于相机的曝光时间。
3.7.2 启动 / 停止延时摄影
启动
停止
当所有参数设置完毕,点击“启动”图标。
点击“暂停”图标
点击“确认”按钮。
Step 1
在 APP 控制界面点击右上角 “ ”图标
Step 2
选择“固件升级”
Step 3
点击 “下一步”图标。
成片帧率:指最终合成的视频的帧率,需要用户设置。
拍摄张数:最终拍摄的照片张数,用于辅助用户拍摄,无需设置。
成片时长:最终预计生成的成片时长,用于辅助用户拍摄,无需设置。
30 31

04 产品规格表
名 称 规 格
额定电压
水平负载
垂直负载
最大运行速度
追焦扫景角度
最大运动行程
供电方式
功率
尺寸
重量
7.4 -16.8V
4.0kg
2.5kg
5cm/s
55°
425mm
DC 9-16.8V NP-F 电池
0.5W
610 x 106 x 71.3mm
1.5Kg
32 33
1 . 自 签 收 之 ⽇ 起 1 5 ⽇ 内 ,出 现 质 量 问 题 ,可 享 受 换 货 或 者
免费维修服务。
2. 滑轨在正确使用及保养下,保修期为自签收之⽇起一年
( 附件和线材保修期为 3 个⽉ ), 在保修期内可享受免费维
修服务。
3. 请妥善保管好购买凭证、说明书。
1. 超过三包有效期的(无法提供购买凭证的从产品出⼚⽇
期 开 始 计 算 )。
2. 未按产品使用说明书要求使用、维护、保养造成损坏的。
3. 未经授权的维修、拆解。
4. 因⽕灾、水灾、雷击等不可抗⼒造成的损坏。
售后地址:深圳市龙华区观澜大道 73 号智源云谷 D 栋 302
售后电话:0086-28-84334099
保修说明
01
02
03
质保期限
质保不包括
售后⽀持
Table of contents
Other Accsoon Camera Accessories manuals