thomann 463 239 User manual

Single Head Led Light
GEBRAUCHSANLEITUNG
BESTIMMUNGSGEMÄSSER GEBRAUCH
- Dieses Gerät ist zur zielgerichteten Beleuchtung von
-Notenblättern, Schriftstücken oder Objekten bis Größe DIN A3 bestimmt
- Die Leuchte ist nicht zur Raumbeleuchtung geeignet
VOR DER ERSTEN BENUTZUNG
Vielen Dank, dass Sie sich für dieses Produkt entschieden haben.
Bitte lesen und beachten und bewahren Sie sorgfältig diese Anleitung.
Sie informiert Sie über alle wichtigen Schritte bei Aufbau und Handhabung.
Bei Weitergabe der Leuchte an Dritte ist diese Anleitung mit auszuhändigen.
MERKMALE
- Ein beweglicher Schwanenhals trägt einen mit 8 LEDs bestückten Leuchtkopf
- Der Leuchtkopf ist in 2 Helligkeitsstufen schaltbar
- Eine flexible Einstellung der Lichtquelle ermöglicht helles oder
-gedämmtes, fokussiertes oder flächiges Licht
- Die LEDs sind fest im Leuchtkopf integriert und NICHT austauschbar
- Mit Klammer zum Befestigen der Leuchte an Notenpultköpfen oder
--platten sowie an Tischkanten und Regalen (vertikaler und horizontaler
-Verlauf); Klemmbereich: bis zu 20 mm
- Standfuß zum Abstellen der Leuchte auf ebenen Untergründen
SICHERHEITSHINWEISE
- Im Falle von nicht bestimmungsgemäßem Gebrauch oder falscher Hand-
-habung kann keine Haftung für daraus entstandene Schäden über-
-nommen werden
- Vor Gebrauch Sichtprüfung vornehmen ob alle Teile vorhanden und soweit
-erkennbar in Ordnung sind. Beschädigte Artikel dürfen nicht eingesetzt
-werden bzw. erst nach einer Reparatur.
- Nicht direkt in das Licht schauen oder anderen in die Augen leuchten.
- Die LEDs der Leuchte sind bauartbedingt nicht austauschbar. Der
-Versuch des Austauschs ist unzulässig
- Das Produkt darf nicht geöffnet werden mit Ausnahme des Batteriefachs
-zum Batterietausch.
- Auf sicheren Sitz der Befestigungsklammer ist zu achten.
- Benutzte Stative sind auf ausreichende Standsicherheit zu prüfen
- Die Leuchte ist kein Spielzeug und von Kleinkindern fernzuhalten
- Vor Feuchtigkeit und Nässe schützen
- Ein nicht mehr betriebsfähiges Produkt muss fachgerecht entsorgt werden.
BATTERIE-/AKKU-HINWEISE
- Batterieschacht öffnen und Batterien unter Beachtung der richtigen
-Polung (+/-) einlegen. Siehe Anleitung und auch Prägungen im Boden
-des Schachtes.
- Nur Batterien des gleichen Herstellers und des gleichen Typs verwenden.
- NIEMALS zugleich unterschiedliche Batterien verwenden. Beispiele:
-Standard (Zink-Kohle), Alkali, wiederaufladbare (NiCd-, NiMh-Akku) etc.
- Am Markt werden zwei Varianten von Batterien angeboten:
-a. Batterie (1,5 V) = nicht wiederaufladbar
-b. Batterie (1,2 V, sog. Akku) “Recharge oder Rechargeable” = wieder
-aufladbar
- Bei längerer Nichtbenutzung empfiehlt sich die Entnahme der Batterien/
-Akkus.
PFLEGE, REINIGUNG
- Pfleglicher Umgang sowie die stetige Beseitigung von Schmutz und Feuch-
-tigkeit sind grundlegend für eine lange Lebensdauer der Leuchte.
- Zur Reinigung ein weiches, trockenes Tuch verwenden. Bei hartnäckigen
-Verschmutzungen ein nur leicht angefeuchtetes Tuch und ein nicht
-scheuerndes Reinigungsmittel verwenden.
ENTSORGUNG
- Leuchte
-Elektro-Altgeräte dürfen nicht über den Hausmüll entsorgt werden. Sie
-müssen nach Ablauf ihrer Lebensdauer fachgerecht entsorgt werden und
-können an einem lokalen Wertstoff- oder Recyclinghof abgegeben werden.
- Batterien/Akkus
-Diese dürfen ebenfalls nicht über den Hausmüll entsorgt werden. Die
-Batterien/Akkus müssen zunächst aus der Leuchte entnommen und ge-
-sondert an einer kommunalen Sammelstelle abgegeben werden. Schad-
-stoffhaltige Batterien sind gekennzeichnet mit dem Mülltonnensymbol und
-einem Kürzel des Inhaltsstoffes: Cd (Cadmium), Hg (Quecksilber), Pb (Blei).
- Verpackung
-Sie muss dem DSD (Grüner Punkt) zugeführt werden, möglichst sortenrein.
- Allgemein
-Auskünfte zur Entsorgung erteilt auch die zuständige Kommune.
TECHNISCHE DATEN
LEDs (Typ, Anzahl) SMD LED, 8x
Sockelart fest installiert (kein Austausch)
Helligkeitsstufen Aus - Halb - Voll (schaltbar)
Helligkeit max. Stufe Lumen: 72
LUX: ~140 (DIN A3) / ~1800 (Spot-100 mm)
Farbtemperatur 2900 K - 3200 K
Mittlere Lebensdauer 10.000 Stunden
Betriebsart Batteriebetrieb (3 x AAA)
Netzbetrieb: 5 V-500 mA
Spannung DC: 4,5 V / Netzteil: 5 V
Leistungsaufnahme 0,8 W (8 x 0,1 W)
Abmessungen 310 x 41 x 44 mm, 0,1 kg
VERWENDETE SYMBOLE
Konformitätserklärung
CE steht für Conformité Européenne (Europäische
Konformität) und besagt, dass dieses Produkt die
Anforderungen der geltenden EU-Richtlinien erfüllt.
Entsorgung
Die Leuchte darf nicht über den Hausmüll entsorgt werden.
Auskünfte zur Entsorgung erteilt die zuständige Kommune.
LIEFERUMFANG
- 1 Leuchte (1 x 8 LED)
- 3 Batterien (AAA, Mikro) 1,5 V
- 1 Gebrauchsanleitung
HERSTELLER
Thomann GmbH
Hans-Thomann-Str.1, 96138 Burgebrach, www.thomann.de
463 239 1/21
ABBILDUNG DER LEUCHTE
-perspektivisch Darstellung-

Single Head Led Light
1. Ausstattung & Abmessungen 2. Batterien/Akkus einsetzen oder wechseln
3.a an PLATTEN 3.b an NOTENKÖPFEN 3.c auf TISCHEN
3.c und ABLAGEN
3. Lampe platzieren
4. Licht Ein- und Ausschalten 5. Leuchtenkopf einstellen
2.a
Batteriefachdeckel entriegeln:
Deckel zunächst mit dem
Daumen (ca. 6 mm) in Richtung
des Pfeiles schieben
3.a.1
Klammer drücken und über
die Notenpult- oder sonstige
Platte (max.20mm) schieben...
Durch mehrfaches Betätigen
des Druckknopfes wird die
Lichtstärke gesteuert:
Durch den hochflexiblen Schwanenhals kann der
Lichtkegel im Handumdrehen in wirklich jede gewünschte
Position gebracht werden - und hält diese auch auf Dauer.
Grundstellung = Licht AUS
Schaltzyklus beginnt
erneut
1x schalten
= Volle Leuchtkraft
2x schalten
= Verminderte Leuchtkraft
3x schalten
= Licht geht wieder AUS
3.a.2
...bis die Platte am unteren
Anschlag der Klammer
innen anstößt
3.b.1
Klammer drücken und über
die mittige platzierte Lyra
des Notenkopfes schieben...
3.b.2
...bis die Platte am
oberen Anschlag
innen anstößt
3.c.2
Für die optimale Balance ggf.
den Schwanenhals mitsamt
Leuchtkopf etwas korrigieren
3.c.1
Lampenfuß auf
eine ebene
Unterlage stellen.
Vier Auflagepunkte
sorgen für einen
wackelfreien Stand
2.b
Entriegelten Deckel abheben
2.c
Drei Batterien (AAA-1,5V) bzw.
Akkus (AAA-1,2V) einlegen;
(bitte Polung +/- beachten)
2.e
Deckel mit dem Daumen ge-
gen die Öffnung schieben - bis
die beiden Haken einrasten
2.f
Nach dem hörbaren Einrasten
des Deckels Festsitz prüfen
2.d
Deckel wieder auflegen
8
Leucht-
dioden
Leuchten-
kopf
Schwanen-
hals
Standfuß
Klammer
0-25 mm
Druck-
knopf
mit 2
Schalt-
stufen
Batterie-
fach
(3 x AAA)

Single Head Led Light
INSTRUCTIONS FOR USE
INTENDED USE
- This unit is intended for the targeted illumination of sheet music,
-documents or objects up to A3 size.
- The lamp is not suitable for room lighting
BEFORE FIRST USE
Thank you for choosing this product. Please read and keep these
instructions carefully. It informs you about all important steps in setting up
and handling the luminaire. If the luminaire is passed on to a third party,
this manual must also be handed over.
FEATURES
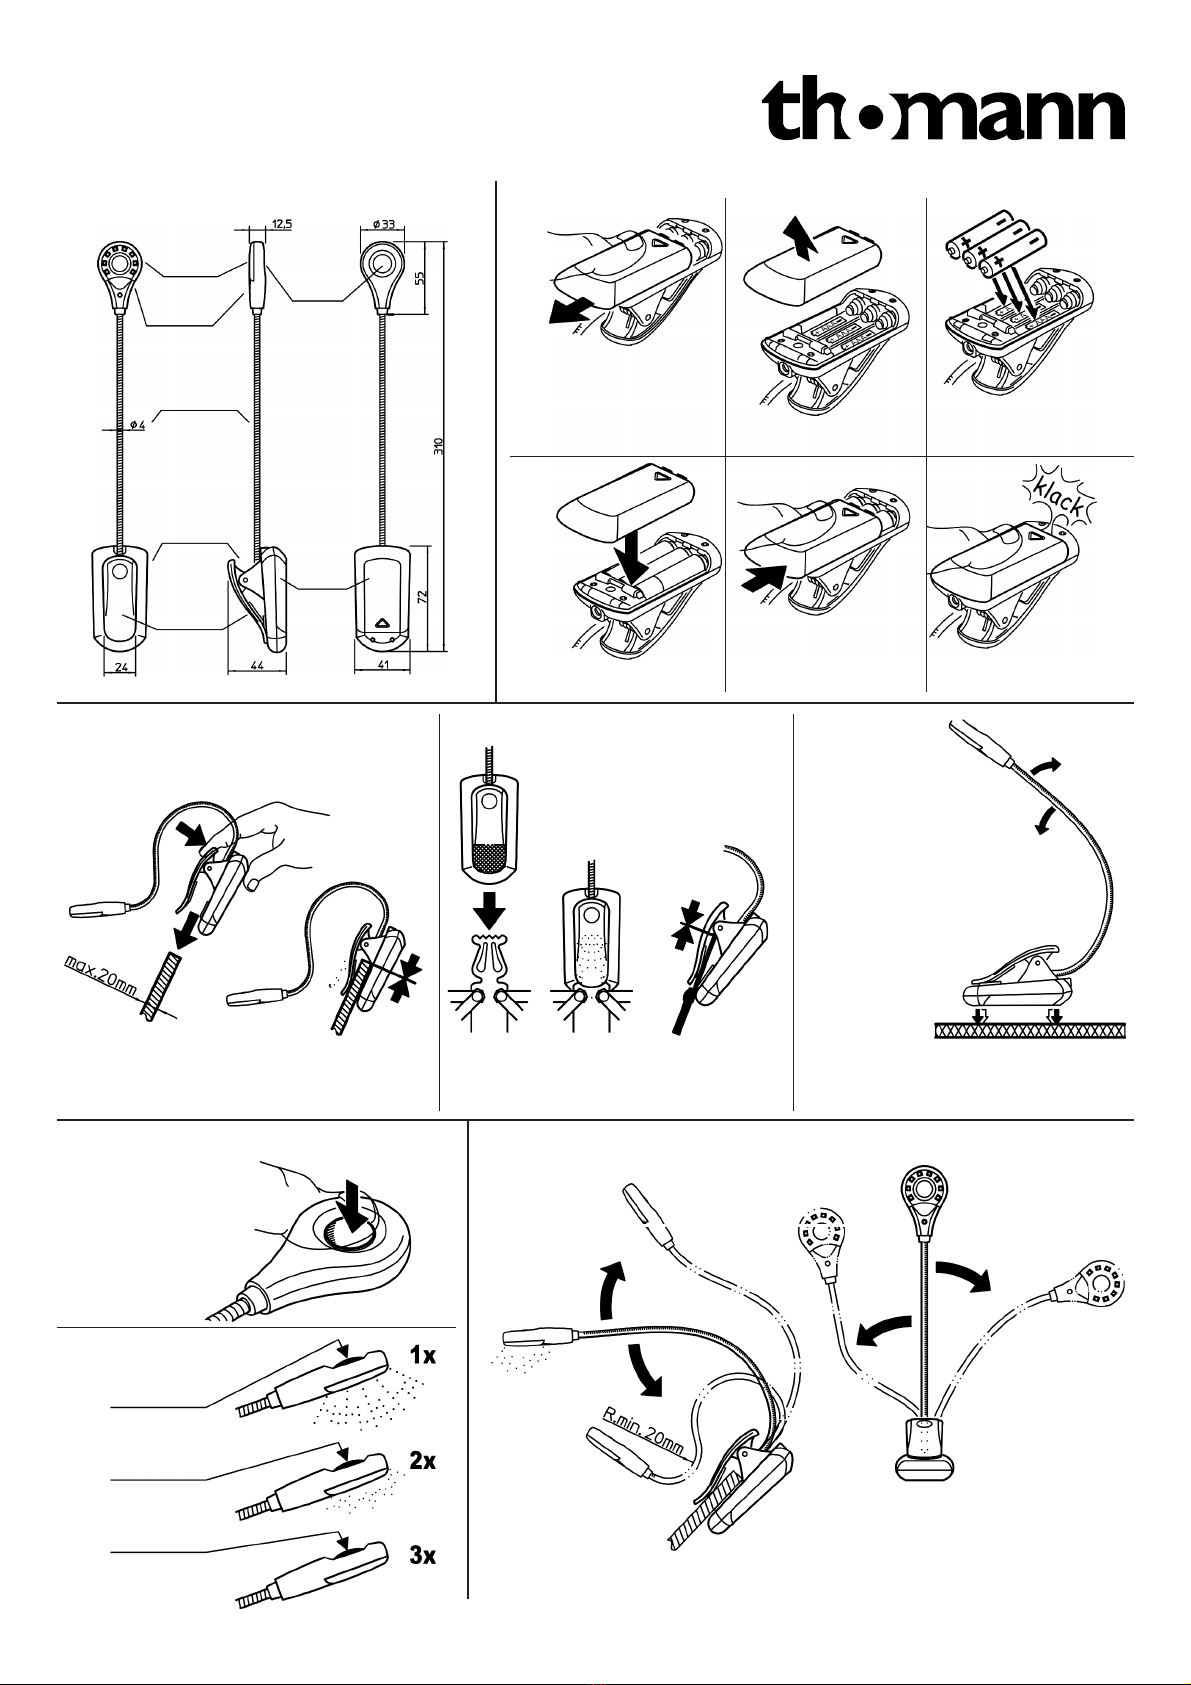
- A movable gooseneck carries a light head equipped with 8 LEDs.
- The light head is switchable in 2 brightness levels
- The flexible adjustment of the light source allows bright or dimmed,
-focused or wide-area light
- The LEDs are permanently integrated in the light head and are NOT
-replaceable
- With clamp for attaching the luminaire to music stand heads or tops as
-well as to table edges and shelves table edges and shelves (vertical and
-horizontal progression); Clamping range: up to 20 mm
- Stand for placing the luminaire on level surfaces
SAFETY INSTRUCTIONS
- In the event of improper use or handling, no liability can be accepted for
-any damage no liability can be accepted for any damage resulting from
-improper use.
- Before use, check visually that all parts are present and in good order.
-Damaged articles must not be used or only after repair.
- Do not look directly into the light or shine it into the eyes of others.
- The LEDs of the lamp are not replaceable due to their design. Attempting
-to attempting to replace them is not permitted.
- The product must not be opened, with the exception of the battery
-compartment for battery replacement.
- Ensure that the mounting bracket is securely fastened.
- Stands used must be checked for sufficient stability.
- The luminaire is not a toy and must be kept away from small children.
- Protect from moisture and wetness.
- A product that is no longer operational must be disposed of properly.
BATTERY/RECHARGEABLE BATTERY INSTRUCTIONS
- Open the battery compartment and insert the batteries, observing the
-correct polarity (+/-) insert. See instructions and also embossing in the
-bottom of the compartment.
- Only use batteries from the same manufacturer and of the same type.
- NEVER use different batteries at the same time. Examples: Standard
-(zinc-carbon), alkaline, rechargeable (NiCd, NiMh), etc.
- There are two types of batteries available on the market:
-a. Battery (1.5 V) = Non-rechargeable
-b. Battery (1.2 V, so-called accumulator) “Recharge or Rechargeable”
- In case of prolonged non-use, it is recommended to remove the batteries/
-rechargeable batteries
CARE, CLEANING
- Careful handling and the constant removal of dirt and moisture are
-essential for a long are essential for a long service life of the lamp.
- Use a soft, dry cloth for cleaning. For stubborn dirt use a slightly damp
-cloth and a non-abrasive cleaning agent.
DISPOSAL
- Lamp
-Used electrical appliances must not be disposed of with household waste.
-They must be disposed of properly at the end of their life and can be
-taken to a local at a local recycling centre.
- Batteries/rechargeable batteries
-These must also not be disposed of with household waste. The batteries/
-rechargeable batteries must first be removed from the luminaire and
-disposed of separately at a municipal collection point. Batteries containing
-hazardous substances are marked with the dustbin symbol and an
-abbreviation of the ingredient: Cd (cadmium), Hg (mercury), Pb (lead).
- Packaging
-It must be returned to the DSD (Green Dot), if possible, sorted by type.
- General
-Information on disposal can also be obtained from the responsible local
-authority.
TECHNICAL DATA
LEDs (typ, quantity) SMD LED, 8x
Socket type fixed installed (no replacement)
Brightness levels Off - Half - Full (switchable)
Brightness max. level Lumen: 72
LUX: ~140 (DIN A3) / ~1800 (Spot-100 mm)
Colour temperature 2900 K - 3200 K
Average life 10.000 hours
Mode of operation Battery operation (3 x AAA)
Mains operation: 5 V-500 mA
Voltage DC: 4.5 V / Power supply: 5 V
Power consumption 0.8 W (8 x 0.1 W)
Dimensions 310 x 41 x 44 mm, 0.1 kg
SYMBOLS USED
Declaration of conformity
CE stands for Conformité Européenne (European Conformity)
and states, that this product meets the requirements of the
applicable EU directives.
Disposal
The luminaire must not be disposed of with household waste.
For information, please contact your local authority for disposal
information
SCOPE OF DELIVERY
- 1 light (1 x 8 LED)
- 3 batteries (AAA, micro) 1,5 V
- 1 instruction manual
MANUFACTURER
Thomann GmbH
Hans-Thomann-Str.1, 96138 Burgebrach, www.thomann.de
463 239 1/21
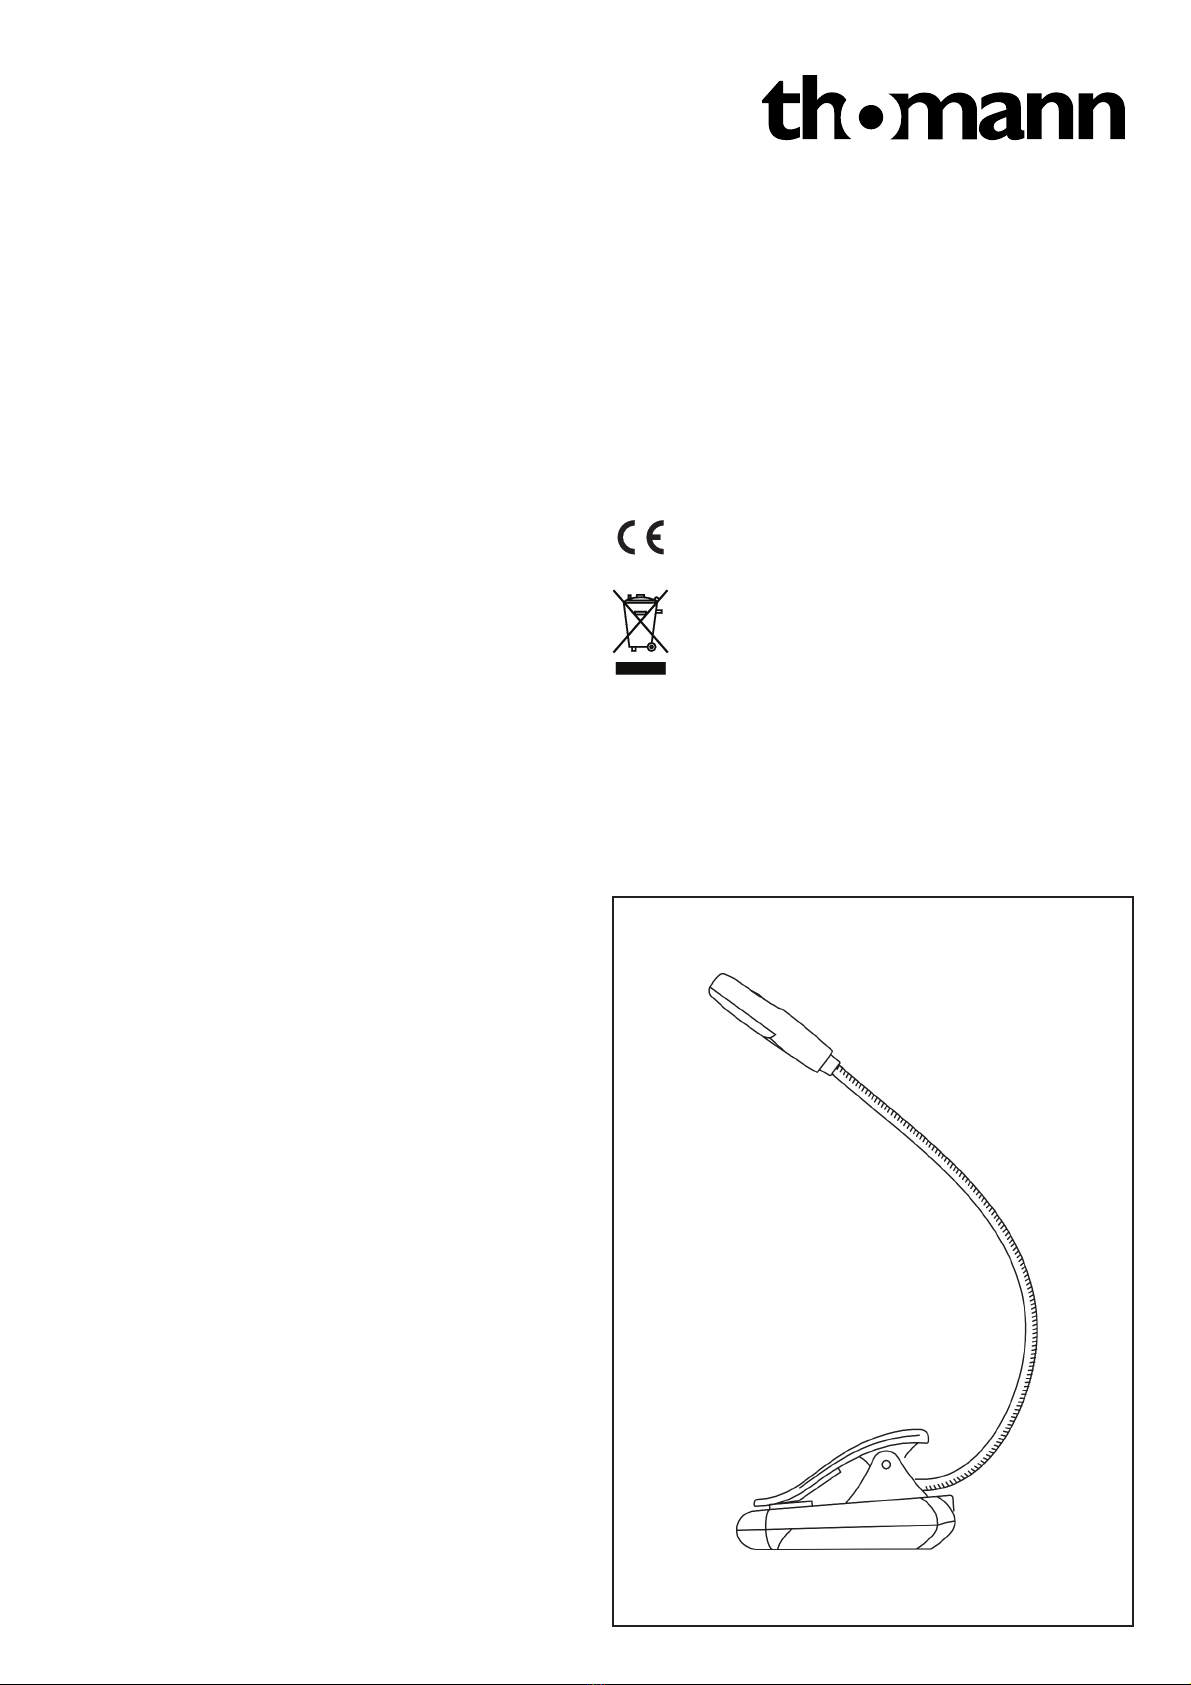
ILLUSTRATION OF THE LIGHT
-perspective view-

Single Head Led Light
8
Light
diodes
Light
head
Goose-
neck
Base
Clamp
0-25 mm
Press
button
with 2
switch
levels
Battery
case
(3 x AAA)
By repeated pressing of the
press button the
brightness is controlled:
Initial position = Light OFF
The switching cycle
begins again
Press 1x
= full brightness
Press 2x
= less brightness
Press 3x
= Light is turned OFF
1. Equipment & Dimensions 2. Batteries/rechargeable batteries insert or change
3.a to the PLATES 3.b to NOTE HEADS 3.c on TABLES
3.c and TRAYS
3. Placement of the lamp
4. Turn Light On/Off 5. Adjust the Light Head
2.a
Battery case lid:
Slide the lid with your thumb
(approx. 6 mm) in the direction
of the arrow
3.a.1
Press the clamp and slide the
music desk or other plate
(max. 20 mm)...
The highly flexible gooseneck can be used to quickly place
the light in the desired position - and it will stay there until it
is adjusted again.
3.a.2
...until the plate reaches
the inside of the lower end
of the clamp
3.b.1
Press the clamp and slide
the Lyra placed in the middle
of the note head...
3.b.2
...until the plate rea-
ches the inside of the
upper end of the clamp
3.c.2
To attain optimal balance
adjust the gooseneck and the
light head a bit
3.c.1
Place the lamp foot
/base on a level
surface. Four
points of support
ensure stability
2.b
Unlock the lid and lift
2.c
Insert three batteries (AAA-1.5V) i.e.
rechargeable batteries (AAA-1.2V);
(please pay attention to the polls +/-)
2.e
Slide the lid with your thumb
over the opening until both
hooks click into place
2.f
After the “click” ensure
that the lid is securely in place
2.d
Place the lid on the compartment
Table of contents
Languages:
Other thomann Outdoor Light manuals