Thomas C. Wilson 9487-0000 Troubleshooting guide

SM-248A
Power-Soot Vac
Wet/Dry Vacuum Cleaner
MODEL 9487-0000 2 HP 115 volt 60 Hz
MODEL 9487-5220 2 HP 220 volt 50 Hz
OPERATING INSTRUCTIONS &
SERVICE MANUAL
Thomas C. Wilson, Inc.
21-11 44th Avenue, Long Island City, New York 11101
Tel: (718)729-3360 Fax: (718)361-2872 http://www.tcwilson.com
WARNING
Read all these instructions before operating this product and save these
instructions.
2
SM-248A
SAFETY INSTRUCTIONS
1. Do not leave appliance plugged in. Unplug from outlet when not in use and before servicing.
2. Do not expose to rain. Store indoors.
3. Do not allow to be used as a toy. Close attention is necessary when used by or near children.
4. Use only as described in this manual. Use only manufacturer’s recommended attachments.
5. Do not use with damaged cord or plug. If appliance is not work-ing as it should, has been dropped, dam-
aged, left outdoors, or dropped into water, contact Customer Service.
6. Do not pull or carry by cord, use cord as a handle, close a door on cord, or pull cord around sharp edges
or corners. Do not run appliance over cord. Keep cord away from heated surfaces.
7. Do not unplug by pulling on cord. To unplug, grasp the plug, not the cord.
8. Do not handle plug or appliance with wet hands.
9. Do not put any object into openings. Do not use with any opening blocked; keep free of dust, lint, hair and
anything that may reduce air flow.
10. Keep hair, loose clothing, fingers and all parts of the body away from openings and moving parts.
11. Do not pick up anything that is burning or smoking, such as cigarettes, matches, or hot ashes.
12. Do not use without dust bag and/or filters in place.
13. Turn off all controls before unplugging.
14. Use extra care when cleaning on stairs.
15. Do not use to pick up flammable or combustible liquids such as gasoline, or use in areas where they
may be present.
16. This vacuum is for commercial use only.
17. Connect to a properly grounded outlet only. See grounding instructions.
WARNING To reduce the risk of fire, electric shock or injury:
GROUNDING INSTRUCTIONS
This appliance must be grounded. If it should malfunction or breakdown, grounding provides a path of least
resistance for elec-tric current to reduce the risk of electric shock. This appliance is equipped with a cord
having equipment grounding conductor and grounding plug. The plug must be inserted into an appropriate
out-let that is properly installed and grounded in accordance with all local codes and ordinances.
WARNING
Improper connection of the equipment grounding conductor can result in a risk of electric shock. Check with
a qualified electrician or service person if you are in doubt as to weather the outlet is properly grounded.
Do not modify the plug provided with the appliance — if it will not fit the outlet, have a proper outlet installed by
a qualified electrician.
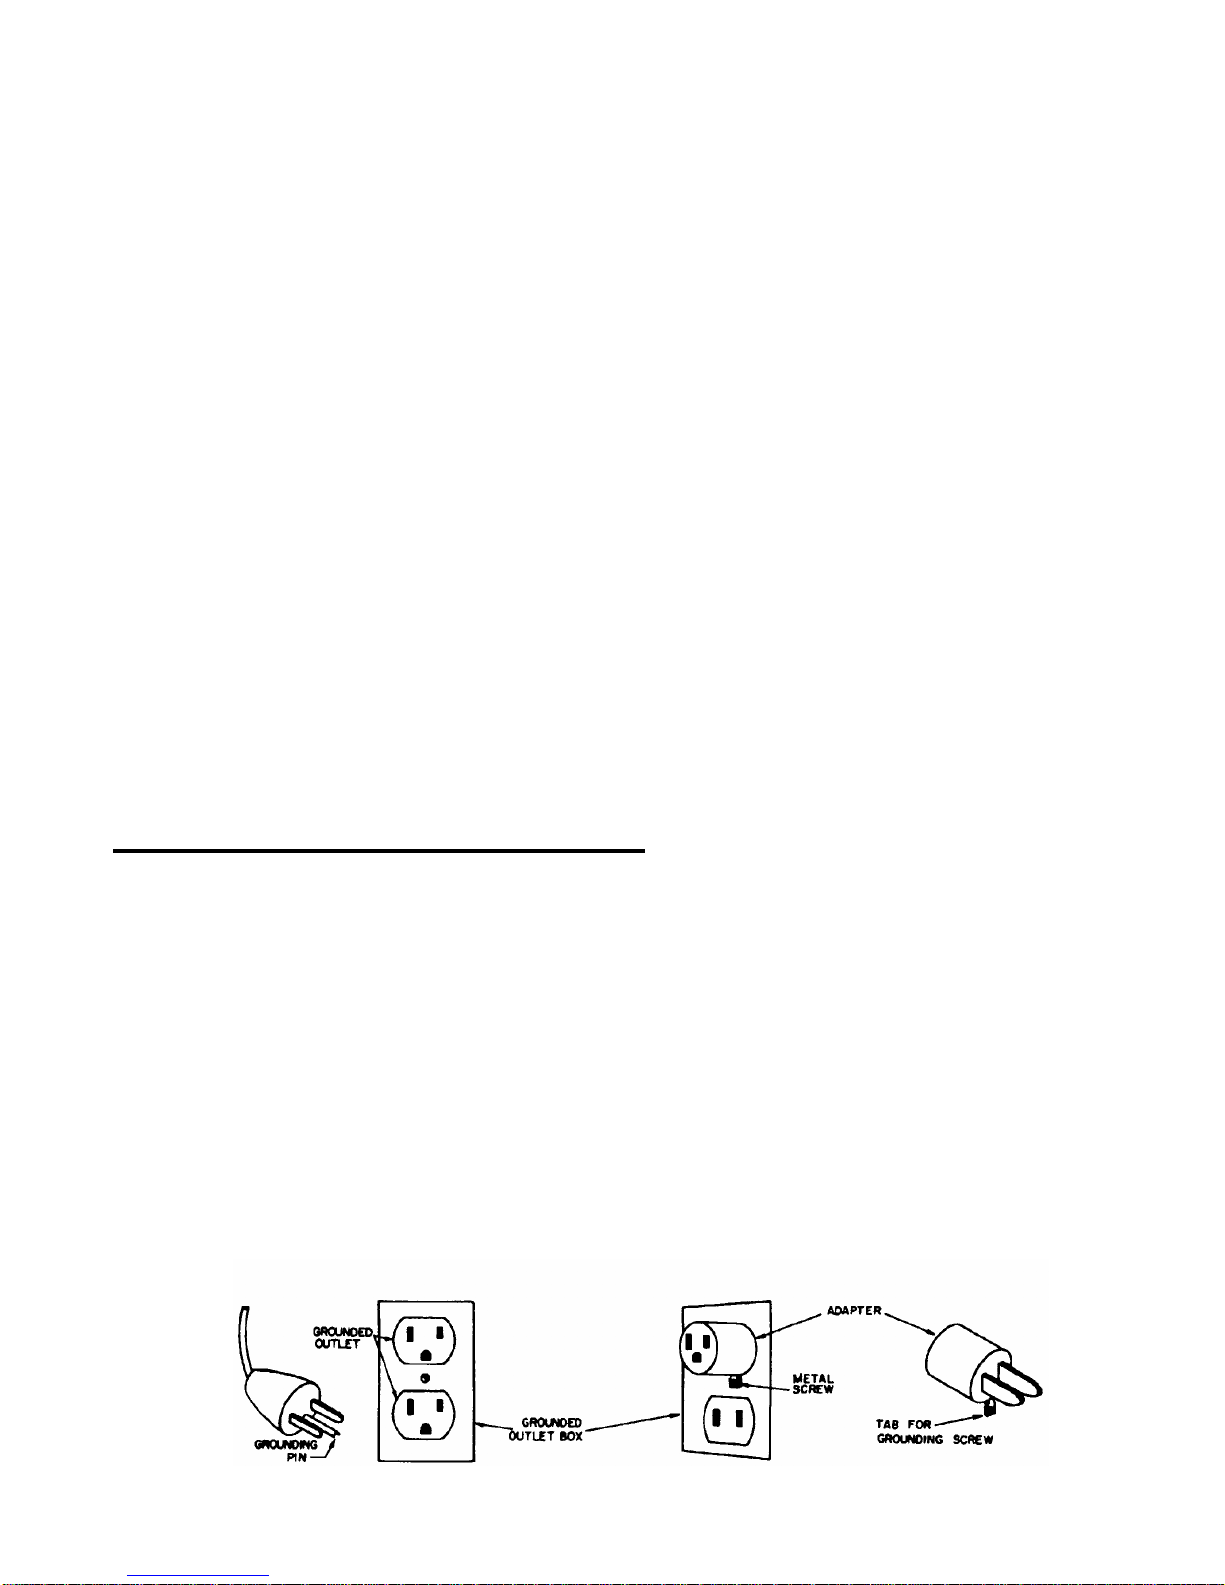
This appliance is for use on a nominal 120- Volt circuit, and has a grounded plug that looks like the plug il-
lustrated in sketch A below. A temporary adapter that looks like the adapter illustrated in sketches B and C
may be used to connect this plug to a 2-pole receptacle as shown in sketch B if a properly grounded recep-

3
SM-248A
ABOUT THE VACUUM CLEANER
The Vacmobile style vacuum cleaner includes as standard equip-
ment:
2 Rear Wheels
2 Hub Caps
2 Casters
2 Washers
1 10’ hose
1 Air Filter Assembly
4 Shaft Caps
To Assemble:
Remove and carefully set aside motor head and filter assembly. Tilt vacuum back to full rest on can handle. Insert and
push casters into caster mount assemblies. Position rear wheels on the rear axle assembly and lock with the hub nuts,
using a rubber hammer.
Replace motor head with filter for either wet or dry application and clamp in place.
To Connect Hose:
Simply push the end of hose onto the intake connector. Wands and/or tools are then fitted to the opposite end of the
hose.
To remove the hose, use a twist and pull action.
To Operate:
The vacuum cleaner is designed to perform as a wet/dry unit.
Dry
With the Air Filter Assembly in place, the motor head securely clamped, plug the power cable into the proper out-let.
Select the appropriate hose, wand, and/or tool and connect to the intake connector. The vacuum cleaner is ready for
dry use.
Wet
Convert this vacuum cleaner from dry to wet pick-up by substituting the Water Pick-up Adapter for the Air Filter As-
sembly. the purpose is to provide protection for the vacuum cleaner bypass motor. When the maximum water level in
the vacuum cleaner collection can is reached, the safety valve (float) closes off suction, auto-matically preventing
further liquid intake.
NOTE: This will cause the motor to race. Turn off motor, remove and empty collection can. Thoroughly clean float
assembly. Replace Water Pick-up Adapter and motor head, then clamp securely. The vacuum cleaner is ready for
wet use.
WARNING:
This vacuum is intended for indoor or outdoor use and for wet pick-up, but is not intended to be exposed to rain.

4
SM-248A
Air Filter Assembly
The Air Filter Assembly with Never-Clog(R) Bag is the standard filter unit shipped with this vacuum cleaner. This fil-
ter consists of a moleskin bag and metal frame, rubber gasket and dacron Never-Clog(R) Bag. This dacron filtration
fabric is designed to trap the minute dirt and dust particles, minimizing the need for frequent replacement of the
moleskin filter. After each use, just tap the Never-CIog(R) filter and the dust buildup falls into the collection can.
The Never-Clog(R) filter is also washable. Carefully remove the rubber gasket from the metal frame and strip the
filter bag. To replace, stretch the Never-Clog(R) filter evenly around the rim of the metal frame, and then secure with
the rubber gasket.
NOTE: Gasket must be seated evenly on the rim of the filter frame to insure proper vacuum seal. No lubri-cation
is required. Service of electrical parts must be performed by an authorized service representative.
Water Pick-Up Adapter
Large quantity water pick-up REQUIRES the Water Pick-up Adapter. The Water Pick-up Adapter is equipped with a
safety shut-off known as the float assembly. IMPORTANT: Remove packing material from a new unit before using
and clean periodically to assure proper action.
Motor Head
When removing the motor head, care in handling is essential. Dropping, banging or other abuse may result in a poor
vacuum seal and a loss in suction power.
NOTE: When changing from wet to dry vacuuming, always rinse the collection can with clean water. Dry the tank
and replace the Water Pick-up Adapter with the Air Filter Assembly.
Storage:
Store in a dry location indoors. Wrap the cord carefully around the vacuum head to avoid accidental damage.
CARE & MAINTAINENANCE
WARNING:
Be sure the building voltage is the same as the voltage on the motor head nameplate and that a proper ground
exists.

5
SM-248A
WET/DRY CARTRIDGE FILTER ASSEMBLY
Outer Filter
9487-4000
Filter Assembly
9487-6000
Caution: This filter MUST be in place at all times during vacuuming operations, both dry and wet.
Never-Clog Dry Filter System
Wet Filter System
Floater Assembly (included)
#9487-0012
9487-2000
9487-8000
Filter Frame
9487-7000

6
SM-248A
PARTS LIST
Item
1
2
3
4
5
6
7
8
9
10
11
12
13
14
15
16
Part no.
9487-9801
9487-9802
9487-9803
9487-9804
9487-9805
9487-9806
9487-9807
9487-9808
9487-9809
9487-9810
9487-9811
9487-9812
9487-9813
9487-9814
9487-9815
9487-9816
Description
Wire Assembly
Switch
Switch Plate
Dome Assembly
Strain Relief
Cord Set
Ground Screw
Gasket
Spacer
Blower Chamber Ass’y
Gasket
Motor Assembly
Gasket
Screen Fan Guard
Gasket
Can Cap
Qty
1
1
1
1
1
1
1
1
1
4
1
1
1
1
1
11
Motorhead Assembly
#9487-0110 For 115 volt, 60 Hz
#9487-5221 For 220 volt, 50 Hz

7
SM-248A
PARTS LIST (CONT’)
1
2
3
4
5 6 7 8 9
5
ITEM PART NO. DESCRIPTION QTY
19487-9000 12 Gallon Steel Tank 1
1A 9487-9900 12 Gallon Stainless Steel Tank 1
29487-9600 Handle 1
39487-0067 Bracket I
49487-9310 Wheel Cap 2
59487-9300 Hub Cap 1
69487-9100 8” Wheel 6
79487-0556 Washer 2
89487-0787 Frame Assembly 2
99487-9200 Caster 3
ACCESSORIES & TOOLS
Moleskin Filter Bag
9487-2000
Vacuum Hose 10-ft
9488-0010
Disposable Paper Bag #9490
Dacron Filter Bag
#9487-4000

8
SM-248A
TROUBLE-SHOOTING GUIDE
Symptom Possible Cause
Loss of Suction 1. Obstruction in hose or wand
2. Clogged air filter assembly
3. Uneven gasket fit
4. Dented collection can rim
Motor Won’t run 1. Blown fuse or tripped circuit.
2. Defective switch.
3. Defective power cord.
Corrective Action
1. Attached hose to exhaust air orifice
2. Tap never-clog bag or wash if necessary.
3. Reposition or replace gasket.
4. Replace can
1. Replace fuse or reset circuit.
2. Replace switch.
3. Replace power cord.
ACCESSORIES & TOOLS
General Purpose Tool Kit #9487-1000 consists of:
9487-3400 Metal Crevice Tool 11”
9498-0000 Wand 2-pc 5-ft
9487-3000 Handi-scrapper Tool 5”
9488-3200 Blower Nozzle
Double-Blade Rubber
Squeegee Tool
9715-0800
Water Pick-up
Adapter
#9487-0012
Liquid Pick-Up Tool Kit #9715-0300 consists of:
9715-0700 Wand 2-pc 5-ft
9715-0800 Rubber Squeegee Floor Tool
9715-0900 Plastic Floor Tool 14”
9715-1000 Plastic Crevice Tool 11”
9715-1100 Metal Crevice Tool 11”
Thomas C. Wilson, Inc.
21-11 44th Avenue, Long Island City, New York 11101
Tel: (800)230-2636 Ext.503 Fax: (718)361-2872
This manual suits for next models
1
Table of contents


