THOMSON DTH8040E User manual

DTH8040E
DTH8042E
User manual

CLASS 1
LASER PRODUCT
DVD/VIDEOCD/CDPLAYERDTH210
STANDBY/ON
OPEN/CLOSE STOPSTOP PREVPREV NEXTNEXT PLAY
SVCD MP3 WMA D
RGB
FR ATTENTION - RAYONNEMENT LASER EN CAS D'OUVERTURE.
NE PAS REGARDER DANS LE FAISCEAU.
EN CAUTION - LASER RADIATIONWHEN OPEN.
DO NOT STARE INTO BEAM.
DE VORSICHT - LASERSTRAHLUNG,WENN ABDECKUNG GEÖFFNET.
NICHT IN DEN STRAHL BLICKEN.
ES PRECAUCIÓN - RADIACIÓN LÁSER CUANDO ESTA ABIERTO.
NO MIRAR FIJAMENTE AL RAYO DE LUZ.
IT ATTENZIONE - QUANDO E' APERTO EMETTE RADIAZIONI LASER.
NON GUARDARE DENTRO IL FASCIO .
NL WAARSCHUWING- LASERSTRALING INDIEN GEOPEND.
KIJK NIET IN DE STRAAL.
PT PRECAUÇÃO - RADIAÇÃO LASER QUANDO ABERTO.
NÃO OLHAR FIXAMENTE O RAIO DE LUZ.
PL UWAGA-OTWARTE URZĄDZENIE WYDZIELA PROMIENIOWANIE
LASEROWE. PATRZENIE GROZI UTRATĄWZROKU.
HU VIGYÁZAT - NYITOTT ÁLLAPOTBAN LÉZER SUGÁRZÁS.
NE NÉZZEN A SUGÁRBA.
CS VAROVÁNÍ - NEBEZPEČÍ LASEROVÉHO ZÁŘENÍ PŘI OTEVŘENÍ.
NIKDY SE NEDÍVEJTE DO LASERU !
RU ОСТОРОЖНО - ЛАЕРНОЕ ИЗЛУЧЕНИЕ.
НЕ СМОТРИТЕ НА ЛУЧ.

1
Contents
EN
EN
Connections and initial set up
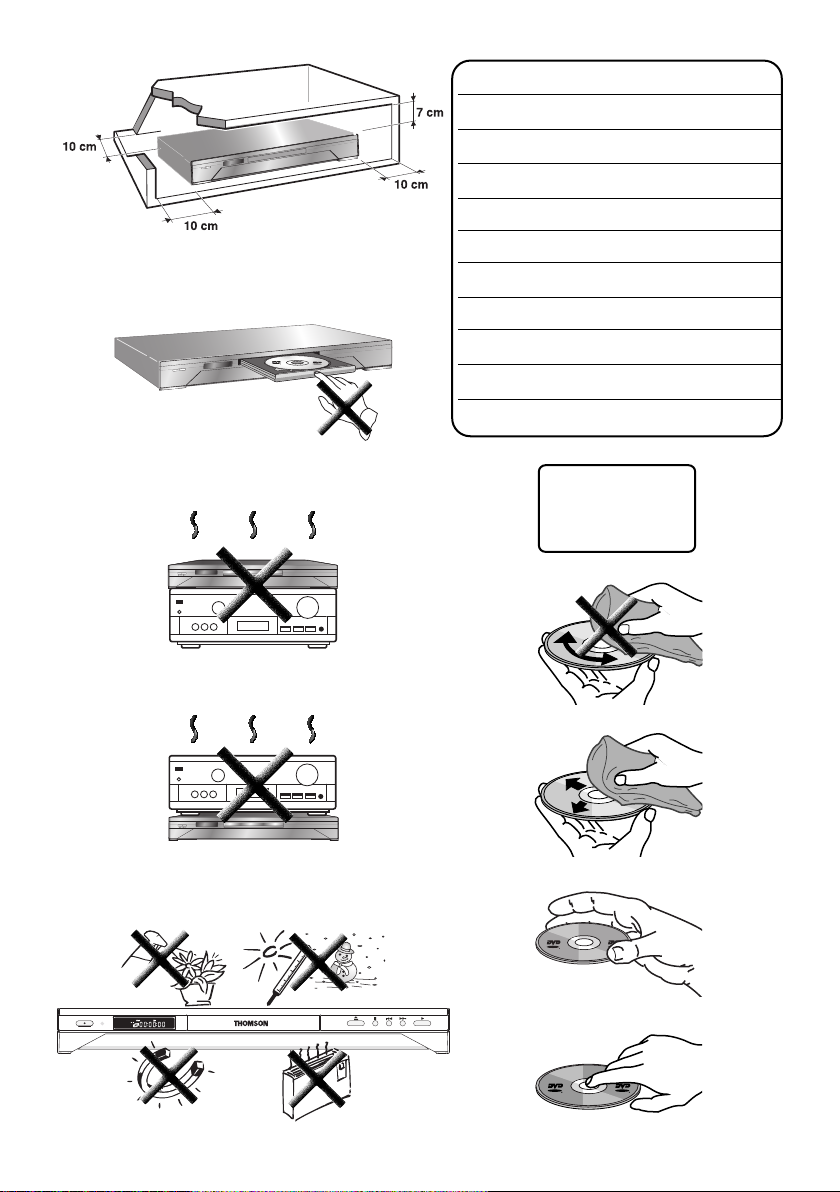
Precautions and information before connecting ..................2
Inserting the batteries..............................................................2
Important information regarding the batteries ........................2
Basic connections......................................................................3
About your device ....................................................................4
Placing the DVD recorder in service ......................................4
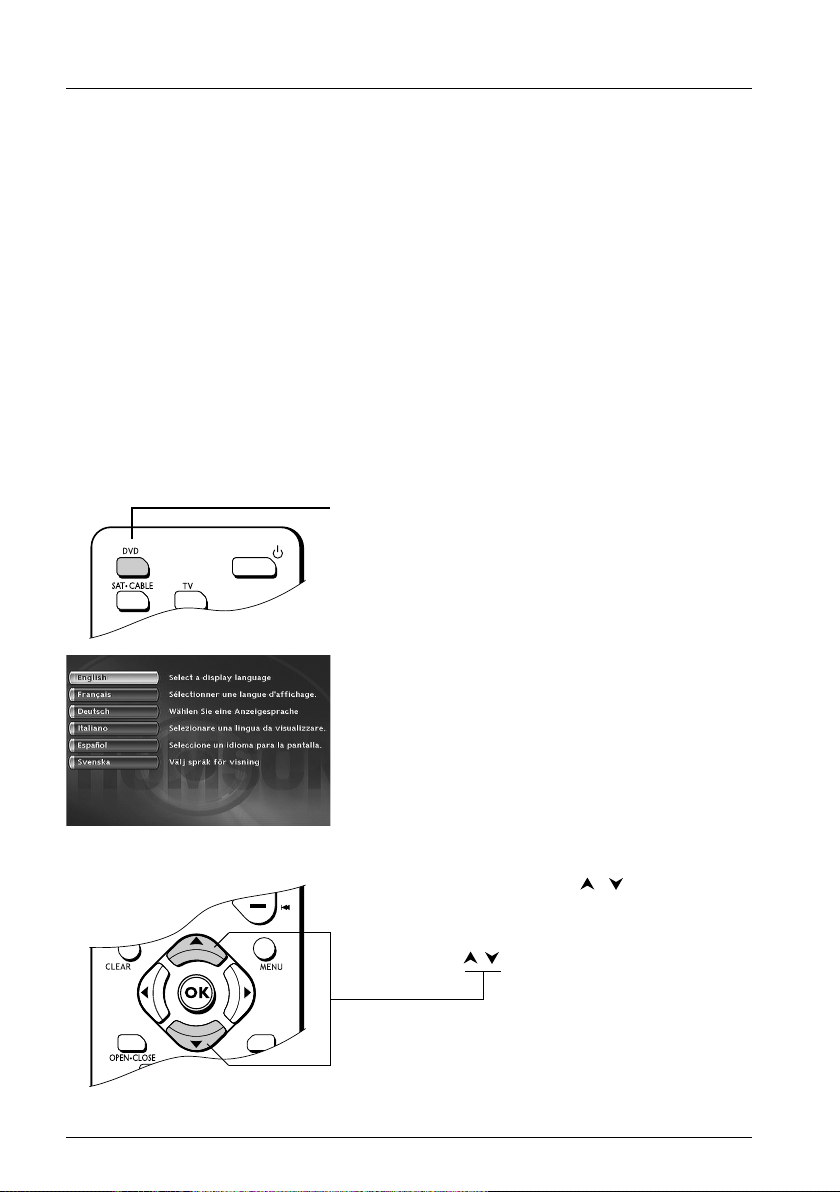
Using the remote control unit correctly ..................................4
Switch on your DVD recorder and your TV set ....................4
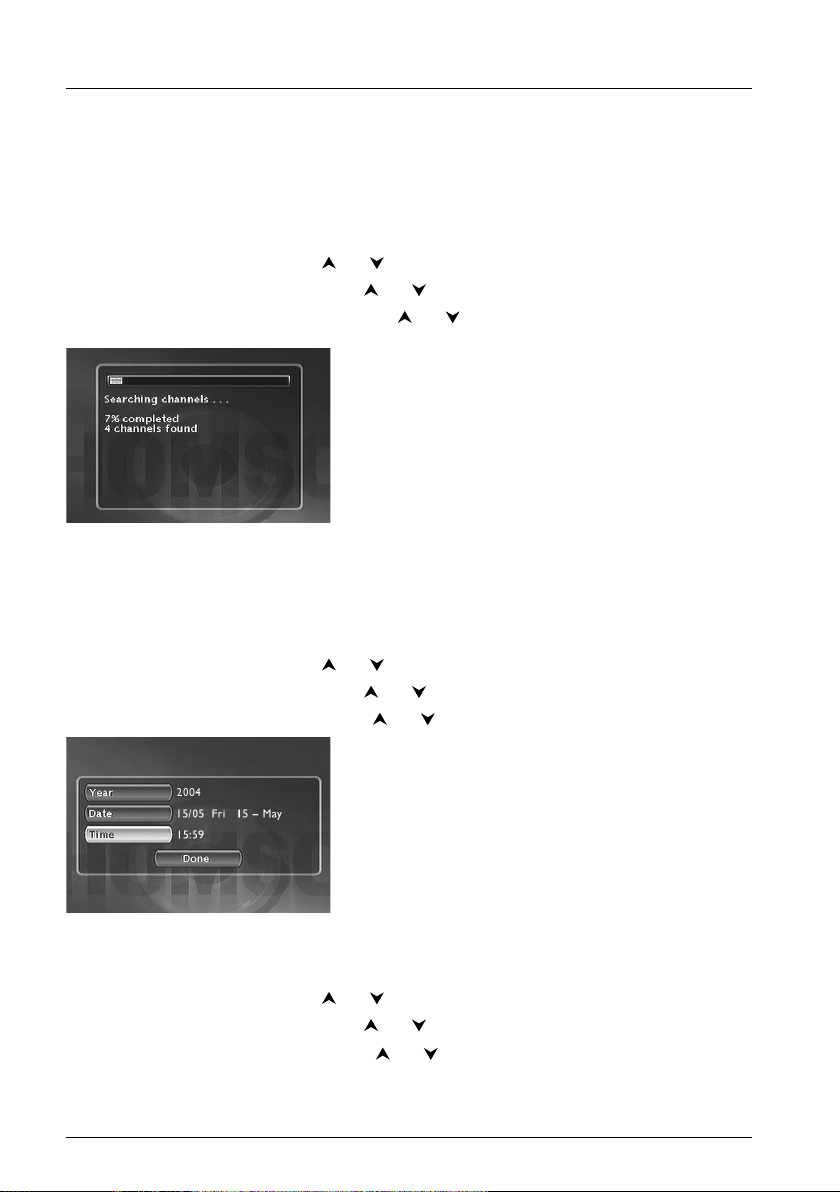
Automatic channel search ......................................................5
Sorting the channels........................................................................6
Clock setting ....................................................................................6
Manual channel search ............................................................7
Channel update ................................................................................8
Clock setting ....................................................................................8
Sorting the channels........................................................................8
Other recommended connections..........................................9
Satellite or cable reciever (or decoder) ....................................9
Video recorder ..............................................................................10
Satellite reciever and video recorder ......................................10
Sockets and cables (inputs) ........................................................11
Sockets and cables (outputs)......................................................12
Front sockets (inputs) ..................................................................13
The buttons on the front ......................................................14
The messages on the display ................................................15
TV Functions ..................................................................................15
With a disc......................................................................................15
Other indications ..........................................................................15
Displays on your DVD recorder (menus and banners) ......15
Remote control
Description of keys in DVD mode............................................16
Using the remote control handset to control your
television and satellite or cable receiver..............................17
Controlling a TV set......................................................................17
Controlling a satellite or cable receiver ..................................17
Remote control - Code A-B ......................................................17
Programming the remote control........................................18
Automatic code search................................................................18
Manual programming ....................................................................18
Recording functions
To watch TV Programmes ....................................................19
To change channel ........................................................................19
Record the current programme ..........................................20
Stop recording ........................................................................21
Closing a DVD+R or DVD+RW disc (Finishing a disc) ......21
Programming a recording......................................................22
SHOWVIEW®Recording ..........................................................24
Programming a recording ............................................................24
Recording from a connected device ....................................25
From a satellite receiver or cable receiver (AV2 socket)....25
From a Camcorder or other device (AV3, AV4 socket)......25
Library......................................................................................26
To find a Title (recording)............................................................26
Sort by Title ....................................................................................27
Sort by Category, sort by date ..................................................27
Access to the title menu ............................................................27
Assign or Change the Category of a title ..............................28
Show discs ......................................................................................28
Playing a disc
Discs you can record ..............................................................29
Discs you can play ..................................................................29
Interactive banners ................................................................30
In TELEVISION mode (Operating principle) ......................30
Information on the TV channel being watched ......................30
Recording the channel being watched......................................30
In DISC PLAYING mode (Operating principle) ................31
With a DVD ..................................................................................31
With an audio CD ........................................................................31
With a VCD (Video CD) ............................................................31
Loading and playing a disc ....................................................32
Search Options........................................................................32
Quick search of an image or a track........................................32
Still picture and frame advance..................................................32
Slow motion (in Pause mode on an image) ............................33
Skipping a chapter or a track (DVD - VCD - CD)................33
Scene Again™ (DVD) ..................................................................33
Advance (DVD) ............................................................................33
Playback options ....................................................................33
Enlarging an image (zoom) ..........................................................33
Titles, chapters, time elapsed, audio and subtitles ................33
The disc information banner ................................................34
Timer (DVD,VCD, CD)................................................................34
Title or Track (DVD,VCD, CD)..................................................34
Chapter (DVD) ..............................................................................34
Subtitle and dialogue language (DVD)......................................35
Play modes of discs (DVD - VCD) ............................................35
Camera angles (DVD) ..................................................................36
PBC - Playback control menu (VCD) ......................................36
Play mode for Audio CDs ..........................................................36
IntroScan (CD) ..............................................................................36
Edit Menu (DVD+RW) ................................................................36
Access to the edit menu ............................................................37
The edit menu functions..............................................................38
Playing images (JPEG), and sounds (mp3) files ..................40
Reading music files (MP3) and / or images (JPEG) ................40
Image Functions ............................................................................41
Menus
Disc menu................................................................................42
Play Disc ..........................................................................................42
Disc Title menu (DVD+R, DVD+RW)......................................42
Rename a disc or a title (DVD+R, DVD+RW) ......................44
Player Menu ....................................................................................45
Playlist ..............................................................................................45
Disc options....................................................................................46
Language Menu ..............................................................................47
Parental control menu..................................................................49
System Options Menu..................................................................51
Recording Options Menu ............................................................53
Further information
Troubleshooting guide............................................................54
Caution ....................................................................................57
Disclaimer of warranty! ..............................................................57
Condensation ................................................................................57
Discs ................................................................................................57
For your safety ..............................................................................57
DVD copy protection ..................................................................57
Remote control - Code A-B ..................................................58
Technical data ........................................................................58
2_DTH8040_42_en.qxd 7/07/04 9:31 Page 1

2
Connections and initial set up
Precautions and information before connecting
• Ensure that the mains supply in your house complies with that indicated on the identification
sticker located at the back of your device. Install your device horizontally, on a suitable base
(furniture), with enough space around it for ventilation (7-10 cm) • Ensure that the ventilation
slots, and the device itself, are not covered by objects such as a mat, newspapers, curtain, etc. • Do
not stack any other equipment on top of your DVD recorder. Do not place the device on top of
an amplifier or any other equipment that gives off heat • The appliance should not be in contact
with liquids or exposed to the risk of dripping or splashing.Therefore be careful not to place any
object containing a liquid (vase, glass, bottle,...) on or near your appliance • The DVD recorder
must not be near or exposed to a flame. For instance, do not place a candle on or near the
device • Protect the DVD recorder from moisture and excess heat (e.g. fireplace) or equipment
creating strong magnetic or electric fields (i. e. speakers ...). Before moving the device, ensure the
disc tray is empty. Switching off the DVD recorder to the stand-by mode does not disconnect the
electricity supply. In order to separate the device completely from the mains, it has to be
disconnected by unplugging the mains plug.When connecting, ensure that the plugs of the various
cables are pushed securely into their corresponding sockets.Your DVD recorder is not intended
for industrial use but for domestic purposes only. Use of this product is for personal use only.
Copying CDs or downloading music files for sales or other business purpose is or may be a
violation of copyright law.
Important notice: Please read the recommendations given on page 57.
Inserting the batteries
Important information regarding the batteries
• Do not mix different types of batteries or new and old batteries. Do not use rechargeable
batteries. In order to avoid any risk of explosion, observe polarities indicated inside the
battery compartment. Replace only with the type of batteries specified above. Do not throw
them into fire, do not recharge them. Remove the batteries from the remote control unit if
you are not going to use it for several weeks. Immediately remove any leaking batteries.Take
care in doing this, as leaking batteries may cause burns to the skin or other physical injury.
• Please respect the environment and prevailing regulations. Before you dispose of
batteries ask your dealer whether they are subject to special recycling and if he
accepts to take them back.
123
2_DTH8040_42_en.qxd 7/07/04 9:31 Page 2

Connections and initial set up
3
EN
EN
1. Unplug the antenna cable from your TV set and plug it into the ANTENNA-CABLE IN
socket of your DVD recorder.
2. Using the coaxial cable supplied, connect the ANTENNA-CABLE OUT socket of the
DVD recorder to the gantenna socket of your TV set.
3. Using a Peritel cable (Scart) [not supplied] connect connector AV1 (TV) of the DVD player
to the Peritel (Scart) connector on the television set (labelled AV 1,EXT 1,AUX 1
depending on the brand).
4. Use the mains cable to connect your DVD recorder to a mains socket, by first connecting the
cable to the back of the DVD recorder.
Note: connection to a satellite or cable receiver is detailled on page 9.
For UK, please see safety information regarding the mains plug at the end of this user manual, in the cover
page.
Basic connections
Your DVD recorder has many connection possibilities to allow it to fit into a setup comprising
several devices.We recommend that you follow the connection setup on this page, and then carry
out the adjustments shown on the following pages.You will first need to set up the channels as
explained in the following pages before the final interconnection of the devices, described on
pages 9 to 12.
TV
DVD recorder
220 - 240 V
50 - 60 Hz
United Kingdom
Ireland
Europe
Scart cable Coaxial Cable
1
2
3
4
2_DTH8040_42_en.qxd 7/07/04 9:31 Page 3

Connections and initial set up
4
About your device
Your DVD recorder is a digital video player and recorder.Thanks to its tuner you can watch and
record TV progammes on DVD+R and DVD+RW discs. It can play the majority of 8 cm and 12
cm discs, with the exception of DVD Rom, DVD Ram, and DVD audio.
Placing the DVD recorder in service
Using the remote control unit correctly
When you use remote control, point the unit at the appliance you want to control (DVD
recorder,TV set or satellite receiver). Ensure that there is no obstacle between the remote
control unit and the appliance, otherwise the infrared signal carrying the remote control
commands will be blocked.To control your DVD recorder, ensure that the remote control unit is
in DVD mode by pressing once on the DVD key before using any other keys.
Switch on your DVD recorder and your TV set
1. Turn on your TV set.
2. Set your DVD recorder remote control unit in DVD
mode by pressing once on the DVD key.
3. Switch on your DVD recorder by pressing the
ON/STANDBY button on the front panel of the
player.
4. The first time you turn on your DVD recorder, it will
ask you to select a preferred language for the various
displays via the menu which appears on your TV
screen. If this menu is not displayed, on your TV
screen select the AV socket to which you connected
your DVD recorder.
Note:The player menus as well as the dialogues and subtitles
of the DVDs will always be presented in the language you’ve
chosen if it is available on the discs played.
5. Choose a language using the , keys on the
remote control unit, then confirm by pressing OK.
Note: Note: the buttons.
Continue on the next page …
2_DTH8040_42_en.qxd 7/07/04 9:31 Page 4

Connections and initial set up
5
EN
EN
6. Select your country of residence using the or
keys, and press OK.
Note: the arrows indicate that other countries are available.
To find your country, use the buttons on your remote
control.
7. On the screen that is displayed, the Automatic
option is already selected. Press OK.
8. An installation window will appear. A cursor shows
the progress in the set-up of the channels.You will
need to wait a fair amount of time.When all the
channels that you can receive in your area have been
stored, 100 % is indicated.The number of channels
found is indicated by XX channels found.
Press OK.
Continue on the next page …
Automatic channel search
In each region,TV stations are broadcast on different channels.Your DVD recorder cannot be
factory-set to receive the TV channels of your area.You will have to set up the channels by
following the automatic procedure recommended below.
2_DTH8040_42_en.qxd 7/07/04 9:31 Page 5

Connections and initial set up
6
Sorting the channels
9. A channel sorting window will appear.The picture of the selected channel is shown in the
background.
The automatic channel search has assigned numbers to the channels is a predefined order.These
numbers may not be the numbers you would have chosen. Should this be the case, you can
change these numbers by following the instructions at the bottom of the screen. For easy channel
identification, we suggest you have a TV magazine at hand.
Note: Channel sorting instructions:
Move: press OK (then the / keys until you reach the
desired position (Pr no. on the left of the list then OK: swapping
of the 2 channels).
Delete: CLEAR key.
Rename: INFO keys, then / to search for a name on the
list. Validate by pressing OK.
Decoder adjustment : AV key (indicates that the images of the
selected channel will be decrypted by a decoder, of the
CANAL+type, connected to connector AV2.The symbol of a
decoder displayed alongside the name of the channel confirms
the adjustment).
10. When all channels have been sorted to your liking, press the key.
11. Your DVD recorder has an automatic time (and date) setting function. In general, no setting is
required on your part. If the time and date information are correct, press OK.A message
appears. It indicates that the installation of the channels are now complete. Press OK.The
main menu of your DVD recorder appears.
Clock setting
AutoClock: If the date and time information is not correct, adjust the clock as described below,
then check in the System Options menu that the automatic time setting is activated.This menu
is reached from the Setup menu (see page 52).The time setting of the DVD recorder is
important for the correct functioning of your programmed recordings.
1. Select Year. Enter 4 digits for the year
(2,0,0,4for 2004).
2. Then enter the 4 digits of the date
(press 1,5,0,5for 15th May).
3. Enter the 4 digits of the time
(press 1,5,5,9for 15:59 (03:59 PM).
4. Then press twice on OK.The Main Menu will appear
again. Channel set-up is complete.
Note:You can now use your DVD recorder and take advantage of its numerous functions. If you want to
connect a satellite receiver to your DVD recorder, refer to page 9 for the recommended connection.You can
also complete your installation through the settings available in the System Options menu (refer to
pages 51-52).These adjustments depend on the other devices that you are likely to connect to your DVD
recorder.
If you want to redo the automatic channel set-up, you will have to select Interactive setup in the
Installation menu (in the Setup menu).
2_DTH8040_42_en.qxd 7/07/04 9:31 Page 6

Connections and initial set up
7
EN
EN
Manual channel search
If you want to set up a new channel, use the manual search procedure which will enable you to
add a channel to the ones already set-up on your DVD recorder.The channels already stored will
not be deleted. During the initial installation, if you carried out the automatic installation
described on page 5, you do not need to carry out the steps shown on 7 and 8.
1. If the main menu is not displayed, press the MENU key.
2. Select the Setup line using the or keys, and press OK to validate.
3. Select the Installation line using the or keys, and press OK to validate.
4. Select the Manual Search line using the or keys, and press OK to validate.
5. Select your country of residence using the or keys on the remote control, and press
OK.
A set-up window will appear.The Standard line is highlighted.
6. Select your country’s TV standard using the key.
Note: the standards displayed depend on the country selected in
step 5.
FRANCE (LL’) for France,
EURO BG (BGH) for Western Europe.
DKK’ for Eastern Europe.
Ifor the United Kingdom.
7. Select the Reception line using the or keys, and use the key to choose the type
of antenna.
• Reception through external antenna: select Antenna (Ch).
• Cable reception: select Cable (Ca).
8. Select the Channel line using the or keys.
9. Press PR+ to start the Manual search.
The search starts.When a channel is found, the picture appears in the background.The channel
number is indicated (e.g.: Ch 06).
If the channel is encoded, press AV to display the pictogram next to the channel number. In
this case, plug a decoder into the blue AV2 connector of the DVD recorder.
If the picture is poor, select Fine Tuning using or and adjust with PR+ or PR-.
10. When the picture and sound of the channel are good, select the line Save using or ,
and assign a channel number with PR+ or PR- or the number keys. Press OK to store the
number that you have assigned to the channel.
The Channel line is once again highlighted to start a new search. Repeat the procedure from
step 9 to search for a new channel or press MENU to exit the manual set-up.
2_DTH8040_42_en.qxd 7/07/04 9:31 Page 7

Connections and initial set up
8
Channel update
If new channels make their way into the audiovisual scene, you will have to update your DVD
recorder’s list of channels. In such a case, start a new channel search from the installation menu.
This set-up deletes all stored channels and resets all the channels that your DVD recorder can
receive. If you only want to set-up a single channel, refer to the manual search on page 7.
1. If the main menu is not displayed, press the MENU key.
2. Select the Setup line using the or keys, and press OK to validate.
3. Select the Installation line using the or keys, and press OK to validate.
4. Select the Channel search line using the or keys, and press OK to validate.
An installation window will appear. A cursor shows the
progress in the set-up of the channels.When all the
channels that you can receive in your area have been
stored, 100 % is indicated. Press OK to return to the
Channel search line. Press MENU to return to the
Main Menu.
Clock setting
Your DVD recorder has an automatic time setting system which recognises the time signals put
out by certain channels. If your DVD recorder is not set at the right time, you can reset it by
following the instructions below;
1. If the Main Menu is not displayed, press the MENU key.
2. Select the Setup line using the or keys, and press OK to validate.
3. Select the Installation line using the or keys, and press OK to validate.
4. Select the Clock Setup line using the or keys, and press OK to validate.
5. year is highlighted. Enter the year’s 4 digits
(press 2,0,0,4for 2004).
6. Then enter the 4 digits of the date
(press 1,5,0,5for 15th May).
7. Enter the 4 digits of the time
(press 1,5,5,9for 15:59 (03:59 PM).
8. Press OK to confirm.
Sorting the channels
1. If the Main Menu is not displayed, press the MENU key.
2. Select the Setup line using the or keys, and press OK to validate.
3. Select the Installation line using the or keys, and press OK to validate.
4. Select the Channel List line using the or keys, and press OK to validate.
Refer to the Channel Sorting paragraph on page 6 to check or sort out the channels
stored on your DVD recorder.
2_DTH8040_42_en.qxd 7/07/04 9:31 Page 8

Connections and initial set up
9
EN
EN
DVD recorder
Satellite receiver
TV set
Other recommended connections
Satellite or cable reciever (or decoder)
Carrry out the connection of cable 5 (not supplied).
In grey: connections already carried out (connections from page3).
5
2_DTH8040_42_en.qxd 7/07/04 9:31 Page 9

10
Connections and initial set up
Video recorder
Satellite reciever and video recorder
Satellite
receiver
Video recorder
Video recorder
DVD recorder
DVD recorder
TV set
TV set
(not supplied)
(not supplied)
2_DTH8040_42_en.qxd 7/07/04 9:31 Page 10

Connections and initial set up
11
EN
EN
The connections proposed on page 3 permit the rapid connection of your DVD recorder and
ensure optimum sound, visual quality (RGB) and standards. Depending on the sockets available on
your other devices or to benefit from the maximum performance of your DVD recorder you may
make other connections.The DVD recorder has other sockets for this purpose.
Sockets and cables (inputs)
1 - Audio inputs (INPUT L, R)
The analogue sound of an operating device (television set or amplifier) can be
input via the 2 Audio sockets L and R of your DVD recorder. If you do not
use the recommended connection, i.e. the Peritel (Scart) socket, you must, as
well as the video connections (CVBS or S-VIDEO) connect the outputs Audio
L and R of the operating device to the Audio L and R inputs of your DVD
recorder.
Note: the audio sockets and cables are generally identified by a colour code (white
for the left channel and red for the right).
2 – Video in - Composite (CVBS) (COMPOSITE VIDEO INPUT)
The yellow video socket also known as composite video (or CVBS): the
image quality provided by this socket is less than all the other video sockets.
Only use this socket if all the other sockets are already in use.
3 - S-Video input (Y/C) (S-VIDEO IN)
The S-Video signal is of a lesser quality than that of the RGB signal supplied
by the Peritel (Scart) socket.The S-Video signal however gives a better image
quality than the composite video socket (C) since black and white (Y) are
separated from colour in the video signal.
Note: do not forget to connect the audio cables since the S-Video cable transmits
only images, not sound.
RCA sockets and
cables for analogue
L and R audio
signal.
RCA socket and
cable for CVBS
Video signal, also
called Composite.
Ushiden socket and
cable for Y/C Video
signal, also called
S-Video.
2 31 7
5 46
2_DTH8040_42_en.qxd 7/07/04 9:31 Page 11

Connections and initial set up
12
Sockets and cables (outputs)
4 -
Optical Out socket (DIGITAL AUDIO OUT)
The digital sound of a disc being played is permanently available on the optical
socket of your DVD recorder. Use this socket by connecting it to a decoder
or a DTS or Dolby Digital amplifier.
5 -
S-Video out socket (Y/C) (S-VIDEO OUT)
The S-Video cable provides a video signal of lower quality than the Peritel
(Scart) socket.An S-Video signal however provides a better quality image than
a composite video socket, because colour (C) is separated from black and
white (Y) in the video signal.
Note: do not forget to also connect the audio cables, because the S-Video cable
transmits images and not sound.
6-
Audio outputs (OUTPUT L, R)
The digital sound output from a disc being read is permanently available at
the two audio sockets, L and R, of your DVD recorder. If you do not use the
recommended Peritel (Scart) connection to the television (paragraph 3
page 3), you must, as well as one of the video connections (CVBS or S-
VIDEO) connect the Audio outputs, L and R, of your DVD recorder to the
Audio inputs, L and R, of your television set (or amplifier).
Note: audio sockets and cables are usually identified by a colour code (white for the
left channel and red for the right channel).
7 -
Composite Video Out socket (CVBS) (OUTPUT COMPOSITE VIDEO)
The yellow video socket is also called composite video, or CVBS.The
image quality delivered by the video socket is the least good of all video
connections. Only use this socket if all other sockets are already in use.
Optical socket and
cable for digital
audio signal.
Ushiden socket and
cable for Y/C Video
signal, also called
S-Video.
RCA sockets and
cables for analogue
L and R audio
signal.
RCA socket and
cable for CVBS
Video signal, also
called Composite.
2_DTH8040_42_en.qxd 7/07/04 9:31 Page 12

Connections and initial set up
13
EN
EN
Front sockets (inputs)
1 -
S-Video socket
For the connection of a Camcorder or other S-Video device.
Note: do not forget to connect the audio cables since the S-Video socket handles only
images and not sound.
2-
AV sockets (Audio/Video)
The AUDIO-VIDEO connectors allow the viewing or copying of your video
sequences from a camcorder or any other AV device that provides a
composite video signal and analogue stereo sound.
The connectors on the facade allow easy connection when copying sound and images or
displaying them from a video camera
2
1
123
The connectors
are behind a
trapdoor
Press here Lift the trapdoor to gain
access to the connectors
2_DTH8040_42_en.qxd 7/07/04 9:31 Page 13

Connections and initial set up
14
The buttons on the front
ON/STANDBY - To switch your DVD
recorder on or off.
STOP - To stop play (press once) or to
stop recording in progress using the
Channels menu (press twice).
PLAY / PAUSE
- To play a disc placed in the disc tray (10)
of the DVD recorder.
- Pause during playback (audio CD or
mp3) or pause on an image (DVD).
GREV / FWD F
Fast forward or reverse (page 32).
RECORD - To start recording a TV
programme (the red indicator lights up)
and if necessary to adjust recording time
by pressing repeatedly. Each press on the
RECORD key extends recording time by
30 minutes.
OPEN/CLOSE - To open and close the
disc tray.
AV - To select the audiovisual sources
(channels or devices connected to the AV
sockets):
PR 1 ,2,3- Channel 1, 2, 3.
AV 1 - Device connected on AV1 (TV set).
AV 2 - Device connected on AV2 (satellite
receiver, decoder, …).
AV 3 - Front AUDIO/VIDEO sockets.
AV 4 - Rear AV sockets (S-VIDEO or
AUDIO/VIDEO.
PR- / PR+ / IGSKIP FI
To change channels (page 19).
Skips forward or backward a chapter
(page 33).
Display panel - Displays your DVD
recorder’s modes of operation (page 15).
Adjusting the brightness (page 52)
Disc tray.
1
2
3
4
5
6
7
8
9
10
0h30 1h00 1h30 2h00 2h30 3h00
21 3 5 6 7
10 9
84
2_DTH8040_42_en.qxd 7/07/04 9:31 Page 14

Connections and initial set up
15
EN
EN
The messages on the display
TV Functions
With a disc
Other indications
- Main menu displayed on screen (device stopped).
No function selected.
- Real-time viewing.
TV mode activated; channel 1 being watched.
- Start of recording of TV program on selected channel.
- Channel 1 currently being recorded.
- DVD playback.
- Playback of an Audio CD or VCD.
- Pause of Audio CD or still frame (DVD,VCD).
- Indicates the Lock function is activated.
(page 49).
- Indication of the selected source:
• AV 2:AUDIO/VIDEO input connector at the rear.
• AV 3:AUDIO/VIDEO input sockets on the front.
• AV 4:AV/ S-VIDEO or AUDIO/VIDEO input sockets at
the rear.
- Fast forward () or reverse ().
- Slow motion, forward (K) or backward (K).
Displays on your DVD recorder (menus and banners)
• Disc menus – Each DVD disc offers a menu, the layout and order of which depend on the
editor of the disc.The main menu of the disc is displayed on the screen when a DVD disc is
loaded and play begins.You can also, at any time, display the main menu of the disc by using
the MENU button.
• Player banners – while a disc is playing back you can display or remove banners using the
INFO key on the remote control unit.The banners appear in the form of a succession of
icons at the top of the screen.
• Player menus – your DVD recorder has menus enabling you to use functions that are not
accessible using the remote control unit keys.The player menu is displayed when the DVD
recorder is not playing a disc (in STOP mode).
Note: settings will only function if the corresponding function has been provided by the editor. For instance, if
you select the subtitle icon in the banner, subtitles will only appear if they actually exist on the disc. Check
the sleeve to see what subtitles are provided. If a menu or icon appears in “grey” it means that the function
is not available.
2_DTH8040_42_en.qxd 7/07/04 9:31 Page 15

16
Remote control
The remote control handset supplied with your DVD recorder is a 3 in 1 type remote control. It
allows 3 devices to be controlled: your DVD recorder, a television set and a satellite or cable
receiver.Thus you have remote control of all these devices by using the 3 modes: DVD,TV or
SAT.CABLE that are accessed by 3 corresponding keys.This page describes the keys that control
your DVD recorder (in DVD mode).
Note: the functions described below depend on the discs and/or the files read.
For description of the TV and SAT.CABLE functions, see the following page.
Description of keys in DVD mode
Signal lamp - this shows the status of the remote control when it
is being used to program or to control another device. It also
indicates that the batteries level is low by flashing several times
when a key is pressed.
Switches the DVD recorder on or off.
DVD Sets the remote control unit in DVD mode (by
pressing once), enabling you to control your DVD
recorder.
PR Skips forward or backward a chapter (DVD) or
track (CD).
RETURN Returns to the previous menu.
MENU Displays the DVD disc menu while a disc is being
played.
CLEAR Removes the menu or banner showing on the TV
screen.
OPEN
.
CLOSE
Opens and closes the disc holder of the DVD
recorder.
ZOOM Enlarges the picture during playback, slow motion
or pause mode.
INFO Displays the DVD recorder information banner on
the TV screen while a disc is being played.
SHOWVIEW Display programming screen with guide number.
ANGLE To access a choice of angles of an image if available
on the disc.
(JPEG) To rotate an image through 90°.
0 to 9 Keys used to enter information such as a chapter
or track number, or to make choices from menus.
TV
.
VIDEO Passes DVD images to the television set connected
to AV1.
REV Fast backward while a disc is being played.
PLAY Plays a disc.
FWD Fast forward while a disc is being played.
REC To record the TV program watched onto the
recordable disc (DVD+R / DVD+RW).
STOP Stops disc playing or recording and displays the
DVD player menu.
PAUSE Pause during playback (CD) or pause on an image
(DVD).
AGAIN Skips backward – each press replays the last
seconds during DVD playback.
ADVANCE To skip forward approximately 30 seconds (DVD)
or to play another track (audio CD).
2_DTH8040_42_en.qxd 7/07/04 9:31 Page 16

Remote control
17
EN
EN
Using the remote control handset to control your television
and satellite or cable receiver
The DVD recorder remote control handset is a 3 in 1 device that allows you to control the
operation of 3 devices: your DVD recorder, a television set, or satellite receiver.This page
describes the keys that control your television set and your satellite or cable receiver if they
have the same functions.
Controlling a TV set
TV Sets the remote control unit in TV mode (by pressing once) and enables
you then to control your TV set.
Switches the TV set on or off.
Volume control.
Switches sound off or on again.
PR Switches channel or selects an AV socket.
AV Selects an AV socket.
0 to 9 Keys enter digital values or change channel.
MENU Displays main TV set menu.
RETURN Returns to the previous menu.
CLEAR Removes menu or other information displayed on the screen.
Note: colour keys enable one to use the teletext function on THOMSON TV sets.
Controlling a satellite or cable receiver
SAT
.
CABLE Places the remote control in the SAT•CABLE mode (press once) and
then enables you to control your satellite or cable receiver.
To turn on or off the satellite or cable receiver.
PR Switches channel.
0 to 9 Keys enter digital values or change channel.
MENU To display the main menu of the satellite or cable receiver.
RETURN Returns to the previous menu.
CLEAR Removes menu or other information displayed on the screen.
Note: the colour keys allow access to the same functions as colour keys on the
remote control.
Remote control - Code A-B
With certain devices (combined TV/DVD or other DVD player) it may
happen that your DVD recorder controls the DVD player of the other
device. In this case you can adjust your remote control and the DVD
recorder on another code known as code B (adjustment shown on page 58).
2_DTH8040_42_en.qxd 7/07/04 9:31 Page 17

Remote control
18
Programming the remote control
If your remote control does not control your satellite receiver (or cable) or your television set
you will need to configure it using one of the two methods proposed: automatic code search or
manual programming.
Automatic code search
This method can be used to automatically find the most appropriate code for
your appliance.
1. Switch on the appliance you wish to use the remote control with.
2. Press the relevant button for this appliance on the remote control, and
while holding this button down, press the standby button until the
remote control light comes on. Release the two buttons.
3. Point the remote control at the appliance and press PLAY.Wait until the
light stops flashing. If the appliance has not gone into standby mode after
five seconds, press the PLAY button again to continue the search for the
next set of codes. Repeat this operation until the appliance goes into
standby mode.There are 20 sets of codes.
4. When the appliance goes into standby mode, press the button on the
front to switch it on again.Then press the REV button to put it back in
standby mode, and if necessary, keep pressing until the appliance goes into
standby.
5. Press the STOP button and hold it down until the remote control light
goes off.
Manual programming
This method involves carrying out a manual search for the codes to be used
for controlling your other appliances.
1. Switch on the appliance you wish to use the remote control with.
2. Press the corresponding key on the remote control, while holding it
pressed down, enter one of the codes corresponding to the make of the
device (Thomson Group codes on the bottom left of this page, other
brands can be found in the “Related documents” leaflet).
If the remote control light flashes you have entered the wrong code or it is not
possible to program the remote control.
3. Point the remote control at the appliance and press the relevant button.
Press the standby button.
If the appliance does not go into standby mode, try another code.
Depending on the year of manufacture and the type of appliance, some functions
may not be available.
Certain codes may cover more functions than others.Test the functions you
can control and, if appropriate, try other codes.
Note here the code(s) which work best.
Note: when you change the remote control’s batteries, remember to reprogram it.
TV
SAT•CABLE
SAT Codes: 5000, 5001,
5031, 5037, 5043, 5064,
5065, 5066, 5058, 5084.
TV Codes: 1000, 1001,
1002, 1016, 1024, 1033,
1041, 1051, 1089, 1096,
1127, 1128, 1129, 1130,
1134, 1135, 1148, 1151.
2_DTH8040_42_en.qxd 7/07/04 9:31 Page 18
Other manuals for DTH8040E
1
This manual suits for next models
1
Table of contents
Other THOMSON DVD Recorder manuals

THOMSON
THOMSON DTH 8543 - ADDITIF User manual

THOMSON
THOMSON DTH8060 User manual

THOMSON
THOMSON DTH8560E User manual

THOMSON
THOMSON DTH8555 X User manual

THOMSON
THOMSON DTH 8550E User manual

THOMSON
THOMSON DTH 8657 User manual

THOMSON
THOMSON DTH 8657 User manual

THOMSON
THOMSON DTH8045E User manual

THOMSON
THOMSON DTH8040 User manual

THOMSON
THOMSON DTH7000 User manual