THOMSON DTH8560E User manual

The content in brief...
EN
EN
1
To begin
About your device
Your appliance is a digital video player/recorder. It has a built-in
tuner so you can record TV programmes directly onto DVD+R
and DVD+RW discs or onto the built-in 250 Go hard disk. It can
play the majority of 8 cm and 12 cm discs, with the exception of
DVD Rom, DVD Ram, and DVD audio.
Precautions to take
• Ensure that the mains supply in your house complies with that indicated on the identification
sticker located at the back of your device • Install your device horizontally, on a suitable base
(furniture), with enough space around it for ventilation (7 to 10 cm) • Ensure that the ventilation
slots, and the device itself, are not covered by objects such as a mat, newspapers, curtain, etc. • Do
not stack any other equipment on top of your DVD recorder • Do not place the device on top of
an amplifier or any other equipment that gives off heat • The appliance should not be in contact
with liquids or exposed to the risk of dripping or splashing.Therefore be careful not to place any
object containing a liquid (vase, glass, bottle,...) on or near your appliance • The DVD recorder
must not be near or exposed to a flame. For instance, do not place a candle on or near the
device • Protect the DVD recorder from moisture and excess heat (e.g. fireplace) or equipment
creating strong magnetic or electric fields (i. e. speakers ...). Before moving the device, ensure the
disc tray is empty. Switching off the DVD recorder to the stand-by mode does not disconnect the
electricity supply. In order to separate the device completely from the mains, it has to be
disconnected by unplugging the mains plug.When connecting, ensure that the plugs of the various
cables are pushed securely into their corresponding sockets.Your DVD recorder is not intended
for industrial use but for domestic purposes only. Use of this product is for personal use only.
Copying CDs or downloading music files for sales or other business purpose is or may be a
violation of copyright law.
Important: Please take the time to read the further recommendations at the end of this handbook.
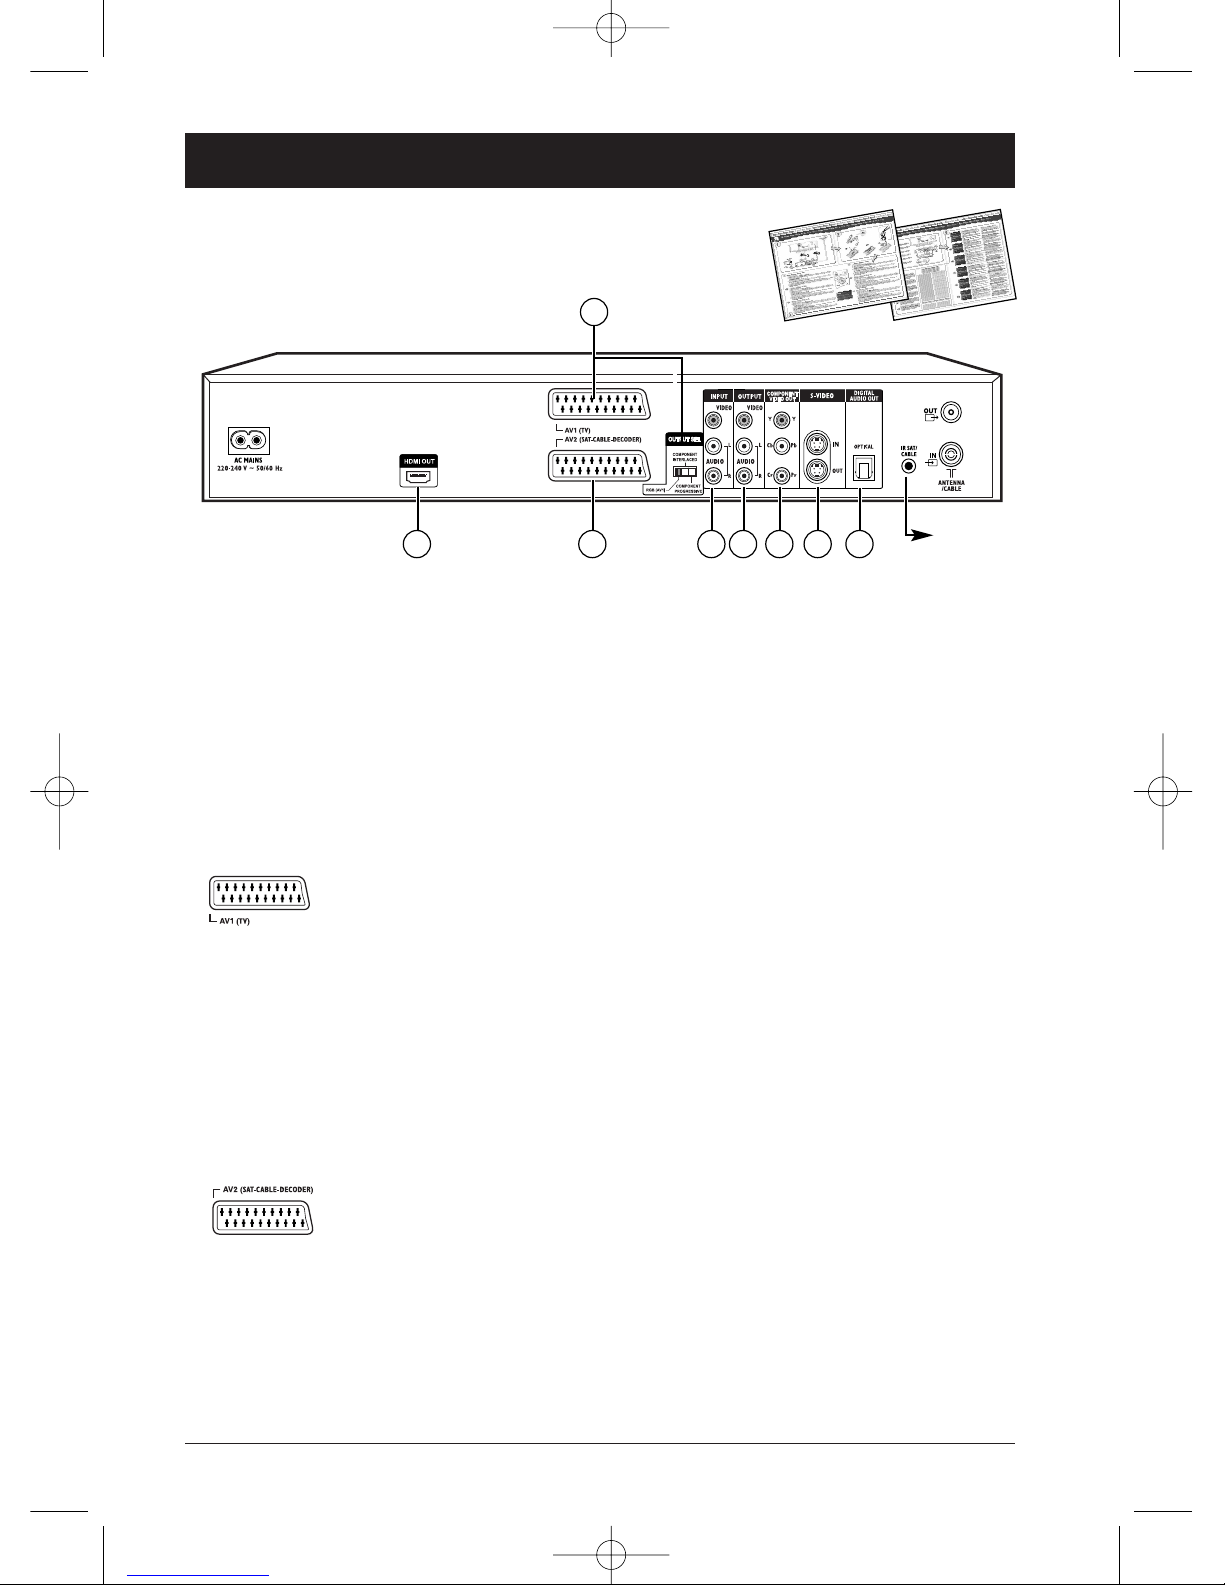
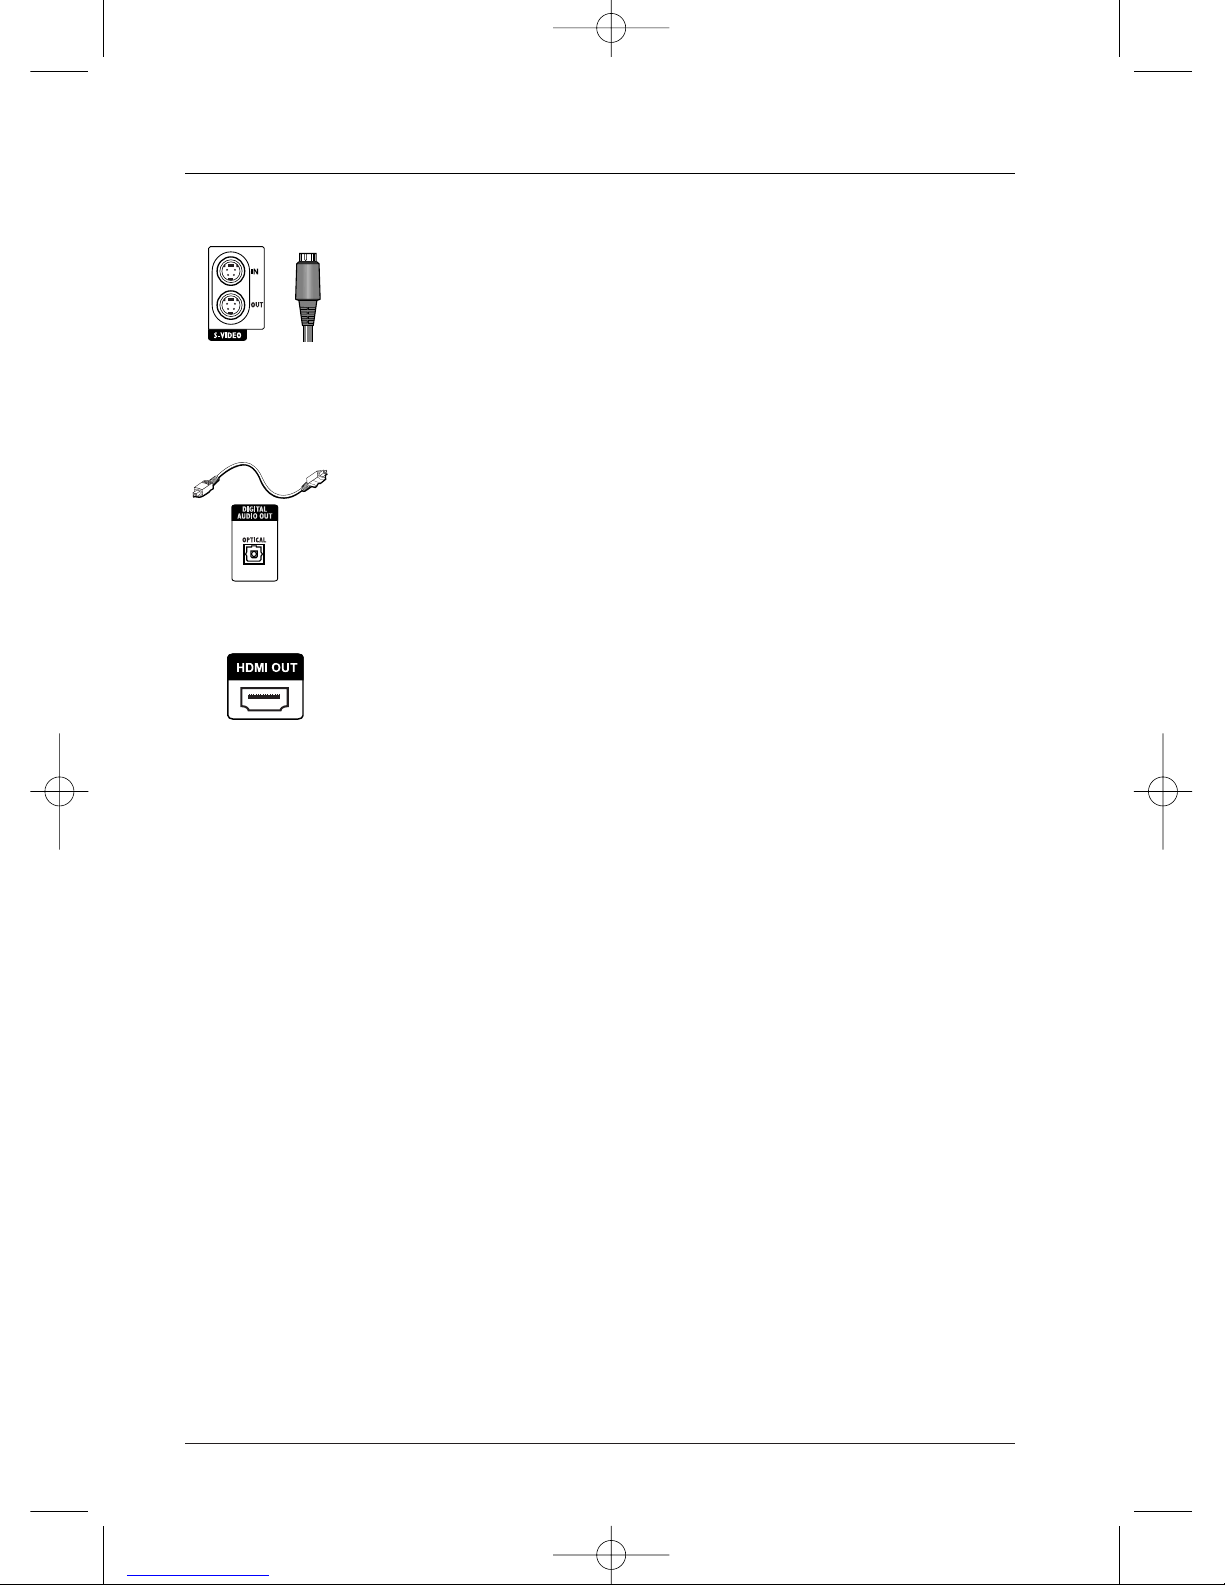
• Connections and initial set up..........2
Basic connections - Other Audio -Video connections
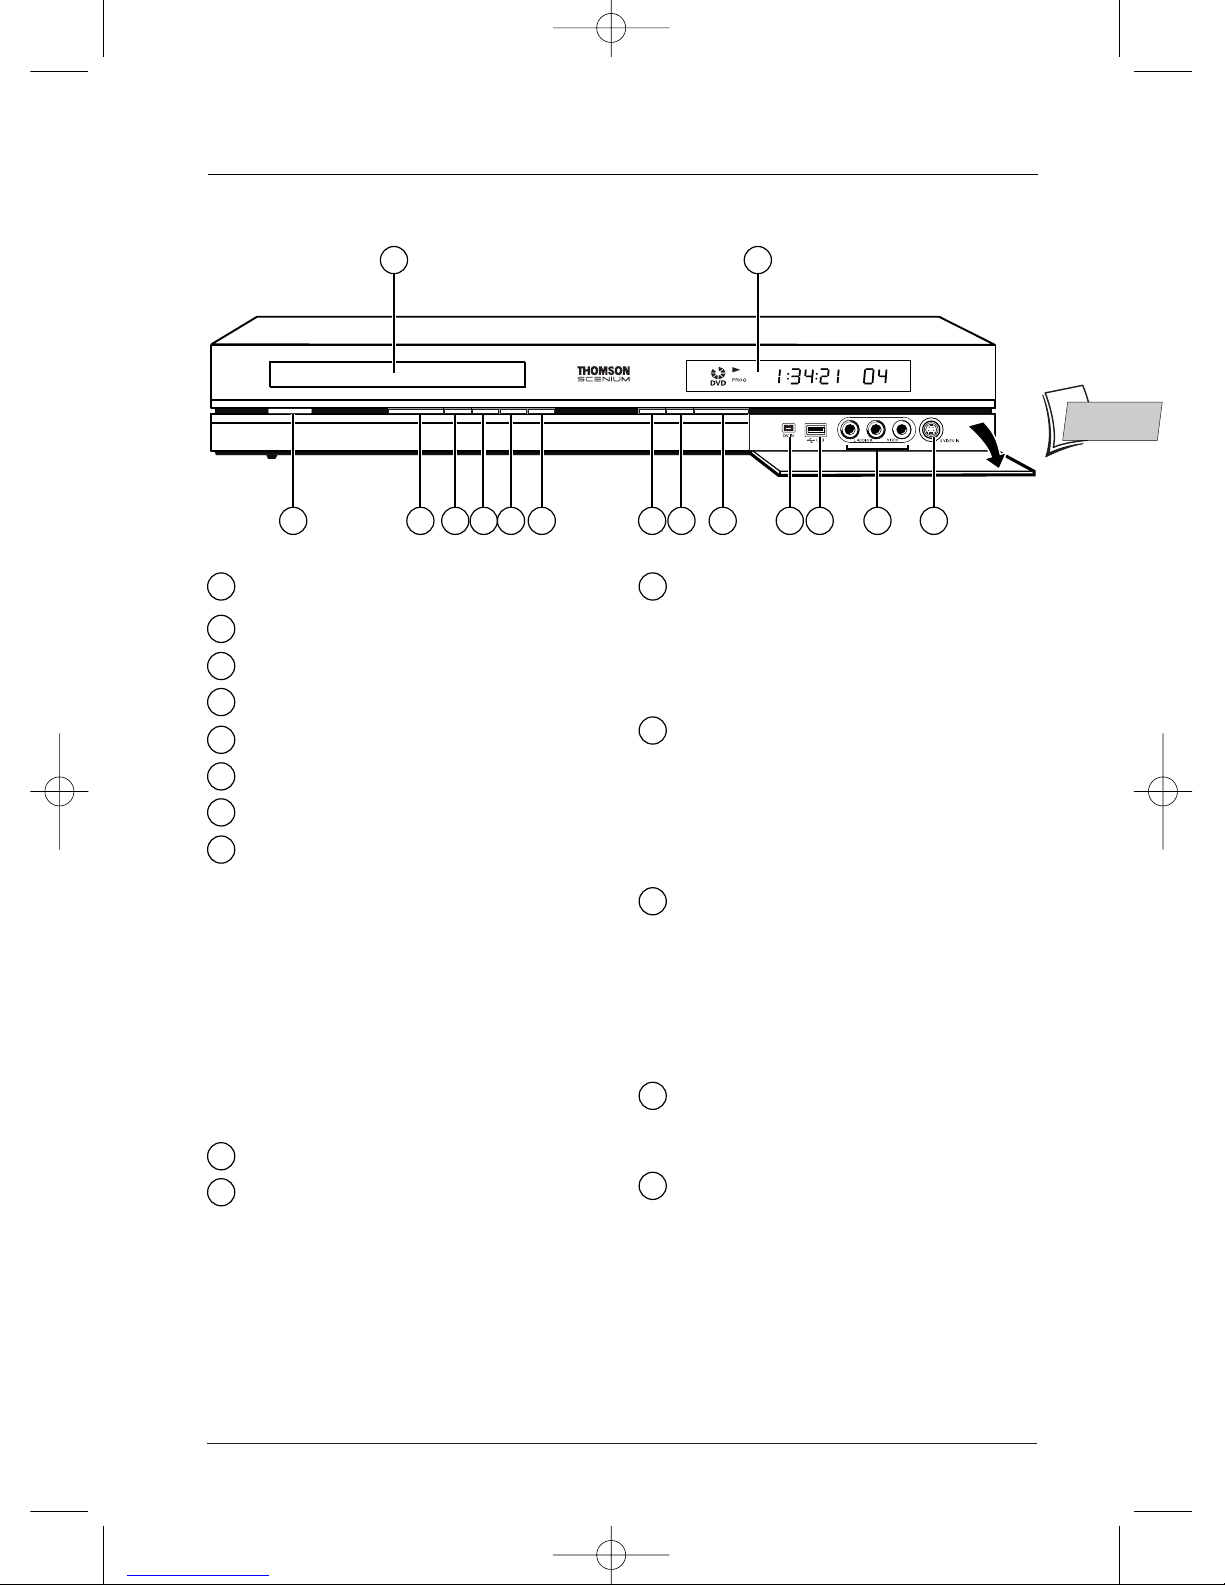
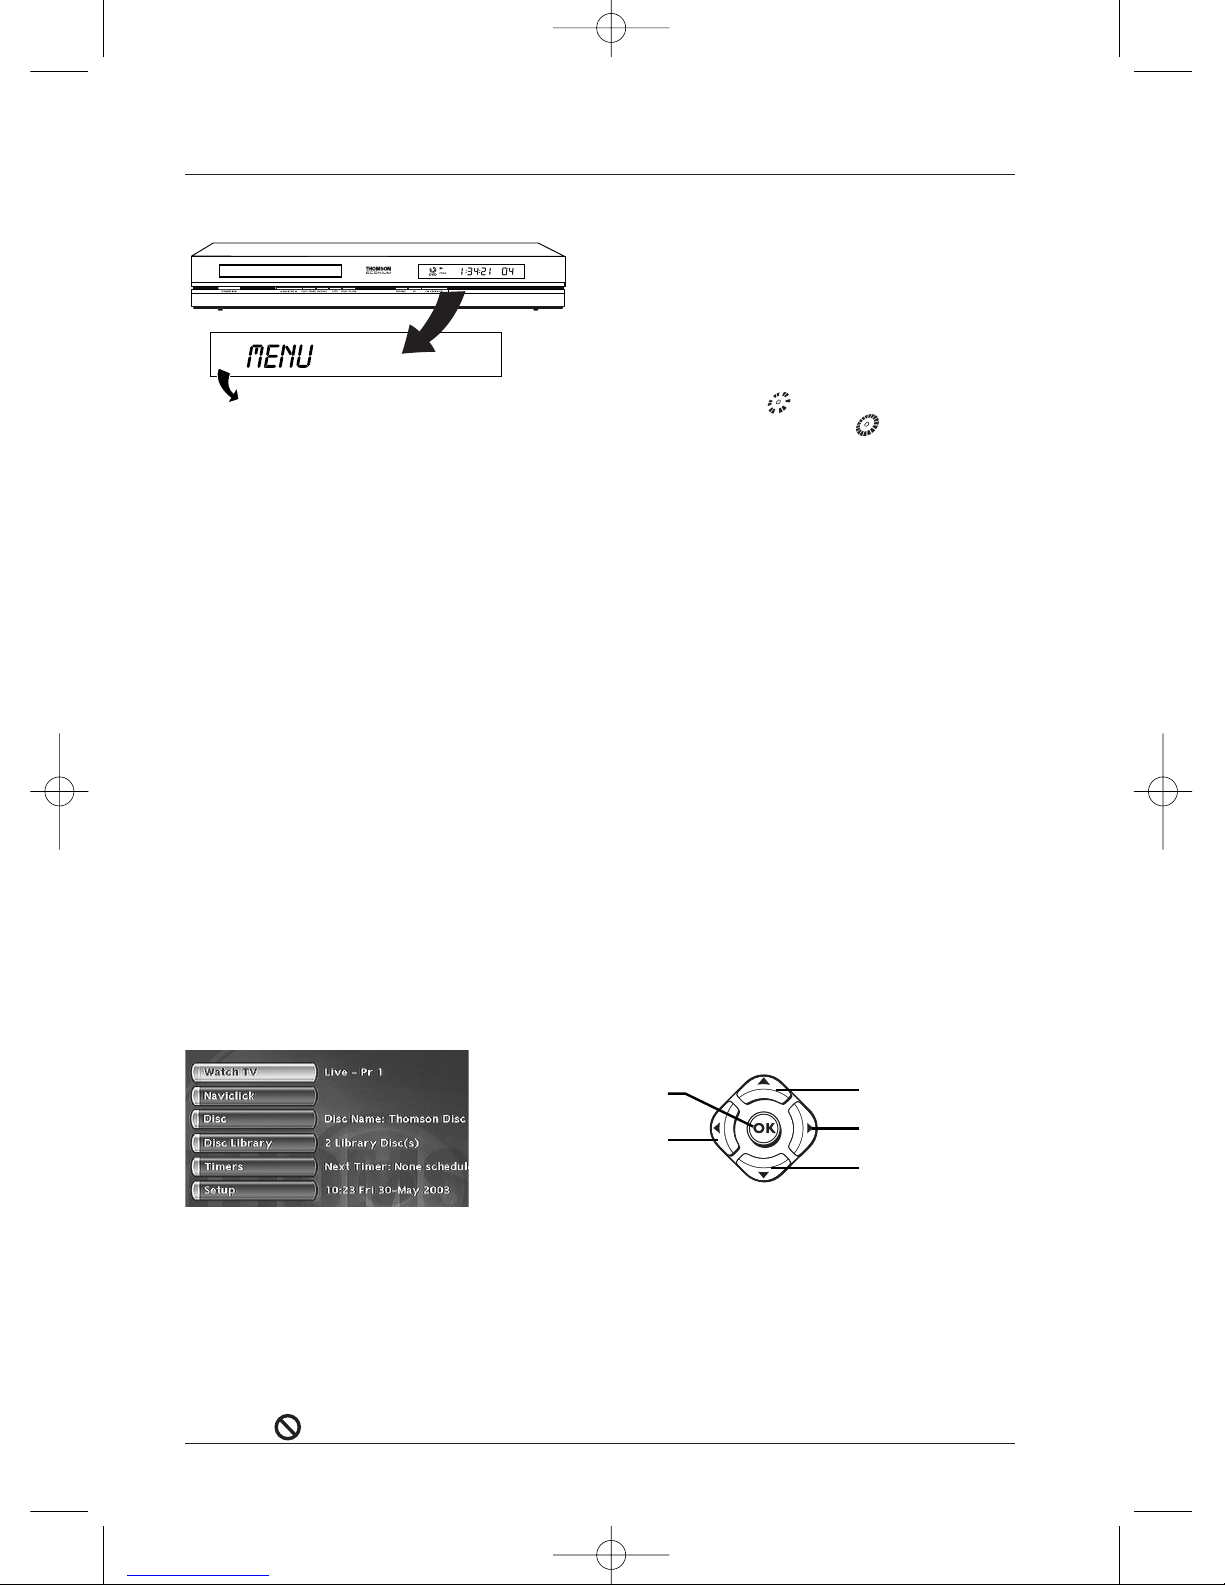
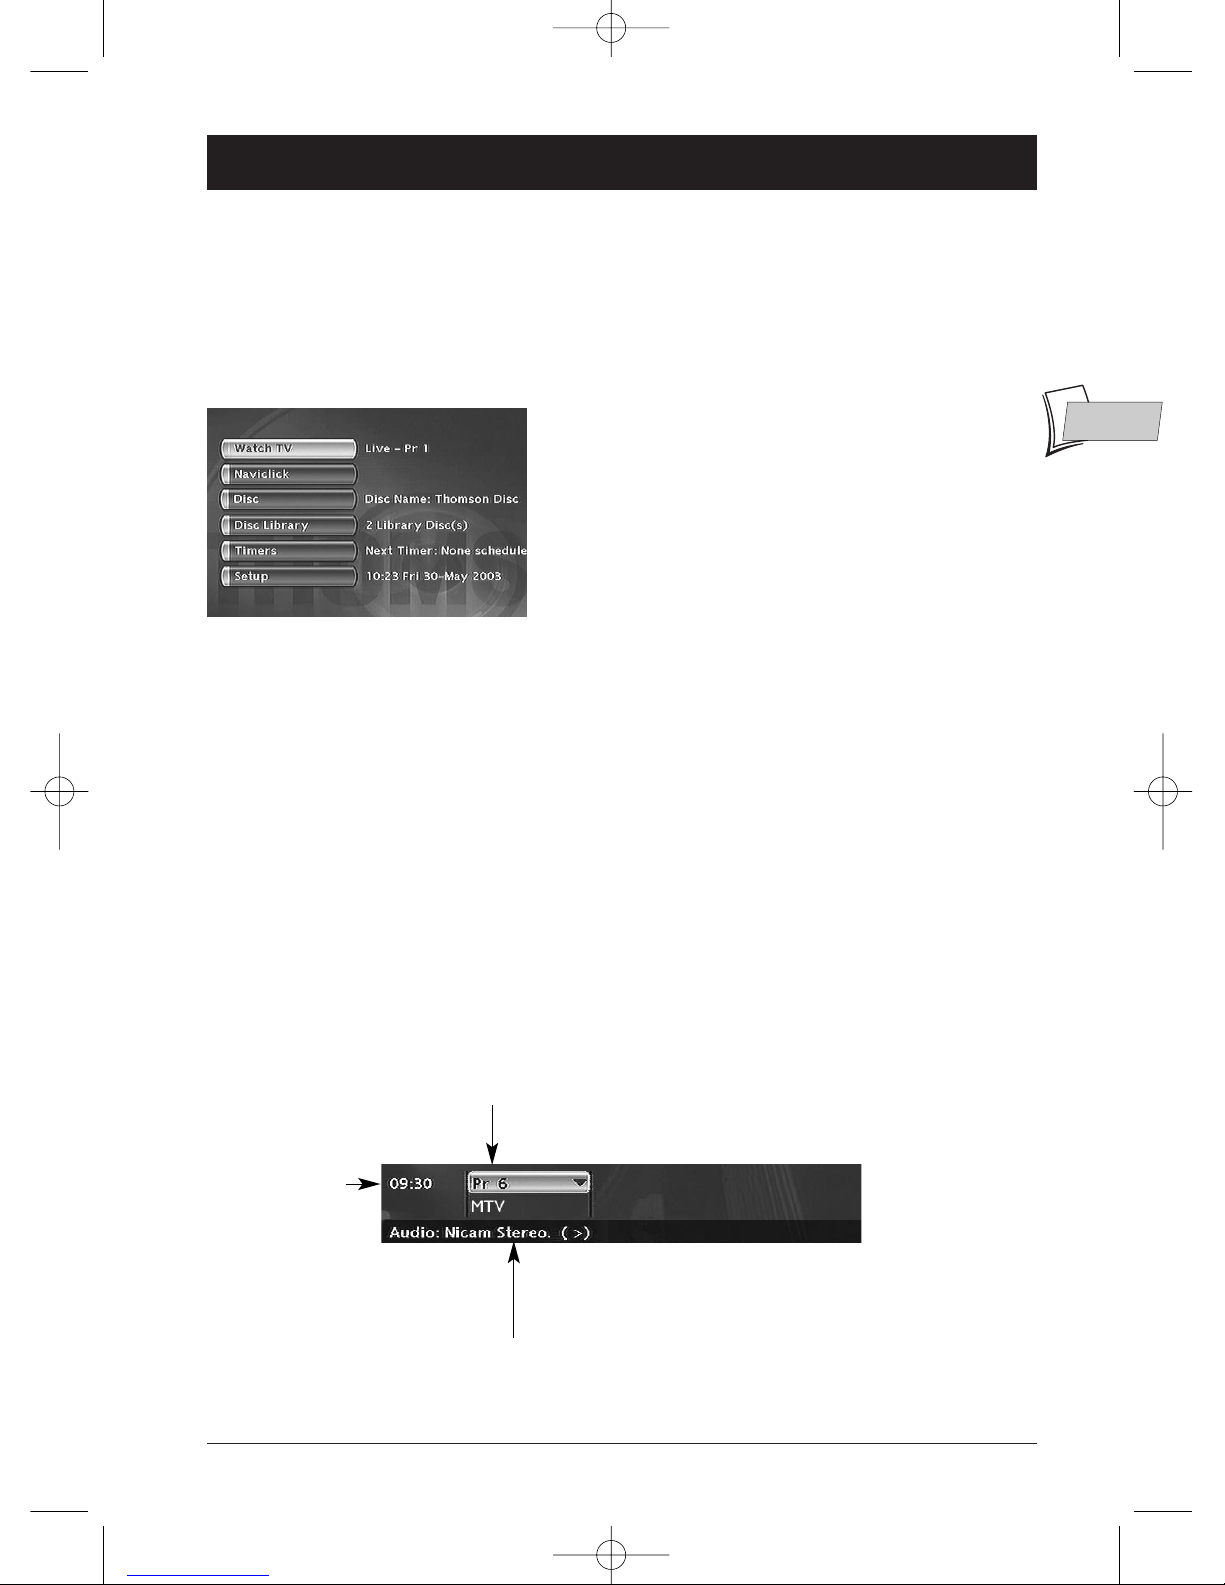
The front of your player recorder - Main messages on
display panel - About other displays (menus and banners)
• Recording functions...........................7
To watchTV Programmes -Taking a break (Time Shift
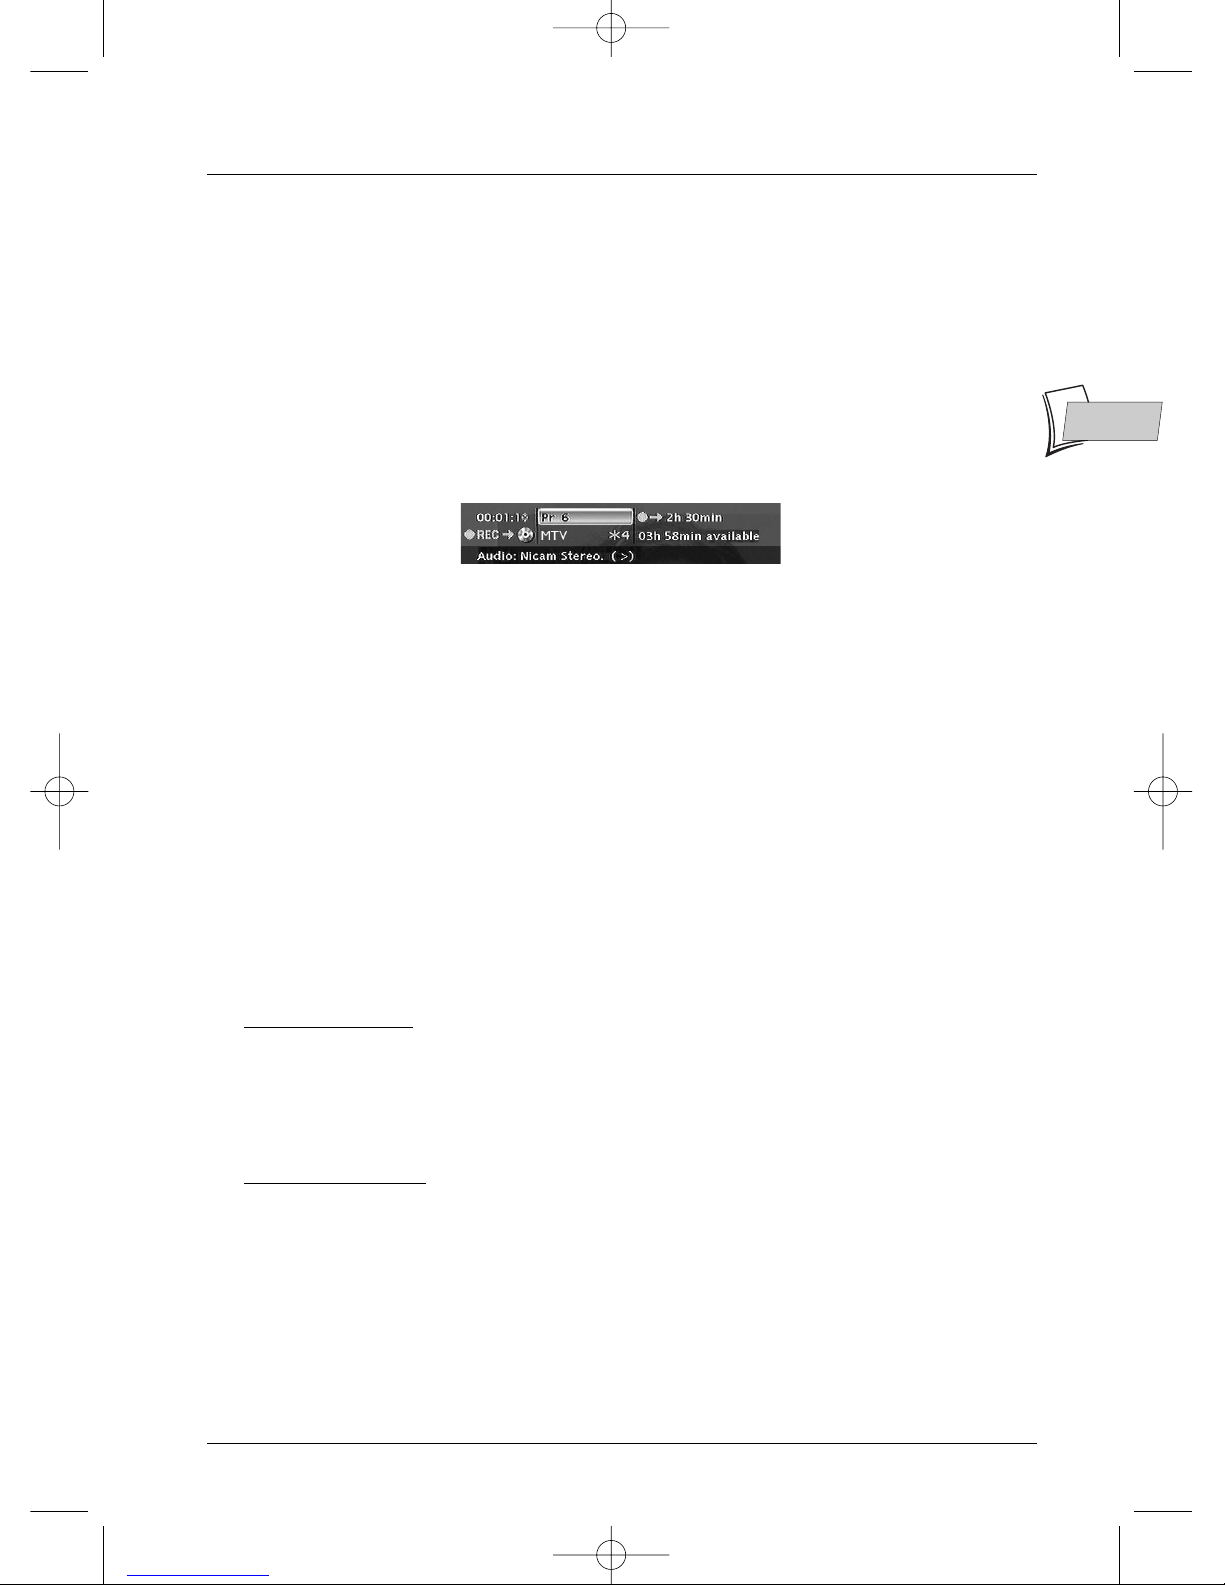
function) - Record the current programme - Programming
a recording or a transfer - Programming a transfer -
Automatic programming (Naviclick) - Recording from a
connected device - Library
• Playing a disc ....................................15
Readable discs - Interactive banners - Loading and playing a
disc - Displaying the information banner - Playing image
and audio (JPEG, mp3, wma) -To play DivX files
• Menus ...............................................22
Disc menu - Playlist -Title functions - Disc options -
Recording Options Menu - Selecting Languages - Parental
control - System Options - Naviclick Settings
• Further information ........................34
Recommendations and information concerning discs -
Troubleshooting guide - Other important informations -
Technical data
THIS DVD RECORDER LETSYOU RECORD TV PROGRAMMES
IN DIGITAL QUALITY AND ARCHIVEYOUR OWN VIDEOS FROM VIDEO CAMERAS
OR VHS CASSETTES TO DVD DISCS.
YOU CANNOT COPY PRE-RECORDED FILMS
TO DVD IFTHEY HAVE BEEN COPY PROTECTED.
MAKE SURE THATYOU BUY DISCS
WITH THE «+» SYMBOL ON THE PACKAGING.
02_DTH8560_en.qxd 23/09/05 14:45 Page 1

Basic connections
Consult the Quick Set-up Guide (A) supplied
with this handbook.
There are several ways you can incorporate your DVD player into its audio-video surroundings.
The simplest of these is described in detail in the Quick Set-up Guide supplied with this handbook.
This uses Scart-Peritel cables that combine Audio analogue connections for sound, and Video for
the RGB image.This connection ensures the optimum image quality (like Y, U,V). If you cannot use
Scart-Peritel sockets, the explanations on this and the followings pages should enable to you to
choose the method of connection best suited to the sockets and appliances you have. Sound and
image quality depend to a large extent on the types of connections used.
2
Connections and initial set up
Peritel socket (scart)
1 - AV1 (audio - video Outputs)
This socket allows you to transfer Audio and Video (sound and images) from
your DVD recorder to a television set or other device (flat screen, audio-
video amplifier, etc.) that is fitted with the same type of socket. In order to
benefit from the best image quality, ensure that the OUTPUT SEL selector
is positioned on RGB (AV1).
Note: if you useY, Pb/Cb Pr/Pb sockets also known as YUV), select the Component
Interlaced or Component Progressive position depending on the possibilities of
the television set or monitor:
• Component Interlaced for interlaced scan,
• Component Progressive for progressive scan.
2 - AV2 (audio - video Input and Output)
This socket allows the sending of AudioVideo (sound and images) from your
DVD recorder to another device (satellite or cable receiver, …) fitted with
the same type of socket.
If you have connected a cable or satellite receiver to this connector, in the
system Options menu select the RGB (AV1) setting in order to benefit
from the best image quality for your recordings.
Note: the Péritel socket is also known by the name of Péritélévision or Scart.The
latter is an abbreviation of « Syndicat des Constructeurs d’Appareils Radioélectriques
et de Télévision ».
28 3 4 5 6 7
1
Consult the
Quick Set-up
Guide (B).
AB
02_DTH8560_en.qxd 23/09/05 14:45 Page 2

3
EN
EN
Connections and initial set up
3 - Audio - Video Input
Audio (INPUT L, R) Video - Composite (CVBS) (COMPOSITE
VIDEO INPUT) inputs
The analogue sound of an operating device (television set or amplifier) can be
input via the 2 Audio sockets L and R of your DVD recorder.
The yellow video socket is also called composite video, or CVBS. the image
quality provided by this socket is less than all the other video sockets. Only
use this socket if all the other sockets are already in use.
4 - Audio - Video Output
Audio outputs (OUTPUT L, R) CompositeVideo Out socket
(CVBS) (COMPOSITEVIDEO OUTPUT)
Analogue sound output and composite images (CVBS) from the disc being
played are constantly available at your DVD recorder's two audio sockets
(L & R) and video socket.
5 - Composite Video Outputs (Y, Pb/Cb, Pr/Cr) (YUV)
The Y, Pb/Cb, Pr/Cr sockets deliver an optimum image quality due to the
separation of the video signal into three separate components (comparable
with RGB separation in a Scart-Peritel cable).
Note: the available video signal on these 3 sockets depends on the selection made at
the rear (Component Interlaced or Component Progressive) of your
player.The available signal can be Y, Cb, Cr (Component Interlaced) for a
progressive interlaced orY, Pr, Pb (Component Progressive) for a non interlaced
progressive signal (no frame interleave).
In order to obtain the best possible image quality, always use very high quality
cables for the connections.Your dealer can provideYUV cables that are sold
together and come in the standard colour codes (red, green and blue) used
for these types of sockets and cables.
Note: do not forget to also connect the audio cables, because Component cables only
transmit images, and not sound.
Other Audio - Video connections
If there is no Peritel-Scart socket available on the television, check to see if there are any other
Video sockets (Components, S-Video or Composite) to connect your player by using the
corresponding sockets. In this case, do not forget to also connect the player’s Audio outputs
(AUDIO OUT) to the Audio input sockets (AUDIO IN) on your television.
02_DTH8560_en.qxd 23/09/05 14:45 Page 3

4
Connections and initial set up
6 - S-Video Input and Output
S-Video input/output (Y/C) (S-VIDEO IN)
The S-Video signal is of a lesser quality than that of the RGB signal supplied
by the Peritel (Scart) socket.An S-Video signal however provides a better
quality image than a composite Video (CVBS) socket, because colour (C) is
separated from black and white (Y) in the video signal.
Note: do not forget to connect the audio cables since the S-Video cable transmits
only images, not sound.
7 - Optical Audio Output (digital sound)
The digital sound of a DVD Video disk when played is permanently available
on the optical socket of your player. Use this socket by connecting it to a
decoder or Dolby Digital amplifier or DTS.
8 - Digital Audio Video outputs
The HDMI socket permanently delivers very high quality digital sound and
pictures.This connection is strongly recommended with a digital television
which is fitted with the same socket and is compatible.
HDMI connection, image adjustment
If you connect your DVD recorder to a TV set using the HDMI OUT
socket, make sure the selector at the rear of your recorder is set to
Component Progressive.
If no image comes up on your TV screen and you're sure its set to HDMI (via
the on-screen menu or other means), try the following resolution adjustment:
- In STOP mode (with no disc in the appliance), press the ZOOM button on
the remote control several times to adjust the resolution of the HDMI OUT
socket output signals to 480p, 720p, or 1080i.These changes are displayed on
your recorder’s read-out.
Note: for an S-video or normal video connection (yellow socket), leave the selector set
to RGB.
HDMI connection, sound adjustment
The sound available from the HDMI OUT output socket can be adjusted in
the Digital Audio Out menu (Dolby Digital,DTS,MPEG).
02_DTH8560_en.qxd 23/09/05 14:45 Page 4

5
Connections and initial set up
The front of your player recorder
12 1310 11
EN
EN
2 3 4 5 6 7 8 91
15 14
On/Off.
Fast forward or reverse.
Play or Pause (freeze frame) (DVD).
To record to the DVD+R/+RW disc.
Stop playing or recording.
To open and close the disc tray.
To record to the hard disc.
To select the audiovisual sources (channels
or devices connected to the AV sockets):
PR 1 ,2,3- Channel 1, 2, 3.
AV 1 - Device connected to AV1
(television set).
AV 2 - Device connected to AV2 (satellite
receiver, decoder, …).
AV 3 - Sockets AUDIO/VIDEO on the
front.
AV 4 - Sockets AV (S-VIDEO or
AUDIO/VIDEO) at the back.
Change channel or skip chapter.
DV IN (input) socket, also called IEEE
1394, for viewing and/or copying images
and sound from a digital camcorder.
Note: to display the images, select DV-CAM in
the main menu.
USB socket for opening and copying JPEG
image files or mp3 files from a compatible
appliance.
Note: Recognised players: USB 1.1 MASS
STORAGE CLASS.
AUDIO-VIDEO (input) sockets for
viewing and/or copying your video
sequences from a camcorder or any other
AV appliance that has a composite video
signal output and analogue stereo sound.
Note:View the images using the AV key.
S-Video socket (input) For the
connection of a Camcorder or other
S-Video device.
Note: do not forget to connect the audio cables
since the S-Video socket handles only images
and not sound.View the images using the AV
key.
Displays your DVD recorder’s modes of
operation.
• Adjusting the time.
Disc tray.
1
2
3
4
5
6
7
8
9
10
11
12
13
14
15
02_DTH8560_en.qxd 23/09/05 14:45 Page 5

66
Connections and initial set up
About other displays (menus and banners)
•The disc menus – Each DVD video disc offers menus and for which the presentation and
organisation depends on the disc’s editor.The disc menu is displaye don te screen when a
DVD disc is loaded and it starts to play.You can also, at any time, display the main menu of
the disc by using the MENU button.
•Player banners – while a disc is playing back you can display or remove banners using the
INFO key on the remote control unit.The banners appear in the form of a succession of
icons at the top of the screen (page 42).
•Player menus – your DVD recorder has menus enabling you to use functions that are not
accessible using the remote control unit keys.The main Menu of the player is displayed when
there is no disc playing (in STOP mode).
Browse through the menus with the navigation buttons and confirm your choice with the OK
button.
Note: settings will only function if the corresponding function has been provided by the editor. For instance, if
you select the subtitle icon in the banner, subtitles will only appear if they actually exist on the disc. Check
the sleeve to see what subtitles are provided. Check the jacket to see whether there are any subtitles. If a
menu or icon appears in “grey” it means that the function is not available.
Function indicator not available:with certain discs, direct access to a scene is not possible even if the time
elapsed is shown on the banner.
A question mark in the counter zone indicates an input error.
LThis symbol is sometimes displayed. It indicates that the function is not available or that the key used is
incorrect .
UpConfirmation/OK
Left Right
Down
- Indication of the selected source:
• AV 2:AUDIO/VIDEO input connector at the rear.
• AV 3:AUDIO/VIDEO input sockets on the front.
• AV 4:AV/ S-VIDEO or AUDIO/ VIDEO input
sockets at the rear.
- Display of digital video from a video camera connected
to the DV-IN socket on the front.
Main messages on display panel
LIVE PR 1
LIVE AV, LIVE SAT, LIVE CABLE
RECORD
LIVE AV3
CAM, LIVE DV
- Main menu of the recorder on the screen (device
stopped). No function selected.
- Channel 1 being watched ( ).
- Channel 1 currently being recorded ( ).
- Example of a device connected to the AV1 or AV2
(SAT ou CABLE if a satellite installation has been
carried out).
- Start of recording of TV program on selected channel.
02_DTH8560_en.qxd 23/09/05 14:45 Page 6

7
Recording functions
EN
EN
7
To watch TV Programmes
1. Turn on your TV set.
2. Turn on your DVD recorder using the ON/STANDBY. The time displayed on your DVD
recorder is replaced by the word MENU.
• After a few seconds the main menu of the player appears on the television screen.
• The Watch TV function is already selected.
Note: turn off non used devices to avoid problems of selecting
sockets or other types.
If the main menu of the player is not displayed on the television
screen, check and/or select the Scart socket to which you
connected your DVD recorder (see page 4 - AV1 selection).
Generally the selection is carried out using the AV key on the
television set remote control.
If the THOMSON logo temporarily appears, it is because the
screen saver has been triggered; press the OK button to display
the menu.
3. Press the OK key of the remote control or one of the PR+/PR-, keys on the front panel.
• The images of the last watched channel appear.
• Encrusted within the image for a few seconds is information on the current channel and
programme.This disappears after several seconds.
Note: when the information banner is displayed at the top of the screen you have the possibility of choosing
an audio channel (if this is provided by the channel) using the Bkey on the remote control.
To display information again, press the INFO key of the remote control.
To change channel
Change the channel with the PR+/PR- - key or the remote control number keys.To select the
channel of a device connected to your DVD recorder (satellite reciever) or to view images from
a video recorder, use the AV button on the remote control or press the PR+/PR- button several
times to select one of the three connectors (AV1,AV2,AV3) to which the device is connected.
Note: refer to the connection diagrams in the Quick Set-up Guide (A) if necessary.
Current time
No. and name
of the channel selected
on the DVD recorder
Indications concerning the channel
sound and the selection of audio
channels. Selection is possible with the
Bkey on the remote control.
02_DTH8560_en.qxd 23/09/05 14:45 Page 7

Recording functions
8
Taking a break (Time Shift function)
Your recorder can save in its memory images of the last 60 or 120 minutes of the programmes
viewed. Use the scroll keys (PAUSE,PLAY,REVG/F...) to use this function.
Note:This function, associated with the Save Buffer function lets you save a programme for which you
missed the start to the DVR hard disc.
Record the current programme
Recordable discs
• DVD+R, DVD+RW - The majority of DVD+R (write once) and DVD+RW
(write many) of 4.7 Gb capacity with the following characteristics.
Recommended brands and types
Certain brands of discs have been “approved” for your player. Other brands can be used but the
discs must be good quality to produce successful recordings. Recommended brands: Imation,
Maxell, Philips, Ricoh,Verbatim,TDK, Sony, etc.
The DVD discs are certified for certain recording
speeds.These speeds must correspond to the
capabilities of your player, i.e.:
Note:The brands mentioned in this manual
are registered trademarks.
Configured recording (on hard disc, DVR or DVD+R, +RW discs)
Configured recording lets you record the programme after a quick adjustment of the duration,
the quality and the destination of the programme to be recorded (to the hard disc or to a
DVD+R, +RW disc).
1. Load a disc - Open the disc tray by pressing OPEN/CLOSE. Put in a disc with the printed
side upwards. Close the tray using the OPEN/CLOSE key.
2. Press and release the REC button.
3. You can choose a duration using the Bkey. Each time you press the Bkey the duration is
increased by 30 minutes up until the maximum time remaining on the disc is attained.When
the maximum duration is reached, pressing again on Bdisplays --h--min which indicates the
precise time remaining, for example 1 hour 12 min.
4. The time remaining on the disc is indicated next to Recording quality. If you modify the
quality you will also modify the duration, which may be useful with a DVD+R, +RW disc
which has little space. Select Recording Quality with the ▼key, then select a lower
recording quality using the Bkey, this will increase the amount of time available on the disc.
However, for a recording to the hard disc that you can copy later to a DVD+R, +RW disc,
increase the quality.
DVD+R DVD+Rewritable
02_DTH8560_en.qxd 23/09/05 14:45 Page 8

Recording functions
9
EN
EN
5. Destination
The default recording destination is set for the DVR hard disc.To record to a DVD+R/+RW
disc, change the setting with the key B.
6. Start the recording by choosing Start record with the ▼key then by pressing OK.
• Recording starts.
• The indication RECORD is displayed for a few moments on the display of the DVD recorder.
The red lamp on the front lights up. It confirms that recording has started.
• The information banner appears for several seconds on the screen of your television.The
information that is displayed confirms the channel, the programme being recorded and the
time remaining on the disc.
Note: after several seconds the information banner disappears. You can redisplay it using the INFO key on
the remote control.
Changing the channel during recording is not possible.To watch another channel during the recording session,
select it directly on the television set, using its own remote control handset
Save Buffer
This function lets you start to record a programme to the DVR hard disc even if you missed the
start thanks to the Time Shift function.
Return to the start of the programme with the REV key, change to play mode with PLAY then
press REC.
In the recording menu which appears, select Save Buffer and confirm with OK.The programme
is recorded to the hard disc and its references (name, times, etc.) are stored in the video library.
Stop recording
Press the STOP button twice.
• With a DVD+R disc, if you do not have another recording to make, you need to «Finalize»
the disc in order that it can be read by other DVD+R compatible players. Closing a DVD+R
disc is described in detail below. If you do not close a DVD+R disc, it will still be possible to
make other recordings on it later on, providing there is enough disc space.You can therefore
safely store it.You may also erase recordings but the corresponding duration will be lost.You
may not record other titles in their place
• With DVD+RW discsdiscs this function does not exist. It is replaced by a function that
renders the disc compatible in such cases where you have added or removed chapter
bookmarks using the edit menu. For some players, it is necessary to render the disc
compatible even though you haven’t carried out modifications to the chapters.
Note: if you only press once on the STOP key, the confirmation window appears. Press a second time to
definitively stop the recording or select continue using the▲and OK keys. At the end of each recording, your
DVD recorder takes a few seconds to prepare the disc welcome menu.This menu is made up of pictures which
represent the first images of each title.
02_DTH8560_en.qxd 23/09/05 14:45 Page 9

Recording functions
10
Programming a recording or a transfer
Your DVD recorder lets you program recordings or transfer. Programming several recordings is
really useful when it uses the high capacitu of the hard disc, thereby enabling you to go beyond
the limited capacities of DVD+R /+RW discs. You can programme recordings using the manual 9
step method or by choosing, for channels which broadcast the programme guide, the Navclick
programming.
Manual programming
MENU èTimers èOK èOK.
Note: your DVD recorder can memorise the parameters of 8
different programmings. In the case of double programming, a
warning message is displayed.
Name - Press the INFO button to access the character table. Enter the name of the recording,
one letter at a time, then confirm.
Channel - a) Enter the channel number using the digit keys of the remote control (Pr -- must
be displayed) or browse the list of channels in the memory of the DVD recorder using the
PR+/PR-key.
b) Or select one of the Audio-Video (AV2,AV3,AV4) sockets to which is connected a device
(satellite receiver or other) using the Bkey.
Note: selecting the AV2 connector allows you to program the recording of a satellite reciever programme
(either left switched on or also programmed) connected to this connector.The selecting of the AV2 connector
is activated by default by the AV Timer function (triggering of programming via the AV connector).
Day(s) - Type in the date using the number buttons on the remote control handset (if the
recording is not scheduled for the same day) and/or choose a repeat period with the Bbutton.
Once: to record the selected programme according to the parameters you have defined.
Each Tue:to record the same programme the same day every week starting from today (supposing today
is Tuesday).
MON-FRI: to record the same programme, everyday at the same time from Monday to Friday.
Time - Enter the recording start time and then the stop time.
To this end, and according to the features of the receivers, you must:
- either program the receiver with the same beginning and end times, then switch off the DVD
recorder and the receiver,
- or leave the satellite receiver switched on, on the channel to record, program the DVD
recorder, then switch it off.
Note: if you selected AV2 during step 4, you do not need to enter the start and stop times, since it is the
device that is connected that triggers the start and stop of the recording at the times set via its
programming menu.
02_DTH8560_en.qxd 23/09/05 14:45 Page 10

Recording functions
11
EN
EN
VPS/PDC - If the channel also broadcasts VPS/PDC signals, activate the VPS/PDC function to
ensure recording begins at the actual time the programme starts.
Record destination - Select the disc where the programme will be recorded (DVD+R/+RW
or internal DVR).
Recording quality - choose the recording quality you want.
Note: selecting the quality enables you to adapt the recording time on the DVD disc.The lower the quality,
the longer the time available on the disc. For example, the time available with a clean 4.7 Gb disc with
“Low” quality will be approximately 8 hours while in “Best” quality the time will be approximately 60
minutes.The figure 1to 6is displayed in the information banner when playing the recording.The quality
selection will only be valid for this programming. For an automatic quality selection according to the time
remaining on the disc, activate the SmartRecord™ function.
Save your settings by selecting Keep Timer and confirm.
Return to the main menu using the MENU key in order to continue to use your DVD recorder
or turn it off using the ON/STANDBY key, after having loaded a DVD+R or DVD+RW disc with
remaining time compatible with your programming.
Programming a transfer
MENU èTimers èOK èSet transfer èOK.
• The Timers screen appears. It contains the list list of the recordings and transfers you have
already programmed. If you didn’t programme anything, the screen displayed only indicated
Timers and Set transfer.
1. Select Set transfer and confirm.
The transfer programming menu appears.This menu allows you to define all the parameters
necessary for a deferred transfer.
Note: your DVD recorder can memorise the parameters of 8 different programmings, but only one transfer. In
the case of double programming, a warning message is displayed.
2. Select Copy from / to then choose the source and destination of the recordings to copy.
3. Select Day(s) then type in the transfer date.
4. Select Start time then type in the time you want the transfer to begin.
5. Memorise your settings by selecting Keep Timer and press OK to confirm.
02_DTH8560_en.qxd 23/09/05 14:45 Page 11

Automatic programming (Naviclick)
For certain channels your DVD recorder offers a daily and sometimes following day TV
programme guide.The information that it provides come from the Teletext and NexTView
services broadcast by certain channels.The updating of Naviclik information is carried out once
every 24 hours. Naviclick allows you to display on your screen the programmes of those channels
and to select the broadcasts you wish to record simply by clicking on them.
Consulting the TV guide with Naviclick
Channel èGUIDE
Use the C,Bkeys to move from one channel to another or to move around the list of
programmes for the channel (▲,▼➔move from one programme to another)
(FWD,REV ➔move from 10 to 10 programmes).
To consult the programs of the channels at a given time, choose a program from the list (e.g.: 9
o’clock news) and use the (C,B) keys to move on to the programs of the other channels.
Recording through the Naviclick TV guide
1. Select a channel on your DVD recorder.
2. Press the GUIDE key and wait for the Naviclick page to appear.
3. Go to the programme you want to record. Move between channels with PR+/PR- or C,B.
4. Confirm with OK.
5. You can turn off your DVD recorder or leave it turned on (don’t forget to load a DVD+R or
DVD+RW disc). In this case the DVD recorder will automatically seek the channel to
automatically record at the correct recording time.
Note:for the correct downloading of the programme guide, the clock of your DVD recorder must be set.
Recording from a connected device
1. Satellite or cable receiver - When you are watching a channel, select the AV2,AV3, or AV4
socket on the DVD recorder using the AV button on the remote control handset. AV2-SAT-
CABL appears in the information banner and on the display panel on the recorder (LIVE
AV2) for the SCART socket.
2. Camcorder or other appliance - When you are watching a channel, use AV to select
which sockets to use:AV3 if your camcorder is connected at the front of your DVD recorder
or AV4 if it is connected to the S-VIDEO IN or COMPOSITE INPUT sockets at the
back.
Record with REC (RECORD).
Stop the recording by pressing twice on the STOP key.
12
Recording functions
02_DTH8560_en.qxd 23/09/05 14:45 Page 12

Recording functions
13
EN
EN
Library
The library lets you locate the various recordings present on the DVR hard disc or the different
DVD+R/+RW discs in your DVD library.The library groups together the recording names and
parameters and lets you look for them using the search functions.
The recording names are distributed according to the nature of the files and titles in four sub-
libraries. Each one will let you access functions specific to the nature of the recordings.The
contents of the library are not lost even if the recorder is no longer connected to the mains
supply for a while.
MENU èLibrary èOK.
The library screen comes up.This gives access to four sub-libraries and to the following
functions: Video library,Library (disc), Music library,Image library,Export.
Depending on the recording you are looking for, select the library and confirm with OK.
The screen specific to the library appears.
Video library (on the hard disc)
To look for a video or DivX title.
The video library brings together all the names of titles of DivX files saved to the hard disc (TV
programmes or films in DivX format).
Note: Playing a Video and PIP title (picture in picture)
Select a title with the ▼key and change to play mode with the PLAY key.
While a video title (from a video DVD, DVD+R/+RW or DVR hard disc) is playing, you can superpose TV
pictures from your recorder’s tuner using the LIVE key.This will let you monitor programmes on a channel
while you are watching a video recording.You can change channel with the PR+/PR- key.
Functions for managing your recordings (on the hard disk)
Select a title and press OK to confirm..
Among other things, the management functions let you rename, copy or delete a title.To access
them, when a title in the Video library is selected, press OK.The functions to manage the chosen
title appear:
• Play title, to play the title except for the hidden chapters.
• Play all chapters, to play the title, even the hidden chapters.
Note: Indispensable if you want to split a recording up using the Edit menu.
• Modify the title to give it the name of your choice letter by letter using the character
grid.
• Delete the title to free up space on the hard disc.
• Lock the title (or unlock it) to avoid (or enable) its erasure.
• Copy to disc to conserve (archive) a title to a DVD+R/+RW disc and then erase it from
the hard disc.
• Erase chapter to delete all the electronic bookmarks positioned automatically at regular
intervals in order to define others.
Note: Useful for copying only those chapters you wish to store on a DVD+R/+RW disc.
Note: Jpeg, mp3, wma and DivX files cannot be copied using this menu.To do this, use the library’s Export
function (see below).
02_DTH8560_en.qxd 23/09/05 14:45 Page 13

14
Recording functions
Library (disc)
The (disc) library brings together the names of all the titles recorded to the different
DVD+R/+RW discs in your DVD collection.
Note: if a disc appears in front of the name of a title it means that the disc is loaded in your DVD recorder.
Note: For recordings that you have made directly or for those you have programmed, without providing them
with names, appear along with the name of the channel, the time and date.
Note: the Library may be accessed even if there is no disc in the recorder.
Note:The titles and names of programmes (Pr1, Pr2, AV2, ..) and times correspond to those recordings that
you have not renamed (Modify title function).
Note: Depending on the duration of the recordings, the number of titles and/or the number of discs, we may
estimate that the library may contain the names of 400 titles created on the different discs in your DVD
collected (DVD+R or +RW discs only) on the internal DVR hard disc. In order to assist you to find a title, the
library offers a range of functions (sort by title, sort by type, etc.).
Musical library (on the hard disc)
The musical library brings together the names of all the MP3 or WMA files recorded on the hard
disc.When the musical library screen is displayed, you can play a title or file, create or edit playlists,
rename a title, delete it or sort titles.
Picture library (on the hard disc)
The picture library lets you look for and view photos one by one or look at them using a
slideshow.The library displays the last six photos recorded on a screen which brings together the
six snapshots with selection buttons.The other photos can be accessed using the ▼key. Select a
photo using the C,B,▲,▼keys and confirm with OK or start the slideshow with the PLAY key.
Export
You can copy one or more titles to a DVD+R/+RW disc.
Note: EXPORT Function
Your recorder has separate adjustments for the recording quality on the DVR hard disk and on the
DVD+R/+RW discs you use.This means you can copy titles that have been recorded with very high quality
on the hard disk (e.g., *1: Best), and make sure they fit on the DVD+R/+RW disc by selecting a lower
quality for the copy (e.g., *3: Good).
Title and disc management functions
The management functions let you sort titles according to the criteria proposed by your
recorder.To access them, when a title in the Video library is selected, press OK.The functions to
manage the chosen title appear:
Note: If you delete a disc, it is still possible to “reload” the titles of the disc by adding a new recording.
Note: Deleting a title or a disc is not immediate, it may take several seconds. Wait until the «Please wait»
message at the bottom of the screen disappears.
Note:The number of the disc to load may appear in a superimposed window.To remove the window press
the EXIT/CLEAR or OK.key..
The management functions can be accessed by selecting the button in the frame with the B
key then by displaying another choice with this same key. Confirm your choice with OK.
Other disc managemetn functions
Access: Main Menu,Disc,OK,Disc action and OK.You can:
• Rename the title to give it the name of your choice letter by letter using the character grid.
• Erase the disc
• Unlock or Lock the disc to enable or avoid an accidental erasure.
• Make the disc compatible to enable it to be read by other players.
• Copy to DVR to copy one or more titles on the hard disc.
Copying to DVR
To copy one or all the titles to the hard disc.
02_DTH8560_en.qxd 23/09/05 14:45 Page 14

15
Playing a disc
Readable discs
• DVD - Video - 12 cm and 8 cm, single or double sided, single or dual
layer. DVDs are high density optical discs on which high quality picture and
audio are recorded by means of digital signals.
Region code number - Your DVD recorder responds to the regional
management information recorded on DVDs.The regional code of your
DVD recorder is 2. Before buying a DVD, make sure that it bears the
correct logo.ALL means all regions.
Note: for your information: the other areas are - 1: USA, Canada - 3: Southeast Asia,Taiwan
- 4: Central America, South America, Australia, Mexico, New Zealand - 5: Russian
federation,Africa (except Egypt and Rep. of South Africa), India, Pakistan - 6: China.
• DVD+/-R, DVD+/-RW - Most DVD-R and DVD+R (one recording
only), and DVD-RW and DVD+RW discs (rewritable). Recordings on DVD-
R and DVD-RW discs must be made in Video DVD mode. Recordings on
DVD+RW discs must be made in accordance with the specifications for the
4.7 Gb capacity DVD+RW disc format.
• Audio CDs - Audio Compact Discs (8 and 12 cm).
• CD-R, CD-RW - Most CD-R (one recording only) and CD-RW discs
(rewritable). Compatibility is dependent on which DVD writer, writer
software and discs are used.
• Video CD (VCD) -Video Compact Disc. Disc which enables you to
record to a CD up to 74 minutes ofVHS quality video associated with fixed
pictures, audio tracks and interactive menus.
• Super Video CD (S VCD) - Most S-VCD discs conform to the IEC
62107 standard.They can be used to record up to 70 minutes of digital
sound and video, with MPEG-2 standard video and MPEG-1 standard audio.
S-VCD disc compatibility is dependent on which MPEG coding software,
disc design software and disc writer software are used, and the discs
themselves.
Note: in spite of progress made to ensure playability of all disc types, it is not possible to
guarantee playback of discs which are not in conformity with DVD, CD, VCD or S-VCD
standards. Moreover, this unit may not play some recordings or files on CD-R, CD-RW,
DVD-R, DVD-RW, DVD+R, DVD+RW due to differences in recordings formats, software
used & Disc types.
The files which your player can read
- Discs containing sound files in MP3 format.
- Discs containing images in JPEG format. Compatibility is dependent on the
disc creation software used and file sizes, stated in millions of pixels. Certain
JPEG files such as Progressive JPEG files cannot be read by this equipment.
- Discs containing sound files in WMA format.
- Discs containing audio and image files in the certified DivX format.
DVD+Rewritable
EN
EN
02_DTH8560_en.qxd 23/09/05 14:45 Page 15

16
Playing a disc
No. of the channel
selected on the
DVD recorder.
Indications concerning the channel sound and the
selection of audio channels. Selection is possible
with the Bkey on the remote control.
- Current time.
- Clock setting.
Remaining recording time available on the
disc according to the quality selected.
- Press REC once.To select recording time press
the key several times (while banner is displayed) to
extend recording time by 30 minutes up to a total
of 3 hours.
- Name of channel and details of the programme
viewed if the programme guide (Naviclick)
is available on this channel.
Recording Function in progress.
Interactive banners
In addition to menus, your DVD recorder has interactive information banners with icons
representing functions or information. Some banners provide access to disc playback functions (for
DVDs, CDs,VCDs, etc.) while others give you information on the channels and related functions.
While watching a channel
Access: INFO button.
For standard playing, repeating of a title, a scene
between 2 points A an B, or an entire disc.
Track/Title/Play index.
To select the play mode Standard,
Random.
To control the repeat reading of a disc,
a musical track or repeating of a music
track between 2 points A and B.
To choose the dialogue
language and audio format.
To change the viewing angle
for video DVD discs.
To select the language of the subtitles
for video DVD discs.
To access the edit menu for
DVD+R/+RW discs.
Chapter 1 currently being played
Title 3 currently being played
Play mode.
Time elapsed.
Introscan -To play the first seconds
of each track.
To select the Stereo,Mono,Left
or Right audio channel.
To select the PBC function where
available on the disc.
While playing a disc
Access: INFO button.
1. Select an icon using the C,Bkeys, or enter a number using the number buttons to access a
chapter, a title or a track depending on the disc being played (when the corresponding T,C,
Picon is selected).
2. Remove the banner using the yellow INFO key or the CLEAR key, or wait a few seconds
until it disappears.
With a DVD
PLAY MODES (PLAY,PAUSE,REV,FWD buttons)
B PLAY (Play) Fast forward (Bx3, x6…), or reverse (C-x3, -x6…).
K PAUSE (Pause) Slow motion, forward (KBB 1/2 , 1/6 …), or backward (CCK -1/2 , -1/6 …).
With an audio CD / a VCD (Video CD)
02_DTH8560_en.qxd 23/09/05 14:45 Page 16

17
EN
EN
Playing a disc
Loading and playing a disc
Switch on your TV set and DVD recorder. It may be necessary to turn off other appliances.
If the player menu is not displayed on TV screen, select the TV set Scart Peritel socket to which
you connected your DVD recorder.
Note: the Disc heading is shown as transparent when there is no disc in the device or if the disc is not
compatible.
Note: the disc label must face upwards (double sided discs have a small label on both sides around the centre).
Playback functions
The playback functions depend on the discs and/or files being played.
Quick search
PLAY button then FWD or REV (press once or several times).
Normal playback with PLAY.
Still picture and frame advance
PLAY button then PAUSE. During playback press PAUSE once to freeze the image. Press
PAUSE again to go into “frame” mode (the PAUSE icon is then replaced by the FRAME icon on
the TV screen). Press FWD or REV to view images one after the other forward or backward.To
resume normal playback press PLAY.
Slow motion (in Pause mode on an image)
PLAY button then PAUSE then FWD/REV. Press once or several times.
Normal playback with PLAY.
Skipping a chapter or a track
PLAY button then PR F
l
/PR
l
G.
Note: Forward or backward skips can also be made by using the
l
GSKIP and SKIP F
l
keys on the
DVD recorder.
Scene Again™ (DVD)
PLAY button then AGAIN (skips back approximately 10 seconds).
Advance (DVD)
PLAY button then ADVANCE (skip forward 30 approximately secondes).
Enlarging an image (zoom)
PLAY button then ZOOM. Move the zoomed image around using ▲,▼,Cand Bto view a
particular spot. If this does not work, try again after pressing PAUSE.To resume normal playback
press the key several times to return to the original format.
Titles, chapters, time elapsed, audio and subtitles
From the banner, you can access certain functions directly using the C,Bkeys. Choose a title or
a chapter (DVD), or a track (CD,VIDEO CD). Change the language of DVD dialogues or subtitles.
For direct access to a specific scene on the disc, select the first
icon with the CBkeys. Enter the requested place in the scene
(expressed in hour, minutes, seconds) with the remote control
number keys.(enter 001205 to access a scene which is 12 minutes
and 5 seconds away from the start of the disc (DVD) or track
(Video CD)).
02_DTH8560_en.qxd 23/09/05 14:45 Page 17

Playing a disc
18
Playing discs - Displaying the information banner
To access the information banner, press INFO on your remote
control unit during playback
.
Use the arrow keys
C
and
B
on
the remote control unit to select the various icons.When an
icon is selected it is highlighted.The line under the banner is an
information and instruction line.When small arrows appear
above and below the selected icon these point to other
possible options. Now use the
▲
and
▼
keys to scroll through
the various options.
Banner with a DVD video disc.
Note: the icons displayed in the banner depend on the type of disc being
played.
The functions displayed depend on the type of discs and files being played.
Timer
The timer provides direct access to a scene or a musical passage by keying in
the starting time. Select the time elapsed icon and use the numbered keys on
the remote control unit to access the place from which you want to play
back. Use two digits for each field. For instance, if you enter 01:35:12, you will
access the sequence beginning 1 hour, 35 minutes and 12 seconds after the
start of the title.
Note: for audio VCDs, the timer refers to the track currently being played.
Title or Track
Most DVD discs only contain one title. However some discs may contain
several titles each of which is itself divided into several chapters.
Select the Ticon then use ▲or ▼to scroll through the titles or tracks.
Chapter
Most DVD discs contain several chapters.
Select the Cicon then use ▲or ▼to scroll through the chapters.
Note: follow your progress below the banner.
Important: the icons displayed in the information banner depend on the type of disc
being played.The icons shown in the banners and their use depend on the type of discs
and files being played. In all cases, follow the help line at the bottom of the screen.
02_DTH8560_en.qxd 23/09/05 14:45 Page 18

19
EN
EN
Playing a disc
Subtitle and dialogue language
Choose a language for the subtitles or dialogues if these are available on the
disc.The selected language name appears beneath the banner.
Note: selecting the language of subtitles only involves the disc being played. If you
remove the disc or if you switch off the DVD recorder your selection will be cancelled.
In this case the default language, chosen when your DVD recorder was first installed,
will be reactivated. If the preferred language is not available on the DVD disc the
preferred language of the disc (default language) will be selected automatically.With
some discs you can only access the dialogue or subtitle languages through the menu
provided on the disc.
Play modes of discs
The DVD recorder has several play modes that depend on the type of disc
being played: standard play respects the order of the titles and chapters on
the disc; repeat between 2 points or repeat a disc, a title.The icon of the play
mode is accessible via the information banner during playback.
Repeat playback between two points A and B
A-B Repeat mode allows you to select exactly the sequence you wish to repeat.
1. Choose repetition mode A-B with the ▲or ▼button and confirm to memorise the start of a
passage you want to play again later.
2. Wait a few seconds then press OK to mark the end of the passage you want to repeat (point
B).To stop the repetition, select another mode using the ▲or ▼buttons or press STOP.
Note: repeat functions remain active until you turn them off, open the disc tray or turn off the power. Repeat
play only works with discs that show the elapsed time on the display.This may not work correctly with
certain discs (Video CDs in PBC mode).
Play modes
Selecting the
language of
subtitles
Selecting the
language of
dialogues
02_DTH8560_en.qxd 23/09/05 14:45 Page 19

20
Playing a disc
Camera angles
A few DVD discs contain scenes shot from various different angles. If a disc
being played back offers different camera angles the icon in the banner will
show the number of the angle on the screen.With the disc in playback, press
ANGLE on the remote control unit and choose the angle using the same key
or the ▲or ▼keys.
PBC - Playback control menu
This function enables you to make interactive selections of some scenes or
information through an on-screen menu. Moreover, high resolution images
may be viewed if they are included on the disc. During playing of a disc, press
the INFO key (the information banner is displayed). Press Cor Bto select
the PBC icon. Uses the ▲or ▼key to see other screens or deactivate the
functions on offer...
Play mode for Audio CDs
Your player has several play modes for Audio CDs:
standard play that respects the order of the tracks; random play that reads
music tracks in a random order; repeat play: Repeat A-B, Repeat track, Repeat
disc, Repeat de-activated.
IntroScan
The IntroScan function enables you to listen to the first few seconds of each
track of an audio CD.
Note: when the first few seconds of all tracks have been played the player starts
playback from track one.
Repetition
Rotating an image
90°, 180°, 270°
Zooming in on an image (zoom)
X1, X2, X3, X4
Speed of the slide show
Selecting a play
mode
Changing camera
angles
Standard play
IntroScan
02_DTH8560_en.qxd 23/09/05 14:45 Page 20
Table of contents
Other THOMSON DVD Recorder manuals

THOMSON
THOMSON DTH 8657 User manual

THOMSON
THOMSON DTH 8550E User manual

THOMSON
THOMSON DTH8040E User manual

THOMSON
THOMSON DTH 8657 User manual

THOMSON
THOMSON CB1160HDD User manual

THOMSON
THOMSON DTH8060 User manual

THOMSON
THOMSON DTH8045E User manual

THOMSON
THOMSON DTH 8543 - ADDITIF User manual

THOMSON
THOMSON DTH8640 User manual

THOMSON
THOMSON DTH8555 X User manual