THOMSON MID1003 User manual

16GB 25.65cm (10.1”) Touch Screen Tablet PC
Model No.: MID1003
User Manual

Please read this instruction manual carefully before connecting or
operating the product. Save it for future reference.

1
Table of Contents
1 OUTLOOK DESCRIPTION......................................................................................................................2
2 POWER BUTTON USAGE......................................................................................................................2
3 TOUCH-SCREEN NAVIGATION .............................................................................................................2
4 USING MICRO SD CARD .......................................................................................................................2
5 GETTING STARTED................................................................................................................................3
6 DESKTOP ................................................................................................................................................4
7 APPLICATION MANAGEMENT.............................................................................................................. 4
8 CLOCK .....................................................................................................................................................6
9 APP MARKET ..........................................................................................................................................7
10 BROWSER.............................................................................................................................................7
11 CALENDAR............................................................................................................................................8
12 CAMERA................................................................................................................................................8
13 RECORDER ...........................................................................................................................................9
14 EMAIL.....................................................................................................................................................9
15 FILE MANAGER ..................................................................................................................................12
16 MUSIC ..................................................................................................................................................12
17 VIDEO...................................................................................................................................................13
18 SETTINGS............................................................................................................................................14
FREQUENTLY ASKED QUESTIONS ......................................................................................................15
BATTERY MANAGEMENT.......................................................................................................................16
IMPORTANT SAFETY PRECAUTIONS ..................................................................................................16

9)Volume“+” 10)Volume“-” 11)RearCamera 12)Speaker
2
1OutlookDescription
1) Front-facing Camera 2) Headphone Interface 3) Micro USB Interface 4) HDMI Interface
5)DCInterface 6)Reset 7)MicroSDCardInterface 8)Power
2PowerButtonUsage
Turn On: Press the power button and hold for 3 seconds.
Turn Off: Press the power button and hold for 3 seconds, →tap Power off →tap OK.
Screen lock and Unlock: Press the power button quickly to lock and try again to unlock .
Force Shutdown: If device does not respond, press and hold the power button for 7 seconds. (Note: If it is
not necessary, we don’t suggest use Force Shutdown. You should follow the steps to perform the shutdown.
Force shutdown may lead to unpredictable system errors)
3 Touch-Screen Navigation
The touch-screen allows for quick, easy and convenient navigation.
You can use the touch-screen refer to the following method through the user guide.
Tap: Quick tap & release on an item on the screen.
Finger slide: Touch & slide your finger across the screen and then release.
Touch & hold: Touch and hold in place approx 2 seconds, and then release to display an options window.
☆ To avoid scratching or crushing, do not place objects on the touch screen surface.
4UsingmicroSDCard
☆The device supports a maximum 32GB micro SD card (not included).
Insert your card into the micro SD slot until it clicks into place. It’s OK
Remove micro SD Card: Close all applications or documents which have been opened on the card. Tap
→Settings →Storage →Uninstall SD card. Press the card lightly; it is partially ejected allowing you
to pull the card out
☆Don’t insert and remove the USB drive repeatedly in a short time, as this may cause damage to the
card.
☆We recommend using major brands of memory cards to avoid incompatibility.
2
3
4
5
6
7
8
111
12
910

3
5GettingStarted
Charge the device
☆You can use the device while the battery is charging, although the charging time is longer when
operating and charging at the same time.
Plug the power adapter into an electrical wall outlet, and then connect to the device to fully charge the
battery before use ( Filled with about 4 hours).
Turn the device on: Press the power button and hold for 3 seconds.
Wi-Fi Network Setup: Since many features require a Wi-Fi connection, we recommend you set up your
Wi-Fi network now.
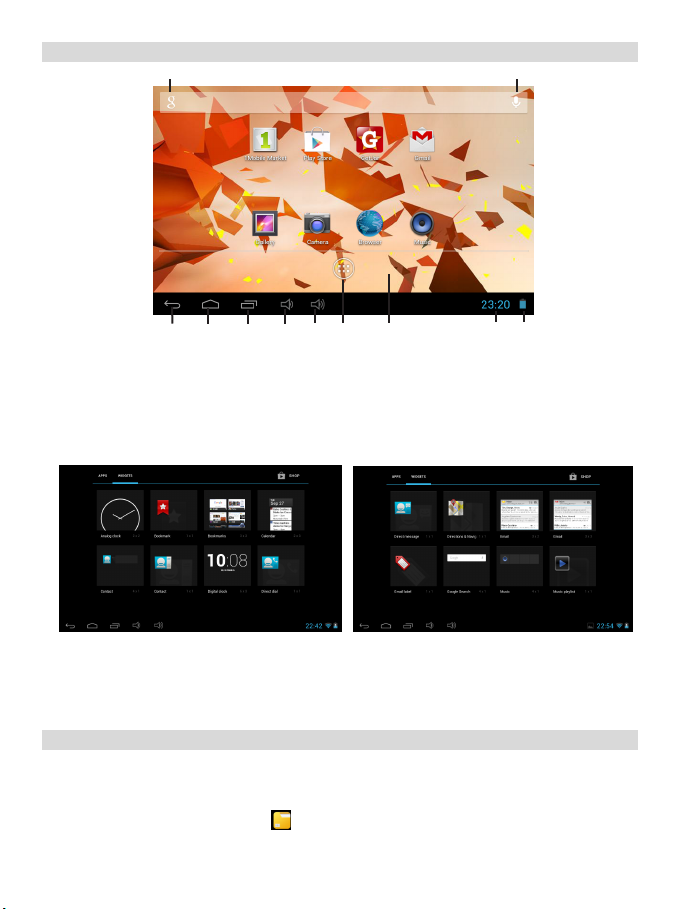
1) Tap , →Settings, →Wireless & network.
2) Select Wi-Fi to turn on.
The device automatically scans and lists all local Wi-Fi Network found.
A indicates secure networks that require login name/password to connect.
3) Tap the desired network which you want to connect, →enter the Network Password if applicable,
→tap Connect.
4) Tap to return to the Desktop screen.
☆If your Wi-Fi network is set as hidden, it won’t be found by the auto scan. Tap Add Wi-Fi network and
follow the prompts to add your network.
Ethernet connection settings:
1) Micro Interface connect to the OTG cable(not included), the other side interface connect to the
Ethernet adapter and connect to the network cable.
2) Tap →Setting →more →Ethernet.
3) Check the “Use Ethernet”.
4) Click the “Advanced Configure”, you can choose to check the “dynamic allocation”, the default
network automatically assigns IP addresses, check on and you can connect Ethernet; you can also uncheck
the “dynamic allocation”, by manually entering IP address, subnet mask, default gateway, DNS server, and
other information can also be connected to Ethernet.
5) After the Ethernet connection is successful, it will appear the Ethernet connection symbol “ ”in the
lower-right corner.
3G network settings:
First of all, according to network services provider to buy the 3G wireless network card.
1)Micro Interface connect to the OTG cable (not included), the other side interface connect to the 3G
dongle and plug in the effective 3G card.
2) The system automatically senses the 3G network, while 3G network the connection is successful,
will appear in the lower-right corner of the 3G connection symbol “ ”

3.Accesstoapplications
8.Volume“+”
4. Go back last page
11.Batteryindicator
7.Volume“-”
4
6DESTOP
1. Access to Google search engine 5.Access to main screen 9. Main screen
2.Voicesearch 6.Recentlyapplicationsmenu 10.Timedisplay
Widget: Click “widget” button, there will be a lot of application widget icon , you can select the icon which
will appear in the home page as the shortcut. You will quickly get to the program.
☆Tap on any application icon to launch it.
☆Touch, hold and then slide icons to other reposition on the screen.
☆Touch, hold and slide icons onto “×” to remove them from the Desktop screen.
7APPLICATIONMANAGEMENT
Install Android Applications
☆There are many interesting and free Android applications that can be found on the web. Just launch
your web browser and do a search for “Android applications”.
Purchased or free Android applications that you have downloaded to your computer can be installed
quickly & easily on your Tablet using the File Manager application.
1) Copy the .apk files that you want to install onto a SD card or USB device, →insert or connect to
your Device.
3
4 5 678910 11
12

5
2) Tap the File Manager application icon.
3) Tap or and locate the folder in which the .apk application files were saved.
4) Tap on a .apk file →Install.
The application is installed and the application icon is added to the Applications screen.
5) Tap Open to launch the application now, or tap Done to return to the File Manager screen.
Download Android Applications direct from a Website
You can download Android applications directly from websites, and then quickly and easily install them
on your device.
1) Tap the Web application icon to launch the internet browser.
2) Enter the desired website URL, and tap the download link for the application you want to install on
your device.
3) After the download is complete, touch & hold on the download file (in the Download history screen),
→tap Open →Install.
Uninstalling Android Applications
You can also quickly and easily uninstall the Android applications that you have installed.
1) Tap →Settings →Applications →Manage applications.
2) Tap the application you want to uninstall, →Uninstall.
3) Tap OK to confirm the Uninstall.
8CLOCK
Tap the Clock application icon. You can see the time and date. Alarm clock, count down, stopwatch
feature can also set multiple.
Alarm
Add Alarm
1.Tap Set alarm →Add alarm.
2.Set up your alarm as desired.
3.Tap OK.
4.Turn on the right switch of the alarm clock which need to be enabled.
Shut Off Alarm Alert
When a scheduled alarm is activated, a pop-up window with the alarm title appears.
Drop to if you want to be reminded again in 10 minutes.
Drop to to cancel the alert.

6
Turn Alarm on
1.In the Alarm list, find the desire alarm.
2.The switch button to open the alarm clock on the right side ,the switch button from to .
Edit Alarm
1.Enter the alarm list ,click the alarm time to edit.
2.After editing, tap OK.
Delete Alarm
Enter the alarm list ,drag left or right to delete the alarm you want to delete.
Countdown
Add countdown
1.Tap Count down icon to enter the countdown interface.
2.After set a time, Tap Start.
☆If user has set a countdown, please tap bellow the interface to continue to add a new countdown.
Edit countdown
1.Tap to add one minute countdown time.
2.Tap Stop to pause countdown.
3.After pause countdown, tap to reset countdown.
4.Tap to add tags to countdown.
Delete countdown
In countdown interface, tap to delete the corresponding countdown.
Stopwatch
Start stopwatch

1)
Tap the
7
1.Tap Stopwatch icon to enter the stopwatch interface.
2.Tap Start to start the stopwatch.
Pause, Restart stopwatch
1.In the course of the stopwatch, tap Stop to pause stopwatch.
2.After pause stopwatch, tap to reset stopwatch.
Lap times
In the course of the stopwatch, tap to record the lap times.
Share timing results
After pause stopwatch, tap to search the timing results on Google or sent through Gmail.
9APPMARKET
The App Market has many applications that you can quickly and easily download to your Tablet.
Download Applications
Play store application icon.
☆ The first time, you are prompted for your App Market login information. If you have not yet registered
a google account, tap Register. Otherwise, tap Login and enter your login information and then tap
Login again.
2) You can select applications from the default Featured group, by Categories, Top (latest, hottest,
random), or search by name.
3) Tap on an application, →Download.
4) After the app is downloaded, tap Install.
5) Tap Open to launch now, or Done to return to the Play store screen.
History: After downloading apps, tap on History to manage the installed applications. You can add and/or
view comments from other users, launch apps, and uninstall them.
10BROWSER
Users can connect to the Internet through a browser.
Click the browser icon on the Desktop , and then you can open the Web browser.

8
11CALENDAR
Tap the Calendar application icon.
For the first time using the Calendar, you need to add an Exchange account. Enter account email address
and password. Click Next and follow the prompts to complete the account configuration. Then you can use
the Calendar (Note: we generally recommend that Gmail account, test server for: m.google. com)
Add Event
1) On the Calendar screen, tap on the date to which you want to add an event.
2) Tap on the event time, →tap in each entry field to enter the desired event information.
3) Tap Done.
12CAMERA
Tap the Camera application icon. You can tap icon “ ” , then tap the icon “ ”to achieve front and
rear conversion of the camera.
In Camera →tap to take the picture.
1) The picture will be saved.
2) Tap the picture thumbnail enter My Photo to scan the picture.
3) Press Back to the Camera.
4) Tap to exit the Camera and back to the Desktop.
Take Videos
1) Tap switch to video, and you can take videos.
2) Tap to begin and tap again to stop.
3) The video will be saved.
4) Tap the video thumbnail to play the video.
5) Press Back to the Camera.
6) Tap switch back to camera.
7) Tap to exit the Camera and back to the Desktop.
Note: You can tap to take the panoramic photos.

9
13RECORDER
1) Tap the recorder icon.
2) Tap the record icon to start recording.
3) Tap the record icon to stop record.
4) Tap the play button to play the voice of recording.
14EMAIL
☆POP3 and SMTP accounts are supported.
In the main menu or desktop, tap the icon to enter the “Email” client. It’s required to configurate the
account information for the first time. E-mail need network support, please ensure that the network E-mail
link to normal.
Here we use whhpwjh@126.com as an example; As shown below:
After that, you can select “Next”, account type selection screen will come out, we use a POP3 account type,
as shown below:
Later it is appear “the incoming server settings” interface.As shown below:

10
After that select “Next”, it will enter “check-up incoming server settings”, and then it will appear “Outgoing
server setting” interface as follow:
Modify the port number “587” to “25”
Select “Next”, you can enter the account information to customize the interface:

11
In the “Your Name” column enter the name that you want to display on the outgoing message. Then click
“Finish” button to enter the mail interface, which will automatically load the e-mail, a mailing list is as follows:
You can check you e-mail through choosing one of the check bar, in where you can also put up “Reply”,
“delete”,
“More replies”, and Click on button on the right top corner , can be set account message , as shown
below:

12
15FILEMANAGER
Tap the File Manager application icon to view the files on all storage devices (Internal memory, SD
card, USB device), and to quickly & easily install Android application on your Tablet.
Use the icons across the top of the screen as follows:
Local disk (Internal memory) YourSDcard USB disk
Returnpreviousfolder Search Menu
Copy Media between Computer and Tablet
You can use the File Manager to copy files between an external storage devices and your computer.
You can first copy the desired files onto a SD card or USB device or directly use an USB cable to connect
the device and the computer and then copy files.
☆ The internal device storage is titled “Local Disk”, a memory card “SD card”, and a USB storage
device is titled “USB disk”.
☆ The instructions below are for copying from a SD card or USB storage device into the device. You
can use the same method to copy from the device to a SD card or USB storage device, and then
connect the storage device to your computer to transfer the files into the desired folder on your
computer.
1) Tap the or to display the contents of your storage device.
2) Tap the menu and then tap the “Multiple Select”, finally, hold in the folder/file you want to copy,
→tap Copy.
3) Tap on the Internal Memory, →tap on the folder into which you want to copy the file, →tap
menu →select the “Multiple Select” →tap Paste.
Delete files:Tap menu →select the “Multiple Select” →tap and hold on the folder/file you want to
delete, →tap Delete →OK to confirm the deletion.
16MUSIC
☆Audio file formats supported: MP3, AAC, WMA, AC3 etc.
When no music files in the audio player playlist, the system will automatically load the music files from the
card to the audio player playlist after turning on the audio player .The playlist as shown in the above figure:
You can pass the audio files by the way of synchronous USB, or access to audio files by inserting the SD
card which it is already full of audio files. You can also download the audio file through the network.
Select the appropriate tab key, you can see for example “Artist”, “album”, “songs” and other interfaces.
Select a song to play.

13
17VIDEO
☆Video file formats supported: MP4, MKV, AVI, WMV etc.
☆ Picture file formats supported: JPG, JPEG, GIF, BMP, PNG.
In the main menu or desktop, tap the icon to enter “Video” interface, on where it will list all the video
files. As shown below:
Select the video files into video player interface. You can choose “Play”, “Stop”, “fast forward”, “rewind”,
“progress bar” and other control keys to control the playback progress.

14
18SETTINGS
Wireless &
networks
Wi-Fi Turn on/off Wi-Fi.
Data usage A list of the data at that time use and mobile data flow
conditions.
more Airplane mode, VPN, Portable hotspot, Ethernet, Mobile
networks.
Sound
Volumes To adjust the Media volume, Alarms volume and Notifications
volume. Tap & slide the slide
r
and then tap OK.
Default
notification You can select the default notification which you like.
Touch sounds Select to enable a sound when making a screen selection.
Screen lock
sounds Play sounds when locking and unlocking the screen.
Display
Brightness Tap & slide the slider to adjust the screen brightness as
desired, and then tap OK.
Wallpaper
Y
ou can choose dynamic wallpaper, wallpaper and super
clear player set wallpaper.
Sleep Choose the sleep time.
Daydream Set the daydream .
Font size Choose the font size.
HDMI Turn on HDMI, HDMI Resolution, Screen Zoom.
Screenshot
Setting Some basic settings about Sreenshot.
Storage
Total space,
Available space
It values appears when a SD card/USB storage is inserted in
device.
Unmount
storage
SDcard/USB
Storage
When the SD card/USB storage is inserted, tap it to safety
remove the SD card/USB storage.
Battery Discharging How much power your battery?
On battery
Y
our batteryrespectivelyconsumption in where.
Apps
Downloaded Tap in see the application which it is downloads from website
and manage it.
On SD card Tap in see the application which it is on the SD card and
manage it.
Running Tap in see the application which it is running and manage it.
All Tap in see the application which it is all applications and
manage them.
Location access
Access to my
location
Use the wireless network applications (such as Google
Maps) to view location.
GPS satellites Let apps use GPS on your tablet to pinpoint your location.
WiFi&Mobile
network
location
Let apps use Google’s location to estimate your location
faster.
Security
Screen lock Lock screen with None, a pattern, PIN, Slide, Face Unlock.
Owner info Show owner info on lock screen.
Make password
visible Choose √ or not to make the password visible.
Device
administrators View or deactivate device administrators.
Unknown
sources Allow installation of non-Market apps.
Trusted Display trusted CA certificates.

15
credentials
Install from SD
card Install certificates from SD card.
Language &
Input
language Select the language and region according to your location.
Personal
dictionary
You can add words to a personal dictionary, words that may
not be included in the default dictionary.
Android
keyboard Onscreen keyboard settings.
Voice Search Set up the language of the voice search.
Pointer speed Adjust the pointer speed.
Black up and
reset
Back up
&Restore Back up data and account, automatic restore setting.
Factory data
reset
Tap to reset the device to its initial factory state, erasing all
data and downloaded applications.
Tap reset: device to proceed with reset, or tap to cancel
and return to previous screen.
WARNING! The following will be erased during the factory
reset:
~ Google account
~System and application data and settings
~ Downloaded applications
The factory reset will NOT erased:
~ Current system software and bundled applications
~ SD card files, such as music or photos
Accounts Add your personal accounts.
Date & time
Automatic Date
& time
Using the value of the network can be synchronized with the
network time.
Automatic time
zone Use network-provided time zone.
Set date Set the date.
Set time Set the time.
Select time
zone Select the time zone.
Use
24-hour format You can choose to use 24-hour format or 12-hour format.
Select date
format You can select the date format.
AccessibilitySystem Set up the parameter of the system.
Developer
options
USB debugging ,Stay awake, Allow mock locations, HDCP
checking ,Desktop backup password, Strict mode enabled,
Show CPU Usage ,Show all ANRs etc.
About tablet View Status (Battery, Networ
k
etc), Legal information, Model
number, Android version, Kernel version and Build number.
Frequently Asked Questions
Android
Q: What Android OS version is on my Device?
A: 4.2.2
Basic Device Functionary
Q: Do I have to charge the battery before use?
A: You should charge the battery for at least 4 hours, but you can use the device while it’s
charging. Use the include power adapter to charge; this device can be charged via the
USB cable.

16
Email Q: Can I use any of my personal email addresses to send/receive email?
A: The device supports POP3 and SMTP accounts. Some free email accounts are not
supported on mobile devices. Check with your email provider to see if you account is
supported.
Media Cards
Q: Which media cards are compatible with my Device?
A: micro SD cards.
Music
Q: How do I add music files to my device?
A: Copy the music files from your computer onto a SD card or USB storage device, and
then use the File Browser application to copy the files into the device.
Photos Q: How do I add photo files to my device?
A: Copy the photo files from your computer onto a SD card or USB storage device, and
then use the File Browser application to copy the files into the device.
Wi-Fi Q: Do I need a Wi-Fi adapter to connect to the Internet?
A: No. The Wi-Fi adapter is built-in to the device.
Inconsistent with the physical specifications, please prevail in kind.
BatteryManagement
The battery is not fully charged out of the box, so it is recommended that you charge the battery for at least 4
hours before you start to use the device.
The rechargeable battery is designed and manufactured to be used and recharged frequently. As with all
batteries, the capacity of the battery reduces each time it is charged/depleted. However, you can still try to
prolong the battery’s lifetime by following the suggestions below:
●Use your Tablet at least once a week.
●Charge the battery regularly and fully.
●Never leave the battery fully discharged for a long period of time.
●Always keep the device and the battery away from heat.
●Please do not place the product in hot environment. The highest temperature is at 37°.
●Only use the product below the altitude of 2000 meters.
●Do not use the product in the tropical conditions.
Charge battery
Plug the power adapter into an electrical wall outlet, and then connect to the device to fully charge the
battery before use.
☆You can charge the battery using the USB cable.
A fully discharged battery takes approximately 4 hours to fully charge, but you can use the device while
plugged in when desired.
Important Safety Precautions
Always follow these basic safety precautions when using your Tablet. This reduces the risk of fire, electric
shock, and injury.
●Do not expose this product to rain or moisture.
●Keep the device out of direct sunlight and heat sources.
●Protect the power cord. Route power cords so that they are not likely to be walked on
or pinched by items placed on or against them. Pay particular attention to the point
where the cord attaches to the device.
●Only use the AC adapter included with the device. Using any other power adapter voids
your warranty.
●Do not remove the cover. There are no user-serviceable parts inside.
Clean your device
Treat the screen gently. To clean fingerprints or dust from the screen, we recommend using a soft,
non-abrasive cloth such as a camera lens cloth.
Table of contents
Other THOMSON Tablet manuals

THOMSON
THOMSON TEO10 User manual

THOMSON
THOMSON QM734-2 User manual

THOMSON
THOMSON M6 User manual

THOMSON
THOMSON Platium User manual

THOMSON
THOMSON TEO User manual

THOMSON
THOMSON TEO User manual

THOMSON
THOMSON QM735-8G User manual

THOMSON
THOMSON TEO7-8S User manual

THOMSON
THOMSON TEO User manual

THOMSON
THOMSON MID1002 User manual