Thor Kitchen TWD3001 User manual

COOK
LIKE
A
GOD
TWD3001 PROFESSIONAL WARMING DRAWER|

PROFESSIONAL
WARMING DRAWER
USE AND CARE MANUAL
TWD3001

SAFETY PRECAUTIONS ............................................................................................................... 2
General Safety Requirements ..................................................................................................... 2
WARMING DRAWER FEATURES .................................................................................................. 3
Features ...................................................................................................................................... 3
WARMING DRAWER OPERATION ................................................................................................ 4
Control Panel .............................................................................................................................. 4
Temperature ................................................................................................................................ 4
CARE RECOMMENDATIONS ........................................................................................................ 5
Cleaning ...................................................................................................................................... 5
TROUBLESHOOTING ................................................................................................................... 6
PRODUCT DIMENSIONS .............................................................................................................. 6
INSTALLATION DIMENSION ........................................................................................................ 7
Cabinet Front View ...................................................................................................................... 7
Clearance Dimensions – Flush Installation ................................................................................ 8
ACCESSORIES ........................................................................................................................... 10
INSTALL HANDLE ..................................................................................................................... 11
TROUBLESHOOTING AND INFORMATION CODES .................................................................... 12
WARRANTIES ............................................................................................................................ 12
IMPORTANT NOTE
To ensure this product is installed and operated as safely and efficiently as possible,
take note of the following types of highlighted information throughout this guide:
IMPORTANT NOTE highlights information that is especially important.
CAUTION indicates a situation where minor injury or product damage may occur if
instructions are not followed.
WARNING states a hazard that may cause serious injury or death if precautions are not
followed.
IMPORTANT NOTE: Throughout this guide, dimensions in parentheses are millimeters
unless otherwise specified.
TABLE OF CONTENTS
1

GENERAL SAFETY REQUIREMENTS
• Read this use & care guide carefully before using your new warming drawer to reduce
the risk of fire,electric shock or injury to persons.
• To protect against electrical shock do not immerse cord or plug in water or other
liquid.
• The use of accessory attachments not recommended by the appliance manufacturer
may cause injuries.
• Do not repair or replace any part of the warming drawer unless specifically
recommended in litera-ture accompanying this appliance. All service should be
referred to Thor Group Certified Service.
• Close supervision is necessary when any appliance is used by or near children.
• Do not use outdoors (model TWD3001).
• Do not use appliance for other than intended use.
• Do not touch the heating element or the interior surface of the warming drawer.
These surfaces may be hot enough to burn. The inside surfaces of the warming
drawer may be hot when opened.
• Do not use aluminum foil to line the warming drawer. This may cause damage to
interior sur- faces of the warming drawer.
• Do not heat unopened food containers, such as baby food jars and cans. Pressure
build-up may cause the container to burst and cause injury.
• Do not store or use gasoline or other flammable vapors and liquids in the vicinity of
this or any other appliance.
• Ensure that towels are stacked only as high as the sides of the drawer pan. Any
higher may result in discoloration of the towels.
• Do not place more than 50 lb (20 kg) into the warming drawer.
SAFETY PRECAUTIONS
2
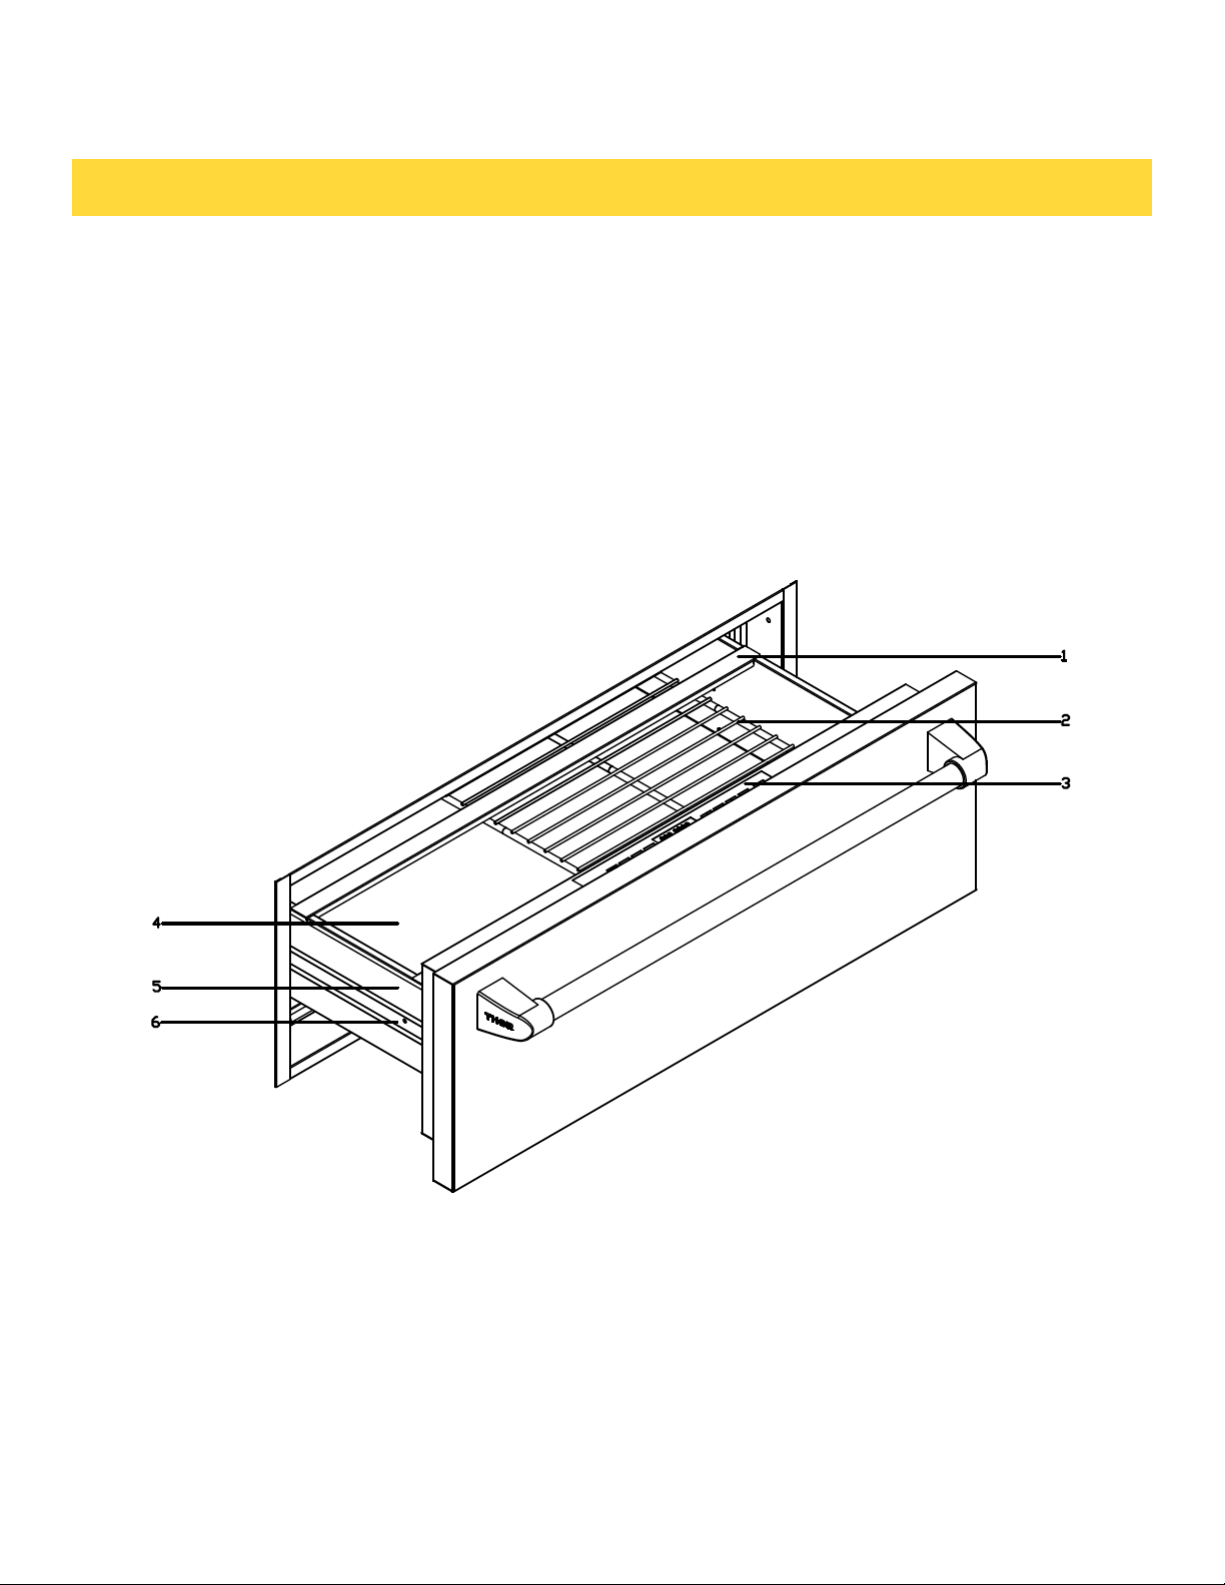
FEATURES
1. Pan support rail locator notch
2. Removable Rack
3. Control panel
4. Drawer Pan
5. Drawer side
6. Drawer rail
WARMING DRAWER FEATURES
3

WARMING DRAWER OPERATION
TIMER
Bread Proof: The default working time is 4 hours. The maximum is 12 hours.
Keep Warm: The default working time is 2 hours. The maximum is 5 hours.
Plates: The default working time is 3 hours. The maximum is 12 hours.
Cups: The default working time is 3 hours. The maximum is 12 hours.
Setting timer:
1/ Select desired temperature.
2/ Touch TIMER UP or DOWN arrows to select the desired time (one gear every 15
minutes). ‘TIMER’ and the shut off time will appear in the display.
TEMPERATURE
The warming drawer features four preset temperature settings; KEEP WARM, PROOF
PLATES and CUPS. During preheat, the temperature display will alternate between the
set point and the actual temperature. ‘Proof’ will appear until the temperature reaches
85°F (30°C) . An audible chime indicates preheat is complete. Refer to the chart below.
CONTROL PANEL
The electronic control panel features touch controls and a visual display. Refer to the
illustration below. The control panel is hidden when the warming drawer is closed.
Open the drawer to access the control panel.
4

CLEANING
Stainless steel
Use a nonabrasive stainless steel cleaner and apply with a soft lint-free cloth. To bring
out the natural luster, lightly wipe surface with a water-dampened microfiber cloth
followed by a dry polishing chamois.
Always follow the grain of stainless steel.
The stainless steel drawer pan is removable for cleaning. To remove, open drawer
completely. Slide fingertips under side edges of pan, pull up and out.
Control panel
Use a spray degreaser to remove fingerprints and food soil. Spray on a cloth before
wiping panel.
Do not spray cleaners directly on the control panel.
Removable Rack
Clean with hot water and mild detergent or paste of baking soda and water. Towel dry.
Interior
Wipe with a soft damp cloth. Do not use abrasive or harsh cleaners or scouring pads.
For heavier soil, use baking soda or a mild soap; rinse thoroughly with hot water.
Drawer Guides
Remove food crumbs from drawer guides. Wipe with a soft dry cloth.
Note:THOR KITCHEN warming drawer is equipped with a food-grade silicone pad at
the bottom of the drawer, which can be easily cleaned.
CARE RECCOMENDATIONS
5
WARMING DRAWER DOES NOT OPERATE.
• Verify power is on.
• Verify electrical power to warming drawer and home circuit breaker is on.
DRAWER DOES NOT SLIDE SMOOTHLY.
• Drawer is out of alignment. Fully extend the drawer and close completely to realign.
• Drawer is overloaded. Reduce weight to less than 50 lb (20 kg) .
• Redistribute contents to balance load.
EXCESSIVE CONDENSATION.
• Remove liquid in drawer pan.
• Cover food with lid or aluminum foil.
• Temperature setting is too high. Use lower setting.
NO HEAT IN PROOF SETTING.
• Verify PROOF is illuminated on the control panel display.
• Room temperature may prevent thermostat from turning on.Food dries out in proof
setting.
• Cover food with lid or aluminum foil.
TROUBLESHOOTING
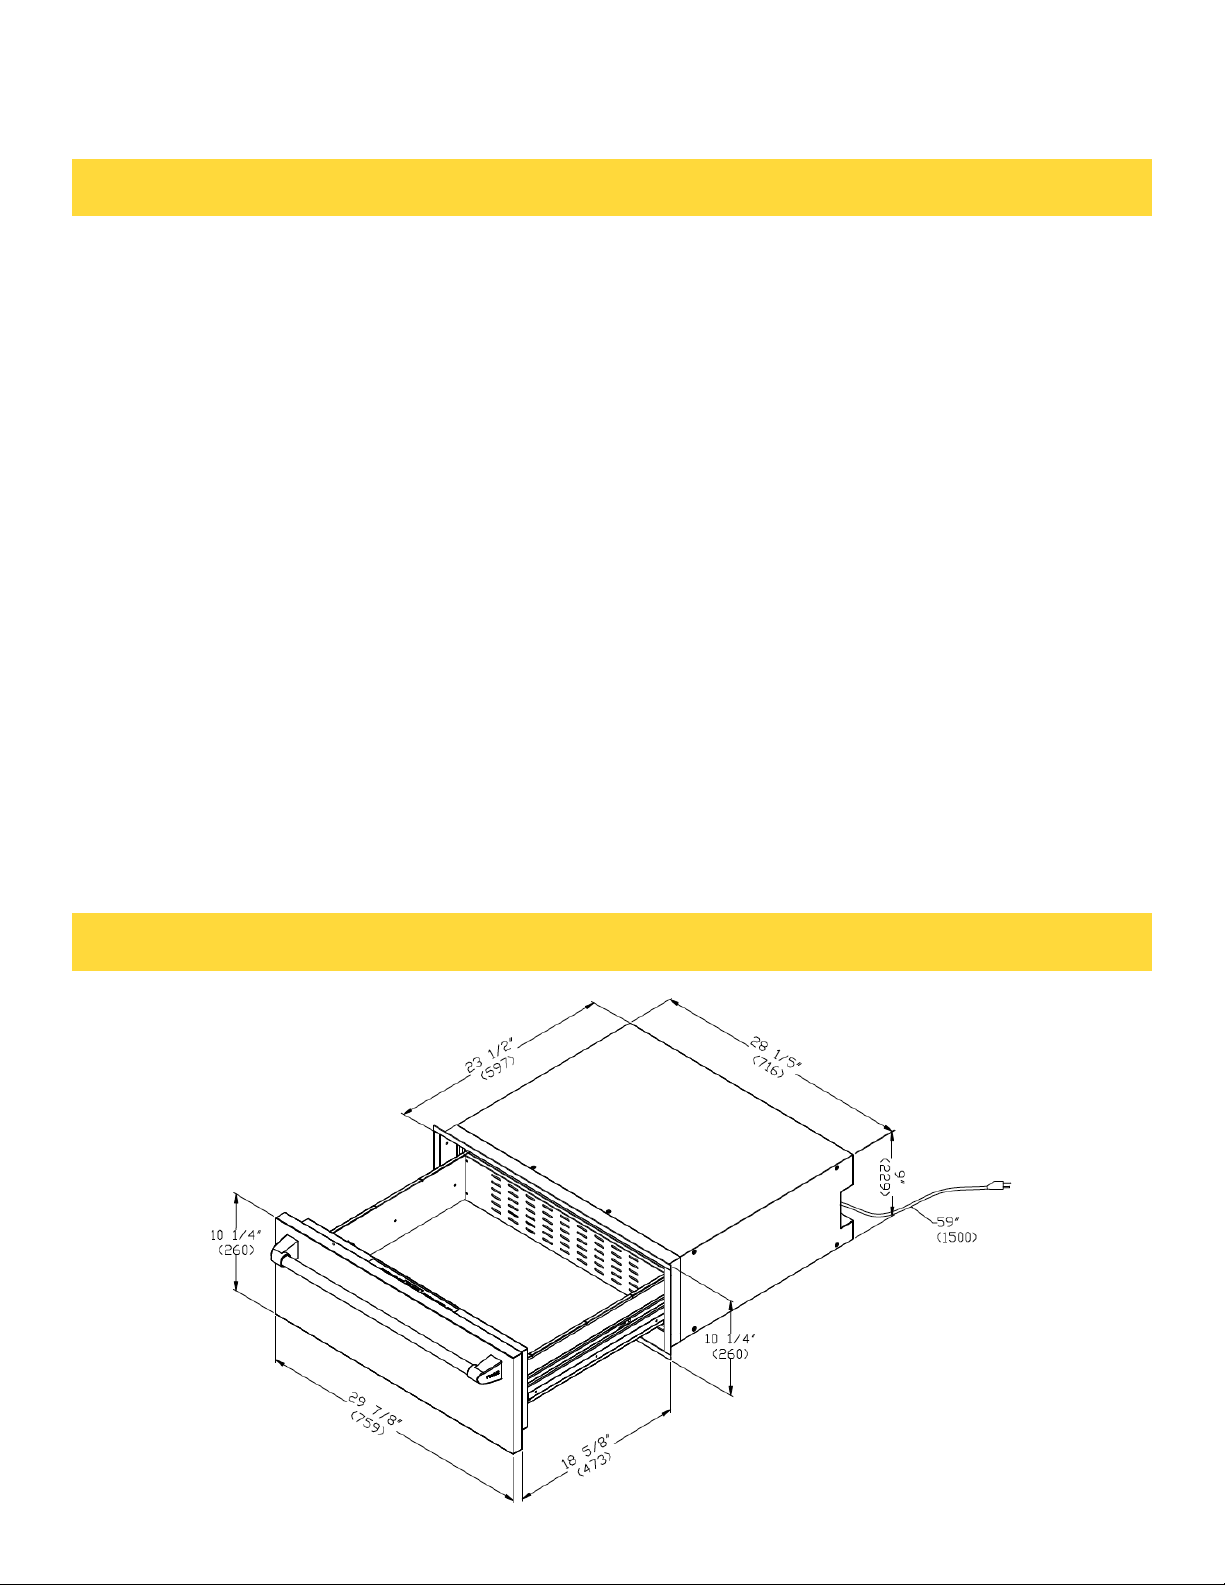
PRODUCT DIMENSIONS
6

Warming drawer can be installed as an indoor single or double installation or installed
under a single oven. Two warming drawers
under a single oven are shown.
NOTE: The warming drawer cannot be leveled after being installed.
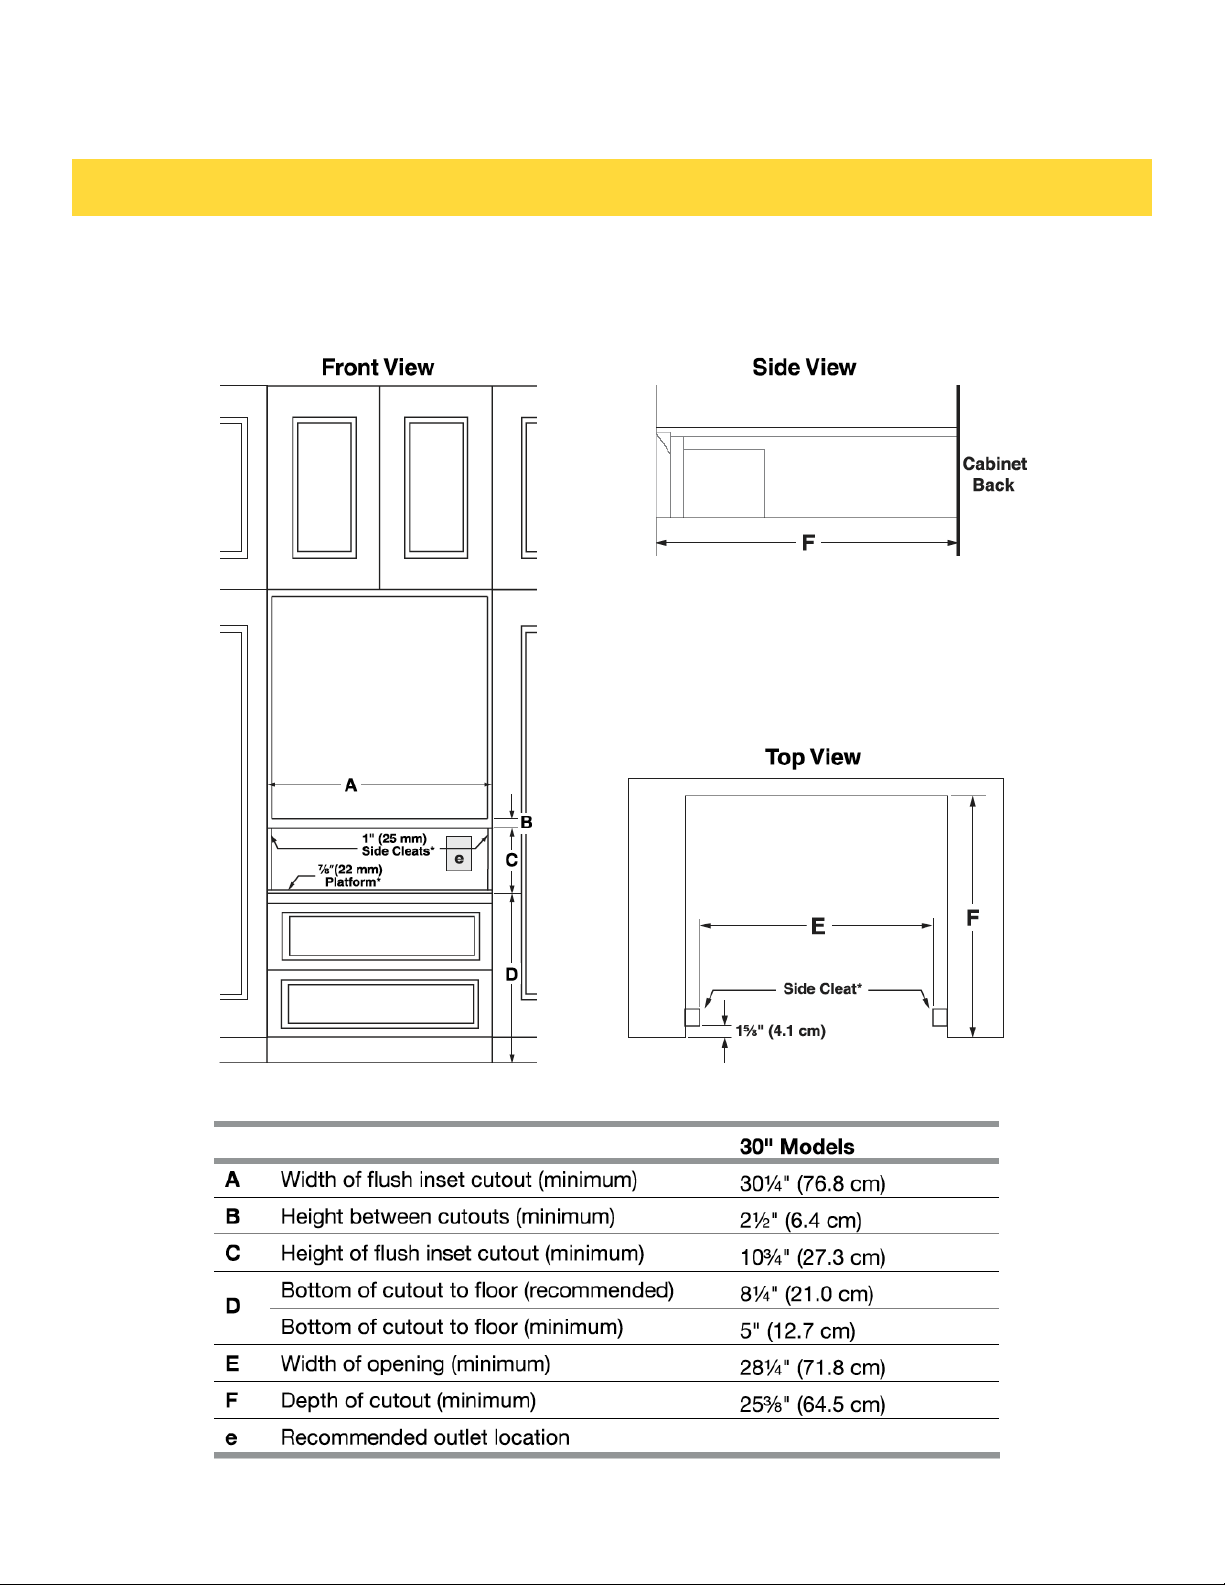
For outdoor installation follow the cutout dimensions above. Install the outdoor
warming drawer in a permanent fixture.
Custom Wood Drawer Front
If you plan to install a custom wood panel to match your cabinets, we recommend
consulting a qualified cabinetmaker or carpenter. The back of the wood panel must be
sealed to avoid moisture damage.
CABINET FRONT VIEW
INSTALLATION DIMENSION
7
CLEARANCE DIMENSIONS – FLUSH INSTALLATION
INSTALLATION DIMENSION
8

Fix the anti-tilt fixing plate on the back wall with screws according to the size shown in
the figure. After the product is pushed in, Fix it with screws at the screw hole in the
front of the product.
INSTALLATION DIMENSION
9
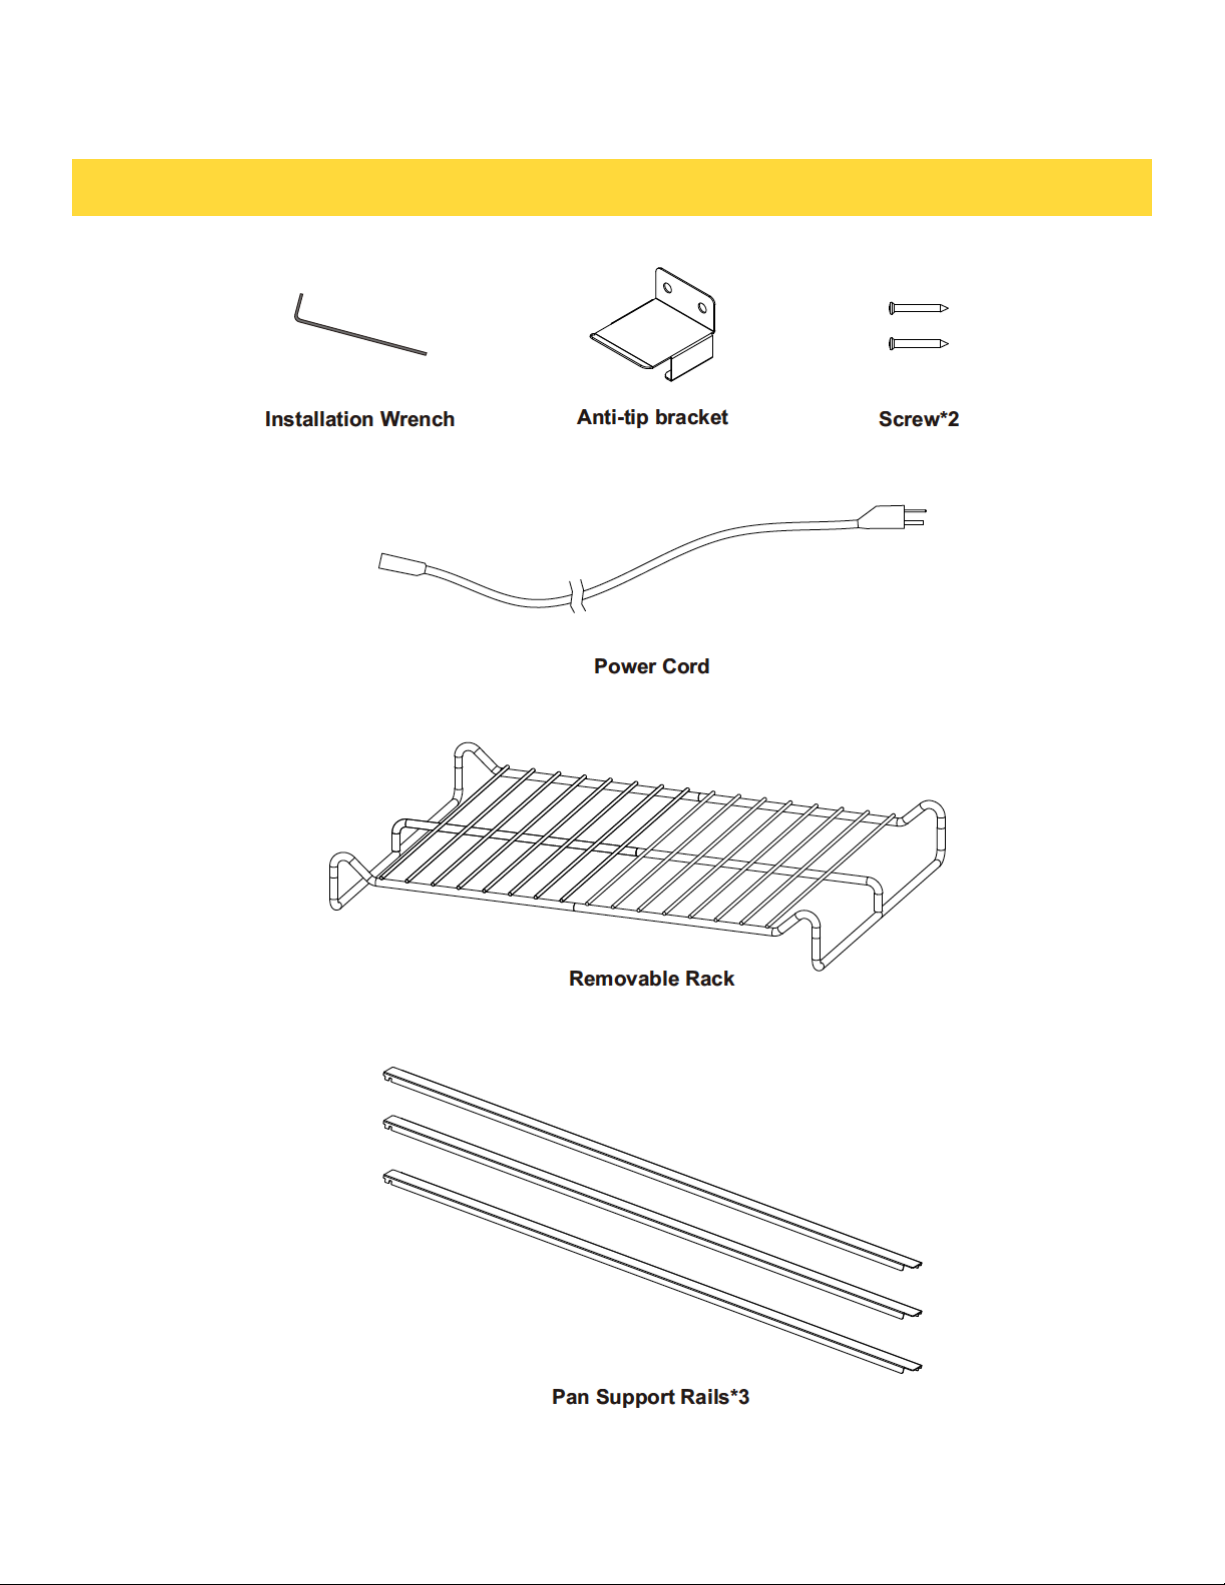
ACCESSORIES
10

INSTALL HANDLE
5. Check if the oven door is level and stable.
1. How to install Handles For Thor KD Models.
2. Connect the handle to the handle hodlers.
3. Lay the door handle against to the oven door and fit it on the connection part.
4. Use the wrench to get the door handle holder tinght.
11
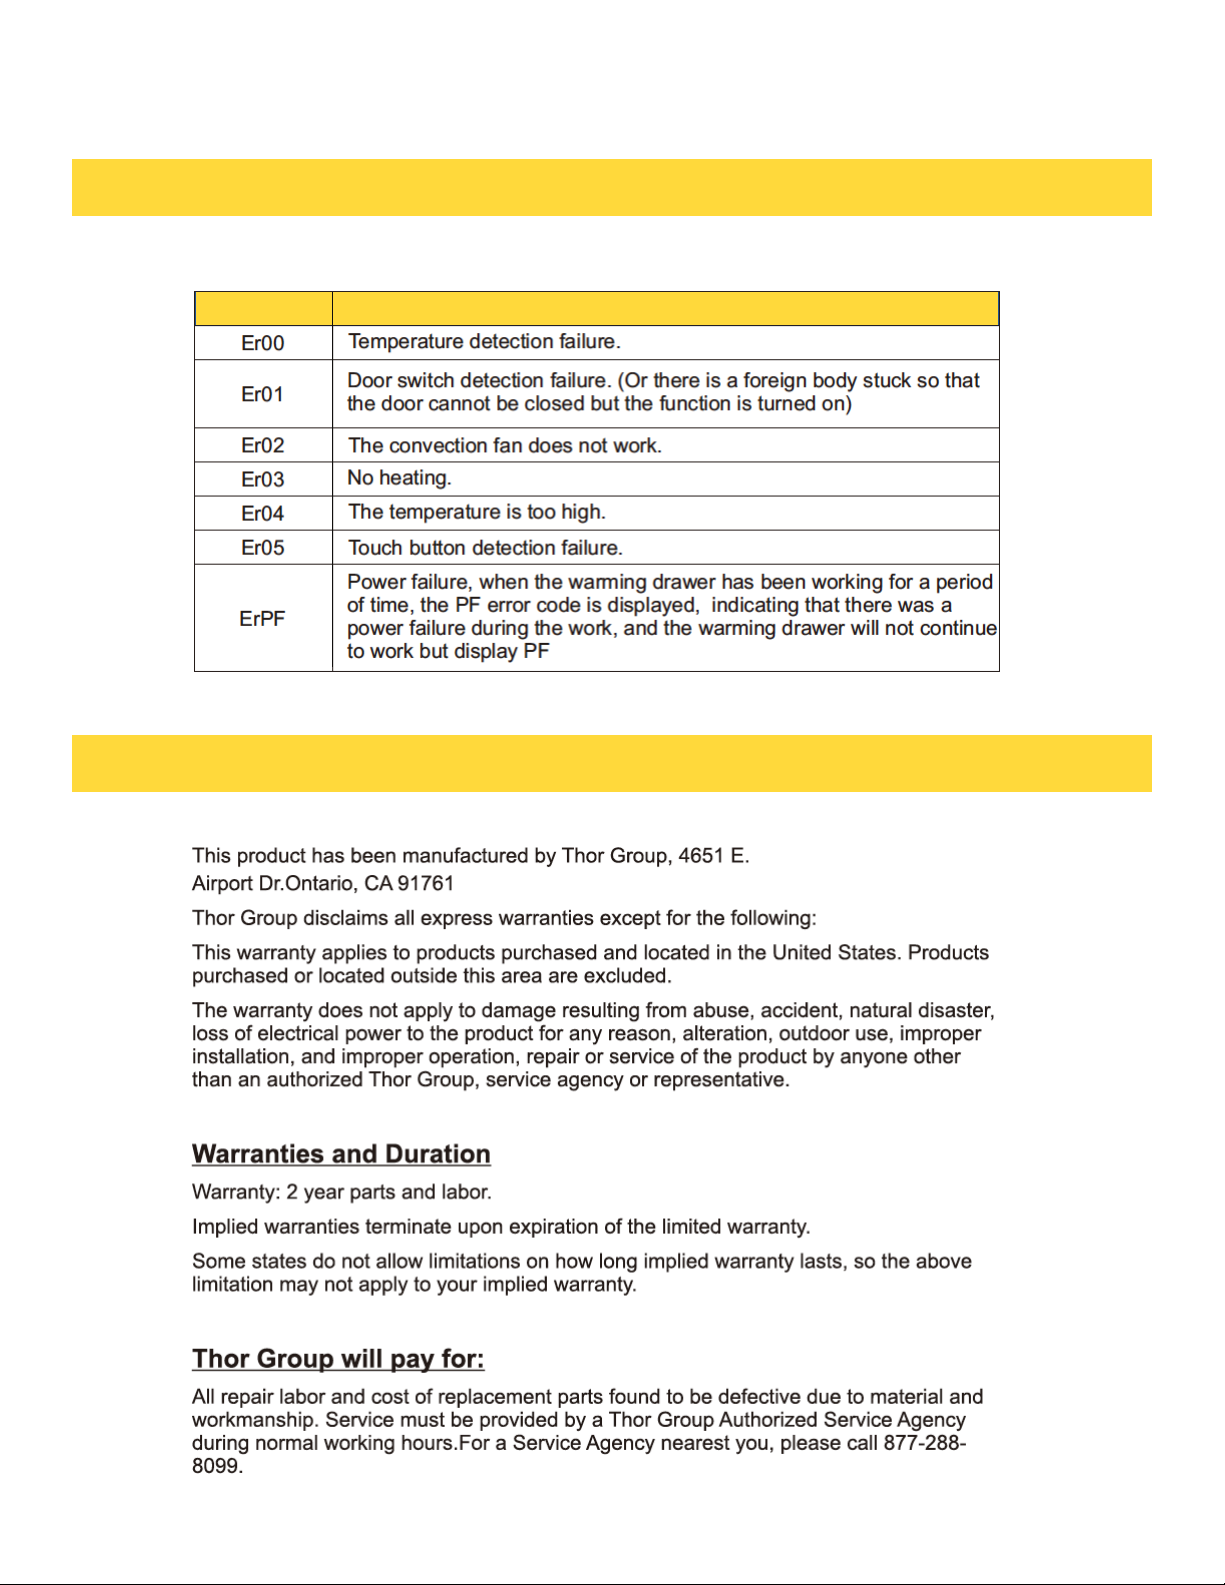
TROUBLESHOOTING AND INFORMATION CODES
ERROR CODE AFTER SALES SERVICE
WARRANTY
12

WARRANTY
13

Thor Group is not responsible for incidental or consequential damages. Under no
circumstances will Thor Group’s liability exceed the cost that you paid for the product.
Some states do not allow the exclusion or limitation of incidental or consequential
damages, so the above limitations or exclusion may not apply to you.
This warranty gives you specific legal rights, and you may also have other rights that
vary from state to state. Whenever you call our customer service at 877-288-8099 (Thor
Kitchen product) for technical information and parts sales in the United States or to
request service for your appliance, please have your complete model number and
serial number ready. The model and serial number can be found on the product data
plate.
Please enter the information requested in the spaces provided.
Model No._______________________ Date of Purchase _________________
Dealer__________________________ Town___________________________
Serial No._______________________ Purchaser_______________________
Suburb _________________________ Country_________________________
Note: You must provide proof of purchased or installation date for in-warranty service.
WARRANTY
14
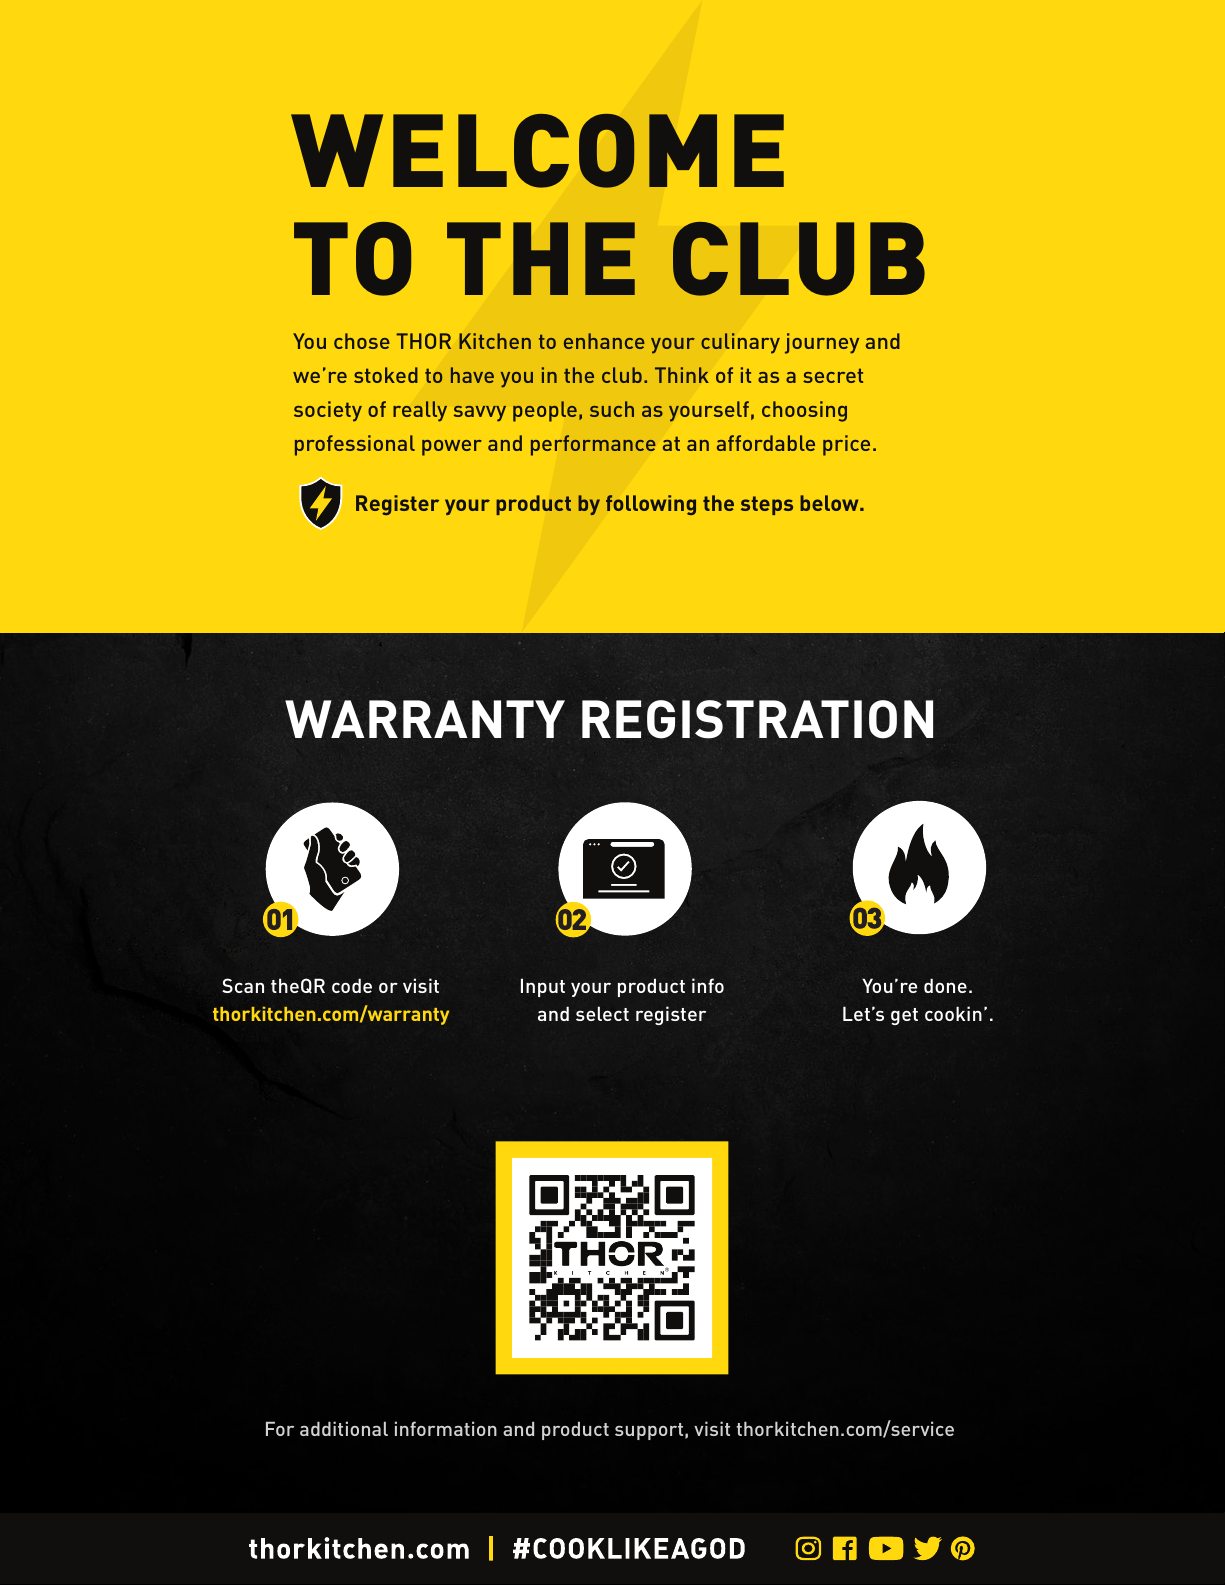
WARRANTY REGISTRATION
Scan theQR code or visit
thorkitchen.com/warranty
Input your product info
and select register
You’re done.
Let’s get cookin’.
You chose THOR Kitchen to enhance your culinary journey and
we’re stoked to have you in the club. Think of it as a secret
society of really savvy people, such as yourself, choosing
professional power and performance at an affordable price.
Register your product by following the steps below.
WELCOME
TO THE CLUB
For additional information and product support, visit thorkitchen.com/service
Table of contents
Popular Warming Drawer manuals by other brands

Wolf
Wolf WWD30-2 Installation information

Porter&Charles
Porter&Charles WD60-14 use and care manual

Siemens
Siemens HW1402P2B instruction manual

Gaggenau
Gaggenau WS061102 User manual and installation instructions

Frigidaire
Frigidaire Warm Drawer use and care manual

Frigidaire
Frigidaire Warmer Drawer use & care


