THOR ZONE NANOQ S User manual

USER MANUAL (ENG)
NANOQ S
THOR ZONE

1NANOQ S
S:t Persgatan 23, 602 33 Norrköping Sweden
[email protected] thor-zone.com
THOR ZONE
2X TOP/BOTTOM DUST FILTER2X SIDE DUST FILTER1X FRONT DUST FILTER1X RISER CABLE
MISC
4X RUBBER FEET1X M4 WASHER1X M4 THUMB SCREW4X #6-32x0.25inx4 STANDOFF
2X M3x6.54X #6-32x0.25in PAN HEAD4X #6-32 NUT2X M3x3 SPACER4X M3x3 SET SCREW
12X #6-32x0.3125in COUNTERSUNK6X #6-32x0.4375in COUNTERSUNK2X #6-32x1.25in COUNTERSUNK
SCREWS
NANOQ S
WHAT’S IN THE BOX? (1/2)

2NANOQ S
S:t Persgatan 23, 602 33 Norrköping Sweden
[email protected] thor-zone.com
THOR ZONE
4X M3x5.5 COUNTERSUNK2X SPRING4X M3x5.5 NYLON SCREW2X M3x10.5 NYLON SCREW
2X 4TH COLUMN
2X 3RD COLUMN
2X LOCK COLUMN
1X CENTER COLUMN
(Addon)WALNUT FRONT
2X SPRING
2X M3x10.5 NYLON SCREW
1X CENTER COLUMN
(Addon)STEALTH FRONT
4X GRIP FEET2X HANDLES
(Addon)HANDLES
4X M3x4
1X PC CABLE
1X LINK CABLE
2X LIGHTRAYS
(Addon)LIGHTRAYS
WHAT’S IN THE BOX? (2/2)
3NANOQ S
S:t Persgatan 23, 602 33 Norrköping Sweden
[email protected] thor-zone.com
THOR ZONE
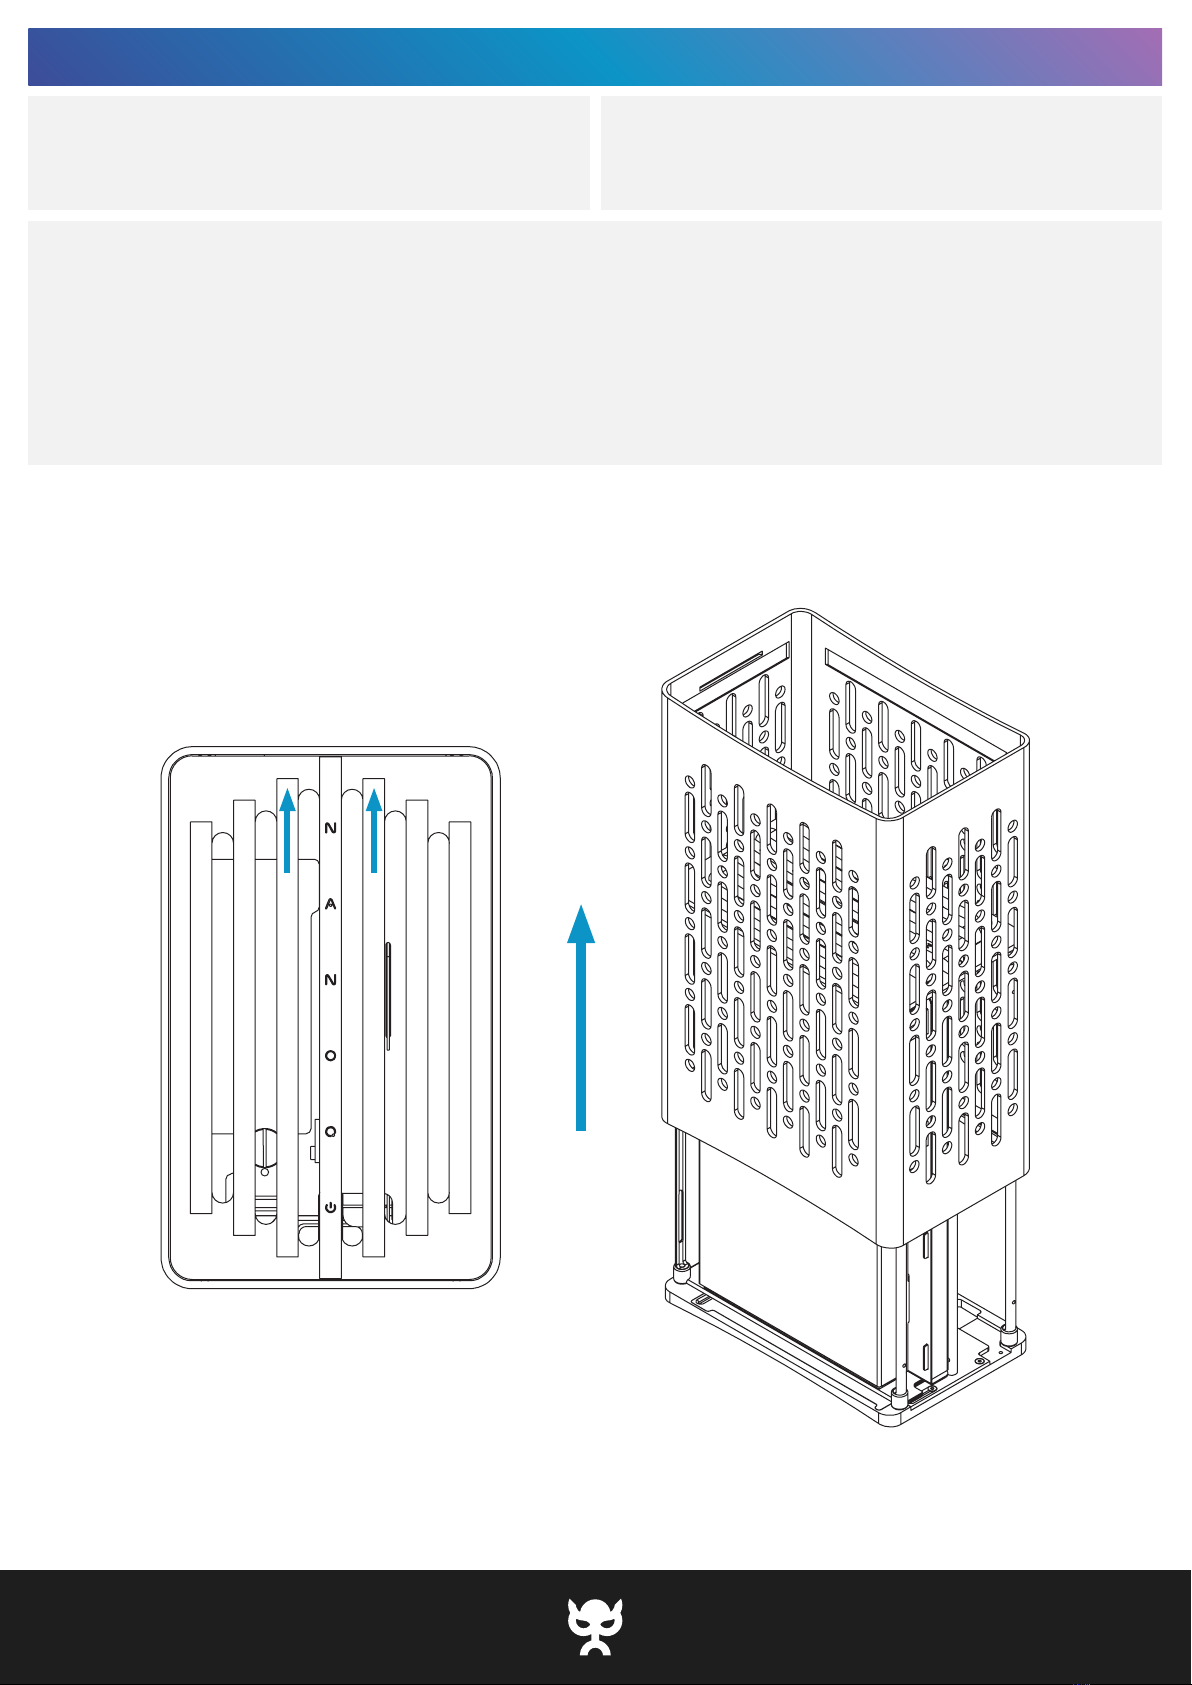
1. Place the case on it’s back. TIP: Put a soft cloth underneath to avoid scratches.
2. Unlock the case by pushing the lock columns up.
3. Gently pull the shell up and off the core.
4. Perform steps 1-3 in reverse to close the case again.
INSTRUCTIONS
SCREWSTOOLS
OPEN THE CASE

4NANOQ S
S:t Persgatan 23, 602 33 Norrköping Sweden
[email protected] thor-zone.com
THOR ZONE
•The core can be inserted normally or reversed 180°.
INSTRUCTIONS
SCREWSTOOLS
FLIP LAYOUT

5NANOQ S
S:t Persgatan 23, 602 33 Norrköping Sweden
[email protected] thor-zone.com
THOR ZONE
1. Attach the top/bottom/side dust filters to the interior of the shell. NOTE: Attaches magnetically.
2. Attach the front dust filter to the front of the core interior. NOTE: Attaches magnetically.
INSTRUCTIONS
SCREWSTOOLS
DUST FILTERS

6NANOQ S
S:t Persgatan 23, 602 33 Norrköping Sweden
[email protected] thor-zone.com
THOR ZONE
ORIENTATION 2ORIENTATION 1
•Gently insert the rubber feet into the ventilation holes on the shell. TIP: The side you choose will become the bottom of the case.
INSTRUCTIONS
4x RUBBER FEET SCREWSTOOLS
CASE FEET

7NANOQ S
S:t Persgatan 23, 602 33 Norrköping Sweden
[email protected] thor-zone.com
THOR ZONE
1. Gently slide the bottom rail guards up. NOTE: These are the short black tubes at the ends of each corner rail.
2. Remove the bottom (8) M3x3 set screws and remove the rail plugs. TIP: These screws are very small, careful not to loose them.
3. Insert the handles into the bottom plate. TIP: Use the included grip feet to give the handles extra
protection and stability when placed on hard surfaces.
4. Secure the handles with (8) M3x3 set screws.
5. Gently slide the bottom rail guards down.
INSTRUCTIONS
SCREWS
•Hex key (size: H2.0)
TOOLS
HANDLES (Addon)
8NANOQ S
S:t Persgatan 23, 602 33 Norrköping Sweden
[email protected] thor-zone.com
THOR ZONE
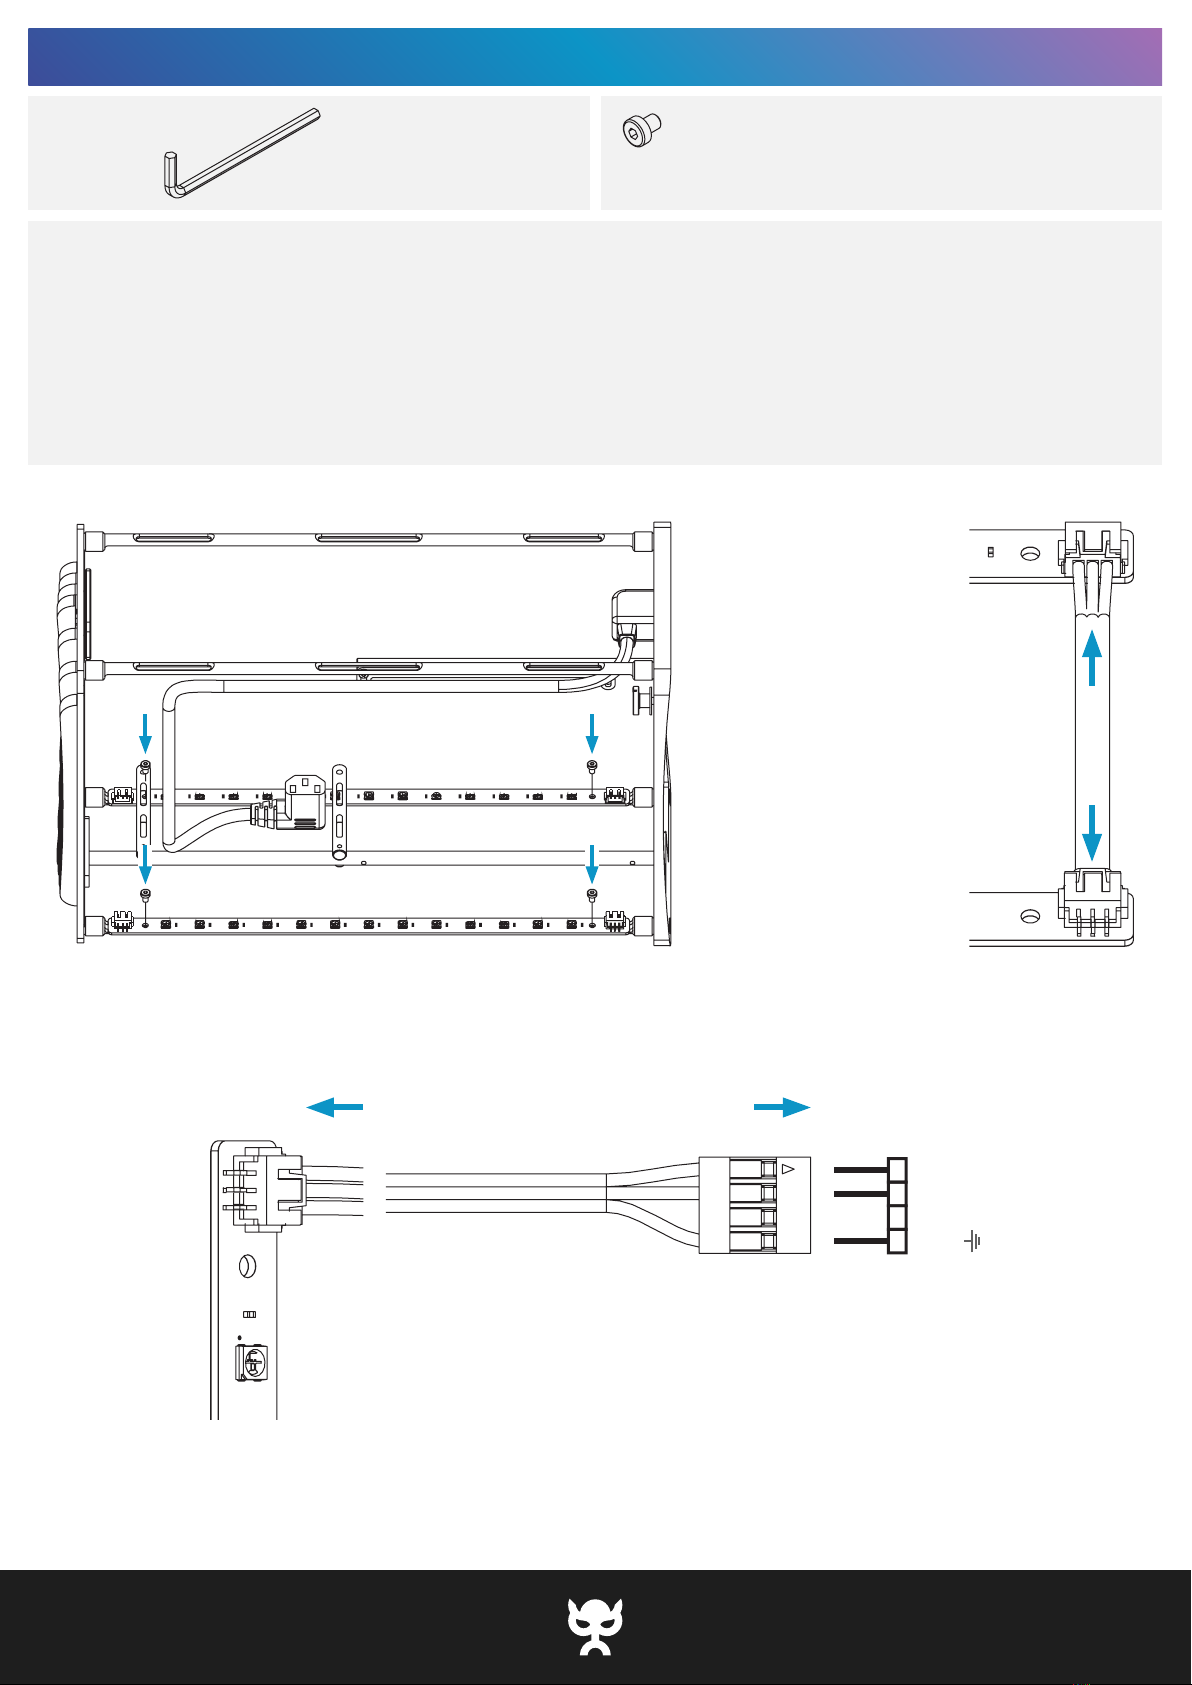
+5V
D
GND
IN
1. Attach the lightrays to the core with (4) M3x4 screws.
2. Connect the lightrays to each other with the link cable. NOTE: Connect IN-port on one lightray to the OUT-port on the other.
3. Connect the lightrays to the Motherboard with the PC cable. NOTE: Connect the IN-port on the lightray to a 5V dRGB header.
•5V DIGITAL RGB HEADERS ONLY - AVOID 12V HEADERS AT ALL COSTS.
•CORRECTLY CONNECT POWER, DATA AND GROUND.
•Lightrays are controlled through motherboard software. TIP: Software examples: OpenRGB, Armoury Crate (ASUS ROG),
RGB Fusion 2.0 (Gigabyte).
INSTRUCTIONS
4x M3x4 SCREWS
•Hex key (size: H2.0)
TOOLS
LIGHTRAYS (Addon)

9NANOQ S
S:t Persgatan 23, 602 33 Norrköping Sweden
[email protected] thor-zone.com
THOR ZONE
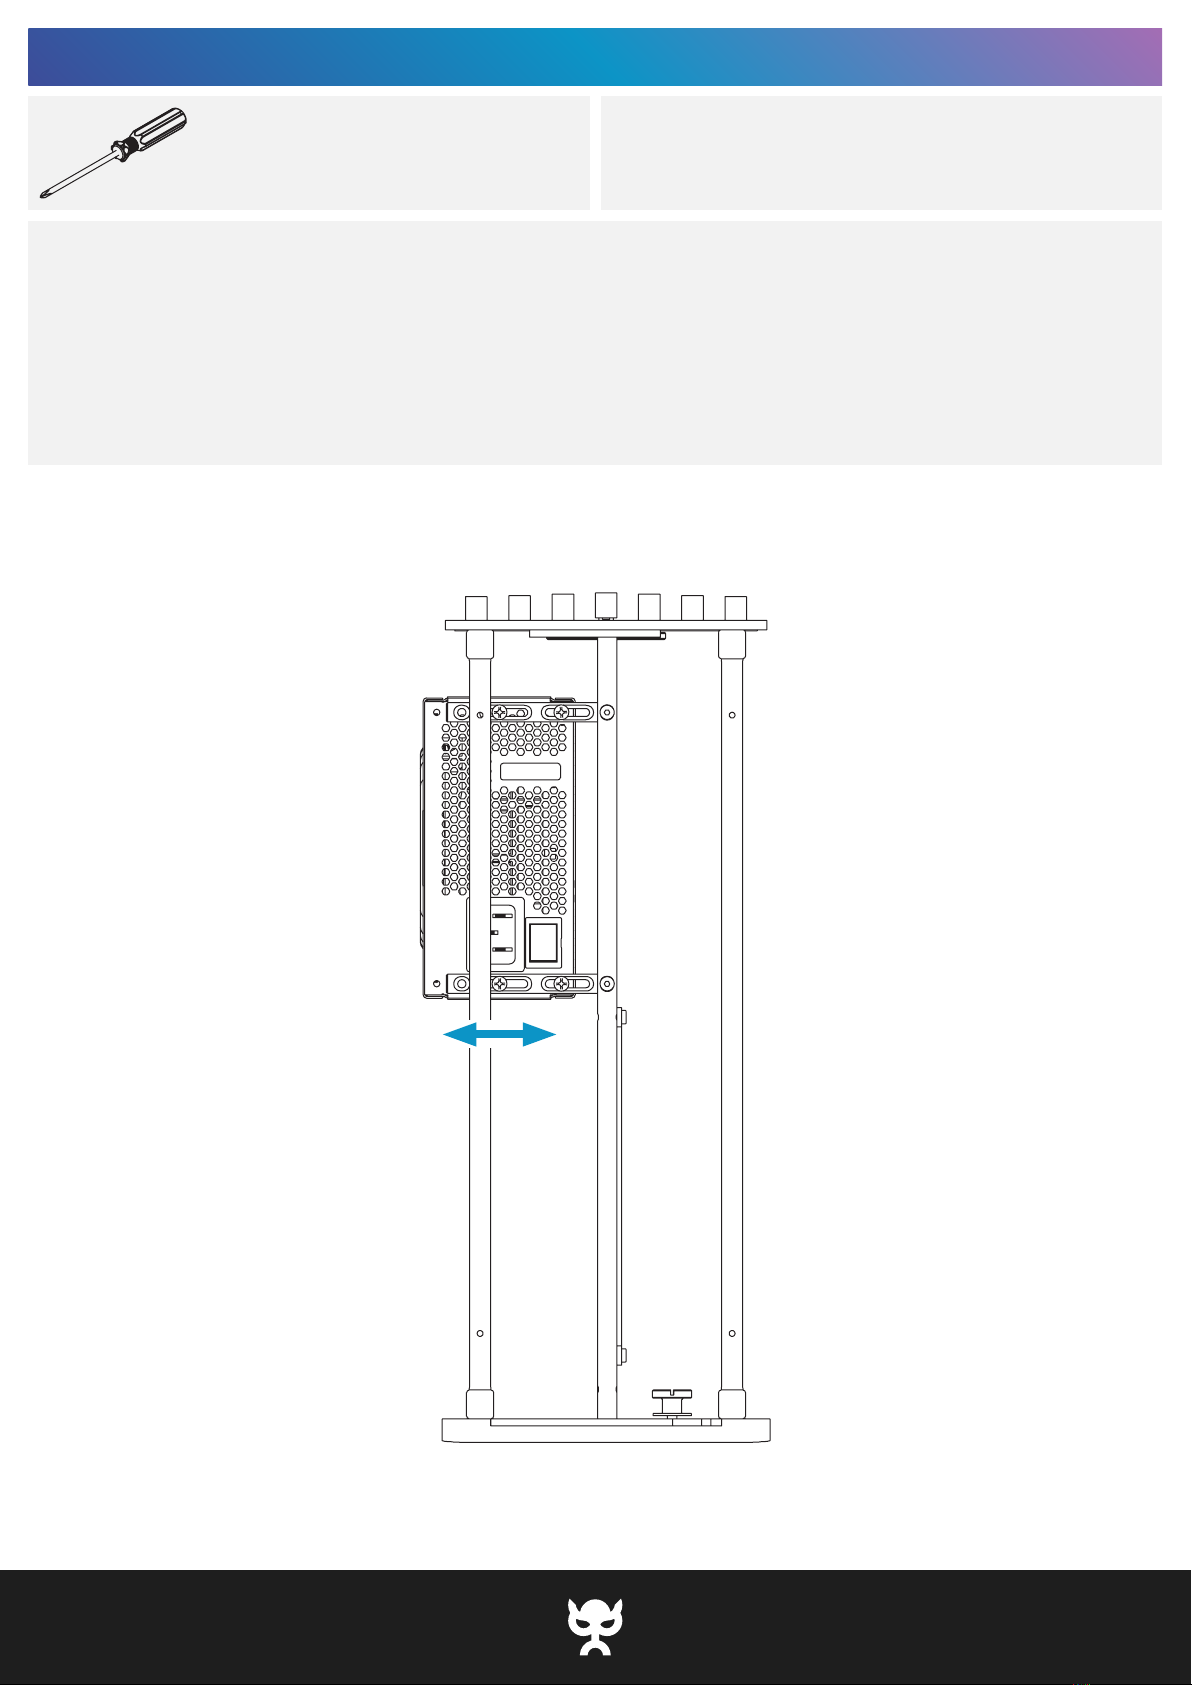
1. Loosen the (4) screws holding down the shift panel. NOTE: Located on the back of the core.
2. Loosen the (2) screws holding down the shift bracket. NOTE: Located on the front of the core.
3. Now you can shift the spine more towards the CPU side or the GPU side.
4. Tighten the previously loosened screws to fix the spine in the new position.
INSTRUCTIONS
SCREWS
•Hex key (size: H2.0)
TOOLS
SPINE SHIFT

10NANOQ S
S:t Persgatan 23, 602 33 Norrköping Sweden
[email protected] thor-zone.com
THOR ZONE
1. Install the included (4) #6-32x0.25inx4 standoffs.
2. Install the I/O shield (usually included with your motherboard).
3. Align the motherboard with the I/O shield and secure it with NOTE: Compatible with mini-ITX motherboards only.
(4) #6-32x0.25in pan head screws.
4. Connect the power button.
INSTRUCTIONS
4x #6-32x0.25inx4 STANDOFF
4x #6-32x0.25in PAN HEAD
SCREWS
•Phillips screw driver (size: PH1)
TOOLS
MOTHERBOARD

11NANOQ S
S:t Persgatan 23, 602 33 Norrköping Sweden
[email protected] thor-zone.com
THOR ZONE
1. Connect the riser cable to the motherboard.
2. Attach the riser cable to the core with (2) M3x3 spacers and
(2) M3x6.5 screws.
4. Insert the GPU into the riser cable.
5. Secure the GPU in place with the included M4 washer and
M4 thumb screw.
INSTRUCTIONS
2x M3x3 SPACER
2x M3x6.5
1x M4 WASHER
1x M4 THUMB SCREW
SCREWS
•Hex key (size: H2.0)
TOOLS
GRAPHICS CARD

12NANOQ S
S:t Persgatan 23, 602 33 Norrköping Sweden
[email protected] thor-zone.com
THOR ZONE
1. Remove the M4 washer and thumb screw that hold the GPU.
2. Loosen the (2) screws holding the riser bracket.
3. Shift the riser bracket up/down to fit your needs.
4. Perform steps 1-2 in reverse to lock in the new GPU position.
INSTRUCTIONS
SCREWS
•Hex key (size: H2.0)
TOOLS
RISER SHIFT

13NANOQ S
S:t Persgatan 23, 602 33 Norrköping Sweden
[email protected] thor-zone.com
THOR ZONE
1. Secure the PSU to the core with (6) #6-32x0.4375in countersunk screws. NOTE: Compatible with SFX and SFX-L PSUs only.
2. Plug in the power cable into the PSU power socket.
INSTRUCTIONS
6x #6-32x0.4375in COUNTERSUNK SCREWS
•Phillips screw driver (size: PH1)
TOOLS
POWER SUPPLY
14NANOQ S
S:t Persgatan 23, 602 33 Norrköping Sweden
[email protected] thor-zone.com
THOR ZONE
1. Loosen the (6) screws that hold the PSU.
2. Shift the PSU sideways to fit your needs.
3. Tighten the previously loosened screws to lock in the new PSU position.
INSTRUCTIONS
SCREWS
•Phillips screw driver (size: PH1)
TOOLS
POWER SUPPLY (SHIFT)
15NANOQ S
S:t Persgatan 23, 602 33 Norrköping Sweden
[email protected] thor-zone.com
THOR ZONE
•Fans, radiators and AIO water coolers can be mounted to the radiator rails NOTE: Compatible with 120mm and 240mm radiators and fans.
using (4-8) #6-32x0.3125 countersunk screws.
INSTRUCTIONS
4-8x #6-32x0.3125in COUNTERSUNK SCREWS
•Phillips screw driver (size: PH1)
TOOLS
FANS AND RADIATORS (BOTTOM)
16NANOQ S
S:t Persgatan 23, 602 33 Norrköping Sweden
[email protected] thor-zone.com
THOR ZONE
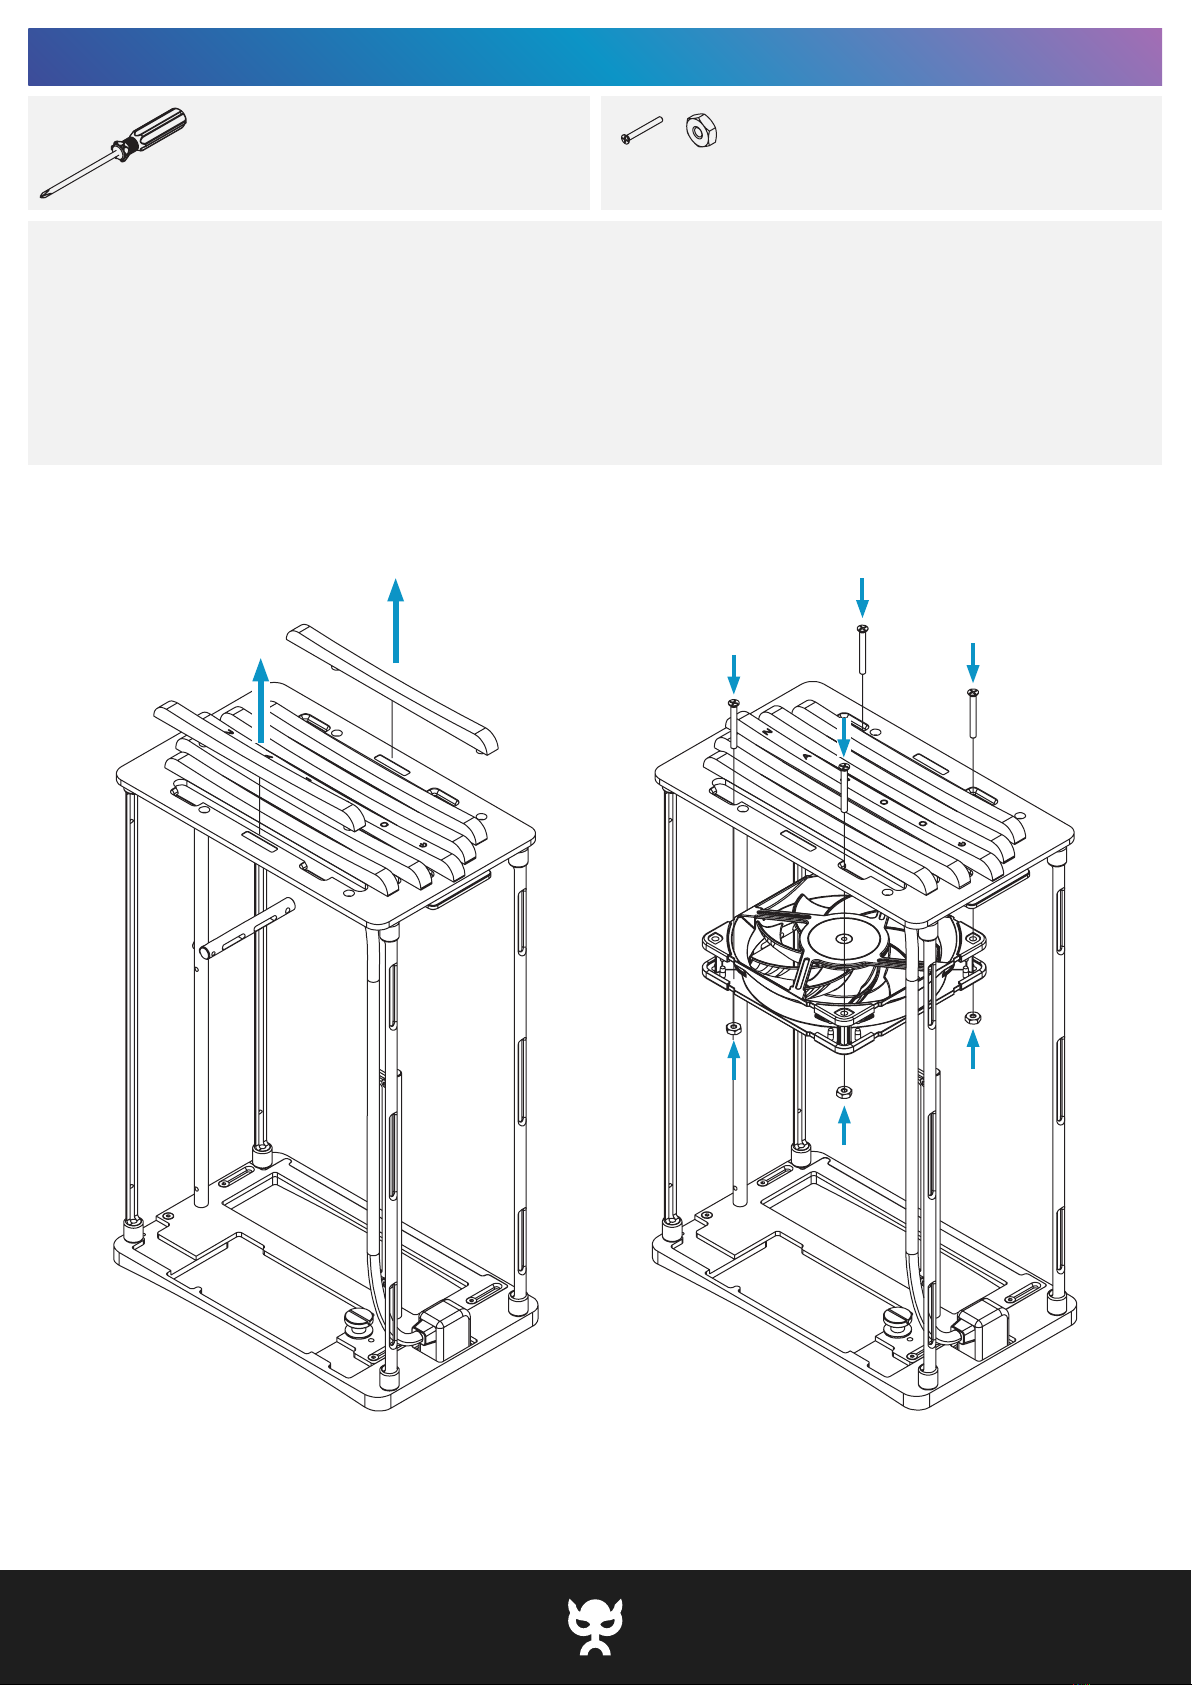
1. Remove both 4th columns.
2. Secure the fan with (4) #6-32x1.25in countersunk screws and NOTE: Compatible with 120mm fans.
(4) #6-32 nuts.
3. Attach both 4th columns again. NOTE: Attaches magnetically.
INSTRUCTIONS
4x #6-32x1.25in COUNTERSUNK
4x #6-32 NUT
SCREWS
•Phillips screw driver (size: PH1)
TOOLS
FANS (TOP)
17NANOQ S
S:t Persgatan 23, 602 33 Norrköping Sweden
[email protected] thor-zone.com
THOR ZONE
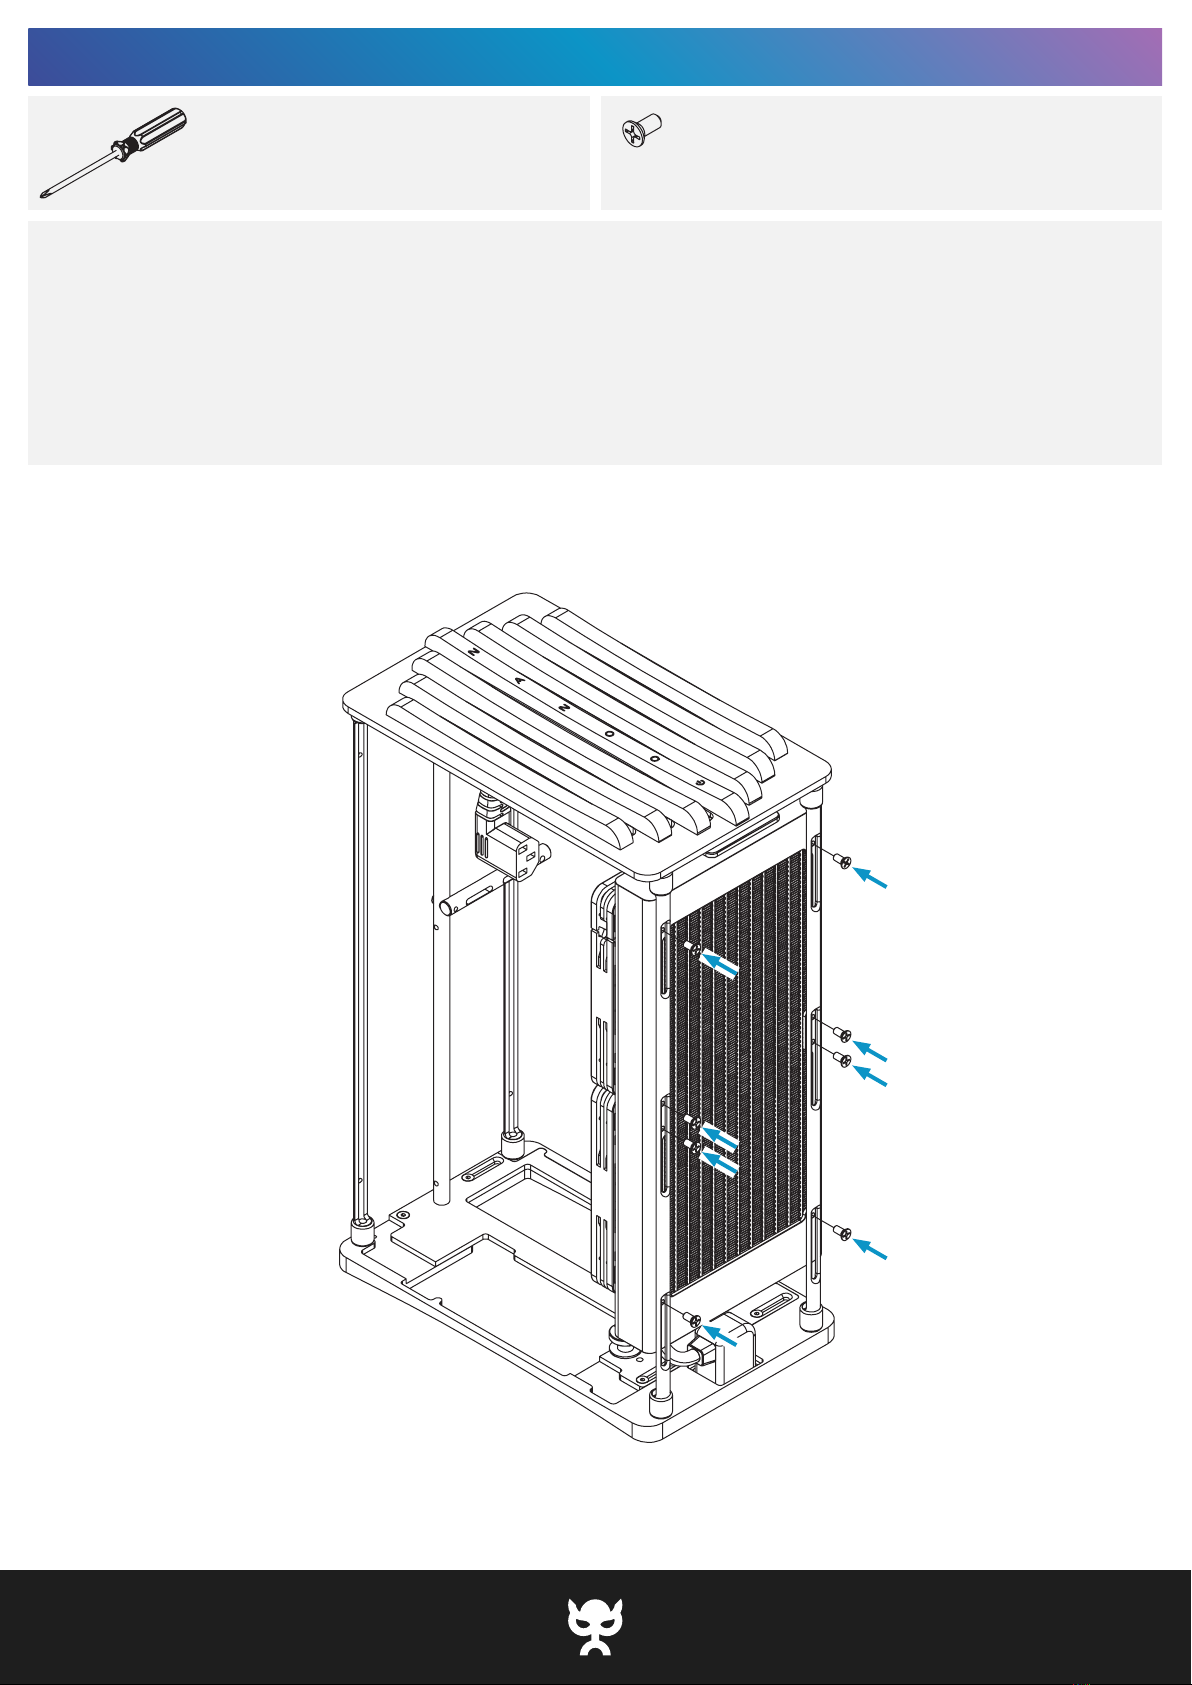
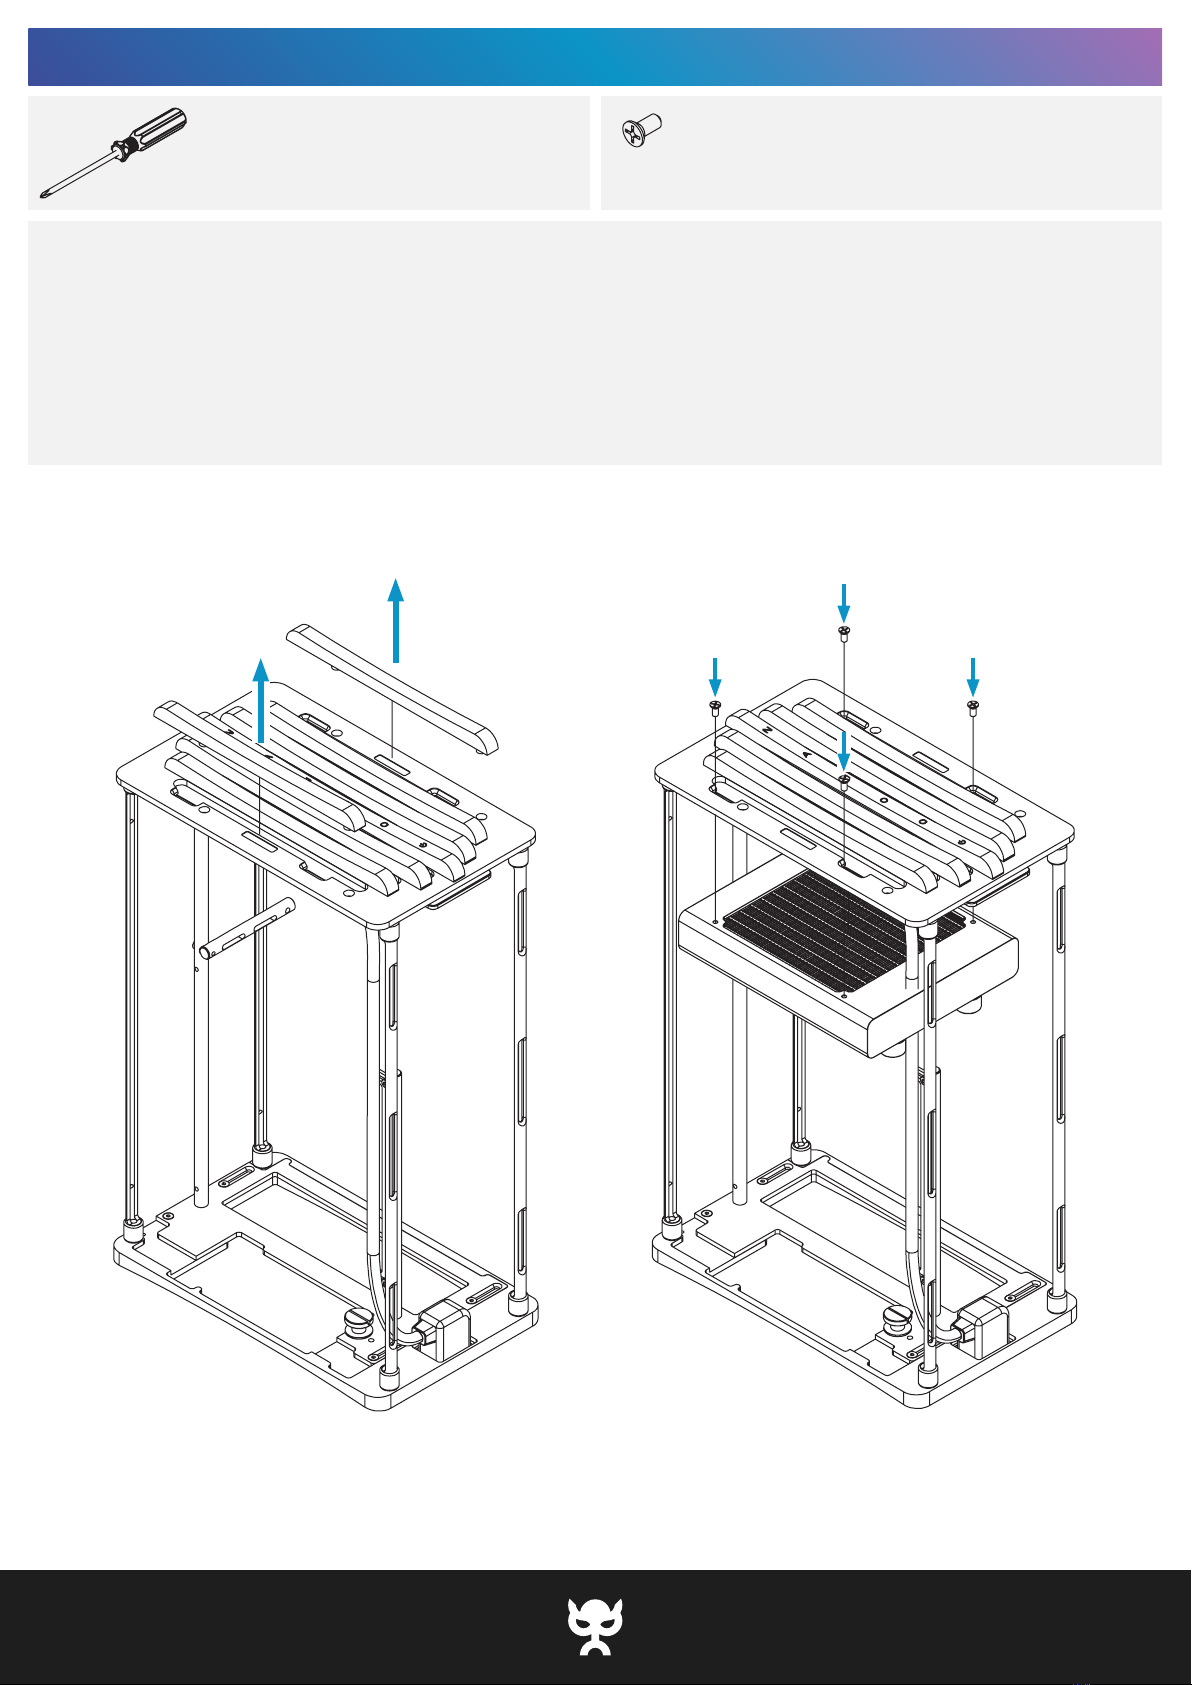
1. Remove both 4th columns
2. Secure the radiator with (4) #6-32x0.3125in countersunk screws. NOTE: Compatible with 120mm radiators (without fan).
3. Attach both 4th columns again. NOTE: Attaches magnetically.
INSTRUCTIONS
4x #6-32x0.3125in COUNTERSUNK SCREWS
•Phillips screw driver (size: PH1)
TOOLS
RADIATORS (TOP)
Table of contents


