Thoro-Matic ABS1500 Installation and operation manual

READTHISBOOK
This operator’s book has important information for the
useandsafe operation ofthismachine. Read this book
carefully before starting the machine. Keep this book
and tell all operators to read the book. If you do not
followthe instructions, you can causean injuryor dam-
ageequipment,furniture orbuildings.
For new books write to:
Thoro-Matic
2259SouthSheridanRoad
Muskegon,MI 49442
Carefullyinspect all componentsto ensurethatthere is
no concealed freight damage. If such damage is dis-
covered,file a “CONCEALEDDAMAGE REPORT”im-
mediatelywiththe deliveringcarrier.
The contents of this manual are based on the latest
productinformation available atthe time ofpublication.
Thoro-Maticreserves theright tomake changesor im-
provements to its machines without notice.
FORYOURCONVENIENCE,RECORDTHE
FOLLOWINGIMPORTANTINFORMATION:
MODEL_______________________________
SERIALNUMBER______________________
PARTNUMBER_________________________
DATEPURCHASED____________________
OPERATING & MAINTENANCE
INTRODUCTION INSTRUCTIONS
UHS BURNISHER
ABS1500 1500RPM

IMPORTANTSAFETYINSTRUCTIONS
To assure thesafe operationof this machine,you mustread andunderstandallwarnings andinstructions in thisbook.
Ifyou donot understand,askyour supervisor.
READ ALL INSTRUCTIONS BEFORE USING THIS MACHINE
WARNING: To reduce the risk of fire, electric shock, or injury:
1. You must be trained to operate this machine. This machine is to be operated for its intended use only.
2. Do not operate this machine unless it is completely assembled.
3. Always use a three-wire electrical system connected to the electrical ground. For maximum protection against
electricalshock, usea circuitthat isprotected bya groundfault circuitinterrupter. Consultyour electricalcontrac-
tor.
4. To prevent electric shock, always remove the electrical plug from the electrical outlet before doing any repairs or
maintenanceandwhen leaving themachineunattended.
5. To preventelectric shock, keepthe machine surfacedry. Donot subjecttorain. Store themachine inadry building
area. Clean the machine with a dry cloth only.
6. Machines can cause an explosion when near flammable materials and vapors. Do not use this machine with or
near fuels, grain dust, solvents, thinners, or other flammable materials. Do not use flammables to clean this
machine.
7. Aqualifiedor authorizedperson must domaintenance andrepairs.
8. Topreventdamagetothepowercord,donotmovethismachineoverthepowercord. Alwaysliftthepowercordover
themachine. Donot pullorcarry cord, usecord as ahandle, close adooron cord,orpull cordaroundsharp edges
orcorners. Keep cordaway from heated surfaces.
9. Do notusewith damaged cordor plug. If themachineis notworkingas it should,has been dropped,damaged,left
outdoors,ordropped intowater, return it toa servicecenter.
This machine must be grounded. If it should malfunction or break
down, grounding provides a path of least resistance for electric
currenttoreducetheriskofelectricshock. Thismachineisequipped
with a cord having an equipment-grounding conductor and ground-
ing plug. The plug must be inserted into an appropriate outlet that
is properly installed and grounded in accordance with all local
codes and ordinances.
WARNING - Improper connection of the equipment-grounding con-
ductor can result in a risk of electric shock. Check with a qualified
electrician or service person if you are in doubt as to whether the
outlet is properly grounded. Do not modify the plug provided with
the machine - if it will not fit the outlet, have a proper outlet installed
by a qualified electrician.
This machine is for use on a nominal 120-volt circuit, and has a
grounded plug that looks like the plug illustrated in figure A. A
temporary adapter that looks like the adapter illustrated in figures B
and C may be used to connect this plug to a 2-pole receptacle as
shown in figure B if a properly grounded outlet is not available.
The temporary adapter should be used only until a properly
grounded outlet (figure A) can be installed by a qualified electri-
cian. The green colored rigid ear, lug, or the like extending from the
adapter must be connected to a permanent ground such as a
properly grounded outlet box cover. Whenever the adapter is
used, it must be held in place by a metal screw.
NOTE: In Canada, the use of a temporary adapter is not permitted
by the Canadian Electrical Code
EXTENSIONCORDS
Use only three-wire 12/3 or larger gauge approved extension
cords that have three-prong grounding type plugs and three-pole
receptacles that accept the appliance’s plug. Replace or repair
any damaged cords or plugs.
When servicing, refer to authorized person only. Use only identi-
cal replacement parts.
GroundingInstructions
NOTE: Do not use adapters shown in figures B & C in Canada
2

WARNING! For the safe operation of this machine
follow the instructions given in this booklet and
the training given by your supervisor. Failure to
do so can result in personal injury and/or damage
to machine and property!
DONOTOPERATE MACHINE INANEXPLOSIVE EN-
VIRONMENT!
Themodelsshowninthis manual areintendedforcom-
mercial use.
PREPARATION
Topreparethemachine foroperation,make sureitis of
correct voltage and properly assembled. If in doubt,
askyoursupervisor.
Your new floor machine operates in a straight-line for-
wardmotion,rather than thenormalside tosidemotion
ofa conventional singledisc machine. Beprepared by
having your floor area cleared and ready for the fast
actionof a burnisher.
Preparethefloorareabysweeping,dusting or mopping
as needed. Check the proper application recommen-
dationsandproceduresfoundon the labelofyourfinish
container. IFIN DOUBT,CALLYOUR SUPERVISOR.
WARNING! NEVERUSETHISMACHINEWITHFLAM-
MABLEOREXPLOSIVE MATERIAL!
For Burnishing: Select the correct clean floor pad
(yoursuppliercanhelpyou).The lighter color floorpads
(bufforwhite) arenormallyused fortheburnishing pro-
cedure.
NEVER OPERATE THE MACHINE WITHOUT THE
FLOORPADINSTALLED!
It is very important to select clean, dry pads of uniform
thickness. Pads with high or low sections, or hard or
soft spots are unacceptable. Pads of open weave are
recommended;because closeweaves tend to load up
fast, bog down the machines, cause circuits to over-
loadand generally givepoor results.
Unplugthemachinefromthe wall outletandthentipthe
machine back to expose the pad driver. Remove the
padcenter lock ring. Carefullycenter the padonto the
pad driver and secure with the locking ring. Check for
level,centering and flatness.
OPERATION
Set the machine upright onto the pad. Plug the
machine’spower cableinto aproperly grounded outlet
(see Safety Instructions). Next, release the handle by
unlockingthe knob and allow thehandle tolower into a
comfortable position. THEN ALWAYS SECURE THE
HANDLELOCKINGKNOB. Thiswillallowthe operator
to easily control the pad pressure.
Depressthe handleslightly to elevate the padfrom the
floor. This is toavoid burning theflooron initialstartup,
before the operator is ready to move forward. Pull out
on the “Watch Dog” Safety Lock button and start the
machine by depressing either the left or right switch
levers.
Whenyou’rereadyto move forward, lowerthemachine
headandpadtothefloorandproceedforwardinastraight
line, at a steady pace.
MAINTENANCE
AFTER EACH USE: Store the machine in a clean dry
area. Wipe the entire machine and cord down with a
cleancloth.Removethepadandcleanthoroughly. Wrap
the machine’s electrical cord onto the handles and the
cordhookprovided.CHECKthecordandplugfornicks,
cuts or damage. Report these to your supervisor for
correction.
WARNING! Always disconnect the machine’s elec-
trical plug from the electrical outlet before per-
forming any service, maintenance, pad changing
or inspection of the machine.
MOTOR: The motor is lubricated for life under normal
use. Nooilingorgreasingis necessary. However,if the
machine is used in dusty areas the motor should be
cleaned.Blowing themotor outwith compressedair or
withthe exhaust froma vacuum issuggested. Keeping
the motor clean will allow the clear passage of air for
ventilationandpreventoverheating.
BELT TENSION: Proper belt tension is important for
smooth operation and belt life. Check the belt tension
andhave nomore thana 1/8-inchdeflection. If adjust-
ment is needed, loosen the four (4) motor mounting
bolts. Then move the motor and retighten the four (4)
motormounting bolts.
CARBON BRUSH INSPECTION: Long life3000-hour
carbonbrushesareinstalledinthemotor. Themachine
isalsoequippedwithacarbonbrushwearindicatorlight
tosignal whena carbonbrush changeis required.
OPERATINGPROCEDURES
3

4
515904 - Pad Assembly, Flex Drive
ABS1500 1500RPM BURNISHER

5
ABS1500 1500RPM BURNISHER
PARTS LISTS
ITEM PART NO. DESCRIPTION QTY. ITEM PART NO. DESCRIPTION QTY.
1 W323D Screw, 6-32x1 Pan Hd. 2 50 502319 Cover-Bearing, Plastic 1
2 980016 Washer, #6 Ext. Tooth 2 51 502481 Collar, Upper Shaft 1
3 500801 Bracket, Switch Mounting 1 52 507780 Drive Shaft 1
4 911135 Switch 1 53 920002 Nut, 3/8-16 Hex 4
5 508301 Spring 1 54 980009 Washer, 3/8 Lock 4
6 507001 Plunger 1 55 501380 Block, Bearing 2
7 500802 Bracket, Switch 1 56 962026 Screw, 8-32 x 1/2 Type F 3
8 962002 Screw, 10-32 x 1/2 Oval Hd. 2 57 487202 Retainer, Axle 1
9 504810 Interlock Asm.-Switch 1 58 505181 Light,Brush Wear Indicator,115V 1
10 962011 Screw, 10-32 x 3/4 Oval Hd. 2 505182 Light,Brush Wear Indicator,230V
11 486404C Switch Cover Plate 1 59 502396 Cover, Motor DC IMP 1
12 509821 Washer, Rubber 2 60 962036 Screw, 1/4-20 x 1 FHP 6
13 920005 Nut, 3/8-24 Hex 1 61 see page 7 Motor, 1.5 HP 115V DC 1
14 508020 Switch Assembly (or 505003) 1 62 509780 Wheel, 1/2 x 4" Grey 2
15 505121 Lever, Switch Left 1 63 507781 Wheel Axle 2
16 505120 Lever, Switch Right 1 64 980005 Washer, Wave 8
17 920001 Nut, 10-32 Elastic Stop 1 65 509820 Washer, Fiber 12
18 509830 Washer, Handle Tube 1 66 507320 Snap Ring 1/2 Shaft 4
19 503320 Flange, Strain Relief 1 67 509781 Wheel, 1/2 x 5" Grey 2
20 505720 Handle Nipple 2 68 508080 Bumper Strap 1
21 481304C Switch Housing,w/o Circuit Brkr. 1 69 962161 Screw, #10x3/4 PHP 2
22 515150 Warning Label 1 70 501286 Bumper, Base 1
23 501210 Bumper, Handle 1 71 962162 Screw, #10x1/2 FHP 3
24 962003 Screw, 10-32 x 3/4 Pan Hd. 1 72 502110 Bumper Clip 3
25 962006 Screw, 1/4-20 x 1/2 Pan Hd. 7 73 483214 Base 1
26 503711 Handle Grip, Grey 2 74 962018 Screw, 3/8-16 x 1-3/4 HH 4
501501 Cap, Protective End (Blue) 2 75 915001 Key 1
27 980015 Washer, #10 Shakeproof 2 76 980003 Washer, 3/8 Flat 9
28 508520 Strain Relief-Complete 1 77 980009 Washer, 3/8 Lock 4
502020 Strain Relief-Brass Clamp 1 78 962048 Screw, 3/8-16 x 1-1/4 HH 4
29 962015 Screw, 10-32 x 3/8 Pan Hd. 2 79 962016 Set Screw, 10-32 x 3/8 1
30 507481 Rod, Brace 1 80 506980 Pulley, Motor 1
31 980007 Washer, 5/16 Flat 2 81 903005 Belt 1
32 509082 Handle Tube 1 82 506994 Pulley, Pad Driver 1
33 507310 Snap Ring 1 83 510202 Adaptor, Flex Drive 1
34 502422 Cord Asm.Yellow 1 84 515901 Pad - FlexDrive 1
35 502021 Clamp-Handle 1 85 515001 Kit-T-Nut & Screws (8 ea/pkg) 1
36 500880 Arm, Handle Support 2 86 503382 Flange, Flex Pad Driver 1
37 962009 Bolt, Carriage 5/16-18 x 2-1/2 1 87 980006 Washer, 5/16 Lock 1
39 505010 Turn Knob 1 88 962014 Bolt, 5/16-18 x 3/4 Allen 1
41 908004 Handle Cord 1 89 504471 Pad Holder Asm. 1
42 509920C Yoke, Handle 1 90 962076 Screw #8 x 5/8 PHP Wood 3
43 962005 Screw, 1/4-20 x 3/8 Allen 1 91 486602 Plate, Stiffener 1
44 504702 Insulator, Switch 1
45 504420 Cord Hook 1
46 980018 Washer, #10 Countersunk 1 485106 Handle Warning 1
47 507480 Shaft, Handle Yoke 1 506318 Interlock 1
48 962073 Screw, 1/4-20x5/8 Set 2 506340 Brush Indicator 1
49 962161 Screw, #10x3/4 PHP 3 515150 Warning 1
Labels Not Shown:
6
505286 MOTOR PARTS LIST
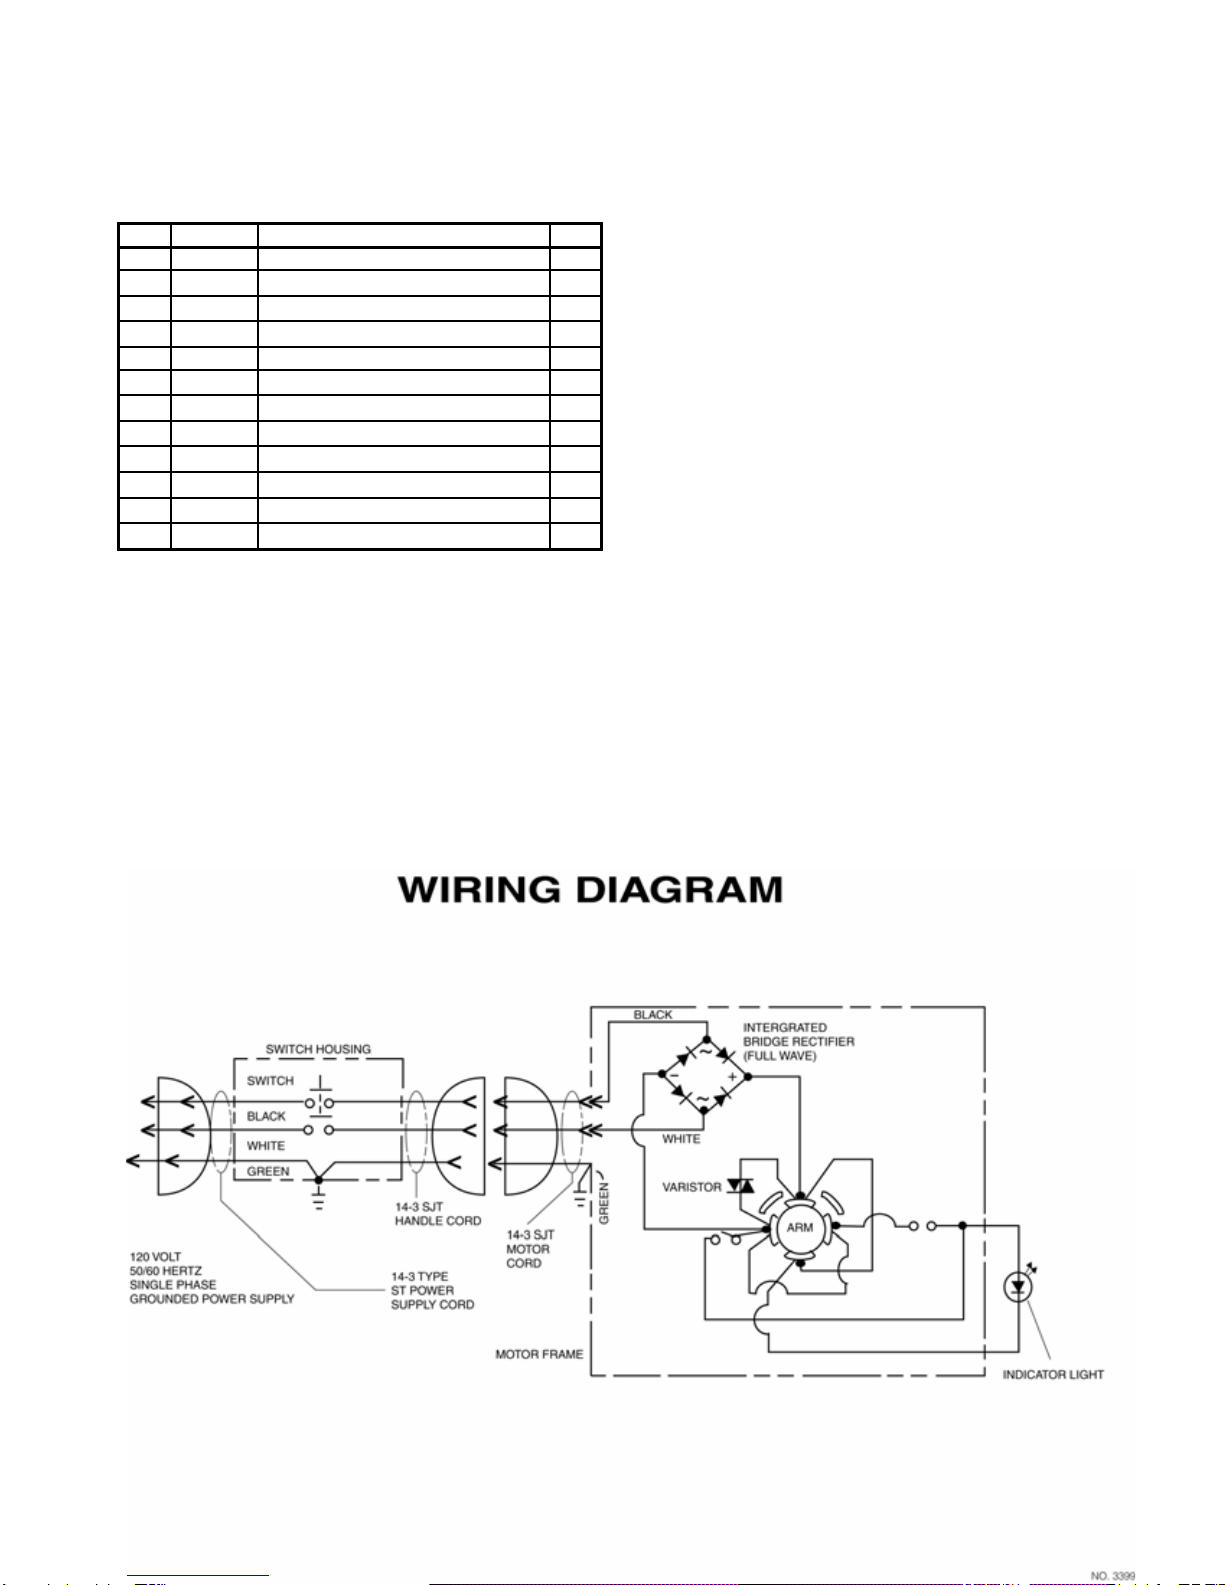
WIRINGDIAGRAM
ITEM PART NO. DESCRIPTION QTY.
505286 Motor 115V, 1.5HP 1
A 502919 End Bell - Motor LOWER 1
B 500417 Armature Asm.w/Bearings,115V 1
902012 Bearing, Motor Lower 1
C 503117 Field & Shell Assembly 1
D 902003 Bearing, Motor Top 1
E 500903 Carbon Brush, Motor 115V 4
F 507322 Brush Ring Asm. Complete 1
G 502920 End Bell - Motor TOP 1
I 960018 Bolt, Motor Thru 4
J 911048 Rectifier, 115V 50/60C 1
K 908024 Cord Assembly, Motor 1

7
NOTES

WARRANTY POLICY
LIMITED WARRANTY
TheThoro-MaticABS1500Burnisherhas beenmanufactured, tested andinspected in accordancewith specificengi-
neeringrequirements andis WARRANTEDto be free from defects in workmanship and materialsas follows:
Eighteen (18) months parts, One (1) year labor - DC Motors (except motor switches, rectifiers, carbon brushes and
varsitors)
One (1) year parts and labor –All other components unless excluded below.
Thiswarrantyextends totheoriginal user/purchaser andonlywhen used,operatedand maintained inaccordance with
Thoro-Matic Operatingand Maintenance instructions.
This warranty does not apply to the following wear parts and accessories of the machine including:
PartNumber
502422
509780
509781
503711
501286
903005
500903
Nor does it apply to damage or failure caused by improper use, abuse or neglect. Warranty credit or replacement of
return parts including motors, etc., is subject to incoming inspection of those items.
To secure repairunderthis warranty,the followingprocedure should be taken:
· Theinoperative machineor warrantedparts mustbe delivered to the authorized service center with shipping and
deliverycharges prepaid. Ifunableto locatea servicecenter, youmay contactThoro-Matic atthe addresslisted
herein for the location of the nearest repair center or agent or for other instructions pertaining to your warranty
difficulty.
· Upon compliance with the above warranty procedure, all warranted repairs would be completed at no additional
charge or cost to the user.
· OnlyThoro-Matic or itsauthorized dealers and agents may make no charge warranty repairson thisproduct. All
others do so at their own risk.
Thiswarranty limits Thoro-Matic liability to therepair ofthe productand/or warranted partsreplacement anddoes not
includeincidental or consequentialdamages arisingfrom theuse of aThoro-Matic machine whetherdefective or not.
This warranty is in lieu of all other expressed or implied warranties and is extended to the original purchaser/user.
PartName
CordAssembly
Wheel,4”
Wheel,5”
HandleGrip,Grey
BumperBase
Belt
CarbonBrush, 115V Motor
2259 South Sheridan Road Muskegon, MI 49442
800-968-1332 • Fax 800-863-9536
Table of contents
Popular Floor Machine manuals by other brands

Kärcher
Kärcher BR 30/4 C Adv user manual

Sioux Tools
Sioux Tools DAAY POWER SWEEP owner's manual

Koblenz
Koblenz TP-2015 Operating and service instructions

U.S. Products
U.S. Products King Cobra KC-500 Information and operating instructions

Wacker Neuson
Wacker Neuson Trowel CT 24-4A Operator's manual

Wetrok
Wetrok Duomatic Intense operating instructions


Windsor
Windsor SCE264 operating instructions

PowerBoss
PowerBoss Admiral 48D instruction manual

Ghibli & Wirbel
Ghibli & Wirbel FR 30 SM 45 BC TOUCH Use and maintenance

Ice
Ice i36BT Operator's & parts manual

American-Lincoln
American-Lincoln MPV 60 Operator's manual

Blastrac
Blastrac BMS-280LP operating manual