Thought Technology MYONYX Use and care manual


Myonyx Firmware Update Instructions 2 | P a g e
Thought Technology Ltd.
5250 Ferrier, Suite 812,
Montréal, Quebec
H4P 1L3 Canada
+1 (514) 489-8251
mail@thoughttechnology.com
Product Name
MyOnyx System
Device Name
MyOnyx
SA9020
Manual Number/ Revision
Myonyx Firmware Update Instructions
SA9037 (August 2022)
© Thought Technology Ltd. 2022

Myonyx Firmware Update Instructions 3 | P a g e
Contents
Introduction.......................................................................................................................... 4
Preparation........................................................................................................................... 4
How to Update your Myonyx Device...................................................................................... 4
Bluetooth pairing your device to your pc............................................................................ 4
Step 1: Put your device in pairing mode...............................................................................................4
Step 2: Pairing your device with your Windows PC..............................................................................5
Running the Update application......................................................................................... 9
Step 1: Open the Myonyx Update Installer on your PC........................................................................9
Step 2: Choose your Myonyx Device...................................................................................................10
Step 3: Update your firmware ............................................................................................................11
Step 4: Check your Myonyx device About Device Screen...................................................................12
Step 5: Apply the new device label.....................................................................................................12
Step 6: Take a picture & send it to us .................................................................................................13
How to Update your Myonyx Mobile App............................................................................ 13
Automatic Updates .......................................................................................................... 13
Manual Updates .............................................................................................................. 13
Verifying the App Update................................................................................................. 14
Help & Support.................................................................................................................... 14

Myonyx Firmware Update Instructions 4 | P a g e
Introduction
This quick manual is to help the user to upgrade their SA9000 device to SA9020 with version 1.26.0.0 of
firmware. This will enable TENS (Transcutaneous electrical nerve stimulation) and MET (Micro-current
Electrostimulation Therapy) functions of your MyOnyx device.
Preparation
Before you start updating, please make sure these items are ready:
•MyOnyx device and its power adapter (charger).
•The USB key with firmware updater (installer) in it.
•A Windows 10 or 11 PC with Bluetooth function.
•Your Android device is powered on and connected to the internet
How to Update your Myonyx Device
Bluetooth pairing your device to your pc
To update the firmware, MyOnyx device should be paired to a Windows PC first. Windows 10 or 11 PC is
recommended. (There is slight difference between Windows 10 and 11 for Bluetooth pairing)
Please skip this section and go to Running the Update Application on page 9 if your MyOnyx is already
connected with PC over Bluetooth.
Step 1: Put your device in pairing mode
•In the home screen, select SETTING and
press OK
•Step 2: Select BLUETOOTH PARING and
Press OK

Myonyx Firmware Update Instructions 5 | P a g e
•The Bluetooth screen and Bluetooth Name will
be shown. Now the device is waiting for the PC
to connect.
5
Step 2: Pairing your device with your Windows PC
•In the Windows 10 PC, 'Right click' on the Start button (lower left side) and click on the Settings
item, then click on the Devices icon in the settings window, the Bluetooth & other Devices
window will be shown, select Add Bluetooth or other Devices.
•In the Windows 11 PC, ‘Right Click’ on the Start button, choosing Settings, then click on
Bluetooth & Devices in the settings window. Select Add Device from the top of your screen.

Myonyx Firmware Update Instructions 6 | P a g e
•In the Add a device window click on Bluetooth.
•After several seconds of searching, the MyOnyx device with its Serials Number will be shown.

Myonyx Firmware Update Instructions 7 | P a g e
•Select your MyOnyx device in the list, PINs are displayed on both the MyOnyx device screen and
the PC. Make sure the two PINs are the same. Click on Connect on the PC and Press OK on the
device.
Myonyx Firmware Update Instructions 8 | P a g e
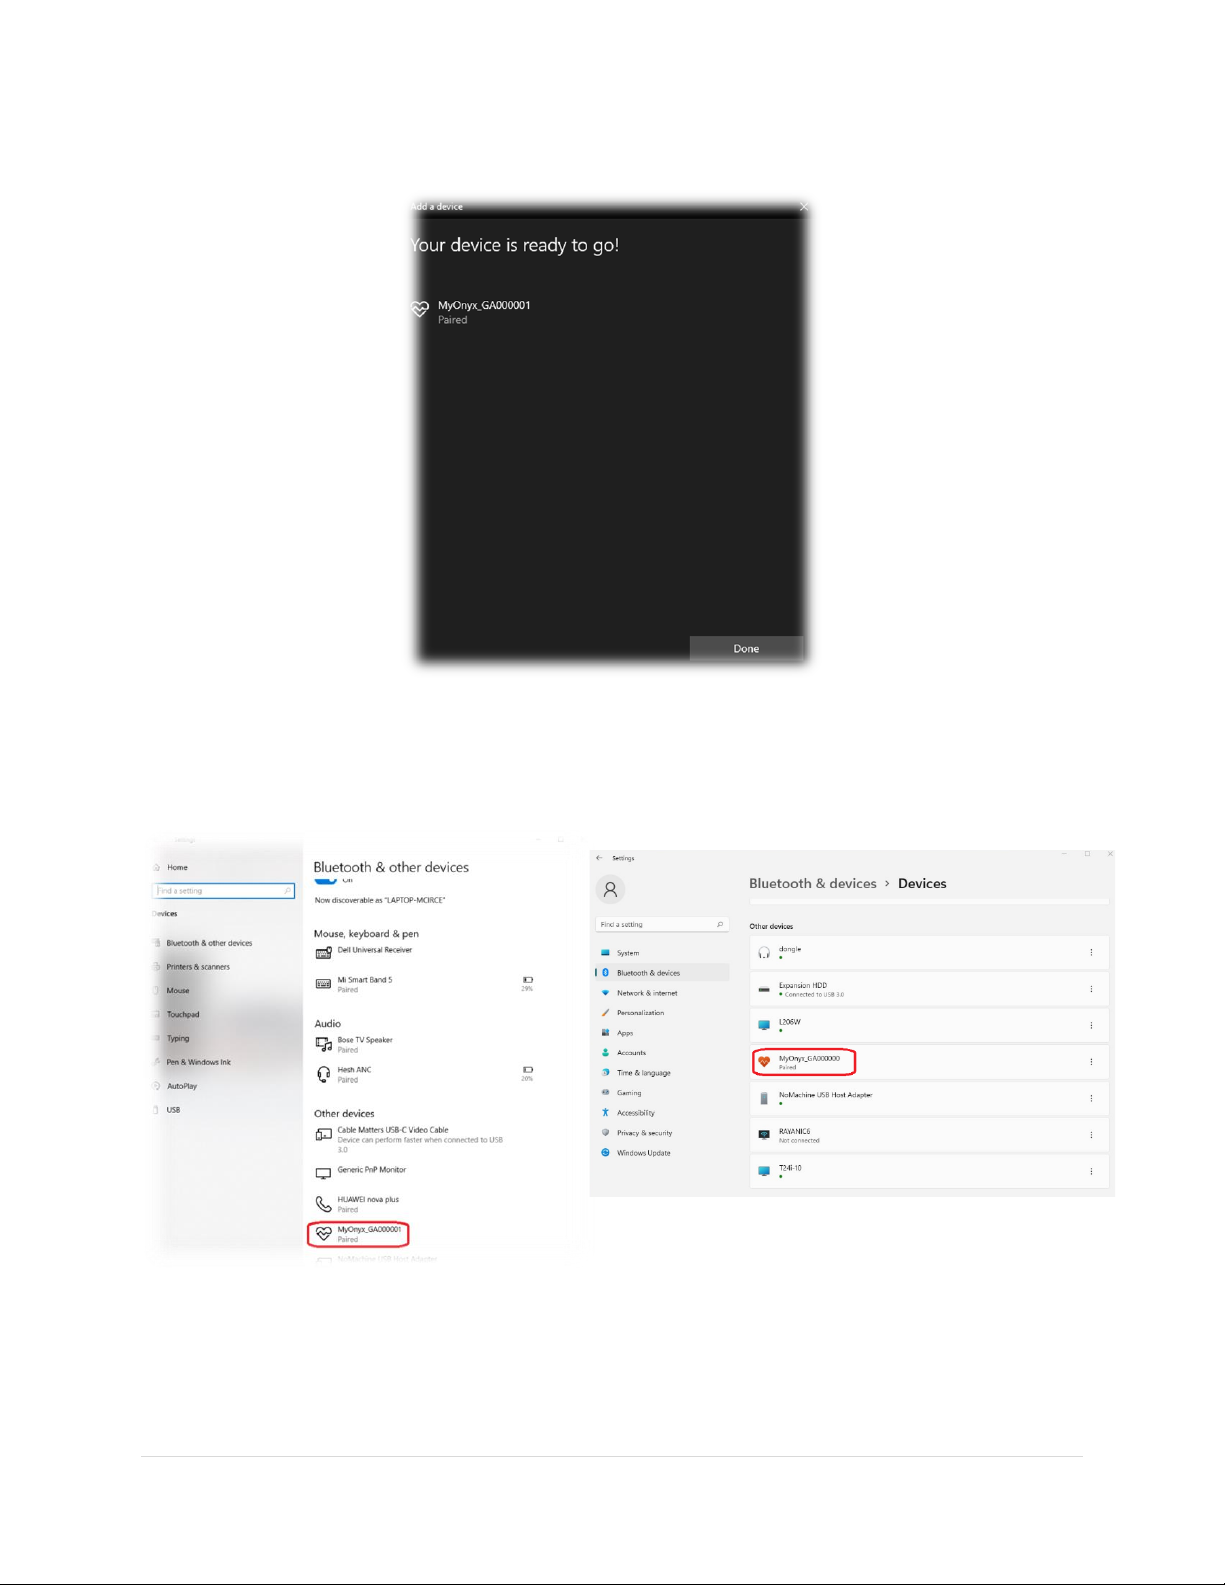
•Your device is now paired.
•You can also see the device in Other devices list on Windows 10.
Figure 1: Your device will be on the "Other Devices" list (Windows 10 on the left, and Windows 11 on the right)

Myonyx Firmware Update Instructions 9 | P a g e
Running the Update application
Please check battery level of your MyOnyx device:
•The battery level should be higher than 50%
•We highly recommend you connect power adapter (charger) to MyOnyx and keep it connected
until the end of the update process.
•Please do not turn off the device during update. If for some reason the device is turned off it is
still safe to turn it on and retry the update process.
Now your MyOnyx device is ready for update.
Step 1: Open the Myonyx Update Installer on your PC
•Plug the USB key to your PC, go to the updater folder, double click on the executable file:
Myonyx-Updater-v1.26.0.0-PatchDeviceInfo.exe
(Please keep AMI.dll in the same folder of the .exe file)
Myonyx Firmware Update Instructions 10 | P a g e
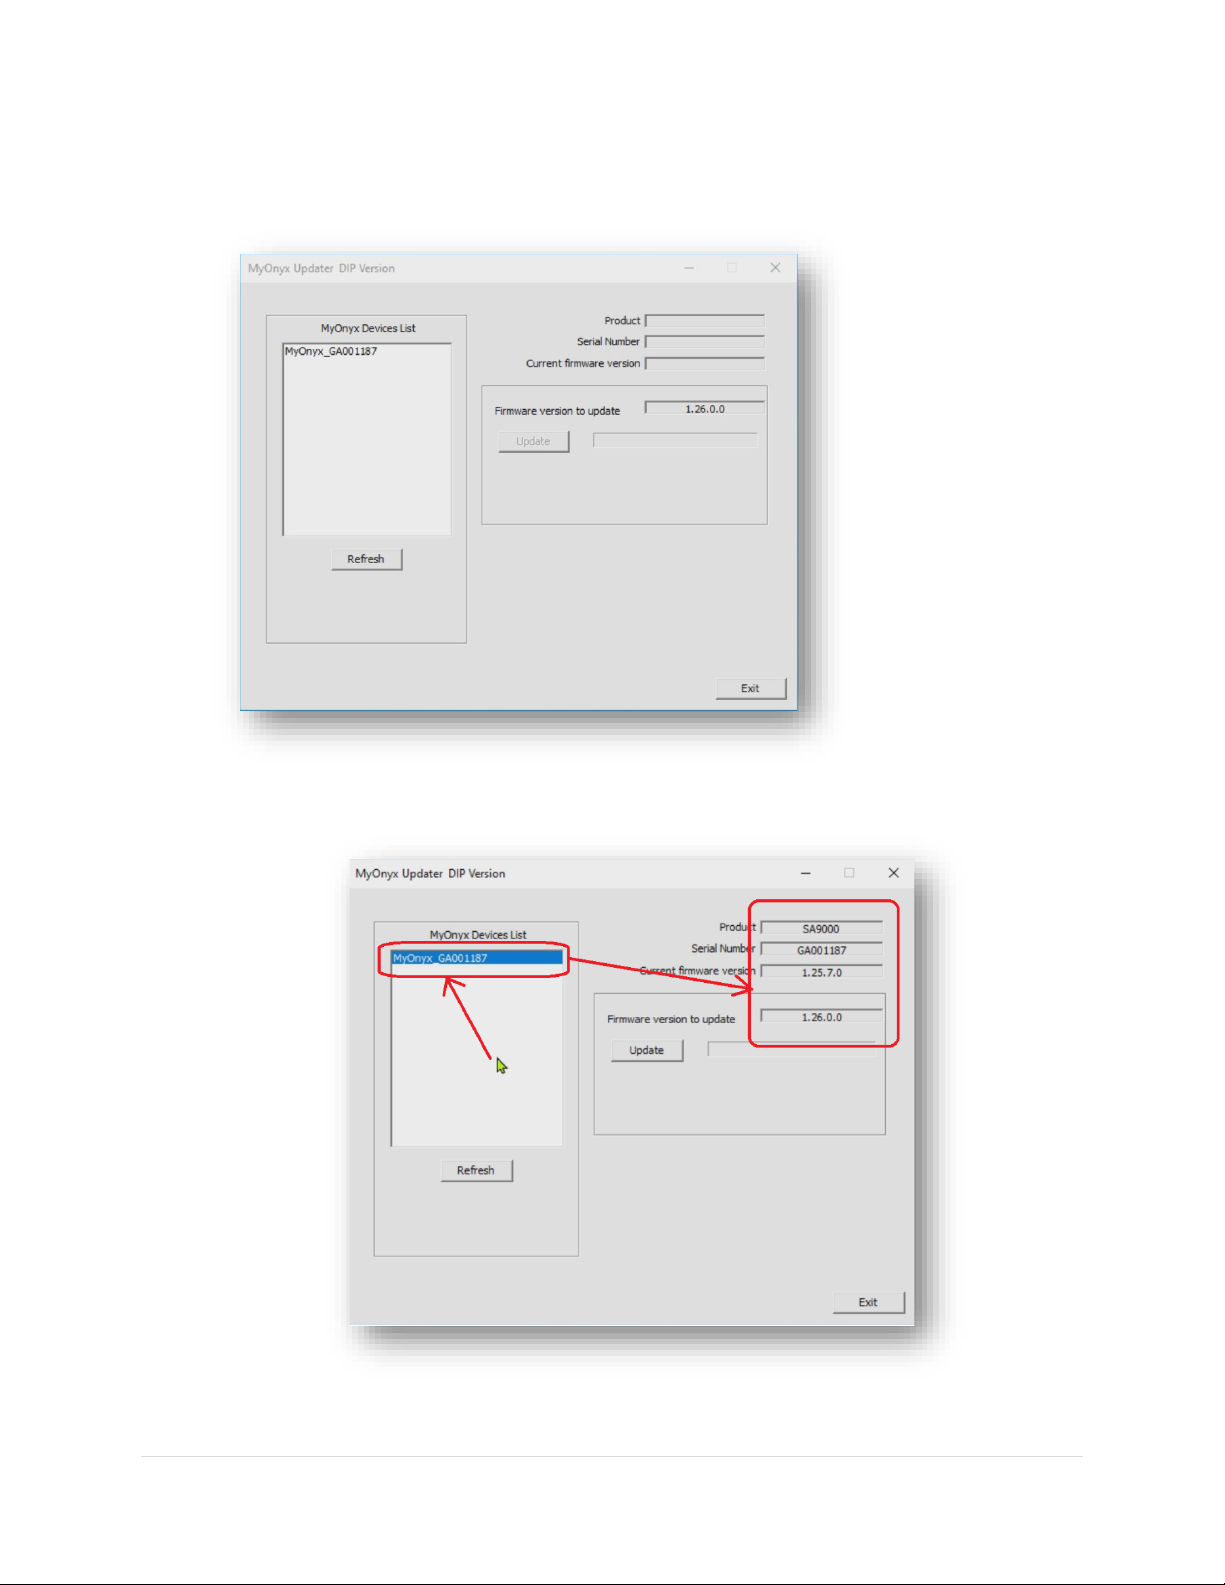
Step 2: Choose your Myonyx Device
•The updater application will list all paired MyOnyx devices, select your device which can be
identified by the serial number
•After several seconds, the application will show the device and current firmware information.
Myonyx Firmware Update Instructions 11 | P a g e
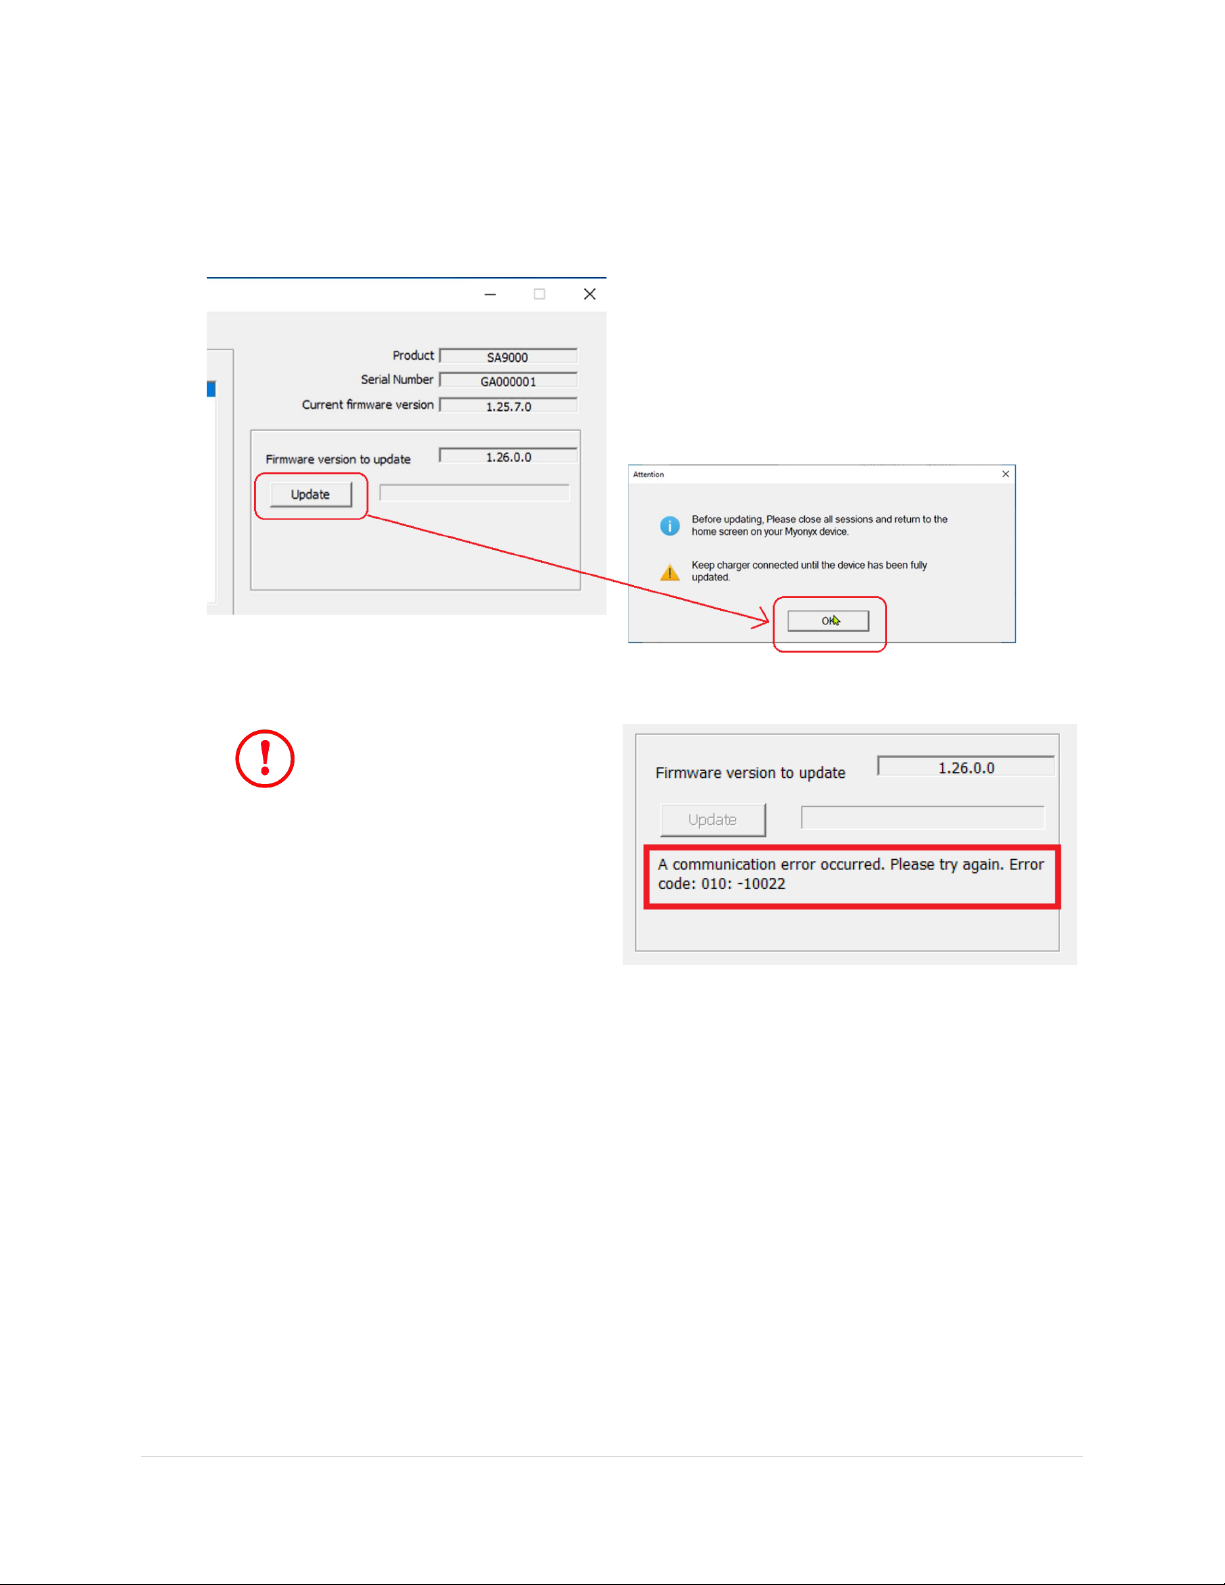
Step 3: Update your firmware
•Click on Update. You will get a popup with information about going back to the home screen on
the MyOnyx device and keeping the power adapter (charger) connected. Click OK on the
message and the update will start. Your device will restart multiple times during the upgrade.
If there is any error happen
during updating, the updating
process will be stopped and an
error message will be shown. In this case,
please close the updater application, then
reopen it and try again.

Myonyx Firmware Update Instructions 12 | P a g e
•You will see a message confirmation in green that the device successfully updated.
Step 4: Check your Myonyx device About Device
Screen
•Check the device information in the ABOUT
DEVICE of MyOnyx. You should see the product
number is SA9020 and the firmware version is
1.26.0.0.
Step 5: Apply the new device label
•Be sure to apply the new label that you received
in your upgrade package to the back of your Myonyx device. You can place it over the old label.

Myonyx Firmware Update Instructions 13 | P a g e
`
Step 6: Take a picture & send it to us
•Please take a photo of the new label on the device,, and of your about screen, and email both
pictures to us at support@thoughttechnology.com.
How to Update your Myonyx Mobile App
Automatic Update
Updating your Myonyx Mobile App will install new functionalities such as MET and TENS
electrostimulation programs. Updates are usually done automatically, and requires no steps for you to
take.
Manual Update
If you have turned off automatic updates, you will have to manually update the app.
Step 1: Open the Google Play Store on your device
Step 2: Click on your icon in the top righthand corner
Step 3: Choose Manage Apps and device
Step 4: Select the Manage tab along the top
Step 5: Select Updates Available
Step 6: Scroll until you see Myonyx Mobile App, and press on the icon
Step 7: Press the Update button
Play Store Link
For a manual update, you can also:
•Follow this link
•Scan the QR code
•Search for Myonyx in the Google Play Store

Myonyx Firmware Update Instructions 14 | P a g e
Verifying the App Update
To be sure you are on the correct version of the Myonyx Mobile App, please visit the about screen:
Step 1: Open the Myonyx Mobile App
Step 2: Click the Settings Icon in the top right corner of your screen
Step 3: Click About
If you are on the correct version, the REF number will be SA9030
Help & Support
If you are having any trouble updating either the app or your device, our support team is happy to help
you. Please contact them at support@thoughttechnology.com, or at 1-800-361-3651 extension 167.
Appendix A: TENS and MET Program Configuration & Specifications
The following section is an excerpt taken from the most recent update to the Myonyx Hardware User
Manual, specifically addressing TENS and MET:
Transcutaneous Electrical Nerve Stimulation (TENS) Programs
TENS is designed to stimulate the nervous system with little or no motor contraction.
There are two TENS programs: Chronic Pain and Acute Pain. The delivery type for both is
continuous. This means that ES is delivered throughout the session with no rest phase. For the
chronic pain program, ES is delivered in a burst pattern at two bursts per second. The pattern
for the acute pain program is called Frequency Modulated. The pulse rate and width increase
and decrease following a predefined pattern. The parameters for these programs are listed in
the following table: Program
Pattern
Total
Time
(sec)
Cycles
STIM
time
(sec)
Rest
time
(sec)
Ramp-
up (sec)
Ramp-
down
(sec)
Pulse
Rate
(Hz)
Pulse
Width
(μs)
Acute
Pain
Modulated
1800
1
1800
0
0
0
100
150
Chronic
Pain
Burst
1200
1
1200
0
0
0
100
200
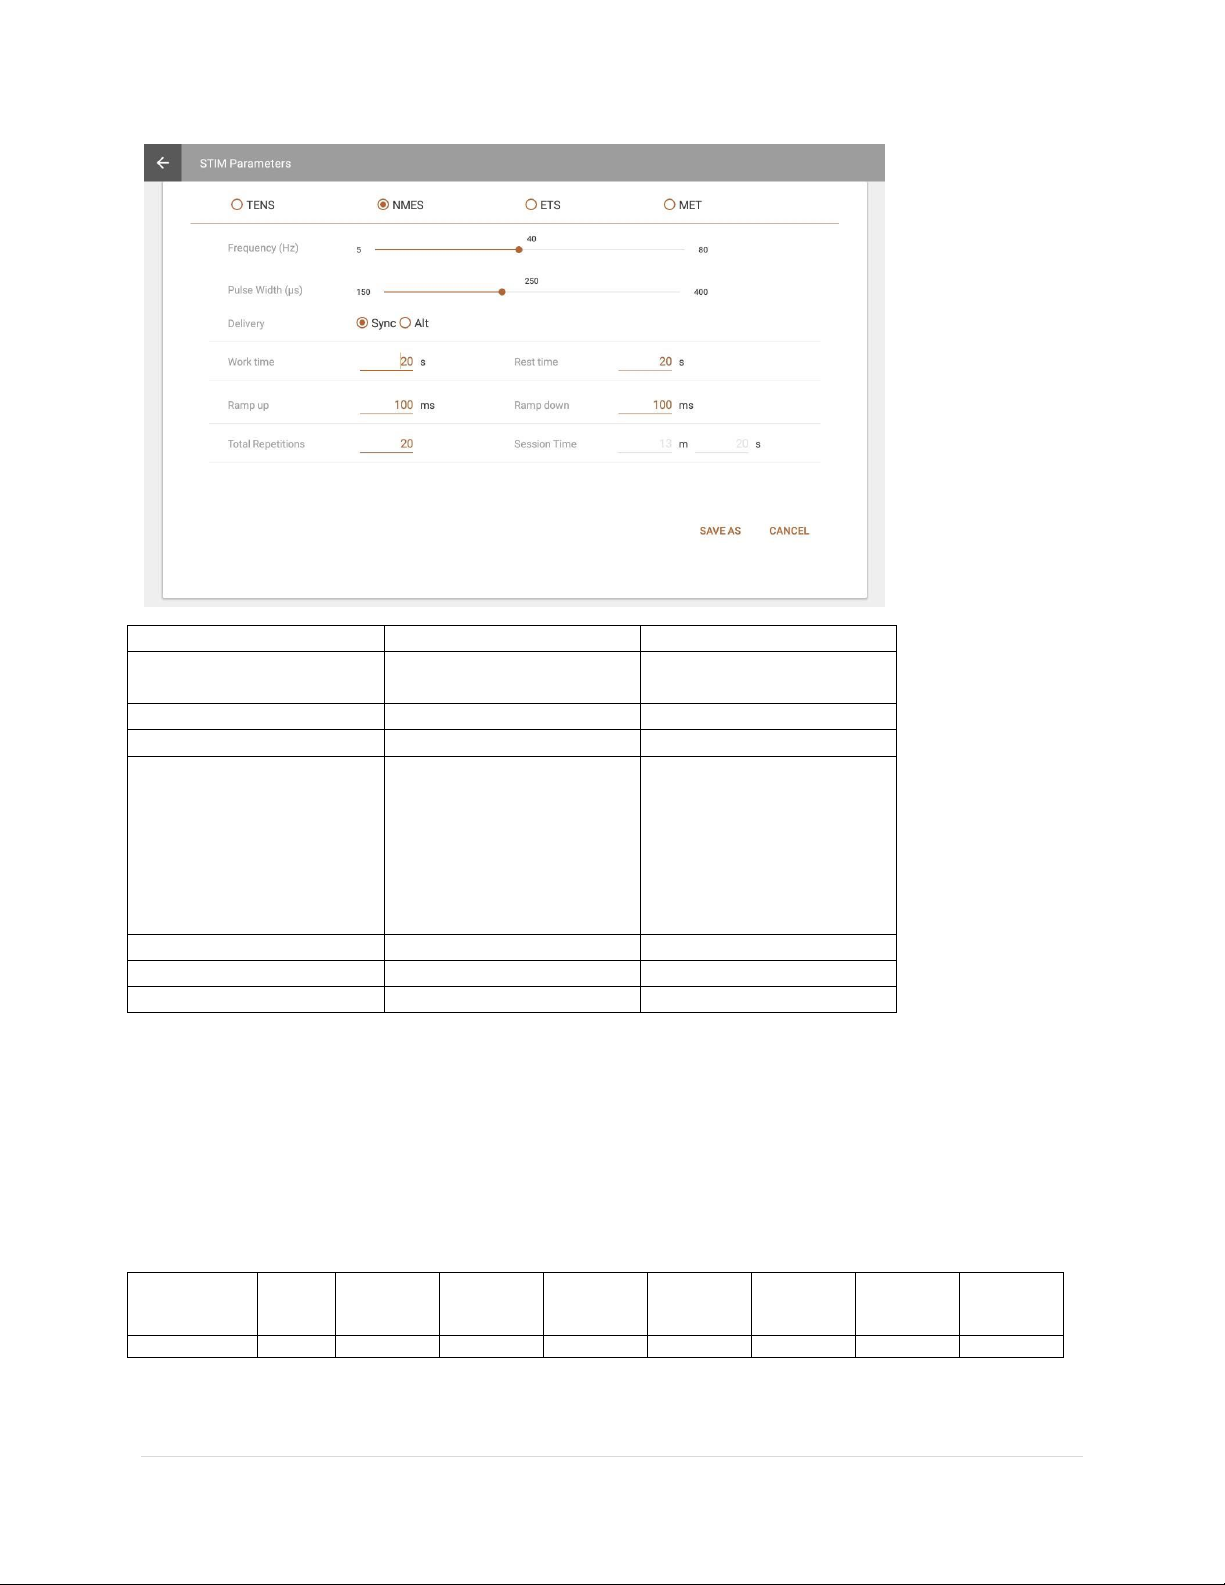
Modifying a TENS Program
You can make changes to the following fields, by overwriting the values in the text fields or
moving the sliders left or right:
Myonyx Firmware Update Instructions 15 | P a g e
Parameter
Value range
Default value
Frequency (Pulse
Rate)
[2 –150 Hz]
80 Hz
Pulse Width
[50 –250 μs]
150 μs
Delivery
Continuous (Fixed)
Continuous
Pattern
Burst
Continuous
Frequency Modulation
Low Freq. + Amp.
Modulation
High Freq. + Amp.
Modulation
Burst
Ramp Up
[0 –10000 ms]
0 ms
Ramp Down
[0 –10000 ms]
0 ms
Session Time
[0, 7200s]
300s
Microcurrent Electrostimulation Therapy (MET) Program
MET, like TENS, is used for treating some forms of pain. The main difference is that it is applied
at much lower intensities. It is measured in microamps, rather than milliamps.
There is one MET program: Microcurrent. The delivery type is continuous. It is delivered at the
same amplitude throughout the program. The pattern is also continuous. There is no variation in
ES duration during the work phase.
The parameters for this program are listed in the following table:
Program
Total
Time
(sec)
Reps
STIM
time
(sec)
Rest time
(sec)
Ramp-up
(sec)
Ramp-
down
(sec)
Pulse
Rate (Hz)
Pulse
Width
(μs)
Microcurrent
900
1
900
0
0
0
0.5
500,000

Myonyx Firmware Update Instructions 16 | P a g e
Modifying the MET Program
You can make changes to the following fields, by overwriting the values in the text fields or moving the
sliders left or right:
Parameter
Value range
Default value
Session time
1-7200 s
300 s
Frequency (Pulse
Rate)
0.5 Hz (Fixed)
0.5 Hz
Pulse Width
500 ms (Fixed)
500 ms
Delivery
Continuous (Fixed)
Continuous
Pattern
Continuous (Fixed)
Continuous
Ramp Up
0 (Fixed)
0 ms
Ramp Down
0 (Fixed)
0 ms
Session time
1-7200 s
300 s
This manual suits for next models
2
Table of contents


