Thrax Audio ARES User manual

Ares
Modular Audiophile System
by Thrax Audio
Operating Manual
Manual issued 15/03/2018
CAUTION
THE UNIT CONTAINS NO USER SERVICEABLE PARTS. DO NOT REMOVE THE COVERS. LETHAL
VOLTAGES ARE PRESENT WITHIN THE CHASSIS.
NEVER OPERATE THE PREAMPLIFIER WITH THE CHASSIS COVERS REMOVED.
DO NOT OPERATE THE UNIT IF WET OR NEAR WATER.
THE PREAMPLIFIER IS FAIRLY HEAVY. BE SURE TO USE PROPER LIFTING TECHNIQUES TO AVOID
BACK STRAIN AND INJURY. BE CERTAIN TO INSTALL IT IN A SECURE LOCATION FROM WHICH
IT CAN NOT FALL OR TIP OVER.
TIME SPENT FAMILIARIZING YOURSELF WITH THIS MANUAL WILL BE WELL REWARDED.

1. Important Safety Instructions …………...................….................................... 3
2. Specifications ……........................................................................................… 4
3. Introduction ………........................................................................................… 5
4. Front Panel ……..............................................................................................… 6
5. Back Panel
- Inputs …..…...........................................................................................… 7
- Outputs ………......................................................................................… 7
- AC Fuse …….........................................................................................… 7
6. Unpacking and Installation
- Unpacking ……....................................................................................… 8
- Installation ……....................................................................................… 8
7. Operation ………...........................................................................................… 9
CONTENTS
2

READ ALL INSTRUCTIONS: All the safety and operating instructions of your Thrax Audio
equipment should be read before power is applied to the equipment.
RETAIN OWNER'S MANUAL: These safety and operating instructions should be retained
for future reference.
HEED WARNING: All warnings on the unit and in the operating instructions should be
adhered to.
FOLLOW INSTRUCTIONS: All operating and use instructions should be followed.
CLEANING: Unplug the unit from the wall outlet and leave for at least 30 min. - make sure
the unit is not hot before you start cleaning. Use dry or damp soft cloth to clean the
surfaces. Do not use corrosive, abrasive or spray for cleaning.
VENTILATION: Do not block any ventilation openings. Do not install near any heat sources
such as radiators, heat registers, stoves, or other apparatus (including amplifiers). The unit
should not be installed in a built-in location such as a bookcase or rack unless proper
ventilation is provided.
GROUNDING: Do not defeat the safety purpose of the grounding-type plug. A
grounding-type plug has two blades and a third grounding prong. The third prong is
provided for your safety. If the provided plug does not fit into your outlet, consult an
electrician for replacement of the obsolete outlet.
POWER CORD PROTECTION: Protect the power cord from being walked on or pinched
particularly at plugs, convenience receptacles and the point where they exit from the
apparatus.
LIGHTNING: Unplug this apparatus during lightning storms or when unused for long
periods of time.
SERVICING: Refer all servicing to qualified service personnel. Servicing is required when
the apparatus has been damaged in any way, such as if the power-supply cord or plug is
damaged, liquid has been spilled inside the appliance or it has been exposed to
moisture, the appliance does not operate normally, or has been dropped.
DO NOT OPEN THE CABINET: There are no user serviceable components inside this
product. Opening the cabinet may present a shock hazard, and any modification to the
product will void your warranty.
WARNING: To reduce the risk of fire or electric shock, do not expose this apparatus to rain
or moisture.
IMPORTANT SAFETY INSTRUCTIONS
3

4
SPECIFICATIONS
• Power supply: ………........……...............................................…...115 or 230 V
• Power output: ………...……...............................…….. 4 Ω - 160W / 8 Ω - 120W
• Gain: ………..,,,,,,.............................…….. 32 db (balanced & unbalanced)
• THD (Total Harmonic Distortion): ……….........................…….. < 0.03% @ 50W
• Power consumption: ………........…....................................................….. 30W
• Finish : ………..…….......................................…….. Silver anodized aluminium
• Dimensions: ………..…............….............................. 432W x 450D x 120H mm
• Weight: ………..…….......................................................................…….. 27 kg

ARES is a complete audiophile system bringing you a unique set of features &
components in a single box, all designed to work perfectly together for the cleanest
sound - in its most basic configuration ARES can be used as a power amplifier in an
existing system, and optionally as a phono preamp (MM & MC), a sophisticated DAC with
DSP functions, or a versatile Network Player.
Features
• 2x true mono Class A power amplifiers (4 Ω - 160W / 8 Ω - 120W)
• Phono preamp - supports both MM & MC cartridges
• Network Player accommodating all modern digital interfaces (AES, Spdif, Toslink, USB,
Network and Bluetooth)
• R2R multibit DAC
• Upsampler - increases the sampling rate of the signal to 32-bit / 352 kHz or 32-bit / 384
kHz
Clock / Jitter control - synchronizes incoming data with an internal clock reference
generator removing jitter
• Remote control
INTRODUCTION
5

On the from panel you will find 6 buttons:
ON/OFF Button
Switches the unit on and off.
Menu Button
Switch between the three Menu pages.
1. Balance control
2. Phase inverting - Remote control setup / Display brightness / Phono stage source
select - MC or MM
3. Digital filter - SD Slow / SD Sharp / Slow / Sharp / Bypass
Input Button
Toggle between input sources (RCA 1-3, XLR, RIAA, USB, COAX, OPT, AES, LAN, Bluetooth),
or switch back to the home screen if one of the menu pages is open.
Volume down Button
Turn the volume control down by one step / menu navigation.
Select Button
Select highlighted menu item / apply input selection.
Volume up
turn the volume control up by one step / menu navigation.
FRONT PANEL
6
On/Off
Button
Menu/Balance
Button
Select Input
Button
Volume Down
Button
Select/Mute
Button
Volume Up
Button
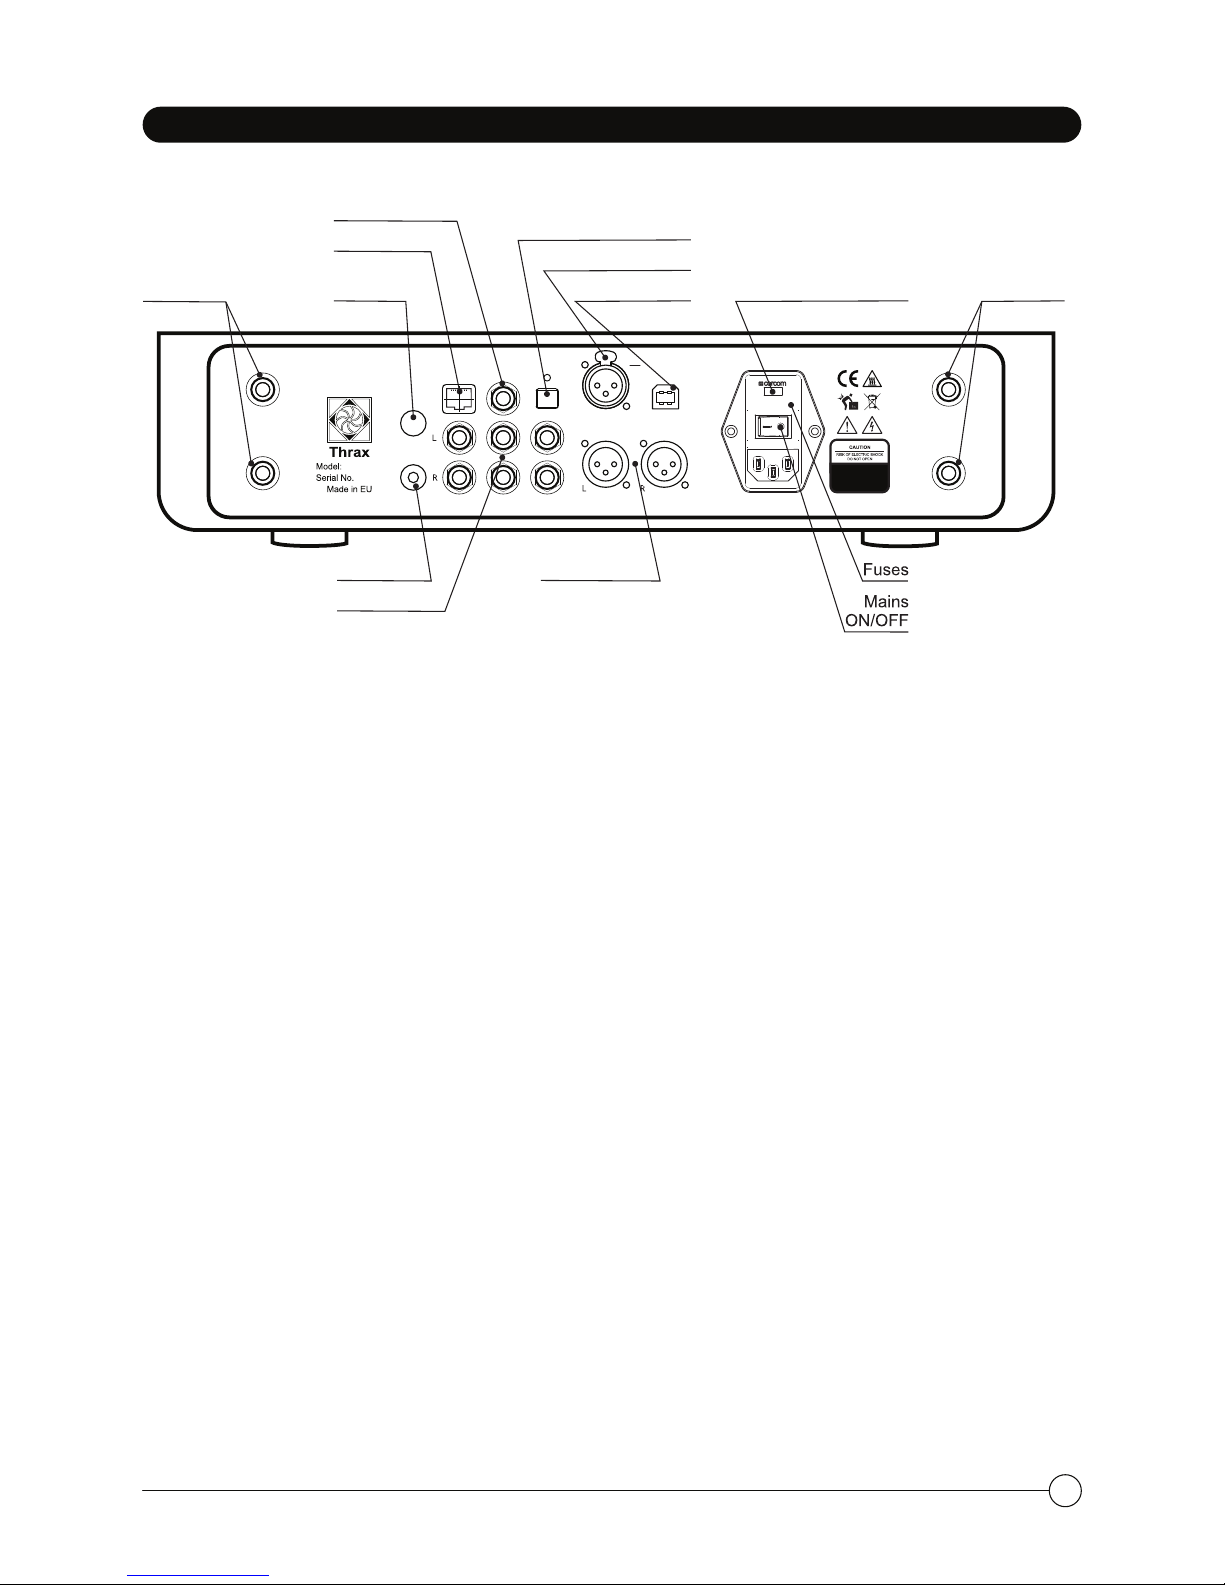
BACK PANEL
Inputs
• 6 digital inputs
- 1x Network (LAN)-
- 1x COAX (RCA)
- 1x Toslink
- 1x AES (XLR)
- 1x USB
• Bluetooth
• 4 pairs of analog inputs
- 3x RCA (unbalanced)
- 1x XLR (balanced)
AC Fuse
• IEC Power Connector, Main Switch, Fuses and Input Voltage Selector - There are fuses
located in the IEC power connector on the back panel. For 230 volts operation a 0.63
amperes “Slow Blow” fuse is used. For 115 volts operation the fuse should be 1.25 amperes.
If power does not come on, contact your authorized service representative.
Outputs
• Binding posts
7
3
LAN COAX. OPT. USBEBU
4
AES
DIGITAL
INPUTS
RL
NO USER SERVICEABLE
PARTS INSIDE.
REFER SERVICING TO
QUALIFIED SERVICE
PERSONNEL ONLY.
Ares
713103
ANALOG
INPUTS
GND
Input Voltage Selector
Ground
RCA Inputs
XLR Outputs
USB (optional)
AES/EBU Input
Bluetooth
Antenna
LAN Input
12
TOSLINK Input
COAX Input
Speaker L
Speaker R

This section describes the unpacking and installation procedures for your new
component.
Unpacking
All Thrax Audio shipping boxes have been specially designed to protect their contents
and special care has been taken to prevent damage under normal shipping conditions.
Mishandling should be evident upon inspection of the shipping container. Carefully
remove your new component from its packaging and examine it closely for signs of
shipping damage. We strongly recommend saving all original packaging to protect your
component from damage should you wish to store it or ship it at a later date.
Installation
• BE CERTAIN TO INSTALL THE UNIT IN A SECURE LOCATION FROM WHICH IT CANNOT FALL
OR TIP OVER.
• Provide adequate ventilation - the chassis will become warm in normal use. Do not
operate on carpet or any other surface that might block air flow.
• Do not allow the chassis to touch any metal parts, such as the frame of an equipment
rack. This might create a parallel ground path that could degrade the sound of your
system.
• Connect your source's cables to their appropriate inputs.
• Connect your speakers using the binding posts on either side of the back panel.
IMPORTANT: READ THE SECTIONS “BACK PANEL”.
WARNING: The unit should be operated only at the rated voltage indicated on the power
connector. If you are not sure what the mains voltage supplied to your home is, consult
with your unit dealer.
• Connect the power supply to the power source indicated on the rear panel. Avoid
power conditioners that float the ground pin. ALWAYS connect power cord to
component before plugging it into an AC outlet, and make sure that unit's main switch is
set to the „off” position before making the final connection. For best performance, try to
route the power cord away from signal cables.
• Pay close attention to power quality, and be aware that different power cords can
alter the sound.
• For initial power up press the main switch located on the back panel.
UNPACKING AND INSTALLATION
8
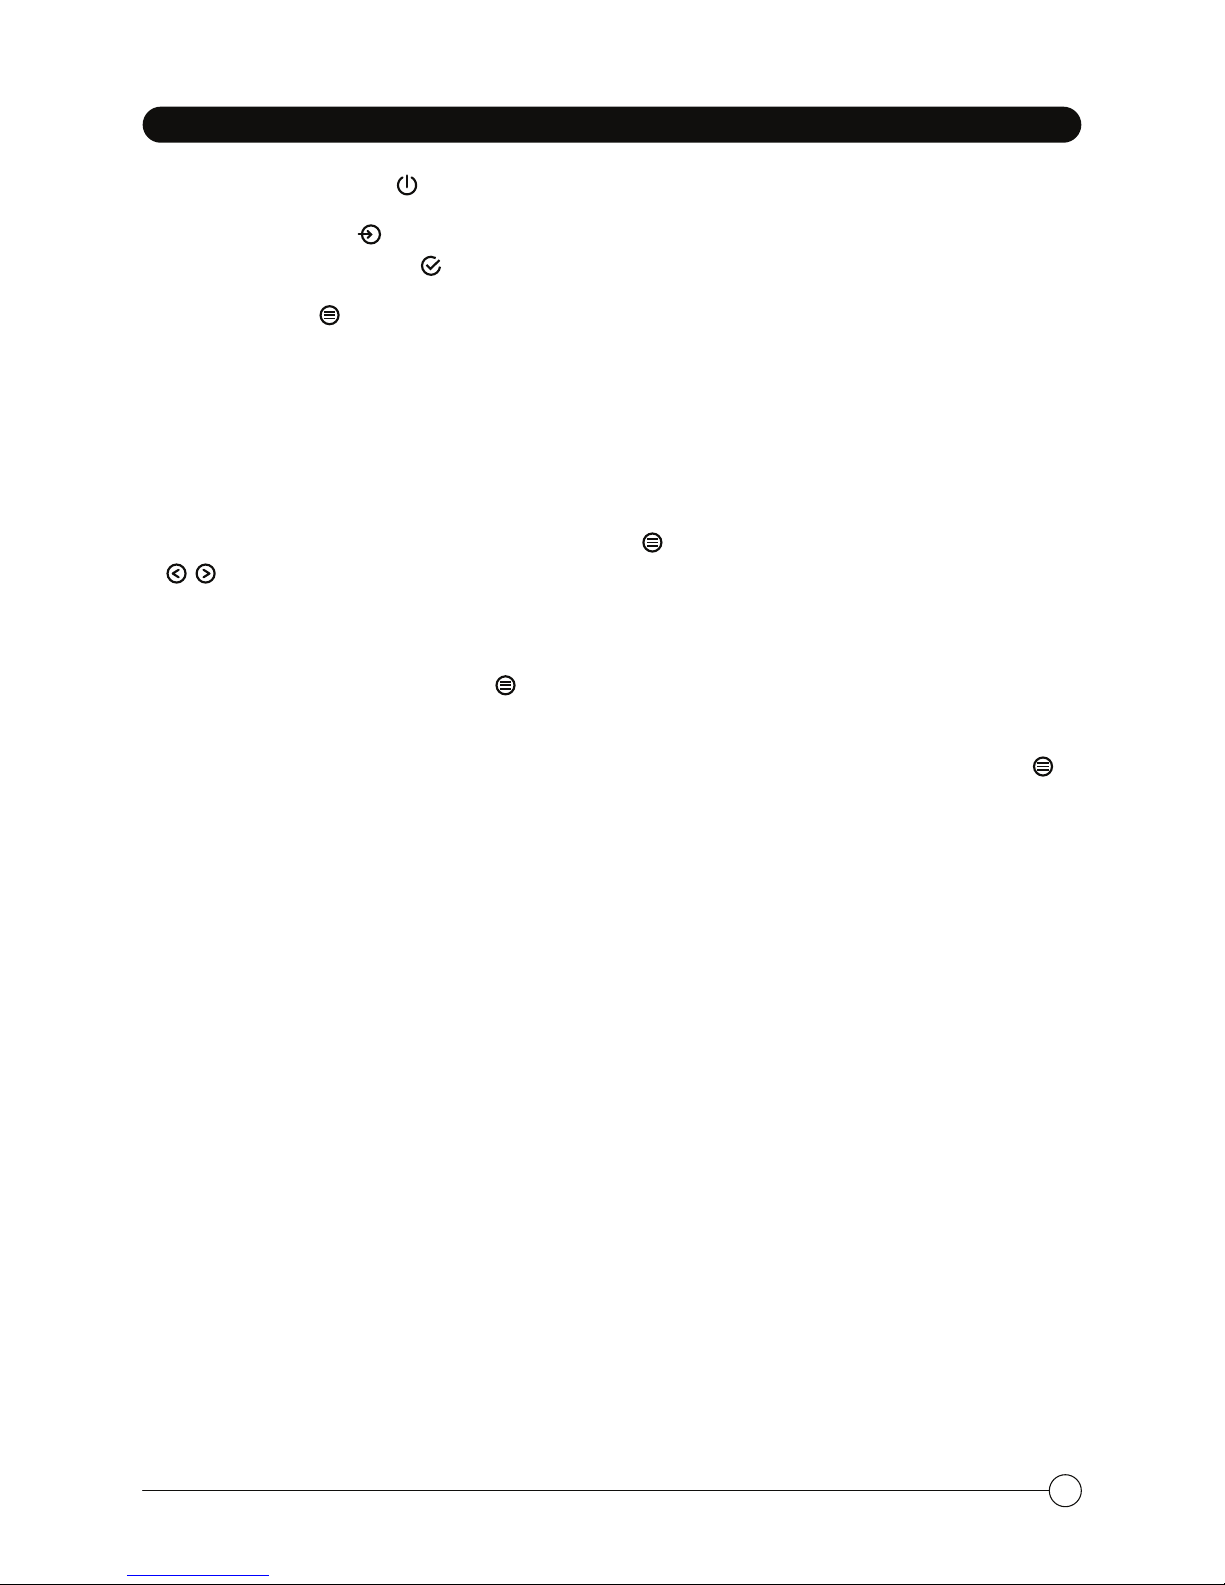
• Press the “ON/OFF” ( ) button to power up the device
• Use the “Input” ( ) button to toggle between input sources and set the one you will
be using with the Select () button.
• In the Menu () you will find three pages
1. Balance control
2. Phase/Remote control setup/Display brightness/Phono stage source select - MC or
MM
3. Digital filter - SD Slow / SD Sharp / Slow / Sharp / Bypass, Dither and De-emphasis
• To shift the Left/Right balance, press Menu () once and use the navigation buttons
( , ) to adjust.
• Turntables - if you're playing from a turntable, select the appropriate setting for your
tonearm's cartridge type (MM - moving magnet or MC - moving coil) in the second
page of the menu (press Menu () twice to access)
• If you're listening from a digital source, you may select one of the digital filter options
(Slow, Sharp, SD Slow, SD Sharp, Bypass) on the third page of the menu (press Menu ()
three times to access). Each option provides a distinct, glorious listening experience. You
may favor one or the other, or enjoy changing the filter response to suit the music you
listen to. Allow the system 20-30 seconds to implement the new filter after selecting it.
OPERATION
9

NOTES
Table of contents


