Thrustmaster 5.1 sound system User manual

ENGLISH
DEUTSCHFRANÇAISITALIANONEDERLAND
ESPAÑOLPORTUGUÊS
1/10
USER MANUAL
THRUSTMASTER®
HOTLINE
TECHNICAL FEATURES
System output power: 900W P.M.P.O. or 60W RMS (effective)
Subwoofer output power: 300W P.M.P.O. or 20W RMS (effective)
Speaker output power: 120W P.M.P.O. or 8W RMS (effective) per channel
Frequency response: 35Hz – 20kHz
Decoder: compatible with stereo, Dolby® Surround, Dolby® Pro Logic, Dolby® Pro Logic 2 (signal
detected and converted into Dolby® Pro Logic) and Dolby® Digital (AC-3) output
BOX CONTENTS
- 1 decoder
- 1 decoder power supply cable
- 1 remote control
- 2 AAA batteries
- 1 subwoofer
- 5 speakers
- 1 G9 cable
- 1 optical cable
- 1 RCA cable
- 1 coaxial cable
Please note: this document describes how to use the 5.1 Sound System Home Cinema with the
remote control. All the functions can also be controlled using the buttons situated on the front of
the decoder.

2/10
DOLBY® DIGITAL SOUND
Dolby® Digital sound is a truly advanced technological process, decoding sound signals over 5
channels plus an extra channel specifically reserved for special low frequency sound effects. (This
channel, referred to as LFE for “Low Frequency Effect”, represents the well-known “point one” in the
5.1 hardware standard.)
In contrast to Dolby® Surround, which reproduces 4 sound signals (front-left, front-right, center and
rear) over only two speakers, Dolby® Digital reproduces the main sound signals over 6 speakers, as
follows:
- The subwoofer emits only low frequencies and special effects (LFE), delivering impressive, realistic
sensations (during explosions, for example).
- The center satellite emits only character dialog, adding to the realism of conversations.
- The four other satellites emit the other sound signals independently (music, ambiance, sound effects,
etc.). Their interaction provides a spatial sound sensation worthy of the best cinemas: a revolving
sound or one moving from right to left will be physically transmitted as such by the satellites,
immersing the listener completely in the film.
SPEAKER PLACEMENT
Follow the instructions below and refer to the diagram (opposite) to position your speakers.
Note 1: the feet on the 5 speakers are removable. You can take them off and use the openings
situated on the back of each speaker to attach them to the wall.
Note 2: use the speakers with longer cables as your rear speakers, making use of their longer cables
to position them at the back of your living room.
ENGLISH
DEUTSCHFRANÇAISITALIANONEDERLAND
HOTLINE ESPAÑOL
PORTUGUÊS
3/10
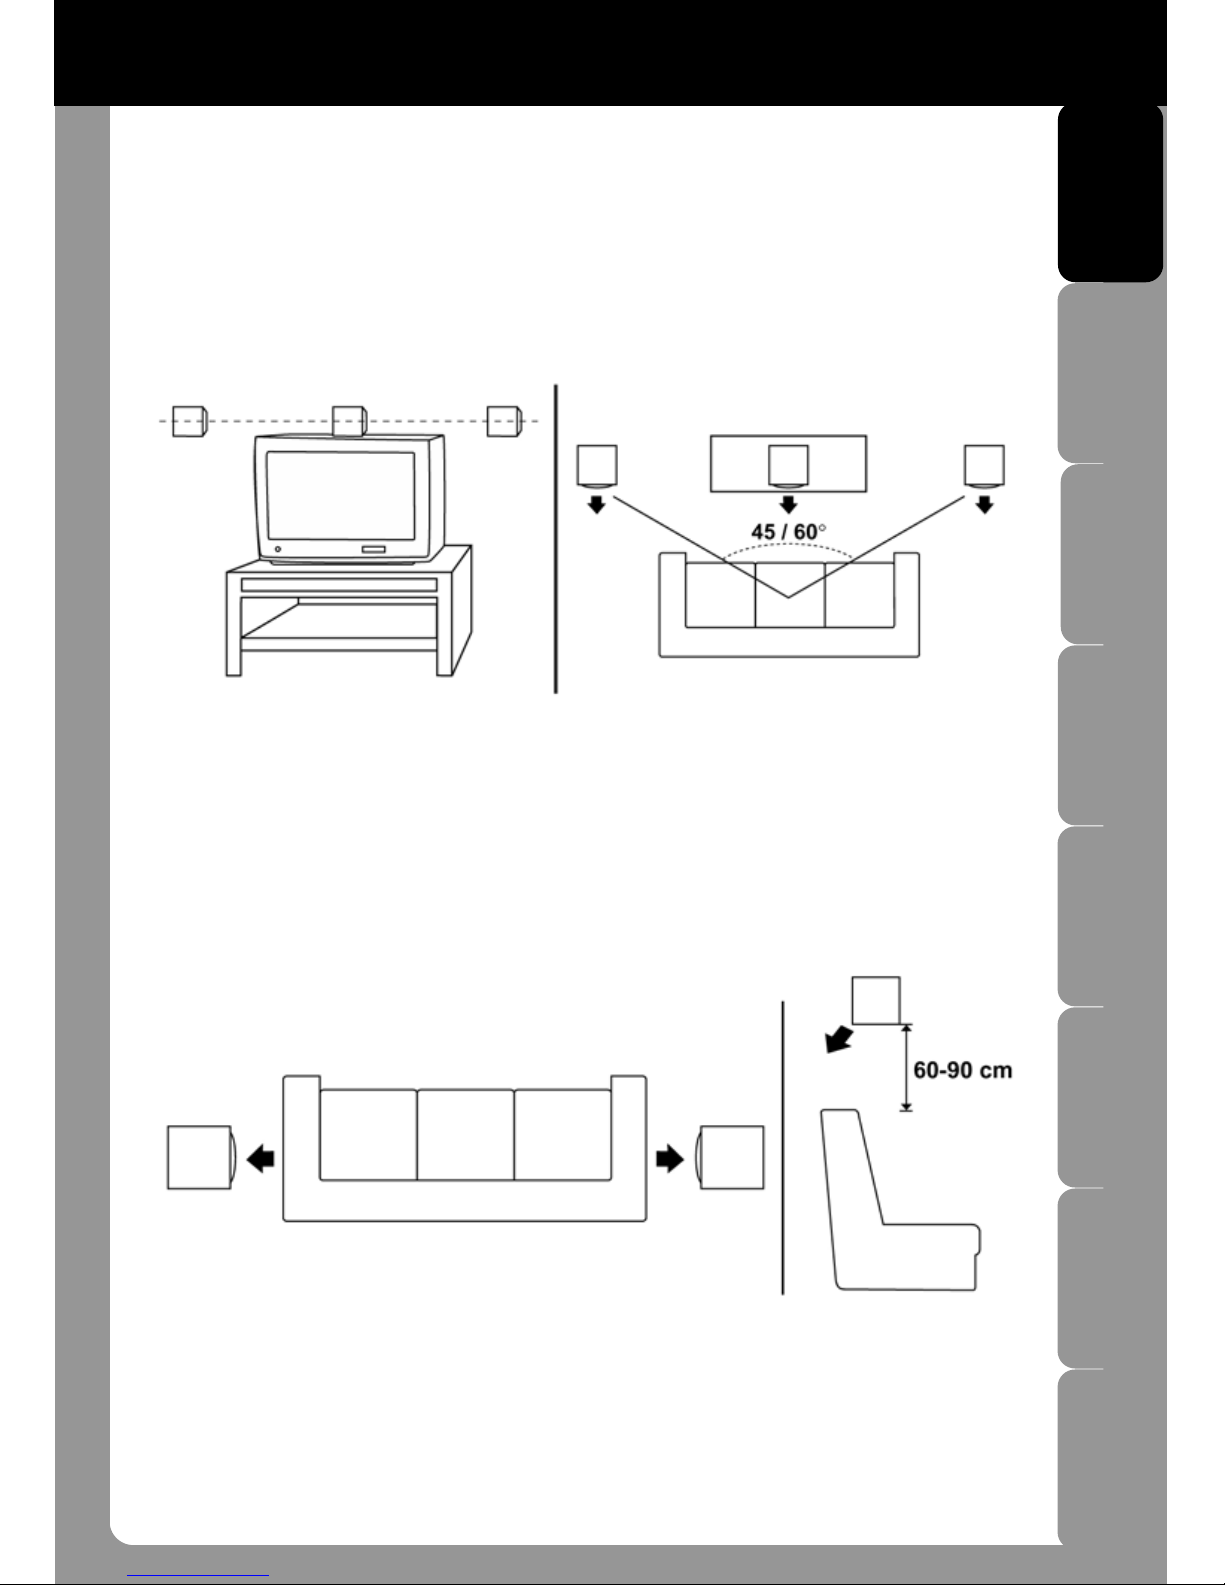
Place the front speakers on either side of your television set and the center speaker just above
the television. Ideally, these three speakers should be set at the same height and level as the
listener’s ears. In addition, the three speakers should be directed towards the listening position
(your sofa, for instance) and at an equal distance from it. For example, the front speakers should
not be positioned further back than the center speaker. Ideally, the space between the left and
right speakers should correspond to an angle of between 45 and 60 degrees in relation to the
listening position (see the diagram below).
The rear speakers should be placed either side of the listening position and slightly behind it (but
not at the back of it). Direct the speakers towards the listening position and not towards the
television. We also recommend that you position the rear speakers approximately 60 to 90 cm
above the listening position, in order to provide truly spatial sound. If you wish, you can also try
out other positions until you are completely enveloped by the surround sound effect.
The position of the subwoofer is not all that important. We do recommend, however, that you
place it on the floor (next to the TV cabinet, for example), to enable a better distribution of low
frequencies.
4/10
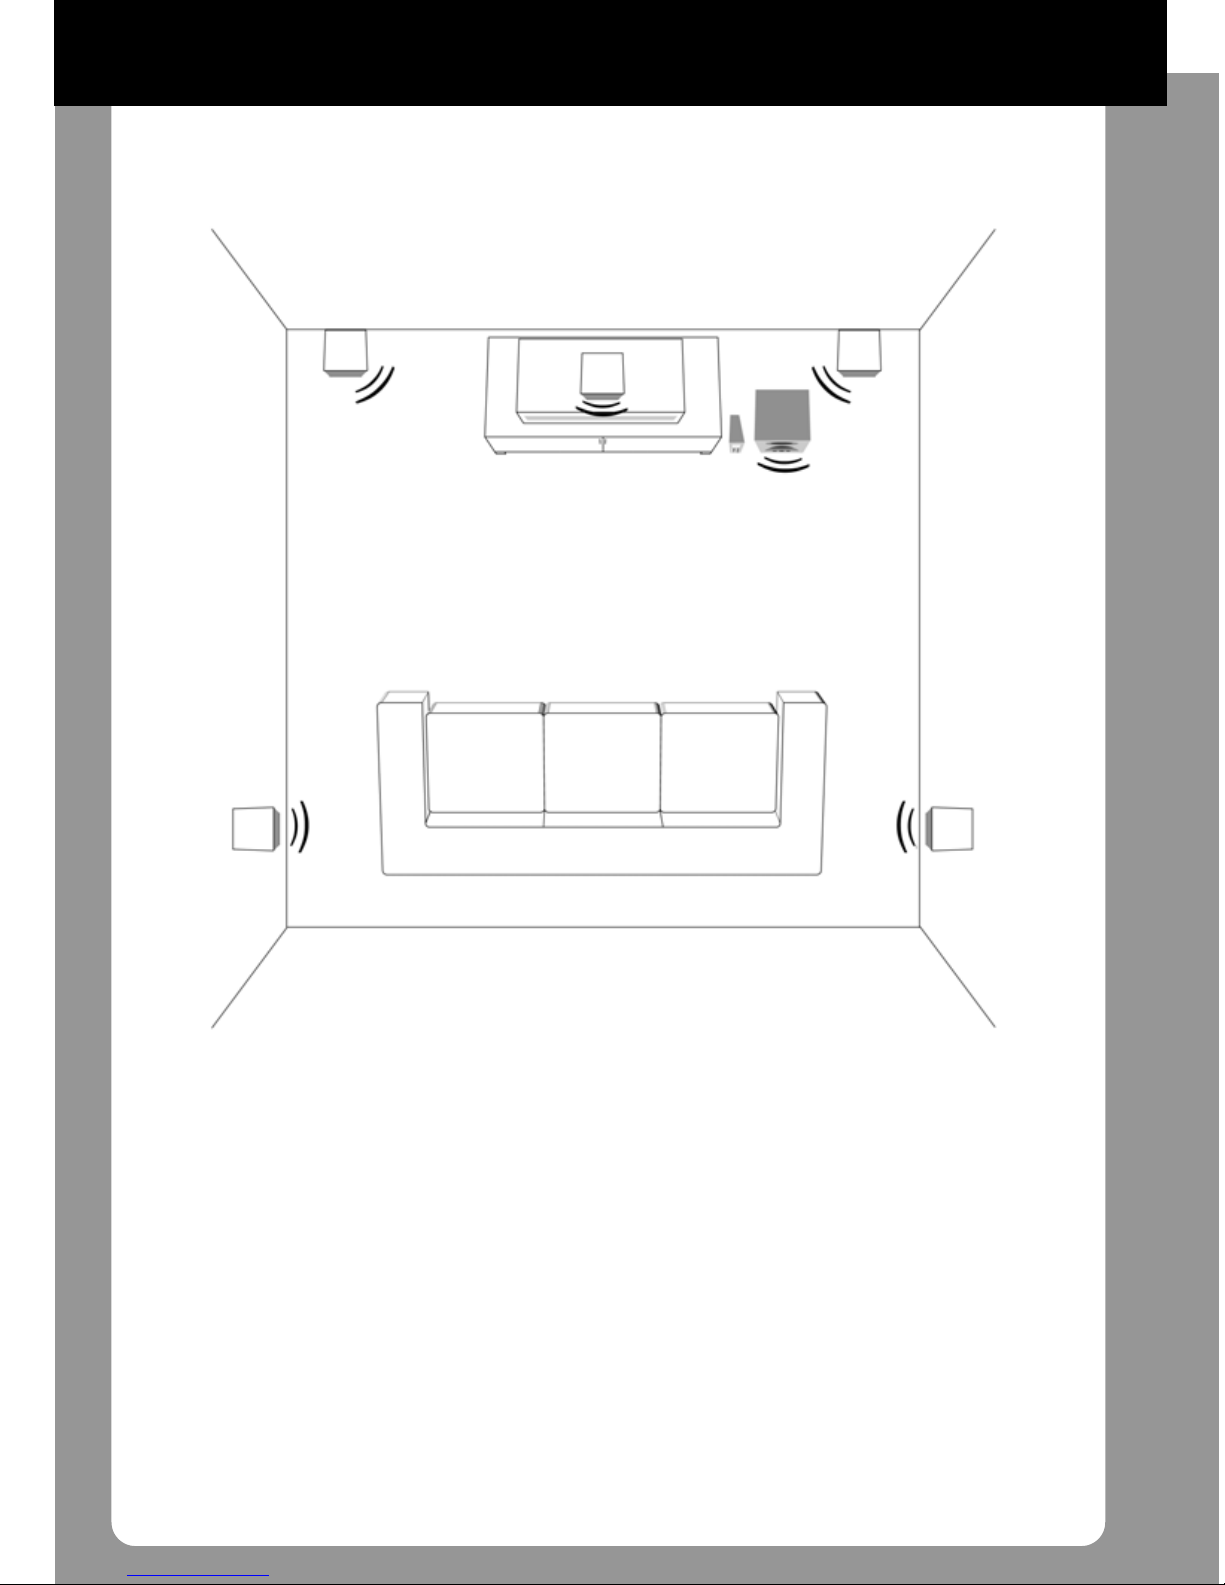
Once your speakers are in position, your set-up should look something like the one illustrated in the
diagram below:
ENGLISH
DEUTSCHFRANÇAISITALIANONEDERLAND
HOTLINE ESPAÑOL
PORTUGUÊS
5/10
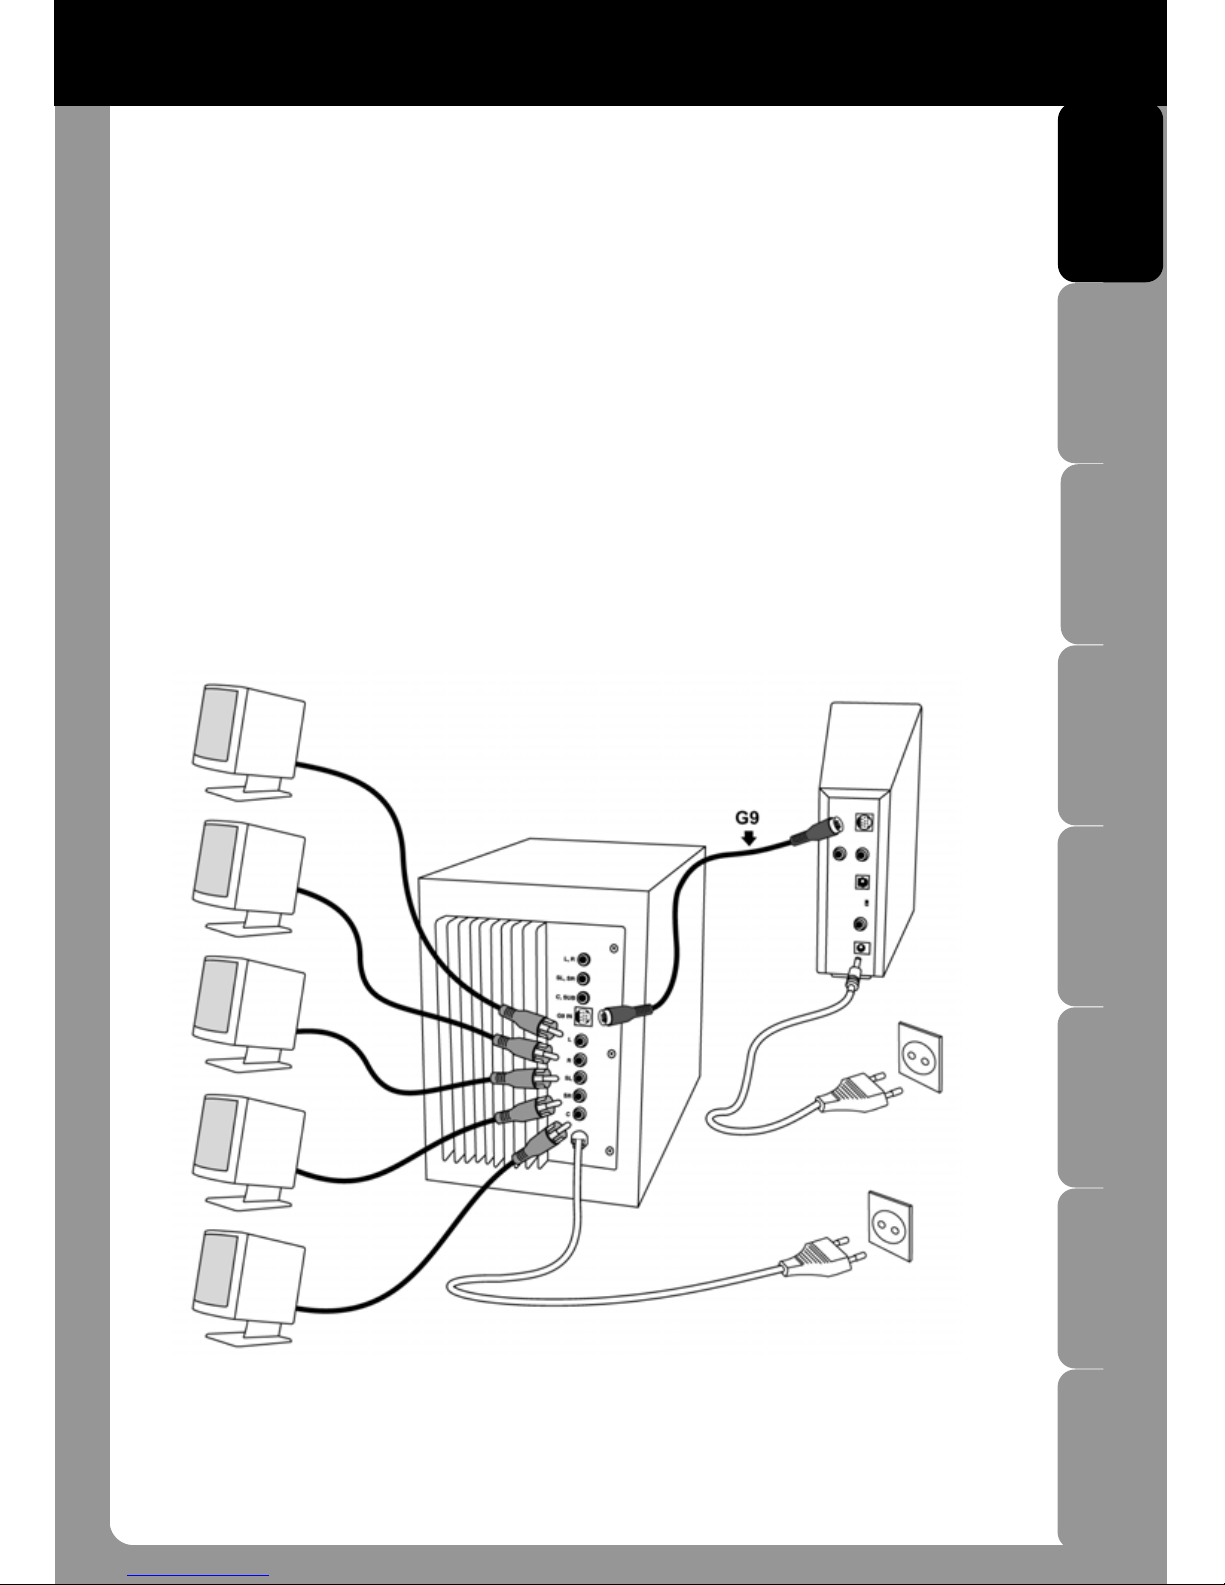
CONNECTION
Follow the instructions below to connect the different components of your 5.1 Sound System
Home Cinema.
1. Switch off your peripheral device (console, DVD player, VCR, etc.).
2. Connect the speakers to the following plugs on the subwoofer:
L: front-left satellite speaker,
R: front-right satellite speaker,
SL: rear-left satellite speaker,
SR: rear-right satellite speaker,
C: center satellite speaker.
3. Connect the G9 OUTPUT plug on the decoder to the G9 IN plug on the subwoofer, using the
G9 cable provided.
Note: the L, R, SL, SR and C, SUB plugs on the subwoofer allow you to connect your 5.1 kit to a
PC equipped with a 5.1-channel-compatible sound card.

6/10
4. Connect the decoder to your peripheral device using one of the following three methods:
•If your peripheral device is equipped with a digital optical output (PlayStation 2, Xbox, DVD player,
cable or satellite television):
- Set the DIGITAL INPUT SW switch on the decoder to the OP position.
- Connect your peripheral device to the OPTICAL plug on the decoder, using the optical cable
provided.
Note 1: before using the optical cable with your PlayStation 2, do not forget to activate the
DIGITAL OUT (OPTICAL) function in your console’s configuration panel.
Note 2: a special Xbox audio-video cable with an optical input is required for optical connection to
an Xbox console (this cable is available in most shops selling electrical goods).

ENGLISH
DEUTSCHFRANÇAISITALIANONEDERLAND
HOTLINE ESPAÑOL
PORTUGUÊS
7/10
•If your peripheral device is equipped with a digital coaxial output (DVD player, cable or
satellite television):
- Set the DIGITAL INPUT SW switch on the decoder to the CO position.
- Connect your peripheral device to the COAXIAL plug on the decoder, using the coaxial
cable provided.
•If your peripheral device is equipped with an RCA output (PlayStation 2, Xbox, GameCube,
VCR, CD player, television set):
- Connect your peripheral device to the ANALOG INPUT plugs on the decoder, using the
RCA cable provided (for all consoles these cables correspond to the audio-video cable’s
red and white connectors, which must be disconnected from the SCART plug).
5. Connect the decoder’s power supply cable to the POWER plug and then plug it into a wall
socket.
6. Plug the subwoofer’s power supply into a wall socket.

8/10
INSTALLATION TEST
Attention: before doing anything else, make sure that the VOLUME button on the subwoofer is not set
to the maximum value.
1. Press the POWER button on the subwoofer: a green LED lights up.
2. Press the POWER button on the remote control: the red LED lights up in green.
3. Press the TEST button on the remote control.
A sound signal is emitted by each of the 6 elements of your 5.1 kit in succession. The indicator light on
the front of the decoder moves according to the speaker being tested (Lfor the front-left speaker, Rfor
the front-right speaker, SL for the rear-left speaker, SR for the rear-right speaker, Cfor the center
speaker and SUB for the subwoofer). In this way, you can check that the speakers have been properly
connected and are in the correct positions.
If any problems arise during the test, verify that the speakers have been connected properly as
described above.
USING THE 5.1 SOUND SYSTEM HOME CINEMA
Insert an audio-visual disk or cassette (DVD, game CD or DVD, audio CD, VHS cassette) and/or turn
on your television set.
The decoder automatically identifies the audio format and indicates the mode selected:
•STEREO LED lit up: the decoder is in stereo (2 channel) mode; only the front satellites (front-left
and front-right) and the subwoofer are active. The bass sound obtained through filtering is less
realistic.
•PROLOGIC LED lit up: the decoder is in Dolby Pro Logic mode. The decoder produces a spatial
sound from a stereo signal using the 5 satellites (front-left, center, front-right, rear-left, rear-right)
and the subwoofer; however, the rear-left and rear-right sounds are identical (monophonic effect)
and have an upper-register limit of 7KHz.
With Dolby Pro Logic 2, the rear-left and rear-right are differentiated (stereophonic effect), the
upper-register limit is 20KHz and bass sounds are still obtained by filtering, although with a
greater degree of realism.
Note: the PROLOGIC LED indicates that the decoder has detected either a Dolby Surround or
Dolby Pro Logic 2 signal.
•DIGITAL LED lit up: the decoder is in Dolby Digital (5.1) mode; all speakers are operating at their
maximum capacity, each of them emitting a completely distinct signal. Low frequency effects
(LFE) are reproduced exclusively by the subwoofer with an unrivalled degree of realism.
Note: in digital mode, the sound signal always comes from a source using an optical or coaxial
output (DVD player, PS2 and Xbox consoles, cable or satellite television).

ENGLISH
DEUTSCHFRANÇAISITALIANONEDERLAND
HOTLINE ESPAÑOL
PORTUGUÊS
9/10
The SURROUND MODE button enables you to switch from one audio mode to another. In this
way, you can enjoy spatial sound even with a stereo source, thanks to Dolby® Pro Logic mode.
Example: you are listening to an audio CD; the STEREO LED is lit up. Press the SURROUND
MODE button to switch to Dolby Pro Logic mode: the signal emitted by the front speakers is also
reproduced on the rear and center speakers.
ADJUSTING THE VOLUME
There are two ways of adjusting the volume: via the subwoofer and via the decoder. The “master”
setting is on the decoder. I.e. if the volume was on a scale from 0 to 100 and you set the decoder
volume to 20, the maximum volume on the subwoofer would not exceed 20.
If you adjust the volume on the subwoofer, this volume setting will also be applied to the 5
speakers. Adjusting the volume via the decoder allows you to set independent levels on the
following 4 elements:
•The front speakers (press the MASTER button on the remote control),
•The center speaker (press the CENTER button on the remote control),
•The rear speakers (press the SURROUND button on the remote control),
•The subwoofer (press the SUB button on the remote control).
Once the element has been selected, the indicator lights up on the front of the decoder to display
the setting in question: the 6 LEDs represent a scale of values with the SL LED corresponding to
the minimum setting and the SR LED corresponding to the maximum setting.
Use the VOL + and VOL – buttons on the remote control to adjust the volume.
Note: the BASS button on the subwoofer allows you to adjust the bass level.
Mute function
The decoder includes a mute function: press the MUTE button on the remote control to turn off
the sound; the MUTE LED lights up. Press this button again to restore the normal volume.

10/10
AUDIO SOURCE SELECTION
If you have connected more than one peripheral device to the decoder, you can switch between them
at any time.
Press the AUDIO INPUT button on the remote control.
The DIGITAL and ANALOG LEDs indicate which input is active on the decoder.
Note: the DIGITAL LED includes both the digital optical and coaxial inputs. To switch from one to the
other, you must use the DIGITAL INPUT SW switch situated at the rear of the decoder.
SWITCHING OFF YOUR 5.1 SOUND SYSTEM HOME CINEMA
- Press the POWER button on the remote control.
The POWER LED lights up in red; the decoder is now in standby mode.
- Press the POWER button on the subwoofer.
Your 5.1 Sound System Home Cinema is now switched off.
www.thrustmaster.com
© Guillemot Corporation 2002. All rights reserved. Thrustmaster® is a registered trademark of Guillemot Corporation S.A. Dolby®,
Dolby® Surround,Dolby® Pro Logic and Dolby® Digital™ are trademarks and/or registered trademarks of Dolby Laboratories
Corporation. PlayStation® and PS one™ are trademarks and/or registered trademarks of Sony Computer Entertainment, Inc. Xbox™ is
a trademark of Microsoft Corporation in the U.S. and/or other countries and is used under license from Microsoft. GameCube™ is a
trademark of Nintendo Co., Ltd. All other trademarks and brand names are hereby acknowledged and are property of their respective
owners. Illustrations not binding. Contents, designs and specifications are subject to change without notice and may vary from one
country to another.
Other manuals for 5.1 sound system
1


