Thulos TH-HW011 User manual
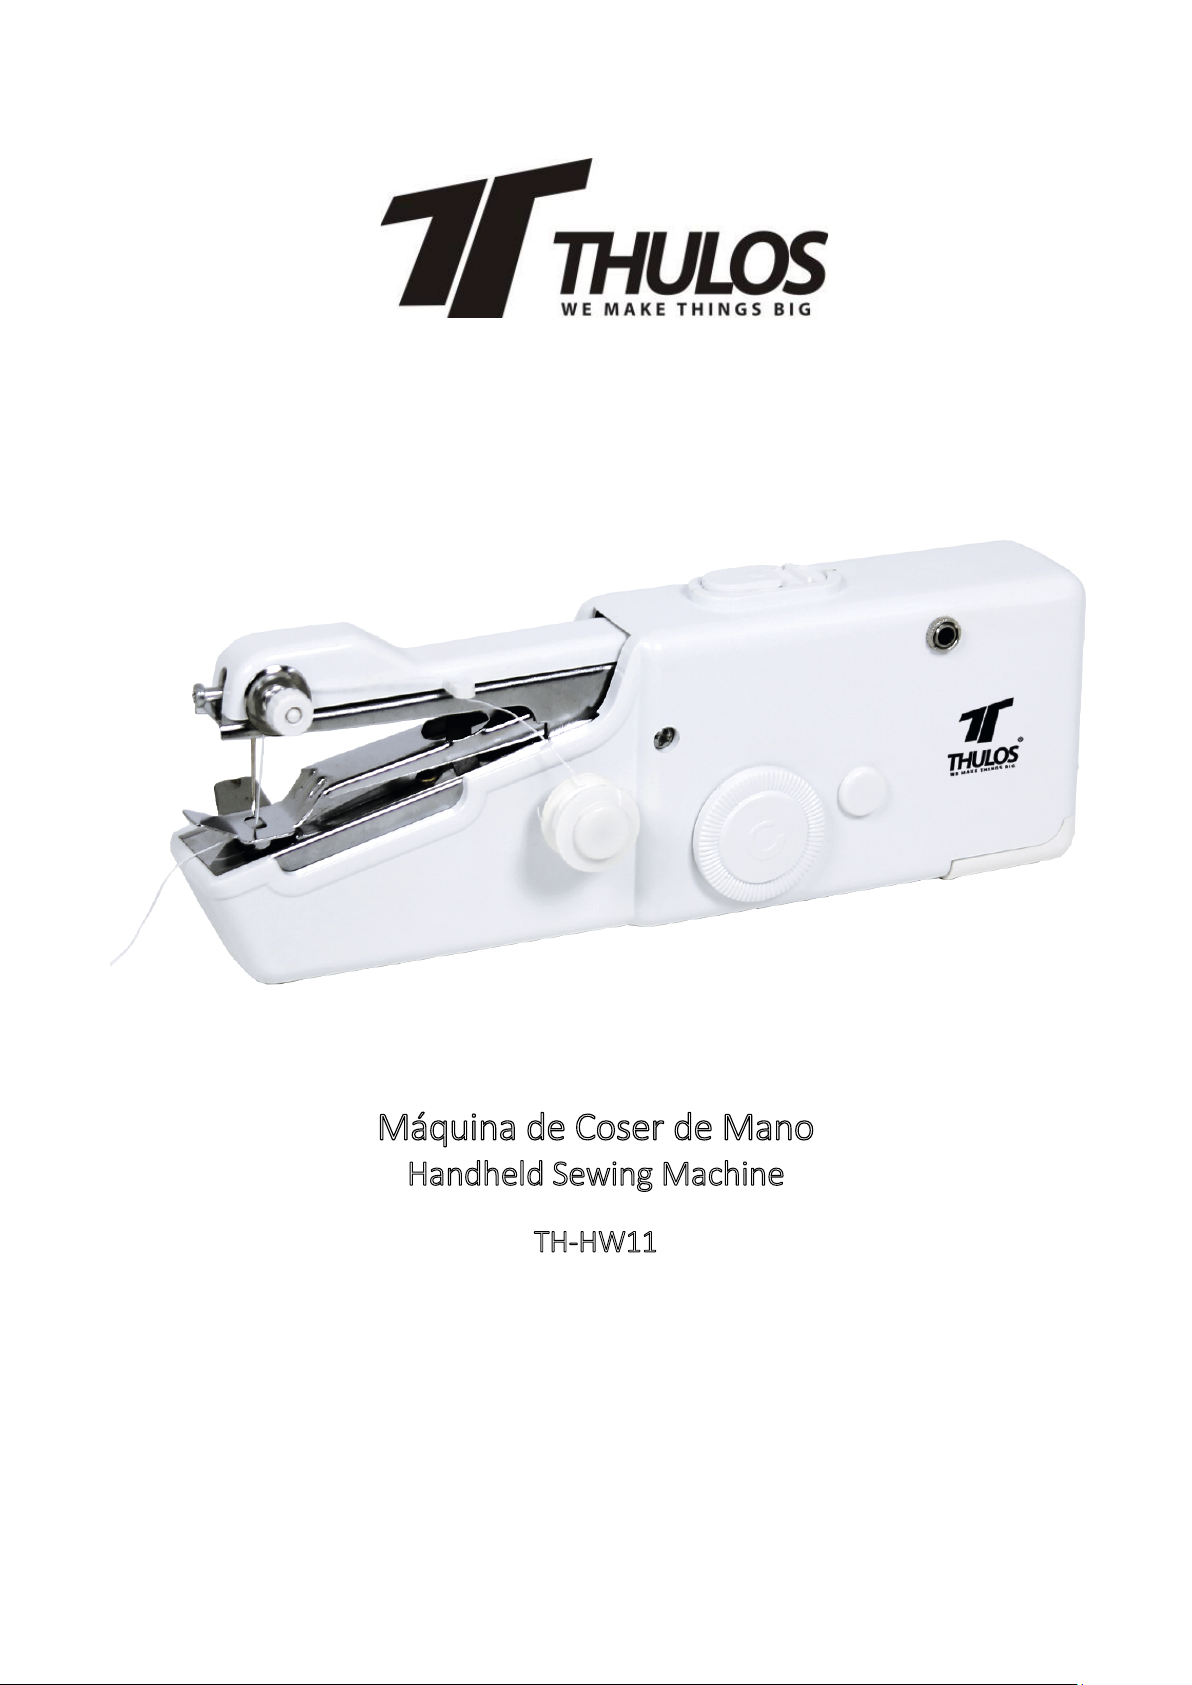
Máquina de Coser de Mano
Handheld Sewing Machine
TH-HW11
Por favor, lea cuidadosamente este manual antes de usar la fiambrera por primera vez.
Guarde el manual para futuras consultas.
For you safety and con�nued enjoyment of this product. Always read the instruc�on book carefully
before using.
ES
Estimado cliente:
Agradecemos la confianza depositada en nosotros al adquirir este producto. Nuestro
principal empeño es ofrecer artículos excelentes, manteniendo los más estrictos
controles de calidad y cumpliendo todas las normativas vigentes de seguridad, con el
objetivo de presentar un producto perfecto y seguro para el uso doméstico.
Lea detenidamente el presente manual de instrucciones y guárdelo para posterior
consulta. En caso de entregar el aparato a terceros, entregue también el presente manual
de instrucciones.
Cuando use aparatos eléctricos, debe seguir siempre unas medidas básicas de
seguridad, incluyendo las siguientes:
Lea las instrucciones antes del primer uso y consérvelas para futuras consultas.
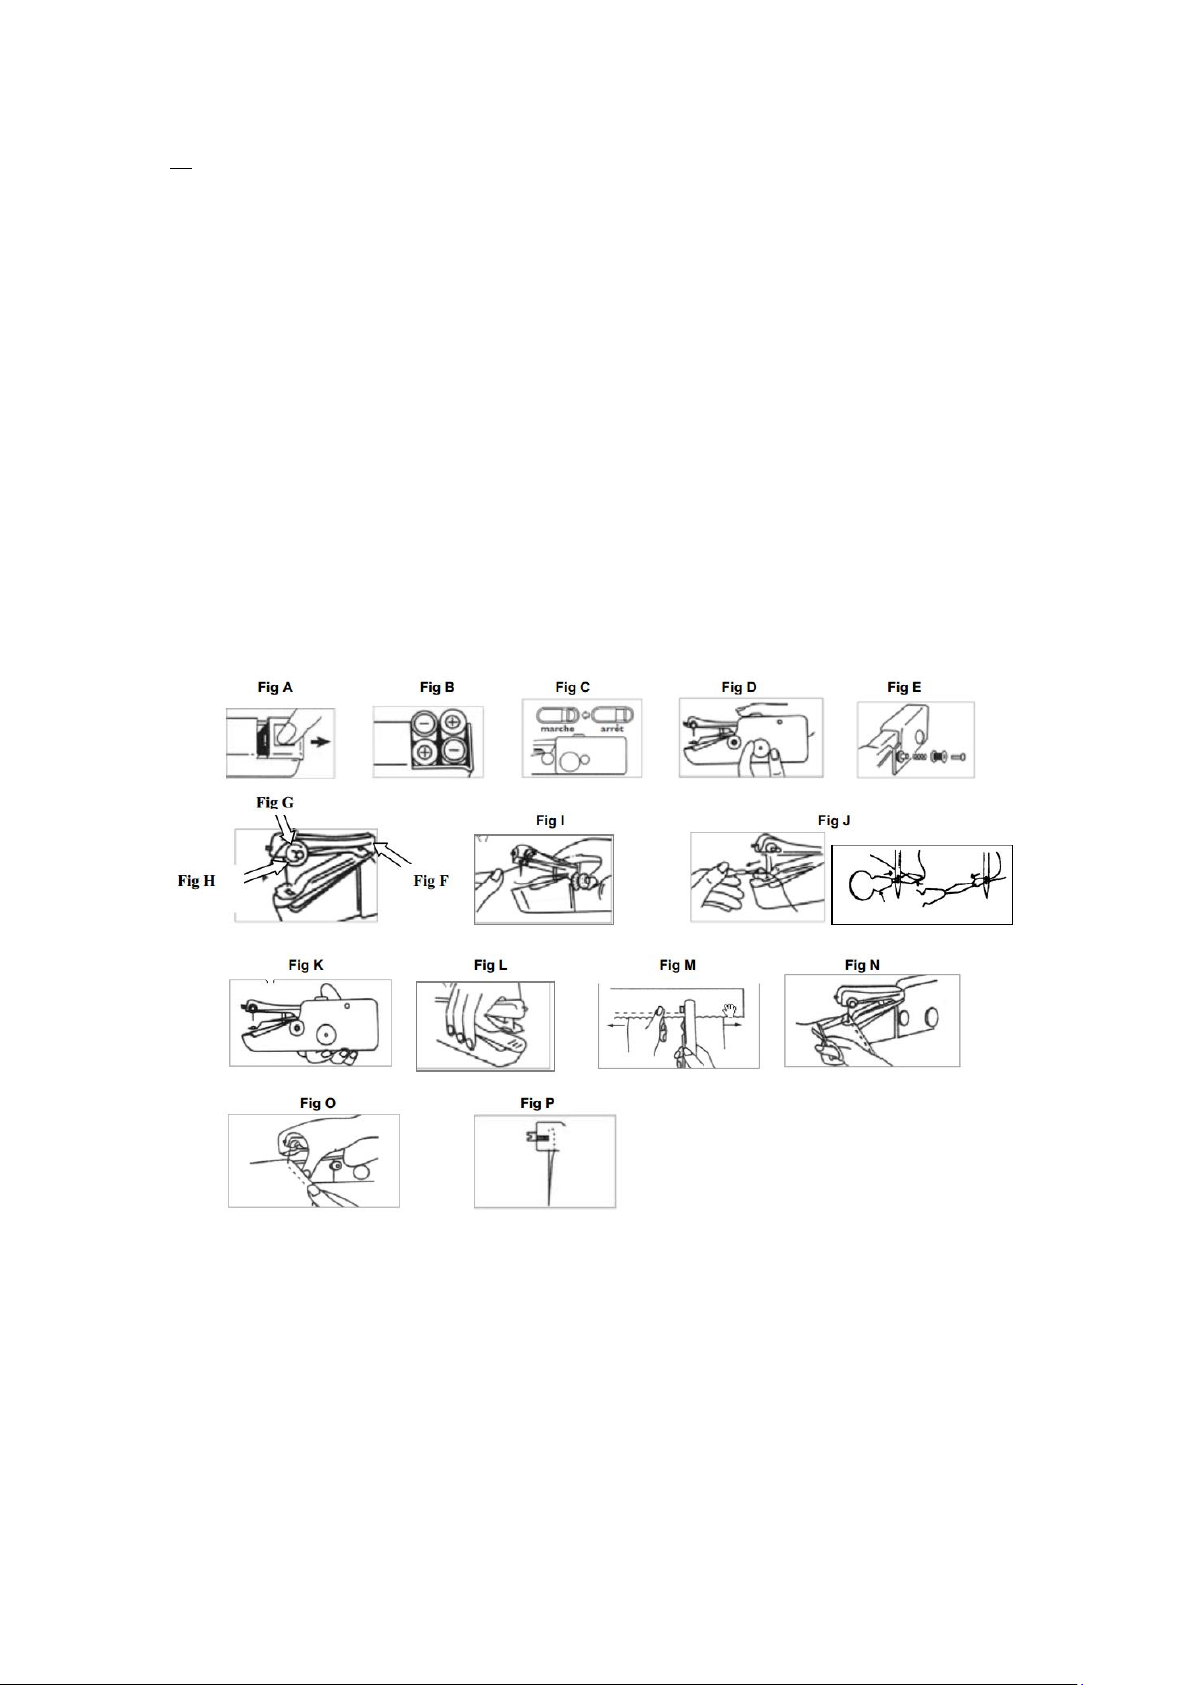
COLOCACIÓN DE LAS BATERÍAS (FIG. A & B)
Necesitará 4 pilas AA 1.5V. No están incluidas en el paquete.
Voltear la máquina de coser. Abra el compartimiento de la batería (Fig. A)
deslizando la tapa. Inserte las pilas. Observe la polaridad correcta (+/-) (Fig. B).
Cierre la tapa del compartimiento de la batería presionando para asegurarse de
que encaje en su lugar.
También puede conectar la máquina de coser a la red eléctrica con un adaptador

de CC de 6 voltios (no incluido).
ENHEBRAR LA AGUJA (FIG. C a J)
Compruebe que el interruptor de encendido / apagado esté en la posición de
seguridad (deslice hacia adelante) (Fig. C).
Levante el brazo de la aguja girando el dial hacia la derecha (Fig. D).
Coloque una bobina o carrete de hilo en el soporte de tal manera que gire en
sentido antihorario al tirar del hilo. Luego coloque el resorte en el soporte y
presione (con el resorte) para que encaje en su lugar (Fig. E).
Pase el extremo del hilo a través de la guía de la aguja (de abajo hacia arriba) (Fig.
F).
Pase el hilo hacia arriba entre los dos discos del tensor de hilo (Fig. G).
Luego pase el hilo a través de la guía del hilo (Fig. H).
Pase el extremo del hilo de atrás hacia adelante (hacia la punta de la unidad) (Fig.
I) a través del ojo de la aguja. Si es necesario, use el enhebrador de agujas (Fig. J):
oPase el bucle del enhebrador a través del ojo de la aguja, de adelante hacia
atrás.
oPase el hilo por el bucle del enhebrador de agujas;
oSaque el enhebrador de aguja del ojo de la aguja, tirando del hilo a través
del ojo de la aguja;
oEl hilo ahora está enhebrado en la aguja. Sacarlo del bucle del enhebrador
de aguja.
LA MEJOR MANERA DE SUJETAR SU MAQUINA DE COSER (FIG. K)
Sostenga la máquina con la mano derecha colocando el pulgar en la parte superior de la
máquina. Coloque los otros dedos en la parte inferior.
CÓMO COSER (FIG. L & M)
Levante el prensatelas, coloque el material de costura entre el prensatelas y la
placa de la aguja y baje el prensatelas (Fig. L).
Durante la costura, la tela se transporta hacia la izquierda, por lo que es necesario
introducir la tela en la máquina por su extremo izquierdo.
Tire del hilo alrededor de 5 cm.
Gire la perilla hasta que la aguja se pinche en la tela. Sostén la tela con la mano
izquierda.
Sujete la máquina de coser con la mano derecha y presione el interruptor de
encendido / apagado con el pulgar en la posición "on".
La tela se cose y se transporta hacia la izquierda (Fig. M). Guíe suavemente la tela
con la mano izquierda para una costura recta. Para alargar las puntadas, tire de la
tela ligeramente.

CAMBIO DE SENTIDO DE COSTURA
Detenga la máquina de coser donde desee cambiar de dirección y de modo que
la aguja esté aún en la tela. Si es necesario, gire el dial hasta que la aguja se pinche
en la tela.
Levante el prensatelas y gire la tela hacia la nueva dirección, utilizando la aguja
como punto de apoyo.
Baje el prensatelas y continúe cosiendo en la nueva dirección.
FIN DE COSTURA (FIG. N & O)
Detenga la máquina de coser.
Gire el dial para llevar la aguja a la altura máxima.
Use unas tijeras para sacar un poco más de hilo de la máquina de coser (Fig. N).
Cortar el hilo aprox. 15 cm de la tela para que quede suficiente hilo para asegurar
la costura a mano.
Levante el prensatelas y suelte la tela con cuidado (Fig. O).
REEMPLAZO DE LA AGUJA (Fig. P)
Antes de reemplazar la aguja, retire las baterías de la unidad.
Lleve la aguja a su posición más alta usando el dial.
Sujete la aguja y afloje el tornillo de sujeción de la aguja girándolo en sentido
antihorario. Ahora puede quitar la aguja.
Inserte la nueva aguja hasta el tope en la abrazadera de la aguja. El lado plano de
la aguja debe estar orientado hacia el tornillo de sujeción de la aguja.
Sostenga la aguja y apriete firmemente el tornillo de la abrazadera de la aguja.
RIESGOS ASOCIADO CON LAS BATERÍAS
Reemplace siempre todas las pilas. No use pilas nuevas y usadas al mismo tiempo. No
utilice tipos, marcas, pilas diferentes y con diferente capacidad. Al cambiar las pilas, vigile
la polaridad (+/). Retire las pilas del aparato cuando estén agotadas o si no utiliza el
aparato durante un largo periodo. Así evitará posibles daños. Las pilas no recargables no
deben ser recargadas. Los terminales no deben estar en cortacircuito.
MEDIO AMBIENTE
¡Usted también puede contribuir a la conservación del medio ambiente!
Este aparato no debe desecharse con la basura doméstica al final de su vida útil,
sino que se debe den un punto de recogida para el reciclaje de aparatos
eléctricos y electrónicos. Este símbolo en el aparato, manual de instrucciones y
embalaje quiere atraer su atención sobre esta importante cuestión. Los
materiales utilizados en este aparato se pueden reciclar. Mediante el reciclaje de
electrodomésticos, usted contribuye a fomentar la protección del medioambiente.
Solicite más información sobre los puntos de recogida a las autoridades locales.

CONDICIONES DE GARANTÍA
•Por la presente se garantiza la calidad de este producto según plazos y
condiciones de la legislación vigente.
•Quedan excluidos de esta garantía todos aquellos aparatos que presenten golpes
o manipulaciones incorrectas, así como las deficiencias ocasionadas por un uso
anormal o abusivo.
•La empresa, se reserva el derecho a elegir entre reparar, sustituir o canjear por
otro de características similares, en función del tipo de avería o de las existencias
de nuestros almacenes.
•El producto está garantizado contra todo defecto de fabricación.

EN
Dear Customer:
We appreciate the confidence placed in us by purchasing this product.
Our main commitment is to provide excellent articles while maintaining the strictest
quality controls and compliance with all applicable safety regulations, with the aim of
presenting a perfect and safe product for domestic use. Carefully read this manual and
keep it for future reference. If the instrument is delivered to third parties, also delivered
this instruction manual.
HOW TO INSERT THE BATTERIES (Fig. A & B):
You need 4*AA 1.5V batteries. They are not included in the delivery.
Turn the sewing machine upside down. Open the battery compartment (Fig. A) by
sliding the cover. Insert the batteries with correct polarity (+/-) (Fig. B). Close the
battery compartment cover.
You can also connect the machine to the main power by using a 6 Volt DC adaptor
(not included).
HOW TO THREAD (Fig. C to J):
Slide the On/Off switch away from the arm of the sewing machine to deactivate
it (Fig. C).
Turn the handwheel until the arm and the needle are at the top (Fig. D).
Place a bobbin or spool of thread onto the holder in such a way that it rotates
anticlockwise when you pull the tread. Then place the spring onto the holder and
push it (together with the spring) firmly into the associated opening in the device
(Fig. E).
Push the end of the thread through thread guide (from the bottom upwards) (Fig.
F).
Place the thread from above between the two discs of the thread tensions
regulator (Fig. G).
Guide the thread through thread guide (Fig. H).
Place the end of the thread from the back forwards (towards the end of the
device) (Fig. I) through the eye of the needle. If necessary, use the threader to
help you (Fig. J):
oGuide the wire loop of the threader from the front backwards through the
eye of the needle.
oPush the thread through the wire loop.
oPull the wire loop with the thread out through the eye of the needle.
oThe thread is now threaded. Remove it from the wire loop.

HOW TO HOLD YOUR SEWING MACHINE (Fig. K):
Hold the machine in your right hand by placing your thumb on the top of the machine.
Place the other fingers at the bottom.
HOW TO SEW (Fig. L & M):
Raise up the fabric clamp, place the fabric to be machined between the fabric
clamp and the needle plate and lower the fabric clamp (Fig. L). During the sewing,
the fabric will be transported to the left. This is why it must be placed into the
sewing machine at the left end.
Pull the threaded yarn out around 5cm.
Turn the handwheel until the needle pricks into the fabric. Hold the fabric firmly
with your left hand.
Take the sewing machine in your right hand and slide the On/Off switch into the
‘On’ position using your thumb.
The fabric is sewn and transported to the left (Fig. M). Guide the fabric carefully
with your left hand so that the stitch is straight. To extend the length of the
stitches, you can pull the fabric lightly and evenly.
HOW TO CHANGE THE SEWING DIRECTION:
Stop the sewing machine at the point where you want to change the sewing
direction and so that the needle is positioned in the fabric. If necessary, turn the
handweel until the needle pricks into the fabric.
Raise the fabric clamp and turn the fabric to face the new direction, using the
needle as the fulcrum.
Lower the fabric clamp and continue sewing in the new direction.
HOW TO END THE SEWING (Fig. N & O):
Stop the sewing machine.
Turn the handwheel to bring the needle up to its highest position.
Use a pair of scissors to pull some more thread out of the sewing machine (Fig.
N). Cut through the thread approx. 15cm from the fabric so that enough thread is
left over to secure the seam by hand.
Raise the fabric clamp and carefully pull out the fabric (Fig. O).
HOW TO CHANGE THE NEEDLE (Fig. P):
Take the batteries out of the device before replacing the needle.
Bring the needle up to its highest position with the handwheel.
Hold the needle and loosen the needle clamp screw by turning it in the
anticlockwise direction. You can now remove the needle.
Insert the new needle up to the limit stop into the needle clamp. The flat side of
the needle must be oriented towards the needle clamp screw.
Hold the needle firmly and tighten the needle clamp screw.
Danger Associated with Batteries: Always replace all batteries. Do not use new
and used batteries at the same time. Do not use any different battery types,
brands or batteries with different capacitance. When changing the batteries,
check the polarity (+/-). Take the batteries out of the unit if they are empty or if
you do not use the unit for a prolonged period of time. Thus you will prevent
damages that could occur if the batteries leak. Non-rechargeable batteries must
not be recharged. The terminals must not be short-circuited.
ENVIRONMENT
This appliance should not be put into the domestic garbage at the end of its
durability, but must be offered at a central point for the recycling of electric
and electronic domestic appliances. This symbol on the appliance,
instruction manual and packaging puts your attention to this important
issue. The materials used in this appliance can be recycled. By recycling of used domestic
appliances you contribute an important push to the protection of our environment. Ask
your local authorities for information regarding the point of recollection.
WARRANTY CONDITIONS
•The quality of this product according to terms and conditions of the current
legislation is guaranteed.
•Excluded from this guarantee all those devices which have bumps or improper
handling and defects caused by abnormal or abusive use.
•The company reserves the right to choose between repair, replace or exchanged
for another with similar characteristics, depending on the type of damage or
stocks from our warehouses.
•The product is guaranteed against all manufacturing defects.

Table of contents
Languages:
Other Thulos Sewing Machine manuals


