TICWELL WHALE SW-301 User manual


Contents
English
Francais
Español
01~18
19~36
37~54


Table of Contents
Chapter 1 Notes
Chapter 2 Before Use
Chapter 3 Use the Product
Chapter 4 Cleaning and Maintenance
Chapter 5 Troubleshooting
Chapter 6 Product Specifications
Chapter 7 After-sales service
2.1 Unpack 02
01~02
02~03
04~12
12~14
14~15
15~16
16~18
2.2 Name of all parts 03
2.3 Packing list 03
3.1 Function icons 04
3.2 Product dis-assembly05~8
3.3 Product use 08~12
4.1 Clean sewage tank12~13
6.1 Technical parameters 15
6.2 Circuit diagram 16
4.2 Clean rolling brush 13
4.3 Regular maintenance and storage 14
(English)

Chapter 1 Notes
Before using this product, please read this user guide carefully, and install the
machine according to the steps outlined in this user guide and keep it for future
reference. This product is suitable for operation and use in a conventional home
environment, not for industrial and outdoor purposes.
This product is an electric appliance. Do not allow the machine to run
unattended.
When charging, please use the special charger provided by our company for
charging. Other types of chargers may cause the battery to a malfunction or the
battery may be damaged and cannot be used.
The battery pack must be removed from the battery case when cleaning,
repairing, or temporarily disabling the machine.
Do not allow the power cable to pass through the sharp object and avoid
dragging the power cable to move the machine. Otherwise, the power cable may
be damaged.
Please do not use the whole machine to inhale hot objects such as carbon,
cigarette butts, sharp objects such as broken glass, lime, cement, carbon powder,
gypsum powder, and other ultra-fine substances, corrosive liquids such as
solvents, detergents, washing powder, flammable and explosive materials such as
gasoline and alcohol, etc. Otherwise, the whole machine may be damaged or a
fire may occur, resulting in personal injury and other accidents.
Do not use this product to absorb water or wet dust, while preventing the
machine from rain, water or avoiding to use it in wet places (such as bathroom,
toilet and laundry room etc.), to break down the product.
Do not allow the machine to approach the heating appliance or be exposed to
the sun. Otherwise, a fire may occur.
Do not let people with impaired behaviors or people without experience and
common sense play or operate the machine so as to avoid accidents.
Avoid running the machine for a long time when the float blocks the air inlet so
as not to damage the machine.
After using the machine, it is necessary to clean the sewage tank in a timely
manner to keep the air duct path clear, to avoid the suction force from being
reduced and motor heating due to blockage. These may affect the performance
and service life of the cleaner.
The machine body and the floor brush can be energized, so they cannot be
cleaned in water.
When the machine breaks down, do not repair it by yourself, please call our
- 01 -

Notes on cleaning solution:
1.If a large amount of cleaning solution enters the motor, it will cause danger.
2.Please follow the requirements in the user guide (the ratio of the solution and
water 1:40) to prepare the solution. It is recommended to use the cleaning solution
produced by our company and its approved manufacturers. The solution must not
contain acids, alkaline solutions, or substances harmful to the environment.
3.The cleaning solution shall be kept in a well-ventilated place, away from light
and out of reach of children. If the cleaning solution gets into the eyes accidentally,
it shall be thoroughly rinsed with clean water in time. In case of accidental inges-
tion, please seek medical attention immediately.
4. When treating sewage and cleaning solution, follow local environmental
protection requirements.
2.1 Unpack
Unpack and take out the cardboard liner, all the built-in accessories ,and
materials. Grasp the machine, take out the cleaner from the box and take off the
plastic bag. Store the outer package for future transportation and maintenance.
About disposal methods of waste batteries:
1.When the battery assembled in the product contains materials that are harmful
to the environment, the battery pack must be removed from the machine before
disposal.
2. When the battery pack is taken out, the product is in a shutdown state and must
be powered off.
3. Please dispose of the waste battery pack safely and properly, and do not throw
it into the fire, water ,or soil.
4.Leakage of waste batteries may contaminate the skin or clothing. Please treat it
with clean water and seek medical treatment in a timely manner.
The technology and data as specified in this user guide are obtained from our
company’s laboratory or a designated third-party testing company, and they shall
be finally construed by our company.
- 02 -
Chapter 2 Before use
professional maintenance personnel for after-sales treatment.
Do not remove the rolling brush cover or rolling brush body when the machine
is energized or running so as to avoid personal injury.
If the charger wire or plug is damaged, in order to avoid danger, you must seek
the manufacturer, its maintenance department, or similar department profession-
als for help.

2.2 Name of all parts
2.3 Packing list
- 03 -
Handle body
Machine body cover
(The built-in removable battery pack)
Cleaner
Charging stand
Charger
Cleaner Handle body Charging stand Charger BatteryUser guide
1 1 1 1 1 1

3.1 Function icons
Unpack and take out the cardboard liner, all the built-in accessories ,and
materials. Grasp the machine, take out the cleaner from the box and take off the
plastic bag. Store the outer package for future transportation and maintenance.
- 04 -
Chapter 3 Use the Product
Handle body
ON/OFF button
Working indicator
Speed button
Machine body cover
(The built-in removable battery pack)
Water tank
Roller brush cover
Roller brush body
Charging stand
Charger
Water tank release button
Sewage tank

3.2 Product dis-assembly
3.2.1 Handle body installation
Insert the end of the handle into the port of the machine body perpendicular to
the direction of the machine. After hearing a click, ensure that the handle is tight
and not loose, that is, the installation is successful. If you want to take out the
handle body, you need to unscrew the body cover, insert it into the hole shown in
the figure with a hard tool, and then pull out the handle.
3.2.2 Install the battery pack
Push the machine body cover-up and put the battery pack into the battery pack
slot. When you hear the crisp “click” sound of the channel, it indicates that it is
assembled in place and then the body cover is closed.
- 05 -
Handle release hole
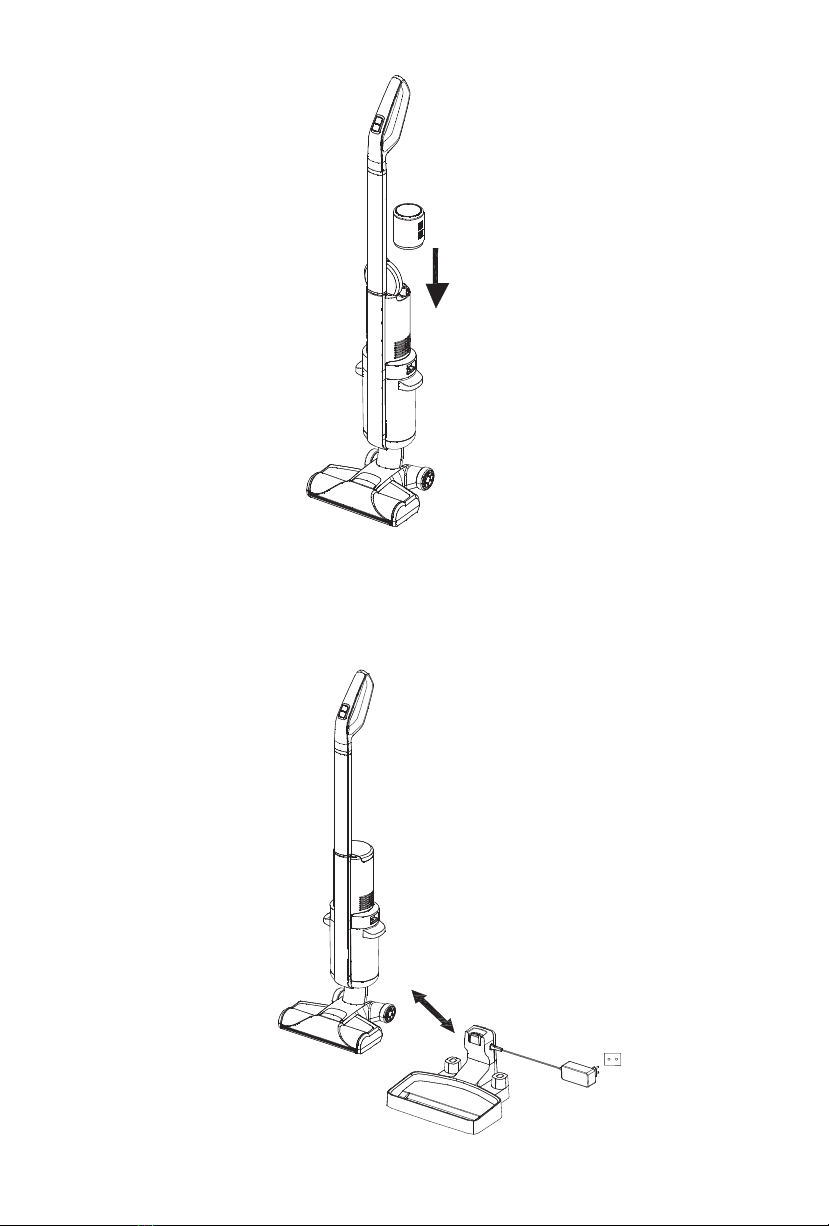
3.2.3 Charging function
After installing the handle and battery pack on the machine body, align the
whole machine with the charging base, insert the charger port into the charging
base, insert the charger plug into the AC outlet, and the working indicator lights up
in red to indicate normal charging.
- 06 -

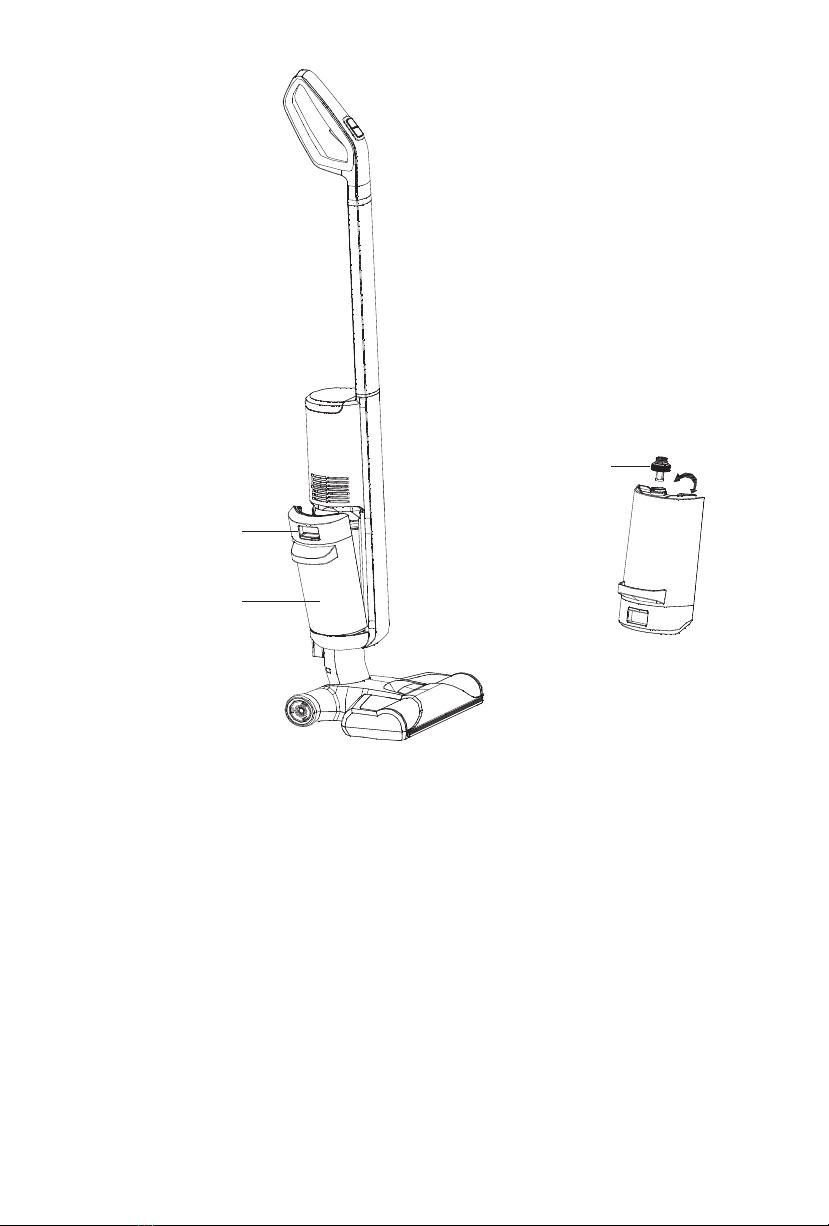
3.2.4 Dis-assembly and assembly of the clean water tank and
sewage tank
To remove the water tank or sewage tank, hold the machine body with one
hand, hold the water tank handle with the other hand, and press the water tank
release button with your thumb to remove the water tank or sewage tank diago-
nally; if you want to install the water tank or the sewage tank, first put the bottom
of the clean water tank or the sewage tank against the flanged edge of the tray
and press the clean water tank or sewage tank with your hand. After you hear a
click, the installation is successful.
3.2.5 Removal and installation of roller cover and roller body
1.If you want to remove the rolling brush cover, first put your finger on the edge of
the rolling brush cover and push the rolling brush cover-up and rotate to remove
the rolling brush cover. You need to align the buckle at both ends of the rolling
brush cover with the grooves at both ends of the floor brush, and then press the
rolling brush cover. The installation is successful after hearing a click.
2.If you want to cancel the rolling brush body, use your fingers to pull up the left
- 07 -
Press the sewage tank or
water tank release button
Sewage tank
Sewage tank

rolling brush handle to remove it; when installing, hold the rolling brush end cap
with your hands, align it with the groove and put it into the groove and then the
rolling brush is installed in place.
- 08 -
3.3 Product use
(Note: Before use, check if the vacuum cleaner has power, if no power, charge it
in time, fully charged before use.
3.3.1 Filling the water tank
1.Gently press the water tank release button on the water tank and remove the
water tank;
2. After the water tank is turned upside down, unscrew the cap in the clockwise
direction as shown, and pour clean water (below 50°) until the water level line;
3.Tighten the screw cap of the water tank to ensure that it is tight without loose-
ness and water leakage;
4.Install the water tank into the machine body. It indicates that the installation is
successful after hearing a click.
3.3.2 Whole machine work
1. The ON/OFF button of the machine is located above the handle. Press the
ON/OFF button to start working with the hand. The mode is low gear by default
after booting. After pressing the speed button, you can switch between high and
low gear at this time. Press the ON/OFF button and the whole machine stops
working at this time.
2. After pressing the ON/OFF button, press and hold the water spray button, at
this moment, the sprinkler head on the floor brush sprays water to wet the rolling
brush body. When you stop pressing, the floor brush stops spraying.
Notes:
1. The water spray button cannot be used with the switch button or speed control
button at the same time.
2. Please do not suck foam liquid with the product, nor put a high-foam cleaning
- 09 -
Water tank
release button
Water tank cap
Water tank

3.3.3 Drain sewage from the sewage tank
1. Gently press the water tank release button on the sewage tank and remove the
sewage tank;
2.Hold the dust cup in one hand and pull out the upper cover of the sewage tank
with the other hand;
3.After the sewage in the sewage tank is drained, please be sure to clean the
sewage tank, place the cover of the sewage tank in place and install the sewage
tank back into the machine body. When you hear a click sound, the installation is
successful.
- 10 -
Speed button ON/OFF button
Spray button
Water tank
release button
solution into the water tank.
3. It is recommended to use high-end work when the environment is heavily
polluted or when there are many water stains.
4. When the sewage tank is full of water, the indicator light will flash green,
and the main motor stops working at the same time, and the rolling brush will be
reminded according to 3 frequency actions.
5. After using the machine, it is recommended that it be placed vertically on
the charging base.
Sewage tank

3.3.4 Product charging
Connect one end of the charger to the mainframe and the other end to the
home socket (the red light is always on when charging, and the green light is
always on when it is fully charged). When charging, the whole machine shall be
placed on the charging stand, close to the wall corner, to avoid tripping and other
injuries (Note: it is best not to plug the charger into the plug for a long time, to
prevent children from touching it ,etc.).
Note: Every 3 months after the product is purchased, please use the charger
specially provided by our company to charge the battery.
3.3.5 Rolling brush self-cleaning function
Before the self-cleaning, place the machine on the tray, insert the charger into the
plug, and keep at least 1/2 of the water in the water tank. Press and hold the
speed button for 3s and enter the self-cleaning mode after the indicator light
flashes for 3s. After the self-cleaning ends, the machine will automatically shut
down, which is a self-cleaning cycle.
Note: Before using the self-cleaning function, please clean the sewage in the
sewage tank after the self-cleaning is completed
- 11 -

4.1 Clean sewage tank
When the sewage tank is full of sewage, the float of the water level starts to work,
the machine starts to blink green and work intermittently. At this time, please shut
down the whole machine and clean the sewage tank as soon as possible (if you
do not shut down immediately, the whole machine will also automatically shut
down after 3S). After stopping work, take the upper cover of the sewage tank up
by hand, pour out the sewage from the sewage tank, and rinse the sewage tank,
float bracket and float, filter rack, and sponge with clean water. After cleaning,
install the sewage tank into the whole machine and continue to use it.
- 12 -
Water tank
Chapter 4 Cleaning and Maintenance

4.22 Clean the floor brush assembly
First, insert your finger into the window and pull it up, take out the window
assembly, pull up the left handle of the rolling brush to remove the rolling brush,
wipe the empty space of the rolling brush with a dry rag, and use a knife to insert
the rolling brush to cut the tangled hair and throw it into the trash. Place the
window and rolling brush body in clean water to rinse. After rinsing, assemble the
rolling brush and window in place.
Tips: When cleaning, be sure to take out the battery pack to avoid injury caused
by accidental start. If you do not continue to use the machine, please install the
sewage tank body, its upper cover, sponge, the filter frame, the rolling brush body,
and the window in the whole machine and place it in a ventilated place to dry and
then for storage, so as to prevent the bad smell caused by bacteria breeding due
to the moist environment.
- 13 -
Water tank
release button
Sewage tank

4.3 Regular maintenance and storage
It is recommended to clean the sewage tank, filter element, rolling brush body,
and rolling brush cover after each use, for the next use. If the sewage in the
sewage tank has reached the maximum max line during use, it is recommended
to immediately clean up, otherwise, it will affect the use effect; after the cumulative
use time of the filter reaches 30-50h (according to the use of the filter), it is
recommended to buy and replace the filter at the Ticwell brand flagship store, so
as not to affect the performance of the whole machine.
When the machine won’t be used for a long time, please place the machine in a
cool and dry place and not in direct sunlight or a humid environment.
Before entrusting the maintenance department, please check the following points
- 14 -
Chapter 5 Troubleshooting
Faults Possible causesSolutions
Machine does
not work
1. The product has no power
or insufficient power.
2. The ON/OFF button is not
pressed.
3. The rolling brush body is
seriously tangled.
4. The machine stops
working after being turned on.
1. Charge and use in time.
2. Press the ON/OFF button.
3. Clean the rolling brush
body in time.
4. Clean the sewage tank.
Less suction
force
1. The sewage in the sewage
tank has reached the
maximum capacity.
2. The rolling brush cover and
the sewage tank are not
installed in place.
3.The rolling brush body is
entangled with hair.
4. The floating filter is dirty
5. Insufficient battery power.
1. Clean the sewage tank.
2. Re-install.
3. Clean the rolling brush
body.
4. Clean the filter frame.
5. Use the machine after
charging in time.
Whole machine
sound is
abnormal
1. The suction port is blocked.
2. The sewage in the sewage
tank has reached the
maximum capacity and the
float moves.
1. Clean the suction port
foreign body.
2. Clean the sewage tank.

6.1 Technical parameters
If there are other faults and special tools need to be repaired, please contact
Ticwell after-sale service to help you perform after-sales warranty service.
- 15 -
The floor brush
doesn’t spray
water
1. No water in the water tank.
2. The water spray button is
not pressed.
3. The water tank is not
assembled in place.
1. Add water to the water tank.
2. Press the water spray
switch.
3. Re-install the water tank in
place.
Water spray at
the air outlet
1. After the filtering sponge is
cleaned and used, it is not
air-dried.
2.The water in the sewage
tank has exceeded the
maximum limit.
3. The machine shakes a lot
or hits the wall with a strong
force during use.
4.No filter sponge or float
installed.
1. After the filtering sponge is
cleaned, it needs to be dried
for use.
2. Take out the sewage tank,
drain the sewage and use the
sewage tank.
3. Remove the dirty water tank
and empty the waste water
for reuse.
4. Install the filter sponge or
float.
Spray water
at the air
outlet grille
1. No filter is installed.
2. No float is installed.
3. The filter is not dried after
cleaning.
4. The sewage tank has
reached the maximum
capacity value.
1. Install the filter.
2. Install the float.
3. The filter must be dried after
cleaning.
4. Clean the sewage tank.
Chapter 6 Product Specifications
Machine model SW301
Power supply100-240V,50/60Hz
Rated power 215w
Battery capacity 2500mAh
Water tank volume 0.40L
Sewage tank volume 0.35L
Charging time 3~4h
Executive StandardUL1017

6.2 Circuit diagram
WARRANTY: 2-YEAR LIMITED WARRANTY
• Only applies to purchases made from authorized retailers of Ticwell.
• Is subject to the adherence of the requirements outlined in this instruction
manual, and is subject to further conditions outlined below.
- 16 -
Chapter 7 After-sales service
Charger
Battery pack
Adapter board
Motor diaphragm pump
Brush motor
Vacuum motor
Working indicator
Other manuals for SW-301
1
Table of contents
Languages:


