Tide TEVS10-K07 User manual

‘Safety Precautions’ are to
protect user safety and prevent
property damage. Be sure to
read and use it correctly.
The pictures in the user manual
are drawn for explanation
purposes and may differ in part
from the actual shape.
www.tidekorea.com
20F, 128, Gasan Digital 1-ro, Geumcheon-gu, Seoul, Republic of Korea
Tel : +82-2-6673-0930 FAX : +82-2-6673-0968
20F, 128, Gasan digital 1-ro, Geumcheon-gu, Seoul, Republic of Korea
Designed by TIDE
Product Manual
TEVS10-K07

3
2
Model Name : TEVS10-K07(Slow Charger)
Index
Index
Index
What to Know Before Reading the Manual
• Be sure to read 'Precautions for safe use' before use EV Charger.
• After reading, please keep the product manual in a place where anyone can see it.
※ Appearance is subject to change without notice for quality improvement.
What to Know Before Reading the Manual
- To help us quickly solve your issue, please provide the following information
when reporting a problem: the product's model name, the type of failure, and
your personal details (such as phone number and address)
- Please, send pictures of product failure for faster service when
reporting a fault.
- Please, read the entire manual before installing and operating your EV charger.
Product Overview
Product Design and Specifications _____________________________________ 4
Product Dimension and Size __________________________________________ 5
Component Names and Functions _____________________________________ 6
Caution
Precautions Prior to EV Charger Installation ______________________________ 8
Precautions when installing EV Charger _________________________________ 9
Product Installation
Preparation of equipment and parts for installation _______________________10
How to Drill Holes for EV charger and Connector Cradle _________________11
How to Install EV Charger and Connector Cradle ________________________12
Wiring & Connections _____________________________________________13
Operation
Operation _________________________________________________________16
Others
Error Code ______________________________________________________ 22
Other Troubleshooting Methods to Try __________________________________23
Product Warranty __________________________________________________24

Product OverviewProduct Overview
5
4
* Appearance may change without notice for quality improvement
Index Description
Model Name TEVS10-K07
Touch Type Touch Button
Display Type OLED
Input Voltage / Frequency Single-Phase AC230V / 50Hz
Output Voltage / Frequency Single-Phase AC230V / 50Hz
Output Power (Max) / Frequency 7kW(32A) / 50Hz
Charing Processor OCPP 1.6
Protection Surge Protection Circuit, Earth Leakage Breaker
IP Level IP55
Constant 1000 Pulse/kWh
Maximum Tolerance ±1%
Charing Connector AC 7 Pin Type 2
IEC/EN 62196.1-2014, IEC/EN 62196.2-2017
Earth Leakage Breaker
AC 230V, 40A / A Type
Dimension 235(W)mm x 364(H)mm x 154(D)mm
Warranty Within one year after purchasing
Product Dimensions and SizeProduct Design and Specifications
Product Overview
Product Overview
Product Overview
Product Overview
Product Overview
7
6
Product Overview
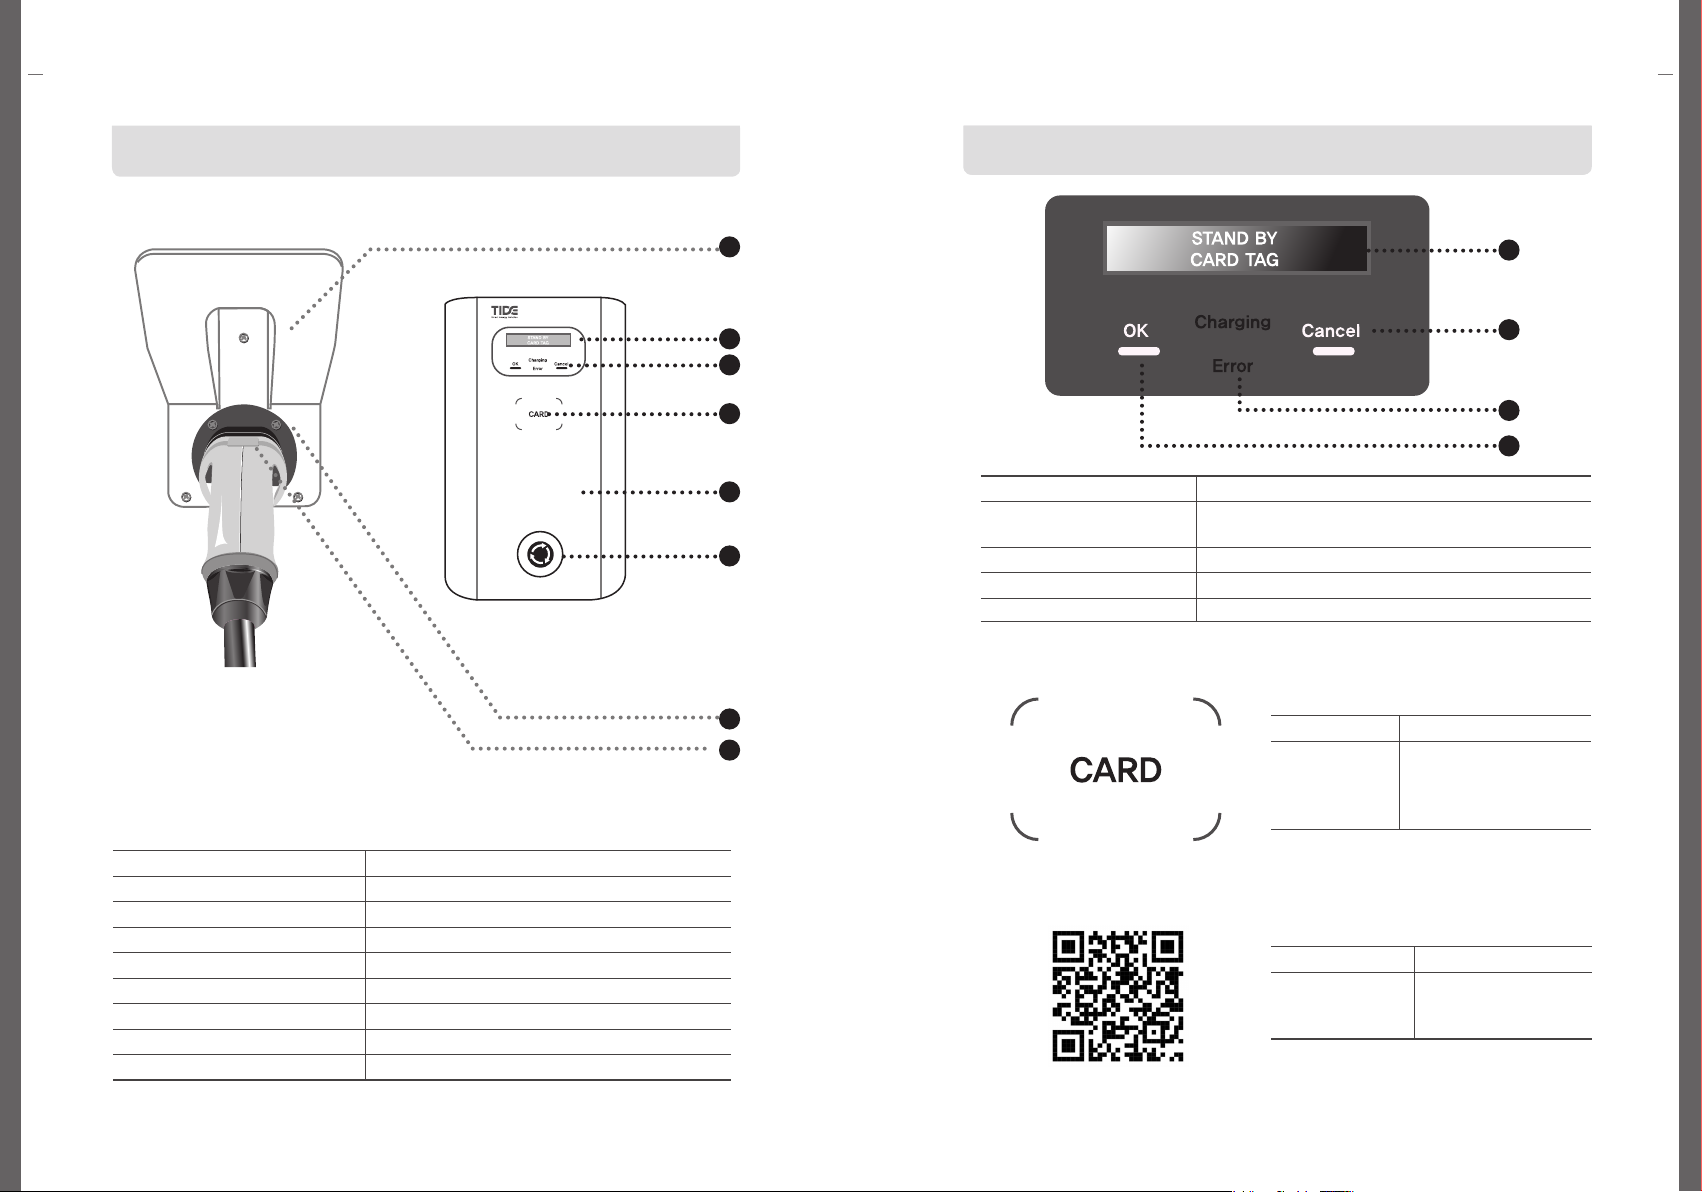
Component Names and FunctionsComponent Names and Functions
No Name
1 Connector Cradle
2 Display(OLED)
3 Touch Pad(OK, Cancel)
4 NFC Pad
5 EV Charger Body
6 Emergency Button
7 Wall Bracket
8 Charging Connector
No. / Name Description
1.OLED Display Charging status, charging time, charging amount
(kW), error message, etc.
2. Cancel Touch Button for Cancel
3. Charging or Error(LED) Display of the status for charging or error
4. OK Touch Button for OK
Name Description
NFC Pad
Tag the authentication/
registration completed
card to start charging or
stop charging
Name Description
QR Code
Open the app and
Scan QR code
to start charging
1
2
3
4
2
1
7
8
3
4
5
6

9
8
Precautions
Precautions
Precautions when installing EV Charger
Safety Precautions for Use
Precautions Prior to EV Charger Installation
Important information before installation and use
The following is to prevent user safety and property damage in advance,
so please read it carefully and follow it.
·
During trial operation, you must perform trial operation according to the basic
operation sequence.
·
Use it according to the instructions displayed on the screen, and in case of an
abnormality, stop using it immediately and contact the service center.
·
Excessive manipulation of the charger and improper use of the charger may
cause damage to the product.
·
It is prohibited to arbitrarily change the location of the charger from the place
where it was originally installed.
·
Relocation of the charger location can be requested through A/S.
·
Please use a dry towel when cleaning to keep the charger clean.
(Never spray water or use a wet towel. There is a risk of electric shock and
damage to internal components.)
·
If there is moisture inside the charging connector, be sure to remove the
moisture before use.
·
Be careful not to let foreign substances enter the charger in case of a risk
for fire.
·
When not using the charger, be sure to store the charging cable and charging
connector as described in the manual.
·
When opening the front panel of the EV charger or the back cover of the
stand, be sure to use the key provided.
·
When installing the charger, the lowest point of the charging connector must
be installed within 0.5~1.5M from the ground.
Expertise Requirements for Product Installation
The installation work and initial operation check of the charger should be
carried out only by engineers who have completed installation training from
the manufacturer
·When installing the product, the engineer must have the necessary safety
equipment, including insulated gloves, a safety helmet, safety goggles or face
shield, safety clothing, and any required tools.
·Required that the installer has received education and training in first aid in case
of an emergency.
·Please note that physical damage caused by unqualified installers will be
charged, even if it occurs within the warranty or A/S period.
Precautions when opening the door of EV charger for maintenance
·Be sure to turn off the circuit breaker of the distribution panel before opening
the EV charger.
·Be careful with handling the internal circuits and parts.
(There is a risk of electric shock due to the circuit where AC 230V voltage flows.)
·Please, open after contacting the service center.
·Be sure to close the EV charger tightly after opening and closing it.
·Please read this manual carefully and check the product before installing,
operating or maintaining the charger.
·After reading the manual, keep it in a place where the user can see it at any time.
·In order to use the product's functions safely, fully familiarize yourself with
the manual in advance.
·When using the EV charger, there is a risk of electric shock or explosion due to
the high voltage and current.
·However, in normal operation, it is designed to be sufficiently safe so that there is
no danger to the user.
·This charger may have different internal systems depending on the country of
installation. Be sure to check the country and environment when installing.
·If this manual is damaged or lost, you can download it from our homepage.
11
10
OK
Charging
Error
Cancel
Precautions
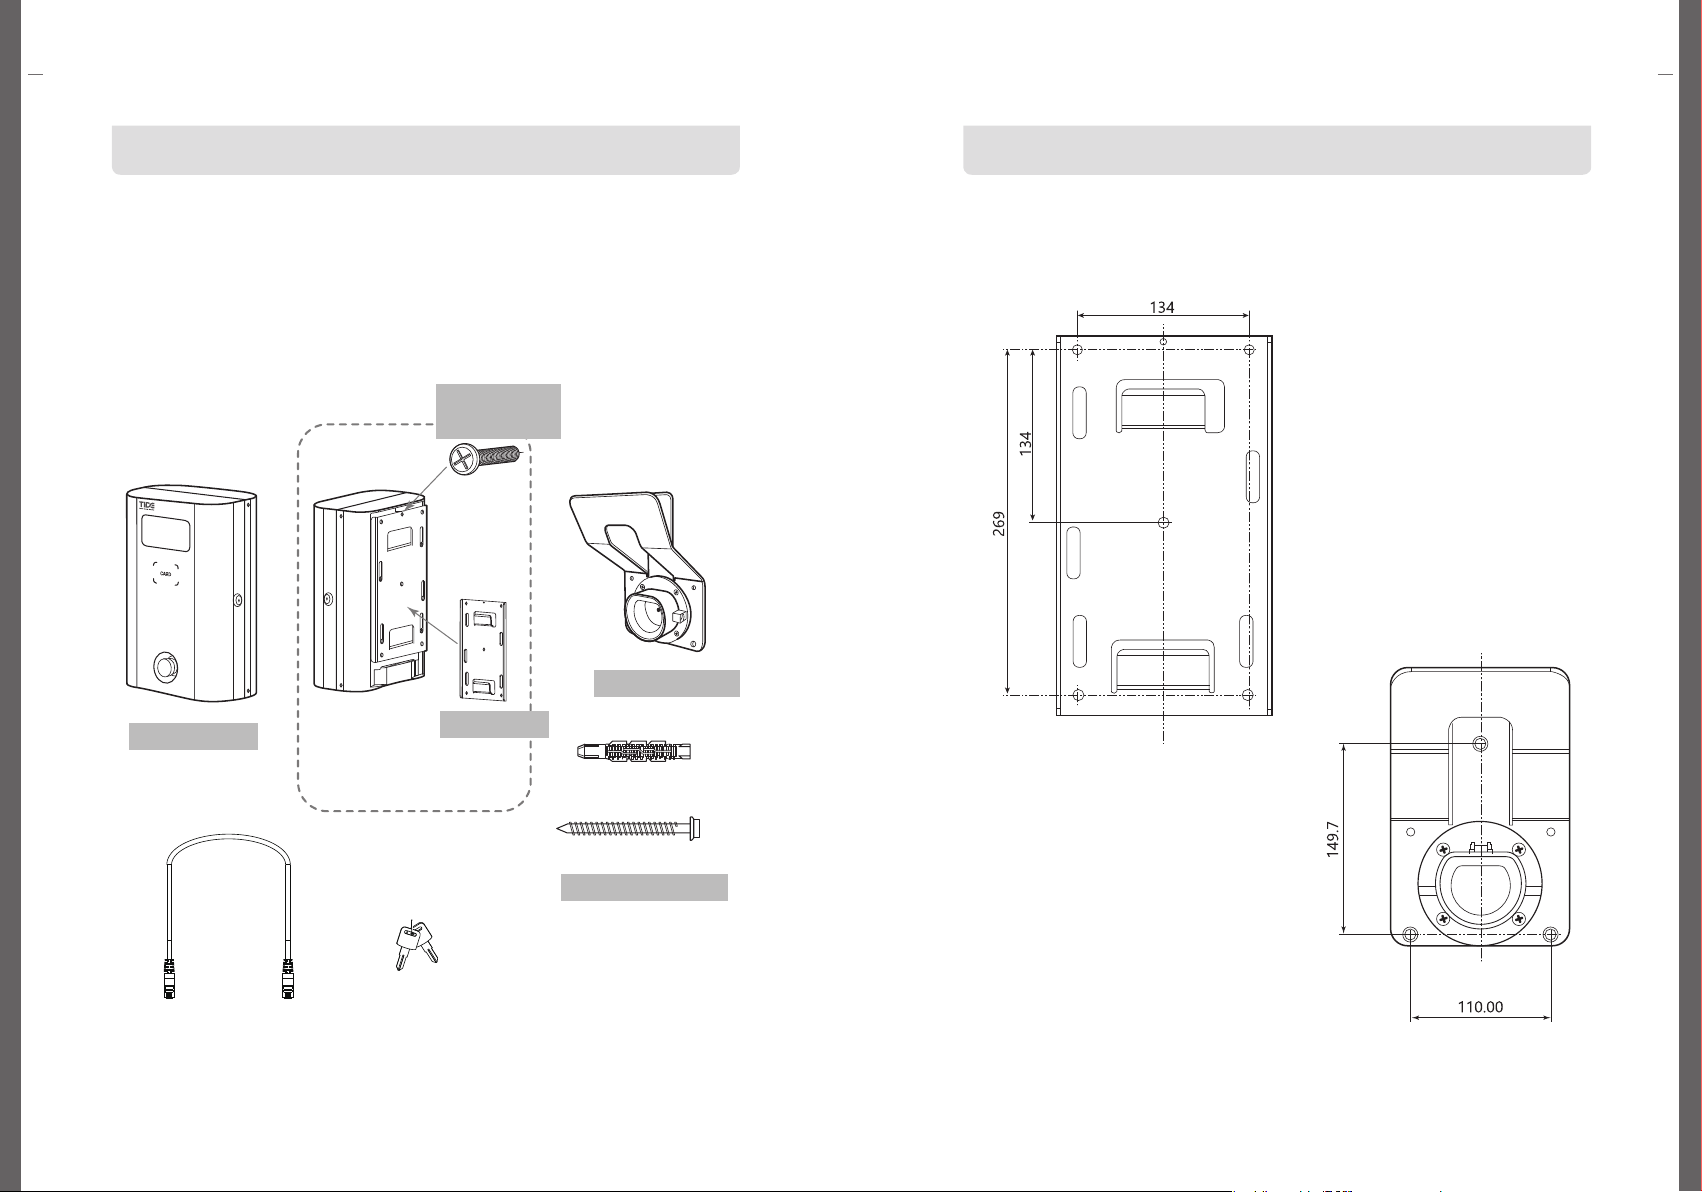
How to Drill Holes for EV Charger & Connector Cradle
Product Dimension
Precautions
Preparation of equipment and parts for installation
Product appearance and specifications
* Appearance may change without notice for quality improvement
After receiving the product, check the box packaging condition, remove the
packaging, and check if there is any damage during transportation. In case of
damage, immediately contact the service center.
·
Preparations for installation vary slightly depending on the installation
environment, so prepare other parts and tools for wiring work.
·
Before installation, in the charger installation site, check the power wiring. And
check whether you need to install the power distribution panel for the charger or
not.
Refer to the drilling guide below and drill a hole according to the size of the
screw anchor on the wall where the cradle will be installed.
Screw Anchor Size : 8mm X 60mm
※ Remove the fixing screw
on the top of the charger and
remove the wall bracket.
Body
Connector Cradle
anchor bolt 8SET
Screw Anchor
Φ8X60
LTE Modem
LAN Cable
Lock Key
M5X65
Charger
Fixing Screw
(M3X18)
Wall Bracket
Drilling Guide for Charger Cradle
Drilling Guide for
Connector Cradle

13
12
① Insert the screw anchor
into the hole in the
perforated wall.
② Align the hole of the
fixing bracket with the
screw anchor.
③ Fix with M5X65 screws.
④ Hang the charger body
on the bracket and lower
it vertically to fix it.
⑤ Secure with a M3X18
screw to the hole at the
top center of the charger.
Wiring & Connections
Wiring & Connections
How to Install EV Charger and Connector Cradle
How to Install EV Charger and Connector Cradle
Install the cradle in the order below. Open the door of EV Charger
① Insert the screw anchor into the hole
on the drilled wall.
② Align the hole of the connector cradle with
the screw anchor.
③ Fix with M5X65 screws.
④ Plug the connecto into the connector
socket and store it.
[M3X18]
(Charger Fixing Screw)
[Connector]
[M5X65]
(Anchor bolt)
[Bracket coupler]
[Screw Anchor]
(Anchor bolt)
[Fixing Bracket]
[[Screw
Anchor]
(Anchor
bolt)
[[Body]
[M5X65]
(Anchor bolt)
1
2
4
5
3
OK
Charging
Error
Cancel
① Unlock the EV charger with the enclosed key.
② Remove the M3X12 screws on the top and bottom of the side.
2
1
[M3X12]
(Screw)
[Lock Key]

15
14
Wiring & Connections
Wiring & Connections
Wiring & Connections
Wiring & Connections
Power on the EV Charger
Connection for LAN Cable
① Turn on the circuit breaker inside the charger.
② Turn on the switch of the board attached to the front cover of the body.
① Connect the LAN cable to the communication input port according to the
installation environment.
LAN
Port
N E L
N E L
Connect the cables in the following order.
When connecting cables, be sure to turn off the circuit breaker.
Wire debris generated when connecting cables can cause abnormalities, breakdowns, and malfunctions.
So, clean up the area after work. And be sure to connect N, E, L separately.
Caution
Preparation before connecting the power cable
①
There are two holes on the bottom of the charger. Insert the power cable into the left hole.
②
After inserting the power cable, close the hole by using a cable gland (PG21), etc.
③ Use a flexible tube to close the power cable so that it is not exposed.
Connection for the power cable
① Input power must be connected to the power grid. Connect the cables according to
Neutral, Earth, and Live wires. (Input wire, ground wire cross section: 6mm²or more)
② Terminate each cable by using a ring-type crimp terminal.
③ Cover the cables with insulating tape so that they are not exposed. After connecting
the wiring, turn on the circuit breaker inside the charger. And turn on the switch of the
board attached to the lid of the body.
2
1

CHARGING CANCEL
OK / CANCEL
17
16
Operation
Operation
The OLED screen displays each step of the charging process
Operation
Operation
Full
Charging
Cancel
Touch
CARD PROCESS
ERROR - E301
The OLED screen displays each boot step
This EV charger is a product with high voltage and current.Incorrect
operation may cause device failure, and in serious cases, fire or personal
injury may occur. When using the product, follow the procedure below.
Through the OLED window, you can check the progress of each step of the
charger and operation errors.
When the power is turned on, the charger will boot up and the OLED
screen will display the status of the charger.
When 'STAND BY CARD TAG' is displayed on the OLED screen, the
charger has completed booting up and is in a normal standby state ready
for charging.
Charging
Available
Charging
Unavailable
Booting Error
Unavailable
Emergency Stop
Reservation
Offline
Booting Up
Reservation /
Availability
BOOT PROCESS WAIT
CHECK PROCESS WAIT
STAND BY CARD TAG
STAND BY
CARD TAG
INSERT CONNECTOR
CHARGING PROCESS
0Wh 00:00:01
CHARGING COMPLETE
50kWh 07:30:00
CHARGING ERROR
50kWh 07:30:00
Card Error
ONLINE
CARD TAG
CHARGING CANCEL
CARD TAG
CHARGING ERROR
ERROR - E104
CPID 99999922191
EMERGENCY STOP
(SPIN TO BACK)
DO NOT USE CHARGER
BOOT ERROR
RESERVED
CARD TAG
OFFLINE
CARD TAG
UNDER MAINTENANCE
Card Tag
Charging
Connector
Start to Charge
Stop to Charge
Completed
Charing Error

19
18
Operation
Operation
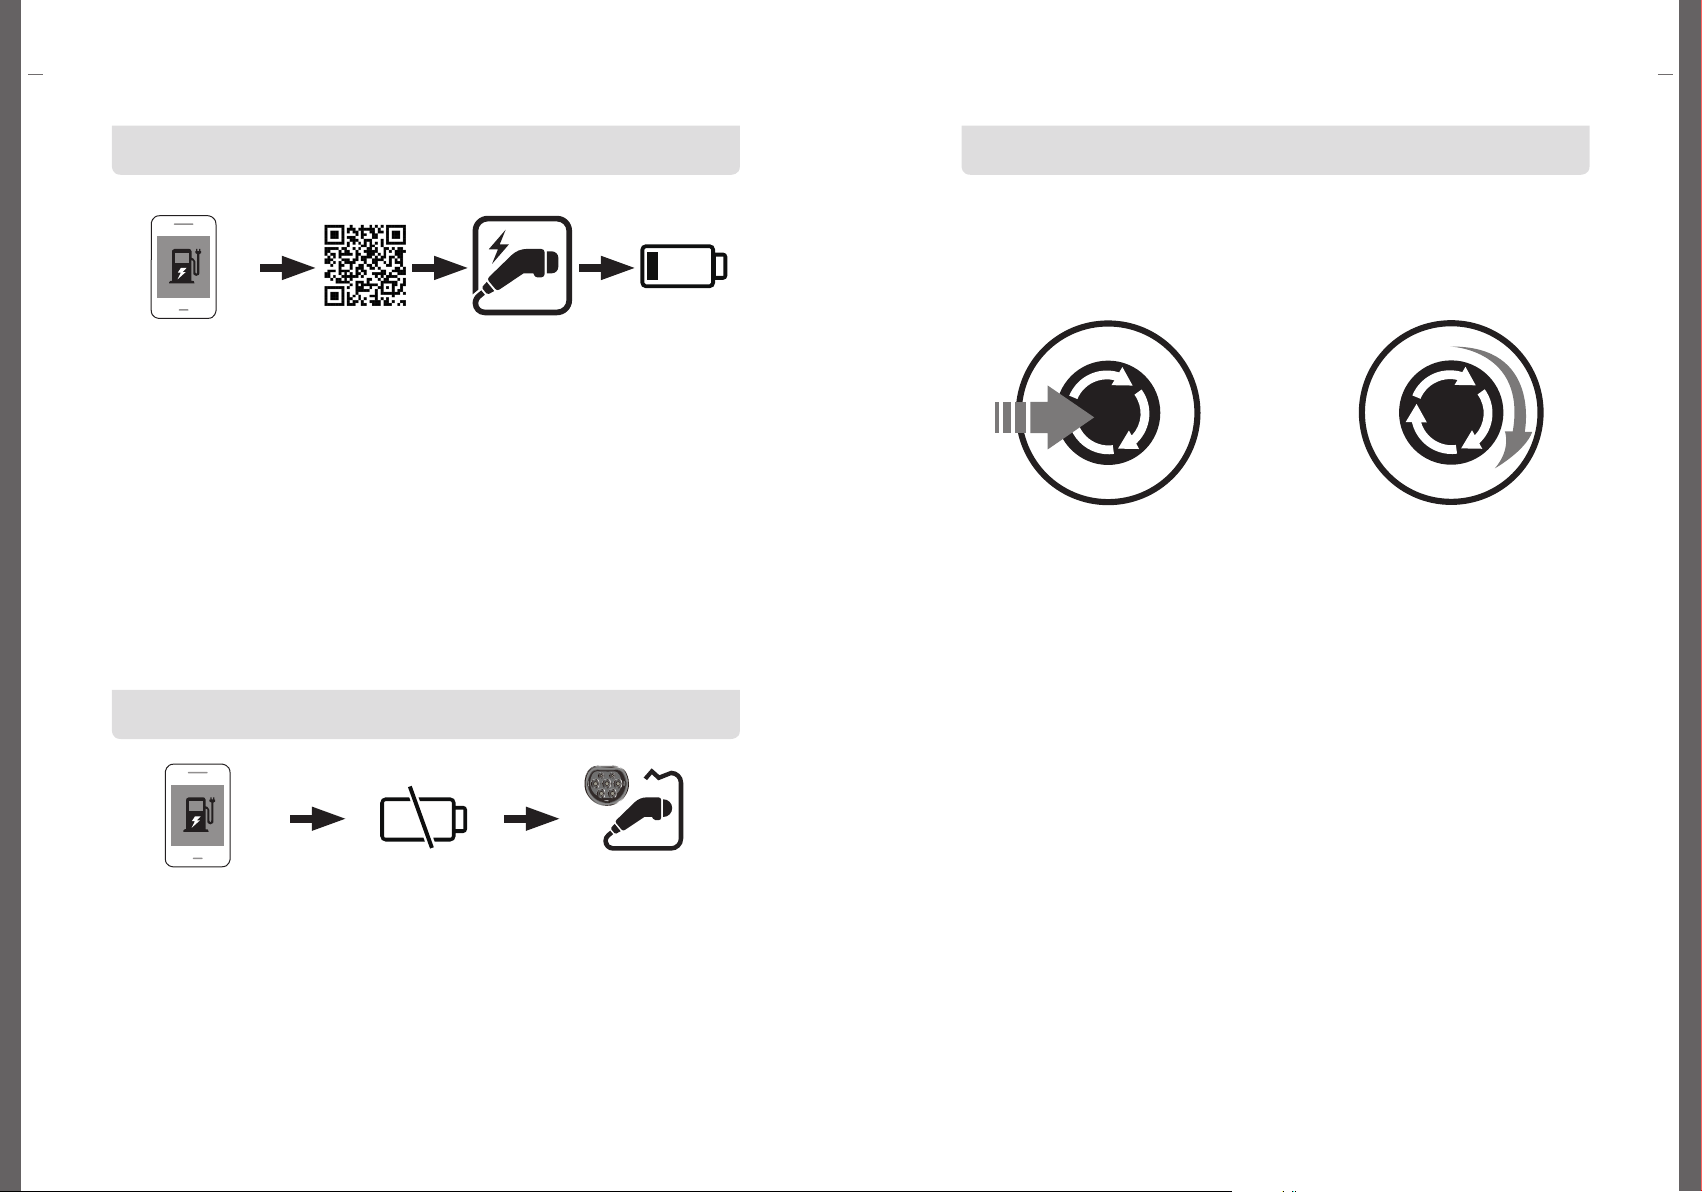
Operation (Card Tag)
Start to Charge
Operation(QR Code Scan)
The OLED screen displays each step of the charging process
NFC Card Tag Connect EV and
charging connector
Start to Charge
1. Authenticate the user using the NFC card. Tag the NFC card in the
tagging area.
2. Connect the connector of the charging cable to the EV.
If there is moisture in the charging connector, remove it before connecting.
3. When charging starts normally, the charging time is measured on the
OLED window as soon as the charging starts, and the amount of charge (kWh)
is also displayed, and the unit is displayed in units of 0.01 kWh.
충전 정지
Touch Cancel
Button
Disconnect EV and
charging connector
1. Users can stop charging at any time during charging.
2. When charging stops, touch the cancel button.
3. Tag an NFC card.
4. Charging stops, and disconnect the charging connector connected to the EV.
5. Charging stops automatically even when the vehicle's battery is 100% charged.
NFC Card Tag Stop to Charge
QR Code Scan
Insert
Start the charging
Stop the charging
Finish the charging
Charging Error
Open the
app
INCERT CONNECTOR
CHARGING PROCESS
0kWh 00:00:01
CHARGING COMPLETE
50kWh 07:30:00
CHARGING ERROR
50kWh 07:30:00
CHARGING ERROR
ERROR-E 104
Charging stop request
in the app
ONLINE
CARD TAG
Full
Charging
CPID 99999922191
STAND BY
CARD TAG
21
20
Operation
Operation
Operation
Operation (QR Code Scan)
Start to Charge
Start to Charge
Emergency stop
-When charging, if you press the emergency stop button on the front, the
charging will immediately stop.
-The emergency stop button must be used only in an emergency.
-Incorrect use may cause product operation problems.
Press the emergency
stop button
Release the emergency
stop button by turning it to
the right.
Run the app
Stop charging in app
QR Code Scan Connect EV and
charging connector
Start to Charge
Stop to Charge Disconnect EV and
charging connector
1. Run the charger app.
For how to install the charger app, refer to the charger app description.
2. Scan the QR code to start charging.
For how to use the charger app, refer to the charger app description.
3. Connect the connector of the charging cable to the EV.
If there is moisture in the charging connector, remove it before connecting.
4. When charging starts normally, the charging time is measured on the OLED
window as soon as the charging starts, and the amount of charge (kWh) is
also displayed, and the unit is displayed in units of 0.01 kWh.
1. Users can stop charging at any time during charging.
2. Stop charging using the charger app.
3. Charging stops, and disconnect the charging connector connected to the EV.
4. For how to stop charging in the charger app, refer to the charger
app description.
23
22
Other Troubleshooting Methods to Try
Other Troubleshooting Methods to Try
When encountering issues during product use, please first check the
following items. If the problem persists, please contact the service center or
our headquarters for further assistance.
Error Code
Error Code
If you encounter any issues while using the product, please check the
following items first. If the issue persists, please contact either our service
center or head office for further assistance.
Error Code of Charger
Error Code of Card
If the product is not operating normally, please contact our A/S center or
manufacturer for repair assistance. To expedite the process, please have the model
name, serial number, and year of purchase ready when you call our main phone
number.
Code Description Code Description
E
r
r
o
r
C
o
d
e
E103 Emergency Stop button
F
a
i
l
u
r
e
C
o
d
e
E201 Stop chsrging on sever
E104
Disconnection for the
charging connector
E202 Damage on charger
E105 EV Charger Reset E203 Storage Capacity Excess
E106 EV Charing Fail E204 CP Signal Abnormality
E107 Authentication Failure E208 Overcurrent
E108 Authorization timeout E209 Overvoltage
E109
Timeout for maximum
charging time
E210
Damage on
Electricity Meter
E110 CP Signal Abnormality E211 Damage on Relay
E112 Charger Ground fault E212 Damage on Card Reader
E114 Overcurrent Detection E214 Low Voltage
E115 Overvoltage Detection E216 Network Abnormality
E116 Electricity Meter Error E240 Others
E117 Relay Error
E118 Card Reader Error
E120 Low Voltage Detection
E140 Others
Code failure description
E301 Unregistered Card
E302 Expired Card
E303 Abnormal Card
E304 Currently Being Used Card
E305 Mismatched Card
E306 Offline Authentication Failure
E309 Others
Problem
Probable Cause
Corrective Measures
The power is being supplied
to EV charger, but
EV charger is not turning on
Is the system power OFF?
Please, turn on the circuit breaker
switch inside the charger
Please, turn on the main board power
switch inside the charger
Is the circuit breaker in the
distribution panel turned OFF?
Please, turn on the circuit breaker
in the distribution panel inside the
charger.
User authentication can not
be identified.
Is it the registered card?
User authentication can only be
performed with registered, authorized
cards
Is the card used to stop
charging the same as the card
used to start charging?
To stop charging, the user must
tag the same card used to start the
charging session for authentication.
Charging can not be unable
to proceed.
Does the OLED screen display
error messages, and is there
an Error LED on the charger
body?
Please, check "Error Code of
Charger”
Have you connected the
charging connector to the EV
and tagged the product body
with an NFC to start charging
Please, get your NFC tag to start
charging.
Charging ends shortly after
starting to charge
Is the EV battery fully charged? If the EV battery is fully charged,
charging will end automatically
Is the EV unable to charge?
Please, check the EV status. If there
are any problems, please contact the
manufacturer.
Charging stops repeatedly
during charging.
Does the function of stop
charging repeatedly happen? Please, check the condition of the EV.
Do you find it difficult to
determine the cause of the
issue?
To request service, please contact
either the A/S center or the
manufacturer
The charging connector
cannot be connected to the
EV.
Is there a problem with the EV
charging connector?
Please, check the EV charging
connector socket. The charging
connector locking device may be
engaged.

Product Warranty
TIDE guarantees the product as follows in accordance with the Consumer Damage Compensation
Regulations.
This product has passed strict quality control and inspection, and in case of failure, it is guaranteed
according to the contents of this warranty. For repairs, present the warranty to the place where you
purchased this product or to the installation company and ask for repairs.
If a product malfunctions due to a defect in the product under normal use within the warranty
period from the date of purchase, it will be repaired free of charge within one year from the date
of purchase.
Information
on Paid Services for EV Charger
The cases that free A/S is not provided even within the warranty period are as follows.
Thus, customers should be aware of the following.
·
In case of malfunction due to customer's negligence or careless handling, or deformation
or malfunction due to arbitrary modification
·
In case of failure due to abnormal power supply
·
In case of failure due to defective connection device
·
In case of compatibility issues with other systems and hardware, not with Tide products
·
Relocation installation request (customer requesting installation to a location other than the
installation location initially delivered by Tide) or customer's random relocation installation
and a defect occurs during installation
·
In case of product failure due to the use of parts or consumables not specified by
Tide Co., Ltd.
·
If the product is repaired or modified by a third party other than an engineer who has
completed installation training from the manufacturer, any resulting failures will not be
covered by the product warranty.
Information on Free Services For EV Charger
Category Item Customer
Product EV Charger Name
Warranty 1 Year Warranty from
Date of Purchase Date of Purchase
www.tidekorea.com
20F, 128, Gasan Digital 1-ro, Geumcheon-gu, Seoul, Republic of Korea
Tel : +82-2-6673-0930 FAX : +82-2-6673-0968
Designed by TIDE
www.tidekorea.com
Table of contents


