Tiffany WDV225 User manual
12V Wet & Dry Vac
User Manual
Model Number: WDV225
READ AND SAVE THESE INSTRUCTIONS

IMPORTANT
Read and follow the instructions in this user manual even if you feel you are familiar with the product, and find a
place to keep it handy for future reference.
For your convenience record the complete model number (located on the product identification plate) and the
date you received the product, together with your purchase receipt and attach to the warranty and service
information. Retain in the event that warranty service is required.
NOTE: The rating of this product (as marked on the product identification plate) is based on specific loading
tests. Normal use or the use of other recommended attachments may draw significantly less power.
IMPORTANT SAFEGUARDS
When using any electrically powered product, basic safety precautions should always be followed,
including the following:
PLEASE READ ALL INSTRUCTIONS CAREFULLY BEFORE USING THIS PRODUCT
WARNING!: - to reduce the risk of fire, electrical shock or injury to persons or property:
•Read all instructions before operating the portable vacuum cleaner for the first time and save for
future reference.
•This appliance is intended for household (indoor) use only and not for commercial or industrial use.
•Do not use without canister and filter in place.
•The appliance is not intended for use by persons (including children) with reduce physical, sensory
or mental capabilities, or lack of experience and knowledge, unless they have been given
supervision or instruction concerning use of the appliance by a person responsible for their safety.
•Children should be supervised to ensure they do not play with the appliance.
•Never use the appliance to pick up explosive or flammable substances, combustible liquids,
incandescent ashes, burning or smoking materials, nails, pins, egg shells, or any sharp objects or
metal items.
•Use only Tiffany portable vacuum cleaner accessories, filter and charger.
•Clean canister and filter after picking up any perishable food items.
•Never use the appliance to suck up any liquid other than cold water.
•This portable vacuum is designed to pick up cold liquids. Only use the nozzle end of the canister,
and never allow liquids to come into contact with the motor.
•Do not operate in the presence of explosives and/or flammable fumes or liquids.
•Do not unplug the charger by pulling on the cord.
•Never carry the charger or charging base by the cord, or yank to disconnect from an outlet; instead
grasp the charger and pull to disconnect. Do not pull cord around sharp edges or corners.
•Never exceed the MAX level when picking up liquids.
•Do not immerse the vacuum cleaner, charger, cord, or charging base in water or any other liquid.
•Use only the charger supplied with this appliance to recharge the vacuum cleaner.
•Empty the canister after each use.
•Always switch the vacuum cleaner off when charging.
•Do not attempt to use the charger with any other product.
•The use of an extension cord is not recommended.
•After washing the canister and/or filter, wait until they are completely dry before reassembling. Do
not attempt to assemble wet or damp parts.
•Ensure the ventilation openings are never blocked.
•Do not wind the power cord around the device.
•Never use the device to pick up cement powder, filings, sawdust or metal powder. They could block
the filter and cause damage to the motor.
•Do not open the canister when the device is operating.
•Recharge the device using only its compatible charger. Do not use other power supplies or battery
chargers.
•Do not use the charger to recharge other electrical appliances.
•Never handle the charger or vacuum cleaner with wet hands.
•Do not operate with a damaged charger, cord or charging base, or after the appliance has
malfunctioned or been damaged in any way.
•Do not use with any openings blocked; keep free of dust, lint, hair, or anything that may reduce
airflow.
•This appliance has no user serviceable parts. Any maintenance other than cleaning bowls and
filters should be performed by a qualified person.
•Do not use this appliance for other than its intended use. Do not use in moving vehicles or boats.
•The installation of a residual current device (safety switch) is recommended to provide additional
safety protection when using electrical appliances. It is advisable that a safety switch with a rated
residual operating current not exceeding 30mA be installed in the electrical circuit supplying the
appliance. See your electrician for professional advice.
FEATURES
BEFORE FIRST USE
•Remove all packaging materials and any promotional labels from your vacuum cleaner.
•When unpacking the vacuum, ensure that you have received the charger, charging base, brush
tools and screws before you discard the packaging.
WARNING: Before first use, charge your vacuum cleaner for at least 24 hours. Ensure that the
On/Off switch is turned to the ‘OFF’ position before charging. Otherwise the vacuum cleaner will not
charge.
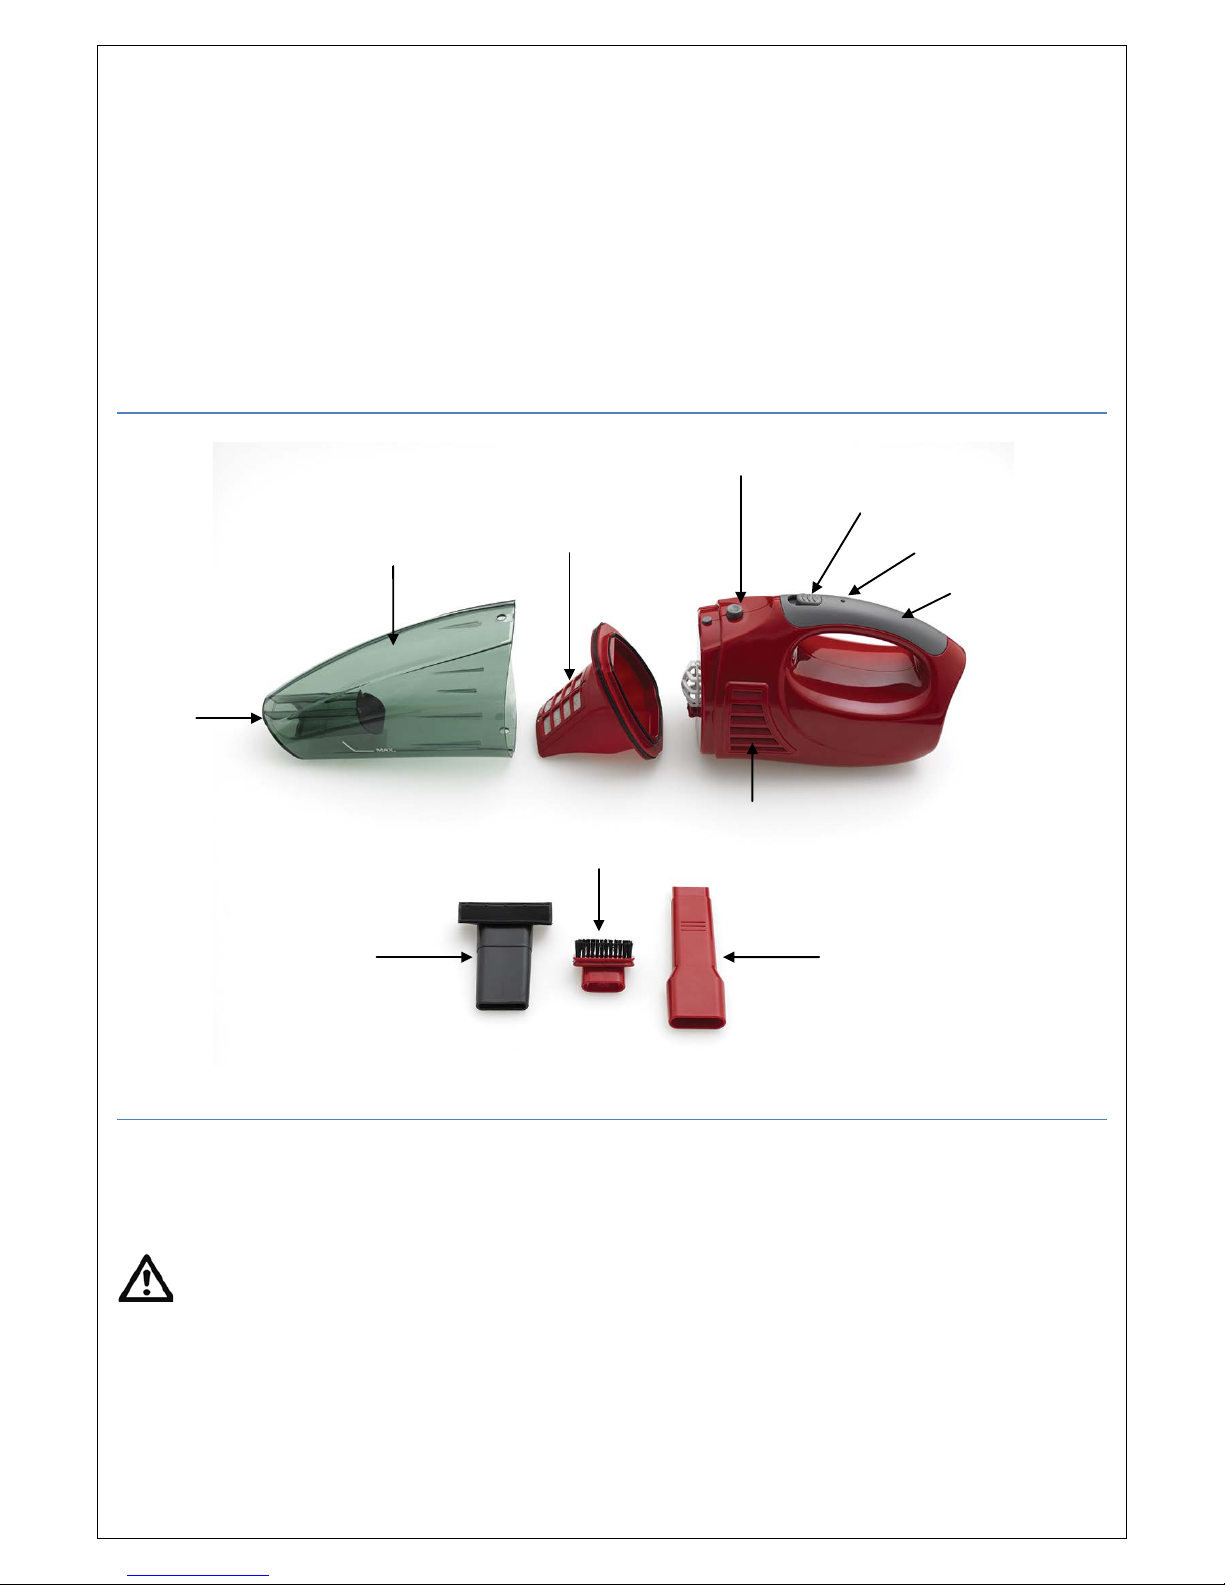
Canister release button
On/Off switch
Indicator light
Handle
Ventilation
opening
Dust filter
Suction
nozzle
Brush
attachment
Dust canister
Extension
attachment
Liquid suction
attachment

TO WALL MOUNT THE VACUUM CLEANER
The charging base can be mounted vertically or placed on a horizontal surface such as a counter or shelf.
1. Pick a convenient position that is within 1m of a power outlet. If the charging base is closer than 1m,
wrap any excess cord around the charging base.
NOTE: The charging base should be mounted on the wall, so that the dust canister is pointing
downward when the portable vacuum is placed in the charging base.
2. If wall mounting, place the charging base in the desired location (ensure that is a clean, dry area)
and mark the centre of one of the holes.
3. Drill a hole through the centre of the hole. Push a plastic wall anchor into the drilled hole.
4. Insert one of the included screws and turn it until it is secure.
5. Re-check the second hole alignment and complete steps 3-4 again.
6. The charging base should be securely fixed to the wall.
WARNING: The appliance must be positioned so neither the appliance itself nor its power supply
can be reached by children and/or mentally disabled people.
BATTERY CHARGING PROCEDURE
1. Plug the charger into the power supply.
2. Ensure the vacuum cleaner is switched off before charging.
3. Align the jack connector with the slot so it fits in the groove.
4. Slide the vacuum cleaner downward onto the charging base making sure it firmly locks on, and that
the charger is firmly inserted into the vacuum. The red indicator light will illuminate.
5. To maintain a charge, keep the charger plugged into a power outlet. When charging, the charger
may be warm to touch, but this is normal. Always charge the vacuum after each use to extend the
life of the battery.
NOTE: If the device is used until the battery is flat, it should be charged continuously for 14 hours.
OPERATING THE VACUUM CLEANER
1. Ensure that the filter is correctly installed.
2. Ensure you have let the vacuum charge for 24 hours if it is being used for the first time, 14 hours
from the battery being flat, or 2 hours from the last short use.
3. Remove the device from the charging base.
4. If an attachment is needed, attach it to the appliance opening, otherwise use it as is.
5. Slide the button forward to the ‘On’ position; the vacuum will begin to work.
6. Commence the cleaning task, and ensure the suction nozzle always points downwards. It is
recommended that you turn the appliance off between cleaning tasks to conserve power.
NOTE: Use your vacuum to pick up any dry debris before picking up any wet spills.
NOTE: Empty the canister and clean the filter:
•When the suction power decreases.
•Crumbs come out of the nozzle.
•Debris reaches the max fill line.
•After each use.
Picking up liquids or wet debris
1. Never use the appliance to suck up any other liquid than cold water.
2. Use the liquid suction attachment to pick up liquids or wet debris.
3. Do not exceed the MAX fill line when sucking up liquids (the MAX fill line must always be measured
when the appliance is in the vertical position, with the suction inlet facing down).
4. When picking up liquids, always keep the vacuum in the vertical position, with the suction inlet
facing downwards. Never place the appliance in any other position and never allow liquids to come
into contact with the motor.
NOTE: Empty the canister immediately after use and wash the filter.
NOTE: Rinse the canister and the filter in cold water and let all parts dry completely before reassembling.
CLEANING & MAINTENANCE
Emptying the canister & removing the filter:
1. Whilst holding the canister in one hand and the vacuum handle in the other, press the canister
release button and unclip the dust canister.
2. Once the canister is removed, remove the dust filter by pulling it out of the canister and empty the
contents of the canister into the bin.
3. Clean the filter and if necessary clean the inside of the canister with a dry cloth.
4. Replace the filter in the canister and clip the canister back onto the vacuum.
NOTE: After intensive use, or once you have had the vacuum for a long time, it is necessary to replace the
filter.
WARNING: Do not use the device if the filter is broken or worn out.
Cleaning tips:
•Before cleaning the device, always remove it from the charging base and make sure it has
completely cooled down and is switched off.
•Wipe the exterior of the unit with a soft damp cloth; never use abrasive cleaning agents on any part
of the vacuum.
•To avoid the risk of electric shock, do not clean the charging base with water or any other liquid.
Only use a soft dry cloth.
•The dust canister and filter are the only parts that can be washed in cold water. The parts must be
completely dry before reassembling.
•Do not immerse the body, handle, power supply cord, charging base, or the transformer in water or
any other liquid.
•This product is not dishwasher safe.
Table of contents


