Tiger Telematics Gizmondo User manual

GIZMONDO
QUICK START
GUIDE

GIZMONDO
QUICK START GUIDE

GIZMONDO QUICK START GUIDE INTRODUCTION PAGE 3
Welcome to Gizmondo.
In this booklet is all you need to know to get your
Device up and running quickly and easily. We don’t want
anything getting in the way of you starting to use your
GizmondoTM Device, so in the following pages, we have
provided you with an accessible guide to all your new
system has to offer.
By the time you have finished reading this you will be
fully equipped to take complete advantage of the range
of entertainment options the GizmondoTM Device has in
store.
Then, if you are still inquisitive to find out more, in-depth
detail, about specific functions you can take a look at the
User Guide on the CD enclosed in your pack.
INTRODUCTION

GIZMONDO QUICK START GUIDE CONTENT PAGE 4
5. Pack Contents
6. What Does Each Button Do?
8. Get Up and Running
13. Registering your Device
22. Piano Keys
28. Main Menu
29. Inserting an SD Card
30. Games
31. Movies
35. Music
38. Messaging
46. GPS
53. GPS Services
73. Digital Camera
76. Contacts List
79. Applications
85. BluetoothTM
88. Topping Up your SIM Card
92. USB
93. Mobile Content Services
CONTENTS

GIZMONDO QUICK START GUIDE PACK CONTENTS PAGE 5
WHAT SHOULD I FIND INCLUDED IN THE
GIZMONDOTM DEVICE PACK?
You should find the following included in your Gizmondo pack:
1. GizmondoTM Device
2. Device charger
3. Battery
4. Gizmondo Quick Start User Guide
5. CD-ROM featuring the In-Depth User Guide
6. SIM Card. We have provided you with a Vodaphone pre-pay SIM Card.
7. Stereo Headphones
8. USB cable
9. SD Card.
PACK CONTENTS
WHAT DOES EACH BUTTON DO?
GIZMONDO QUICK START GUIDE THE GIZMONDOTM DEVICE PAGE 6
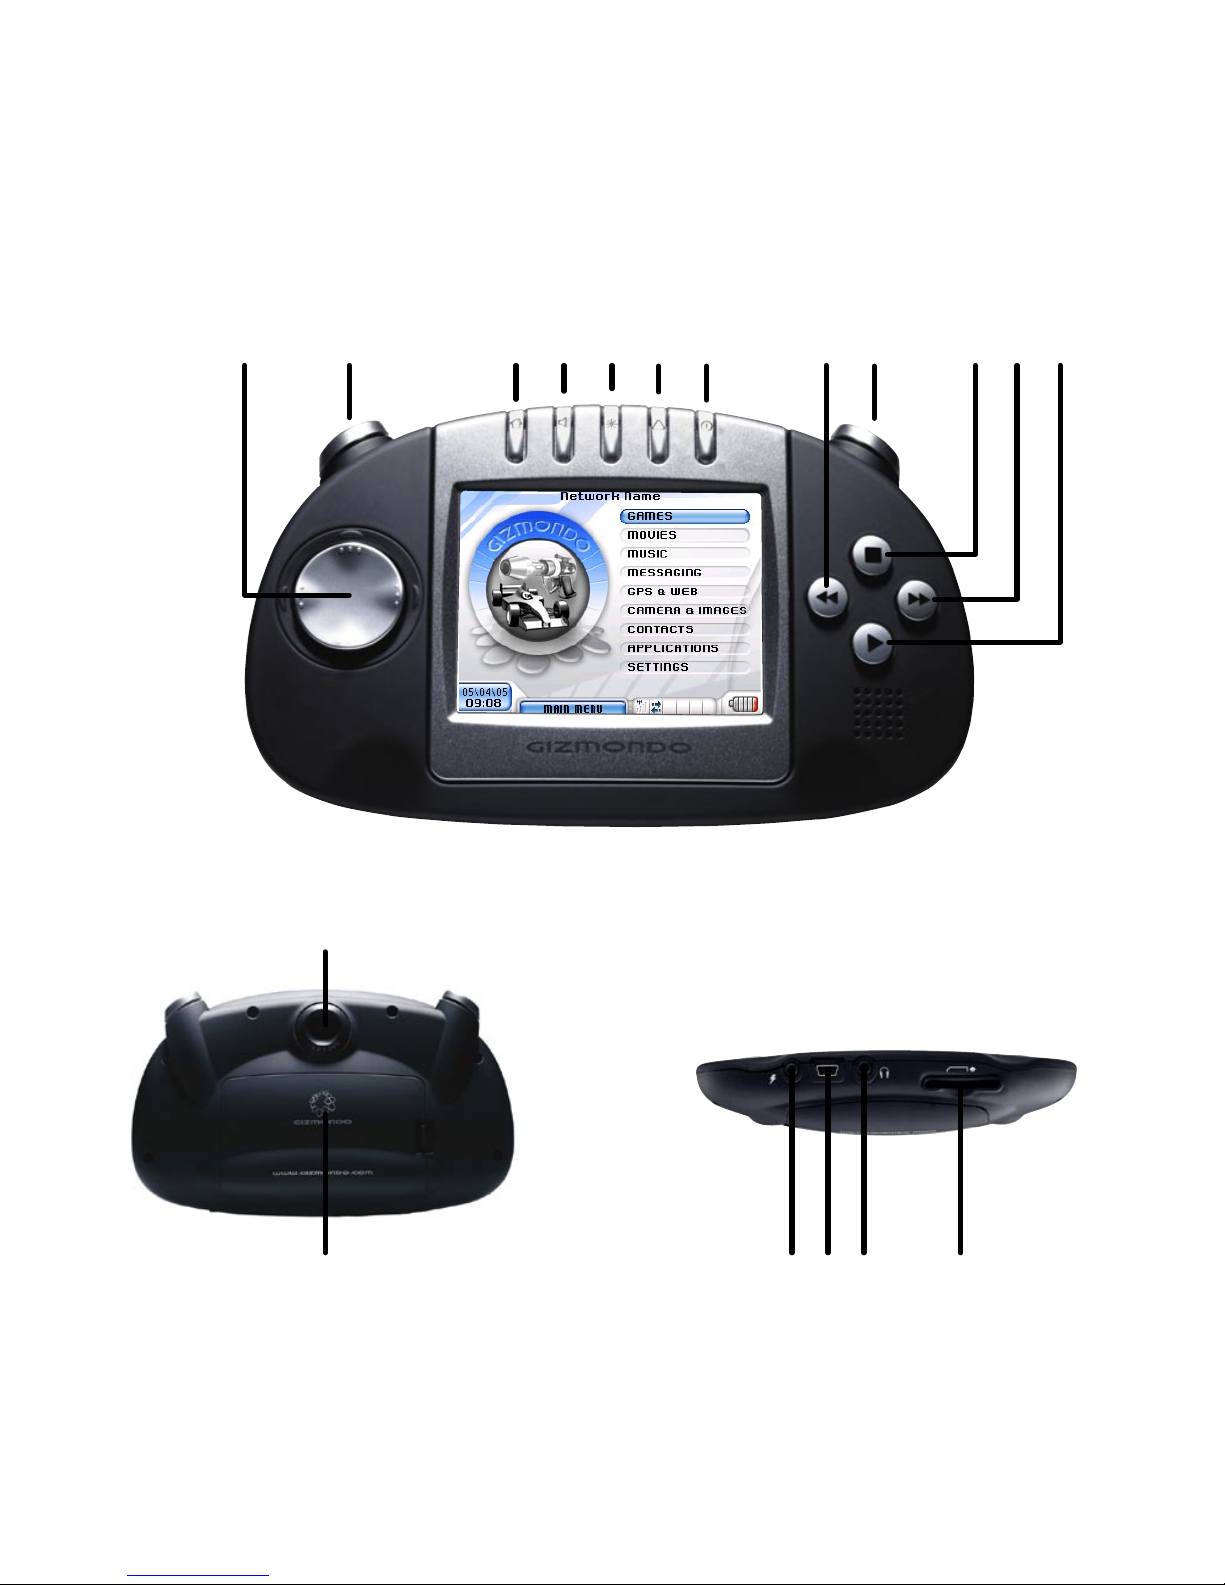
1. 2. 3. 4. 5. 6. 7. 8. 9. 10. 11. 12.
13.
14. 15. 16. 17. 18.

GIZMONDO QUICK START GUIDE THE GIZMONDOTM DEVICE PAGE 7
1. D-PAD: This control allows you to navigate quickly through the menus.
2. L-SHIFT: When used in conjunction with one of the other control buttons the shift opens up many
opportunities for multi-functionality.
3. HOME: By selecting this control button you will be immediately transported back to the main menu.
4. VOLUME: This control allows you to adjust the volume of any music or media quickly and conveniently.
5. BRIGHTNESS: This gives the option to quickly and easily adjust the brightness of the image on the main
screen.
6. ALERT: At Gizmondo we realize that the world we live in is not always as safe as we may hope, so we have
incorporated an alert system into your Device. See page 26 for further details.
7. POWER: An easily accessible on/off button to activate your Device.
8. REWIND: This has various uses, including giving you the flexibility to backtrack through movies or music.
9. R MENU: This conveniently placed button allows you quick and easy access to additional menus within the
separate function areas of your Device.
10. STOP/BACK: This button allows you to navigate back through the different functions on your GizmondoTM
Device, and provides you with a clear and easy way of stopping a movie or piece of music at any given point. .
11. FAST FORWARD: This has various uses, including giving you the flexibility to move forward through movies or
music, and scroll through your messages.
12. PLAY/ ACCEPT: This acts like an enter key, allowing you to accept a function once you have selected it on the
main screen. This will also, amongst other things, play music and movie files for you, read on for more details.
13. CAMERA: The centralised position of the camera lens makes it easy to focus in on the subject of your
photograph, whilst viewing the image on the main screen.
14. BATTERY COVER: An easy to remove cover to keep the battery protected.
15. POWER SOCKET: This allows you to charge your Device efficiently by connecting it directly to a mains power
supply.
16. USB SOCKET: In order that you can take full advantage of your GizmondoTM Device, we have integrated a
USB socket into the console so that you can plug your Device directly into your PC and use it in conjunction
with Microsoft® ActiveSync.
17. STEREO HEADPHONE SOCKET: Allows you to enjoy your GizmondoTM Device without interruption
18. SD CARD SLOT: When you buy games or movies for your GizmondoTM Device they will come in the form of an
SD memory card.

GET UP AND RUNNING
To get your GizmondoTM Device up and running you will
need to carefully work through the step by step
instructions, as outlined in the next 4 pages:
1. Installing your SIM Card and battery
2. Charging your battery
3. Powering up the Device
GIZMONDO QUICK START GUIDE GET UP AND RUNNING PAGE 8
INSTALLING YOUR SIM CARD AND
BATTERY
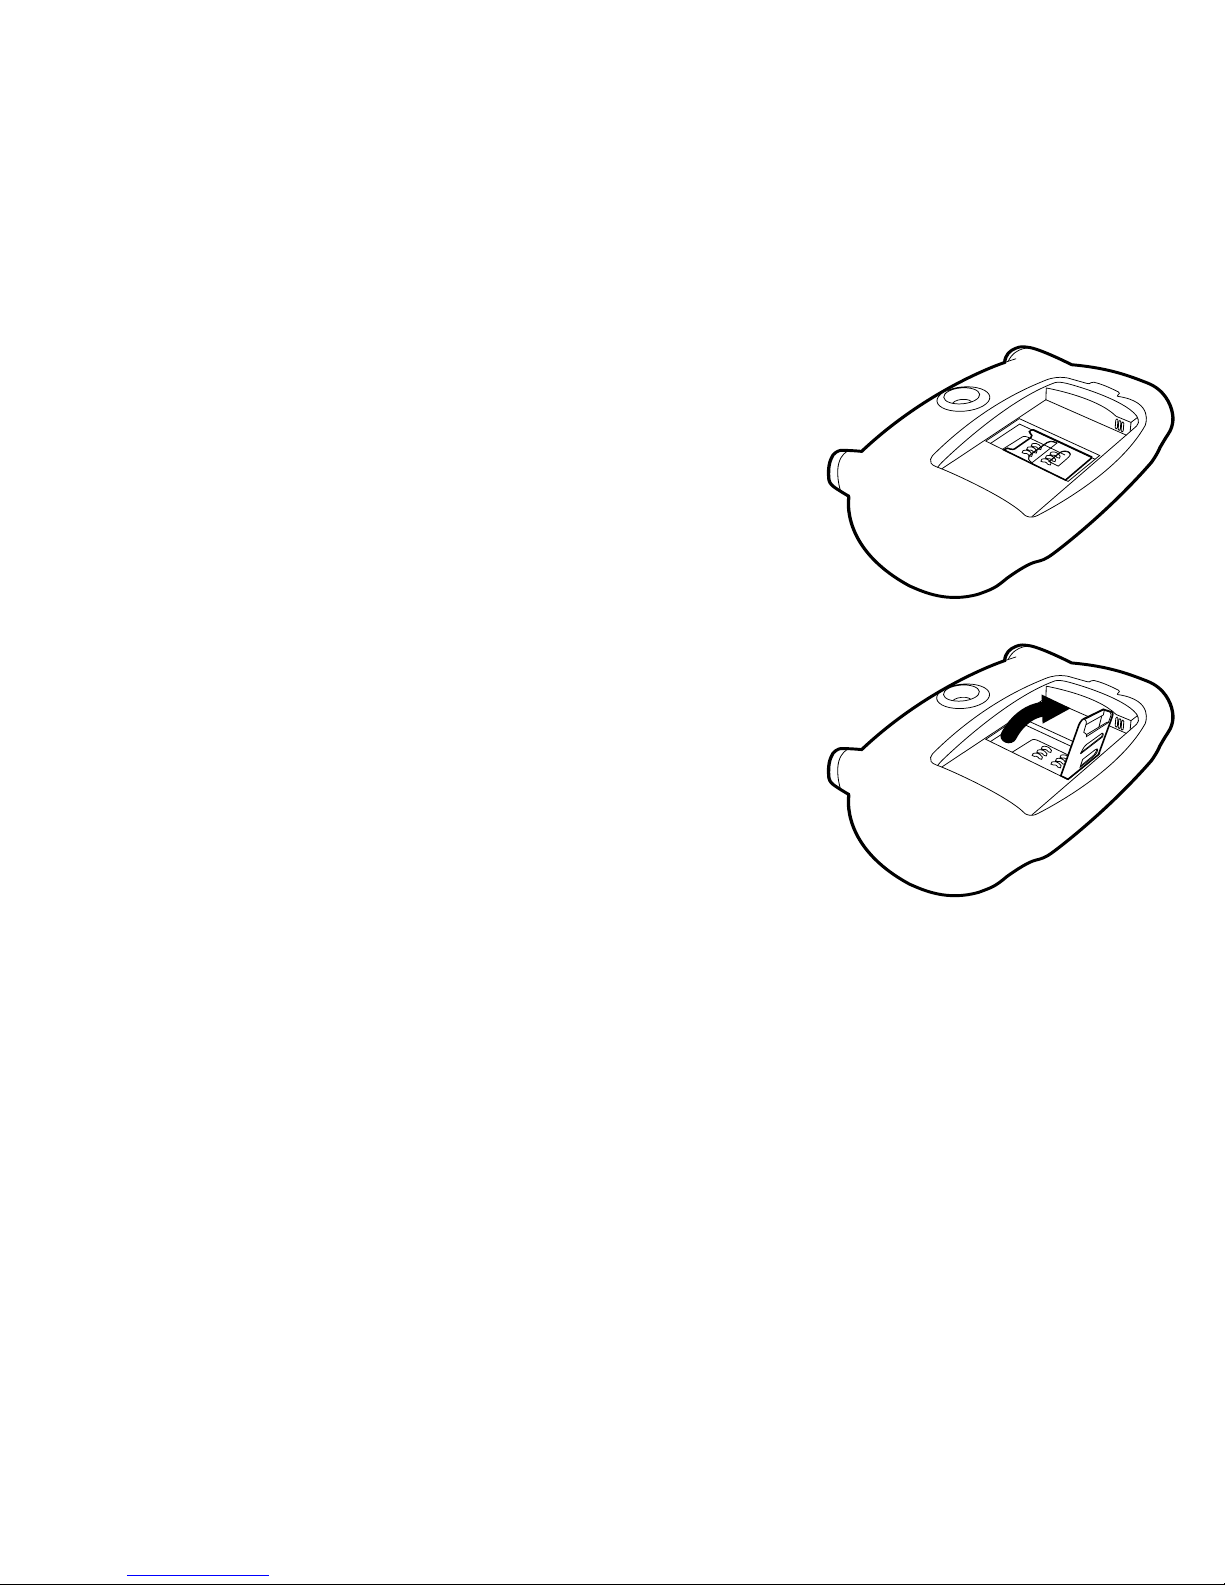
The SIM card is enclosed in your pack. As a means of protection, it
is attached to a credit card-sized piece of plastic. Carefully push the
SIM card away from the surrounding card, making sure that nothing
comes into contact with its metal contacts.
Make sure the GizmondoTM Device is switched off and the charger is
disconnected.
Turn your GizmondoTM Device over so it is facing front down.
You will see that there is a battery cover at the back of the
GizmondoTM Device. Remove this battery cover by releasing the
catch.
In the centre of the battery compartment you will see that there is a
SIM card holder.
Lift SIM card holder.
1.
2.
3.
4.
5.
6.
GIZMONDO QUICK START GUIDE INSTALL SIM AND BATTERY PAGE 9
INSTALLING YOUR SIM CARD AND
BATTERY
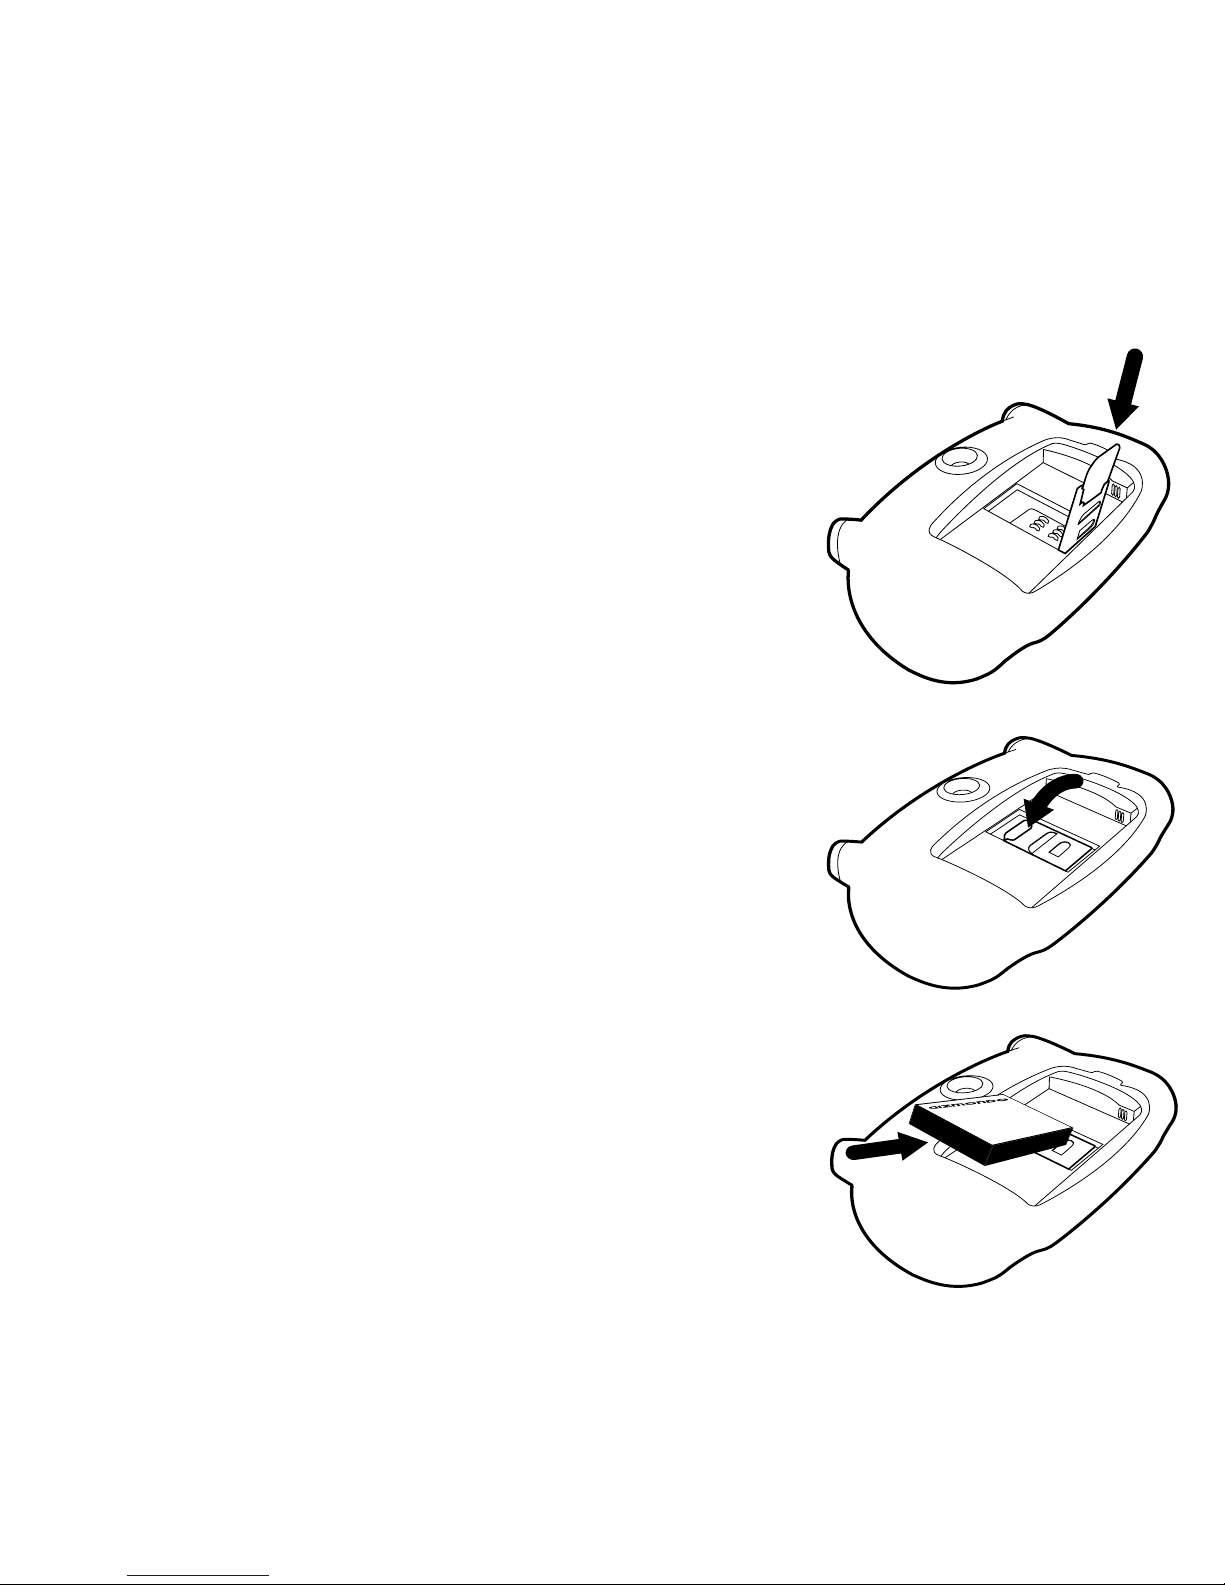
Slide the SIM card into the holder. When installing the SIM card be
sure that you have the gold bars on the card facing into the
GizmondoTM Device, so that they align with the six gold contacts
within the body of the Device. The cut away notch in the SIM card
should be facing towards the top left hand side of the GizmondoTM
Device.
Lower the SIM card holder back into the body of the GizmondoTM
Device.
Slide the silver metallic strip, which is across the SIM card holder,
upwards towards the top of the GizmondoTM Device.
Place the battery inside the Device, as shown in the diagram. Make
sure that the gold contacts on the battery are aligned with the gold
contacts inside the Device.
Replace battery cover.
7.
8.
9.
10.
11.
GIZMONDO QUICK START GUIDE INSTALL SIM AND BATTERY PAGE 10

GIZMONDO QUICK START GUIDE CHARGE THE BATTERY PAGE 11
The GizmondoTM Device has a rechargeable lithium-ion
battery. Before you use your GizmondoTM Device for the
first time, you will need to charge the battery for a
minimum of 6 hours.
HOW DO YOU CHARGE THE BATTERY?
CHARGING YOUR BATTERY
Firstly, take the charger, which you will find in your pack and plug it in
to a mains power supply.
Then take the other end of this lead and plug it into your
GizmondoTM Device power socket.
If your GizmondoTM Device is successfully charging, the battery icon
will apper as so:
Note: This icon will not appear if you have been charging your Device
whilst switched off.
IMPORTANT: IF YOU USE YOUR GIZMONDOTM DEVICE WHILST
THE CHARGER IS PLUGGED IN, A SAFETY MECHANISM WILL
HALT THE RECHARGING PROCESS AFTER 5 HOURS. THIS IS
TO PREVENT ANY DAMAGE TO YOUR GIZMONDOTM DEVICE.
IF THIS OCCURS REMOVE THE CHARGER AND
RE-INSERT ONCE A LEVEL OF DISCHARGE HAS OCCURRED.
This does not mean that you cannot charge your Device overnight,
only that the optimum period of time for charging is 5 hours.
1.
2.
3.

GIZMONDO QUICK START GUIDE POWER UP PAGE 12
Before you can enjoy the Gizmondo experience, you
need to turn your GizmondoTM Device on. To power up
your Device you need to:
1. Hold down the power button ( )
2. If your GizmondoTM Device has sufficient charge
in its battery it will turn on and the Gizmondo
Logo will appear on the screen.
3. Once the Device has loaded the main menu will
appear on the screen
.
POWERING UP YOUR DEVICE

REGISTERING THE DEVICE
Before you can take full advantage of all the options
available to you on your GizmondoTM Device, you will
need to register your Device.
There are two stages to successfully registering your
GizmondoTM Device.
1. Device Registration
2. Online Registration
When you are registering a GizmondoTM Device there are two ways in which
an individual can register themselves in relation to the Device. There is User
registration. This is the registration process that the individual who will be
the primary User of the Device completes. There is also Guardian
Registration, which allows anyone over 18, who is not the primary user of
the device to register their details against a nominated Device. Please note
that to register as a Guardian you need to have permission from the User of
the Device you wish to register your details against.
The following pages explain how to register as either the User or the
Guardian of a GizmondoTM Device.
User Registration: Device Registration
Smart AddsTM
Online Registration
Guardian Registration: Online Registration
GIZMONDO QUICK START GUIDE REGISTER PAGE 13
GIZMONDO QUICK START GUIDE REGISTER PAGE 14
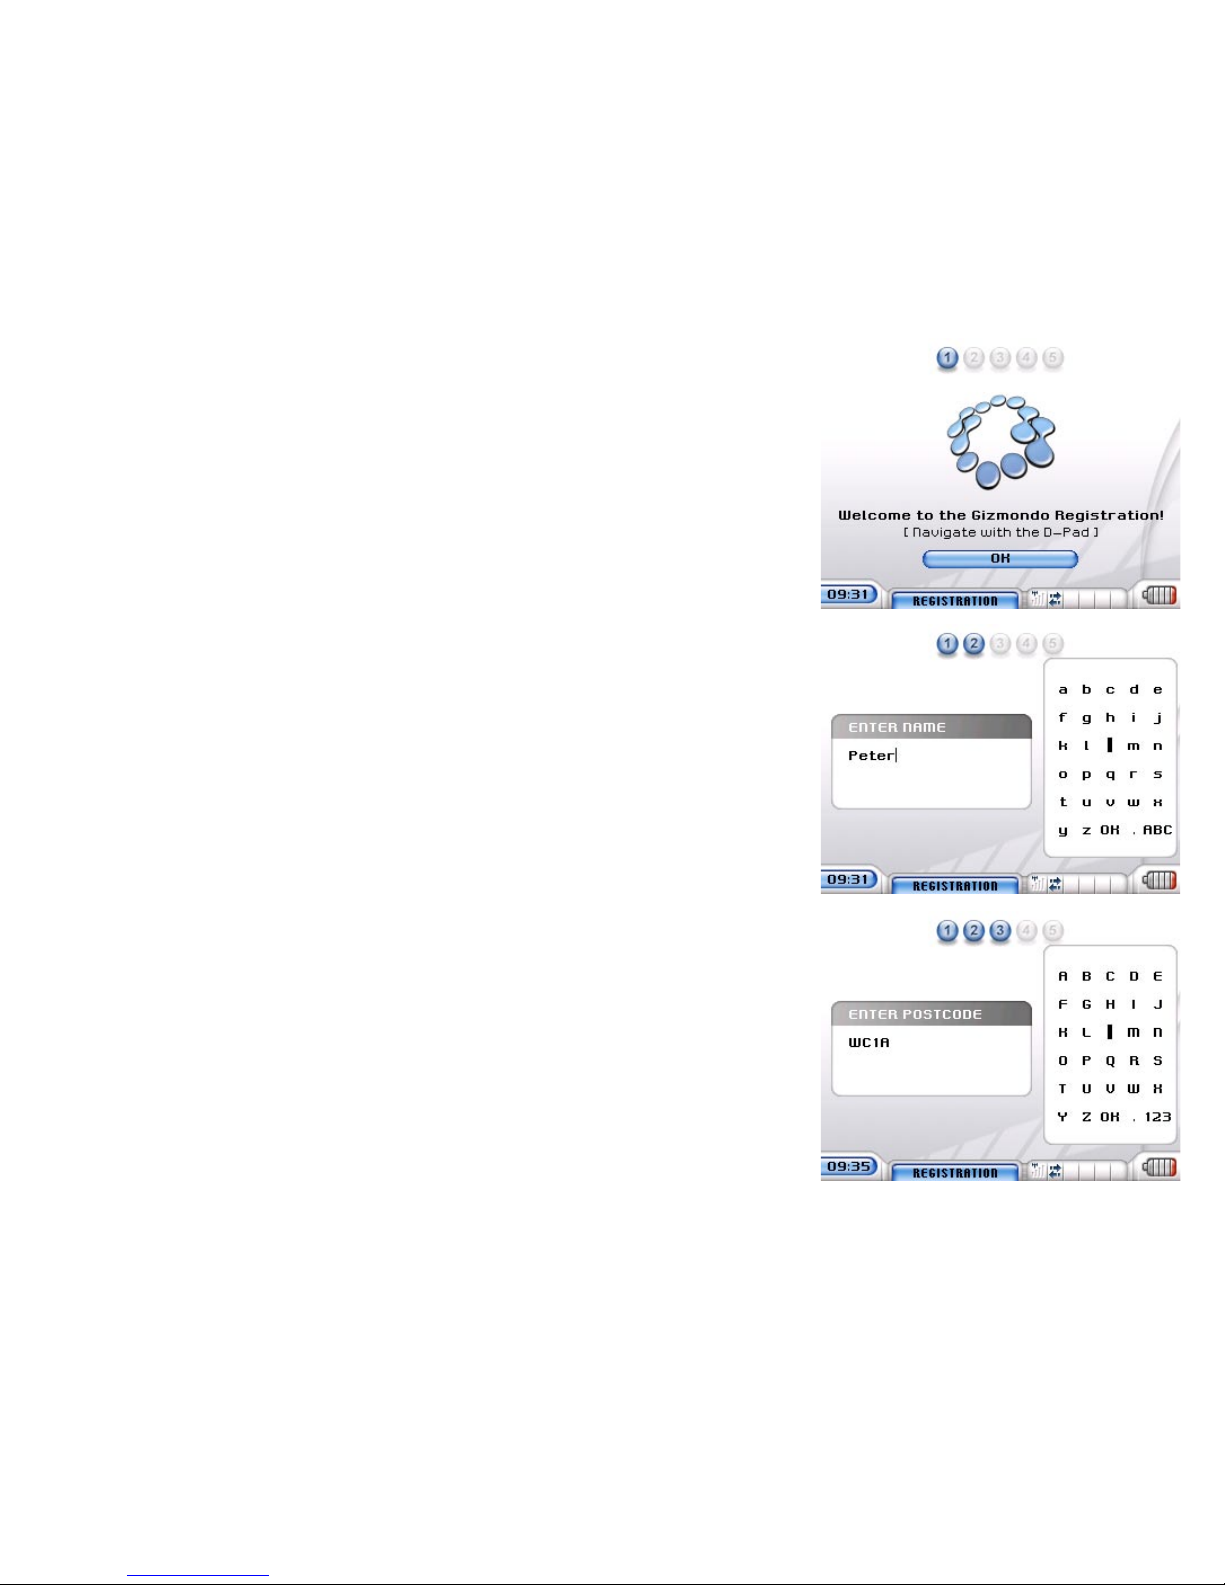
When you turn on the handset for the first time you will
be prompted to enter some personal details, as part of
the initial step in registering your Device. This registration
must be completed by the person who is going to be
using the GizmondoTM Device.
DEVICE REGISTRATION
Once you have turned on your GizmondoTM Device select ‘OK’ on the
screen, by keying on the play/accept button
Using the Soft Input Panel, you will need to input the following information.
This information is purely for your security purposes and is bound by the
Data Protection Act:
1. Name
2. Postcode
3. Gender
4. Date of Birth
5. Smart Adds (see section headed Smart AddsTM, below, for more details)

GIZMONDO QUICK START GUIDE REGISTER PAGE 15
DEVICE REGISTRATION
Use the D-pad to navigate through the alphabet, selecting the appropriate
letters and numbers by keying the PLAY ( ) button.
Once you have filled in the information required select ‘OK’ by pressing the
PLAY ( ) button. This will send an SMS message to us, letting us know
that you have completed the initial registration of your Device.
We will then send an SMS back to your Device. Contained in this message
will be your GizmondoTM Device’s individual username and password and a
request asking you to complete the final stage of your registration by logging
onto www.gizmondo.com

SMART ADDSTM
WHAT ARE SMART ADDS AND WHY WOULD I
WANT TO SIGN UP FOR THEM?
As part of the initial registration process you will be asked whether you
would like to receive advance multimedia information and promotions by
way of Smart Adds. If you select ‘yes’ to this question Smart Adds will
bring you all the latest promotions in a maximum of three, 15-30 second
long multimedia advertisement excerpts per day, completely free of charge.
In addition you will also be able to benefit from any promotions or special
offers attached to the advert. This means that Gizmondo could help you to
enjoy the delights of discounted clothes, music, food and even money off
entrance prices to exciting, high profile events.
As we value our customer and want you to truly enjoy using your
GizmondoTM Device, Smart Adds will send you free monthly downloads
of music, tasters of the hottest new movies and information on services
local to you, on us. It gets better though, not only will you receive these
free downloads but they will be chosen to cater for your personal likes and
interests. From the information you provide in the ‘My Profile’ section of your
online registration/sign-in, we will hand pick the ads and promotions that we
think you will enjoy the most.
You will not receive more than one Smart AddTM at a time, and they will not
interrupt what you are doing on your GizmondoTM Device. Only when you
finish playing a game or listening to music will you be able to view the Smart
AddTM.
GIZMONDO QUICK START GUIDE SMART ADDS PAGE 16

GIZMONDO QUICK START GUIDE REGISTER ONLINE PAGE 17
ONLINE REGISTRATION
WHY DO I NEED TO REGISTER ONLINE?
It is not compulsory to register online, however, if you
choose not to you will not be able to access the
following location based services: Web Tracking,
Geo Fencing, Tracking via a mobile phone, or the
Alert function.
Therefore, if you want to take full
advantage of the innovative features that the
GizmondoTM Device offers, you need to be sure to log
onto the Gizmondo website and register your Device.
Registering your GizmondoTM Device also gives you the
flexibility to sign onto your personal account on the web
site at any point. Once you have registered online your
username and password will be the key to accessing
your account and the additional tracking features,
downloads and personalised points of interest that are
on offer to you.

HOW DO I REGISTER ONLINE?
Registering your Device online could not be simpler. All you need to register
your GizmondoTM Device at the web site are the username and password
that we sent to you in the SMS, once you had completed the initial
registration phase. Once you have those details to hand complete the
following stages:
1. Go to www.gizmondo.com
2. Click on the ‘Register your Gizmondo’ window on the homepage.
3. Alternatively, click the ‘My Giz’ link in the menu at the top of the
homepage. This will take you through to the ‘My Giz’ introductory page.
This features a ‘Login/Register’ tab at the top of the menu on the left
hand side of the page.
4. You will next be presented with a screen asking for the username and
password you received via text message during stage one of the
registration process. Fill in the requested information and click the
‘Login/Register’ button
5. You will arrive at a page marked ‘My Data’. You should fill in details
requested, including name, address, date of birth and mobile phone
number. You can also change your password here. When you are
finished, click the ‘Register’ button at the bottom of the page.
6. You will then be taken through to a page entitled ‘My Profile’. Here, we
try to find out a bit more about you for the purposes of Smart Adds (see
page 16 for further information). Fill in the requested information here,
and click the ‘Register’ button at the bottom of the page.
7. Once you have completed this step, the registration process is
complete and you should see a confirmation page appear. From here,
you can click the ‘My Home’ link on the left hand navigation menu
bar. ‘My Home’ becomes your default login page from now on, unless
you choose a Guardian account, as explained on page 19. You can still
change your personal details and profile by clicking on the ‘My Data’
and ‘My Profile’ links.
GIZMONDO QUICK START GUIDE REGISTER ONLINE PAGE 18

GIZMONDO QUICK START GUIDE GUARDIAN REGISTRATION PAGE 19
GUARDIAN REGISRATION
WHAT IS GUARDIAN REGISTRATION?
Ever wondered if your child is really where they promised
they would be? Ever worried if someone is safe? Well if
the answer is yes to either of these questions then
Gizmondo could have the answer for you. At Gizmondo
we understand the importance of keeping in touch with
each other, especially as you go about your busy life.
This is why we have developed advance location based
tracking.
By registering as a Guardian at www.gizmondo.com you
can take full advantage of our secure and user friendly
GPS and Mapping services. By registering as a
Gizmondo Guardian you can keep an eye on the location
of your specific GizmondoTM Device at anytime. Being a
Guardian also gives you the option to set up a GeoFence
and locate the GizmondoTM Device via your mobile
phone.
Additional information on the exact services available for
Guardians can be found later in this guide.

HOW DO I REGISTER AS A GUARDIAN?
It’s simple, secure and completely free.
1. To create a Guardian Account you will need the Terminal ID of the
GizmondoTM Device, which you are to become Guardian of. To access
this ID Number you need to follow the steps below:
a. Scroll to SETTINGS on the MAIN MENU of the GizmondoTM Device.
b. Then scroll down to DEVICE INFORMATION.
c. Then key the PLAY ( ) button.
d. The ‘Terminal Number’ appears along the top of the screen.
2. Now login at www.gizmondo.com and select the tab headed ‘My Giz’
along the top of the page.
3. Now click on the GPS and Mapping Services along the left hand side of
the page.
4. Click on the ‘Login Here’ icon and then scroll down to ‘My Giz
Guardian’ and select the ‘Create Guardian Account.’ This is situated
underneath the User Login towards the bottom of the page.
5. Once you have read the information scroll to the bottom of the page,
enter the Terminal ID number and then click on the Register Terminal
icon. The Terminal ID will then be verified and an SMS will be sent to the
GizmondoTM Device notifying the User that you wish to create a
Guardian Account for their console. A One-Time Code will then be sent
to the GizmondoTM Device and the Guardian will have 15 minutes to
enter the One-Time Code into the website.
GIZMONDO QUICK START GUIDE GUARDIAN REGISTRATION PAGE 20
Other manuals for Gizmondo
1
Table of contents
Other Tiger Telematics Game Console manuals

Popular Game Console manuals by other brands


Nintendo
Nintendo Nintendo Switch Lite manual

DIGIMON ADVENTURE
DIGIMON ADVENTURE Digivice LAST EVOLUTION instruction sheet

Hyperkin
Hyperkin Retron 3 instruction manual

Excalibur
Excalibur Brew Master 463 operating manual

Microsoft
Microsoft XGX-00038 - 360 Arcade Game Console instruction manual

Sony
Sony CECH-4301A PS3 Safety and support


