Tilta NUCLEUS-NII User manual

WIRELESS LENS CONTROL SYSTEM

目录/CONTENT
(CN) 免责声明 ...................................................................................................................
注意事项和警告 ...........................................................................................................
认识原力N II 控制手轮 ..................................................................................................
产品特点
规格参数
电池使用须知
手轮的使用 .................................................................................................................
单独使用
在其他设备上拓展
认识手轮UI主界面 .......................................................................................................
认识原力N II 电机 ........................................................................................................
规格参数
装配电机于镜头上
电机供电说明 ..............................................................................................................
电机线材连接方式
电机指示灯灯语 ...........................................................................................................
配对操作 ....................................................................................................................
原力N II 控制手轮与原力N II 电机配对
原力N II 控制手轮与原力M 电机配对(方法一)
原力N II 控制手轮与原力M 电机配对(方法二)
原力M电机序号设置
原力N II 控制手轮与VND专用电机配对
固件更新 ....................................................................................................................
手轮-固件更新
电机‒固件更新
01
01
02
03
04
05
06
07
08
09
DISCLAIMER .........................................................................................................................................
WARNING & PRECAUTION ..................................................................................................................
INTRODUCING NUCLEUS N II HAND UNIT .........................................................................................
FEATURES
TECHNICAL DATA
BATTERY USAGE GUIDELINE
USE THE HAND UNIT ...........................................................................................................................
USE INDEPENDENTLY
ATTACH TO OTHER ACCESSORIES
INTRODUCING THE MAIN UI ...............................................................................................................
INTRODUCING NUCLEUS N II MOTOR ...............................................................................................
TECHNICAL DATA
ATTACHING MOTOR TO LENS
MOTOR POWERING GUIDELINE .........................................................................................................
MOTOR CABLE CONNECTION METHOD
INDICATOR LIGHT ................................................................................................................................
PAIRING .................................................................................................................................................
THE NUCLEUS-N II HAND UNIT PAIRING WITH THE NUCLEUS-N II MOTOR
THE NUCLEUS-N II HAND UNIT PAIRING WITH THE NUCLEUS-M MOTOR (METHOD1)
THE NUCLEUS-N II HAND UNIT PAIRING WITH THE NUCLEUS-M MOTOR (METHOD 2)
THE NUCLEUS-M MOTOR NUMBER SETTING
THE NUCLEUS-N II HAND UNIT PAIRING WITH VND MOTOR
FIRMWARE UPDATE .............................................................................................................................
HAND WHEEL CONTROLLER - FIRMWARE UPDATE
MOTOR - FIRMWARE UPDATE
(EN) 12
12
13
14
15
16
17
18
19
21

免责声明
01
注意事项和警告
感谢您购买TILTA产品。
使用本产品之前,请仔细阅读本文以确保已对产品进行正确的设置。本文档及本产品所有相关的文档最终解释权归TILTA所有。如有更新,
请访问www.tilta.com官方网站获取最新的产品信息。TILTA保留随时修改本手册中任何信息的权利,无需提前通知且不承担任何责任。
一旦使用本产品,即视为您已经仔细阅读免责声明与警告,理解、认可和接受本声明全部条款和内容。您承诺对使用本产品以及可能带
来的后果负全部责任。您承诺仅出于正当目的使用本产品,并且同意本条款以及TILTA制定的任何相关条例、政策和指引。
TILTA对于直接或间接使用本产品而造成的损坏、伤害以及任何法律责任不予负责。用户应遵循包括但不限于本文提及的所有安全指引。
即使存在上述规定,消费者权益依然受当地法律法规所保障,并不受本免责声明影响。
TILTA是深圳市铁头科技有限公司及其关联公司的商标。本文出现的产品名称、品牌等均为其所属公司的商标或注册商标。
使用本产品前,请严格遵守以下说明,如因失误操作或者不正当使用等造成的相关后果,我司不负任何责任。
配件要求
充电环境温度高于 40 ℃ 或低于 5 ℃可能导致电池性能下降、膨胀、漏液、过热等损坏。
切勿将电池存储在超过60℃的环境下。理想的存储环境温度为 22 ℃ 至 28 ℃。
电池必须使用TILTA官方提供的充电设备进行充电。对于使用非TILTA 官方提供的充电设备进行充电所造成的一切后果,TILTA将
不予负责。
操作环境
电池安全
维护和保养
温馨提示
本设备内含强磁,为避免产生磁化影响,请远离磁卡、IC卡、植入性医疗设备(如心脏起搏器)、硬盘、RAM 芯片等易受干扰设备。
请在温度为 -20 ℃ 至 45 ℃之间的环境中使用电池。温度过高将会引起电池异常膨胀、着火,甚至爆炸。在低温环境下使用之前,建议
先在常温环境中将电池充满电量,以延长电池使用寿命。
请勿将设备放置在易燃、可燃物(如地毯和木制品)附近充电。请时刻留意充电过程,谨防发生意外。
请在干燥的环境下存储设备,理想的设备存放环境湿度不高于 40%。
请保持设备清洁,无沙尘等异物。使用干净、干燥的布料及时清理产品上的异物。
请勿使设备及其配件受到强烈的冲击或震动,以免损坏设备及其配件,导致设备故障。
如果设备碰撞硬物或设备受到外界的强烈撞击造成屏幕部分破碎,切勿触摸或试图移除破碎的部分,请立即停止使用并及时联系TILTA
售后服务。
设备在工作状态中会产生轻微发热,此为正常现象。
【警告】本设备配有不可拆卸的内置电池,请勿自行更换电池,以免损坏电池或设备。
禁止在强静电或者磁场环境中使用电池,以免引起设备内部电路故障。
请勿将电池暴露在高温处或发热设备的周围,如日照、取暖器、微波炉、烤箱或热水器等。电池过热可能引起爆炸。
请勿拆解或改装电池、插入异物、或浸入水或其它液体中,以免引起电池漏液、过热、起火或爆炸。
电池内部电解液具有强腐蚀性,如果不小心接触到皮肤或眼睛,请立即用清水冲洗至少 15 分钟并马上就医。
请勿把电池扔到火里,否则会导致电池起火和爆炸。
请勿跌落、挤压或穿刺电池。避免让电池遭受外部大的压力,从而导致电池内部短路和过热。
请勿使用已经损坏的电池。
切勿将电池彻底放完电后长时间存储,以避免电池进入过放状态而造成电芯损坏,将无法恢复使用。
务必将电池彻底放电后,再将电池废置于指定的电池回收箱。电池是危险化学品,严禁弃置于普通垃圾箱。相关细节,请遵循当地电池
回收和废置的法律法规。如电池无法彻底放电,请勿将电池直接弃置于电池回收箱,应联系专业电池回收公司做进一步的处理。
!

TYPEC
手轮内置电池容量
(1)工作温度: 充电:0℃~45℃;放电:-10℃~60℃
(2)存储温度: -5℃~45℃
3.7V 1800mAh 6.66Wh
产品特点
电池使用须知
规格参数
(3)运行湿度: 45±20%(Max.)
(4)质保期:12个月且循环次数少于500次
材质:铝合金+塑胶 尺寸:73*72*53mm 重量:175g 颜色配置:黑色
认识原力N II 控制手轮
02
10
11
07
09
06 08
01
02
03
04
05
01
02
03
04
05
07
08
09
06
10
11

单独使用
在其他设备上拓展
搭配原力N II 多功能控制手柄使用(如图)
手轮可通过NATO结构装配在手柄上,锁紧扳扣完成装配。
(如带NATO结构的兔笼或稳定器等设备上)
注:
手轮的使用
03
认识手轮UI主界面
04
连接
连接设置
设置
通用设置
系统
系统设置
电机
电机设置
A
F
STBY
1
2
13
14
15
16
18
19
20
21
17
A
F
FOCUS
ZOOM IRIS
A
B
R
E
C
1
2
A
F
01
02
03
04
05
06
07
08
10
11
12
09
A
F
R
E
C
I
N
F
1
2
23
24
25
26
22
REC
1
2
A
F
13
14
15
16
17
18
19
20
21
07
08
10
09
11
12
03
04
05
06
22
23
24
25
26

规格参数
材质:铝合金+塑胶 尺寸:83*46*31mm 重量:80g 颜色配置:黑色
认识原力N II 电机
05
装配电机于镜头上
⑥
注:
01
02
03
04
05
06
07
08

电机线材连接方式
使用Type-C to C线
使用TILTA专业侧手柄录制线
电机供电说明
06
电机指示灯灯语
07
白灯:电机无配对状态
紫灯:FOCUS
紫灯常亮:已配对完成,分配电机至FOCUS
蓝灯常亮:已配对完成,分配电机至ZOOM
红白灯闪烁: 无线模块配置中
绿灯常亮:已配对完成,分配电机至IRIS
绿灯:IRIS
蓝灯:ZOOM
黄灯常亮:已配对完成,分配电机至OTHERS
黄灯:OTHERS
紫灯闪烁: 电机FOCUS,电压低于6V
绿灯闪烁: 电机IRIS,电压低于6V
蓝灯闪烁: 电机ZOOM,电压低于6V
黄灯闪烁: 电机OTHERS,电压低于6V
电压小于6V时,
未启用PD协议
黄青闪烁: 电机OTHERS,电压大于6V
紫青闪烁: 电机FOCUS,电压大于6V
绿青闪烁: 电机IRIS,电压大于6V
蓝青闪烁: 电机ZOOM,电压大于6V
电压大于6V时,
启用PD协议
红蓝灯闪烁: 自动校准中 红灯闪烁: 电机出现错误
黄白灯闪烁: 手动校准中;
绿红灯闪烁: 电机解锁中(处于不自锁/不可控状态)绿白灯闪烁: 通道配置中
A
F
FOCUS
ZOOM IRIS
A
B
R
E
C
1
2
A
F
A
F
FOCUS
ZOOM IRIS
A
B
R
E
C
1
2
A
F
03
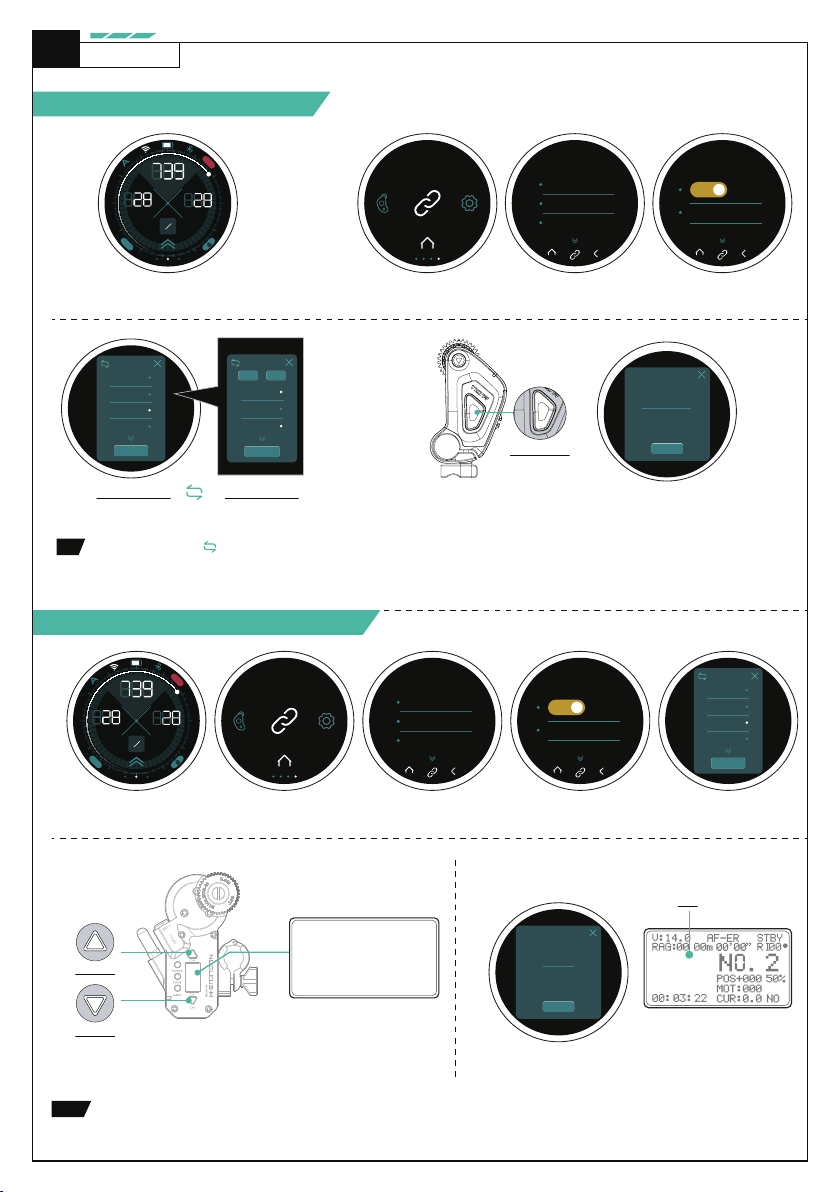
选 择【 连接设置】-【2.4G】模 式 ,再 打开【ON】并点击【频道】进入自动/手动频道模式。
02
01
进入手轮UI主界面,自下向上滑动进入菜单。
01
进入手轮菜单,选 择【 连接设置】-【2.4G】模 式 ,再 打开【ON】并点击【频道】,切换至手动频道模式,选择可用频道(如CH2),进入【搜索】。
原力M 电机接上电源后,长按【向上键】和【向下键】进行【EZ模式】配对。
通过自动/手动频道模式搜索可用频道
手动频道模式
自动频道模式
注: 点击左上角切换图标 可切换搜索模式;
自动频道模式可根据网络情况自动选择频道,在菜单中可选择关闭指定频道;手动频道模式可指定单一频道。
04
电机接口1或接口2接上电源后双击【功能键】,电机指示灯闪烁,进入
配对状态。待手轮界面上搜索到电机时,点击【确认】,待电机指示灯
(紫/绿/蓝/黄)常亮时即配对完成。
双击【功能键】
02 03
原力N II 控制手轮与原力N II 电机配对
原力N II 控制手轮与原力M 电机配对(方法一)
待手轮界面上搜索到电机时,点击【确认】,完成配对。
此时电机屏幕主界面上会显示相应的频道(如02)。
H02
频道
原力N II 控制手轮与原力M 电机或VND电机配对,均通过手轮的【2.4G】手动频道模式进行配对。
配对操作
08
【向上键】
EXT1=00 MOTOR
EXT2=00 MOTOR
EZ Mode
【向下键】

原力M 电机接上电源后,双击【MENU】键进入菜单,选择【Motor No.】按【ENTER】键进入。通过单击【向上键】或【向下键】调整电机序号。
调整电机序号1(紫色)、2(绿色)、3(蓝色)、4(黄色),即可使用原力N II 控制手轮或多功能控制手柄的相应部件,控制原力M 电机。
02
02
进入手轮菜单,选 择【 连接设置】-【2.4G】模 式 ,再 打开【ON】并点击【频道】进入手动频道模式,选择可用频道(如CH3),然后退出此界面。
进入手轮菜单,选 择【 连接设置】-【2.4G】模 式 ,再 打开【ON】并点击【频道】进入手动频道模式,选择可用频道(如CH3),然后退出此界面。
A
F
FOCUS
ZOOM IRIS
A
B
R
E
C
1
2
A
F
01
A
F
FOCUS
ZOOM IRIS
A
B
R
E
C
1
2
A
F
01
原力N II 控制手轮与VND专用电机配对
原力N II 控制手轮与原力M 电机配对(方法二)
配对操作
09
通过单击【向上键】或【向下键】调整电机序号(不操作时10S后自动退出
或三击【向上/下键】退出)。
调整电机序号1(紫色)、2(绿色)、3(蓝色)、4(黄色),即可使用原力N II
控制手轮或多功能控制手柄的相应部件,控制VND电机。
VND电机接上电源后,长按【向下键】开机,通过双击【向上键】
或【向下键】调整频道与手轮一致。
双击【向上键】
为频道减
双击【向下键】
为频道加
频道
03
三击【向上键】进入电机序号设置:
原力M 电机序号设置
【向上键】
【向下键】
原力M 电机接上电源后,长按【POWER】键开机,
通过双击【向上键】或【向下键】调整频道与手轮一致。
03 03
H03
H03
Motor No:
= 1
H03
1

A
F
FOCUS
ZOOM IRIS
A
B
R
E
C
1
2
A
F
手轮-固件更新
进入手轮菜单,选择【系统设置】-【固件更新】,选择需更新的手轮程序,如【手轮-M】,并点击【确认】进入更新,待更新进度达100%后,
菜单界面返回到主界面即更新完成。
在手轮已提前联网更新最新固件的情况下,先按住电机【功能键】①再接上电源②,绿灯短闪,进入电机更新状态;
01
PD供电线
PD电源/V口电池
绿灯短闪
01
03
04
选 择【 连接设置】-【WIFI】模 式 ,再 打开【ON】并点击【设置】进入WIFI搜索模式。
02
进入手轮UI主界面,自下向上滑动进入菜单。
点击【搜索】查找可用WIFI,输入密码后确定【OK】,待出现绿色打钩图标 即联网成功。
电机-固件更新
固件更新
10
仅【手轮-M】程序需要联网更新,其他程序均可在【手轮-M】固件更新完成后在单独离线更新。

固件更新
11
!
进入手轮菜单,选择【系统设置】-【固件更新】,选择需更新的电机程序,如【电机-M】,并点击【确认】进入更新,待更新进度达100%后,
即更新完成。如需再更新【电机-S】,需先断开电机电源,再重复上述更新操作即可。
在手轮已联网的状态下,进入【系统设置】-【固件更新】
界面会弹出【服务器】窗口,请根据所在地点选择对应
的服务器,再进行更新。
查看程序是否需要更新:
① 程序下方是否带“→”的版本号,即当前版本需要
固件更新,如下。
02
更新过程中请勿插拔电机电源或关闭手轮。如若有,电机需再次接上电源, 重复更新操作即可。
多个电机不能同时进行固件更新,仅能依次更新一台电机,避免信号干扰。
当固件更新完,要进行下一个固件更新时需断开电机电源后进行。
电机需跟手轮进行配对后才可查看当前固件版本号。
电机如果误触【功能键】进入固件更新状态,请先断开电机电源,并未在按压【功能键】的情况下,重新接上电源即可。
更新前确保手轮电量不低于50%,同时确保区域内没有其他电机正在固件更新。
电机固件更新前,需确保手轮已提前联网更新最新固件。
如果更新的百分数停留在5%-6%之间,或者递增速度过慢,即需要手轮关机重启,再次进行上述更新操作。
程序下方未带“→”的版本号,即当前版本不需要
固件更新,如下。
【手轮-M】程序:手轮主控固件; 【手轮-S】程序 : 手轮外设设备管理固件
【电机-M】程序:电机端-相机控制固件; 【电机-S】程序:电机控制固件
【控制手柄】程序:多功能控制手柄固件
手轮在已联网的状态下,系统会自动检测到最新的固件版本。
更新过程中屏幕会重启,请等待更新完成即可,更新完成后手轮菜单会返回到主界面。
更新【手轮-M】程序时,会同时下载【手轮-S】/【电机-M】/【电机-S】/【手柄】多个程序的固件,后续更新电机和手柄时即无需联网。
手轮更新后查看当前固件版本号。
手轮在联网状态下更新失败或中断时,请检查网络状态或重启手轮。
原力N II 电机
原力N II 控制手轮

DISCLAIMER
12
WARNING & PRECAUTION
Thank you for purchasing a TILTA product.
Before using this product, please carefully read this document to ensure that the product has been set up correctly. The final interpretation of
this document and all related documents for this product belongs to TILTA. For updates, please visit the official website at www.tilta.com for
the latest product information. TILTA reserves the right to modify any information in this manual at any time without prior notice and without
assuming any responsibility.
By using this product, you are deemed to have carefully read the disclaimer and warnings, understood, agreed, and accepted all the terms
and content of this statement. You promise to take full responsibility for the use of this product and any consequences that may arise.
You commit to using this product only for legitimate purposes and agree to this term as well as any related regulations, policies, and guidelines
set by TILTA.
TILTA is not responsible for any damages, injuries, or legal liabilities caused directly or indirectly by the use of this product. Users should follow
all safety guidelines mentioned in this document, including but not limited to those mentioned. Despite the above provisions, consumer rights
are still protected by local laws and regulations and are not affected by this disclaimer.
TILTA is a trademark of Shenzhen TILTA Technology Co., Ltd. and its affiliated companies. Product names, brands, and other trademarks
appearing in this document are trademarks or registered trademarks of their respective companies.
Before using this product, please strictly follow the instructions below. Our company assumes no responsibility for any consequences caused
by improper operation or misuse.
ACCESSORY REQUIREMENTS
Charging at temperatures higher than 40°C (104°F) or lower than 5°C (41°F) may result in decreased battery performance, swelling, leakage,
overheating, and other damage.
Do not store the battery in an environment exceeding 60°C (140°F). The ideal storage temperature is 22°C (71.6°F) to 28°C (82.4°F).
The battery must be charged with the charging equipment provided by TILTA. TILTA will not be responsible for any consequences resulting
from charging with non-TILTA official equipment.
OPERATING ENVIRONMENT
BATTERY SAFETY
MAINTENANCE & CARE
This device contains strong magnets. To avoid magnetic interference, please keep it away from magnetic cards, IC cards, implantable
medical devices (such as pacemakers), hard drives, RAM chips, and other devices that may be affected.
Use the battery in an environment with a temperature between -20°C (-4°F) and 45°C (113°F). Excessive temperatures can cause the
battery to swell abnormally, catch fire, or even explode. Before using the device in a low-temperature environment, it is recommended to
fully charge the battery at room temperature to extend its service life.
Do not place the device near flammable or combustible materials (such as carpets and wooden products) while charging. Always pay
attention to the charging process to prevent accidents.
Store the device in a dry environment, with an ideal storage humidity not exceeding 40%.
Please keep the device clean and free of sand, dust, and other foreign objects. Use a clean, dry cloth to promptly clean any debris on the
product.
Do not subject the device and its accessories to strong impacts or vibrations, as this may damage them and cause device failure.
If the device collides with a hard object or the screen is broken due to a strong external impact, do not touch or attempt to remove the
broken parts. Instead, immediately stop using the device and promptly contact TILTA customer service.
NOTE: The device will generate slight heat during operation, which is normal.
[ Warning] This device is equipped with a non-removable built-in battery. please do not attempt to replace the battery yourself, as this
may damage the battery or the device.
Do not use the battery in environments with strong electrostatic or magnetic fields, as this may cause internal circuit failures in the device.
Do not expose the battery to high temperatures or place it near heat-generating devices, such as sunlight, heaters, microwaves, ovens,
or water heaters. Overheating the battery may cause it to explode.
Do not disassemble or modify the battery, insert foreign objects, or immerse in water or other liquids, as this may cause the battery to
leak, overheat, catch fire, or explode.
The electrolyte inside the battery is highly corrosive. If it accidentally comes into contact with your skin or eyes, rinse immediately with
clean water for at least 15 minutes and seek medical attention.
Do not throw the battery into fire, as this can cause it to catch fire and explode.
Do not drop, squeeze, or puncture the battery. Avoid subjecting the battery to external pressure, which may cause internal short circuits
and overheating.
Do not use damaged batteries.
Do not store the battery for an extended period after it has been completely discharged, to avoid entering a deep discharge state that
can cause damage to the battery cells, rendering it unable to be used again.
Be sure to fully discharge the battery before disposing of it in a designated battery recycling bin. Batteries are hazardous chemicals and
must not be disposed of in regular trash bins. For details, please follow the local laws and regulations regarding battery recycling and
disposal.
If the battery cannot be fully discharged, do not dispose of it directly in a battery recycling bin; instead, contact a professional battery
recycling company for further processing.
!

< Right Side >< Left Side > < Rear Side >
NATO Mount
For Mounting the Hand Unit
Built-in Battery Capacity
(1) Operating Temperature: Charging: 0°C to 45°C (32°F to 113°F); Discharging: -10°C to 60°C (14°F to 140°F)
(2) Storage Temperature: -5°C to 45°C (23°F to 113°F)
(3) Operating Humidity: 45±20% (Recommended)
(4) Warranty Period: 12 months and less than 500 charge cycles
3.7V 1800mAh 6.66Wh
Dynamic Interaction/350ppi
Circular Touch Screen USB-C
Supports PD Fast Charging
Built-in High Capacity Battery
with Extended Life
Continuous Operation for Over 7 Hours
& Smart Standby up to 20 Hours
FEATURES
BATTERY USAGE GUIDELINE
TECHNICAL DATA
Material: Aluminum Alloy+Plastic Dimensions: 73*72*53mm Weight : 175g Color : Black
INTRODUCING NUCLEUS NII HAND UNIT
13
Safety Pin
Prevents Accidental Disconnection
Tie Down
Lock to Secure a NATO Accessory
USB-C Port
For PD Fast Charging
Hand Wheel
Motor / Parameter Control
1.6-inch Circular Touch Screen
Lens & Camera Data / Parameter Display & Control
Rotation Limit Switch
Switch TF / DF Mode
( TF Mode: Compatible with TILTA Wireless Follow Focus Systems;
DF Mode: Compatible with DJI Follow Focus Systems)
Switch Up to TF Mode ( Limits Focus Knob Rotation to 360 Degrees )
Switch Down to DF Mode ( Focus Knob can Rotate Freely )
Control Rocker
Control One Assigned Motor
[FUNC] Button
01 Set Marks
02 Hold to Calibrate Lens
[REC] Button
01
Long Press 3s: Power On / Off
Long Press 8s: Force Power Off
Single Press:REC Run/Stop Function
02
10
11
07
09
06 08
01
02
03
04
05
Electronic Contact Points
01 Power the hand wheel controller via the
Power Handle or Control Handle
02 Compatible with other external devices
for data transmission
01
02
03
04
05
07
08
09
06
10
11
USE INDEPENDENTLY
ATTACH TO OTHER ACCESSORIES
USE WITH THE NUCLEUS NANO II CONTROL HANDLE(as shown below)
Note: When assembling and disassembling, pay attention to the contact pins on the Control Handle to prevent damage
from external force.
USE THE HAND UNIT
14
Attach the hand unit to the Control handle using the NATO mount, lock the tie down to secure.
ASSEMBLY
The focus motor can be controlled by operating the hand
wheel or using the control rocker.
The Nucleus-N II and some camera settings can be
controlled through the touch screen.
The Nucleus-N II hand unit features a NATO quick-release mount, allowing it to be attached to NATO rail.
(such as NATO rail on the side of a camera cage or DJI RS 2/RS 3 Pro, etc..)
WARNING:
Align the saftey pin on the hand
wheel with the reserved slot on
the handle and clamp the unit
into place without sliding the unit.

INTRODUCING THE MAIN UI
15
After turning on the device, the hand wheel controller will enter the main Interface. Swipe left or right to switch between
the Three Main Screens. Swipe up from the bottom of the screen to access the Four Settings Menus.
Swipe left or right to select the desired settings menu and tap the center icon to enter the secondary menu.
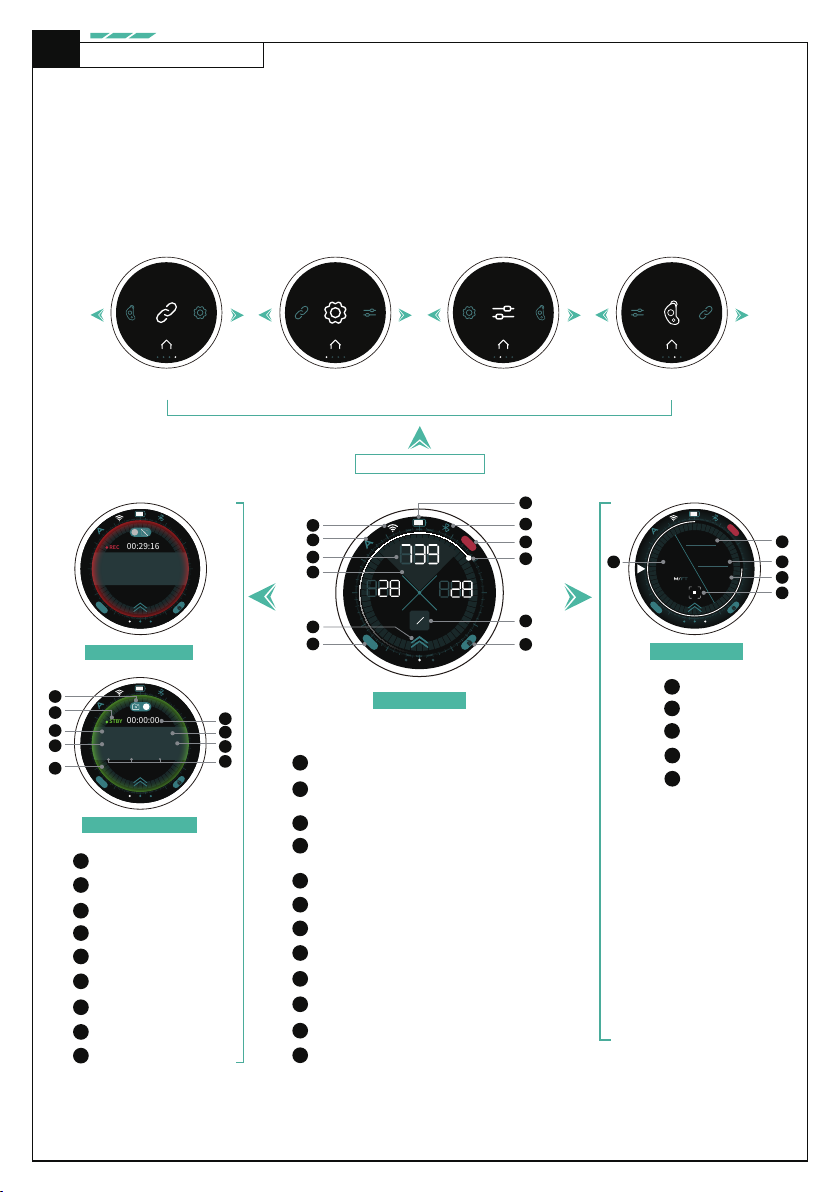
The Nucleus-N II hand unit UI consists of Three Main Screens and Four Settings Menus.
The Three Main Screens include the Camera Control Interface, Motor Parameter Interface, and Focus Distance Interface.
The Four Settings Menus are Connect Settings, Function Settings, System Settings, and Motor Settings.
A
F
STBY
1
2
13
14
15
16
18
19
20
21
17
13
14
15
16
Camera Settings
Lock Button
REC/STBY Indicator
Iris Info
ISO Info
17
18
19
20
21
Recording Run Time
Shutter Speed Info
Color Temperature Info
Resolution / Data Rate /
Frame Rate
Communication Protocol Info
22
23
24
Focus Distance
Lens Manufacturer
Lens Model
25
26
Set Mark Button
Focal Length Info
Swipe up from the bottom
Connect Settings
Function Settings
System Settings
Motor Settings
Camera Control Interface- STBY
Camera Control Interface- REC Focus Distance Interface
Battery Information
07
Bluetooth Status
08
10
Focus Knob Range Indicator
09
REC/STBY Indicator
11
Set Mark Button
12
Touch Screen Lock Button
01
02
Wireless Channel Indicator
A: Automatic Channel Mode
M: Manual Channel Mode
Number: Channel No.
WIFI Status
03
04
05
Additional Settings (Swipe Up)
Motor Indicator
FOCUS Indicator / IRIS Indicator / ZOOM Indicator
Motor Parameter (0-999)
06
AF/MF Switch Button
Swipe right
from the left
Motor Parameter Interface
A
F
FOCUS
ZOOM IRIS
A
B
R
E
C
1
2
A
F
01
02
03
04
05
06
07
08
10
11
12
09
Swipe left
from the right
A
F
R
E
C
I
N
F
1
2
23
24
25
26
22
REC
1
2
A
F

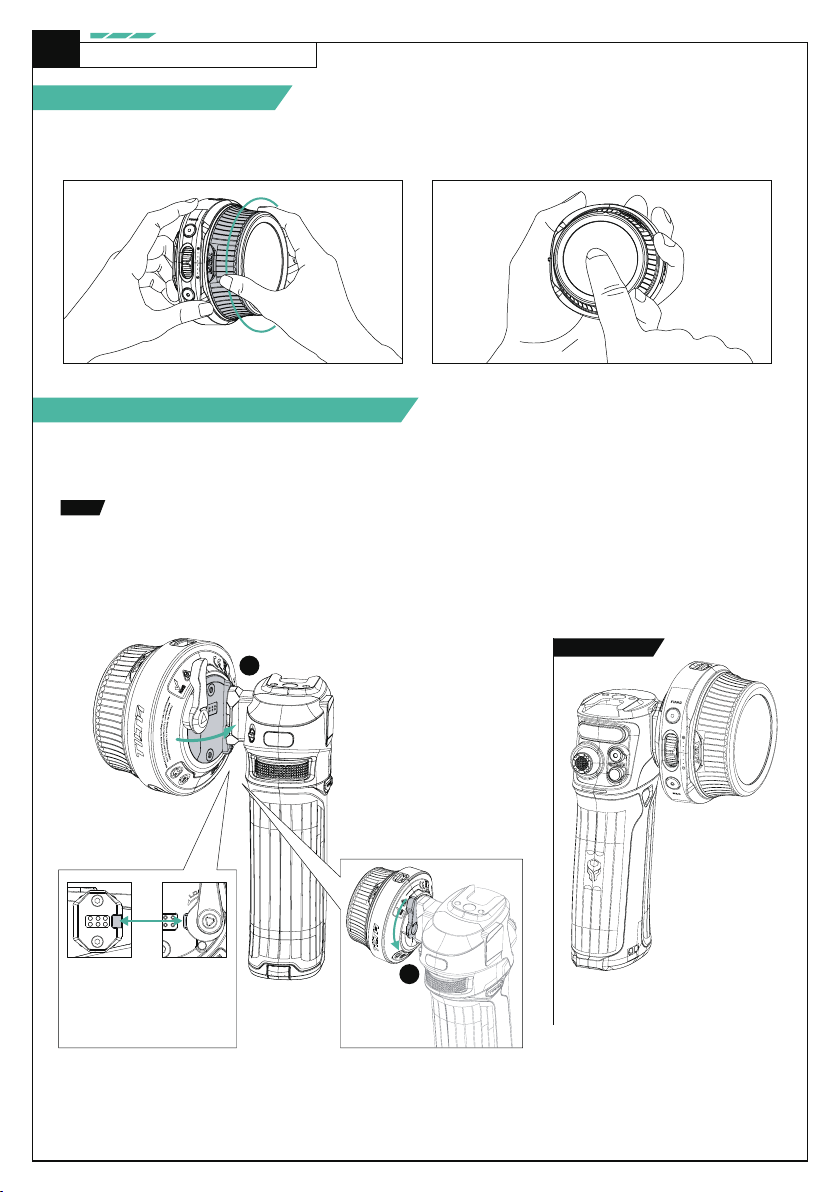
INTRODUCING NUCLEUS NII MOTOR
16
Attach part lens gear to the lens, following
the indicated direction. Secure part to
complete the assembly.
ATTACHING MOTOR TO LENS
Note: If the lens comes with a 0.8 module gear ring, skip this step.
⑥
TECHNICAL DATA
Material: Aluminum Alloy+Plastic Dimensions: 83*46*31mm Weight: 80g Color: Black
< Left Side > < Rear Side >
Motor Driver
0.8M Lens Gear
LED Indicator
USB-C Port 1
USB-C Port 2
Connects to Lens
15mm Rod Holder
Tie Down
For Mounting via a 15mm Rod
For securing the Motor
01
02
03
04
05
06
07
08
(1) Attaching Lens Gears
(2) Attaching the Rod Holder & 15mm Rod
(3) Attaching the Motor
Attach the rod holder to the 1/4" thread on the cage
side arm, and tighten the screw. Then, secure the 15mm
rod to the rod holder, which will be used to attach the
motor.
Mount the motor onto the 15mm rod, adjust the motor
angle, and then engage the motor gear with the adjustable
lens gear and then tighten the tie down to complete
the assembly.
Supports PD input,
(input voltage: 7.4V-16.8V)
Supports USB-C to C
control cables
Function Button
Single-Click : Switch Motor
FOCUS / IRIS / ZOOM / OTHERS
Double-Click : Enter Pairing Mode
Long Press 3s : Calibrate Lens
Supports PD Input/Output,
(input voltage: 7.4V-16.8V)
Supports USB-C Run / Stop
cables
gear pitch, can be used with the adjustable lens
gear included in the kit or the TILTA Seamless
Focus Gear Ring (Optional).
Compatible with focus rings with a 0.8Note:
Optional TILTA rod adapters for motor assembly
Including: 15mm Single Rod Holders and LWS Baseplates

MOTOR CABLE SETUP
When using multiple motors, you can connect them in series by using the USB-C (PD protocol) for
passthrough power.
Note:
You can use TILTA’s Universal Power Bank Holder or TILTA’s L Series Battery Plate (Optional) for supporting various power options,
in order to supply power to the focus motor via the USB-C port (PD protocol).
USB-C RUN/STOP CABLE
MOTOR POWERING GUIDELINE
17
Attaching the Universal Power Bank Holder
(TA-UPBH-B)
Attach the Universal Power Bank Holder to a
1/4”-20 thread. Tighten the screw and then
secure the power supply equipment (such as
a power bank).
Attaching the Tilta L Series Battery Plate (TA-BTP2-F970-B)
Attach the Battery Plate to a 1/4”-20 thread.
Tighten the screw and then secure the power supply
equipment (such as an F970/F550 battery).
Power Source + 1 Motor
+ PD Power Cable (USB-C to C)
Power Source + 2 Motors
+ PD Power Cable (USB-C to C)
Power Source + 3 Motors
+ PD Power Cable (USB-C to C)
USB-C TO C CABLE
Power Source + 2 Motors + PD Power Cable (USB-C to C) + Camera
PD Power Cable
(Control and Recording)
PD Power Cable
Power Source + 1 Motor +PD Power Cable
(USB-C to C) (Port 2 Input) + Run / Stop Cable (Port 1 Output)
Run / Stop
Cable
PD Power Cable
Run / Stop
Cable
PD Power Cable
Power Source + 2 Motors + PD Power Cable (USB-C to C) (Port 2 Input)
+ Run / Stop Cable (Port 1 Output) + Camera
Power Source + 1 Motor + PD Power Cable
(USB-C to C) + Camera
PD Power Cable
PD Power Cable
(Control and Recording)
Note: When connecting multiple motors in series, use Port 2 as the power input for the
first motor and connect the second motor via Port 1 on both motors. Use Port 2
on the last motor to connect to the camera.
Note: When using a USB-C Run Stop Cable, use Port 2 as the power input for the first motor and connect the next motor from Port 1 to Port 2,
leaving Port 1 on the last motor open for the Run / Stop Cable.
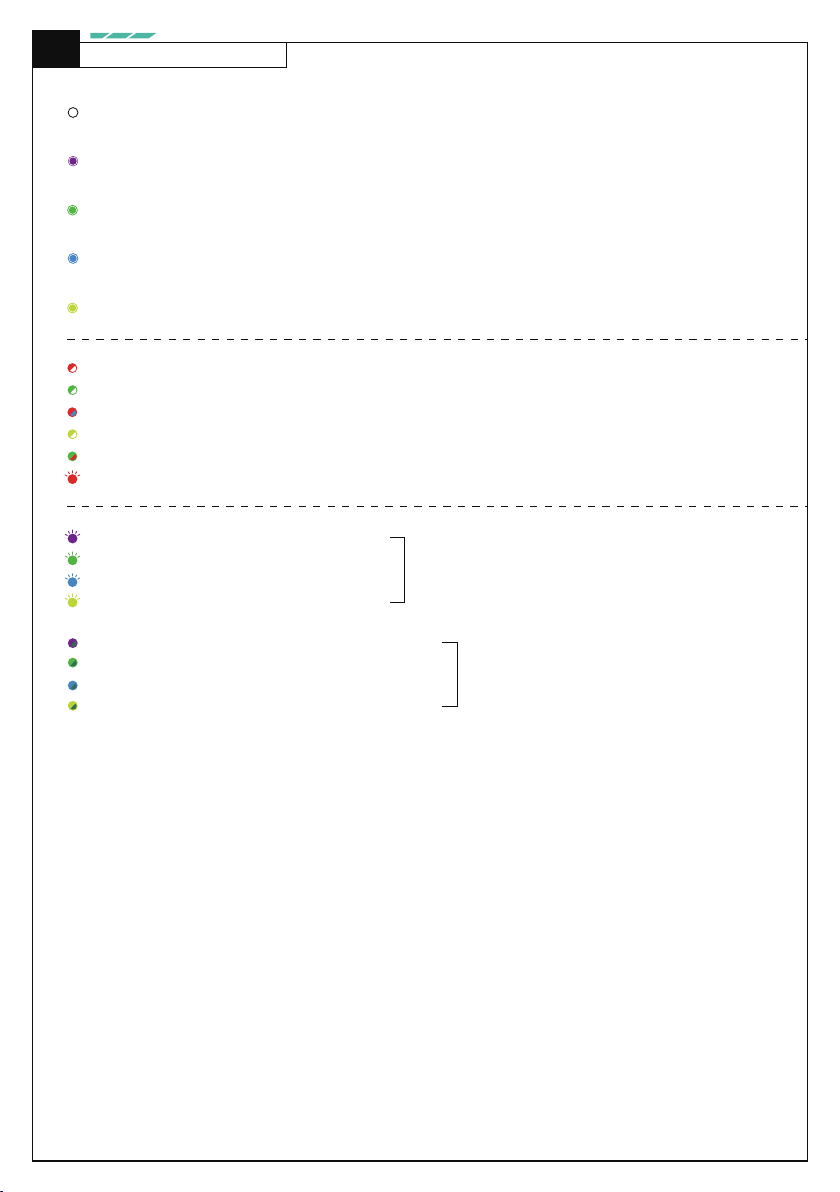
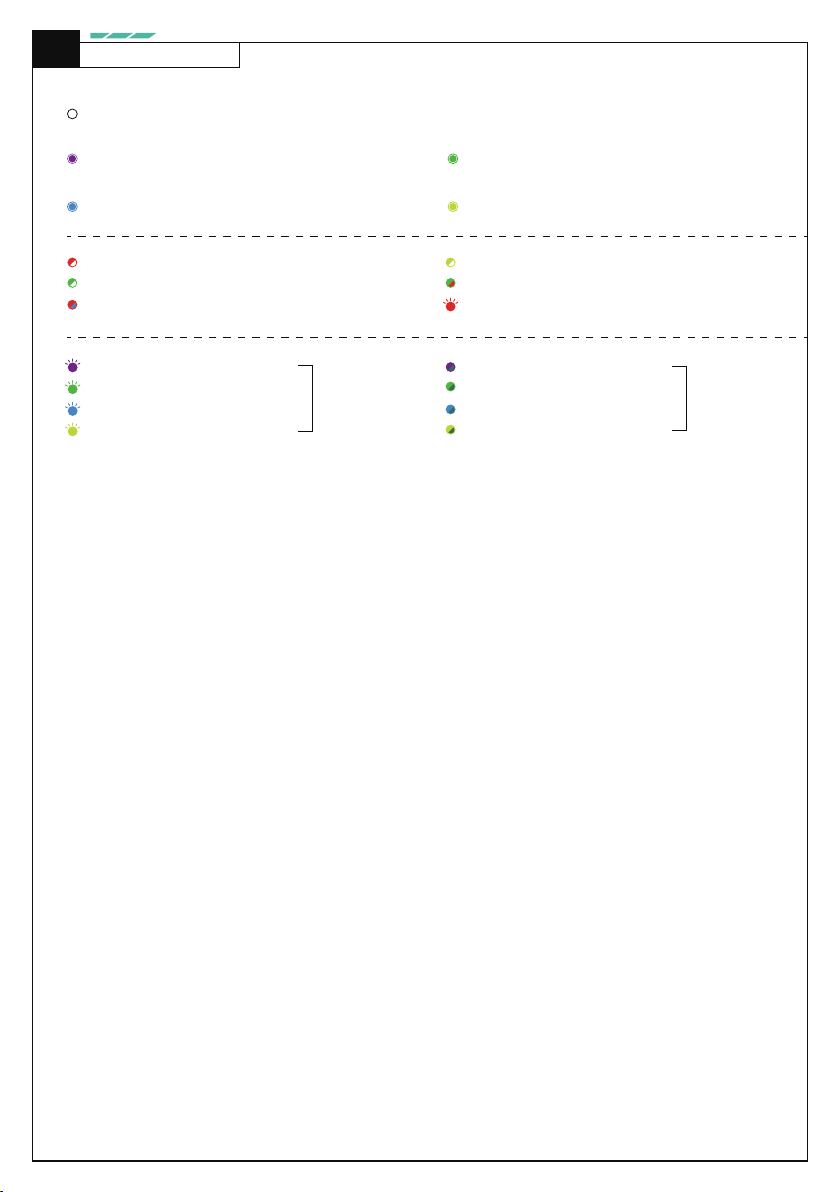
INDICATOR LIGHT
18
Purple: FOCUS
Purple Light: Pairing completed, motor assigned to FOCUS.
Green Light: Pairing completed, motor assigned to IRIS.
Green: IRIS
Blue Light: Pairing completed, motor assigned to ZOOM.
Blue: ZOOM
Yellow Light: Pairing completed, motor assigned to OTHERS.
Yellow: OTHERS
White: Motor is not assigned to any function
Red & White Lights Flashing: Wireless module configuration in progress
Purple Light Flashing: Motor FOCUS, voltage below 6V
Green Light Flashing: Motor IRIS, voltage below 6V
Blue Light Flashing: Motor ZOOM, voltage below 6V
Yellow Light Flashing: Motor OTHERS, voltage below 6V
Voltage below 6V, PD protocol disabled
Yellow & Cyan Lights Flashing: Motor OTHERS, voltage above 6V
Purple & Cyan Lights Flashing: Motor FOCUS, voltage above 6V
Green & Cyan Lights Flashing: Motor IRIS, voltage above 6V
Blue & Cyan Lights Flashing: Motor ZOOM, voltage above 6V
Voltage above 6V, PD protocol enabled
Red & Blue Lights Flashing: Automatic calibration in progress
Red Light Flashing: Motor Error Detected
Yellow & White Lights Flashing: Manual calibration in progress
Green & Red Lights Flashing: Motor unlocking (non-controllable state)
Green & White Lights Flashing: Channel configuration in progress
This manual suits for next models
2
Table of contents


