Timber Tuff Tools CS-CBRSC User manual

Rivet Spinner and Chain Breaker
OWNER’S MANUAL
MODEL# CS-CBRSC
WARNING:
Carefully read and understand all ASSEMBLY AND OPERATION
INSTRUCTIONS before operating. Failure to follow the safety rules and
other basic safety precautions may result in serious personal injury.
20180829

Thank you very much for choosing a Timber Tuff product. For future reference, please complete the
owner’s record below:
Model: Purchase Date: _______________
Save the receipt, the warranty and these instructions. It is important that you read the entire manual
to become familiar with this product before you begin using it.
This product is designed for certain applications only. The manufacturer and/or distributor cannot be
responsible for issues arising from modification. We strongly recommend that this product not be
modified and/or used for any application other than that for which it was designed. If you have any
questions relative to a particular application, DO NOT use the product until you have first contacted
the distributor to determine if it can, or should, be performed on the product.
For technical questions, please call 1-218-943-6290.
GENERAL SAFETY RULES
WARNING: Read and understand all instructions. Failure to follow all instructions
listed below may result in serious injury.
CAUTION: Do not allow persons to operate or assemble this rivet spinner and chain
breaker until they have read this manual and have developed a thorough understanding
of how the this rivet spinner and chain breaker works.
WARNING: The warnings, cautions, and instructions discussed in this instruction
manual cannot cover all possible conditions or situations that could occur. It must be
understood by the operator that common sense and caution are factors that cannot be built into this
product, but must be supplied by the operator.
SAVE THESE INSTRUCTIONS
WORK AREA
•Keep work area clean, free of clutter, and well-lit. Cluttered and dark work areas can cause accidents.
•Keep children and bystanders away while using this tool. Distractions can cause you to lose
control, so visitors should remain at a safe distance from the work area.
•Be alert of your surroundings. Using this rivet spinner and chain breaker in confined work areas may
put you in a dangerous situation.
PERSONAL SAFETY
•Stay alert, watch what you are doing, and use common sense when using this equipment. Do not use
the rivet spinner and chain breaker while you are tired or under the influence of drugs, alcohol, or
medication. A moment of inattention while operating the log skatemay result in serious personal
injury.
•Dress properly. Do not wear loose clothing, dangling objects, or jewelry. Keep your hair, clothing, and
gloves away from moving parts.
Rivet Spinner and Chain Breaker
2 of 9

Rivet Spinner and Chain Breaker
RIVET SPINNER AND CHAIN BREAKER USE AND CARE
•DO NOT force the rivet spinner and chain breaker. Use this tool only for its intended purpose.
•DO NOT modify the rivet spinner and chain breaker in any way. Modification may impair the function
and/or could affect the life and safety of the equipment.
•DO NOT operate this tool with damaged parts. Check for damaged parts before each use. Replace
damaged or worn parts immediately. Never operate the product with a damaged part.
•STORE the rivet spinner and chain breaker when not in use. Store it in a dry, secure place out of the
reach of children. Inspect the rivet spinner and chain breaker to ensure it is in good working condition
prior to storage and before each use.
•DO NOT operate the rivet spinner and chain breaker without the guards in place. Be sure the guards
are in place and in working order.
CAUTION:
To prevent serious injury or death, read and understand owner’s manual before use.
• Wear ANSI safety compliant goggles.
• Keep hands clear of rivet spinner and chain breaker during use.
• Inspect tool for damaged parts before each use.
• DO NOT use by, or around, children.
ASSEMBLY INSTRUCTIONS
Bench Mounting
The rivet spinner and chain breaker is equipped with two holes for mounting to a bench. Lag screws or
bolts (not included) may be used to hold the unit into position (figure A).
Mount with rivet spinner and chain breaker flush with the side or front of the bench area. Mounting the
rivet spinner and chain breaker flush to the bench allows chains to clear for spinning.
SPINNER ANVIL/TAKE-UP HANDLE CHART
3 of 9
Spinner Anvil/Take-up Handle Chart
Take-Up Handle Marking
Spinner Anvil Marking
Chain Pitch
Drive Link Number
“B”
“B”
1/4
25
“A”
“A”
3/8
72
73
75
76
77
78
91
“B”
“B”
0.325
20
21
22
33
34
35
"A”
"A”
0.404
16
18
26
27
28
50
51
52
57
58
59

Rivet Spinner and Chain Breaker
Replacing the Spinner/Anvil
To remove a worn or damaged spinner/anvil, unscrew the take-up handle(#13) until the spinner anvil(#2)
can be easily removed (figure B). Replace it with a new or repaired anvil (#2) and take-up handle(#13).
Note: The unit is supplied with two spinner anvils marked ”A” ”B” and two take-up handles to match the
spinner anvils.
OPERATING INSTRUCTIONS
Right or Left Hand Use
The rivet spinner and chain breaker is assembled for right-hand use. If left-hand use is preferred, follow
the instructions below:
• Unscrew the set screw (#18) and remove the breaker level (#3) (figure b).
• Remove the plastic cap with a screwdriver and depress the spring-loaded punch holder (#21) to free up
the cam (#15) (figures c-d).
• Slide the cam (#15) out by the right side of the unit (figure e).
• Reinsert the cam (#15) into the opposite side of the unit. Depress the punch holder (#21) and insert the
cam (#15) (figure f).
• Replace the plastic cap and reinsert the breaker level (#3). Tighten the set screw with an Allen wrench
(#20).
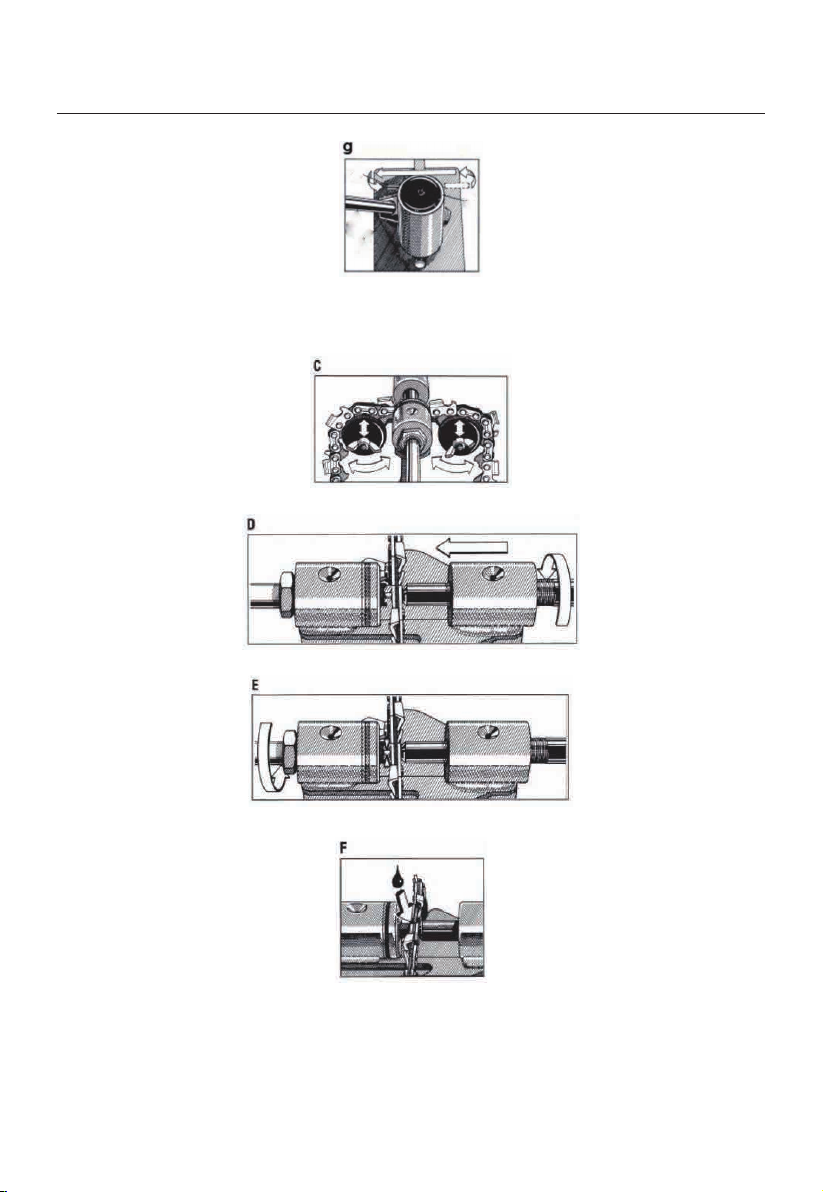
• Remove the stop pin (#14) from the right side of the unit and reinsert it into the left side (figure g).
4 of 9
Rivet Spinner and Chain Breaker
Rivet Spinning
• Lay the chain across the guide wheel (#4) (figure C).
• Rotate the guide wheel (#4) so that the rivet head is centered between the take-up handle (#13) pocket
and the spinner anvil (#2) (figure C).
• Turn the take-up handle (#13) until the chain is secured against the spinner anvil (#2) (figure D).
• Turn the spinner handle (#7) a few times to center the rivet hub in the spinner anvil (#2) (figure E).
• Apply a few drops of oil to the rivet hub (figure F).
• Turn the spinner handle (#7) and at the same time, slowly turn the take-up handle (#13) inward
(approximately one full revolution) until the rivet head is formed. The take-up handle (#13) will provide
pressure while the spinner anvil (#2) forms a rivet head (figure G).
5 of 9

Rivet Spinner and Chain Breaker
Replacing the Punch
• To remove a worn or damaged punch (#19), loosen the set screw (#18) with an Allen wrench (#20)
(figure h).
• Insert a new punch into the punch holder (#21). (Push the punch up with the unit fully seated.) Tighten
the set screw (#18) (figure i).
Replacing a Broken Drive Link
The point of breakage usually occurs at or near the rivet hole.
• First, remove the cutter or the strap and half of the broken drive link. Connect the two broken sections
back to the original position prior to the breakage (figure p).
• Center the breaker punch (#19) over the rivet head and pull the handle down just enough to push the
rivet out. Repeat with the other rivet. Do not use excessive force.
Chain Breaking
• Insert the chain portion to be broken into the slot of the adjustable anvil (figure j). Tighten the
adjustment knob unit until the chain is securely positioned. Position the cutter as shown (figure k).
6 of 9

Rivet Spinner and Chain Breaker
Note: It is not necessary to re-adjust the anvil when breaking multiple loops of chain of the same
chain type.
• Position the rivet head directly under the punch (#19) and pull the breaker level (#3) down just far
enough to push the rivet out. Do not use excessive force (figure I).
Note:
A. When breaking a chain at the cutter, make sure the cutter is in the correct position (figure m).
B. For cutters with depth gauges, as in figure n, make sure to position the cutter properly.
C. Shown in figure o, using the side of the adjustable anvil with the slot.
7 of 9

Rivet Spinner and Chain Breaker
AFTER EACH USE
WARNING: Store the rivet spinner and chain breaker away from children.
MAINTENANCE
It is recommended that the general condition of any tool be examined before it is used. Keep your rivet
spinner and chain breaker in good repair by adopting a program of conscientious repair and mainte-
nance. Have necessary repairs made by qualified service personnel.
This rivet spinner and chain breaker is equipped with oiling chambers and should be maintained
periodically with lightweight oil (figure h).
PARTS DIAGRAM
8 of 9

Rivet Spinner and Chain Breaker
PARTS LIST:
WARRANTY
One-year limited parts warranty
BAC Industries
PO BOX 155
Miltona, MN 56354
Made in CHINA
9 of 9
Part#
1
2
3
4
5
6
7
8
9
10
11
Description
Base
Anvil
Breaker Lever Guide
Wheel Wheel
Locking Screw
Spinner Grip Spinner
Handle Hex Nut M5
Flat Bearing Spinner
Sleeve Spinner Die
Qty.
1
1
1
2
2
1
1
1
1
1
2
Part#
12
13
14
15
16
17
18
19
20
21
Description
Thrust Die
Take-up Handle
Spring Pin
Breaker Cam
Cam Holder Cover
Spring
Hex Screw M5
Breaker Punch
Hex Wrench M2.5
Punch Holder
Qty.
2
1
1
1
1
1
2
1
1
1
For replacement parts and technical questions, please call 1-218-943-6290.
Table of contents


