Tiny Audio C6 User manual

Side 1
English
TINY AUDIO C6
Please read carefully before using this product

Side 2
Safety Instructions:
1. Do not use this radio near water.
2. Clean with dry cloth.
3. Do not block any ventilation openings.
4. Do not use near heat objects.
5. Use accessories provided by manufacturer.
6. Do not dispose this radio to rain or moisture.
7. Do not allow this unit to be exposed to water,
steam, sand or other environmental hazards.
8. Do not leave your radio where excessive heat
could cause damage.

Side 3
Controls:
1. PRESET Button
2. MENU Button
3. MODE Button
4. TX/SCAN Button
5. Tuning Knob and Confirmation Button
6. Stand Holder Slot
7. Power ON/OFF Switch
8. Power Supply Cable Socket
9. 3.5mm Line In or Line Out Jack
10. Antenna Jack

Side 4
Main Unit and Accessories:
1. Main unit, DAB receiver
2. Power cable/Micro USB
3. 3.5mm Aux cable
4. DAB, DAB+ antenna for main unit
5. Dash/window mounting bracket
6. Dual USB charger for 12/24V
Note: All accessories are designed to work
specifically with Tiny Audio C6. Please do not
use third party cables as these may not work
and cause warranty invalidation.

Side 5
Operating your In-Car DAB+ Digital Radio Receiver:
1. Mount the TINY AUDIO C6In-Car DAB+ Radio receiver to
the dashboard using the provided adhesive holder.
2. Connect one end of the USB power supply cable to Micro
USB socket in TINY AUDIO C6and the other end to dual
USB car charger. Plug the dual USB car charger to the car
cigar-lighter socket.
3. Connect the antenna to the antenna jack. ATTENTION!
Proper antenna installation is very important for a good
result. See tips page 17.
4. Turn on the power with the “POWER SWITCH” and the
display will show “Tiny Audio” logo, then the device will
automatically scan all the local DAB/DAB+ channels and
store them in the memory of the device until another
“Auto Scan” is performed. During scanning, a scan moving
bar will be shown in the display to indicate the progress
and the total number of channels received.
5. Once it is scanned, you can select any DAB+ radio
channels by the Tuning Knob.
Receive signal from the In-Car DAB+ radio through line out
cable:
1. Press and hold “MENU” button to enter menu mode, use
Tuning Knob to search for “AUX IN/OUT Select” and
confirm by pressing Tuning Knob. Use Tuning Knob to

Side 6
select “AUX OUT” and confirm by pressing Tuning Knob.
Short press “MODE” button to exit menu. A headphone
icon “ ” will be displayed at the top of the blue bar.
2. Connect your car audio stereo speaker “Aux-in” or
“Line-in” to the “LINE OUT” jack on the right-hand side of
TINY AUDIO C6 with the provided 3.5mm audio cable.
Remark: In “AUX OUT” mode, there will be no FM transmission to
the car stereo.
Receive signal from the In-Car DAB+ radio through FM
transmission:
--Select FM Transmitting Frequency (Auto Mode):
1. Press and hold “MENU” button to enter menu mode,
use Tuning Knob to search for “AUX IN/OUT Select”
and confirm by pressing Tuning Knob. Use Tuning
Knob to select “AUX IN” and confirm by pressing
Tuning Knob.
2. Press “TX/SCAN” button to show FM transmitting
frequency (TX FREQ).
3. Then press and hold “TX/SCAN” button for 2 seconds
to activate the automatic scanning of a “vacant”
transmission frequency without interference with
other channels. The scanning process will take 5-6
seconds to scan the frequency automatically with a

Side 7
flashing display of “---.-MHZ” and stop at a “vacant”
frequency.
4. After a “vacant” frequency is found, press “TX/SCAN”
button again to confirm and exit setting or it will
automatically confirm and exit the setting after 5
seconds. The selected “vacant” frequency (TX FREQ)
will be shown at the top of the blue bar, e.g.
TX108.0MHz
5. Then tune your car FM radio system to match the
selected “vacant” frequency (TX FREQ) for
transmission of the audio signal from TINY AUDIO C6
to your car stereo audio system.
Remark: To enable FM transmitter, you have to set the device
into “AUX IN” mode.
--Select FM Transmitting Frequency (Manual Mode):
1. Press “TX/SCAN” button to enter FM transmitting
frequency selection mode.
2. Then use Tuning Knob to select your favorite vacant
frequency (based on your past experience with the
known vacant frequency) which you would like to
receive by your car radio.
3. Once it is selected, press “TX/SCAN” button to
confirm and exit or the screen will go back to DAB+
mode automatically after 5 seconds and the selected

Side 8
frequency will be shown at the top of the blue bar,
e.g. TX108.0MHz.
Remarks:
“Vacant frequency” means there is no any radio broadcasting
content or noise when the frequency is selected.
Search and select DAB+ channels:
1. Press the “MODE” button until “DAB+ Radio” mode is
found.
2. Use Tuning Knob to select the desired DAB+ channel.
3. Or press “MENU” button to enter Preview Mode, use
Tuning Knob to scroll up or down to select the desired
DAB+ channel and press Tuning Knob to select.
4. You may also press and hold the “MENU” button to
enter menu, use Tuning Knob to select for “DAB
Autoscan” and confirm by pressing Tuning Knob to
re-activate the “Auto Scan” process if you need to
update the DAB+ radio channels.
Remark: For normal use, you don’t have to perform the “Auto
Scan” every time you use the car DAB+ radio unless there are
newly added DAB+ channels, then you may need to perform
the “Auto Scan” again. The scanning operation is similar to
your home TV set.

Side 9
Service Information: DAB+ mode
The Service Information display -The Service Information data
will be displayed with scrolling text which is being broadcasted
from the station.
While listening to DAB+, the display will show the followings if
applicable.
1. Channel Name
2. Frequency
3. Multiplex Name(DLS)
4. DAB+ icon
5. Number of Channel Scan and Stored
6. Signal Strength
7. FM Transmitting Frequency
8. AUX IN or AUX OUT status
9. Service Following On status
Service Following ON/OFF Control:
1. Press the “MODE” button until “DAB+ Radio” mode
is found.
2. In “DAB” mode, press and hold the “TX/SCAN”
button to turn ON the service following function. A
“S/F” will displayed on the LCD screen. Repeat the
same procedure to turn OFF the service following
function and “S/F” will also disappear from the LCD
screen.

Side 10
Manage the Preset Stations:
Storing the Preset Stations:
To program and store your favorite DAB+ preset stations:
1. To select a favorite DAB+ station using Tuning Knob.
2. Press and hold “PRESET” button for 3 seconds to enter
“Store Preset” mode.
3. Use Tuning Knob to scroll up or down to select a
number in memory to store your favorite station.
4. Press Tuning Knob to confirm and exit “Store Preset”
mode. A message “Stored Successfully” will be
displayed.
Recalling the Preset Stations:
To recall your favorite DAB+ preset stations:
1. Press “PRESET” button to enter “Select Preset”
mode.
2. Use Tuning Knob to scroll up or down to recall a
Preset Station.
3. Press Tuning Knob to confirm and exit “Select
Preset” mode.

Side 11
Removal of Preset Stations:
To delete all of your favorite DAB+ preset stations, press and
hold “MENU” button to enter menu mode, use Tuning Knob to
search for “Delete All Presets” and confirm by pressing Tuning
Knob. Then all the memory of presets will be cleared.
Selection of Screen Background and Font color:
The color of screen background and font can be set to
four different combinations to match with your overall
car dashboard color:
1. black background/white font
2. black background/blue font
3. black background/orange font
4. colour
To set the color, follow the procedure below:
1. Press and hold “MENU” button for 3 seconds to
enter “Colour Setting” menu mode.
2. Use Tuning Knob to scroll and select the color and
confirm by pressing Tuning Knob.
3. Once the color is selected, press Tuning Knob to exit
menu.

Side 12
Connecting and Mounting DAB+ Antenna inside the car:
1. Stick the antenna film to the glass as indicate in the
diagram, gently applying pressure to remove any air
bubbles.
2. Remove the adhesive backing from the amplifier
block and stick to the window glass. Remove the
adhesive backing from the earth sheet on the
amplifier block and stick this to the metal of the A
pillar.
3. The antenna should be mounted vertically, not
horizontally.
4. Do not attach the DAB antenna over heating wires,
in a place that obstruct the driver's view, or in a
place that can experience interference from metal.
Cables must not be stretched so that they become
an obstacle to the operation of the vehicle airbags or
function.

Side 13
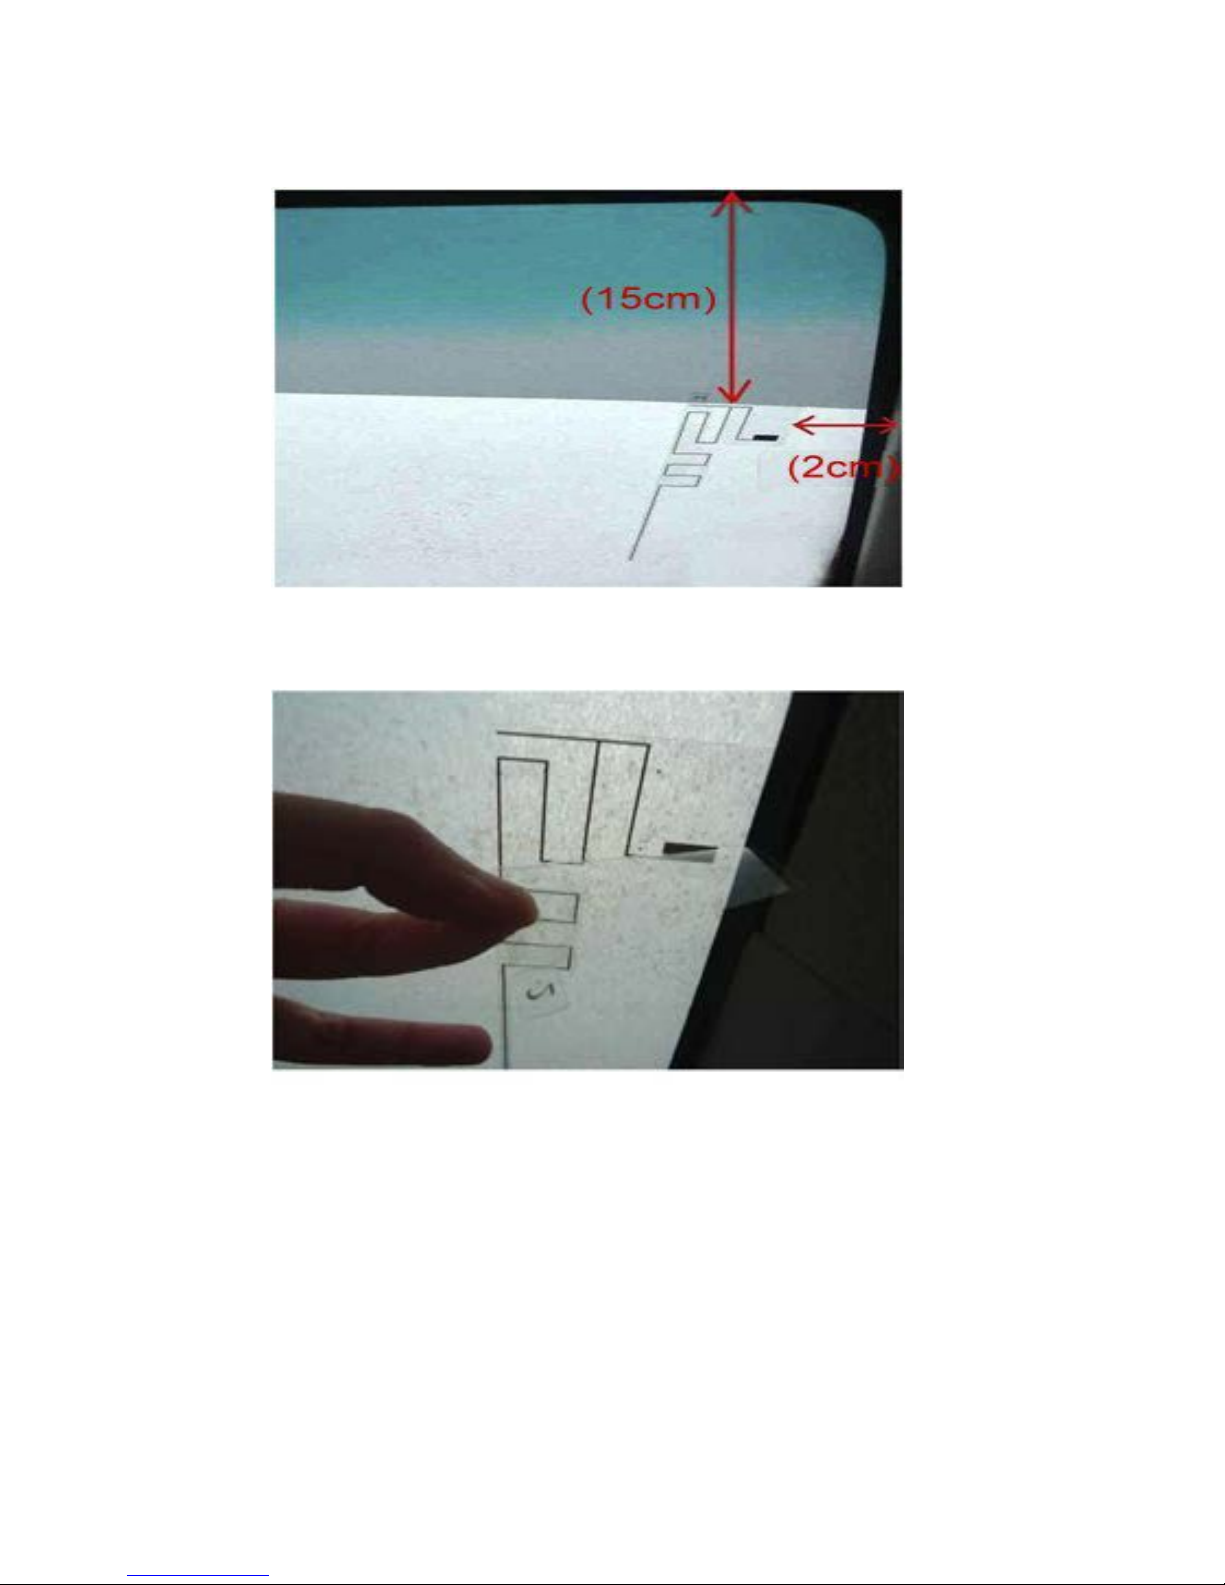
(1) It needs to use alcohol to clean windscreen in the
front of the car as the red square in the below photo
(2) Tear off the separate film of 1
(3)Stick the antenna film on the windscreen in the
front of the car which the distance is 15cm from the
top of car and 2cm from A rod.
Side 14
(4)Tear off the separate film of 2.

Side 15
(5)Tear of the separate film which is in the back of the
antenna connected box
(6)Dismantle the plastic cover of A rod and put the
ground plate into A rod

Side 16
(7) Stick the points of antenna connected box as photo
7-2 1~3 on the antenna film as photo 7-1 1~3
Connecting AUX IN:
The TINY AUDIO C6 features a 3.5mm Aux-IN jack on the
right-hand side. External analog audio source from
iPad/iPhone/iPod/Tablet/Android phone or MP3 players etc.
can be fed wirelessly through FM transmission into your car
stereo audio system.
To connect an external music player:

Side 17
Press “MODE” button until you see “AUX IN” mode. If you
can’t find “AUX IN” mode, then press and hold “MENU”
button to enter menu,
1. Use Tuning Knob to scroll up or down to select “AUX
IN/OUT Select”, press Tuning Knob to confirm.
2. In “AUX IN/OUT Select” menu, use Tuning Knob to
select “AUX IN” and confirm by pressing Tuning Knob.
3. Connect an external audio source such as
iPad2/iPhone/iPod or MP3 player etc. into “AUX IN”
jack on the right-hand side of TINY AUDIO C6 with the
provided 3.5mm audio cable.
Charging iPad/iPhone/iPod/mobile phones/tablets/camera:
1. Using your mobile phone USB cable and plug the USB
connector into the dual USB car charger with 12V
socket,
2. Connect the other end of the cable to your device and
start charging. (Charging Power Output: 5V, 1A, the
current is big enough for iPad charging)
LCD display Dimmer Control:
When drive at night, you may control the brightness of the
color LCD display by press and hold the “MODE” button to
dim the display. Press and hold the “MODE” button again to
return to normal brightness level.

Side 18
Button Light Control:
1. Press and hold “MENU” button to enter menu.
2. Use Tuning Knob to scroll up or down to select
“Button Light” and confirm by pressing Tuning Knob.
3. Use Tuning Knob to select “ON” or “OFF” for button
light and confirmed by pressing Tuning Knob.
Select Language:
1. Press and hold “MENU” button to enter menu
2. Use Tuning Knob to scroll up or down to select
“Language” and confirm by pressing Tuning Knob.
3. Use Tuning Knob to select your desired language and
confirmed by pressing Tuning Knob.
Restore factory setting:
4. Press and hold “MENU” button to enter menu.
5. Use Tuning Knob to scroll up or down to select
“Factory Reset” and confirm by pressing Tuning
Knob.

Side 19
6. Use Tuning Knob to select “YES” or “NO” for the
reset and confirmed by pressing Tuning Knob.
Checking the Software Version of the device:
1. Press and hold “MENU” button to enter menu
2. Use Tuning Knob to scroll up or down to select
“Version” and confirm by pressing Tuning Knob to see
the current software version of the device.
3. Press “MODE” button exit menu.
Product Specification:
1. Product Model: TINY AUDIO C6
2. Radio format support: DAB+ and FM transmitter
3. DAB+ frequency: Band III (174.00 –240.00MHz)
4. FM transmission frequency: 87.5—108MHz
5. Audio Line-Out : 3.5mm stereo jack
6. Power Output : 5V, 1A (charging for
iPad2/iPhone/iPod/Android Phone etc. )
7. Power Source: Car Cigar-lighter Socket (10V- 30V)
8. Dimension: 222 x 111 x 62 mm
9. Net weight: 335g ( approx.)
Certifications:
1. CE
2. RoHS

Side 20
3. In accordance with EMC- and EC-directives 1999/5/EC,
2004/108/EC, 2006/95/EC
4. CE-R&TTE (EN300 328, EN301 357-1,EN301 357-2, EN301
489-1, EN301 489-9, EN301 489-17, EN55013, EN55020,
EN60950-1, EN62479)
*Information of this user manual is subject to change without
prior notice.
Tiny Audio is distributed by TT Micro AS – Salg@ttmicro.no –
www.ttmicro.no
Norsk
TINY AUDIO C6
Table of contents
Languages:
Other Tiny Audio Car Stereo System manuals

Popular Car Stereo System manuals by other brands


arbane
arbane APG DA user guide

Sony
Sony CDX-GT630UI - Cd Receiver Mp3/wma/aac Player operating instructions

Trevi
Trevi SCD 5751 DAB instruction manual
 operating instructions")
Sony
Sony CDX-M850MP (XT-XM1) operating instructions

Metra Electronics
Metra Electronics 99-7431 installation instructions

Mercedes-Benz
Mercedes-Benz COMAND operating instructions


