TIRRITO Roker 100 User manual

Tel:800-618-8968
Website:www.bestrobtic.com
E-mail:[email protected]
Worktime:Mon-Fri, 09:00-18:00 (EST)
User Manual
TIRRITO-Roker100
Keep this manual in a safe place for future reference.

01
02
Product introduction
08
Operation
14
FAQs
1.Safetyinstructions 03
2.Overview 04
3.Accessories 05
4.Technicaldata 06
1.Charging 09
2.Enteringthe pool 10
3.Gettingout of the pool 11
4.Cleaning 12
Contents
5.Helpfultips 07
Troubleshooting 15
5.Installation 13

02
Model:TIRRITO-Roker100
Features:The cordlessrechargeable robotic pool cleaner is well-designed
for use in any situation without any hassle. Thanks to the compactand
lightweight design, it is suitable for pools ofvarious sizes. With intelligent
pathplanning, it can clean the bottom of a pool without draining the water.
With an affordableprice, it delivers a more effective, deeper and perfect
cleaning result.
Thank you for choosing our roboticpool cleaner.
Readthis manual carefully before use and follow the instructions.
Keepthis manual in a safe place for future reference.
01
Product
introduction

03
Safety instructions
1.Readthis manual carefully and use the device accordingly. We are not
liable for any loss or injury caused by improper use of the device.
2.The device is only intended for use on flat-bottomedpools.
3.Beforeusing this device, ensure the water depth of the pool is at least 50
cm away fromthe top of the device.
4.Keephumans and animals out of the pool while the device is working in
it. Do not leave childrenunsuper vised while using the device.
5.Turnoff the switch before cleaning the filter and the bottom of the
device.
6.The device comes with a built-inlithium battery. Do not disassemble the
sealed compartment without authorization. Protect the device fromdirect
sunlight and strongimpacts.
7.Be sureto charge the device before first use.
8.During the idle period, chargethe device once a month to protect its
battery.
9.pH [7.0-7.8], temperature[4-34 °C], chlorine [max. 4.0 ppm], sodium
chloride [max. 5,000 ppm].
is a Caution sign; is a Warningsign
04
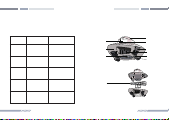
Overview
Handle
Wateroutlet
Waterinlet
Body
Waterspray
cover
Top
Buckle
Filter
Chargingpor t
Powerbutton
Troubleshooting
Error Cause Solution
Thebuzzer gene-
ratesa short beep
every3s
Thedevice is not fully
submergedin water
Turnoff the switch,
orput the device
inwater to work
Thebuzzer gene-
ratesa short beep
Batteryis low
Turnoff the switch and
chargethe device with
acharger authorized by us
Thedevice moves
moreslowly
Thefilter is clogged due
toexcessive accum-
ulationof garbage
Turnoff the switch and clean
thegarbage according
tothe steps in the manual
Thesuction effect
becomesweak-
ened
Thefilter is clogged due
toexcessive accumul-
ationof garbage
Cleanor replace the filter
Thebuzzer gene-
ratesa long beep
Thedevice is charged
whileit is turned on
Turnoff the switch and
chargethe device
15

05
Accessories
●TIRRITO-Roker 100 x 1
●Filter x 1
●Warranty x 1
●Manual x 1
●Quick guide x 1
●Power adapter x 1
●Sticker x 3
●Pick-up hook x 1
●TIRRITO-Roker 100
●Filter
●Quick guide●Manual●Warranty
●Pick-up hook●Sticker●Power adapter
EN
LIMITEOWARRANTY-24MONTHS
TIRRITO-Roker100TIRRITO-Roker100
UserManual
TIRRITO-Roker100
Pleasekeepthismanualforfurther use.
QuickGuide
Model:TIRRITO-Roker 100
Features:Thecordlessrechargeableroboticpool
cleaneriswell-designedforuseinanysituation
withoutanyhassle.Thankstothecompactand
lightweightdesign,itissuitableforpoolsof various
sizes.Withintelligentpathplanning,itcanclean the
bottomofapoolwithoutdrainingthewater. With
anaffordableprice,itdeliversamoreeffective,
deeperandperfectcleaningresult.
Thankyouforchoosingourroboticpoolcleaner.
Readthismanualcarefullybeforeuseandfollow the instructions.
Keepthismanualinasafeplacefor future reference.
①Use the pick-up hook to grab the handle and drag
thedeviceoutofthewater(donot drag too fast);
②Take the device out after the water inside the
deviceisdrainedcompletely;
③Turn the device off;
Note:Afterthedeviceisoutofwater, if a short
beepisheardevery3s,turnoffthe d evice
immediately;ifashort,rushandloud beep is heard,
turnoffthedeviceandchargeitimmediately.
3.Gettingoutofthepool
(Install the pick-up hook on the pick-up rod.
Becarefulwhenusingit.Makesurethe device
is turned off when it is not in use)
①
②
①Gently force apart both sides of the buckle and
slightlyshakethedevicetoseparatethestandfrom
theupperpartofthedevicebody.Lift the upper
partofthebody;
②Remove the filter to expose the garbage;
③Rinse the residual garbage on the filter;
④Rinse the residual garbage on the stand.
4.Cleaning
①
② ④
③
Observetheindicatoronthecharger:
①Red indicates the device is not fully charged;
②Green indicates the device is fully charged;
③The water spray cover should not touch the
groundwhenplacingthedevice.
1.Charging
(Be sure to charge the device before first use;
thewaterspraycovershouldnottouchthe ground
when placing the device)
●Notfully
charged
●Fullycharged Waterspraycover
①
②
③
5.Installation
① Align the card slots on both sides of the filter
withthestandcardsandpressthemdown;
② Align the buckle on the upper part of the device
bodywiththestandcardlocation,andforce to
combinethem;
③Place the device in a cool place to dry for 20
minutesbeforecharging.
① ②
ChassisCards
Strainers
①Turn the device upside down and press the power
switch.Thedeviceisturnedononcea long beep
and a short beep are heard;
②Put the device on its bottom;
③Grab the handle and put the device on the water
surface;
④Wait for the device to automatically sink to the
poolbottom.
2.Enteringthepool
(Be sure to charge the device before first use)
①
②
③
④
③
03
In case ofany problems other than those described above, you can contact us to
avoid unnecessary losses.
FAQs
14
06
Technical data
Dimensions (L x W x H)
Weight
Battery capacity
Battery life
Motor power
Charging time
Poweradapter/Input voltage
Poweradapter/Output voltage
Poweradapter/Rated power
Operating temperature
Storagetemperature
363 x 363mm x 212mm
3.2 kg
2,600 mAh
max. 85min
20W
2.5 hours
100-240V
12.6V
19W
0 to 35 °C
-10 to 40 °C
Filter density 80μm
Waterdepth suppor ted 1-3m
Moving speed 0.25m/s
Waterprooflevel
PH value supported
IP68
7.0~7.8
13
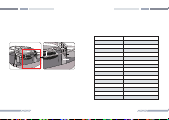
5.Installation
① Align the card slots on both sides of the filter with the
stand cardsand press them down;
② Align the buckle on the upper part of the device body with
the stand cardlocation, and force to combine them;
③Place the device in a cool place to dry for 20 minutes before
charging.
① ②
Standcard
Filter
card
slot
In case ofany problems other than those described above, you can contact us to
avoid unnecessary losses.

Helpful tips
1.Turnoff the device after it gets out of water.
2.After the device finishes cleaning, it is recommended to wait for 20
minutes beforecharging the device. Place the device in a cool place when
charging.Do not cover the device with anything to prevent damage to the
internal components caused by overheating.
3.When the battery is low,the device automatically moves to the pool edge
and stops working.The buzze r generatesa beep af ter the battery is taken
out.
4.After each use, rinse off residualpool water and internal waste in the
device and place the device in a cool and dry place, and away from heat
sources.
5.Clean or replacethe filter if the suction effect is found to be weakened.
6.This device cannot climb. Put it into the waterarea which is away from
steps.
7.For the best cleaning results,ple ase makesure to clean the filter more
than once during the robotworking process.
07 12
①Gently force apart both sides of the buckle and slightly shake the device
to separatethe stand from the upper part of the device body. Lift the
upper part of the body;
②Remove the filter to expose the garbage;
③Rinse the residual garbage on the filter;
④Rinse the residual garbage on the stand.
4.Cleaning
①
② ④
③
02
When the device is working, do not enter the wateror get close to
the device to preventaccidents. The operator must monitor on site
and give promptsand warnings. Our company won’t be respon-
sible for the liabilities caused if the operator fails todo so.
OPERATION
0811
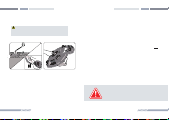
①Use the pick-up hook to grab the handle and drag the device out of the water
(do not drag too fast);
②Take the device out after the water inside the device is drained completely;
③Turn the device off;
Note: After the device is out ofwater, if a short beep is heard every 3s, turn off
the device immediately; if a short, rush and loud beep is heard, turn offthe
device and chargeit immediately.
3.Getting out of the pool
(Installthe pick-up hook on the pick-up rod. Be careful
when using it. Make surethe device is turned off when it is
not in use)
①
②
③

When the device is working, do not enter the wateror get close to
the device to preventaccidents. The operator must monitor on site
and give promptsand warnings. Our company won’t be respon-
sible for the liabilities caused if the operator fails todo so.
09
Observe the indicator on the charger:
①Red indicates the device is not fully charged;
②Green indicates the device is fully charged;
③The water spray cover should not touch the ground when placing the
device.
1.Charging
(Besure to charge the device before first use;
the water spray cover should not touch the
ground when placing the device)
●Not fully
charged
●Fully charged WATER SPRAY COVER
①
②
③
10
①Turn the device upside down and press the power switch. The
device is turned on once a long beep and a short beep are heard;
②Put the device on its bottom;
③Grab the handle and put the device on the water surface;
④Wait for the device to automatically sink to the pool bottom.
2.Entering the pool
(Be sureto charge the device before first use)
①
②
③
④
Table of contents


