Titan TN-700D Series User manual

TN-700D Series Sewing Machine
INSTRUCTION MANUAL

2
INSTRUCTIONS FOR TN-700 SERIES MACHINES
PREFACE
This manual has been prepared to guide you while operating TN-700 series machines and
arranged to simplify ordering spare parts.
This manual explains in detail the proper settings for operation of the machines.
Illustrations are used to show the adjustments and reference letters are used to point out
specific items discussed.
Careful attention to the instructions and cautions for operating and adjusting these
machines will enable you to maintain the superior performance and reliability designed and
built into every sewing machine.
Adjustments and cautions are presented in sequence so that a logical progression is
accomplished. Some adjustments performed out of sequence may have an adverse effect
on the function of the configuration in illustrations or cautions.
On the following pages will be found illustrations and terminology used in describing the
instructions and the parts for your machine.
In addition to the instructions and to the mandatory rules and regulations for accident
prevention and environmental protection in the country and place of use of the
machine/unit, the generally recognized technical rules for safe and proper working must
also be observed.
The instructions are to be supplemented by the respective national rules and regulations
for accident prevention and environmental protection.
Subject to change without notice

3
CONTENTS
PREFACE..................................................................................................................................................................2
SAFETY RULES .........................................................................................................................................................4
GENERAL SAFETY ....................................................................................................................................................5
IMPORTANT SAFETY INSTRUCTIONS ......................................................................................................................6
APPLICATION OF THIS INSTRUCTION MANUAL......................................................................................................6
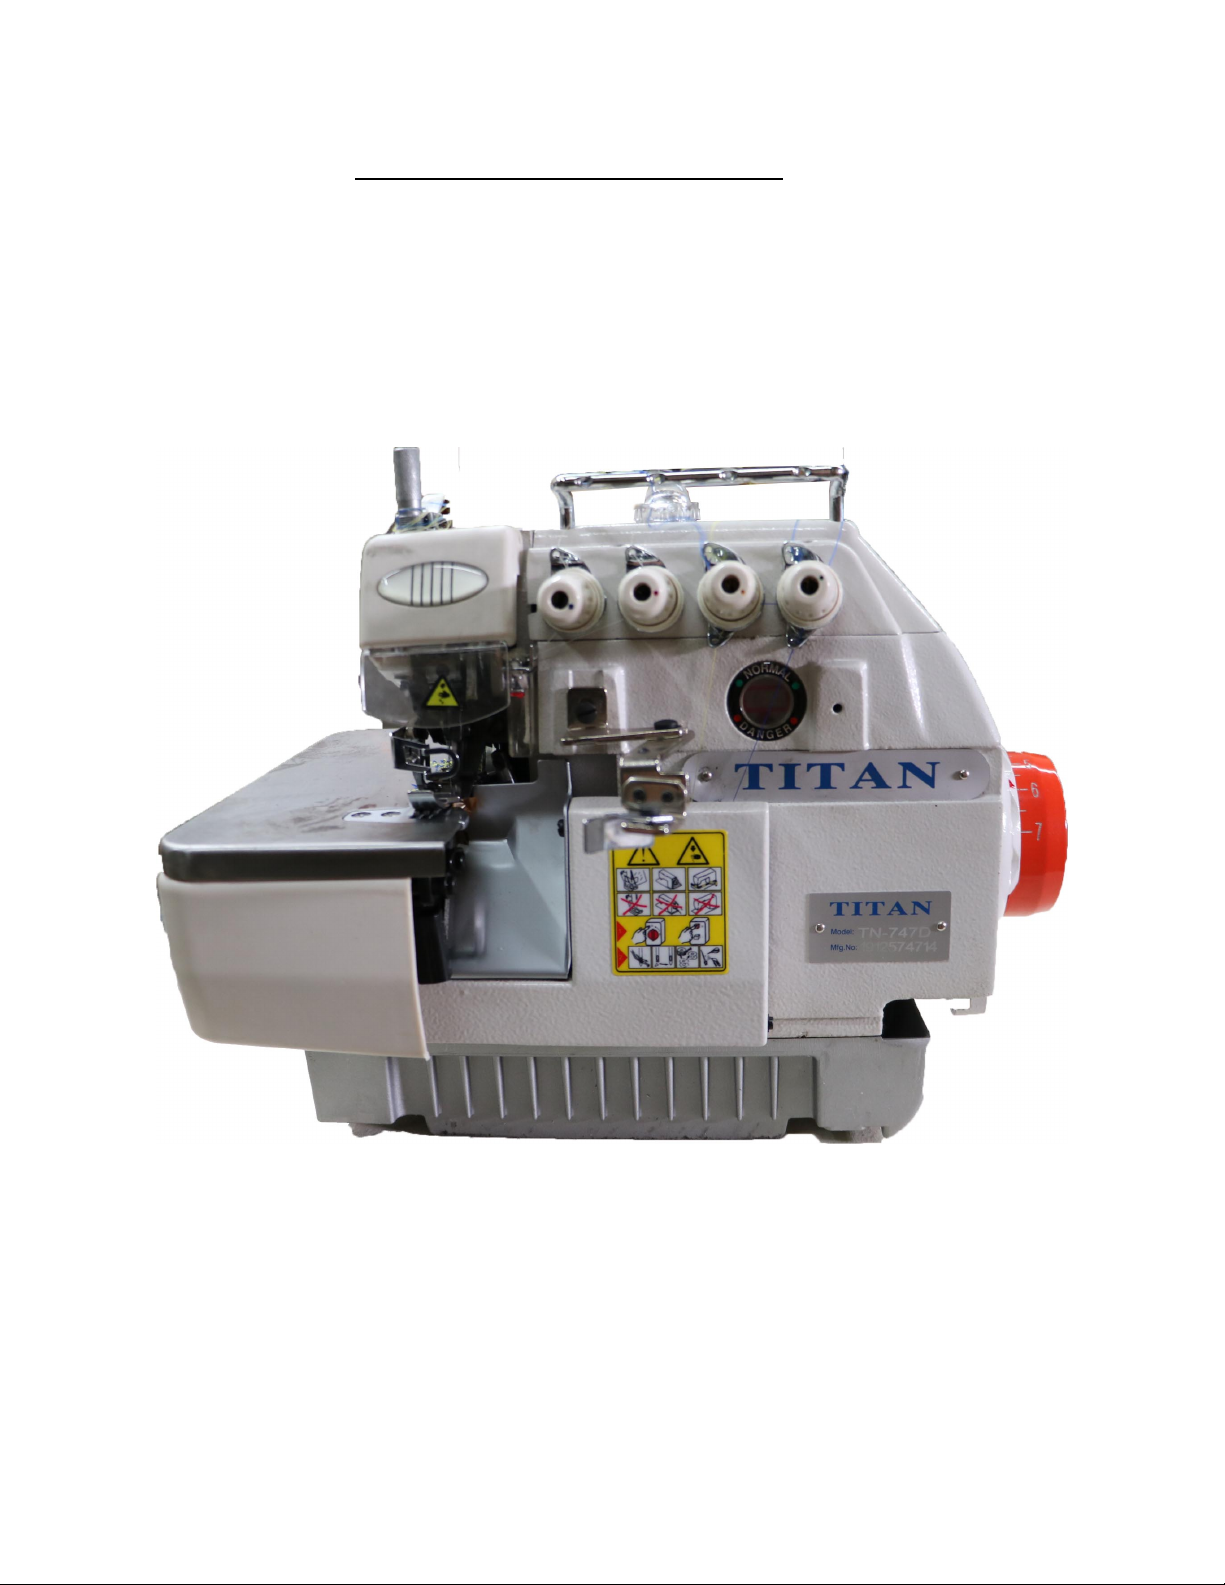
STYLES OF MACHINES.............................................................................................................................................7
TN-737D..................................................................................................................................................................7
TN-747D..................................................................................................................................................................7
TN-757D..................................................................................................................................................................7
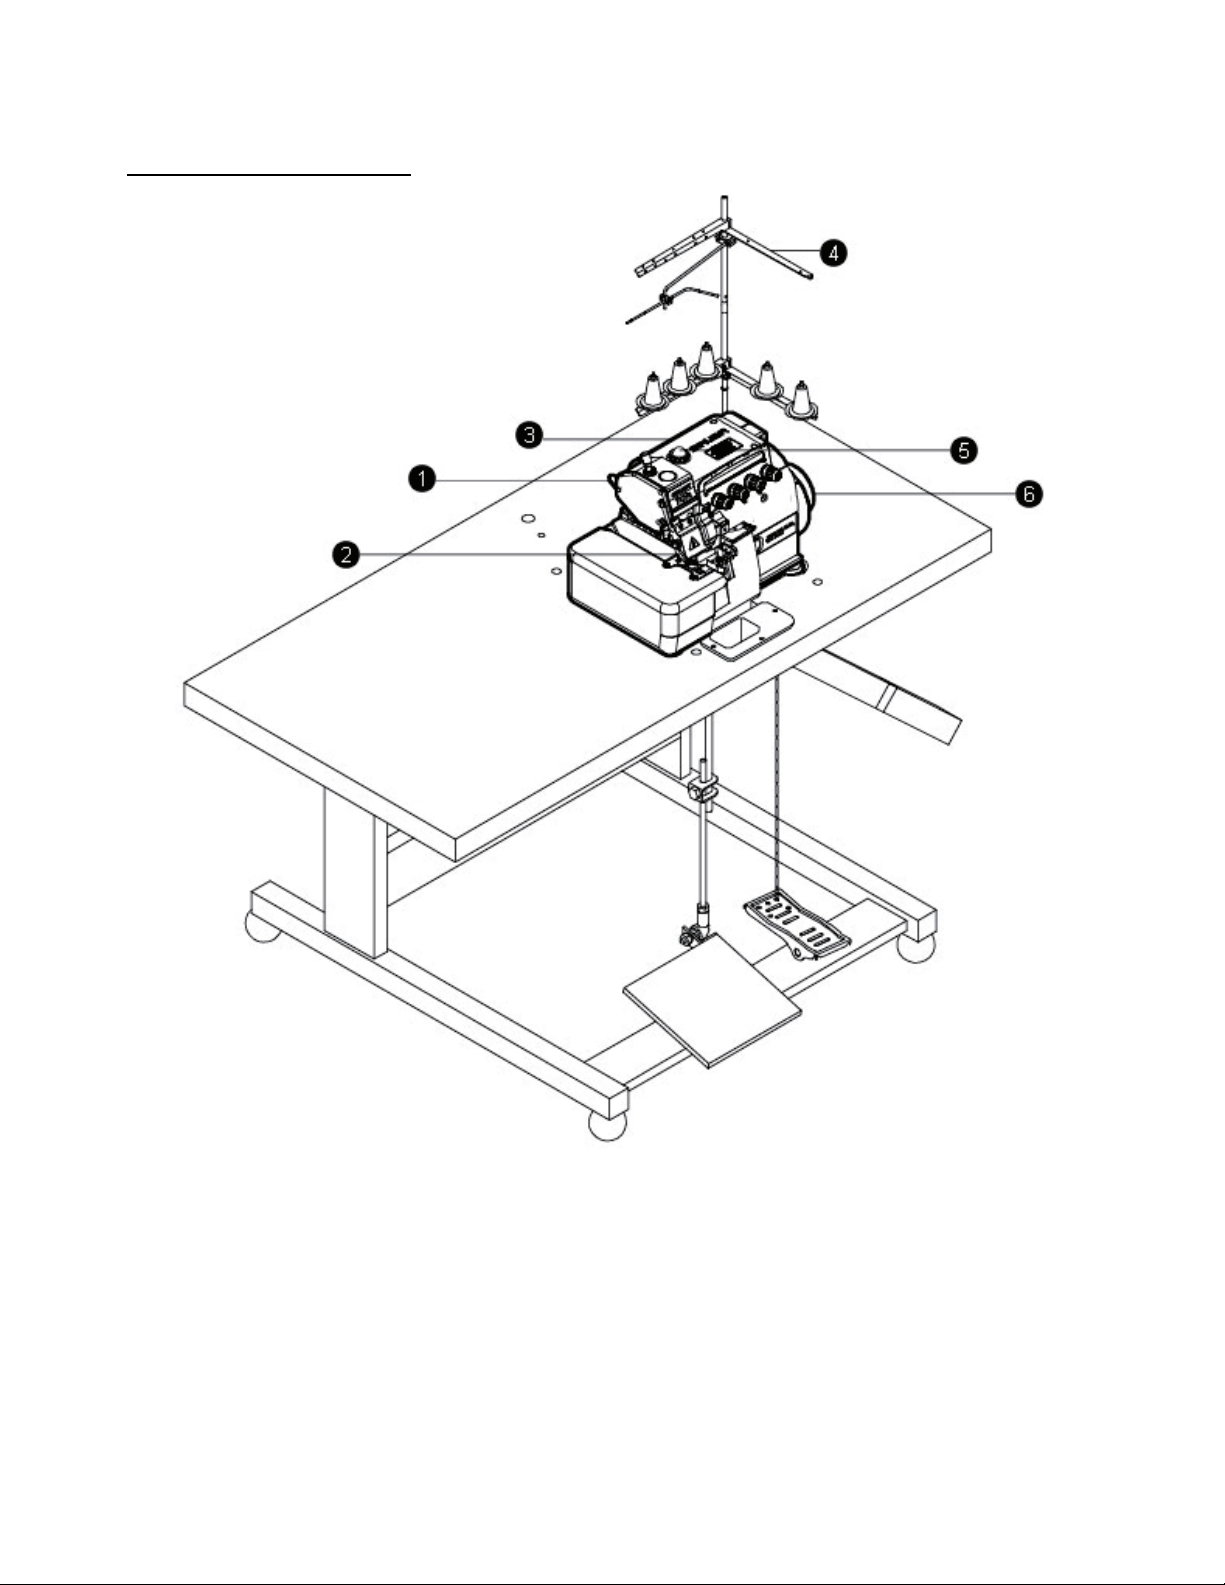
PARTS OF THE MACHINE ........................................................................................................................................8
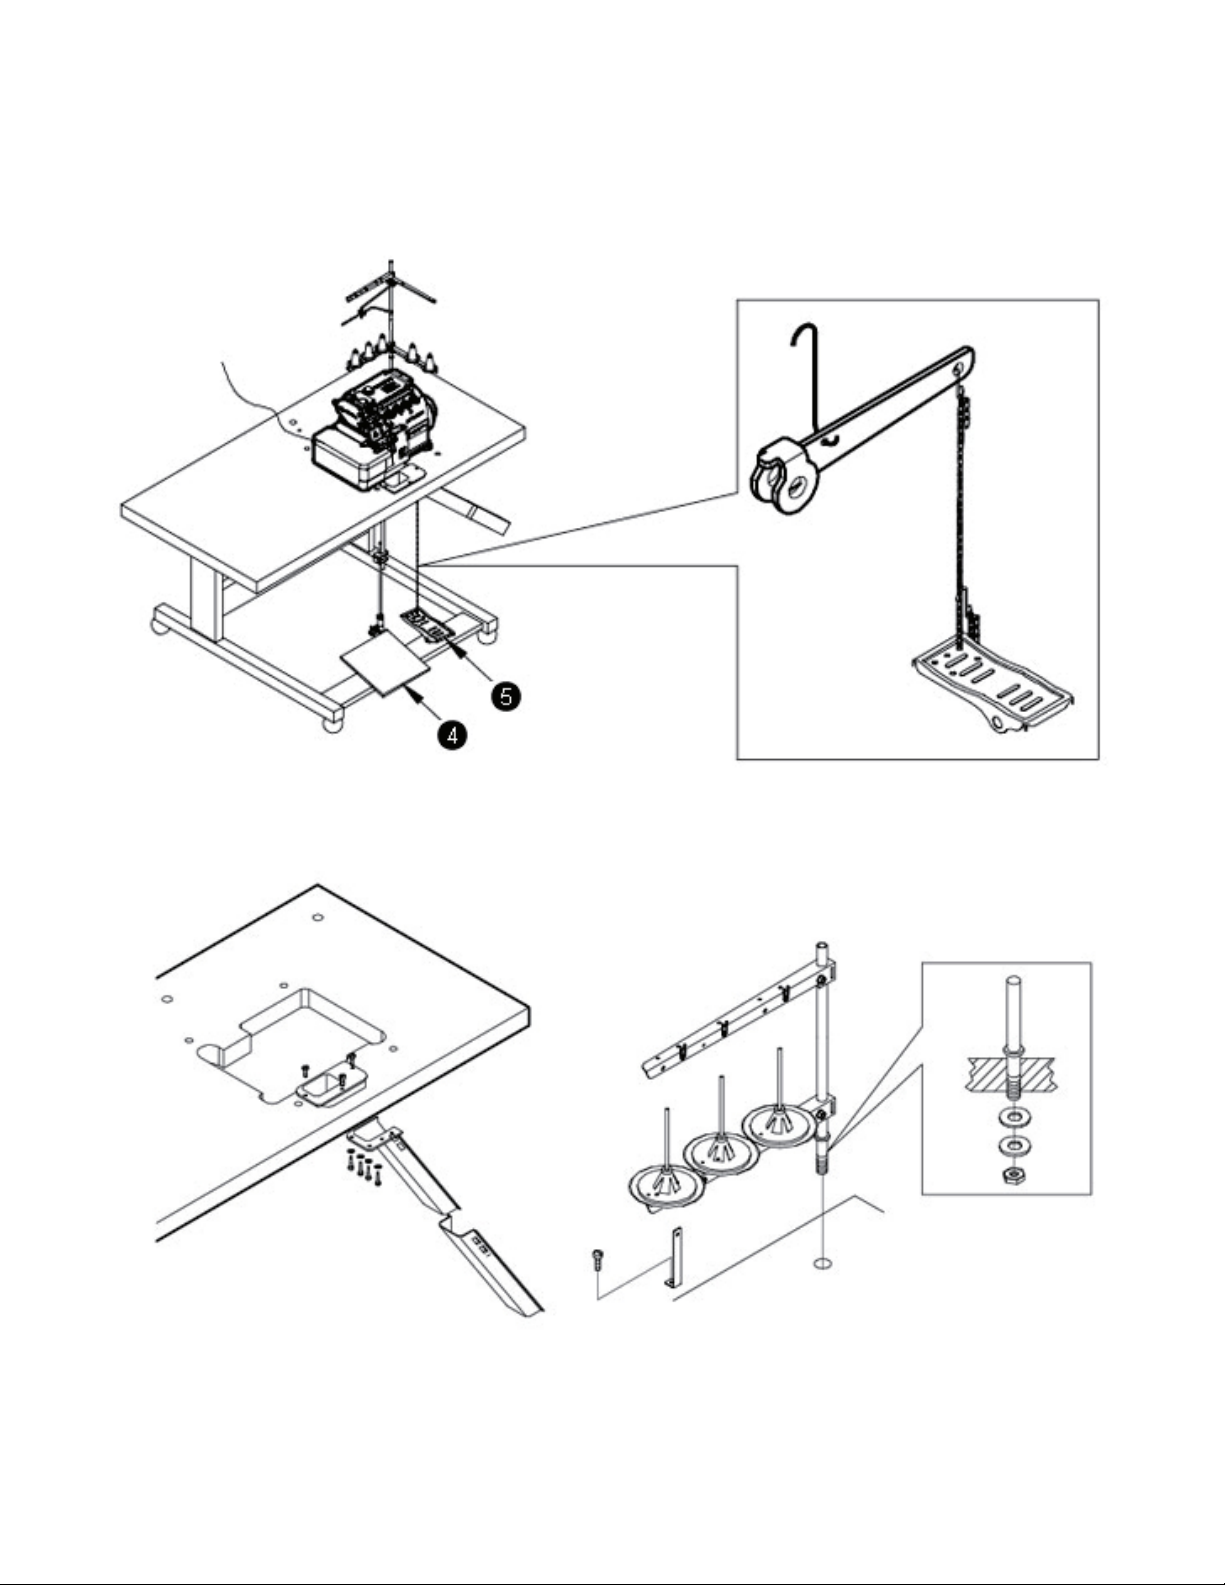
INSTALLATION.........................................................................................................................................................9
HANDLING YOUR MACHINE .................................................................................................................................11
BREAK IN PERIOD..................................................................................................................................................12
LUBRICATION........................................................................................................................................................12
THREADING...........................................................................................................................................................14
TENSIONS..............................................................................................................................................................17
NEEDLES................................................................................................................................................................18
CHANGING THE STITCH LENGTH ..........................................................................................................................19
CHANGING THE DIFFERENTIAL FEED ....................................................................................................................20
ADJUSTING / REPLACING BLADES.........................................................................................................................21
REPLACE THE UPPER BLADE .................................................................................................................................21
REPLACE THE LOWER BLADE ................................................................................................................................21
ADJUST THE HEM / CUTTING WIDTH ...................................................................................................................22

4
SAFETY RULES
IMPORTANT! Before putting the machine into service, also read the safety rules and instructions from
the motor supplier.
Explanation of safety labels
DANGEROUS
Do not ignore this warning sign and do not proceed with incorrect operation.
Doing so may cause serious personal injury.
CAUTION
Ignoring this warning sign and proceeding with incorrect operation will cause
machine and/ or operator damage.
Moving parts – Please proceed with caution
High voltage, beware of electrical shock
High temperature, beware of burns
Prohibited
Grounding wire

5
GENERAL SAFETY
When using these machines, basic safety precautions should always be followed to avoid the risk of
fire, shock or personal injury. Follow all instructions in this manual to get the most out of your
machine.
•Keep your work area clean: Cluttered workspaces and benches can case injury and damage to
machinery.
•Always consider your work environment and operate according to basic safety factors:
Electricity and fluids do not mix. Do not use any machinery in wet or damp areas and always be
aware of shock or damage when working with power and power tools.
•Keep children and pets away from machinery:Sewing machines are considered high risk and
can cause serious damage. Always keep children or pets away when operating machinery
•Dress properly when operating machines: Do not wear loose clothing or jewelry as these may
get cause in the machinery and cause serious damage.
•Always be cautious of cables and cords and inspect regularly for damage to these: Keep the
cords away from heat, chemicals, and any sharp instruments.
•Maintain the machine with care: Following these instructions for lubrication and adjustments
should be the priority when operating your machine. Not doing this can cause serious long-
term damage to the machine and even the operator.
•Disconnect machine when not in use: Always unplug the machine when not in use or when
adjusting or making changes to the machine configuration.
•Do not use any other parts or accessories unless authorized by a qualified technician
•Always make sure your machine is repaired by a qualitied repair person.

6
IMPORTANT SAFETY INSTRUCTIONS
To operate safely and getting the most out of your machine investment, please read and follow this
manual. Keep this manual close for all references. We are confident that you will enjoy this machine
as much as we enjoyed manufacturing it for you.
•Before using your machine, please make sure you read this manual completely
and follow all basic safety measures.
•Do not modify this machine without confirming this with your qualitied
technician or with Titan Sewing directly.
•When using this machine, all safety equipment and precautions should be in
place to allow a safe environment for the machine and operator.
•This machine needs to be operated by a properly trained operator.
•For your own safety, we recommend protective eyewear.
Hazardous voltage can cause injury. Turn off the machine before opening the control
box or connecting any cables or cords
When there is a need to open the control box, please turn off the machine and wait 5
mins before opening the control box to allow the laten power to dissipate
•Always turn off the power when changing needles / guides / interchangeable parts or
adding /removing any accessories or devices.
APPLICATION OF THIS INSTRUCTION MANUAL
NOTE: Instructions stating direction or location such as right left, front or rear of machine, are given
relative to operator’s position at the machine, unless otherwise noted. The handwheel pulley
rotates clockwise, in operating direction, when viewed from the right end of machine.

7
STYLES OF MACHINES
The TN-700 series of machine is normally split up into (3) categories but not limited to these. Future
expansion may expand these categories
TN-737D:This model is a 3 thread, single needle overcast only machine used traditionally for only
overcasting the edge seams. Can be used on knits or woven materials.
Seam specification: ISO# 504 Overedge formed by 1 needle thread and 2 looper threads producing a
purl on the edge of the seam.
Sewing capacity: up to 5mm
Standard needle: B27 (DCx27) #10/70~14/90
Stitch length: Up to 6 mm
Speed: Up to 5000 stitches per minute, depending on thread, fabric and sewing
operation.
TN-747D:This model is a 4 thread, two needle overcast machine used traditionally for knits and
ready to wear.
Seam specification: ISO# 514 Overedge formed with 2 needle threads and 2 looper threads with the
looper threads forming a purl on the edge of the seam. 514-both needles enter the upper looper loop.
Sewing capacity: up to 5mm
Standard needle: B27 (DCx27) #10/70~14/90
Stitch length: Up to 6 mm
Speed: Up to 5000 stitches per minute, depending on thread, fabric and sewing
operation.
TN-757D:This model is a 5 thread, two needle overcast machine used traditionally for woven
materials. This machine can be used in 3 thread overcast only and 5 thread overcast with a safety
stitch. This machine is not recommended for knits.
Seam specification: ISO# 516 Safety Stitch 5-thread safety stitch. Combining a single-needle
chainstitch (401) and a 3-thread overedge stitch (504) that are formed simultaneously.
Sewing capacity: up to 5mm
Standard needle: B27 (DCx27) #10/70~14/90
Stitch length: Up to 6 mm
Speed: Up to 5000 stitches per minute, depending on thread, fabric and sewing
operation

8
PARTS OF THE MACHINE
(1) Lifting lever
(2) Presser foot
(3) Control box
(4) Thread stand
(5) Oil gauge window
(6) Pulley (Hand Wheel)

9
INSTALLATION
•Machine installation should only be carried out by a qualified technician.
•Contact your dealer or a qualified electrician for any electrical work that may need to be done.
•The sewing machine weighs 48kg. The installation should be carried out by two or more people.
•Do not connect the power cord until installation is complete. The machine may operate if the
treadle is depressed by mistake, which could result in injury.
•Use both hands to hold the machine head when tilting it back or returning it to its original
position. If only using one hand, the weight of the machine head may be too heavy to hold, and
may cause human physical injuries
•Install the rubber cushion and the rest board in sequence as the attached table cut-out drawing
and the part lists. In case of the semi-submerged type installation, the distance from the surface
of the needle plate to the surface of the table is 100 mm, whereas the fully-submerged type
installation is only 5 mm. Figure 1 shows a semi-submerged table top.
Figure 1

10
•Install the pedal of motor (4)(Fig. 2) on the left side, and the pedal of presser foot lift (5) on the
right side.
•Install the waste chute and the thread stand as the part lists show.
Figure 2
Figure 3

11
HANDLING YOUR MACHINE
When lifting your machine in and out of your table or any other situation, please refer to (Fig. 4)
for how to lift your machine. DO NOT lift the machine by the left base arm as in (Fig. 5)
Figure 5
Figure 4

12
BREAK IN PERIOD
Please operate this machine at 80% of the maximum speed in the first tour weeks for engagement.
This will help extend the life of your new machine and allow the machine to “break-in” all new parts.
LUBRICATION
Fill the lubrication oil (Fig. 6)(1) Remove the screw (1), and fill it with the included high speed oil.
Tighten the screw (1) after the oil level indicator locates between the two marking lines.
When changing the oil or simply draining the oil out of the machine, loosen screw (2) (Fig. 7). When
removing the oil drain plug, make sure not to lose the drain plug washer.
Figure 6
Figure 7

13
LUBRICATION (con’t)
When changing the filter (yearly maintenance), the cover is held in place by (3) screws. This cover is on
the backside of the machine.
Figure 8

14
THREADING
Follow the procedures for threading. Wrong threading may cause thread breaking, stitch
skipping, puckering or unexpected sewing.
For three thread only 737 (Fig. 9)

15
THREADING (Con’t)
For four thread only 747 (Fig. 10)

16
THREADING (Con’t)
For five thread only 757 (Fig. 11)

17
TENSIONS
The thread tension should be adjusted properly according to the kinds and the thickness of the
materials, stitch length, and seam width, etc. In addition, adjust the nuts case by case
individually. Turn the nuts clockwise will increase the thread tension. Otherwise, the thread
tension will be decreased
(1) The first adjusting knob controls double chain stitch threads (TN-757) or the left over-
lock needle thread (TN-747).
(2) The second adjusting knob controls the seam lock needle thread.
(3) The third adjusting knob controls the upper looper thread.
(4) The fourth adjusting knob controls the lower looper thread.
(5) The fifth adjusting knob controls the double chain looper thread.
Thread tension adjusting nuts (Fig12)

18
NEEDLES
•Please use the needle DCX27 or the equivalents.
•Loosen the screw and take off the needle.
•Insert the new needle and push it up completely until the top of the needle is firmly
seated as deep as it can travel into the needle bar. All needles should be installed with
the scarf of the needle facing the back of the machine and the long groove faces your
side.
•Tighten the screw (Fig.13)
CAUTION! Turn off main power switch before changing needles
Figure 13

19
CHANGING THE STITCH LENGTH
The stitch length is adjusted according to the fabrics, the differential ratio or other factors. Keep pressing
the button (1) and turn the pulley till the button is locked. Then, release the button after reaching the
desired stitch length. (Fig.14)
Figure 14

20
CHANGING THE DIFFERENTIAL FEED
If the stroke of the main feed dog is larger than the stroke of the differential feed dog, the fabric will be
extended while sewing. Otherwise, it will be shrunk
Loosen the adjusting nut (1) Adjust the adjusting rod (2) downward will shrink the fabric, whereas move it
upward will extend the fabric. Tighten the adjusting nut (1) after the adjustment finishes. (Fig.15)
Figure 15
Table of contents
Other Titan Sewing Machine manuals