TiTLEY Scientific Anabat Walkabout User manual

Anabat Walkabout Bat Detector
User Manual
Titley Scientific
Version 1.7
2
Notice for Customers in the U.S.A
Federal Communications Commission (FCC) Radio Frequency Interference Statement
This equipment has been tested and found to comply with the limits for a Class B digital device, pursuant to
Part 15 of the FCC rules These limits are designed to provide reasonable protection against harmful
interference in a residential installation
This equipment generates, uses, and can radiate radio frequency energy and, if not installed and used in
accordance with the instructions, may cause harmful interference to radio communications However, there is
no guarantee that interference will not occur in a particular installation If this equipment does cause harmful
interference to radio or television reception, which can be determined by turning the equipment off and on,
the user is encouraged to try to correct the interference by one or more of the following measures:
•
Reorient or relocate the receiving antenna
•
Increase the separation between the equipment and receiver
•
Connect the equipment into an outlet on a circuit different from that to which the receiver is
connected
•
Consult the dealer or an experienced radio/television technician for help
This device complies with Part 15 of the FCC Rules Operation is subject to the following two conditions: (1) This
device may not cause harmful interference, and (2) this device must accept any interference received, including
interference that may cause undesired operation
CAUTION
Modifications
Changes or modifications
not expressly approved by Titley Scientific could void the user's authority to
operate the equipment
Interface Cables
Use the interface cables sold or provided by Titley Scientific for your equipment Using other interface cables
may exceed the limits of Class B Part 15 of the FCC rules
Notice for Customers in European Countries
Symbol for Separate Collection in European Countries
This symbol indicates that this product is to be collected separately
The following apply only to users in European countries:
•
This product is designated for separate collection at an appropriate collection point
•
Do not dispose of as household waste
For more information, contact the retailer or the local authorities in charge of waste management
Notice for Customers in Australia
Our goods come with guarantees that cannot be excluded under the Australian Consumer Law You are
entitled to a replacement or refund for a major failure and compensation for any other reasonably foreseeable
loss or damage You are also entitled to have the goods repaired or replaced if the goods fail to be of
acceptable quality and failure does not amount to a major failure Goods presented for repair may be replaced
by refurbished goods of the same type rather than being repaired Refurbished parts may be used to repair
the goods The repair of your goods will result in the loss of any user-generated data Please ensure that you
have made a copy of any data saved on your goods
3
TITLEY SCIENTIFIC CONTACT DETAILS
Head Office (Australia)
4/253 Leitchs Road
Titley Scientific
Brendale QLD 4500, AUSTRALIA
P 61 7 3053 3403
www.titley-scientific.com
info@titley-scientific.com
UK Office
16/17 Arkwright Suite,
Coppull Enterprise Centre, Mill Lane,
Coppull, Lancashire PR75BW, ENGLAND
P 44 (0) 2920 022 099
USA Office
4306 Bold Venture Dr, Unit A
Columbia, Missouri 65202, USA
P 1 (573) 442 8745
Africa Office
Global Supplies
P 27 (0) 600 GLOBAL (456225)
AUTHORS AND ACKNOWLEDGMENTS
This manual was written by Julie Broken-Brow and Dean Thompson. We greatly appreciate the time,
comments and assistance given by those people who were
‘
beta testers
’
for the Anabat Walkabout and this
manual. The testing and troubleshooting have improved the new detector and increased the clarity of the
manual.
DOCUMENT HISTORY
Manual Version Release Date Firmware Version Major Additions and Changes
1.0 26/1/2016 0.100 -
1.1 15/2/2017 0.104
Basic Mode; Mode – Live Second; Heterodyne A tot ne; Dynamic
Range Compression; Man al Record – Contin o s; Zero Crossing
Display
1.2 15/03/2018 0.110
A to-heterodyne mode; pdated instr ctions for new ser
interface; creating/saving/downloading profiles; press-and-hold for
memos
1.3 01/08/2018 2.0 Press-and-hold memos; lock profile setting change
1.4 07/02/2019 2.2 Format SD card; screen mirroring
1.5 10/05/2020 2.3 Address; Species labelling
1.6 11/08/2020 2.3 SD card req irements; pdates to tro bleshooting
1.7 27/1/2022 2.3 Incl ded Items and change of address

4
CONTENTS
INTRODUCTION ............................................................................................................................................. 6
ANABAT WALKABOUT BASIC OPERATION ....................................................................................... 10
SETTING TIME AND DATE .................................................................................................................... 14
TURNING THE MICROPHONE ON & OFF ...................................................................................... 14
SAVING FILES ............................................................................................................................................ 15
SCROLL WHEEL AND QUICK MENU ..................................................................................................... 16
MAIN MENU................................................................................................................................................... 16
PROFILES ..................................................................................................................................................... 16
VIEW .............................................................................................................................................................. 19
AUDIO .......................................................................................................................................................... 0
TRIGGER ......................................................................................................................................................
SAVE AS ....................................................................................................................................................... 4
COMPRESSED MODE ............................................................................................................................. 4
SPECIES LISTS AND LABELLING ......................................................................................................... 5
SENSITIVITY ................................................................................................................................................ 6
VOLUME ...................................................................................................................................................... 7
SCREEN BRIGHTNESS ............................................................................................................................ 7
ADVANCED SETTINGS ............................................................................................................................... 7
SETTINGS TABS ......................................................................................................................................... 8
CAPTURE SETTINGS ................................................................................................................................ 8
TRIGGER SETTINGS ................................................................................................................................. 30
AUDIO SETTINGS ..................................................................................................................................... 31
VIEW SETTINGS ........................................................................................................................................ 33
MAP SETTINGS ......................................................................................................................................... 34
MENU SETTINGS ...................................................................................................................................... 35
SLEEP & SCREEN OFF MODE ................................................................................................................... 35

5
FORMAT/ERASE SD CARD ........................................................................................................................ 36
SECURITY ......................................................................................................................................................... 36
DISPLAY ........................................................................................................................................................... 37
MEMOS & SPECIES LABELS...................................................................................................................... 39
VIEWING & LISTENING TO SAVED FILES ............................................................................................ 41
WIFI .................................................................................................................................................................... 4
MAPPING ........................................................................................................................................................ 4
SOFTWARE ...................................................................................................................................................... 46
WEATHER CONSIDERATIONS ................................................................................................................. 47
DOWNLOADING DATA ............................................................................................................................. 47
HOW TO DOWNLOAD YOUR DATA ................................................................................................ 47
VIEWING FILES AND UNDERSTANDING FILE NAMES .............................................................. 48
TIPS FOR ACTIVE MONITORING ............................................................................................................ 50
TROUBLESHOOTING .................................................................................................................................. 51
FAQS .................................................................................................................................................................. 55
FURTHER INFORMATION ......................................................................................................................... 56

6
INTRODUCTION
All bats in the suborder Yangochiroptera, and many in Yinpterochiroptera, use
echolocation to avoid obstacles and locate prey in conjunction with their eyesight.
Evolutionary history and differing ecological requirements mean echolocation calls tend to
differ between species, so they are often useful for identification. Echolocation calls vary
greatly depending on what a bat is doing, especially in response to how close the bat is to
clutter. Bat detectors detect the echolocation calls emitted by bats and produce audible
and/or visible images which reveal the presence of bats, their activity and useful features
of their calls. his gives us the opportunity to observe, identify, and study bats without
catching them.
he Anabat Walkabout is equipped with a broad-band microphone. he detector displays
and saves the recordings in both full spectrum and zero crossings analysis (ZCA) to make
them visible as sonograms (time vs frequency graphs). his manual contains the operating
instructions for the Anabat Walkabout, including advice for successful recording of bat
calls. Furthermore, this manual includes testing and troubleshooting procedures.
FEATURES OF THE ANABAT WALKABOUT
he Anabat Walkabout is designed for active bat detection with many advanced features
to aid in bat surveying. It is an all-in-one detector with a built in omnidirectional
microphone, detachable directional cone and colour touchscreen display. he Anabat
Walkabout utilises the Android operating system. Some of the key features of the Anabat
Walkabout include:
•
5
”
colour touchscreen display
•
ime expansion, heterodyne, pitch shifting or frequency division audio output
•
Omnidirectional Knowles FG microphone with directional cone attachment
•
Built-in GPS and mapping system with offline map caching
•
WiFi enabled
•
Comfortable hand strap and lanyard
•
16 bit resolution, 500ksps sample rate

7
Hardware
Your Anabat Walkabout comes supplied with the following items; please check they are all
present in the package.
•
Directional Cone Attachment
•
US Cable
•
Wrist Strap Lanyard
•
Headphones
•
Hand strap
•
US Wall Charger with International Plug Set (AU, UK, US, EU)
•
EVA Carry Case
Scroll Wheel
(press to select in Quick Menu)
Manual Record Button
Quick Menu Button
Power Button
(and charging indicator)
Lux Sensor
Temperature & Humidity Sensor
irectional Cone Attachment
USB Connection
Headphone Jack
S Card Slot
External Microphone Jack
Voice Microphone
8
SD Cards
he Anabat Walkabout comes with a SD card for data storage. he detector can use SDXC
and SDHC memory cards. Memory cards can be purchased from itley Scientific, or most
electronics/office stores. For suitable performance, UHS Class 3 Card, at least 90MB/s is
recommended (for example Sandisk Extreme or Lexar Professional SD cards). Slower cards
may result in performance issues.
You can format and erase your SD card on the Anabat Walkabout, see
FORMAT/ERASE
SD CARD
for more details.
USB Cable
he Anabat Walkabout comes with a USB cable for connection to your computer. You can
use this cable to charge your detector (through your computer or USB wall charger) and
download data. Be sure to use the cable supplied with the Walkabout. Other USB cables
may cause longer charge times or poor connectivity.
Microphone & Directional Cone
he Anabat Walkabout features a built-in, omnidirectional Knowles FG microphone. his
detector is also supplied with a click-on directional cone that adds directivity. his helps to
reduce the amount of background noise detected, such as insects, and makes pinpointing
sounds easier. he cone can simply be removed to switch back to omnidirectional
recording. Features of the microphone include:
•
Sensitive from 5 kHz to 200 kHz
•
Extension cables and adaptors for external microphones are available for purchase
from itley Scientific. We can provide custom cables for your application.
9
Lanyard & Hand Strap
he Anabat Walkabout comes with an elastic hand strap and a lanyard for ease of use. he
lanyard can be attached through the lanyard loop on the bottom left of the detector. he
hand strap can be removed by unscrewing the four Pozidrive PZ1 screws on the brackets
using a screwdriver.
Power Requirements
he Anabat Walkabout is powered by an internal rechargeable lithium battery.
Please
charge your Anabat Walkabout fully before first use, this will calibrate the battery
gauge.
Battery life will depend on many factors, including screen brightness, ambient
temperature, whether the WiFi is being used, and amount of bat activity/ambient noise.
Battery Sa ety
his product contains a rechargeable lithium battery. Please pay particular attention to the
important information regarding the use of lithium batteries below. Failure to do so may
result in fire and/or explosion of the battery.
•
Do not dismantle, open, puncture, or shred batteries.
•
Do not expose batteries to heat or fire. Avoid placing the equipment in direct sunlight.
•
Do not leave charging batteries unattended.
•
Do not attempt to charge a battery when its temperature is above 45°C or below 0°C
•
When charging, ensure there is good airflow. Avoid covering the battery, equipment,
and charger with items such as blankets or clothes.
•
Do not use any charger other than specifically provided for use with the equipment.
•
Do not use any battery which is not designed for use with the equipment.
•
Do not leave a battery on prolonged charge. Disconnect the equipment from the
charger as soon as possible when the battery has finished charging.
•
Do not subject batteries to mechanical shock.
•
Do not short-circuit a battery.

10
•
In the event of a battery leaking, do not allow the liquid to come in contact with the
skin or eyes. If contact has been made, wash the affected area with copious amounts
of water and seek medical advice.
•
Seek medical advice immediately if a battery or part thereof has been swallowed.
•
Keep the equipment and batteries clean and dry.
•
Retain the original product literature for future reference.
•
After extended periods of storage, it may be necessary to charge and discharge the
batteries several times to obtain maximum performance.
•
Dispose of used batteries and equipment properly. Follow the regulations applicable
to your area.
ANABAT WALKABOUT BASIC OPERATION
efore you use your detector, it is important to fully charge the battery
.
Once fully
charged
,
insert a SD card into the SD card slot on the side of the detector. Please note
that you should regularly check for online updates and install them to ensure your
detector is working optimally.
CHARGING
To charge, simply connect the detector to a wall charger or US port via the US cable.
The
Power button
will light orange when the detector is charging; this light will turn off
when charging is complete. The orange charge light may flash if there is insufficient
charging current or the unit is too hot. A
battery gauge
and percentage is shown at
the top right of the screen while the detector is turned on. You can also check the charge
progress while the detector is off by briefly pressing the power button (<2 seconds). The
detector will charge more quickly while it is turned off.
For optimum charging the provided US cable and wall charger should be used. Charging
will be slower using a PC US port compared to the provided charger. Charging behaviour
with other chargers/cables cannot be guaranteed.
Before first use, turn the detector on,
11
then plug into the wall charger and fully charge your Anabat Walkabout, this will
calibrate the battery gauge.
Please familiarise yourself with the
Battery Safety
information above before charging your Walkabout.
TURNING DEVICE ON & OFF
Turn your detector on by pressing the
Power button
at the top of the detector for 2
seconds. The logo will appear while the detector starts up, this process takes several
seconds. Once complete, you will be presented with the user interface on the touch
screen.
To turn the detector off, hold the power button for about 2 seconds. A menu will appear,
press
Power Off
on the touchscreen, and then press
Ok
. The detector will shut down. If
the power button is pressed for less than 2 seconds, the detector will enter sleep mode.
See below for more information on this function.
In the event that the detector becomes unresponsive, you can manually shut down by
holding down the power button for longer than 8 seconds.
WALKABOUT APPLICATION
Upon startup, the Walkabout will automatically load the bat detector user interface. Other
Android applications can be run on the detector, however this manual will not discuss the
operation of other applications.
12
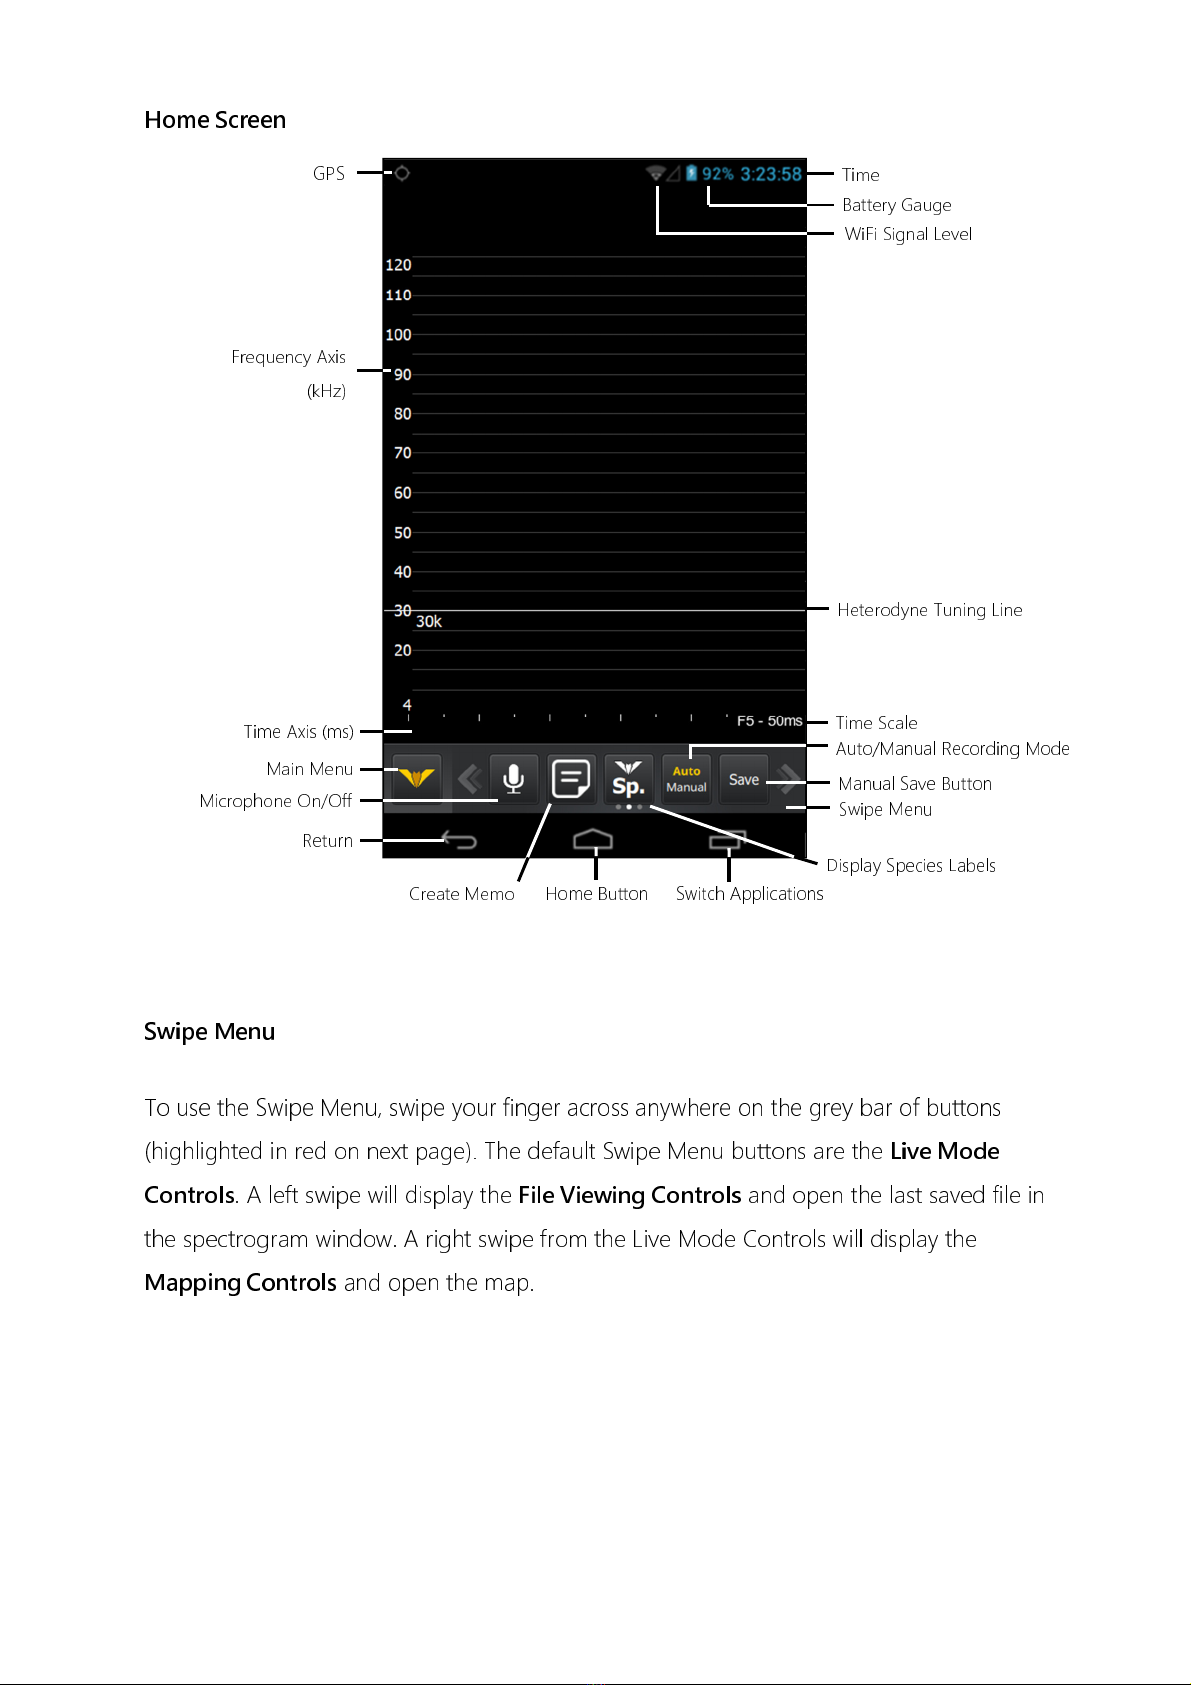
Home Screen
Swipe enu
To use the Swipe Menu, swipe your finger across anywhere on the grey bar of buttons
(highlighted in red on next page). The default Swipe Menu buttons are the
Live ode
Controls
. A left swipe will display the
File Viewing Controls
and open the last saved file in
the spectrogram window. A right swipe from the Live Mode Controls will display the
apping Controls
and open the map.
Time
Battery Gauge
GPS
Heterodyne Tuning Line
Frequency Axis
(kHz)
Time Scale
Time Axis (ms)
Main Menu Auto/Manual Recording Mode
Swipe Menu
Switch Applications
Home Button
Return
Microphone On/Off
Create Memo
isplay Species Labels
WiFi Signal Level
Manual Save Button

13
ain enu
To enter the Main Menu, press the button on the
Home Screen
.
When a button is highlighted in yellow, the feature is turned on. When the button is white,
the feature is turned off.
Compressed mode
off
Compressed mode
on
Profile Selection
Viewing Mode
Trigger Type
Compressed/Uncompressed Mode
Sensitivity
Volume Control
Screen Brightness
WiFi Settings
Advanced Settings
Update Firmware
Android Settings
About the etector
File Viewing Controls Live Mode Controls Mapping Controls
Memo
Open File List
Next
/Previous
File
Species Labels
Centre Map
Open Cached Map
Cache Map
Split Map Screen
Main Menu
Microphone On/Off
Display Species Labels
uto/Manual Record Mode
Manual Save
Delete
Format/Erase S Card
Audio Mode
Saving File Type
Species List
Android Home
Screen Rotate Lock

14
If a profile setting appears as a button, it means it can be changed (
but the changes may
not be remembered
). If it does not appear as a button, it means the setting is locked in
the profile, and you will need to Creating a New Profile to change this setting.
Setting
can be changed
Setting is
locked
Returning To Walkabout Home Screen/Application
To return to the Home Screen from the Main Menu, you can either press the button
or press anywhere in the blank space. When you are changing the detector settings and
you wish to return to the Home Screen, press the
Close button
at the bottom of the
page. If you are in the Android Settings menu and wish to return to the Walkabout Home
Screen, press the
Return Arrow
at the base of the screen until you reach the Home
Screen.
If you are using other applications on the device (eg. Web browser) press the
Home
Button
at the base of the screen and it will return to the Walkabout application.
SETTING TIME AND DATE
To change the date and time settings
press then press , scroll down to select
Date
& Time
. Time/date will be set automatically when you connect to a WiFi network or
acquire a GPS fix. e sure to set your current time zone to ensure the time displayed is
correct. Press
Select time zone
to choose the correct time zone.
TURNING THE MICROPHONE ON & OFF
Press the button (located in the Swipe Menu at the bottom of the Home Screen) to
turn the microphone on and off. When the microphone is on a live display of ultrasonic
sound will appear and the icon will illuminate yellow.

15
SAVING FILES
o save files, you can choose either
Manual
or
Auto
mode at the bottom of the display in
the
Swipe Menu
. Press your selection and it will be highlighted in yellow. In either mode,
when a file is saved, the last filename will be shown below the spectrogram. A red
recording circle will appear briefly near the top right corner of the display while the file is
being written to the SD card. You can save files in full spectrum (.wav) and/or zero
crossing (.zc) formats. o choose which format you would like to use, see
SAVE AS
.
Manual Mode
At any time while the microphone is on, you can press the
Record
button directly above
the scroll wheel on the side of the detector or the
Save
button in the swipe menu, and a
recording will be saved. o indicate a file has been saved, the detector will beep. In default
Manual Mode when the Record Button is pressed, the
previous
10 seconds of data will be
saved to the SD card. For example, once a bat has flown past, you can press the record
button if you want to save the recording to a file. You can adjust this save time up to a
maximum of 20 seconds in
Manual Record Length
. You may choose to change this
default manual mode to
Continuous Manual Recording Mode
in Capture Settings. his
means that the detector will start recording when you push the Record/Save Button, and
stop recording when you push the Record/Save button again.
Auto Mode
Auto mode will automatically record to the SD card based on your selected trigger
settings. Auto mode trigger settings are based on either zero crossing sensitivity or crest
factor threshold. he trigger mode you can choose will depend on whether you are
viewing in full spectrum (zero crossing or crest factor), or zero crossing (zero crossing
trigger only). You can then change the
Crest Factor Trigger
or
Zero Crossing Trigger
sensitivity
(depending on what trigger mode you selected) in the Main Menu, or with the

16
Quick enu
and
Scroll Wheel
. See the
Quick enu
section of this manual for more
information. In Auto mode you can also use the
Record/Save
button to manually trigger
save a file of the previous 10 seconds.
SCROLL WHEEL AND QUICK MENU
Using the
Scroll Wheel
, you can quickly change the heterodyne frequency, trigger
sensitivity, audio volume, or add a species label, all singlehandedly and without having to
use the touch screen. The setting controlled by the Scroll Wheel is selected using the
Quick enu Button
directly below the Scroll Wheel. Press this button and a menu will
appear on the left of the display (see below).
To use the Quick Menu, roll the scroll wheel to the setting you would like to change and
gently press the scroll wheel in. You will notice it clicks and the menu disappears. You will
now be able to change that setting simply by scrolling the wheel up or down. As you scroll
the wheel, you will see your selected setting appear on the left of the screen. This is the
simplest way to change your audio volume, trigger sensitivity, or heterodyne frequency on
the go. It can also be useful for quick labelling of species.
When using the Quick Menu to add a species label to a file, you will need to press in the
scroll wheel to confirm your selection.
MAIN MENU
To access the Main Menu press .
PROFILES
Your display, audio and capture settings are saved in profiles. Your Anabat Walkabout will
come with a set of default profiles (Full Spectrum, Zero Crossing, and asic), and you can

17
create new profiles which can be edited, locked, downloaded to an SD card and
transferred to other detectors. o select a profile, press the
Con iguration Pro ile
button,
then choose your preferred profile or create a new one.
De ault Pro iles
he default profiles that come with the detector are locked. his means any changes you
make to these profiles will not be saved. In all the default profiles, the default sensitivity is
19, with manual recording mode selected, and compressed mode on.
Full Spectrum
he full spectrum profile will make the Anabat Walkabout operate as a full spectrum bat
detector. his profile will display a full colour spectrogram, based off a zero crossing
trigger, and will save files as .wav. he default audio mode will be auto-heterodyne, but
you can change this to another audio mode (however your change will not be
remembered once the detector is turned off).
Zero Crossing
he zero crossing profile will make the Anabat Walkabout operate as a zero crossing bat
detector. his profile will display in zero crossing, based off a zero crossing trigger, and will
save files as .zc. he default audio mode will be auto-heterodyne, but you can change this
to another audio mode (however your change will not be remembered once the detector
is turned off).
Basic
he basic profile will make the Anabat Walkabout operate as a heterodyne bat detector.
his profile will only show the basic mode display (no spectrogram), recordings will be
based off a zero crossing trigger, and will save files as .wav. he default audio mode will

18
be auto-heterodyne, but you can change this to another audio mode (however your
change will not be remembered once the detector is turned off).
Creating a New Profile
To create a new profile,
press the Configuration Profile button. You can then have two
options for creating a new profile. 1)
New Profile
New ProfileNew Profile
New Profile
, default settings based off the full
spectrum profile; 2)
New Profile (copy current)
New Profile (copy current)New Profile (copy current)
New Profile (copy current)
, default settings will be based off the
settings currently running on the detector, for example if you have the Zero Crossing
profile loaded, but have changed the audio mode to frequency division, it will copy these
settings to a new profile.
You can then name the new profile, and press
Done
DoneDone
Done
. The new profile will be loaded and
you can press
Close
CloseClose
Close
. Any changes you make in the Main Menu or Advanced Settings
menu will automatically be saved to the profile and remembered for the next time you use
this profile. To lock certain settings, see
MENU SETTINGS
MENU SETTINGSMENU SETTINGS
MENU SETTINGS
.
To edit the name of a profile you’ve created, press .
Exporting and Importing Profiles via SD Card
Once you have created a new profile, you can then save it to the SD card to transfer it to
other detectors. To begin, ensure an SD card is inserted, then press next to the profile
you want to export to the card. It will state that “Profile has been exported”. Remove the
SD card and insert into another detector. Open the
Configuration Profile
Configuration ProfileConfiguration Profile
Configuration Profile
menu on this
detector and you will see the
Import
ImportImport
Import
button. The number next to Import indicates how
many profiles are on the SD card. Press the Import button and the profile will be
downloaded to the detector and loaded.
19
VIEW
Please note: I you are unable to change the View, it is because the pro ile is locked.
You will need to Creating a New Pro ile to unlock View in MENU SETTINGS.
Full Spectrum
his will display a full colour spectrogram.
This view can only be selected i iles are
being saved as .wav.
Zero Crossing
his will display the spectrogram as a series of zero crossing dots.
This view can only be
selected i your trigger is zero crossing, and iles are being saved as .zc, or both .zc
and .wav.
FS + ZC
his will split the display, with full spectrum at the top and zero crossing displayed below.
Basic Mode
Basic mode will not display a live spectrogram, only current tuned heterodyne frequency
and the peak energy frequency, as well as other measurements including temperature,
humidity and GPS status. his mode is useful for times where a live spectrogram could be
considered distracting. he
Play TE
button will play that last 10 seconds as time expansion
audio. he
Auto Tune
button, when checked, will automatically tune the heterodyne audio
to the peak energy frequency.
This view can only be selected i you are saving iles as
.wav.

20
AUDIO
Please note: If you are unable to change the Audio, it may be because the profile is
locked. You will need to Creating a New Profile to unlock Audio in ENU SETTINGS.
Pitch Shifting
This mode compresses the ultrasonic spectrum down into an audible band by shifting the
pitch of the sound. Harmonic components and amplitude of the bat calls are kept in this
process. This is the recommended audio mode for listening to bats over the full frequency
spectrum as constant adjustments are not required for tuning or sensitivity.
This audio
mode cannot be selected if viewing in zero crossing or basic mode.
Heterodyne
This mode shifts down a portion of the ultrasonic band into the human hearing range by
mixing the signal with an internal reference frequency. This reference frequency is adjusted
by the user to suit the frequency of bat calls of interest. The bandwidth of the heterodyne
mixing is about 5 kHz, so bats calling at a significantly different frequency to the reference
frequency will not be heard.
Current heterodyne frequency
Peak energy frequency
Currently recording
Relative humidity
GPS status
Latitude and longitude
Compass
Ambient light
Temperature
Memory
Play time expansion
Auto-tune heterodyne
Table of contents
Other TiTLEY Scientific Security Sensor manuals


