Tivax SS 602 User manual

Model SS 602
Instruction Manual
For correct usageread these instructionscarefully and
keep in asafe place forfuture reference.
Please note thatthis sewing machineis only suitable
for domestic use.
Sew &Sew ElectronicSewing MachineSS 602
Michley/Tivax Limited Warranty ToOriginal Purchaser
Michley/Tivax warrantsthis product purchased in the USAagainst defects inmaterial
and workmanship undernormal use andservice for aperiod of oneyear from thedate
of retail purchaseby the originalend-user purchaser.Products will notbe warranted
if the serialnumber is removedor defaced.
This warranty shallbe void upontransfer of ownershipof this productand is
effective only when used in the United States.
Michley/Tivax agreesto repair or replace this unit at no charge, within thewarranty
period, providing thatthe product isdelivered to Michley/Tivax in itsoriginal
package or equivalent,fully insured, withall shipping charges prepaid anda return
authorization number listedon the outsideof the packaging.Ahandling charge of $25
will be appliedto any returnedproduct found notto be defective.To honor this
warranty and toensure the bestservice to ourcustomer, Michley/Tivax requires the
following information tobe included withthe returned unit:
•A copyof the originalsales invoice fromyour vendor.
•Model number &serial number ofthe unit.
•A detaileddescription of theproblem, associate electricalconnection and hardware.
A ReturnAuthorization numbercan be obtainedby faxing to650 963-3585 or
This warranty contemplatesthe owner willreasonably maintain thisinstrument or
product without alteration,negligent use, misuse,or abuse. Furthermore,any
unauthorized alteration ofthis device withoutwritten approval byMichley/Tivax
will void anywarranty and theowner's right tooperate this device.
This warranty presentedabove is exclusiveand in lieuof all otherexpressed or
implied warranties.Any warranty applicableto this productis limited tothe period
described above. Inno event willMichley/Tivax be liable for any special, incidental,
or consequential damage,loss of revenue,or cost ofreplacement goods resulting
from the useof malfunction ofthis product tothe equipment systemon which itis
used. This warranty gives specific legal rights and you may haveother rights that
vary from stateto state.

Caution:
1 This appliance is not intended for use by persons (including children) with reduced
physical, sensory ormental capabilities, orlack of experienceand knowledge, unless
they have beengiven supervision orinstruction concerning useof the applianceby a
person responsible fortheir safety.
2 Children shouldbe supervised toensure that theydo not playwith the appliance.
Correct Disposal of this product:
This marking indicatesthat this productshould not bedisposed with otherhousehold
wastes throughout theEU. To prevent possibleharm to theenvironment or human
health from uncontrolledwaste disposal, recycleit responsibly topromote the
sustainable reuse ofmaterial resources. To return your used device, please use the
return and collectionsystems or contactthe retailer wherethe product waspurchased.
They can takethis product forenvironmental safe recycling.
We reserve theright to improve appearance ofproduct. Please check product byreal one, picture in themanual is just for yourreference.

When using an electrical appliance, basic safety precautions should always be followed,
including the following:
Read all instructions before using this appliance.
DANGER---To reduce the risk of electric shock:
1. An appliance should never be left unattached when plugged in. Always unplug this sewing
machine from the electric outlet immediately after using and before cleaning.
2. Always unplug before replacing a sewing machine bulb. Replace bulb with same type
rated 15 Watts.
WARNING---To reduce the risk of burns, fire, electric shock or injury to persons:
1. Do not allow to be used as a toy. Close attention is necessary when using this sewing
machine by or near children.
2. Use this appliance only for its intended use as described in this owner's manual. Use only
attachments recommended by the manufacturer as contained in this owner's manual.
3.
4. Never operate the appliance with any air opening blocked. Keep ventilation openings of
this sewing machine and foot controller free from accumulation of lint, dust and loose cloth.
5. Never drop or insert any object into any opening.
6. Do not use outdoors.
7. Do not operate where aerosol (spray) products are being used or where oxygen is being
administered.
8. To disconnect, turn all controls to the off ( “O” ) position, then remove plug from outlet.
9. Do not unplug by pulling on cord. To unplug, grasp the plug, not the cord.
10. Keep fingers away from all moving parts. Special care is required around the sewing
machine needle.
11. Always use the proper needle plate. The wrong plate can cause the needle to break.
12. Do not use bent needles.
13. Do not pull or push fabric while stitching. It may deflect the needle causing it to break.
14. Switch this sewing machine off (“O”) when making any adjustment in the needle area,
such as threading the needle, changing the needle, threading the bobbin, changing the
presser foot, and the like.
15. Always unplug this sewing machine from the electrical outlet when removing covers,
lubricating, or when making any other adjustments mentioned in this owner's manual.
SAVE THESE INSTRUCTIONS
NOTE: Sewing machine design and specifications are subject to change without prior notice
Never operate this sewing machine if it has a damaged cord or plug, if it is not working
properly, if it has been dropped or damaged, or dropped into water. Return this sewing
machine to the nearest service center for examination, repair, electrical or mechanical
adjustment.
IMPORTANT SAFETY INSTRUCTIONS

TROUBLESHOOTING
Problem Problem cause Amendment
No power orthe machine
runs slowly
Skipping stitches
Bobbin thread cannot be
drawn up
Thread keeps breaking
Stitches too looseor
uneven
Needle breaks
·Adaptor power inadequate ·Use compatible adaptor
·Needle eye not in the
middle
·Remove and re-insertthe
needle with theflat side of
the needle tothe back
·Needle bent ·Remove and re-inserta
new needle
·Presser foot tooloose ·Tighten thepresser foot
·Lower thread hasbeen
used up
·Replace with newfull
bobbin
·Needle threaded incorrectly
·Re-thread the needle,
making sure itis threaded
from the frontto the back
·Needle bent ·Remove and re-inserta
new needle
·Needle shank notproperly
seated
·Remove and re-inserta
new needle
·Thread tension dial,thread
guide or threadpulling bar
too tight
·Loosen the threadtension
between 3-5 number
·Thread blocked byupper
bobbin
·Upper thread tooloose
·Pull out thespool pin and
make the bobbinor thread
run smoothly
·Needle bent ordeformed ·Remove and re-inserta
new needle
SECTION . CARE OFYOUR MACHINE
20
MACHINE SPECIFICATIONS
Item Specification
Sewing speed (Maximum):
Stitch length:
Stitch width:
Stitch package (Stitch function):
(Built-in stitches):
Machine dimensions:
Weight (Net):
Over 350 s.p.m
3.5 mm (Maximum)
6.5 mm (Maximum)
kg
60
12
345 L 275 W 157 H mm
2.9

TABLE OF CONTENTS
Name of Parts....................................................................................................1
Accessories.......................................................................................................2
Connecting Machine to Power Supply..................................................................3
Before Using Your Sewing Machine.....................................................................3
For Your Safety..................................................................................................3
Presser Foot Lifter..............................................................................................4
Thread Cutter.....................................................................................................4
Extension Table..................................................................................................4
•Detaching the table..................................................................................................4
•Attaching the table...................................................................................................4
•Accessory box.......................................................................................................4
Changing Needle................................................................................................5
To Remove and Attach the Foot Holder.................................................................6
•To remove.............................................................................................................6
•To attach..............................................................................................................6
Changing Presser foot
Bobbin winding..................................................................................................7
•Horizontal spool pin
•Bobbin winding
•Removing the hock cover plate
•Insert the bobbin
Thread the machine...........................................................................................10
•Needle thread
•Drawing up bobbin thread
Adjusting the Needle Thread Tension for aStraight Stitch....................................12
•Correct tension
•Tension is too tight
•Tension is too loose
Stitch Selector..................................................................................................14
Stitch...............................................................................................................15
•Starting to sew
•Finishing sewing
Button sewing...................................................................................................17
Manual buttonhole
.........................................................................................6
•To remove.............................................................................................................6
•To attach..............................................................................................................6
.................................................................................................7
..................................................................................................7 8
....................................................................................9
.....................................................................................................9
.......................................................................................................11
.........................................................................................11
.....................................................................................................12
.................................................................................................12
................................................................................................12
Adjusting the Needle Thread Tension for a Zigzag Stitch.....................................13
•Correct tension.....................................................................................................13
•Tension is too tight.................................................................................................13
•Tension is too loose................................................................................................13
......................................................................................................15
...................................................................................................15
......................................................................................18 19
Troubleshooting...............................................................................................20
Stitch choosing button.......................................................................................16
SECTION . NAME OF PARTS
SECTION . GETTING READY TO SEW
SECTION . SEWING
SECTION . CARE OF YOUR MACHINE
8. Raise thepresser foot, turnthe cloth head
back( because clothis sewed forward,if
you want tosew buttonhole, youneed to
turn the directionof sewing.)
9. Choose stitch2 and stitchadjusting E, push
dialing button tothe right tomake presser
th
foot can feedcloth. ( sameas 4 procedure)
10. Turnon switch andsew till buttonholeis
oversewed fully, then stopsewing.
11. Raisepresser foot, turn the handwheel
with one hand,pull the clothlightly with
another hand.
12. Afterpulling the cloth,cut the threadwith
thread cutter onthe machine.
Notice:
When you pushdialing button, youmust turn thehandwheel into 1-2circles.
SECTION .SEWING
19

NAME OF PARTS
23
24
25
26
27
1 Stitch choosing button
2 Power switch & speed
adjusting button
3 Reverse stitch control
4 Reset
5 Stitch panel
6 Thread tension lever
7 Thread winding bobbin
8 Thread pressing circle
9 Bobbin thread
10 Spool pin
11 Thread clamp
12 Bracket of thread clamp
13 Thread take-up lever
14 Thread tension dial
15 Thread cutter
16 Needle clamp screw
17 Needle
18 Presser foot
19 Drawer
20 Hook cover plate
21 Hook cover release button
22 Handle
23 Bobbin winder spindle
24 Handwheel
25 Foot pedal jack
26 Power jack
27 Presser foot lifter
SECTION . NAME OFPARTS
1
Manual Buttonhole
6. Choose stitch 3and stitch adjustingE, push
1. Pull outthe drawer onyour left side
and push dialingbutton to theleft so
that presser footis not incloth feed
status.
2. Put clothunder presser footand press down
the presser footon the clothwhere you need
to sew buttonhole,then choose stitchand
stitch adjusting E.
3. Turnon switch andsew 3-4 stitchin low
speed, then turnoff switch.
4. Choose stitch2 and keepstitch adjusting in
E place, pushthe dialing buttonto the right
side to makepresser foot incloth feed status.
5. Turnon switch andsew on thecloth in
suitable length, thenturn off switch. Note
that try tokeep sewed stitchin straight line.
dialing button backto the leftso that presser
foot is notin cloth feedstatus.
7. Turnon switch andsew 3-4 stitchin low
speed, then turnoff switch.
Dialing
button
SECTION .SEWING
18
5
2
1
3
4
6
7
8
9
11
10
12
13
14
15
16
17
20
19
22
21
18
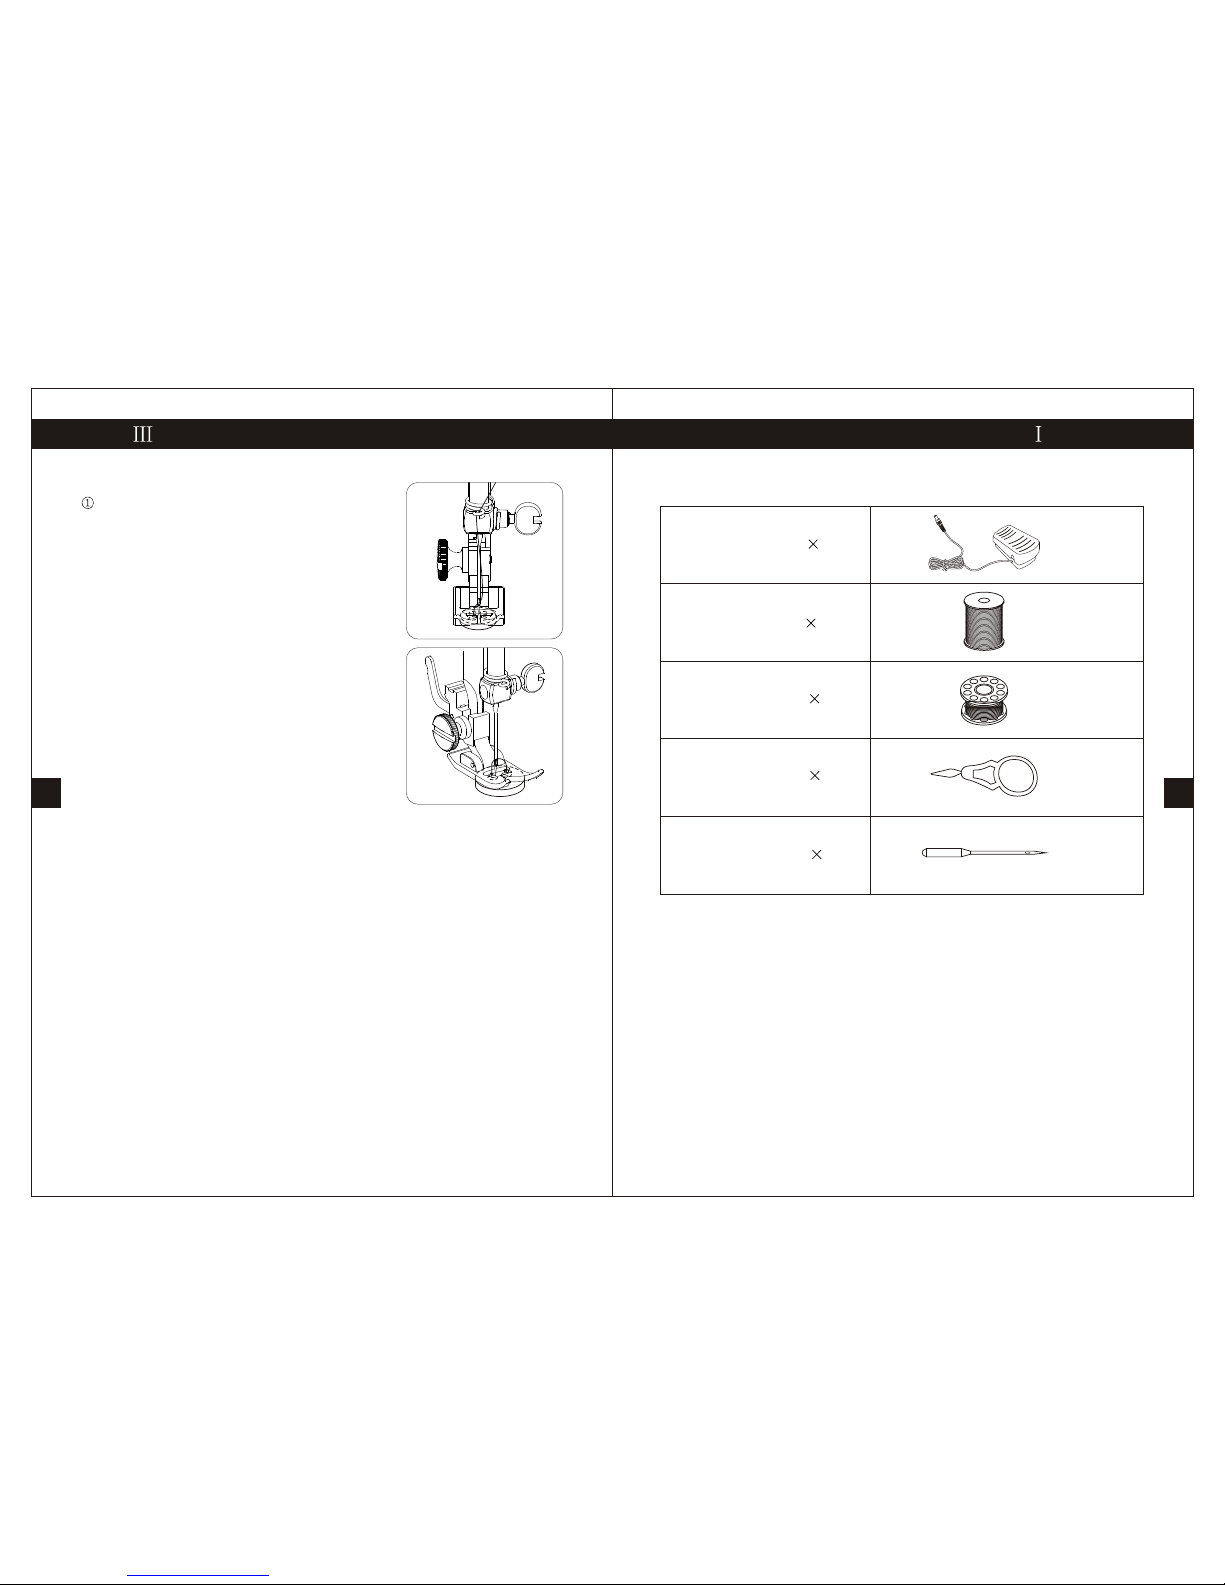
Foot pedal 1
Thread spool 2
Bobbin 2
Needle threader 1
Needle 1
Accessories
SECTION . NAME OFPARTS
2
Button Sewing
Stitch selector: 2to 3
1.Draw theaccessory table and you will see an
adjusting button forbutton sewing. Push the
button to theleft, thus, machine is in the state
of button sewing.Place the button you want
to sew belowthe zigzag foot, making sure to
align the holeswith the horizontal slot in the
foot. Lower thepresser foot to hold the button
in place.
2.Determine whichstitch width setting matches
the distance betweenthe button holes. The
needle must gosafely through each hole when
sewing. Unthread theneedle to help you
determine the zigzagwidth.
3.Thread theneedle. Turn the handwheel, so that
the needle isin its leftmost position, and then
drop the needlethrough the left buttonhole.
4.Press thefoot control and sew about 10 stitches.
5.Sew theother row of holes ( if applicable) using
the steps above.Trim excess threads from both sides of the fabric.
SECTION .SEWING
17

Connecting Machine toPower Supply
Power supply plug
Outlet
Machine socket
Machine plug
Power switch
1.Turnoff the power switch .
2.Insert themachine plug
3.Insert thepower supply plug into the outlet .
4.Turnthe power switch to the leftor right toturn on the power.
Before Using Your Sewing Machine
Before using yoursewing machine forthe first time,place a wastefabric under the
presser foot andrun the machinewith thread fora few minutes.Wipe awayany oil
which may appear.
For Your Safety
While in operation,always keep youreyes on thesewing area. Donot touch any
moving parts suchas the threadtake-up lever,handwheel or needle.
Always turn off the powerswitch and unplug from the power supply:
nWhen leaving themachine unattended.
nWhen attaching orremoving any parts.
nWhen cleaning themachine.
Do not placeanything on thefoot control, whennot sewing.
SECTION . GETTING READYTO SEW
3
Stitch choosing button
Sewing straight stitch
Sewing other stitches
Left position
Middle position
Right position
Left & rightneedle positions:3 to 6
Middle position: 2
Three needle positions:7 to 12
When you pushbutton to theright, green indicator of stitch pattern is on default
stitch 1.All stitches can be chosen as you like by pressing stitch pattern button.
When you pushbutton to theleft, straight stitch is chosen. Moreover, there are
three needle positions.
Needle position adjusting.If you need another needle position to sew fabric with
a straight stitch, draw fabric and needle thread out, push button to the right and
choose stitches otherthan straight stitch, then needle position is changed as you
like. Stitches canbe adjusted into different needle positions below.
SECTION .SEWING
16
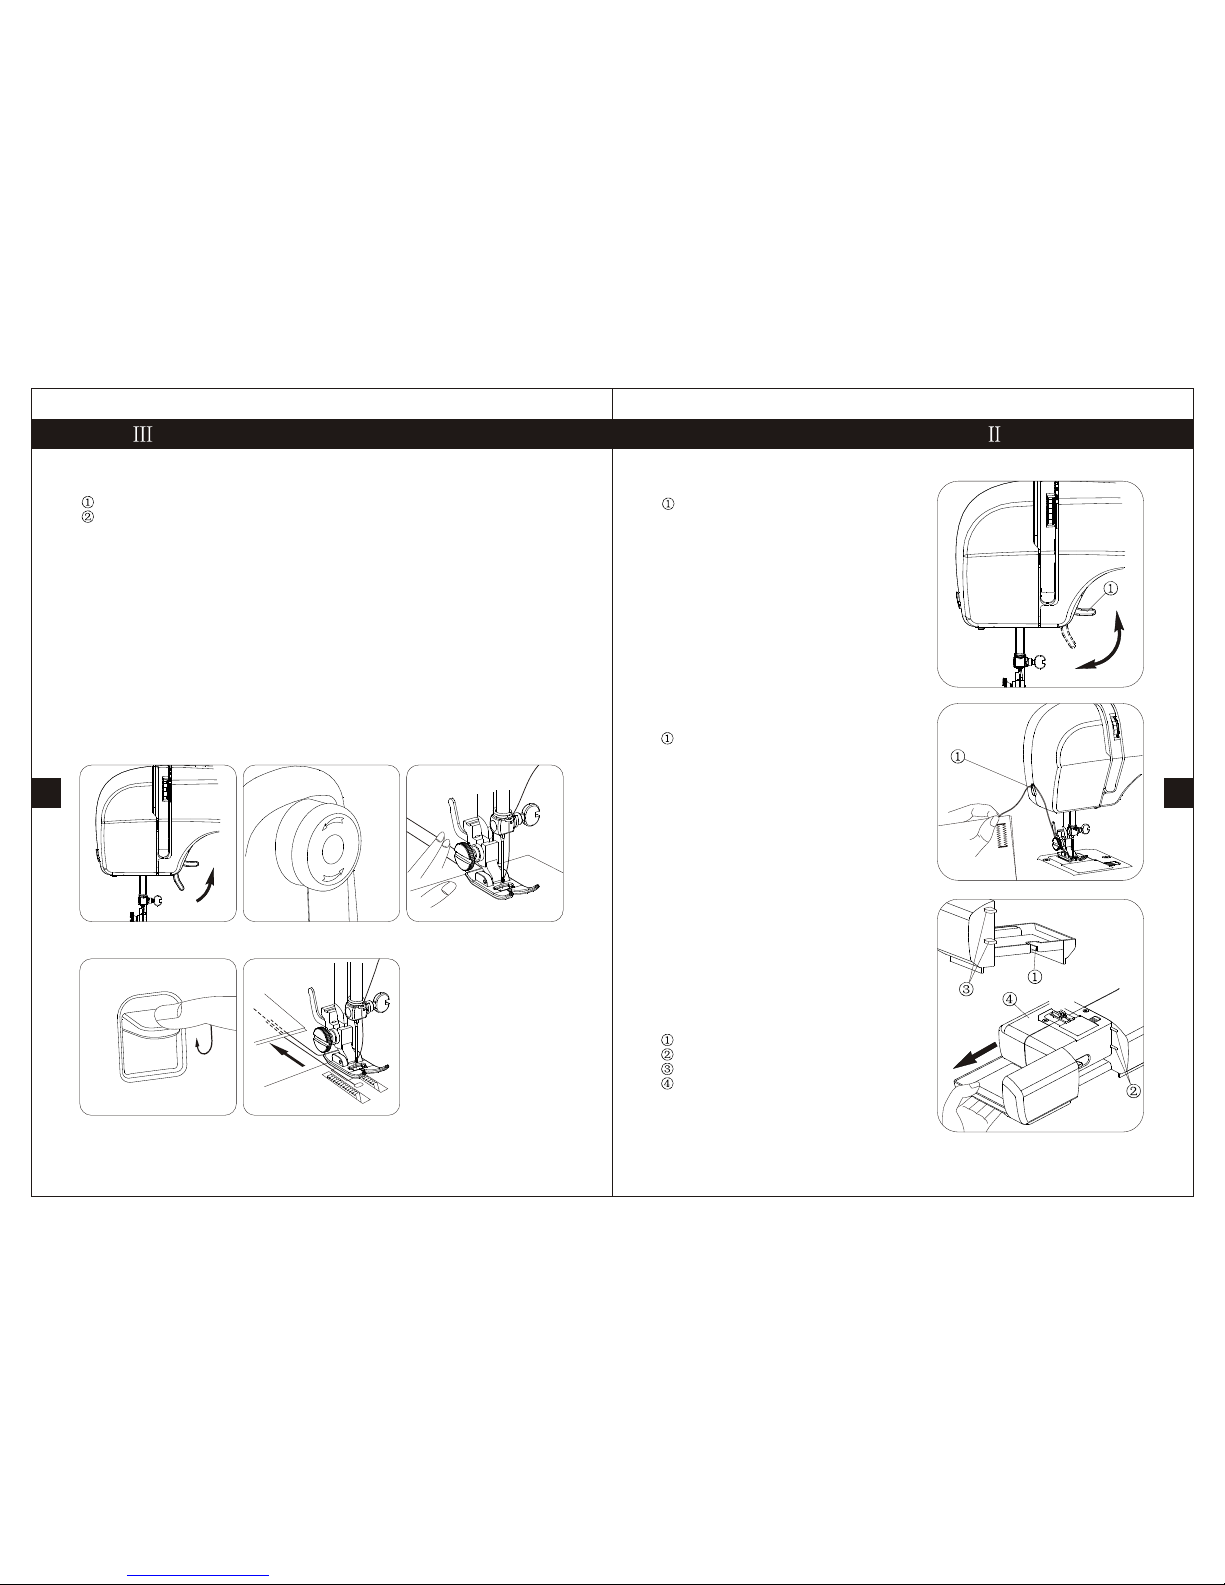
Presser Foot Lifter
Presser foot lifter
The presser footlifter raises andlowers the
presser foot.
Thread Cutter
Thread cutter
Youdo not needa pair ofscissors to cutthe
thread after sewing.Simply use thebuilt-in
thread cutter.
Extension Table
Detaching the table
Pull the tableaway from themachine for
“free-arm” sewing ofcuffs and sleeves.
Attaching the table
Push the extensiontable until itsnaps into
the machine.
Pin
Holes
Tab
Free-arm
Accessory box
Open the coverof the accessorybox toward
you. The sewing accessories are conveniently located in the box.
•
•
•
SECTION . GETTING READYTO SEW
4
Stitch
Straight stitch: 1
Zigzag stitch: 2to 12
Starting to sew
Raise the presserfoot and positionthe fabric onthe needle plate.Turn thehandwheel
and lower theneedle to thepoint where youwant to start.Lower the presserfoot and
pull the threadstoward the back.Depress the footcontrol. Gently guidethe fabric
along a seamguide line lettingthe fabric feednaturally.
CAUTION: Do notplace fingers nearthe presser footwhen guiding fabric,or the
needle clamp screwmay strike andinjure your fingers.
Finishing sewing
To fasten the ends of a seam, press the reverse stitch control and sew several reverse
stitches. Raise thepresser foot. Removethe fabric, drawthe threads tothe back and
cut them withthe thread cutter. The threads are now the proper length to begin
sewing the nextseam.
•
•
SECTION .SEWING
15
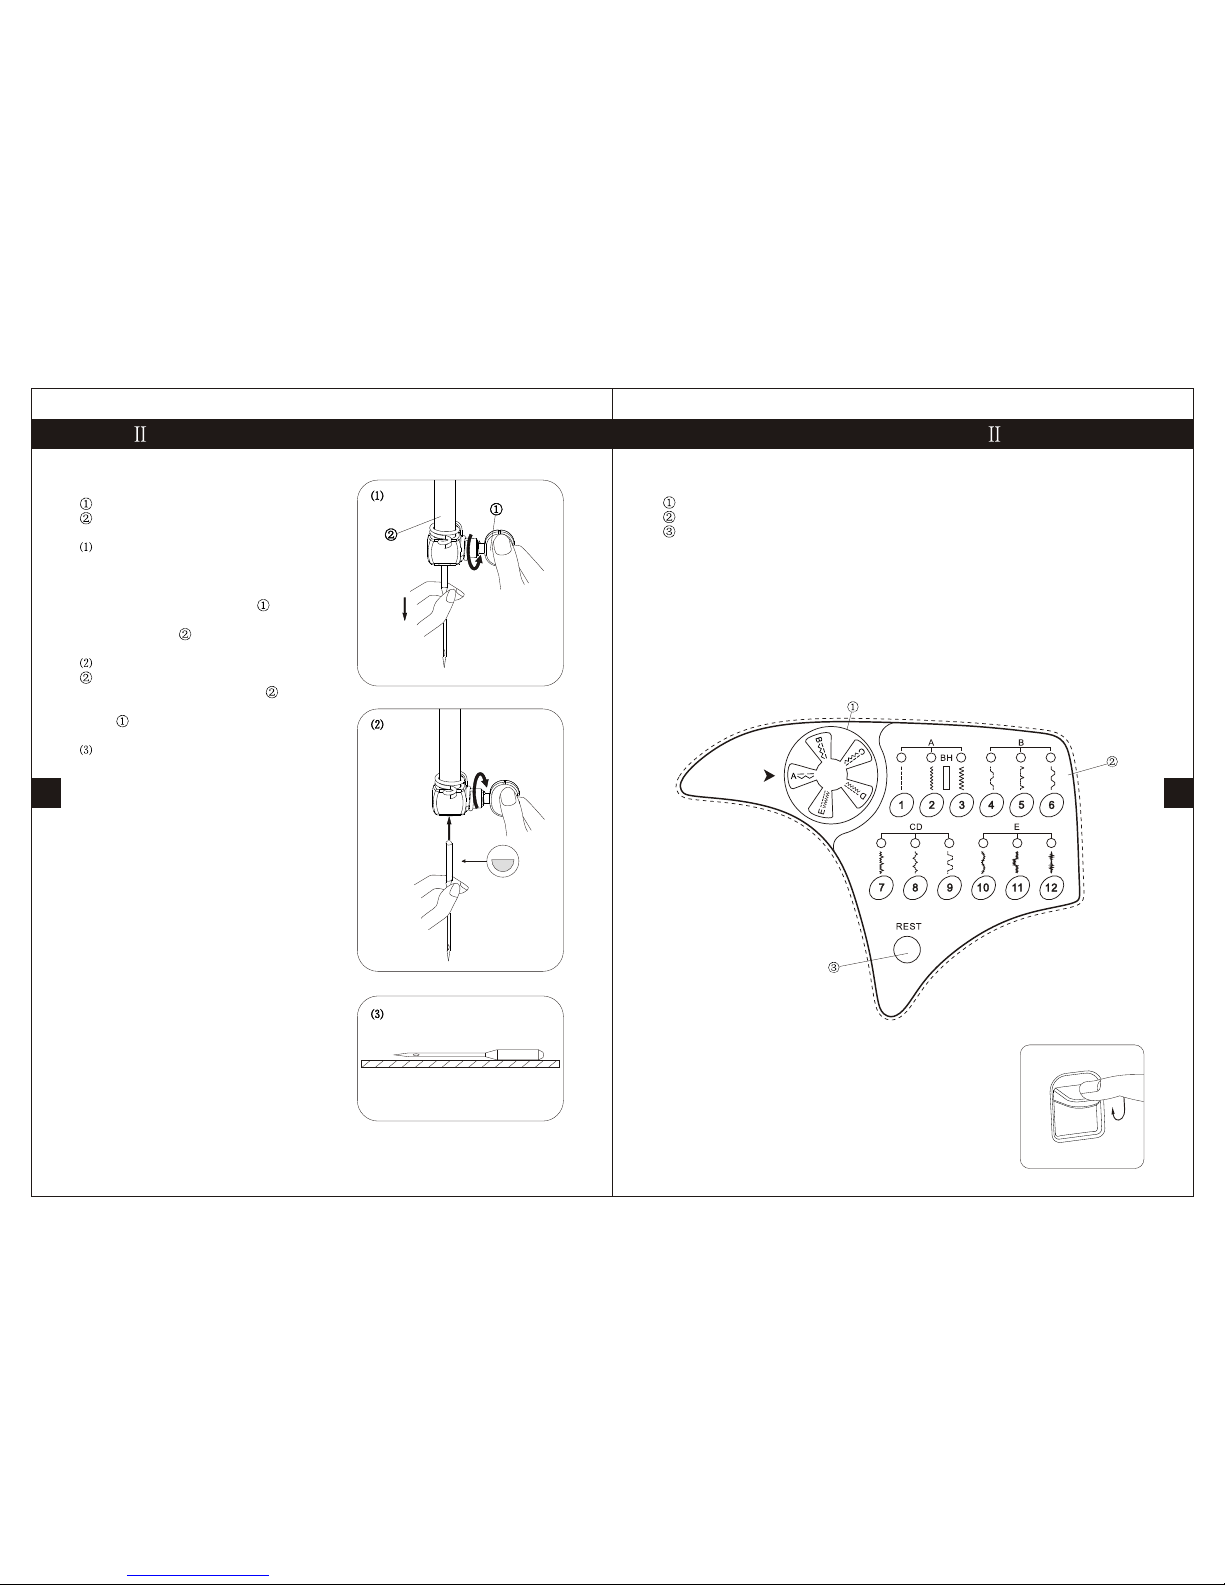
Changing Needle
Needle clamp screw
Needle clamp
Turn off the powerswitch.
Raise the needleto its highestposition by
turning the handwheelcounterclockwise,
toward you, andlowering the presserfoot.
Loosen the needleclamp screw by turning
it counterclockwise. Removethe needle from
the needle clamp .
Insert a newneedle into theneedle clamp
with the flatside to therear. When inserting
the needle intothe needle clamp , push itup
as far asit goes. Tighten the needle clamp
screw firmly by turningit clockwise.
Tosee if theneedle is good,place the flat
side of theneedle onto somethingflat (needle
plate, glass, etc.).Thegap between theneedle
and the flatsurface should beconsistent. Never
use a bentor blunt needle.Adamaged needle
can cause permanentsnags or runsin knits,
fine silks andsilk-like fabrics.
SECTION . GETTING READYTO SEW
5
Stitch Selector (how to selectstitches)
Sewing guide display
Stitch pattern ingreen indicator
Reset key
Choose the stitchyou need and press stitch patternbutton, green indicator will show
the desired stitch.
If you wantto choose anotherstitch pattern, firstpress the reset key and green
indicator returns todefault stitch ( stitch 1), then press your desired stitch pattern.
Stitch width andstitch length can be changed by turning sewing guide display. Each
stitch pattern canbe adjusted into 5 different widths and lengths.
NOTE:
To avoid needle or fabric damage, make sure the needle is up and out of the fabric
while selecting astitch.
Reverse Stitch Control
Press the stitchcontrol to sewin reverse.
SECTION . GETTING READYTO SEW
14

ToRemove andAttach the FootHolder
Thumb screw
Foot holder
Presser foot lifter
To remove
Remove the thumbscrew by turning it
counterclockwise with ascrewdriver.
To attach
Match the holein the footholder with the threaded
hole in thepresser foot lifter Fit the thumbscrew
into the hole.Tighten thescrew by turning it
clockwise with ascrewdriver.
•
•
SECTION . GETTING READYTO SEW
6
Adjust the NeedleThread Tension fora
Zigzag Stitch
•
•
•
For an idealzigzag stitch, the bobbin thread
does not showon the rightside (Top side) of
the fabric, andthe needle thread shows slightly
on the wrongside (Bottom side)of the fabric.
See the illustrationsfor the correct appearance.
To match this appearance, adjust the needle
tension.
Correct tension
Right side (Top side) offabric
Wrong side(Bottom side) of fabric
Minimize the amountof needle thread visible
on the wrongside (Bottom side)of the fabric
without causing excessivepuckering, or
causing the bobbinthread to show on the right
side (Top side) ofthe fabric.
Results vary withfabric, thread andsewing
conditions.
Tension is too tight
Right side (Top side) offabric
Wrong side(Bottom side) of fabric
The corner ofeach zigzag pullstogether on the
right side ofthe fabric.
Tension is too loose
Right side (Top side) offabric
Wrong side(Bottom side) of fabric
The corner ofeach zigzag pullstogether on the
wrong side ofthe fabric.
SECTION . GETTING READYTO SEW
13
Changing Presser Foot
Snap-on button
Groove
Pin
To remove
Raise the needleto its highest position by turning the
handwheel counterclockwise. Raisethe presser foot,
and press thesnap-on button on the backof the foot
holder.
To attach
Place the selectedpresser foot, so that the pin on the
foot lies justunder the groove on the footholder.
Lower the presserbar to lockthe foot intoplace.
•
•

Bobbin Winding
Horizontal spool pin
Spool pin
Spool holder
Lift up thespool pin . Place a spool of thread on the spoolpin with thethread
coming off the spool as shown. Attach the spool holder , and pressit firmly
against the spoolof thread.
•
Bobbin winding
Draw the threadfrom the spool
Guide the threadaround the thread guide.
For the horizontalspool pin
Put the bobbinon the bobbin winder spindle.
Push the bobbinto the right.
With thefree end ofthe thread heldin your
hand, turn onswitch or depress the foot
control. Bobbin willmake turns and wind
thread. Touch bobbin winder stopper tightly,
it stops automatically.
•
SECTION . GETTING READYTO SEW
7
Adjust the NeedleThread Tension fora
Straight Stitch
•
•
•
Correct tension
Needle thread (Top thread)
Bobbin thread (Bobbinthread)
To loosen
To tighten
The ideal straightstitch has threads locked
between two layersof fabric, as illustrated
(magnified to showdetail).If you look at the
top and bottomof a seam, notice that the
stitches are evenlybalanced.
When adjusting theneedle thread tension,
the higher thenumber, the tighter the top
thread tension.
Results depend on:
-stiffness and thickness of the fabric
-number offabric layers
-type ofstitch
Tension is too tight
Needle thread (Top thread)
Bobbin thread (Bottomthread)
Toloosen tension
Right side (Top side) offabric
Wrong side(Bottom side) of fabric
The bobbin threadshows through on the
wrong side ofthe fabric, andthe stitch
feels bumpy. Turnthe dial to a lower
tension setting numberto loosen the
needle thread tension.
Tension is too loose
Needle thread (Top thread)
Bobbin thread (Bottomthread)
Totighten tension
Right side (Top side) offabric
Wrong side(Bottom side) of fabric
SECTION . GETTING READYTO SEW
12
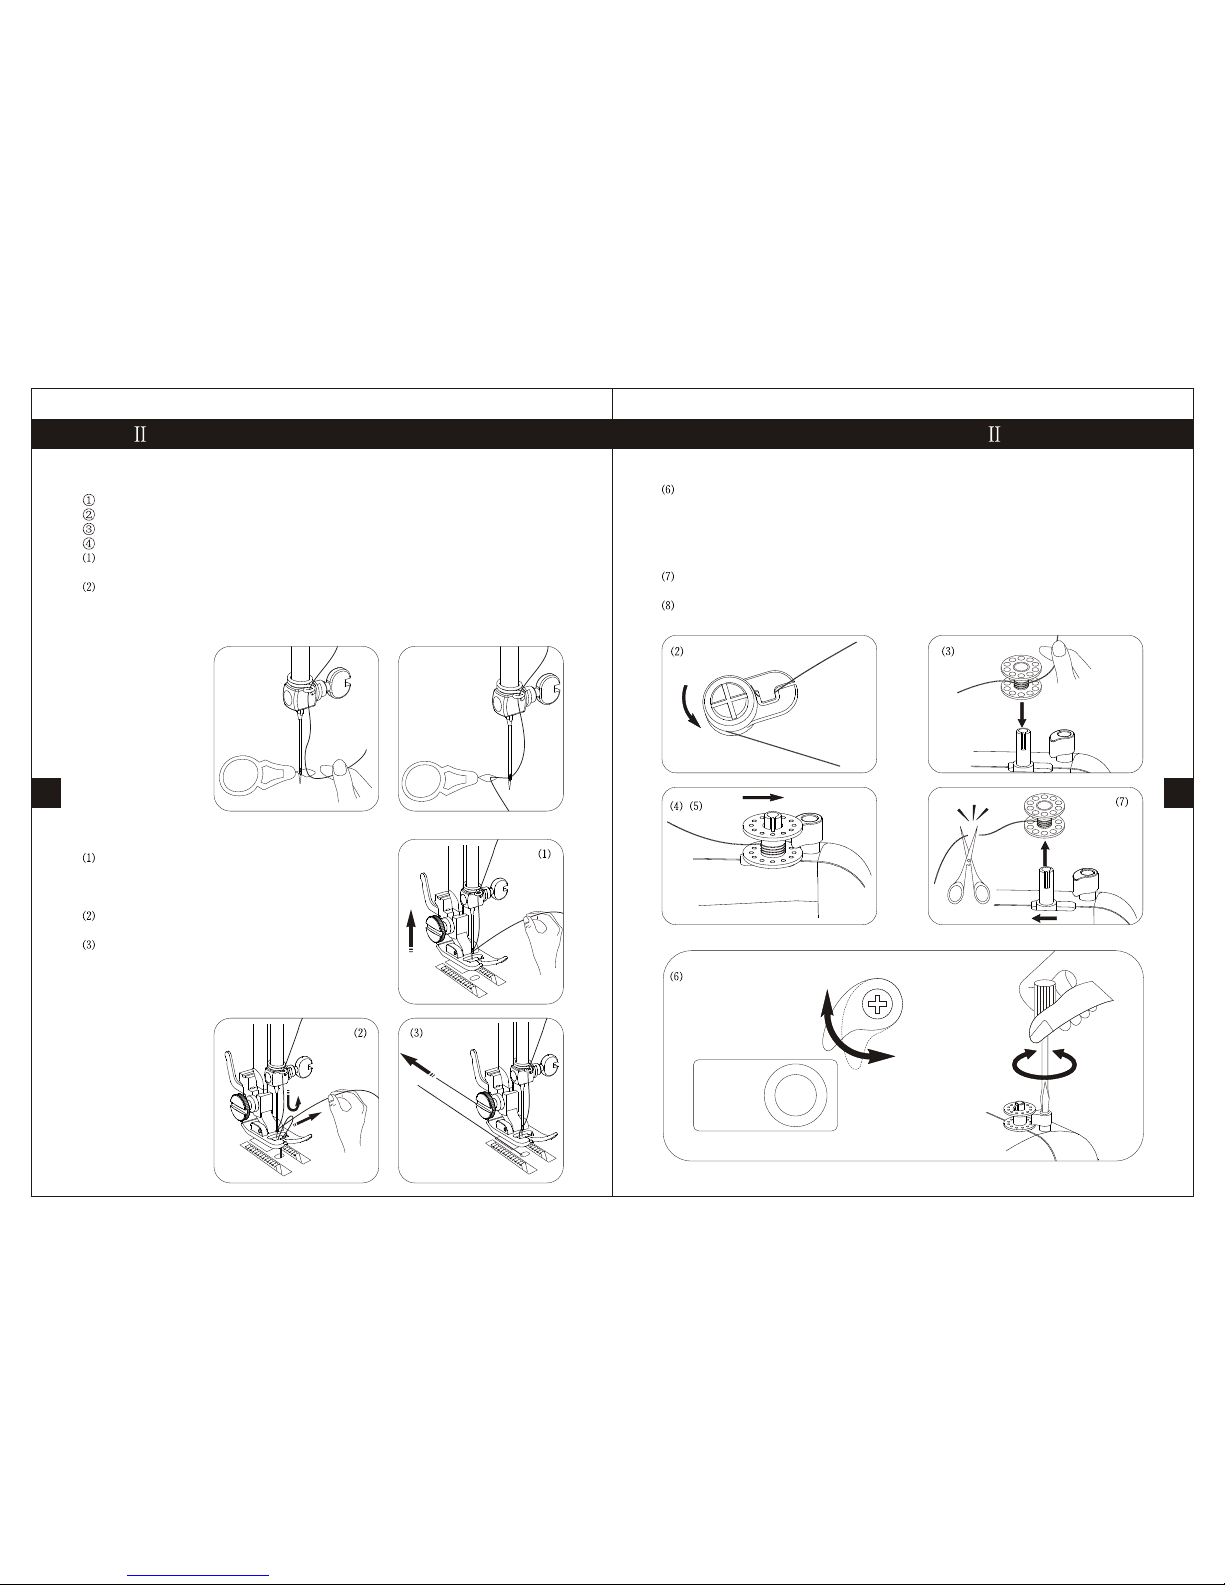
The position ofthe bobbin winderstopper is adjustabledepending on therequired
amount of threadon the bobbin. Using a screwdriver, loosen thescrew one turn or
less ,so thatyou can adjust the position of the bobbin winder stopper. Do not take
the screw allthe way out. Retighten the screw to fix the stopper at the desired
position.
When the bobbin is wound, turn off switch. Return the bobbin winder to its
original position bymoving the spindle to left, and cut the thread as shown.
The machine willnot sew untilthe clutch isengaged.
SECTION . GETTING READYTO SEW
8
•Needle threader
Needle threader
Ring
Needle eye
Thread end
Raise the needleto its highestposition. Paying attentionto the needlepoint,
put ring ofneedle threader togo through needleeye.
Draw thread intoring and pullring back fromneedle eye. Releasethe needle
threader and thethread has beenthreaded through needleeye.
NOTE:
Thread length leaves for 5-10 cm is recommended when sewing.
•Drawing up bobbinthread
Raise the presserfoot. Hold theneedle thread
lightly with yourleft hand and rotate the
handwheel counterclockwise forone complete
turn.
Bring the bobbinthread up bypulling the needle
thread up.
Pull both threads10 to 15cm under andbehind
the presser foot.
SECTION . GETTING READYTO SEW
11
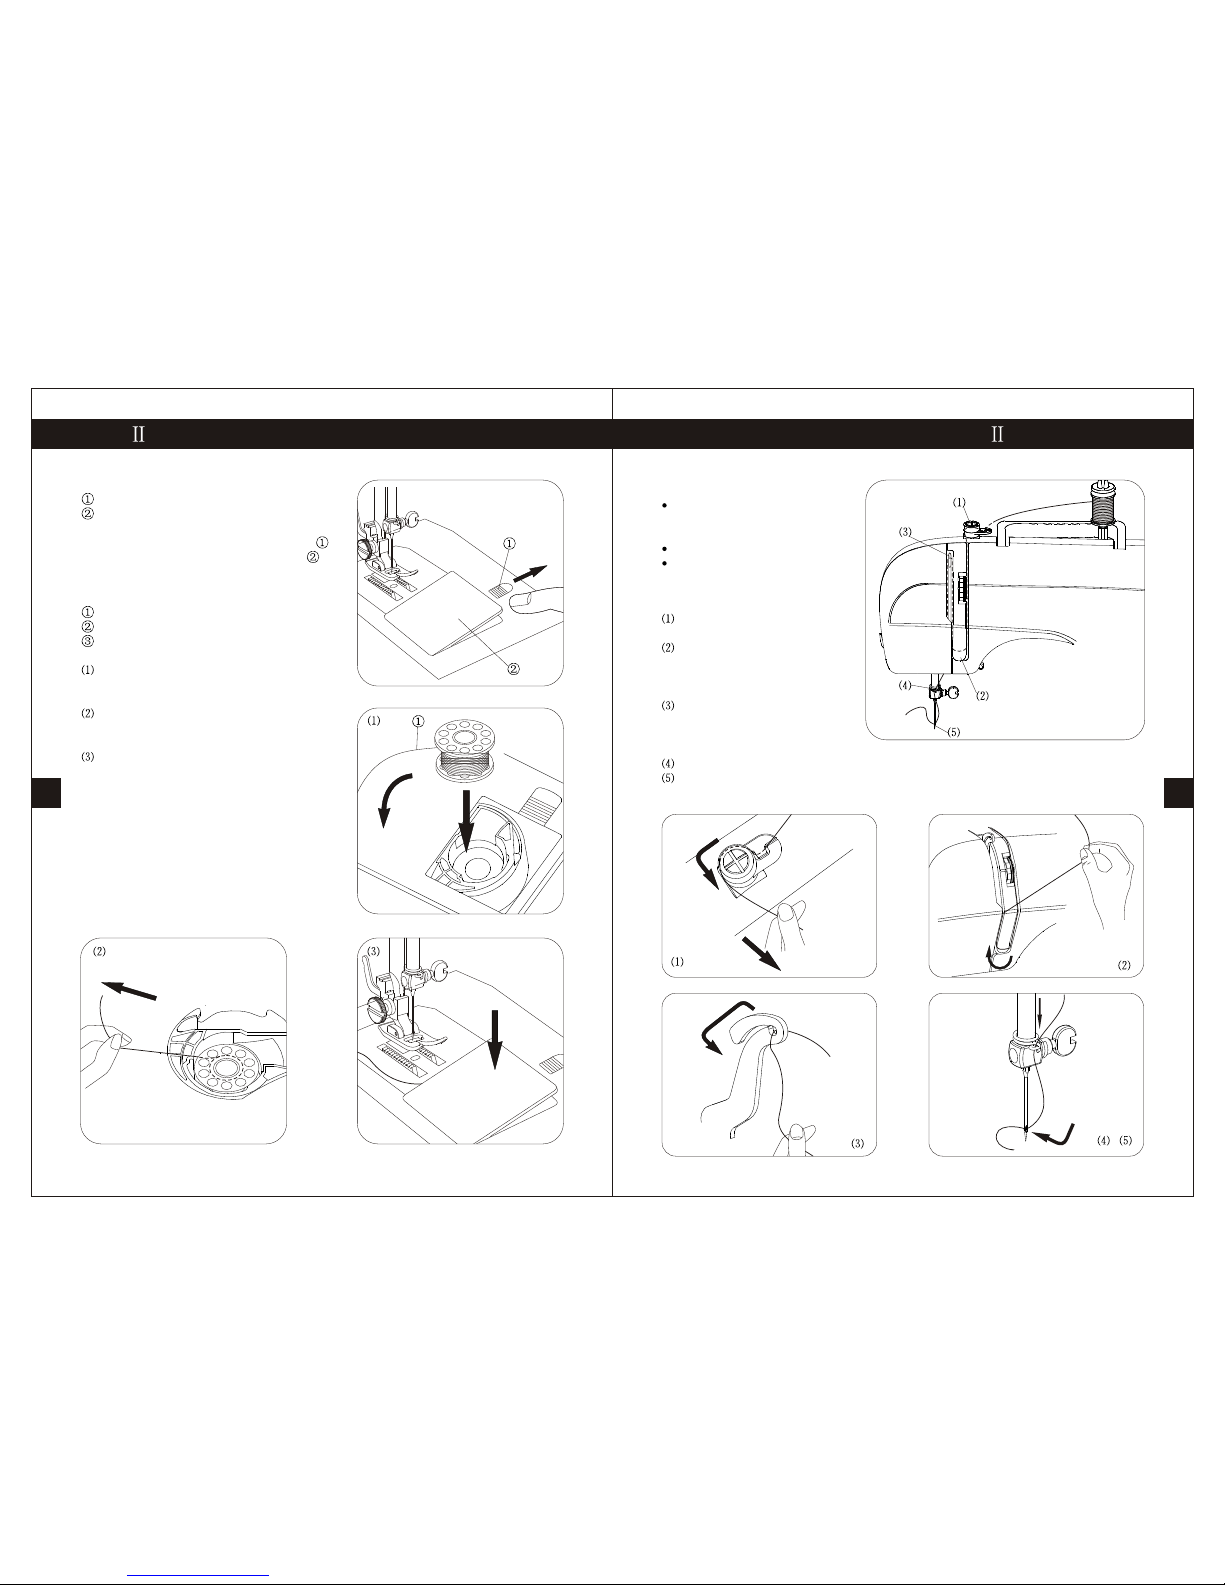
•
•
Removing the hookcover plate
Hook cover platerelease button
Hook cover plate
Slide the hookcover plate releasebutton
to the right,and remove thecover plate
Inserting the bobbin
End of thread
Notch
Notch
Place a bobbinin the bobbinholder with
the thread runningoff counterclockwise.
Draw the threadto the left,Pull out about
15.0 cm ofthread.
Attach thehook cover plate.
SECTION . GETTING READYTO SEW
9
Threading the machine
Raise the threadtake-up lever to
its highest positionby turning the
handwheel counterclockwise.
Raise the presserfoot lifter.
Place a spoolon the spool pin,
with the threadcoming off as
shown.
Draw the endof the thread
around the upperthread guide.
While holding the thread near
the spool, drawthe end of the
thread down aroundthe check
spring holder.
Firmly draw thethread up from
right to leftover the take-up
lever, anddown into the take-up
lever eye.
Slide the threadbehind the needle bar thread guide on the left.
Thread the needle from front to back, or use a needle threader.
SECTION . GETTING READYTO SEW
10
Table of contents
Other Tivax Sewing Machine manuals


