Tivok T-HP20AB User manual

Installation and Operation Manual
Tivok Energy Heat Pump: T-HP20AB

Tivok Energy T-HP20AB Heat Pump Installation Manual
II
CONTENTS
Introduction
General Information
Document Scope
Proper Use
Notes and Precautions
Features and Benefits
Wide Range of Applications
Durable and Long Life
Strong Cabinet
Noise Control
Reliable and Safe Design
Simple Maintenance
Model Naming Nomenclature
Technical Data
Unit Parameters
Dimensions
Performance
System Diagram
Heating Mode
Defrosting Mode
Components
Installation
Heat Pump Installation
Positioning Requirements
Water System Installation
Water Tank Installation
Water Piping Installation
Wired Controller Installation
Wall-mounted Installation
Commissioning
Preparation
Commissioning
Controller Operation
Controller Illustration
LCD Illustration
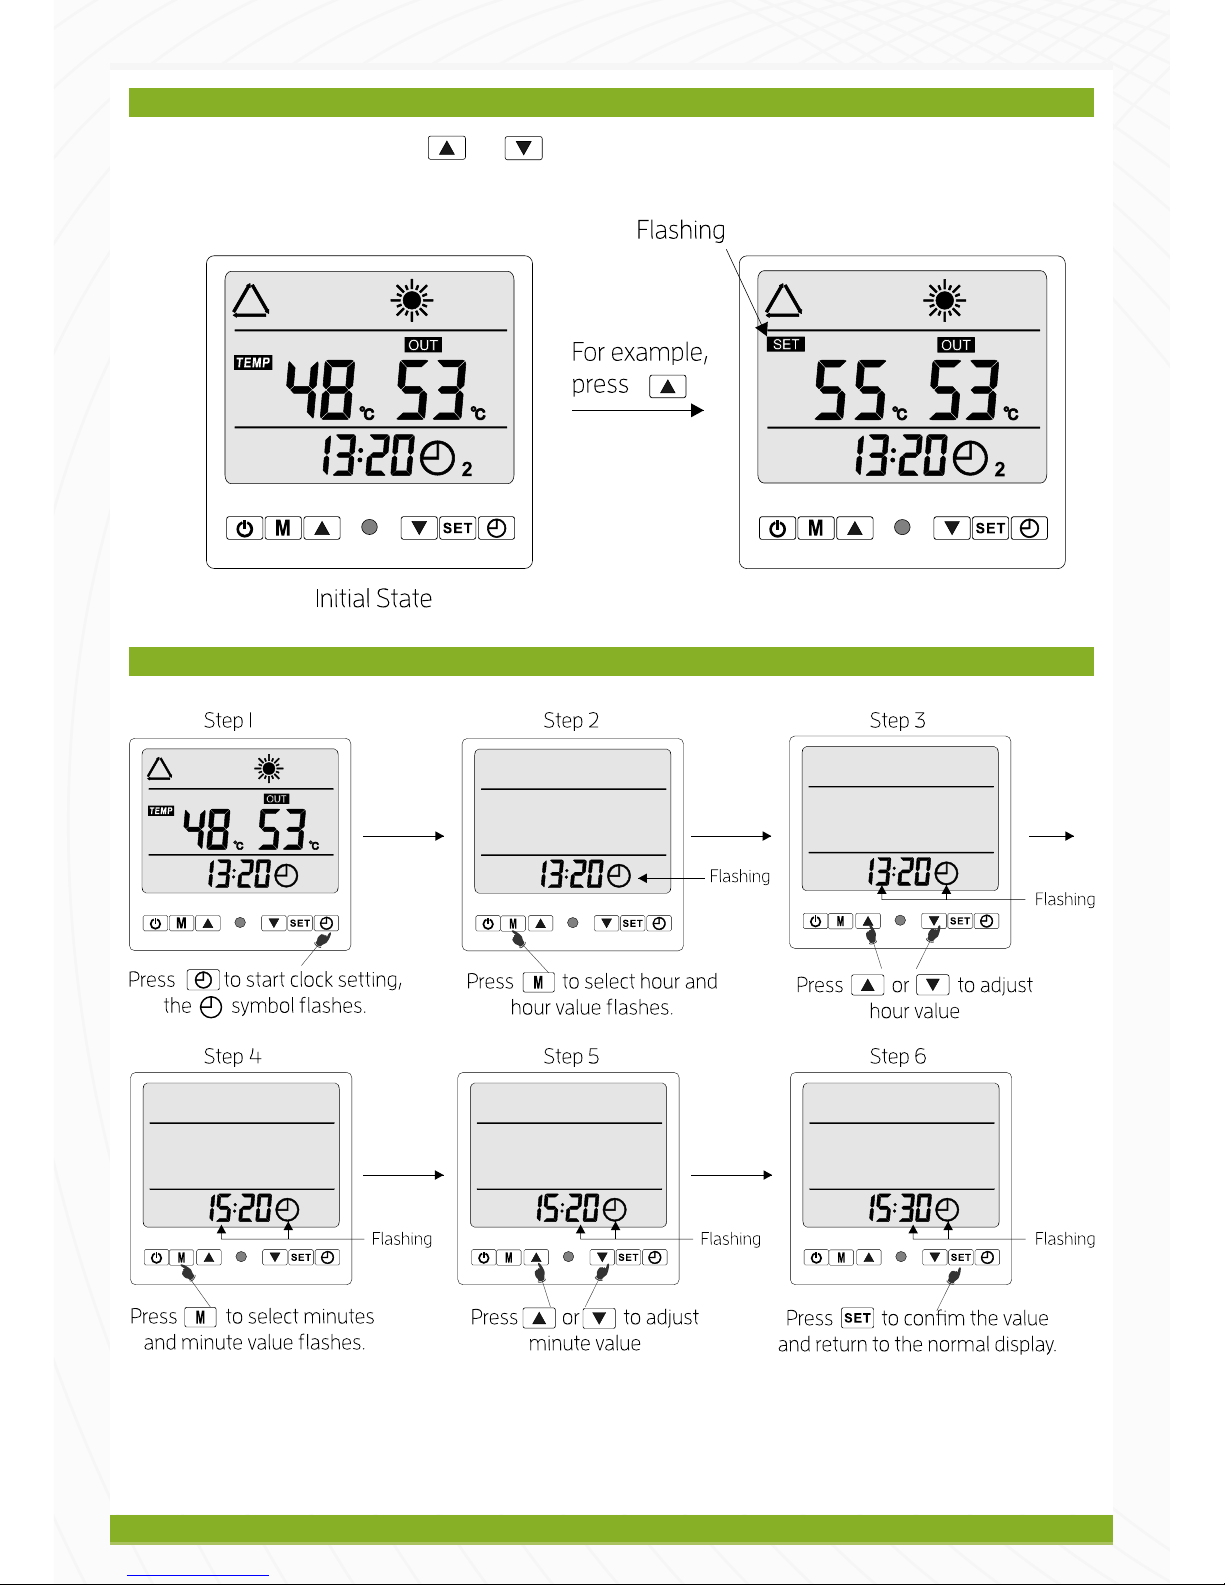
Water Temperature setting
Clock Setting
Circuit Drawing
Model T-HPAB
Maintenance and Troubleshooting
Maintenance
Failure Code Checking
Common Failure Codes
Parameter Checking and Resetting
Parameter Listing
Manometer Instruction
Troubleshooting
Notes

Tivok Energy T-HP20AB Heat Pump Installation Manual
INTRODUCTION
GENERAL INFORMATION
Thank you for choosing a Tivok Energy Heat Pump. We
appreciate your business and your contribution to a
greener tomorrow.
This guide contains information regarding the installation
and safe operation of Tivok Energy Heat Pumps,
specifically the T-HP20AB.
CAUTION
Please read all instructions carefully. It recommended
that you read this guide completely before starting the
installation process. Ignoring to do so may result in
system failure.
The Tivok HP Series is designed for commercial
buildings such as small hotels, oces, schools, hospitals,
apartments etc. as well as domestic hot water for houses.
The hot water outlet range is wide from 20°C to 60°C,
meeting demands for most hot water projects. With a wide
performance range of ambient temperature from -10°C
to 43°C.
Modular control systems are available to meet the
demands of larger hot water projects.
Tivok Energy Heat Pumps are designed for high eciency
performance over the lifetime of operation, with an annual
average COP of up to 4.5. The water pipes and refrigerant
pipes are well insulated to minimise heat loss.
DOCUMENT SCOPE
This guide contains information regarding the installation
and safe handling of Tivok Energy Heat Pumps (from
hereafter referred to as “the heat pump“ or “heat pumps”).
Please follow these instructions carefully and observe all of
the safety precautions.
Please consult your supplier for additional information on
the following subjects:
• System design
• Wiring and piping materials
• Connectors
Before installing a heat pump, you should familiarise
yourself with the mechanical and electrical requirements.
PROPER USE
Heat Pumps extract heat from the air and use it to heat
water.
When installing the system, observe all local, regional and
national statutory regulations, such as obtaining a building
permit.
WARNING
All instructions should be read and understood before
attempting to install, wire, operate, and maintain the
heat pump. Contact with parts that are electrically active
such as terminals may result in burns or lethal shock.
NOTES AND PRECAUTIONS
• The installation, commissioning and maintenance
of the system should only be conducted by qualified
personnel with adequate knowledge of the relevant
standards and local regulations as well as experience
with similar systems.
• To reduce the risk of electrical insulation faults, you
must first make the connection of the protective
conductor of the heat pump safe according to local
regulations. When installing the system make sure
that the interior wires are away from hot or moving
parts in the system to avoid damage to them.
• Make sure the water flow is sucient all the time.
• Anti-freezing measures must be in place to avoid
damage to the water system and the heat pump
water heat exchanger.
• Please make sure lifting and transportation of heat
pump is safely done according to its size and weight.
• Before commencing work cut off the electricity from
the main power source.
• When installing the system, please ensure that no
contaminants enter the water cycle.
• All ground line connections must be prepared in
accordance with relevant local regulations.

Tivok Energy T-HP20AB Heat Pump Installation Manual
FEATURES AND BENEFITS
WIDE RANGE OF APPLICATIONS
The Tivok HP Series is designed for commercial
buildings such as small hotels, oces, schools, hospitals,
apartments etc. as well as domestic hot water for houses.
The hot water outlet range is wide from 20 to 60,
meeting demands for most hot water projects. With the
performance at a wide ambient temperature range from
-10~43°C. Modular control systems are available to meet
the demands of bigger hot water projects.
Our Heat Pump is designed for high eciency
performance over a lifetime of operation with the annual
average COP of up to 4.5. The water pipes and refrigerant
pipes are well insulated to minimize heat loss.
DURABLE AND LONG LIFE
A high eciency Mitsubishi compressor is in all units,
with durable features against high temperatures and
high pressures ensuring a long life. The tube in shell heat
exchanger is durable withstanding corrosion, hard water,
high pressure and unexpected freezing caused by power
loss.
STRONG CABINET
The standard unit fabrication consists of a heavy gage
galvanized sheet metal cabinet construction that provides
maximum strength. All interior sheet metal surfaces are
Electrophoresis treated in advance and powder-painted
for maximum corrosion protection to ensure resilience for
long term vitality.
NOISE CONTROL
Compressor rubber feet are specially selected for reducing
vibration and a compressor sound jacket is available
for every unit. Well-balanced fans and fan motors, with
the optimized fan holder, contributes to the low noise
operation. The cabinet inside is also insulated to reduce
noise transmission.
RELIABLE AND SAFE DESIGN
Standard safety features for the refrigerant circuit include
a high-pressure switch and low-pressure switch to
detect loss the of refrigerant, as well as deficient water
flow. Equipment safety features include water loop
temperature monitoring, voltage protection and water coil
freeze protection. All safety features are tested and run at
the factory to ensure proper operation of all components
and safety switches.
All components are carefully designed and selected for
endurance and durability with each unit fully tested in
performance and safety before leaving the factory.
SIMPLE MAINTENANCE
Full access for maintenance and service is provided from
the service panel allowing for better flexibility in confined
spaces. Easy removal of the control box from the unit
provides access to all refrigerant components. The
refrigerant circuit is easily tested and serviced through
the use of high and low pressure ports integral to the
refrigerant circuit.

Tivok Energy T-HP20AB Heat Pump Installation Manual
MODEL NAMING NOMENCLATURE
TECHNICAL DATA
UNIT PARAMETERS
Model T-HPAB
Heating output .kW
Input power .kW
Running current .A
Max input power .kW
Max running current .A
Coecient of performance .
Power supply -V~Hz
Defined output temperature °C
Maximum output temperature °C
Defined output quantity litres/hour
PRODUCT SPECIFICATIONS
Dimensions mm×mm×mm
Packing dimensions mm×mm×mm
Weight (net, gross) kg, kg
Outlet fittings DN
HEAT EXCHANGER
Pressure drop kPa
Noise level <dBA
Refrigerant RA
Compressor quantity
Compressor make Panasonic
Compressor type Rotary
Electrical protection Class I
Mechanical protection IPX
DIMENSIONS
DETAILED DIMENSIONS
Length (L) mm
Width (W) mm
Height (H) mm
Amm
Bmm
Pressure Gauge
Sensor
Water Inlet
Power
Water Outlet
Tivok Energy T-HP20AB Heat Pump Installation Manual
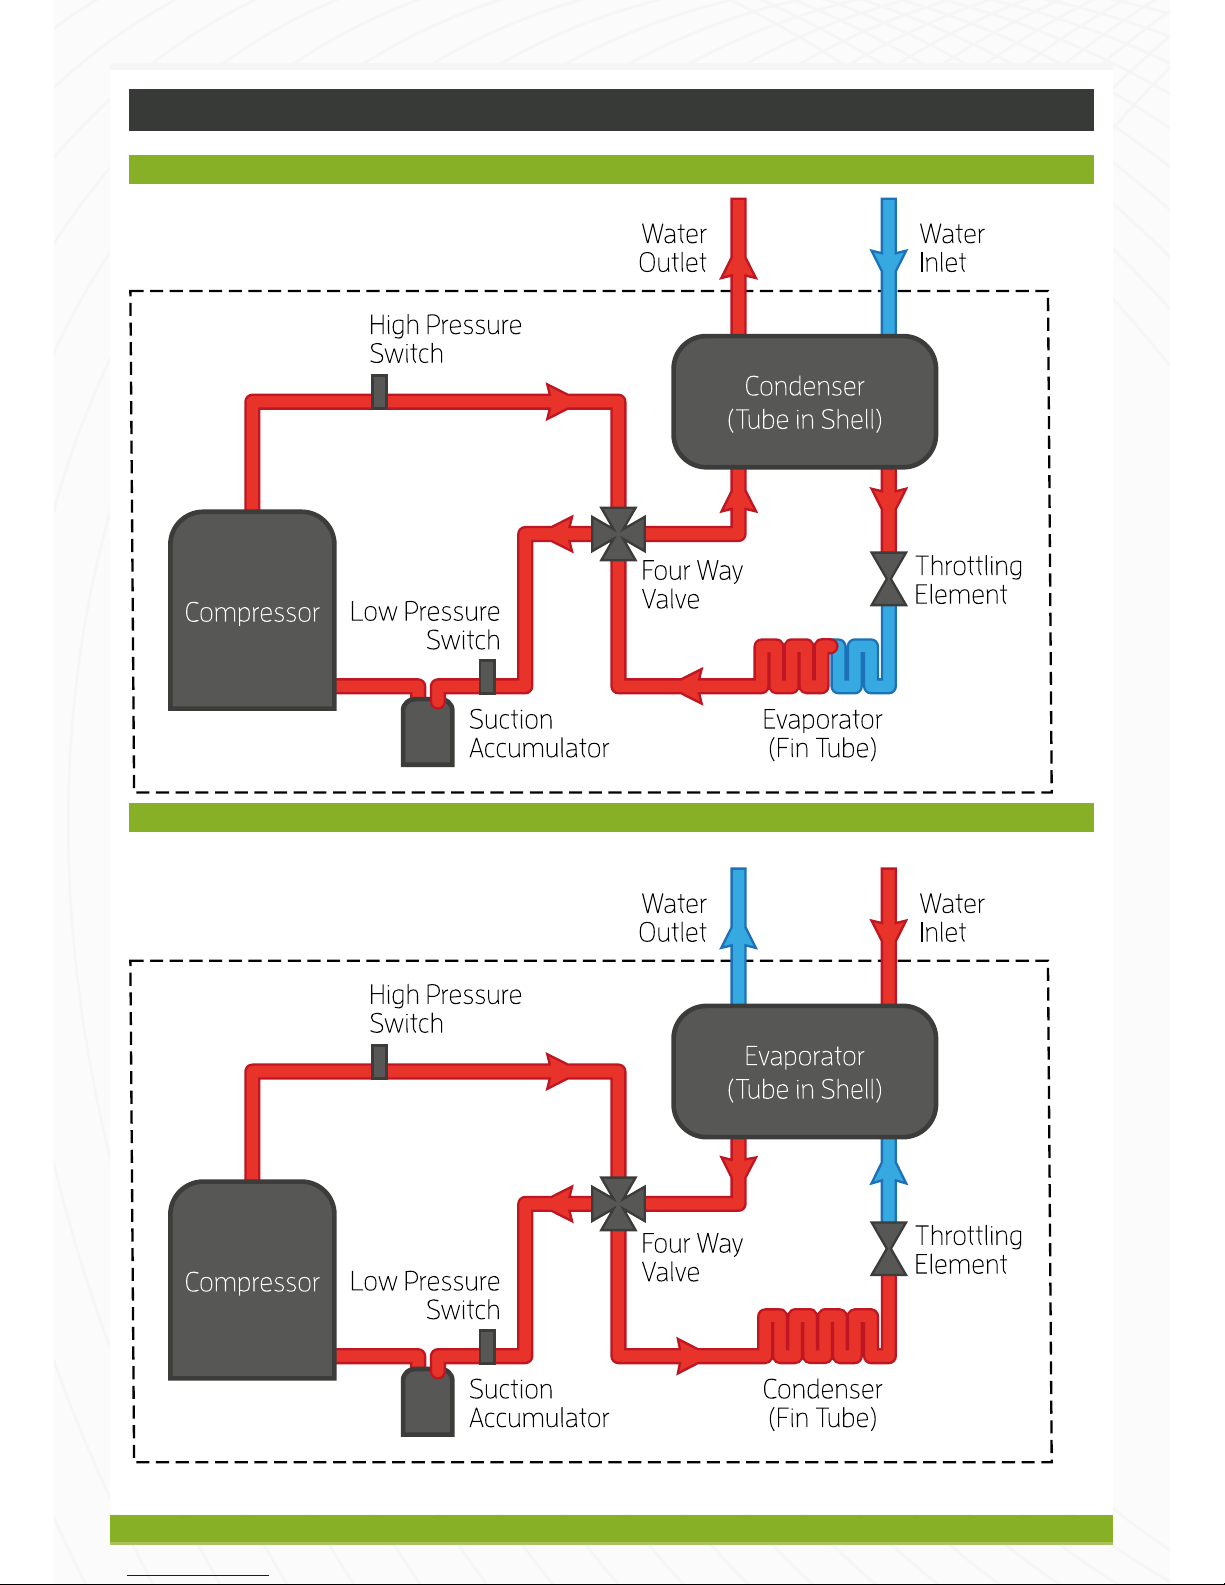
SYSTEM DIAGRAM
HEATING MODE
DEFROSTING MODE
Tivok Energy T-HP20AB Heat Pump Installation Manual
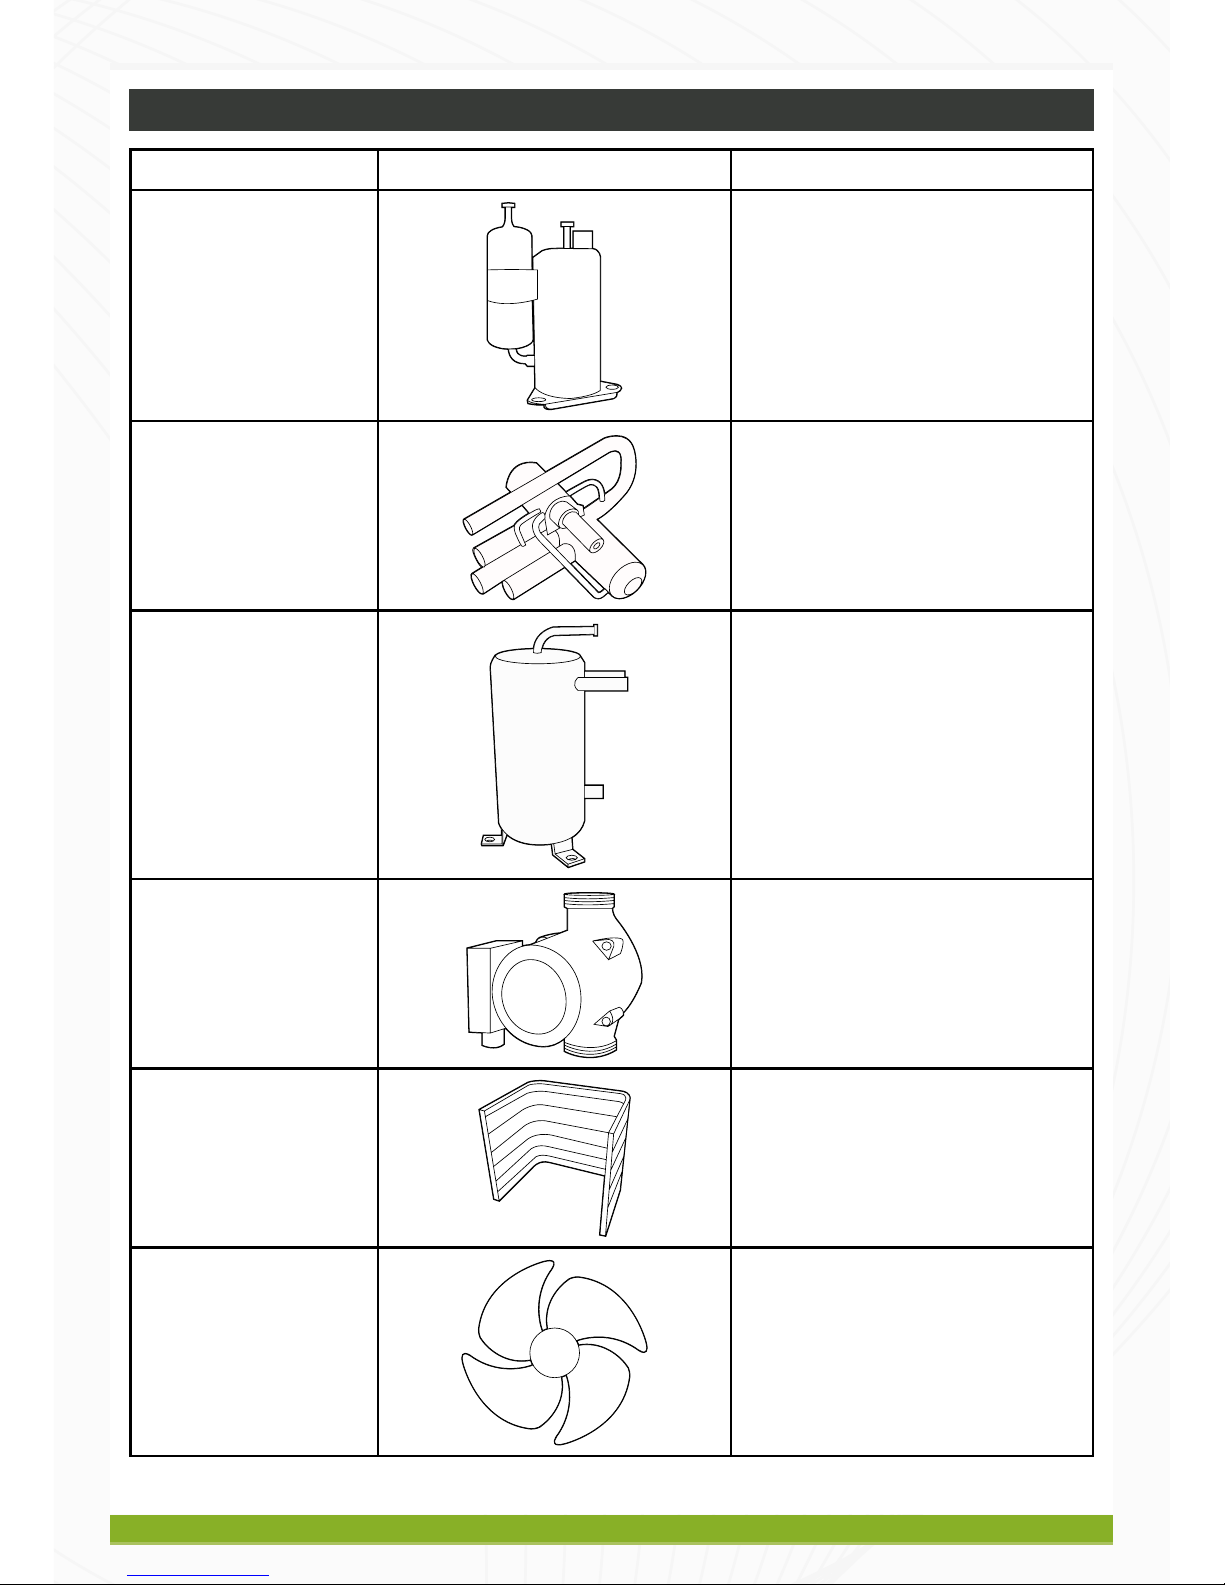
COMPONENTS
Components Diagram Features and Advantages
Compressor A dependable high eciency compressor,
optimised for a R410A system, which can
achieve high water temperatures of up to
60°C while ensuring a long system life.
Four Way Valve The 4 way valve can avoid gas mixing and
ensure stable defrosting.
Condenser The condenser is a tube-in-shell
exchanger with a big heat exchanging area
and high eciency for hot water solutions.
Circulation Pump A Grundfos brand circulation pump,
ensuring reliability.
Evaporator The hydrophilic fin-tube heat exchanger
has a big heat exchanging area and
a rational fin distance, significantly
improving heating and defrosting
eciency.
Fan This is the exterior motor fan with multiple
fan blades. The fan is fixed and its run
slowly, creating high air volume while
lowering noise.

Tivok Energy T-HP20AB Heat Pump Installation Manual
INSTALLATION
HEAT PUMP INSTALLATION
. Installation must be simple and allow easy access for
later work.
. If the unit is to be installed on a floor, its
undercarriage should be heightened to avoid
ingestion of accumulated water. The recommended
height is 20cm to 30cm. In snowy areas it is
important to prevent accumulated snow from
blocking up the air outlet.
. A drain or other facilities should be arranged under
the outdoor unit, to avoid environment influence due
to water discharge.
. If the unit is installed on a balcony or on a rooftop,
the installation site must meet the allowable bearing
capacity of building structure without affecting the
structural safety.
. Ensure the unit is well ventilated with the direction
of the air exhaust is kept away from windows of
neighbouring buildings and the exhaust air cannot
flow back. Moreover adequate service clearance
should be kept around the unit.
. The unit should not be installed at places near oil,
flammable gas, or corrosive components.
. The unit must be installed on reliable base or
framework. Weight capacity of framework should be
3 times of the body weight, and safeguard measures
should be taken to avoid malfunction of fastenings.
. The unit should not be installed at sites with typhoon/
earthquake hazards. Mid-air installation should be
avoided as much as possible as machine falling down
may result in terrible accident.
. Do not install the heat pump close to a road or path
to avoid water splashing on the unit. If possible,
position the heat pump away from areas easily
accessible to children.
POSITIONING REQUIREMENTS
In certain circumstances, the heat pump must be
positioned at least these distances (in millimetres) away.
No obstacles in front of Heat Pump
Some obstacles above the Heat Pump
Obstacles in front of Heat Pump
Several Heat Pumps installed in a row
Tivok Energy T-HP20AB Heat Pump Installation Manual
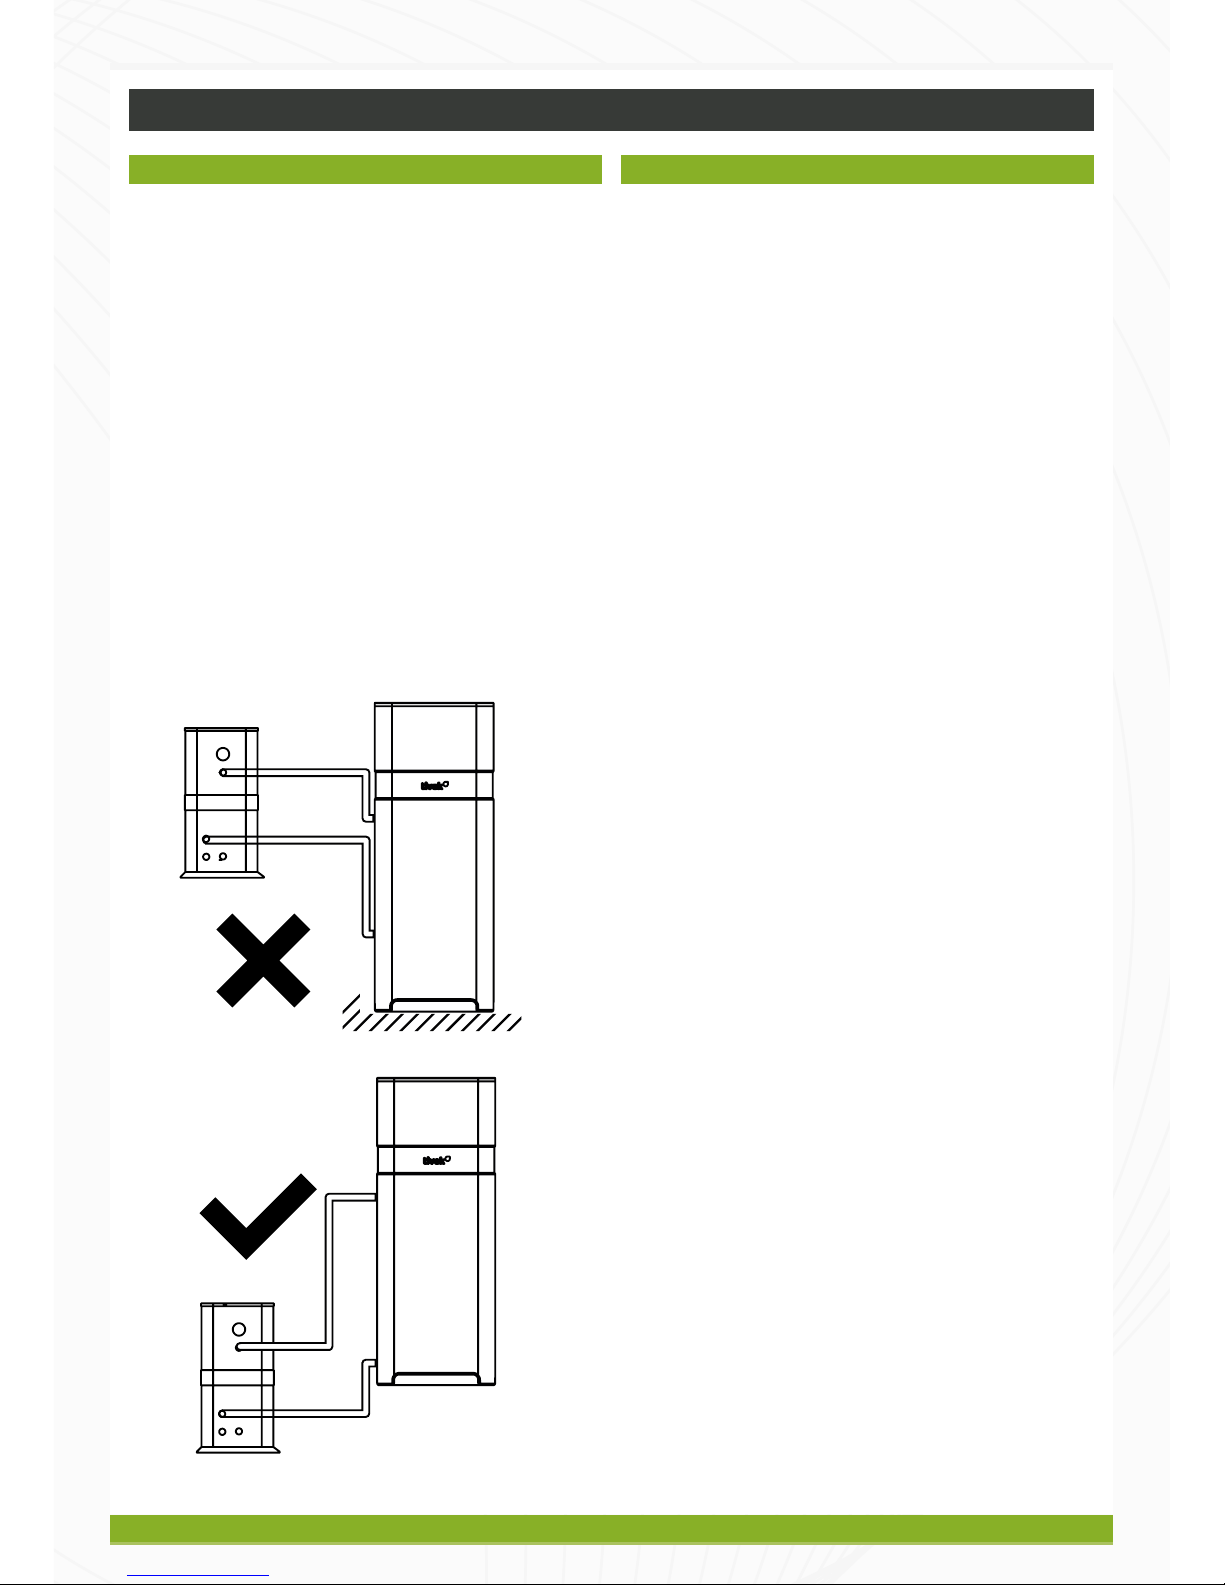
WATER SYSTEM INSTALLATION
WATER TANK INSTALLATION
. The water tank should be put in a place where
ambient temperature is high.
. It can be installed either outdoors or on a roof-top
(some elements such as the size of water tank and
the bearing capability of the building should be
considered). Installation on a roof-top should have
support such as crossbeam or pillar.
. The water tank should not be installed lower than the
foundation of the heat pump. It is suggested to install
the heat pump, the water tank and the circulation
pump at the same level. The height difference
between the heat pump and the water tank should
be no more than 2 meters, when water tank position
is higher than that of the heat pump.
. Do not install the water tank in a polluted or corrosive
environment.
WATER PIPING INSTALLATION
. The drainpipe and overflow pipe should be installed
near a gutter or sinkhole for draining water eciently.
A discharge valve is necessary on the drainpipe.
. A service valve needs to be installed before the
magnet-valves on the system pipeline for further
inspection.
. The pressure of the water outlet should be between
0.3MPa and 0.6MPa.
. It is recommended to use metal pipeline such as
stainless steel pipes, internal-plastic pipes, internal
stainless steel pipes or copper pipes. Telescopic
issues of the pipeline between heat pump unit and
water tank should be considered if plastic pipeline
such as PPR pipe and ABS pipe is used.
. In winter heat preservation may need to be carried
out for the water supply valve and the stop valve of
the system (according to local ambient temperature)
to avoid icing of the water supply pipe and the valves.
. Keep the water pipes straight and the pipeline
allocation reasonable. Reduce pipe turnings as much
as possible to reduce water resistance.
. Prevent the pipeline and the connectors from water
leakage.
. The water pressure bearing capability of each part
of the piping system should be tested after the
installation is finished. Drainage should be done to
create a clean interior system.
. Measures of heat preservation for the hot water
pipeline needs to be conducted after assuring no
water leakage.
Tivok Energy T-HP20AB Heat Pump Installation Manual
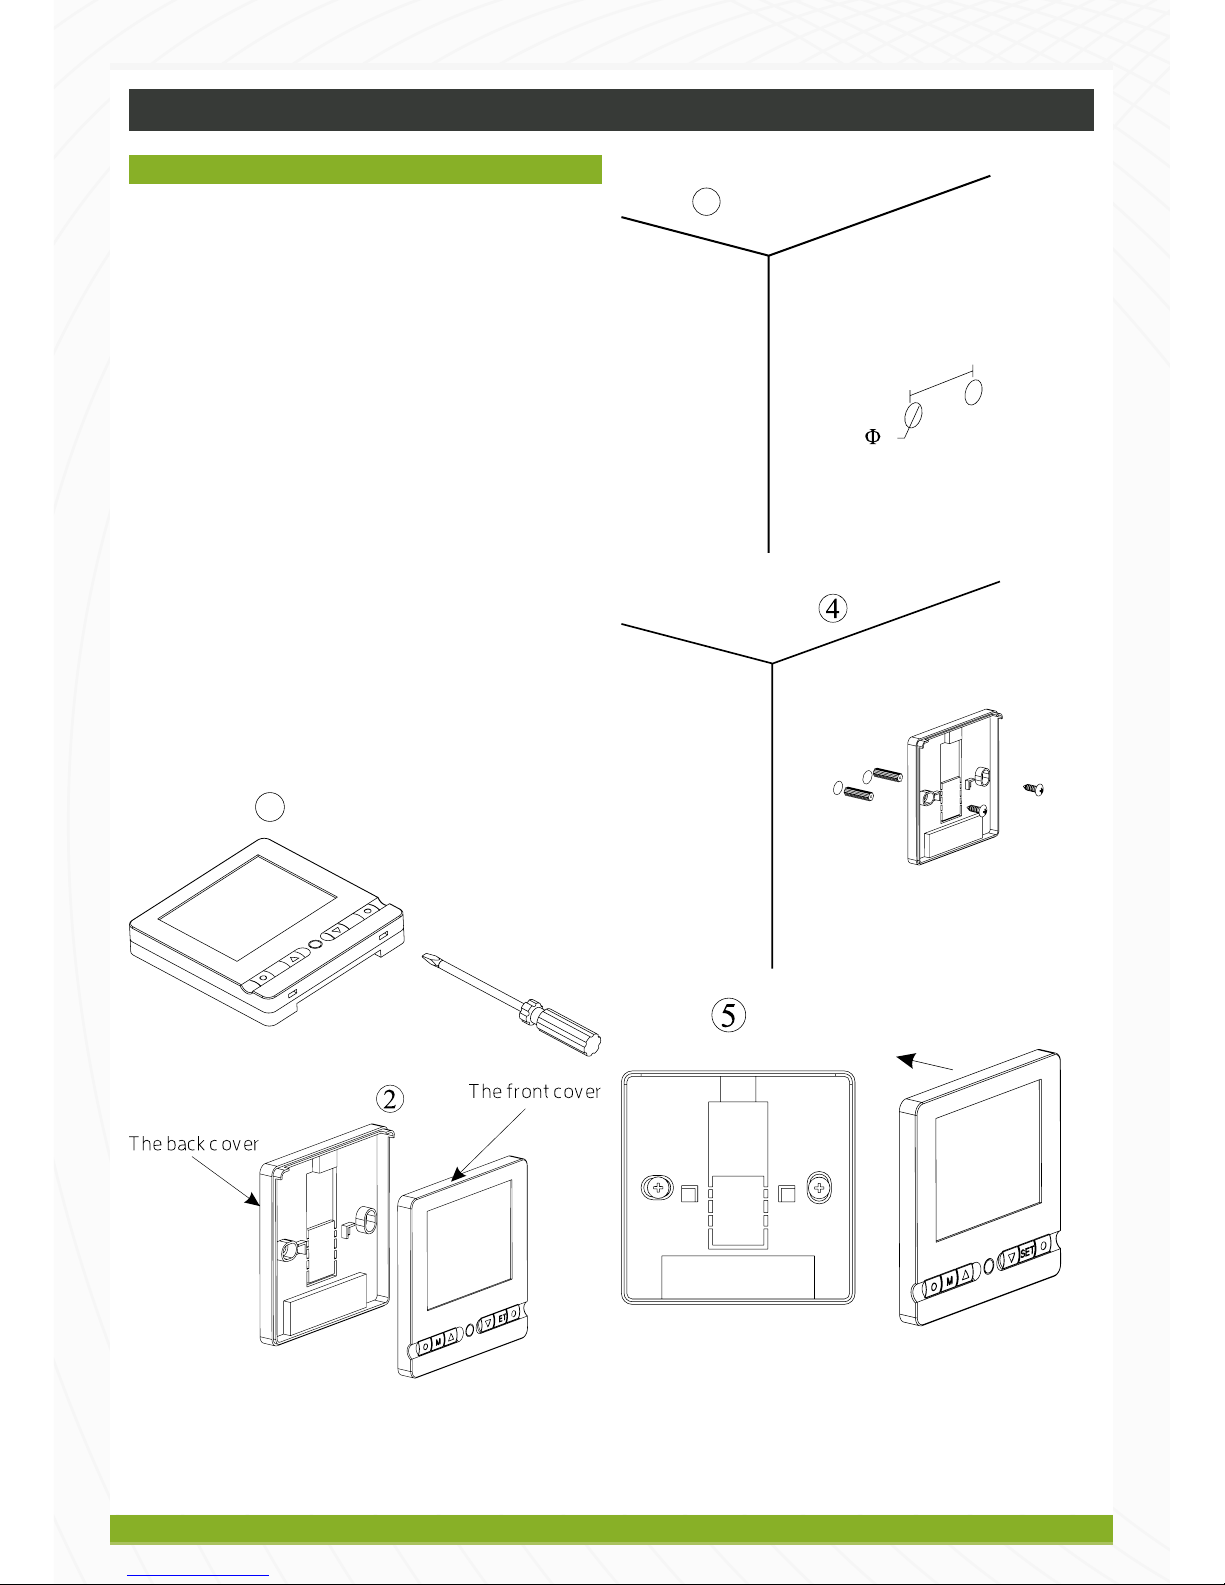
WIRED CONTROLLER INSTALLATION
WALLMOUNTED INSTALLATION
The controller is originally fixed onto the maintenance door
of the heat pump, only refer to the following steps if you
wish to mount the controller on a wall.
. Take down the controller from the machine. The
communication wire is connected with the circuit
board; separate them from where they match.
. Use a screwdriver to open the clip as picture 1,
separate the controller into 2 parts, as picture 2.
. On the wall that you are going to install the controller,
drill 2 holes at a level parallel to the sight line as
picture 3. The hole distance is 60mm, diameter is
8mm.
. Place the plastic screws of the enclosure into the
hole, and use the tapping screw (ST4*16 D-1)
enclosed to fix the back cover of controller on the
wall, as picture 4.
. Match the front and back covers perfectly, as picture
5, make sure that it is fixed firmly on the wall.
. Connect the communication wire well.
j
p b q
1
60mm
8
3

Tivok Energy T-HP20AB Heat Pump Installation Manual
COMMISSIONING
PREPARATION
Heat Pump Check
• Check if the outside case and the inside system
of the heat pump have been damaged during the
transportation.
• Check if there is still air inside the water system. If
yes, use the air vents on the water system and the
circulation pumps to remove the air.
Power Source System Check
• Make sure the power source is accordance with the
specification in the manual or on the heat pump
nameplate.
• Make sure all power connections and control circuits
are in place. Make sure the wiring, grounding and all
terminal connections are strong and reliable.
Piping System Check
• Check if the water piping system including water
supply pipe, return water pipe, pressure gauge,
thermometer, valves and water level switch are
installed correctly. Please open all the valves which
should be opened and close all that should be closed
before the commissioning.
• Make sure the heat preservation of the water system
is in a good condition.
COMMISSIONING
Commissioning should only be carried out by a
professional.
• Comprehensive inspection of the entire system should
be completed and the system identified as meeting
the requirements. The water level inside the tank must
be higher than the cycling heating outlet and the water
outlet before the commissioning.
• After the electricity is turned on, turn on the heat pump
by pressing the on/off key on the control panel.
• Please check if the fan and the circulation pump are
running in the right direction. If not, shut down the
power supply and adjust the phase- order. Make
sure the compressor current is in a normal range and
without abnormal sound.
• Check that the circulation pump and all other parts
meet the requirements. The whole system can be put
into use after the pre-operation for a period of time.

Tivok Energy T-HP20AB Heat Pump Installation Manual
CONTROLLER OPERATION
CONTROLLER ILLUSTRATION
On/Off
Press it to switch on or off heat pump.
Mode Selection
Press it to select the mode. The sequence is: cooling-
heating.
Long press it for more than 6 seconds and heat pump will
enter defrosting mode.
During parameter setting, press it to adjust parameters;
During clock and timer setting, press it to choose the hour
value or minute value.
During parameter setting, press it to adjust parameters;
During clock and timer setting, press it to choose the hour
value or minute value.
Up and Down
Press them to adjust the value of water temperature, clock,
timer and parameters.
During failure checking and parameter checking, press any
of them to exit checking.
Parameter Setting
Long press it for more than 6 seconds, you can check and
adjust the parameters.
Press the UP/DOWN key to exit operation.
When a failure occurs, press it for no more than 2 seconds,
you can check the failure code.
Press it again you can check the other failure code if more
than one occurs.
Press the UP/DOWN key to exit checking.
Clock and Timer Key
Press it to set clock and timer. Detailed operation will be
described in following pages.
During parameter setting, press it to change the rolling
direction of parameters.
Tivok Energy T-HP20AB Heat Pump Installation Manual
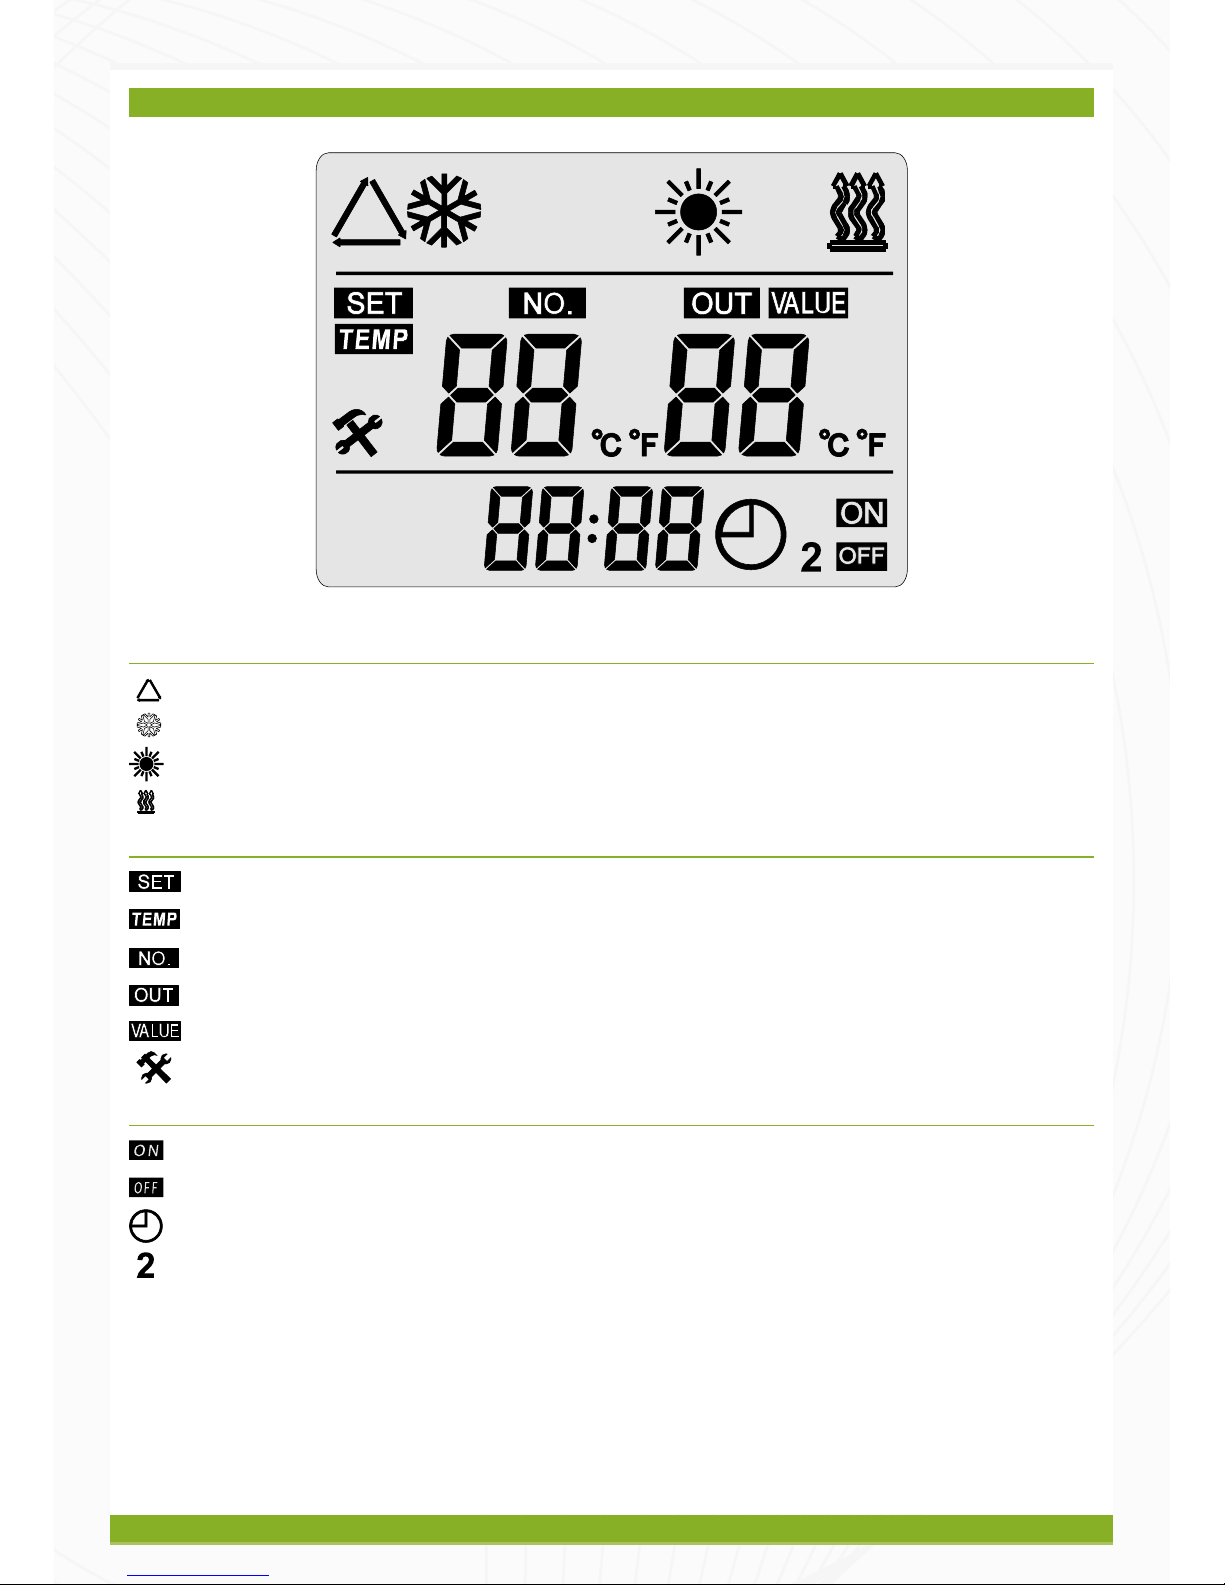
LCD ILLUSTRATION
Top Area
Circulation pump running
Cooling mode/Defrosting (Flashing)
Heating mode
Auxiliary heat source start
Middle Area
Temperature setting symbol, the figure underneath is the temperature value.
Water tank temperature symbol, the figure underneath is the temperature value.
Parameter number symbol, the figure underneath is the parameter number.
Outlet water tempeature symbol, the figure underneath is the temperature value.
Parameter value symbol, the figure underneath is the parameter value.
Failure symbol
Bottom Area
Turning on timer symbol.
Turning off timer symbol.
Clock symbol.
Heat pump has two compressors.
Tivok Energy T-HP20AB Heat Pump Installation Manual
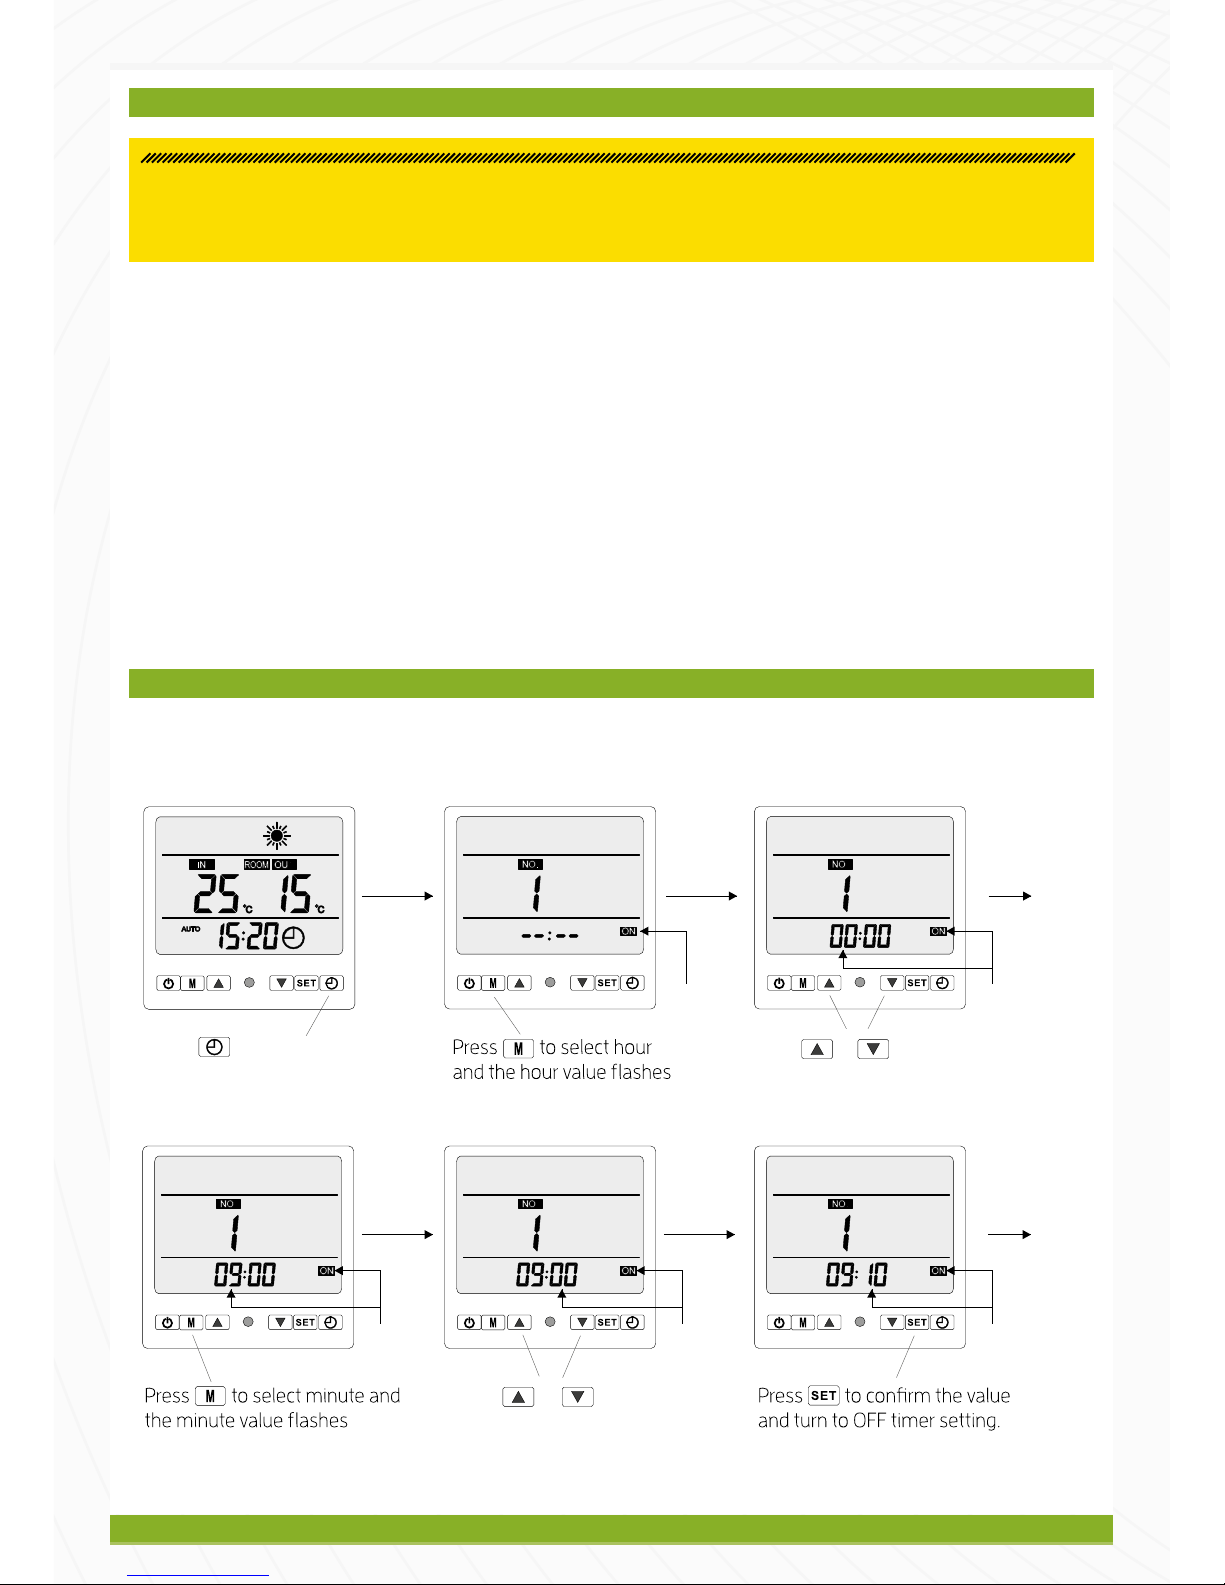
ON/OFF TIMER SETTING
With this function, the heat pump can turn on or off automatically at a preset time. When “Timer on” is activated, the heat
pump starts and thereafter, the “on/off” can be controlled automatically based on the temperature setting
When “Timer Off” has been reached, the heat pump will shut down and the machine can no longer be controlled
automatically based on the temperature. This sequence will be restarted when the next “Timer on” period is reached
3 ON/OFF timers can be set at once, and applied for use either everyday or for only one day. In the timer setting status,
based on the figure shown below, it represents NO time sequence has been set. However, if it shows “--:--” on the
bottom, the timer is invalid.
The examples shown below demonstrate how to set up the heat pump to switch on at 9:10 and switch off at 12:30 (1st
Timer); Switch on at 14:10 and switch off at 17:30 (2nd Timer) and switch on at 19:10 and switch off at 15:30 (3rd Timer)
1ST TIMER SETUP
ATTENTION
If you want to use the “Time on/Timer off” functions, the system time has to be correct. To set this, refer to page 16
Step 1
Step 4
Step 2
Step 5
Step 3
Step 6
Press twice to start the ON
time setting
Press or to adjust
the hour value
Press or to adjust the
minute value
Flashing
Flashing
Flashing
FlashingFlashing
Tivok Energy T-HP20AB Heat Pump Installation Manual
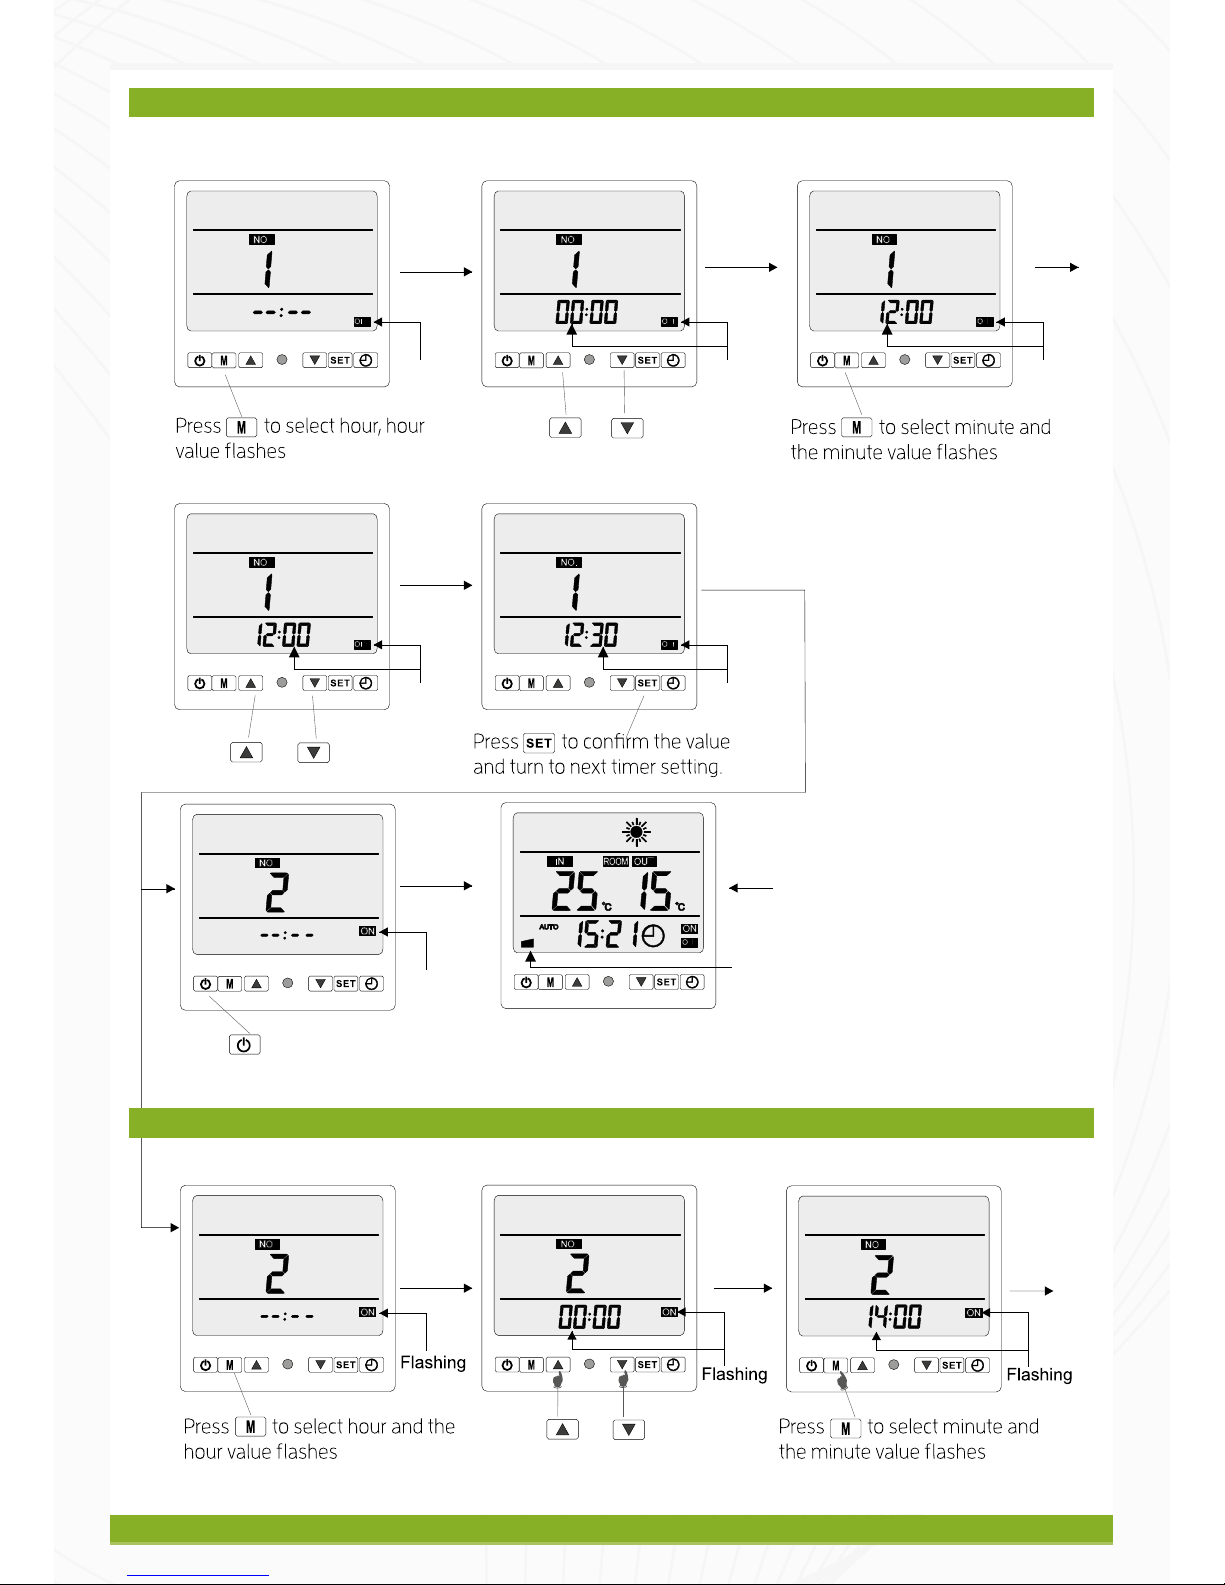
Step 7
Flashing
Press or to adjust
the hour value
Flashing
Step 8 Step 9
Flashing
Press or to adjust
the minute value
Step 10
Flashing
Step 11
Flashing
Press to return to normal
display
Flash
Normal Display
Represents one time has been setup
Press or to adjust
the hour value
Step 1 Step 2 Step 3
1ST TIMER SETUP
2ND TIMER SETUP

Tivok Energy T-HP20AB Heat Pump Installation Manual
2ND TIMER SETUP
3RD TIMER SETUP
Press or to adjust
the minute value
Step 4
Flashing
Step 5
Flashing
Step 6
Flashing
Press or to adjust
the hour value
Flashing
Step 8 Step 9
Flashing
Press or to adjust
the minute value
Step 10
Flashing
Flashing
Step 11
Press to return to normal
display
Flashing
Represent two timers had been
set up.
Normal Display
Flashing
Step 1 Step 2
Press or to adjust
the hour value
Flashing

Tivok Energy T-HP20AB Heat Pump Installation Manual
3RD TIMER SETUP
Flashing Flashing Flashing
Flashing Flashing Flashing
Flashing Flashing
Step 4 Step 5Step 3
Step 7 Step 8Step 6
Step 10Step 9
Press or to adjust
the minute value
Press or to adjust
the hour value
Press or to adjust
the minute value
Represents three timers have
been set up
Tivok Energy T-HP20AB Heat Pump Installation Manual
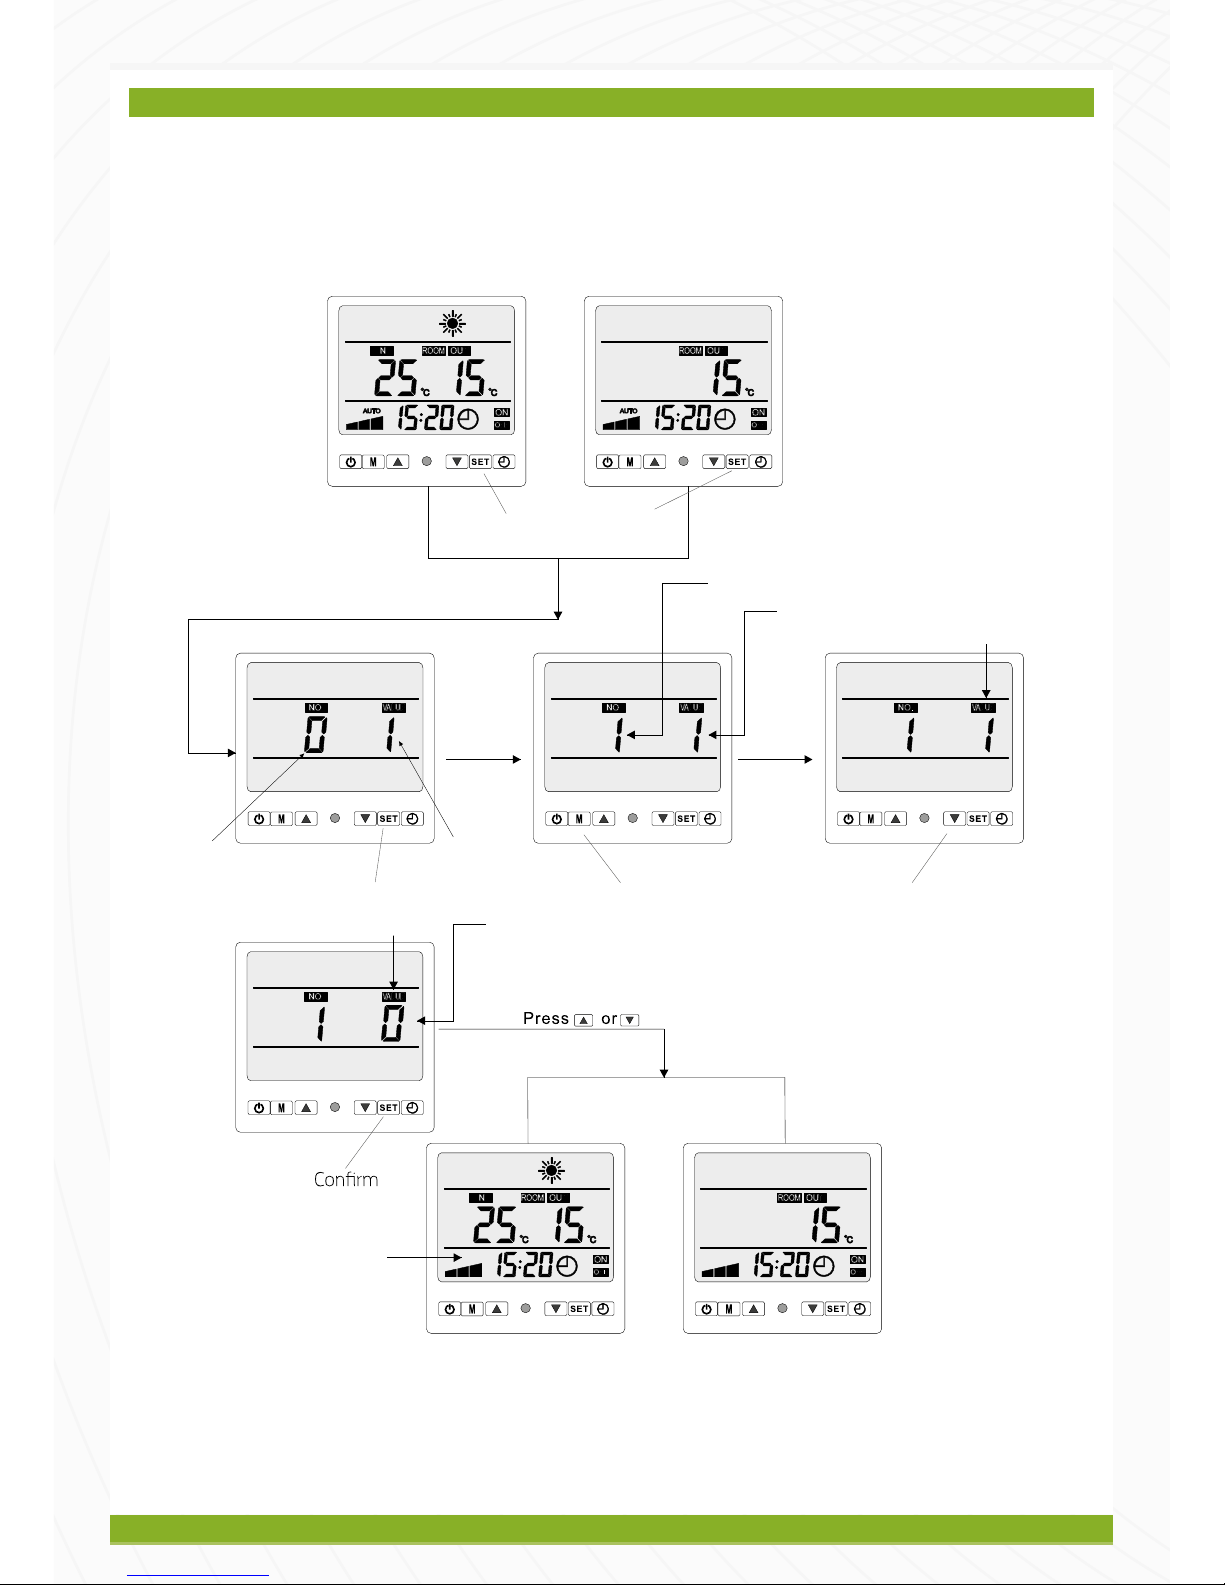
TIMER MODE SETTING
Time is effective either everyday or on a single day, but set to a single day by default.
The default mode is timer recurance, please refer to the following steps to set the timer for just one day.
Running
Long press (more than 6
seconds
Step 1
Standby
Step 2 Step 3
Value
Press to select the value Adjust the value
No. 1 represents the incoming electric
memorised sign
Step 4 Flashing
Represents active days
Parameter number
Step 5 Flashing 0 represents effective day
Running Standby
This place does not appear (Auto),
means the time has been changed to
be effective on that day

Tivok Energy T-HP20AB Heat Pump Installation Manual
TIMER CANCELLATION
To cancel the timer, please refer to the instructions for timer settings, and set it to be --:-- via the M key. Below is an
example of how to cancel the timer. It demonstrates how to cancel the first timer, and can also be repeated for cancelling
the 2nd and 3rd timers.
Step 1 Step 2 Step 3
Step 4 Step 5
Step 7 Step 8 Step 9
Step 10
Step 6
Press M buttonPress M button
Press M buttonPress M button
Press M button
Press M button
Press twice
Flashing Flashing
Flashing Flashing Flashing
Flashing Flashing Flashing
Flashing
Press to return to the normal
display
Tivok Energy T-HP20AB Heat Pump Installation Manual
WATER TEMPERATURE SETTING
When heat pump is on, simply press or to adjust water temperature.
When the outlet water temperature is reset the display will automatically return to the normal display and the reset is
activated.
CLOCK
SETTING
Table of contents
Other Tivok Heat Pump manuals


Popular Heat Pump manuals by other brands

Daikin
Daikin GPHM5 SEER2 M Series installation instructions

Waterstage
Waterstage WO*G112LCT Installation and operating manual

TESY
TESY EVHP 9S 260 60 Instructions for use manual

Heat Controller
Heat Controller B-VCH12FC-1 installation manual

Amana
Amana GSXH5 Series Installation & service reference

Atlantic
Atlantic Geolia 5 Operation manual

Panasonic
Panasonic WH-MDC09H3E5 quick guide

Hephzibah
Hephzibah Airrex AHSC-42 220/1 user manual

York
York YZH024 THRU 060 Technical guide

White Rodgers
White Rodgers 1F85-0422 Wiring diagrams

Dimplex
Dimplex LI 9AS Installation and operating instructions

Ecovolt
Ecovolt EV-H20/180 Installation & operation manual


