TM Electron TMHC109 User manual


INSTRUCCION MANUAL
Thanks for choosing to buy our Beard Trimmer.
Read all instructions of the manual thoroughly before use, even if you are
familiar with this type of product. The safety precautions enclosed herein
reduce the risk of re, electric shock and injury when correctly adhered
to. Keep the manual in a safe place for future reference. If applicable,
pass the instructions on to the next owner of the appliance.
BEARD TRIMMER
TMHC109

5
INDEX
Features............................................................... 6
Important safety instructions............................ 7
Usage Instructions ............................................. 9
BEARD TRIMMER
TMHC109
DO not dispose of electrical appliances as unsorted
municipal waste, use separate collection facilities.
Contact you local government for information regarding
the collection systems available. If electrical appliances are
disposed of in landlls or dumps, hazardous substances can
leak into the groundwater and get into the food chain, damaging
your health and well-being, When replacing old appliances with
new ones,the retailer is legally obligated to take back your old
appliance for disposals at least free of charge. We reserve the
right to make amendments.
ENGLISH
6
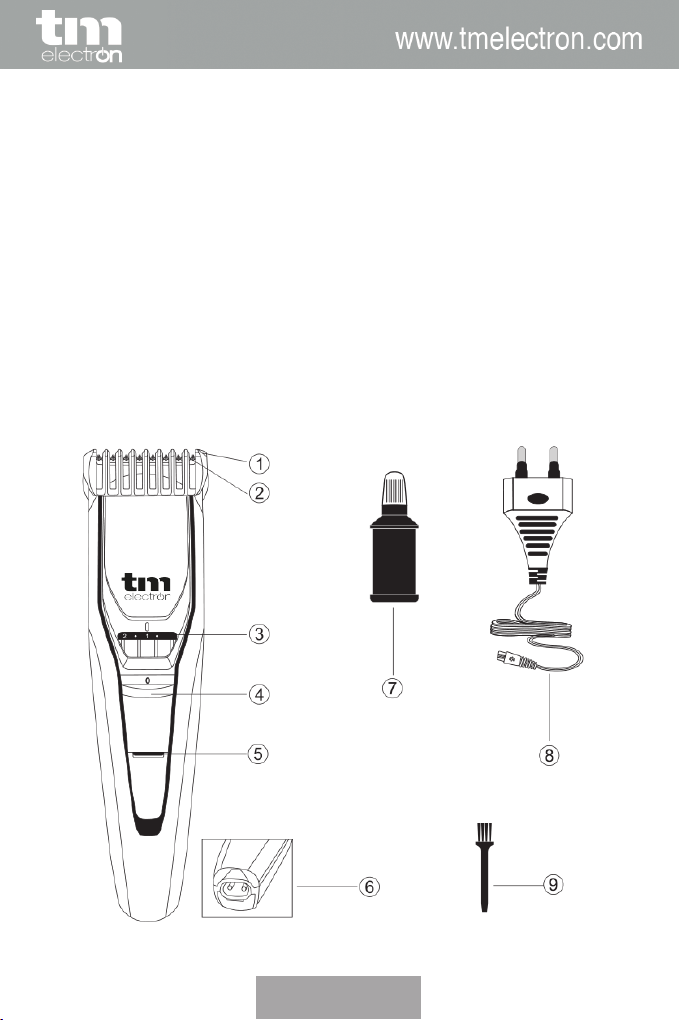
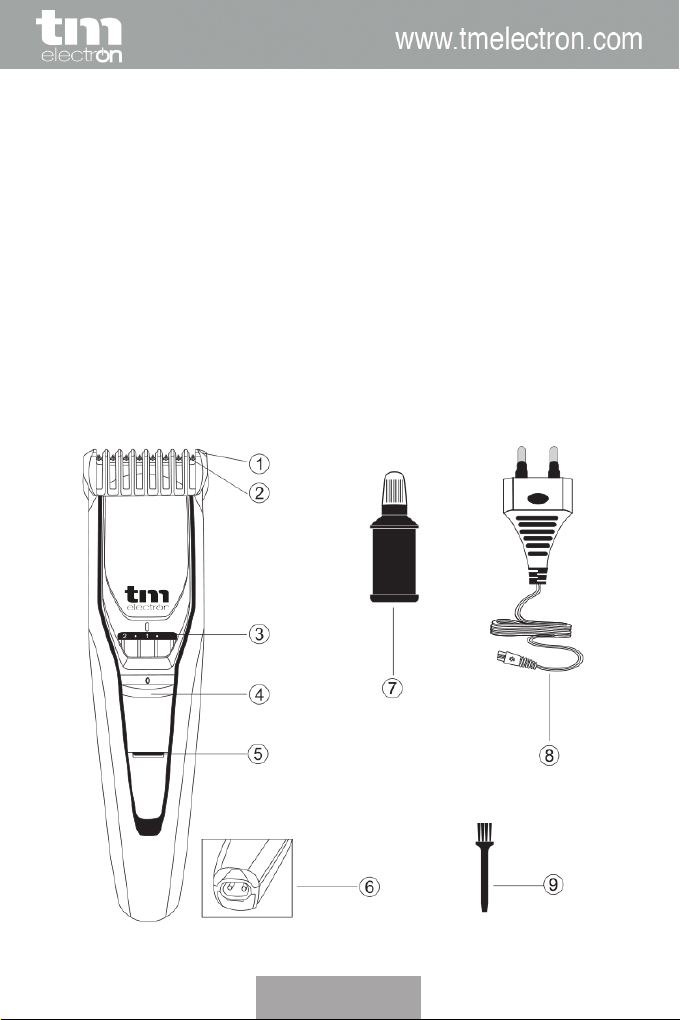
FEATURES
1. Trimming Cutting Guide Comb
2. Cutting Blade
3. Precision Zoom Lock Adjustment Ring
4. On/Off Switch
5. Power indicator light
6. Socket for Appliance Plug
7. Oil
8. Charging Cable
9. Cleaning Brush

ENGLISH
IMPORTANT SAFETY INSTRUCTIONS
When using an electrical appliance, basic safety precautions should
always be followed, including the following:
Read all instructions before using this appliance.
DANGER
To reduce the risk of electric shock:
1. Do not reach for a corded Trimmer that has fallen into water.
Unplug immediately.
2. Use Trimmer only in a dry condition. Do not use while bathing
or in a shower.
3. Do not place or store Trimmer where it can fall or be pulled into
a tub or sink. Do not place in or drop into water or other liquid.
4. Always unplug this Trimmer from the electrical outlet immedia-
tely after (re)charging.
5. Unplug and remove power supply cord from Trimmer before
cleaning.
WARNING
To reduce the risk of burns, re, electric shock or injury to persons:
1. The appliance is intended for trimming purposes only.
2. Keep the appliance dry.
3. This appliance is not intended for use by persons (including
children) with reduced physical, sensory or mental capabilities,
or lack of experience and knowledge, unless they have been
given supervision or instruction conceming use of the applian-
ce by a person responsible for their safety. Children should be
supervised to ensure that they do not play with the appliance.
4. The appliance is only to be used with the power supply unit
provided with the appliance.
5. If the supply cord is damaged, it must be replaced by the manu-
facture, its service agent or similarly qualied persons in order to
avoid a hazard.
7

8ENGLISH
6. Use this Trimmer for its intended household use as described in
this manual.
7. Never operate this Trimmer if it has a damaged cord or plug, if
it is not working properly, if it has been dropped, damaged, or
dropped into water.
8. Keep the Trimmer, cord and any attachments away from heated
surfaces.
9. Never drop or insert any object into any opening.
10.Do not operate, charge, clean or plug in Trimmer outdoors or
where aerosol (spray) products are being used or where oxygen
is being administered.
11.Always check cutters, cutting unit and comb before using the
Trimmer. Do not use the Trimmer if cutters, cutting unit and
comb are damaged, as injury may occur.
12.Always attach plug to Trimmer rst, then to outlet. To discon-
nect, turn on/off switch to “OFF” position, then remove plug from
outlet.
13.To prevent possible damage to the cord, do not wrap cord
around the Trimmer.
14.Never put Trimmer in direct sunlight or store at a temperature
above 60°C or 140°F.
15.Never immerse the Trimmer in water or rinse under the tap.
16.This Trimmer is for use on human hair only. Do not use this
Trimmer for any other purpose.
17.Always store your Trimmer, attachments and power plug in a
moisture-free area. Make sure the cord is disconnected from the
Trimmer.
18.Only use the power plug and other accessories supplied with
the appliance.
WARNING: Keep the appliance dry
• The appliance can be used by children aged from 8 years and

9
ENGLISH
above and persons with reduced physical, sensory or mental capa-
bilities or lack of experience and knowledge if they have been given
supervision or instruction concerning use of the appliance in a safe
way and understand the hazards involved. Children shall not play
with the appliance.
• Cleaning and user maintenance shall not be made by children
without supervision.
• For the purposes of recharging the battery, only use the detachable
supply unit provided with this appliance.
• The appliance is only to be used with the power supply unit provi-
ded with the appliance.
• This appliance contains batteries that are non-replaceable.
• The battery must be removed from the appliance before it is scrap-
ped.
• The appliance must be disconnected from the supply mains when
removing the battery
• The battery is to be disposed of safely.
• Only remove the rechargeable battery when you are intending to
discard the appliance and you have the rechargeable battery remo-
ved by a professional.
•NOT suitable for cleaning under open water tap
•NOT suitable for use in a bath or shower.
INSTRUCTIONS
Like many new products, your Beard Trimmer may take a little
getting used to. If you are using an electric Trimmer for the rst time,
or if you’ve been using a different brand, take the time to acquaint
yourself with your new Trimmer.
Your Beard Trimmer features a unique stubble look setting combined
with an adjustable Zoom Lock to make beard trimming goof proof.

10 ENGLISH
To Charge / Recharge
Fully charge Trimmer before using for the rst time or after non-use
for a long period of time.
Charging, recharging or using Trimmer at temperatures below
4˚C/40˚F or higher than 35˚C/95˚F adversely affects lifespan of the
battery.
If the Trimmer is subjected to a major change in temperature, pres-
sure or humidity, let the:
• Trimmer acclimatize for 30 minutes before using.
• Continuously recharging Trimmer will reduce lifespan of battery.
1. Be certain Trimmer is OFF (g. 1).
2. Connect appliance plug directly into the Trimmer (g. 2) and
plug cable into any 220V AC 50Hz outlet (g.3). Use only the
cord provided.
• A cable plug may be necessary for cord usage in some foreign cou-
ntries. Use an attachment plug adaptor of the proper conguration
for power outlet.
3. The Charging Light on the adaptor lights up RED to indicate
the Trimmer is charging. After fully charging, the Charging Light
will remain lit.
• It will take approximately 8-10 hours to fully charge the Trimmer for
a cordless trimming time of up to 35-45 minutes.
4. Disconnect the cord and unplug from electrical outlet.
12
3

11
ENGLISH
Optimize the working life of the battery
• After the Trimmer has been charged for the rst time, do not re-
charge the Trimmer between trimming sessions. Continue using it
until the battery is completely empty.
• Do not charge for more than 24 hours.
• Do not keep cord permanently plugged in.
• Discharge/run down the battery completely twice a year by letting
the motor run until it stops.
• If the Trimmer hasn’t been used for a long period of time, it must be
recharged for a full 8-10 hours.
Cordless Trimming
1.Charge according to directions. Unplug Trimmer from outlet and
remove cord.
2.Slide ON/OFF switch ON to begin trimming.
3.When nished, turn Trimmer OFF.
Trimming
• Use this Trimmer for its intended household use as described in
this manual.
• Always comb the beard and/or moustache with a ne comb before
you start trimming.
• If you are trimming for the rst time, be careful. Do not move the
Trimmer too fast. Make smooth and gentle movements.
•Make sure that the Trimmer is fully charged before you start trim-
ming.
Trimming with the Beard
Trimming Comb
• Beard Trimming Comb must be on Trimmer to use the Zoom Lock.
1. Turn the Zoom Lock to the desired trimming length setting

12 ENGLISH
(see table). The setting is indicated in the center of the
adjustment ring (g. 4). It has total 20 settings, length from
0.5mm to 10mm .
• If you are trimming for the rst time, start by using the comb at
the maximum trimming length setting (#10) to prevent acciden-
tally trimming hairs too short. As you become familiar with the
settings, adjust Zoom Lock to desired trimming length. Zoom
Lock will “click” into position at each setting.
1. Switch the Trimmer ON.
2. To trim in the most effective way, move the Trimmer against
the direction of hair growth. Make sure the surface of the
comb always stays in contact with the skin (g. 5).
NOTE: Since all hairs do not grow in the same direction, you
may want to try different trimming positions (i.e., upwards, down-
wards, or across).
Practice is best for optimum results.
13
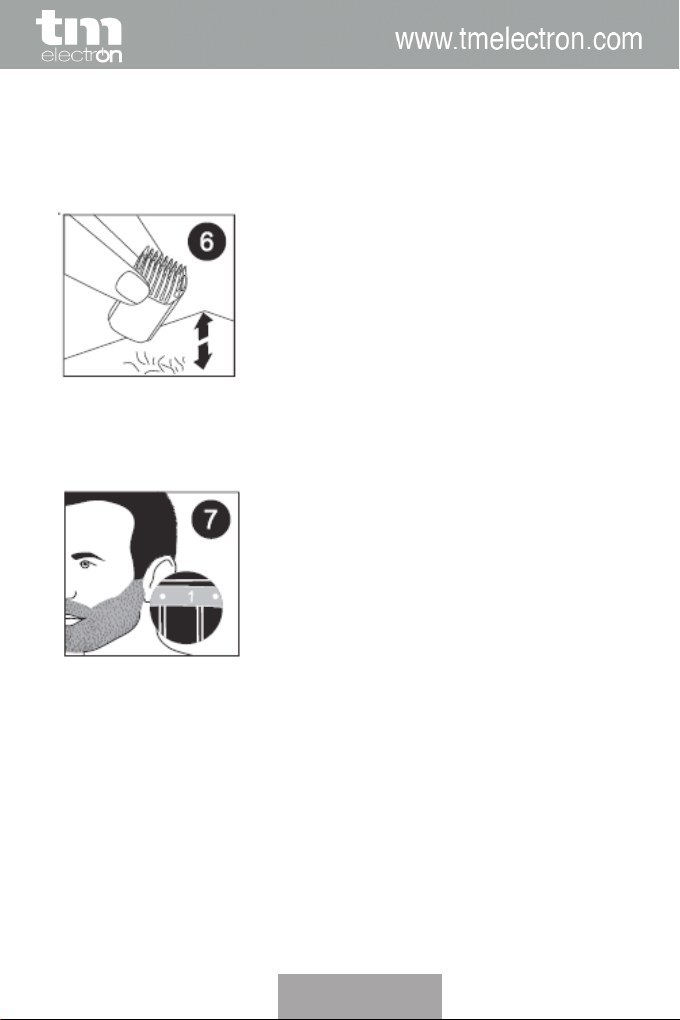
3. If cut hairs have accumulated in the comb, turn Trimmer
off, remove the comb and blow and/or shake the hair out of
the comb (g. 6). The selected trimming length setting will
not change when you do this.
Trimming For ‘Stubble’ Look
4. Be certain Beard Trimming Comb is on Trimmer and use
setting 1 (3/64in/1mm) to result in a ‘stubble’ look (g. 7).
Trimming Without the Beard
Trimming Comb
• Remove comb if you are:
• Dening hair lines
• Trimming nape of neck
• Removing single, unwanted hairs
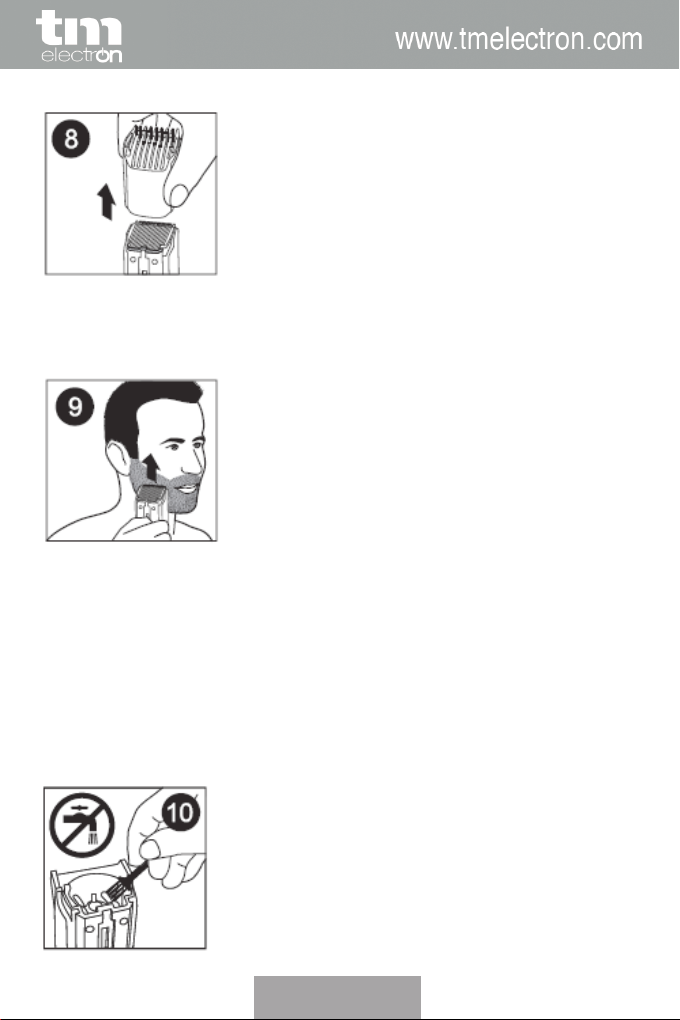
1. Be certain the Trimmer is in the OFF position.
2. Remove the Beard Trimming Comb by pulling it off the
Trimmer (g. 8).
ENGLISH
CASTELLANO
14
3. Switch the Trimmer ON.
4. Make well-controlled movements. Touch the hair/skin lightly
with the Trimmer (g. 9).
Be careful when you are trimming without the comb as when the
Trimmer is turned on it will trim every hair it touches.
Cleaning
• Clean the Trimmer after each use.
• Always switch Trimmer OFF, unplug and remove power supply
cord from Trimmer before cleaning.
• Never immerse the Trimmer in water or rinse under the tap (g.
10).
ENGLISH
CASTELLANO 15
• Do not use abrasive cleaning agents, scourers or aggressive
liquids such as alcohol, gasoline, or acetone to clean the Trimmer
and attachments.
• Never clean, replace or remove Trimmer comb with motor ON.
• Do not apply pressure to cutters.
• Do not touch cutters with hard objects as this may damage them.
• Use a soft, dry cloth to clean Trimmer handle.
During Use:
• If cut hairs have accumulated in the comb area, turn Trimmer off,
pull the comb off Trimmer and remove hairs by shaking, blowing or
using cleaning brush provided.
After Each Use:
1. Make sure the Trimmer is switched OFF and disconnected from
the electrical outler.
2. Remove the Trimming Comb and clean with the brush.
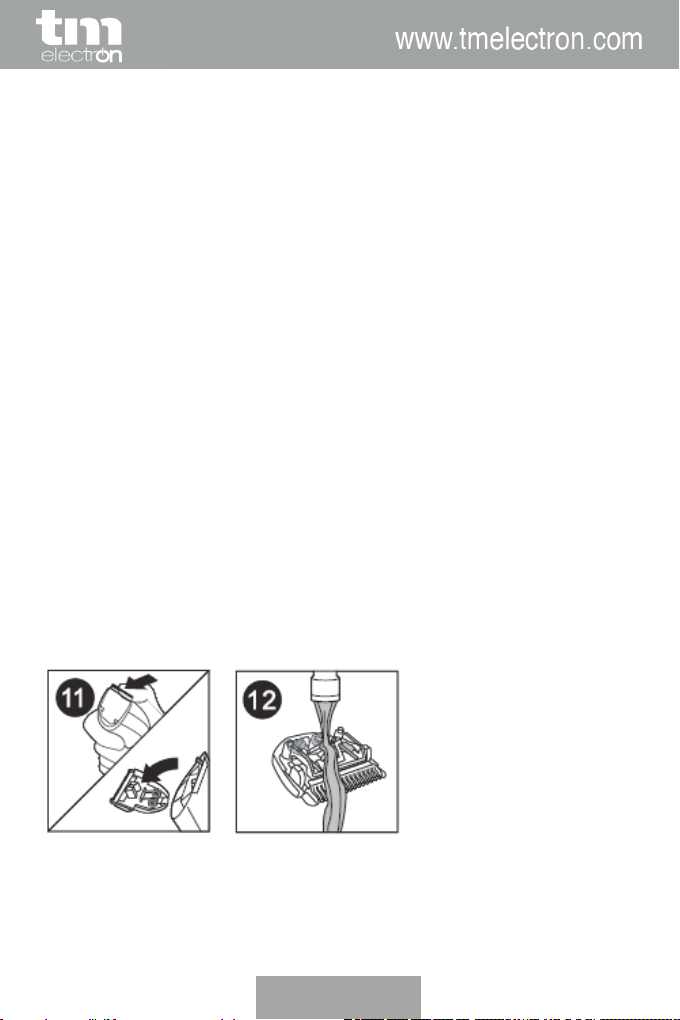
3. Remove the cutting unit by pushing against the teeth of the
cutting unit (g. 11) and rinse under warm tap water (g. 12) or
use the brush supplied.
Allow to air dry thoroughly.
4. Place the cutting unit back by inserting the notch of the cutting
unit into the guiding slot (g. 13).
ENGLISH

CASTELLANO
16
5. Push the cutting unit back into place on the Trimmer until you
hear a click (g. 14).
Replacing The cutting Unit
If your cutters become damaged or worn, do not continue using the
Trimmer. Replace cutters immediately.
1. Open the cutting unit.
2. Remove the old cutting unit by pushing against the teeth of the
cutting unit (g. 11).
3. Insert the notch of the new cutting unit into the guiding slot
(g. 13).
4. Push the cutting unit back onto the Trimmer until you hear a
‘click’ (g. 14).
WARNING
1. Never immerse the machine in water or rinse under the tap.
(Fig.15)
2. Only the trimmer attachment can immerse in water or rinse
under the tap separate from machine (Fig.16)
ENGLISH

CASTELLANO 17
Storage
• Be sure Trimmer is turned OFF. Remove cord from outlet and Trim-
mer before storing in a safe, dry location where it will not be crus-
hed, banged, or subject to damage.
• Do not wrap cord around Trimmer when storing.
• Store cord in a safe location where it will not be cut or damaged.
• Do not place or store Trimmer where it can fall or be pulled into a
tub or sink, water or other liquid.
SPECIFICATIONS
Power Source: AC220-240V 50/60Hz
Motor Voltage: DC1.2V
Charging Time: 8-10 hours
Working Time: 35-40mins
Battery Capacity : NI-MH 600mAh x 1
ENGLISH

CASTELLANO
18
MANUAL DE INSTRUCCIONES
Muchas gracias por conar en nuestros productos. Para una
correcta puesta en marcha y funcionamiento del producto lea
atentamente el manual antes de usar el aparato.
Es muy importante que conserve este manual de instrucciones
para encontrar respuesta a futuras consultas.
AFEITADORA
TMHC109

CASTELLANO 19
INDICE
Características.................................................. 20
Instrucciones de seguridad............................. 21
Instrucciones de uso........................................ 24
AFEITADORA
TMHC109
No deseche los aparatos eléctricos con la basura
normal, utilice las instalaciones de recogida selectiva.
Contacte a su gobierno local para obtener información
sobre los sistemas de recogida disponibles. Si los aparatos
eléctricos son tirados por los sanitarios o en vertederos de
sustancias peligrosas pueden ltrarse a las aguas subterráneas
y entrar en la cadena alimentaria, dañando su salud y bienestar,
al sustituir los electrodomésticos por otros nuevos, el vendedor
tiene la obligación legal de retirar su aparato antiguo de forma
gratuita.
Nos reservamos el derecho a realizar modicaciones.
CASTELLANO
20
CARACTERÍSTICAS
1. Peine de corte
2. Cuchilla de corte
3. Anillo de ajuste de precisión
4. Botón encendido/apagado
5. Indicador de nivel de batería
6. Zócalo para el enchufe del aparato
7. Aceite
8. Cable de carga
9. Cepillo de limpieza
This manual suits for next models
1
Table of contents
Languages:


